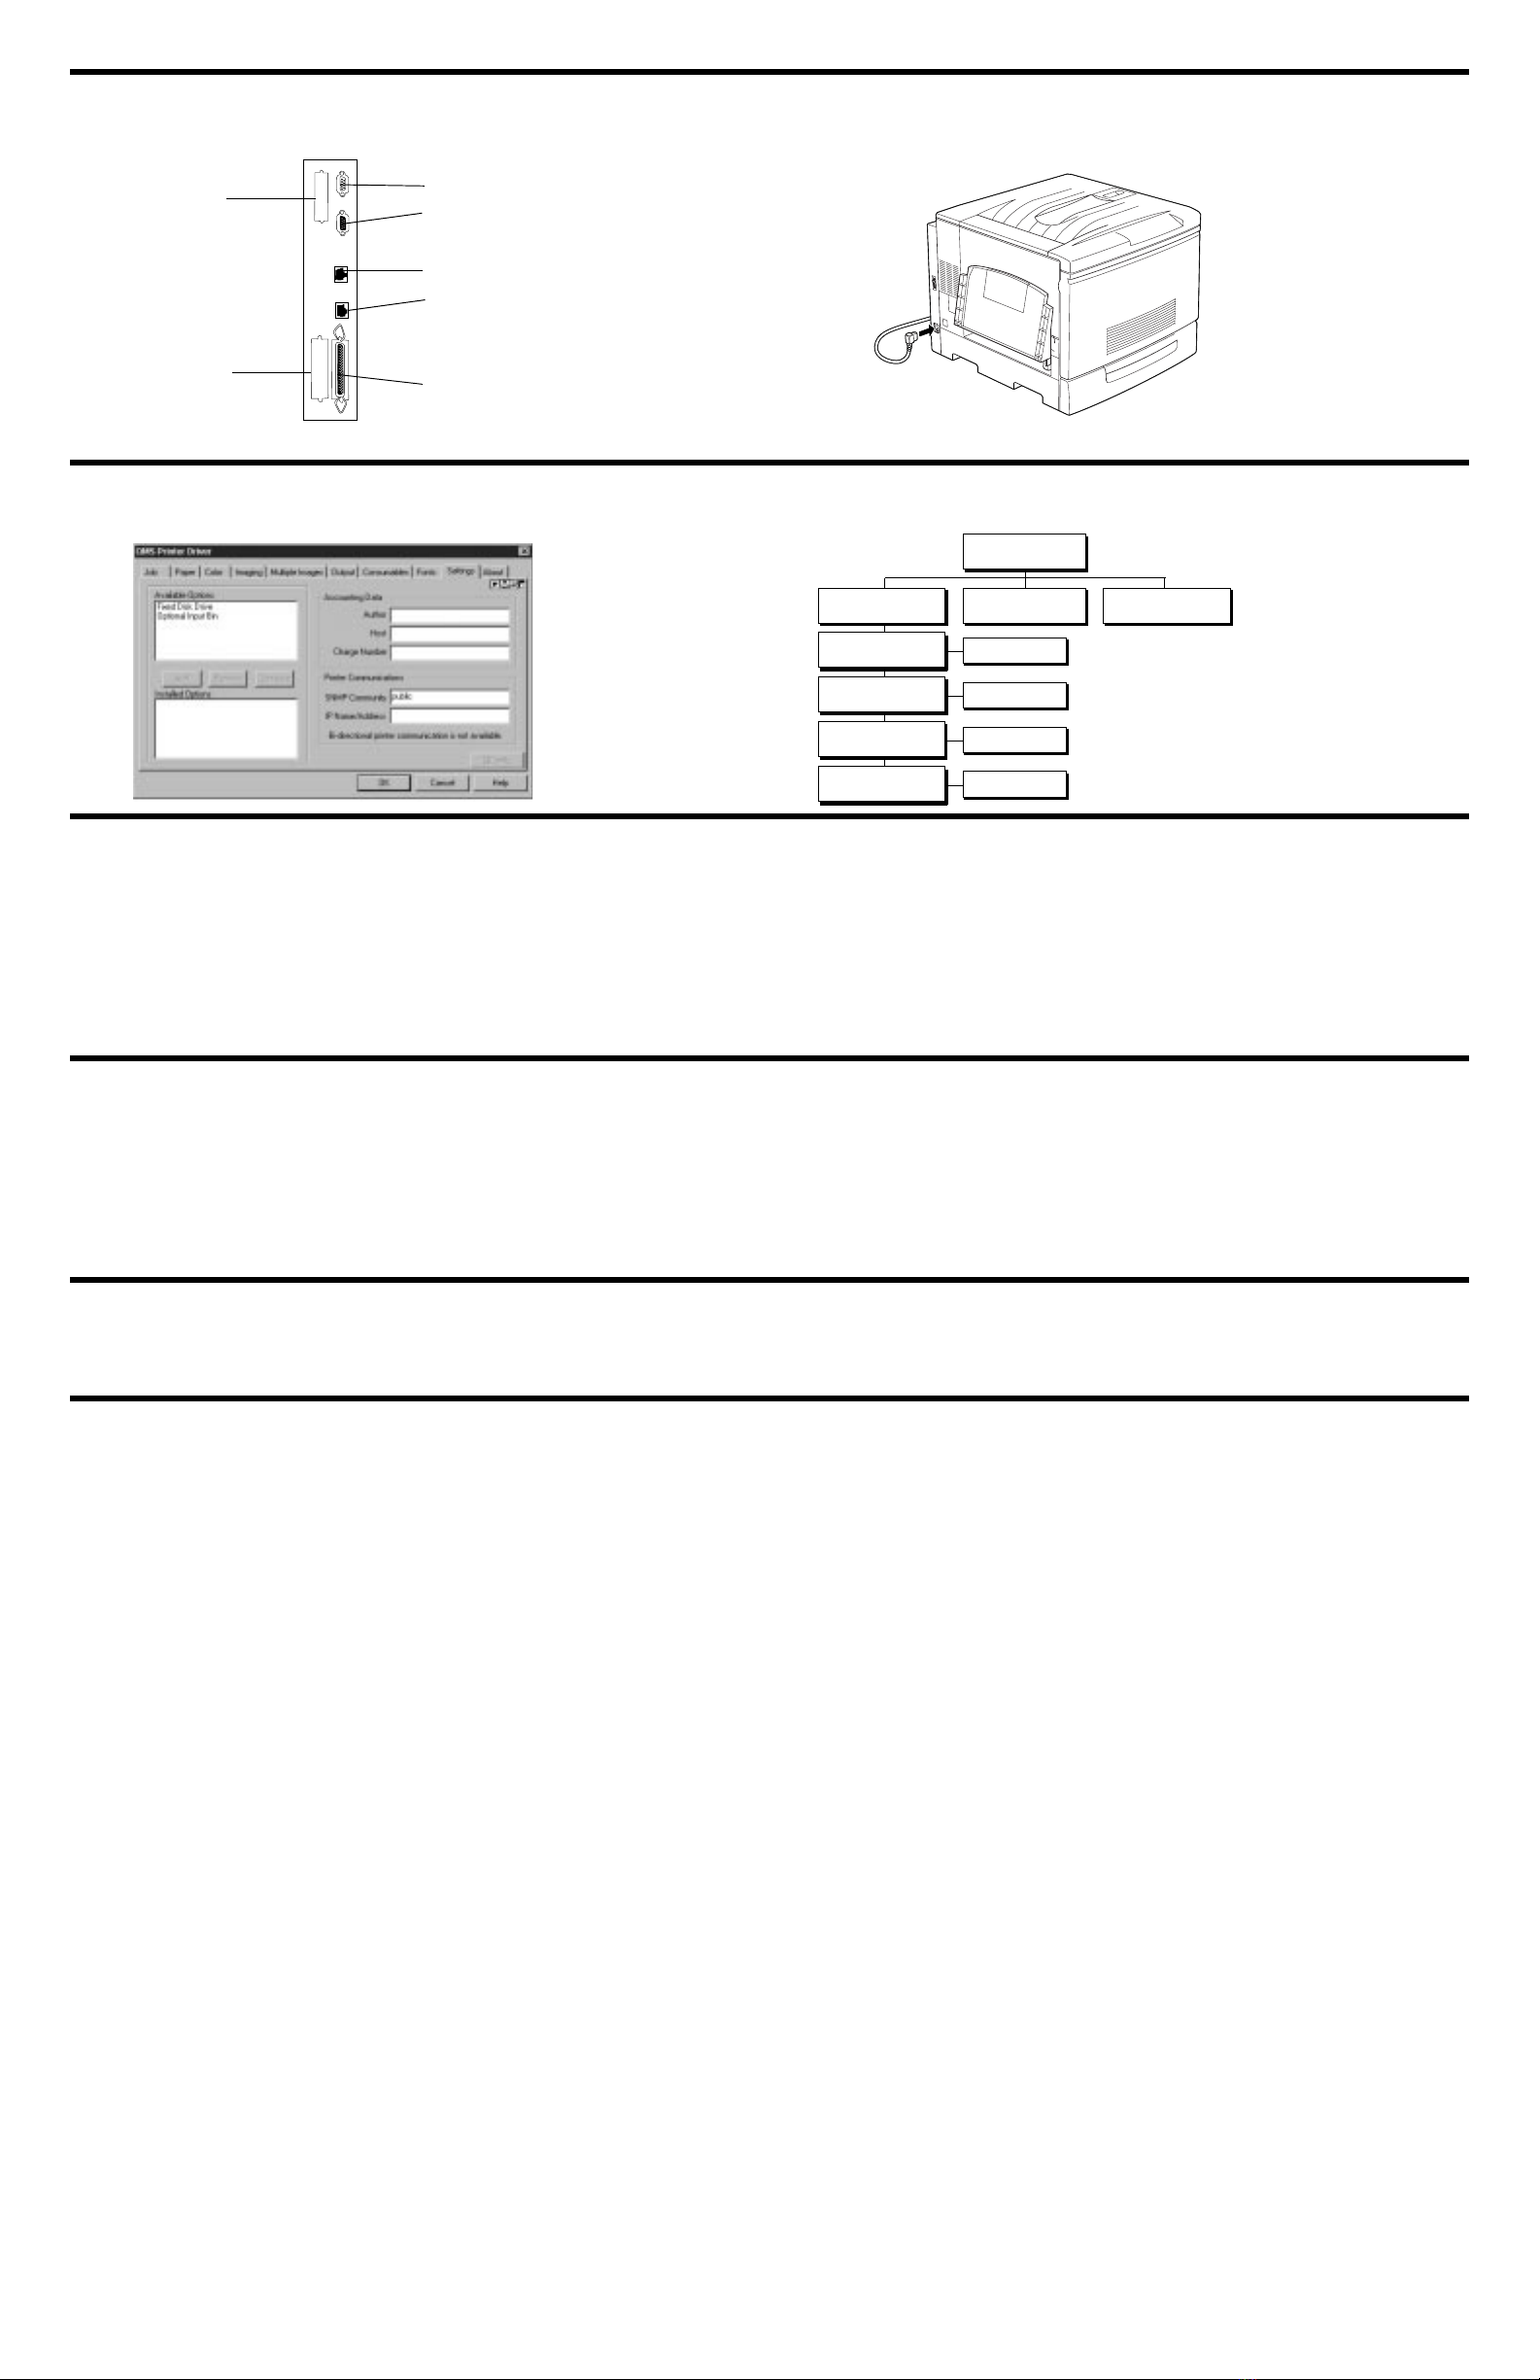
manuals.online logo
Brands
  1. Home
  2. •
  3. Brands
  4. •
  5. QMS
  6. •
  7. Printer
  8. •
  9. QMS Magicolor 330 User manual

QMS Magicolor 330 User manual

 
 


















1 20" (50.8 cm)
2 6" (15.2 cm)
3 22" (55.9 cm)
4 33" (83.8 cm)
5 53.4" (135.5 cm)
6 20" (50.8 cm)
7 22" (55.9 cm)
8 19.3" (49.0 cm)
9 22" (55.9 cm)
10 6" (15.2 cm)
11 27.2" (69.1 cm)
12 33" (83.8 cm)
Remove:
• Outer carton
and packing
material
• Consumables/
accessories kit

1Lift off the
protective plastic
covering and any
instruction sheets.
Have four people
lift the printer
from its pallet.
»Note:
The
back of the
printer is
heavier than
the front.
2Remove any tape
on the outside of
the printer.
Open the front
cover.
Remove the tape
holding the fuser
unit.
Close the front
cover.
 
1Hold the metal
spring leaf loop
close to the tray.
Fit the right
coupling arm (but
not the spring
leaf) into the
printer hole.
Fit the left
coupling arm into
its hole.
2Fit the right
coupling arm into
its right slot.
Fit the left
coupling arm into
its slot and press
downward until it
latches.
!
1Slide the fuser
unit on the left
side out as far as it
will go.
Caution:
Pull the
fuserunit
only by
the hand-
hold.
2Remove the two
metal fuser roller
separators and
the foam spacer
labeled “A” and
any tape attached
to the fuser unit.
Unpack the fuser
oil roller.
3Remove the fuser
oil roller cover and
two pins.
»Note:
The
label on the
fuser oil roller
aligns with
the one on the
fuser unit.
4Lower the fuser oil
roller into place
until it clicks.
Slide the fuser unit
into the printer.
"
1Open the front
cover.
Pull out and
remove the anti-
rotation foam
spacer and its
label “B”.
2Press and release
the antirotation
switch upward to
unlock the
toner knob.
Turn the knob
clockwise.
Caution:
You must release the switch before turning the knob.
2dv





3dv.eps
1dv





 


WARNING!
The printer weighs about 150 lbs (68
kg). Don’t lift it by yourself.
ACHTUNG!
Der Drucker wiegt ca 68 kg; bitte
versuchen Sie niemals, das Gerät alleine
anzuheben oder zu tragen.
WARNING
! You must use the carrying grips to
avoid getting your fingers caught under the printer
when you set it down.
ACHTUNG!
Heben Sie den Drucker nur an den
Tragegriffen an, da Sie sonst thre Finger
einquetchen, wenn Sie das Gerät absetzen.
Caution:
Do not attempt to lift the printer
by the right side.
»Note:
The bottom foam blocks remain attached to the pallet. Retain all packaging materials and spacers in
case you have to move the printer later.
»Note:
Interface cables aren’t included. If you need cables, contact your local vendor or a computer store.

94dv.eps
92dv.eps
5dv.eps
91dv.e
p
s
93dv.eps 95dv.eps
If any items are missing or
damaged, contact your local
shipping company or vendor.






,
,
A
 
       
Note:
Spring leaf
 

3One at a time,
unpack each new
toner cartridge.
Rock the cartridge
7 or 8 times to
evenly distribute
the toner inside.
4 Hold a toner
cartridge with the
arrow on top.
Insert the
cartridge until
seated.
5Rotate the toner
cartridge
clockwise until the
“” mark is
aligned with Lock
position.
Repeat steps 2
through 5 to install
the remaining
toner cartridges.
Caution:
Be sure to rotate the cartridge all the way to the Lock mark.
Otherwise, toner spillage may result.
Caution:
If a toner cartridge doesn’t slide in easity,don’t force it. Check
that you’re installing the correct toner cartridge into the correct slot of
the same color.
!"#"
Caution:
An exposed OPC drum is sensitive to light. Avoid prolonged exposure to light—do not remove the protective cover until ready to install into the
printer. Never touch the surface (the blue part). If the drum is scratched or contaminated with oil from your hand, printing will be degraded.
1Holding it by the
handle, remove
the new OPC
drum cartridge
from its
packaging.
Remove the
protective blanket.
2Make sure the
large lever is
turned counter-
clockwise to place
the “” mark on
the cartridge to
Unlock .
3Match the arrows
to align the
guide with the top
of printer rail.
Push the OPC
drum cartridge
carefully all the
way into the
printer until it
clicks.
4Turn the levers to
Lock .
»Note:
Unless
the OPC drum
cartridge is
inserted all
the way, the
levers cannot
be turned.
Close the front
printer cover.
Caution:
If the guide on the OPC drum cartridge is not aligned with the top of the rail, the cartridge may be damaged.
""
1Pull out the media
cassette.
Remove the
spacer labeled “C”
and the spacer on
the right.
Press down the
metal plate until it
latches.
2Squeeze the
retainers to move
the media guides
all the way out.
3Align the corners
of the media stack
and insert it face
down, covering
the lower-right
arrow embossed
on the metal plate.
»Note:
The
media should
fit under the
fluke and
between the
guides.
4
Caution:
Do not overfill the cassette. The media cassette holds
250 sheets of 20 lb (75 g/m2) paper.
Set both guide
clips.
»Note:
If the
guide clips are
pressed too
tightly against
the media, that
may cause a
media jam.
Push the media
cassettefirmlyinto
the printer.
»Note:
Automatic paper size detection cannot be assured if the left guide clip is even slightly out of position. Slide the guide clip to the left edge of the cassette, then reposition it.
 $
1Slowly pull the
right-side
multipurpose tray
unit out as far as it
will go.
Remove the
protective pads.
2Untwist the
shipping tie-wrap
and remove it.
Press the
multipurpose tray
unit firmly into the
printer until it
clicks.
Caution:
Failure to remove this tie-wrap will damage the printer.
 
!
LOCKED
"
#$

C
$

31dv

"%"&
Refer to the
instructions in
chapter 3
(parallel) or
chapter 4
(Ethernet) of the
Getting Started
manual to connect
your printer to a
PC or network.
»Note:
In compliance with UL guidelines, “The appliance inlet
is considered to be the main disconnect device.”
Make sure the
power to the
printer is off when
you plug in the
power cord.
Plug the other end
of the cord into a
grounded, surge-
protected
electrical outlet.
Turn on the
printer.
»Note:
A
startup page
should print.
"
See the
Getting
Started
manual for
instructions on
installing a QMS
printer driver.
Use the online
help to configure
the driver for
printing.
See the
Reference
manual
for complete
instructions on
configuring the
printer through the
control panel
menus.
 '
Refer to one of the following:
• Chapter 8, “Troubleshooting Printer Problems,” in the
QMS
magicolor
330 Print
System Operation
manual.
• Appendix A, “QMS Customer Support,” in any QMS
magicolor
330 Print System
manual.
"
• Operate the printer within a temperature range of 41° to 89.6° F (5° to 32° C) and a relative humidity range of 15% to 85%.
• Install the printer on a hard, level surface capable of supporting about 150 lbs (68 kg).
• The printer must be placed no more than 10% from horizontal.
• Allow enough space around the printer to allow adequate ventilation and easy servicing.
• Use a properly grounded AC outlet with a line voltage of 120 V or 220–240 V, ±10%.
• Maximum electrical current required during operation is 11 amps for 120 V, and 6 amps for 220–240 V.
• Recommended frequency is 60 Hz ±2 Hz for a 120 V system, and 50 Hz ±2 Hz for a 220–240 V system.
" (
QMS,
magicolor
, and the QMS logo are registered trademarks of QMS, Inc.
This document is Copyrighted © 1999 by QMS, Inc., One Magnum Pass, Mobile, AL 36618. All Rights Reserved. This document may not be copied in
whole or in part, nor transferred to any other media or language, without the express written permission of QMS, Inc.





%%&
!""#
$%#
&!'('
)*)+

Installation
Operator Administration
Idle
Operator
UseOperator
Admin
Use Admin
Off, On
(Enter
Off, On
Control
password)
password)
(Enter

Internet—Visit the QMS Warranty Registration page on
the Internet at http://www.qms.com/support/prodreg/
Mail—Fill out and send in the warranty card enclosed in
your shipment.
Telephone—In the US, call QMS at (334) 633-4500.



Other manuals for Magicolor 330

3

This manual suits for next models

1

Other QMS Printer manuals

QMS 1725E Manual

QMS

QMS 1725E Manual

QMS 1660 Instruction Manual

QMS

QMS 1660 Instruction Manual

QMS 1660 User manual

QMS

QMS 1660 User manual

QMS 2060 User manual

QMS

QMS 2060 User manual

QMS 2060 User manual

QMS

QMS 2060 User manual

QMS Magicolor 2 plus User manual

QMS

QMS Magicolor 2 plus User manual

QMS QMS 4525 User manual

QMS

QMS QMS 4525 User manual

QMS Magicolor LX General instructions

QMS

QMS Magicolor LX General instructions

QMS 1060 User manual

QMS

QMS 1060 User manual

QMS Magicolor 330 User manual

QMS

QMS Magicolor 330 User manual

QMS Magicolor 2 Desklaser Manual

QMS

QMS Magicolor 2 Desklaser Manual

QMS Magicolor CX User manual

QMS

QMS Magicolor CX User manual

QMS 1725E User manual

QMS

QMS 1725E User manual

QMS 1660E User manual

QMS

QMS 1660E User manual

QMS 1725 SLS User manual

QMS

QMS 1725 SLS User manual

QMS Magicolor 2 Desklaser User manual

QMS

QMS Magicolor 2 Desklaser User manual

QMS 3260 User manual

QMS

QMS 3260 User manual

QMS 4060 User manual

QMS

QMS 4060 User manual

QMS 2060 WX User manual

QMS

QMS 2060 WX User manual

QMS Magicolor 6100 Manual

QMS

QMS Magicolor 6100 Manual

QMS 1660 User manual

QMS

QMS 1660 User manual

QMS Magicolor 330 Instruction Manual

QMS

QMS Magicolor 330 Instruction Manual

QMS 2425 Dimensions

QMS

QMS 2425 Dimensions

QMS 860 User manual

QMS

QMS 860 User manual

Popular Printer manuals by other brands

Canon LBP-810 user guide

Canon

Canon LBP-810 user guide

HPRT PPTII-A Programming manual

HPRT

HPRT PPTII-A Programming manual

Schulze PRETREATmaker LINE Maintenance manual

Schulze

Schulze PRETREATmaker LINE Maintenance manual

Lexmark Z2400 Series user guide

Lexmark

Lexmark Z2400 Series user guide

Lexmark 18H0500 - Z 54 Color Jetprinter Inkjet... user guide

Lexmark

Lexmark 18H0500 - Z 54 Color Jetprinter Inkjet... user guide

Epson Stylus Pro 7880 ColorBurst Edition - Stylus Pro 7880... user guide

Epson

Epson Stylus Pro 7880 ColorBurst Edition - Stylus Pro 7880... user guide

EC-PACK EC-JET 1000Pro manual

EC-PACK

EC-PACK EC-JET 1000Pro manual

Samsung CLP 610ND - Color Laser Printer Service manual

Samsung

Samsung CLP 610ND - Color Laser Printer Service manual

Panasonic Network Printing DP2000/2500 Setup guide

Panasonic

Panasonic Network Printing DP2000/2500 Setup guide

Ricoh SP 6430DN Quick installation guide

Ricoh

Ricoh SP 6430DN Quick installation guide

Philips CRYSTAL 660 - NETWORK Installation guidelines

Philips

Philips CRYSTAL 660 - NETWORK Installation guidelines

Xerox Phaser 8500 user guide

Xerox

Xerox Phaser 8500 user guide

Canon PIXMA MX340 Series Simplified service manual

Canon

Canon PIXMA MX340 Series Simplified service manual

Edimax PS-1210MFn manual

Edimax

Edimax PS-1210MFn manual

Tynetec xt user guide

Tynetec

Tynetec xt user guide

Xerox Phaser 7750 Quick reference guide

Xerox

Xerox Phaser 7750 Quick reference guide

Brother MFC-7320 Quick setup guide

Brother

Brother MFC-7320 Quick setup guide

Gerber ODYSSEY XP owner's guide

Gerber

Gerber ODYSSEY XP owner's guide

manuals.online logo
manuals.online logoBrands
  • About & Mission
  • Contact us
  • Privacy Policy
  • Terms and Conditions

Copyright 2025 Manuals.Online. All Rights Reserved.