QRS Music Technologies Ancho User manual

QRS Music Technology introduces the
next generation of music file players
for the player piano and musician.
Ancho
Catalog #98400A
• Internal Source - Preloaded Music
• CD Drive
• CompactFlash Card Reader
• Internal Soundcard
• 20 Character Display
• MP3 Music File Playback
• Function Control From the Front Panel ADJ/SEL Dial
• Recording Capabilities - Optional Record Strip Required
• NetPiano Playback Capability - Subscription Service Required
Owner’s Manual
Manual #980021
Application Version - V041
QRS Music Technologies, Inc.

Warnings
FCC INFORMATION
1. IMPORTANT NOTICE: DO NOT MODIFY THIS UNIT!
This product, when installed as indicated in the Installation Manual, meets FCC requirements. Modifications not expressly
approved by QRS Music Technologies, Inc. may void your authority, granted by the FCC, to use this product.
2. IMPORTANT: When connecting this product to accessories and/or another product use only high quality shielded cables.
Cables supplied with this product MUST be used. Follow all installation instructions. Failure to follow instructions could
void your FCC authorization to use this product in the United States of America.
3. NOTE: This product has been tested and found to comply with the requirements listed in the FCC Regulations, Part 15 for
Class “B” digital devices. Compliance with these requirements provides a reasonable level of assurance that your use of this
product in a residential environment will not result in harmful interference with other electronic devices. This equipment
generates/uses radio frequencies and, if not installed and used according to the instructions found in the Installation Manual,
may cause interference harmful to the operation of other electronic devices. Compliance with FCC regulations does not
guarantee that interference will not occur in all installations. If this product is found to be the source of interference, which
can be determined by turning the unit “OFF” and “ON”, please try to eliminate the problem by using one of the following
measures:
• Relocate either this product or the device that is being affected by the interference.
• Utilize power outlets that are on different circuits (circuit breaker or fuse) or install AC line filters.
If these corrective measures do not produce satisfactory results, please contact the local authorized distributor, or contact
QRS Music Technologies, Inc. 2011 Seward Ave. Naples, FL 34109.
INSTRUCTIONS PERTAINING TO A RISK OF FIRE, ELECTRIC SHOCK, OR INJURY
TO PERSONS
The lightning flash with arrowhead symbol, within an equilateral triangle, is intended to alert the user to the presence of un-
insulated “dangerous voltage” within the product’s enclosure that may be of sufficient magnitude to constitute a risk of
electric shock to persons.
The exclamation point within an equilateral triangle is intended to alert the user to the presence of important operating and
maintenance (servicing) instructions in the literature accompanying the product.
GROUNDING INSTRUCTIONS: This product must be grounded. If it should malfunction or breakdown, grounding
provides a path of least resistance for electric current to reduce the risk of electric shock. This product is equipped with a
cord having an equipment-grounding conductor and a grounding plug. The plug must be plugged into an appropriate outlet
that is properly installed and grounded in accordance with all local codes and ordinances.
DANGER - Improper connection of the equipment-grounding conductor can result in a risk of electric shock. Check
with a qualified electrician or serviceman if you are in doubt as to whether the product is properly grounded. Do not
modify the plug provided with the product. If it will not fit the outlet, have a proper outlet installed by a qualified electrician.
QRS MUSIC TECHNOLOGIES, INC.

Parts Included with the Ancho Controller 4
Accessories & Options 4
Updating the Pianomation Engine 4
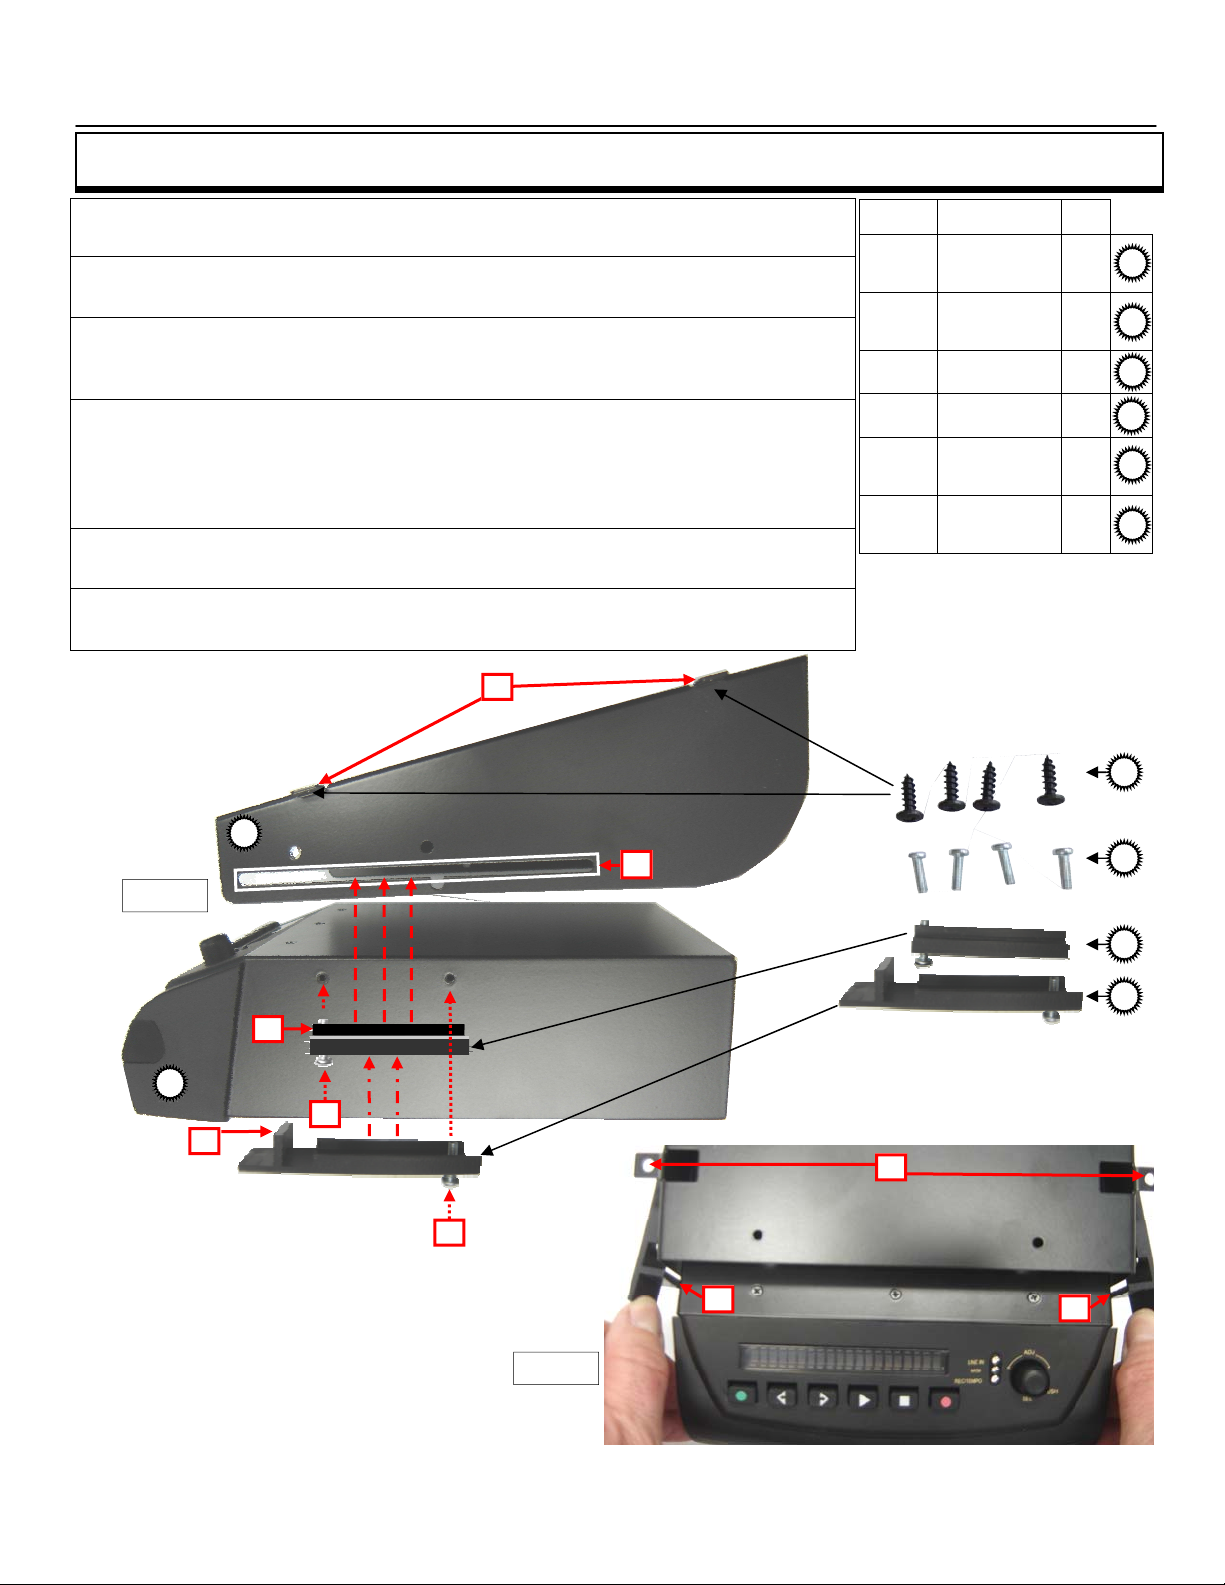
Mounting Ancho to the Piano 5
Connecting Ancho to the Pianomation Engine 6
Ancho’s Power ON Sequence:
Serial & Application Version Numbers 7
Quick Start - Play a CD Using the Ancho Controller 8
Quick Start - Play a CD Using the Remote Control 9
Play Any Source Using the Remote Control 9
Play Pre-Installed Music from the Internal Source 10
Play a QRS CD 11
Play from an External Source - Auxiliary “Line In” 12
Record a Song and Play it Back 13
MIDI Adapter Cable MIDI IN 13
How Ancho Recognizes Sync Along Series Music 14
Preparing Ancho for Sync Along Series Music 14
Entering Sync Along Series Access Codes 15
Play a QRS Sync Along Series CD 15
Remote Control - Features 16
Remote Control - Advanced 17
POWER 17
MUTE 17
Headphone Volume 17
Number Buttons 17
PROGRAM 18
REPEAT 18
<<TRACK and TRACK>> 19
RANDOM 19
PAUSE 19
STOP 19
PLAY 19
BASS Volume 20
TREBLE Volume 20
TRANSPOSE 20
TEMPO 20
PIANO Volume 20
MASTER Volume 21
AUDIO Volume 21
STEREO BALANCE 21
F1/SOURCE 21
Music File Types Recognized 22
How Source Content is Displayed 23
CD & CompactFlash Sources - General Info. 24
CompactFlash Card - Formatting 25
MIDI Input Source: (MIDI-SRC) 26
Play Ancho from a Computer 26
Play a Soundcard voice from piano keyboard 27
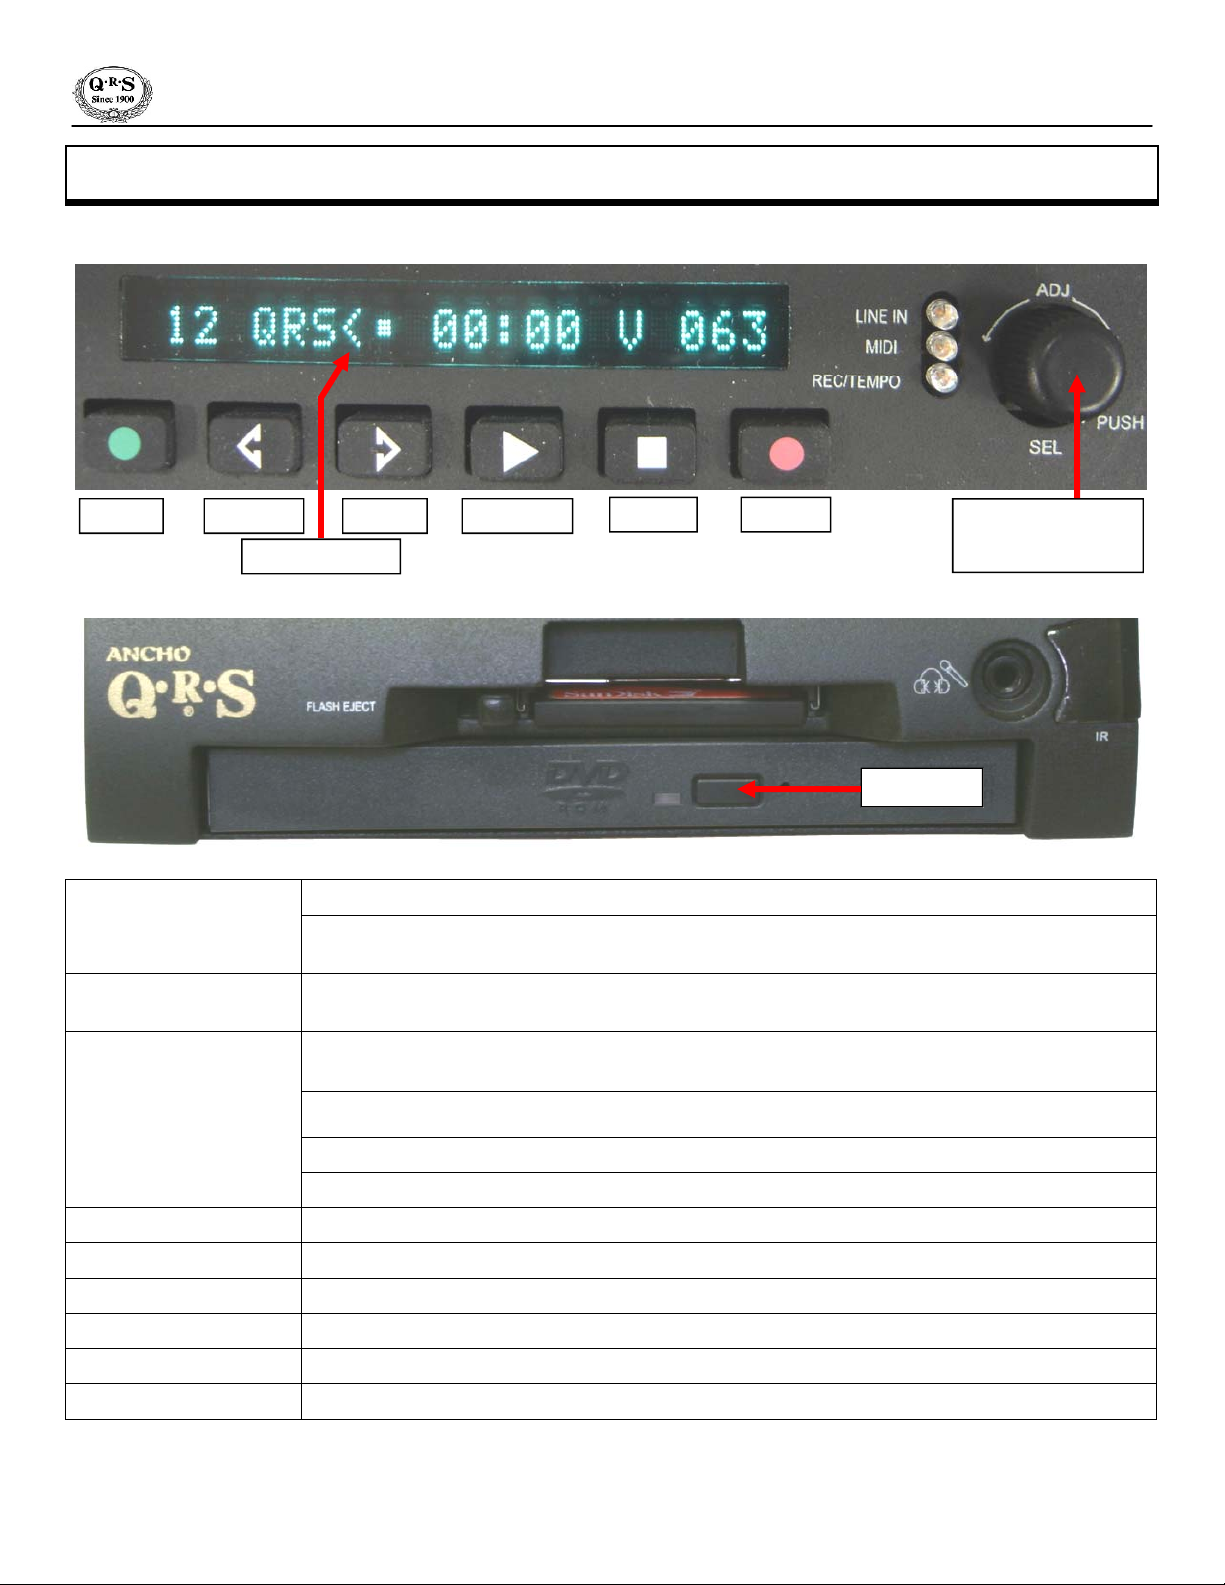
Front Panel Features 28
Rear Panel Features 29
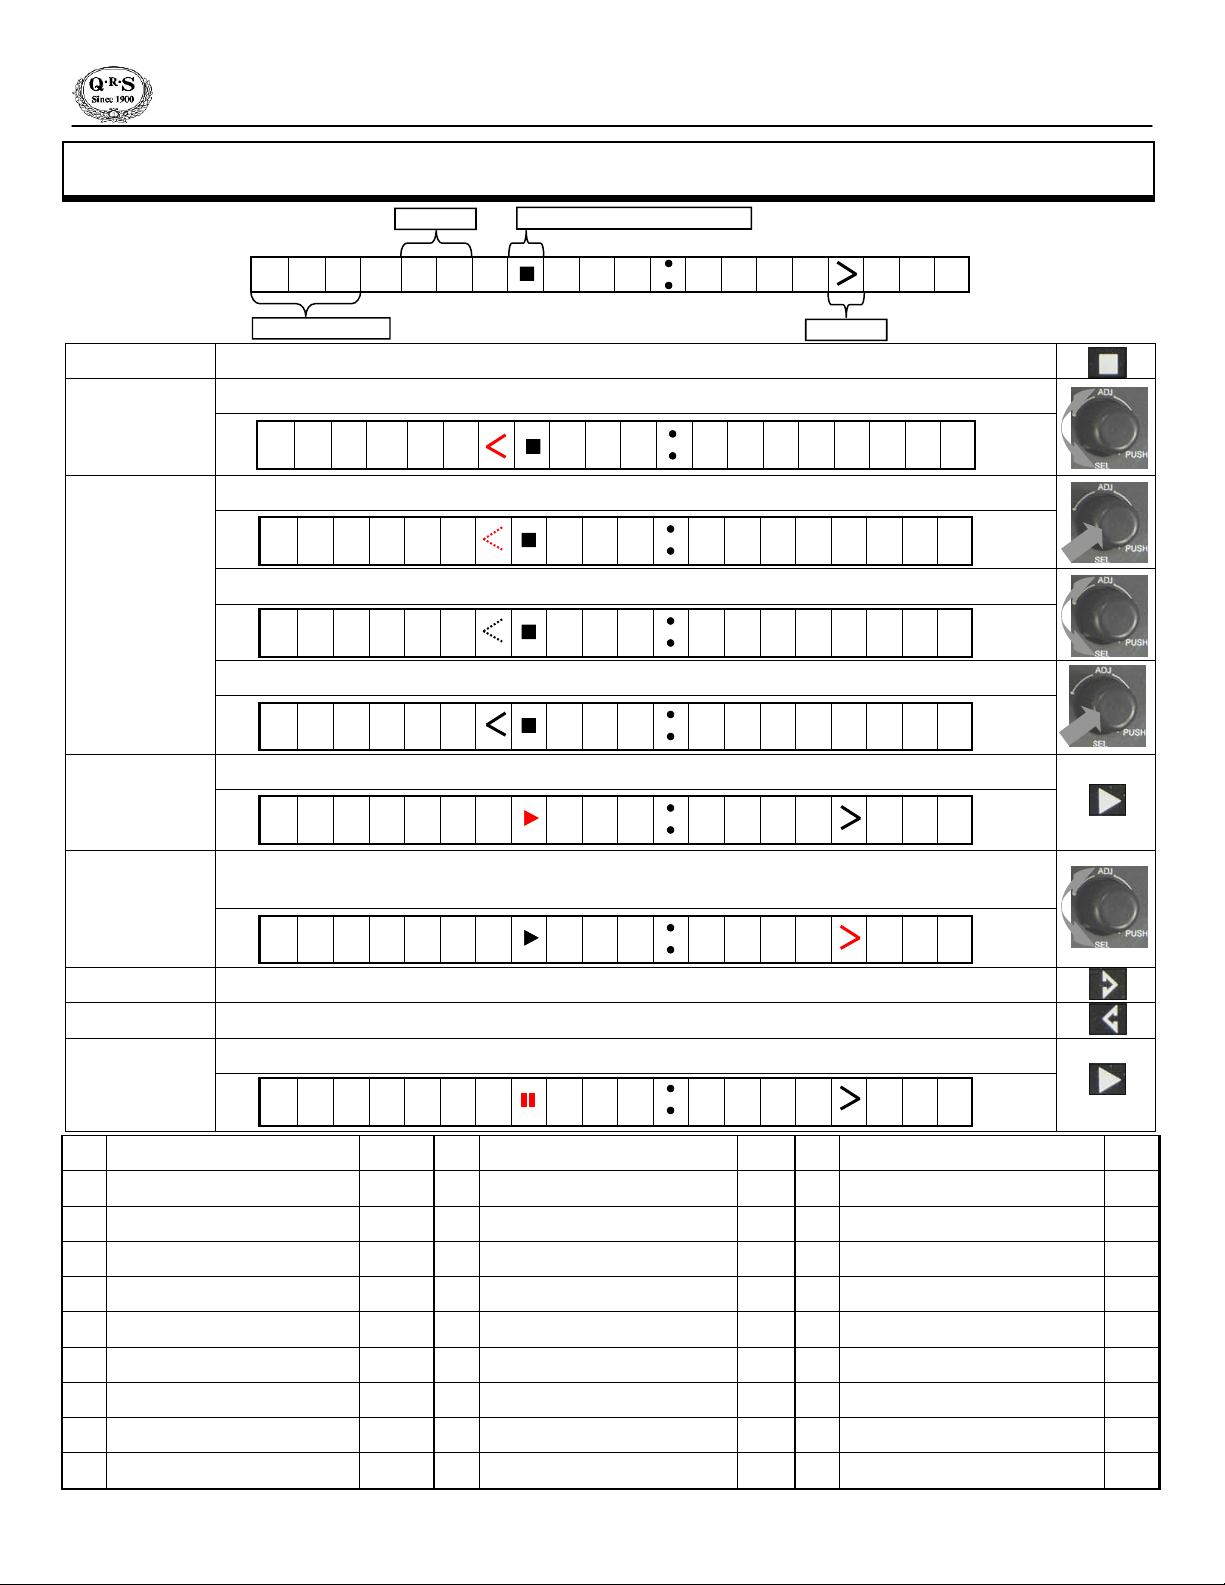
Ancho Front Panel Navigation - Basics 30
Song or Program Number Select 30
Music Files Type [Audio-MIDI-MP3-MPE] 30
Sources [CD-CF-IN-AU-RC-MI] 30
Play Status [Play-Stop-Pause-Random-Repeat] 30
Parameters [All Volumes-Transpose-Tempo] 30
Setup Menu Table of Functions 31
Ancho Front Panel Navigation - Advanced 32
Microphone Volume 32
MIDI Delay [Pianomation or Synthesizer] 33
Pianomation Configuration 34
All Pianos 34
Piano Channel 1 34
All Instruments 34
All MIDI 34
PM_TAB02 (Tests Pianomation Engine) 35
PM_TAB11 (Sets Key Velocities) 36 - 37
Audio Configuration 38 - 39
Standard 38 - 39
Karaoke 38 - 39
Silent Piano 38 - 39
Barcus Berry Pickup 38 - 39
Mixed Output 38 - 39
CompactFlash Utilities 40
Update Demo 40
Update System 40
Update Application 40
Update Key List 40
Format 40
Copy Record 40
CDROM Drive Utilities 41
Update Demo 41
Update System 41
Update Application 41
Update Key List 41
Copy Sync Along 41
F-Curves [Off / Automatic / Manual] 42 - 43
MIDI Input Select [Record Strip / F-Player] 44
Time Signature (Metronome Click-track) 44
Mixed Output Level - Piano 44
Exit the Setup Menu 44
Copy Recorded Songs to a CompactFlash Card 45
Copy Sync Along Files - CDROM to CFLASH 46
Updating Ancho’s Demo Image [Internal Source] 47
Updating Ancho’s Application [Operating System] 48
Easy Update Utility: Application Version 0.38 or Later 49
General MIDI Sounds List 50
Pianomation Accessories 51
Table Of Contents

Ancho Owners Manual
www.qrsmusic.com
QRS MUSIC TECHNOLOGIES, INC.
PAGE 4
Parts Included
Item #Description QTY
98400A Ancho Controller with Soundcard 1
990522 Power Adapter - AC/DC 1
71398 Remote Control 1
70388 Batteries AAA 4
99140 MIDI Adapter Cable 1
70209 Cable: RCA (Connects Ancho to Speakers) 1
980007 Sliding Bracket 1
70213 “Y” Cable: 1 RCA Male to 2 RCA Female 1
990050 Plastic Slide for Mounting Bracket 2
Plastic Latch for Mounting Bracket 2
990048 Screw: M3 x 14mm - Attaches Plastic Slides to Ancho 4
Paper Template - Positions Sliding Bracket on Piano 4
70592 Screw: #8 x 3/4” - Black - Mounts Sliding Bracket to Piano 4
980021 Owners Manual 1
OM98002 Quick Guide 1
Item # Description Item # Description
79017 QRS PNOscan Record System - Available Summer 2006 970000 NetPiano 2 year subscription
990024 CompactFlash Card 256MB - Type II 970002 NetPiano 4 year subscription
50030 Q-touch Tablet-Ideal for Net Piano 970004 NetPiano “controller lifetime” subscription
EPROM version 1.51 is required for Ancho
to function. This goes into the processor
located under the piano.
To Driver Boards To Power Supply
MIDI In
To User Interface To Test Box
If you are upgrading from a previous version of Pianomation MIDI you will need to update the processor’s EPROM to
version 1.51K. The 1.51K EPROM requires a 256 motherboard, located in processors similar to the ones shown below.
The EPROM version is written on the EPROM inside the processor chassis.
Dip switch #3 must be set to the ON position.
PLAY.ASM ©1993
Piano Automation
Ver 1.30 SN: ****
1.51K
Description QRS Part Number
EPROM 1.51K 70570
Processor with 1.51K EPROM 60108
Current version
Released in the year 2000
Note: After installing Ancho on the piano flip dip switch #3 ON. Dip switches are located on the side
of the Year 2000 processor and inside the enclosure on the previous years enclosures.
Accessories & Options
Updating the Pianomation Engine

PAGE 5
QRS MUSIC TECHNOLOGIES, INC.
For Technical Support Call 1-800-247-6557
www.qrsmusic.com
Mounting Ancho to the Piano
1
2
3
4
5
6
Item # Description QTY
98400A Ancho
Controller 1
980007 Sliding
Bracket 1
990050 Plastic Slide 2
Plastic Latch 2
990048 M3 x 14mm
Screw 4
70592 #8 x 3/4”
Screw-Black 4
Snap the narrow edge [A] of a plastic slide [3] into the sliding bracket’s slot [B].
Repeat on the other side of the sliding bracket.
Lower the sliding bracket [2] over the Ancho controller [1] as shown in Figure 1below.
The narrow edge [A] of the plastic slides should touch the Ancho controller.
Insert a screw [5] through hole [C] of the plastic slide [3]
Align and tighten the screw into the threaded hole [C] of Ancho.
Repeat on the other side.
Place a plastic latch [4] over the plastic slide [3] with the catch [E] facing Ancho. See Figure 2.
The larger hole of the latch aligns over the screw [C] that was inserted in the previous step.
Insert a screw [5] through the smaller hole [D] of the plastic latch [4] and the plastic slide [3].
Align and tighten the screw into the threaded hole [D] of Ancho [1].
Repeat on the other side.
Use the paper template to mark the position under the keybed for the mounting holes [F].
Attach the bracket to the keybed using the #8 screws and connect the cables. See Page 6.
Pull Ancho out until the plastic latches snap into place.
To close, spread the plastic latches as shown below and push Ancho under the keybed.
Figure 2
E E
F
2
1
B
Figure 1
F
E
A
4
3
5
6
C
D

Ancho Owners Manual
www.qrsmusic.com
QRS MUSIC TECHNOLOGIES, INC.
PAGE 6
Power Adapter Output: 5v DC 6.5A
Center Positive
Power Adaptor
#990522
Input: AC 100-240V
1.2A 50Hz/60Hz
Add the MIDI Adapter cable, as shown below, to access to the MIDI IN and MIDI OUT features.
An Optional Record system must be installed for recording capabilities.
MIDI IN - Record
MIDI OUT
Pianomation
Processor
To Driver Boards To Power Supply
MIDI In
To User Interface To Test Box
Cable: MIDI Adapter #99140
IN-Record / MIDI OUT
MIDI OUT
MIDI IN - RECORD
Standard Cable
#70329
Powered Adapter
#990522
Cable: #70209
Male
Female Male Male
Standard Playback
Powered Adapter #990522
Cable: RCA male #70209
Pianomation
Processor
To Driver Boards To Power Supply
MIDI In
To User Interface To Test Box
Standard Cable
#70329
Male
Male
Powered Speaker
#70040
“Y” Cable - 1M to 2FM
#70213
Powered Speaker
#70040
“Y” Cable - 1M to 2FM
#70213
Connecting Ancho to the Pianomation Engine

PAGE 7
QRS MUSIC TECHNOLOGIES, INC.
For Technical Support Call 1-800-247-6557
www.qrsmusic.com
Q R S M U S I C T E C H N O L O G Y
The Ancho controller will power on ready to play from the last played source. If the last played source was the
CD Drive (CD), the CompactFlash Reader (CF) or the Internal Source (IN), the total number of songs currently
on that media will be displayed. Pressing Play will begin to play the first song. If the last played source was either
the CD Drive or the CompactFlash Reader and the drive or reader is empty, then the system will go to the
Internal Source and display the total number of pre-programmed songs. If the last played source was Auxiliary
Input (AU), Record (RC) or MIDI Input (MI), the Ancho controller will turn on to that source ready for an
external input signal or a command from user.
Q R S
Q R S M U S I C
Q R S M U S I C T E C H N O L O G Y
During this time
the CD drive is
also being scanned
for content.
0 1 3 m
I N 0 0 0 0 V 0 6 3
SourceSongs
File Type Arrow Counter/Setup
Parameter’s Level
Parameter
Play Status
A C S P 1 5 1 K
Controller
Code
Ancho Serial
Number
Operating System
Version Number
Pianomation Processor
EPROM Version Number.
Call QRS Technical Support if
P1.51K does not display.
LINE IN
MIDI
REC/TEMPO
Ancho’s Power ON Sequence

Ancho Owners Manual
www.qrsmusic.com
QRS MUSIC TECHNOLOGIES, INC.
PAGE 8
Power ON
Press the Power button to turn on the system.
Ancho will power on and display the total number of songs on the last played source or the total
number of songs in the Internal source.
Insert CD Press the CD Eject button to open the CD tray.
Snap the CD onto the spindle and close the tray.
Select CD Source
With the cursor arrow pointing toward the current source, “QRS” above, press the SELect button
once so that the arrow begins flashing.
Rotate the ADJust Dial until the source changes to “CD”.
Press the SELect button to select CD as the new source.
The total number of songs on the CD will display.
Play Song Press the Play button and the first song begins to play.
Adjust Volume Rotate the Rotate the ADJust Dial to change the Master Volume level.
Stop play Press the Stop button to stop the song.
Next song While playback is Stopped, press the Next button to advance to the Next song.
Previous Song While playback is Stopped, press the Previous button to go back to the Previous song.
Play Song Press Play again to continue.
Power Previous Next Play Stop Record
Cursor Arrow
ADJust Dial
SELect Button
CD Eject
Quick Start - Play a CD Using the Ancho Controller

PAGE 9
QRS MUSIC TECHNOLOGIES, INC.
For Technical Support Call 1-800-247-6557
www.qrsmusic.com
1
6
3
4
5
2
Power ON
Press the Power button to turn on the system.
Ancho will power on and display the total number of tracks on the last played
source or the total number of songs in the Internal source.
Select CD
Source
Press the CD Eject button to open the CD tray.
Snap the CD onto the spindle and close the tray.
Repeatedly tap the F1/Source Button until “CD” displays.
Wait for Ancho to scan the CD.
The type of CD (QRS for Pianomation CDs) and the total number of songs will
display.
Play Song Press the Play Button and the first song begins to play.
Adjust
Volume
Use these six buttons to adjust the volume levels.
Piano adjusts only the piano volume level.
Audio adjusts only the speaker volume level.
Master adjusts the Piano and Audio together.
Stop Play Press the Stop button to stop the song.
Next Song Pressing TRACK >> will advance to the Next song.
Previous
Song Pressing << TRACK will go to the Previous song.
Play Song Press Play again to continue.
1
2
3
4
5
6
Quick Start - Play a CD Using the Remote Control
Play Any Source Using the Remote Control
Press the STOP button to stop any playback.
Repeatedly tap the F1/SOURCE button.
Stop tapping when the desired source is displayed.
Press the PLAY button to play music from the selected source.
5
3
Source Display
CD Drive CD
CompactFlash CF
Internal IN
Auxiliary Input AU
Record RC
MIDI Input / Output MI
2

Ancho Owners Manual
www.qrsmusic.com
QRS MUSIC TECHNOLOGIES, INC.
PAGE 10
Play Pre-Installed Music from the Internal Source
0 2 4 M I N 0 0 0 0 V 0 2 5
Source
Song Number Arrow
Play Status = Stopped
1 3 Q R S 0 0 0 0 V 0 2 5
Stop Play Press the Stop button to stop playback.
Point To Source
Rotate the ADJust Dial so that the arrow points toward the source section of the display.
Select the
Internal Source
Press the SELect button so that arrow is flashing.
Rotate the ADJust Dial so that “IN” appears in the source area of the display by.
Press the SELect button to access the Internal source.
Play First Song
To play the first song press the Play button.
Adjust Volume
Notice that the cursor arrow is now pointing toward the volume level.
Rotate the ADJust Dial to change the master volume level.
Next Song Press the Next button to go to the next song.
Previous Song Press the Previous button to go to the previous song.
Pause Play
Press the Play button to toggle between play and pause (Play-Pause-Play…).
1 3 Q R S 0 0 0 0 V 0 2 5
I N 0 0 0 0 V 0 2 5
0 2 4 m I N 0 0 0 0 V 0 2 5
0 0 1 I N 0 0 0 6 V 0 2 5
0 0 1 I N 0 0 1 3 V 0 2 1
0 0 1 I N 0 0 3 6 V 0 2 1
# Name Type # Name Type # Name Type
001 Georgia On My Mind MIDI 010 Sweet And Low Down MIDI 019 Music Of The Night MIDI
002 Candle In The Wind MIDI 011 Angel Eyes MIDI 020 Amazing Grace MIDI
003 Feelings MIDI 012 Yes! We Have No Bananas MIDI 021 On The Beautiful Blue Danube MIDI
004 Greensleeves MIDI 013 Perfidia MIDI 022 Ave Maria MIDI
005 Danny Boy MIDI 014 Crazy MIDI 023 Meditation and Intermezzo MIDI
006 Mack The Knife MIDI 015 Night And Day MIDI 024 Liebesleid MIDI
007 Burt Bacharach Medley MIDI 016 Someone To Watch Over Me MIDI
008 Ain’t Misbehavin’ MIDI 017 Something MIDI
009 Nice Work If You Can Get It MIDI 018 Stars Fell On Alabama MIDI

PAGE 11
QRS MUSIC TECHNOLOGIES, INC.
For Technical Support Call 1-800-247-6557
www.qrsmusic.com
Play a QRS CD
1 3 Q R S 0 0 0 0 V 0 6 3
Source
Song Number Arrow
Stop Play Press the Stop button to stop play.
Insert CD
Press the CD Eject button to access CD tray.
Place a QRS Pianomation CD (not a Sync Along) in the CD tray and snap it onto the spindle.
Close the CD tray.
Point To Source
Rotate the ADJust Dial so that the arrow points toward the source section of the display.
Press the SELect button so that the arrow is flashing.
Select the CD
Source
Rotate the ADJust Dial so that “CD” appears in the source area of the display by.
Press the SELect button to activate the CD source.
The CD is scanned and the total number of songs is displayed.
Play Song 1
Press the Play button to play the first song.
Adjust Volume
Notice that the arrow is now pointing toward the master volume level.
Rotate the ADJust Dial to change the master volume level.
Next Song Press the Next button to go to the next song.
Previous Song Press the Previous button to go to the previous song.
Pause Play
Press the Play button to toggle between play and pause (Play-Pause-Play…).
0 2 4 m
I N 0 0 0 0 V 0 6 3
0 2 4 m
I N 0 0 0 0 V 0 6 3
C D 0 0 0 0 V 0 6 3
1 5 Q R S 0 0 0 0 V 0 6 3
0 1 Q R S 0 0 0 6 V 0 6 3
0 1 Q R S 0 0 1 9 V 0 2 0

Ancho Owners Manual
www.qrsmusic.com
QRS MUSIC TECHNOLOGIES, INC.
PAGE 12
Use the Line In jack to connect an external device
(CD/DVD player or a Computer’s line output) to
the Ancho controller and the QRS Pianomation.
Connect to an external CD/DVD player’s Left and
Right Line Outputs.
Connect to an external computer’s Line Output
jack.
QRS Sync Along
series music will
NOT play from an
external source.
Source Display File
Extension File Types Recognized
Auxiliary Input
“Line In”
cda Stereo Audio CDs (not Pianomation), QRS CDs and DVDs via an
external CD/DVD player or computer.
wma QRS Pianomation music downloaded from NetPiano.com. Must play from
the computer.
AU
L
R
Cable: Two RCA Male to
two RCA Male
Cable: Two RCA Male to
3.5mm stereo Male
or
Play from an External Source - Auxiliary Input “Line In”
Press the Stop button to stop any playback.
Rotate the ADJust dial to point toward the source section of the display.
Press the SELect button so that the cursor arrow begins to flash.
Rotate the ADJust dial so that the “AU” source appears.
Press the SELect button to select the Auxiliary Source.
Ancho will now play from the external device connected to the Line Input.
The “Line In” LED will flash when a QRS AMI signal is present on Ancho’s Left Line Input.
Ancho will recognize QRS Analog MIDI or Stereo Audio information. Track buttons will switch from AMI to STE.
Press Stop to stop play.
0 0 4 C F 0 0 0 0 V 0 6 3
A M I A U Q - R - S V 0 6 3
S T E A U Q - R - S V 0 6 3
0 0 4 A U Q - R - S V 0 6 3

PAGE 13
QRS MUSIC TECHNOLOGIES, INC.
For Technical Support Call 1-800-247-6557
www.qrsmusic.com
An optional record system must be installed and connected to the adapter cable’s MIDI IN plug.
Record a Song and Play it Back
Stop Play Press the Stop button to stop play.
Select the
Record Source
Press the Record button to select the Record source. Volume is automatically set to 064.
Skip to the next step, to Record a Song, if the Record source is already selected.
Record a Song
Press the Record button to activate Record.
The Rec/Tempo LED will begin to flash at the metronome rate.
An audible click track will be heard through the speakers.
Press the SELect button and rotate the ADJust dial to lower the click track volume. Vo0 = OFF.
Play the piano key to begin recording. Recording begins when the first key is pressed.
Press the Stop Button to save the recording to Ancho’s internal memory.
Play Recorded
Song
Press the Play button to play the recorded song.
Erase the Song Press Play and without pressing a piano key press Stop.
Record
Locations
There are 9 record locations.
Save the
Recording
0 0 1 m R C 0 0 0 3 V 0 6 4
0 0 1 m R C 0 0 0 0 V 0 6 4
0 0 1 m R C 0 0 0 0 M 0 6 4
s a v m R C 0 0 0 0 M 0 6 4
0 0 9 R C 0 0 0 0 V 0 6 4
0 0 1 R C 0 0 0 0 V 0 6 4
All 9 recorded songs can be saved, as a group, to a CompactFlash card.
See the Copy Record option in the Compact Flash Utilities section of this manual.
MIDI Adapter Cable - MIDI IN
0 0 1 m R C 0 0 0 0 M V o 0
MIDI Adapter Cable
Part # 99140
MIDI IN
MIDI OUT
From Record Strip
MIDI OUT
Male
Female Male
To
Processor

Ancho Owners Manual
www.qrsmusic.com
QRS MUSIC TECHNOLOGIES, INC.
PAGE 14
The QRS Sync Along series music plays the piano and the audio using two of Ancho’s sources. The audio of the original artist’s CD
sounds through powered speakers via the CD drive and the piano keys play from the compressed MIDI files located on the
CompactFlash card.
When a customer places their very first Sync Along series order, they receive an original artist CD for each QRS catalog number
ordered, but only one CompactFlash card. This CompactFlash card contains the piano music for ALL of the Sync Along series CDs
in production to-date. On all subsequent Sync Along CD orders QRS will ship the original artist CDs that are ordered and only
one CDROM. This CDROM contains updated files needed to keep the Ancho index and the CompactFlash card up to date with
new the Sync Along series releases.
For the QRS Sync Along CD to work properly in Ancho the following three things must happen.
The CD must be recognizes a QRS Sync Along Series CD by locating its identification number in an index file embedded in
Ancho’s Internal Source (demo.ima).
Ancho must find the Access Code, in it’s memory, for the Sync Along CD currently in the CD drive.
This code is located on the packing slip, next to the catalog number, that comes with each Sync Along order.
The code is entered by the user, once for each CD title, and is stored in Ancho’s memory.
Ancho must find and access the compressed MIDI files located on a CompactFlash card.
Update Ancho’s demo.ima file to insure that the latest Sync Along index is installed.
1] Use the CompactFlash card or the CDROM that you received with your most recent Sync Along order.
2] Go to the QRS website to download the current demo.ima file. http://www.qrsmusic.com/pianomation/downloads/
3] Call 1-800-247-6557 and ask for a free Ancho update CD.
Updating Ancho’s Demo Image [Internal Source]
Go to this section of the manual
for detailed instructions.
Go to this section of the manual
for detailed instructions. Copy Sync Along Files - CDROM to CompactFlash
Update the compressed MIDI files located on the CompactFlash card.
1] Use the CDROM that you received with your most recent Sync Along order.
2] Go to the QRS website to download the current MIDI files. http://www.qrsmusic.com/pianomation/downloads/
3] These are included in the “All Ancho or Ancho Files” Zipped” Download.
4] Call 1-800-247-6557 and ask for a free Ancho update CD.
How Ancho Recognizes Sync Along Series Music
Preparing Ancho for Sync Along Series Music

See Preparing Ancho for Sync Along Series Music on the previous page and, if necessary, update the Ancho
controller.
Insert the CompactFlash card containing the Sync Along MIDI files into Ancho’s CompactFlash card
reader.
Insert the original artist’s Sync Along audio CD.
Using the remote control, repeatedly tap the F1/SOURCE button and stop tapping when “CD”
displays.
Ancho will scan the CD and display “SAL” IF the identification number is found.
If “SAL” never displays then: either the...
...CD’s identification number for this CD is missing from the demo.ima index.
...or, the Sync Along CD has an identification number that we do not have no file.
To correct, update the demo.ima file or call QRS - 800-247-6557
Look on the QRS packing slip that came with the Sync Along CD order to locate the access code. It’s
hand written next to the catalog number.
Use the six volume buttons, located at the bottom of the remote control, to enter the three digit Sync
Along access code.
The two Audio buttons change the left display character.
The two Master buttons change the center display character.
The Piano buttons change the right display character.
See diagram at left.
Press PLAY to enter the access code into memory.
Press PLAY again to play the CD
SAL displays to acknowledge that the CD’s identification number was found in the
index.
SAL displays a second time to acknowledge that the access code has been written to
memory.
SAL displays a third time to acknowledge that MIDI files have been found on the
CompactFlash card.
Once the access code has been entered it will never need to be entered
again for the same CD title.
S A L
S A L
S A L
S A L
PAGE 15
Entering a Sync Along Series Access Code
Play a QRS Sync Along Series CD
y
t
S
P
o
L
J
I
H
G
F
E
d
c
b
A
9
8
7
6
5
4
3
2
1
0
y
t
S
P
o
L
J
I
H
G
F
E
d
c
b
A
9
8
7
6
5
4
3
2
1
0
QRS Remote
y
t
S
P
o
L
J
I
H
G
F
E
d
c
b
A
9
8
7
6
5
4
3
2
1
0

Ancho Owners Manual
www.qrsmusic.com
QRS MUSIC TECHNOLOGIES, INC.
PAGE 16
1. POWER the system ON and OFF.
2. MUTE the piano and audio.
3. NUMBER buttons select song tracks from 1 to 509 for a CompactFlash
Card or from 1 to 999 for a CDROM.
4. Returns to display the top layer (Pxx) of a source
5. Tap the REPEAT button repeatedly during playback to cycle through the
two REPEAT play modes and the normal play mode.
6. Return to PREVIOUS TRACK or PROGRAM.
7. Advance to NEXT TRACK or PROGRAM.
8. Tap the RANDOM button repeatedly during playback to cycle through the
three RANDOM play modes and the normal play mode.
9. PAUSE play.
10. STOP play.
11. Begin PLAY
12. Press BASS and then the master volume up and down buttons to adjust the
bass audio volume.
13. Press TREBLE and then the master volume up and down buttons to adjust
the treble audio volume.
14. Press TRANSPOSE and then the master volume up and down buttons to
change the key of the music, except when playing a CD.
15. Press TEMPO and then the master volume up and down buttons to change
the tempo of the music, except when playing a CD.
16. PIANO only VOLUME UP and DOWN
17. MASTER (piano and audio) VOLUME UP and DOWN.
18. AUDIO (background) only VOLUME UP and DOWN.
19. Press the STEREO BALANCE and then one of the <<track>> buttons to
adjust the left and right audio. Only useful when playing a stereo audio CD
on a piano with two speakers.
20. When playback is stopped, tapping the F1/SOURCE button repeatedly will
cycle through the different sources. Release the button when the desired
source is displayed.
2
3
7
8
10
4
11
5
9
12
6
14
19
20
15
16
17
18
13
1
Remote Control Features

PAGE 17
QRS MUSIC TECHNOLOGIES, INC.
For Technical Support Call 1-800-247-6557
www.qrsmusic.com
POWER
1
Press the POWER button to turn the Ancho controller and Pianomation ON and OFF.
MUTE
2
The MUTE button toggles the piano and the audio ON and OFF while the source continues to play.
When the piano and audio are muted Ancho displays the headphone volume level.
Use the Master Volume buttons to adjust the headphone volume level.
2 -
6 2 5
2 3
6 2 -
P 0 1
P 0 4
P 0 2
n n n
5
3 Number buttons
Playing songs from the Root or within a Program
Press a Number button to select and play a specific song. Song numbers from 1to 9.
Press the +10 or +20 button to enter a 1- or 2- (10 or 20) to the display. Press +20...
Then, press a single digit number from 0-9 to complete the song number selection. ...Then press 3.
Press and HOLD the +10 or +20 button to increment the display by 10 or 20. The display will advance until the
button is released or until the maximum number of songs available on the selected media has been reached.
Maximum: CompactFlash=50- and CDROM=99-).
Then, press a single digit number from 0-9 to complete the song number selection.
Maximum: CompactFlash=509 and CDROM=999.
Playing songs on media with only Programs
Programs are subdirectories on the media.
The first Program is displayed after the initial media scan.
In the following examples assume that there are a total of 4 Programs on the media.
Pressing the Number (n) button displays Program number (n).
Example: Pressing 2 displays song 1within Program 2.
If the Number (N) is greater than the total number of Programs on the media the last Program number will be
displayed.
Example: Pressing 9 displays P04 because it is the last Program on the media.
Then, press PLAY to play song 1or the Number (N) button to play song (N).
See the section directly above to enter numbers greater than 9.
7 6 5 m
C D 0 0 0 0 V 0 0 0
Remote Control - Advanced...
0 0 1 m
I N 0 0 1 6 H 0 6 4
Headphone Volume

Ancho Owners Manual
www.qrsmusic.com
QRS MUSIC TECHNOLOGIES, INC.
PAGE 18
PROGRAM
4
When Pxx is displayed, where xx is a number between 00 and 99, it’s an indication that there are Programs
(subdirectories) on the selected media. Unlike files on the root of the media, where the total number of songs on the
media are displayed after the initial scan, media with programs display the first program after the initial scan.
Press the <<TRACK or TRACK>> buttons to view the available PROGRAMS.
Programs are subdirectories on a CDROM disk or CompactFlash card where song files can be categorized and saved for playback
using the Ancho controller. Ancho will recognize and playback the playable files on either the Root or within a Program on a
CDROM disk or CompactFlash card, but not from both areas on the same media. This means, if there are playable song files on
both the Root and within a Program, Ancho will only recognize and display the song files on the Root of the media.
Save music files to either the Root or in Programs on a particular CDROM or CompactFlash.
Press the PLAY button to enter the PROGRAM.
The first song number will be displayed. Press PLAY again to play this song or...
Press the <<TRACK, TRACK>> or the Number buttons to go to a song within the PROGRAM. Press PLAY to play
this song.
Press and Hold the <<TRACK button until “PuP” (Program Up) is displayed.
To exit from a within a program (subdirectory) press the PROGRAM button to display “PuP and then press the PLAY button.
Pressing PLAY will then return to display the list of available PROGRAMS.
P 0 1
P 0 3
0 0 1
0 5 6
P u P
P 0 1
5 REPEAT
Press PLAY and then tap the
REPEAT button, repeatedly, to cycle
through PLAY and the two REPEAT
options.
PLAY
REPEAT Song
Repeats selected song.
REPEAT Program
Repeats all songs within selected Program or Root
There are two repeat modes:
Repeat Song and Repeat Program.
...Remote Control - Advanced...
Program Number
P 0 1 C D 0 0 0 0 V 0 2 5
Play Status
0 0 1 C D 0 0 1 4 V 0 2 5

PAGE 19
QRS MUSIC TECHNOLOGIES, INC.
For Technical Support Call 1-800-247-6557
www.qrsmusic.com
<< TRACK
6
TRACK >>
7
8 RANDOM
There are three RANDOM modes: One Song, Program, and Source
The RANDOM mode can be changed during STOP or PLAY.
Normal PLAY mode.
RANDOM Song (one)
Plays one random song within the selected program or source.
RANDOM Program
Plays songs randomly within the selected program or source.
RANDOM Source
Plays songs randomly within the selected source.
Tap the RANDOM button, repeatedly, to
cycle through the PLAY mode and the
three RANDOM modes.
PLAY
11
Press PLAY: begin or resume play. 0 2 4 m
I N 0 0 0 0 V 0 6 3
STOP
10
Press STOP to stop play. 0 2 4 m
I N 0 0 0 0 V 0 6 3
PAUSE
9
Press PAUSE to suspend play. 0 2 4 m
I N 0 0 0 0 V 0 6 3
...Remote Control - Advanced...
To go to a Previous Program press the <<TRACK button.
To go to the Next Program press the TRACK>> button.
To go to a Previous Song press the <<TRACK button.
To go to the Next Song press the TRACK>> button.
P 0 2
0 0 2
0 0 1 C D 0 0 1 4 V 0 2 5
Play Status
P 0 1
P 0 3
0 0 3
0 0 2
Programs
Songs

Ancho Owners Manual
www.qrsmusic.com
QRS MUSIC TECHNOLOGIES, INC.
PAGE 20
BASS Volume
12
Press the BASS button to display the current Bass audio volume setting.
Within two seconds after pressing the BASS button, press the MASTER VOLUME buttons to adjust the Bass volume setting.
Range = -12 to +12
TREBLE Volume
13
Press the TREBLE button to display the current Treble audio volume setting.
Within two seconds after pressing the TREBLE button, press the MASTER VOLUME buttons to adjust the Treble volume setting.
Range = -12 to +12
TRANSPOSE
14
Press the TRANSPOSE button to display the current playback “key”.
The key of the music on a CD or an MP3 file cannot be changed!
Within two seconds after pressing the TRANSPOSE button, press the MASTER VOLUME buttons to adjust the playback “key”.
Range = Up 12 to Down 12 in half-step increments from middle “C”.
TEMPO
15
Press the TEMPO button to display the current tempo.
The tempo of the music on a CD or an MP3 file cannot be changed!
Within two seconds after pressing the TEMPO button, press the MASTER VOLUME buttons to adjust the playback speed.
Range = -50 (Displays “MIN”) to +100 (Displays “MAX”)
PIANO Volume
16
Tap the PIANO VOLUME UP or DOWN button to display the current piano volume level setting.
Tap or press and hold to adjust the volume of the Piano only!
Range = -33 to +33
...Remote Control - Advanced
+ 0 2B
- 0 1T
+ 0 4Ω
- 0 1P
0 2K
0 0
Other manuals for Ancho
1
Table of contents