Qsonica Q55 User manual

Rev. 6-19
Sonicator
ULTRASONIC PROCESSOR
Part No. Q55
OPERATION MANUAL
Qsonica, LLC.
53 Church Hill Rd.
Newtown, CT 06 70 USA
Phone: 203. 26.0101
Fax: 203. 26.7026
info@sonicator.com
www.sonicator.com

Rev. -16a
2
Table of Contents
Section Page No.
1. arranty 3
2. arnings 4
3. Specifications 5-6
4. Principles of Operation 7
5. Description of Components / Functions of Controls 8-10
6. Preparation for Use 11
7. Operating Instructions 12-13
8. Maintenance 14-16
9. Troubleshooting 16
10. Service / Return of Equipment 16
11. Service Safety Certification form 17
12. Addendum – Frequently Asked Questions 18-19

Rev. -16a
3
1. ARRANTY
Your ultrasonic processor is warranted and backed by the manufacturer for a period of two years from
the date of shipment against defects in material and workmanship under normal use as described in
this instruction manual. During the warranty period, the manufacturer will, at its option, as the exclusive
remedy, either repair or replace without charge for material and labor, the part(s) which prove to be
defective, provided the unit is returned to us properly packed with all transportation charges prepaid.
Ultrasonic probes are guaranteed against defects for a period of one year from date of shipment. A
defective probe will be replaced once without charge, if failure occurs within the warranty period. Wear
resulting from cavitation erosion is a normal consequence of ultrasonic processing, and is not covered
by this warranty.
The manufacturer neither assumes nor authorizes any person to assume for it any other obligations or
liability in connection with the sale of its products. The manufacturer hereby disclaims any warranty of
either merchantability or fitness for a particular purpose. No person or company is authorized to
change, modify, or amend the terms of this warranty in any manner or fashion whatsoever. Under no
circumstances shall the manufacturer be liable to the purchaser or any other person for any incidental
or consequential damages or loss of goodwill, production, or profit resulting from any malfunction or
failure of its product.
This warranty does not apply to equipment that has been subject to unauthorized repair, misuse,
abuse, negligence or accident. Equipment which, shows evidence of having been used in violation of
operating instructions, or which has had the serial number altered or removed, will be ineligible for
service under this warranty.
All probes are manufactured to exacting specifications and are tuned to vibrate at a specific frequency.
Using an out-of-tune probe will cause damage to the equipment and may result in warranty nullification.
The manufacturer assumes no responsibility for probes fabricated by another party or for consequential
damages resulting from their usage.
The aforementioned provisions do not extend the original warranty period of any product that has either
been repaired or replaced by the manufacturer.

Rev. -16a
2. ARNINGS
Please read the manual in its entirety. Necessary instruction and guidance are provided to help ensure
the successful operation of this device.
Your new ultrasonic liquid processor has been designed, built and tested to assure maximum operator safety. However, no
design can completely protect against improper use that may lead to bodily injury and/or property damage. For total safety
and equipment protection, read the instruction manual carefully before attempting to operate this equipment. Observe the
following ARNINGS:
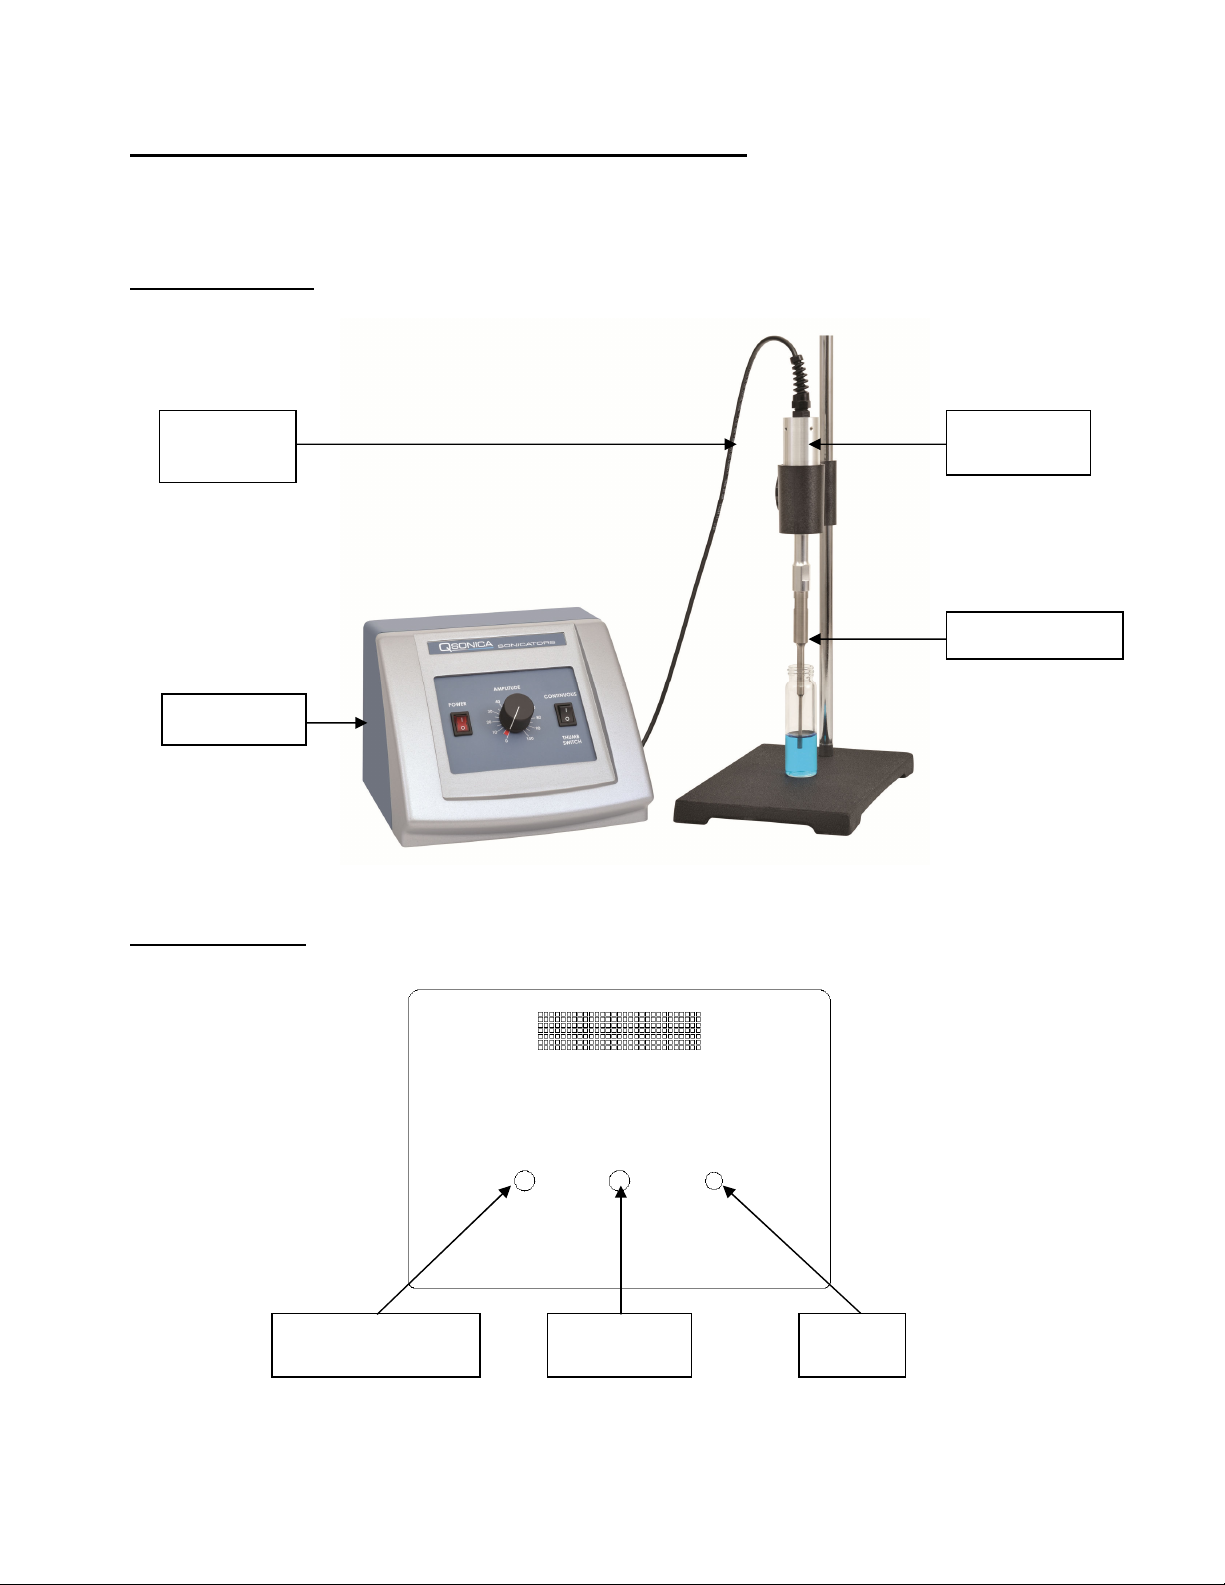
High voltage is present in the generator (power supply), converter and high frequency cable. There are no user-
serviceable parts inside any of these devices. Do NOT attempt to remove the generator cover or converter case.
Do NOT touch any open cable connections on the unit while the power is turned ON.
Do NOT operate generator with converter disconnected from high voltage cable. High voltage is present in the cable and
may pose a shock hazard.
Do NOT attempt to disconnect the converter high voltage cable while the unit is running.
The generator must be properly grounded with a 3-prong plug. Test electrical outlet for proper grounding prior to
plugging in unit.
Install the Sonicator in an area free from excessive dust, dirt, explosive or corrosive fumes and protected from extremes
in temperature and humidity. Do not place the Generator within a Fume Hood.
Hearing protection is highly recommended. It is recommended that a sound abating enclosure or ear protection be used
when operating the Ultrasonic Processor
NEVER immerse the converter in liquids of any kind, or let condensed moisture or liquid drip into the converter.
NEVER grasp an activated horn or touch the tip of a vibrating probe. It can cause severe burns and tissue damage.
NEVER allow a microtip to vibrate in air.
NEVER hold or clamp the converter by the front driver or by the horn itself. This can cause permanent damage to the
system. Support the converter by only clamping around the converter housing (upper portion).
Do NOT allow the tip of a vibrating horn or probe to touch the counter top or any other hard surface. It could damage the
probe, overload the generator, or damage the surface.
Avoid touching the bottom or sides of a sample vessel with an activated probe. It may crack or shatter the glass or melt
the plastic. Use glassware that is free from cracks or chips.
Turn OFF the power switch, unplug the generator and disconnect the power cord from the back of the generator before
attempting to replace the fuses.
Inspect high frequency cable for cracks in the protective outer jacket.
Do not operate unit with a damaged cable. Doing so may cause serious injury.
In case of AC power loss, wait 3 minutes minimum before reapplying power.
Do not turn off Main power switch while running a probe. Stop sonication by lowering intensity setting knob to 0 or release
thumb switch.
Symbols
Caution, Risk of electric shock, Hazardous voltage.
Caution, Risk of danger. Refer to User Manual.

Rev. -16a
5
3. SPECIFICATIONS
AC Adapter
(supplied with
System)
Input Voltage 100 VAC - 2 0 VAC @ 50/60 Hz 1.5A
Output Voltage 2 VDC 2.5A
Rated Power 60 Watts
Generator
Input Voltage
2 VDC
Rated Power 55 Watts
Weight
3 lbs. (1.36 Kg)
Dimensions
8"W x 7.5"L x 5.75"H
20cm x 19cm x 1 .6cm
Output Voltage
700 Vrms (max.)
Output Frequency
20 KHz
Converter
Weight
0.75 lbs. (0.3 Kg)
Dimensions
6" L x 1.25" Dia.
(15cm x 3cm)
Materials
Aluminum Alloy
Standard 1/8”
Microtip
Weight
0.25 lbs. (0.11Kg)
Dimensions
5. " L x 0.5" Dia.
(13.8cm x 1.3cm)
Materials
Titanium Alloy

Rev. -16a
6
Environmental
Pollution Degree
2
Installation Category
II
Operating Limits
Shipping/Storage
Temperature: 1 - 10 ºF (5 - 0ºC)
Relative Humidity 10 - 95% (Non Condensing)
Altitude: 6,651 ft. (2000 m)
Temperature: 35 -120
o
F (2 - 9
o
C)
Relative Humidity 10 - 95% (Non Condensing)
Ambient Pressure Extremes: 0,000 ft. (12,192 m)
Restriction of
Hazardous
Substances (ROHS)
Relative humidity Maximum relative humidity 80% for temperatures up to 31ºC decreasing
linearly to 50% relative humidity to 0ºC
Other For indoor use only
The AC Adapter supplied with the ultrasonic processor must be used. If the 220VAC plug is not configured
to match the wall receptacle, a properly grounded universal AC socket adapter must be added.
Important: Universal adapters do not convert voltage or frequency. Manufacturer is not responsible for damage
caused by the use of an improper power cord or adapter. Transformers are not recommended.
WEEE Statement
This product contains electrical or electronic materials. The presence of these materials may, if
not disposed of properly, have potential adverse effects on the environment and human health.
Presence of this label on the product means it should not be disposed of as unsorted waste and
must be collected separately. As a consumer, you are responsible for ensuring that this product
is disposed of properly. To find out how to properly dispose of this product contact Customer
Service.

Rev. -16a
7
4. PRINCIPLES OF OPERATION
The ultrasonic electronic generator transforms AC line power to a 20 KHz signal that drives a
piezoelectric converter/transducer. This electrical signal is converted by the transducer to a
mechanical vibration due to the characteristics of the internal piezoelectric crystals.
The vibration is amplified and transmitted down the length of the microtip probe where the tip
longitudinally expands and contracts. The distance the tip travels is dependent on the
amplitude/intensity setting selected by turning the output control knob. As you increase the amplitude
setting the sonication intensity will increase within your sample.
In liquid, the rapid vibration of the tip causes cavitation, the formation and violent collapse of
microscopic bubbles. The collapse of thousands of cavitation bubbles releases tremendous energy in
the cavitation field. The erosion and shock effect of the collapse of the cavitation bubble is the primary
mechanism of fluid processing.
The probe tip diameter dictates the amount of sample that can be effectively processed. Smaller tip
diameters deliver high intensity sonication but the energy is focused within a small, concentrated area.
Probes with larger tip diameters can process larger volumes, but offer lower intensity.
The choices of a generator and horns/probes are matched to the volume, viscosity and other
parameters of the particular application. The Accessories section has more information on this subject.
Please consult with a product specialist for assistance with selecting a probe for your application.

Rev. -16a
8
5. Description of Components / Functions of Controls
The Model # Q55 includes a standard 1/8” diameter microtip (# 22).
Q55 Front Panel
Q55 Rear Panel
Generator
Converter
1/8” Microtip
Converter
Cable
Footswitch
Jack
Convertor Cable
Connector
Power
Input

Rev. -16a
9
FUNCTIONS OF KEYS, CONTROLS AND CONNECTORS
FRONT PANEL
Power Switch
ON Position – energizes the power supply.
OFF Position – de-energizes the power supply.
Illuminates when the power supply is energized
Amplitude Control nob Controls the amplitude/intensity of vibrations at the probe tip
Continuous/Thumb Switch
Continuous Position – Probe tip is energized when the amplitude is set
above 0.
ThumbSwitch Position – Probe tip is energized once the thumbswitch or
footswitch is depressed. The probe tip will stop when either switch is
released.
REAR PANEL
Footswitch Jack/Connector Connects to the footswitch cable.
Converter Cable Connector
(Output) Connects the power supply output to the converter.
AC Adapter Connector
(Power Input) Connects the power supply to the AC adapter.

Rev. -16a
10
Note: Improper clamping can damage the system and void the warranty.
Correct way to clamp Not correct
Note: Using a Qsonica sound enclosure or stand will ensure a proper fit.

Rev. -16a
11
6. Preparation for Use
INSPECTION
Prior to installing the Ultrasonic Processor, perform a visual inspection to detect any evidence of
damage, which might have occurred during shipment. Before disposing of any packaging material,
check it carefully for small items.
The Ultrasonic Processor was carefully packed and thoroughly inspected before leaving our factory.
The carrier, upon acceptance of the shipment, assumed responsibility for its safe delivery. Claims for
loss or damage sustained in transit must be submitted to the carrier.
If damage has occurred, contact your carrier within 8 hours of the delivery date. DO NOT OPERATE
DAMAGED EQUIPMENT. Retain all packing materials for future shipment.
ELECTRICAL REQUIREMENTS
The Ultrasonic Processor requires 2 volts DC. A universal 100V~2 0V, 50/60 Hz AC to DC switch-
mode power supply capable of delivering 2 volts at 2.5 amperes is supplied with your system.
If it is necessary to convert the unit for different voltage operation, proceed as follows:
1. Ensure that the power cord is not connected to the electrical outlet.
2. Change the electrical power cord or add
a properly grounded universal AC socket adapter
as
required.
INSTALLING THE ULTRASONIC PROCESSOR
The Ultrasonic Processor should be installed in an area that is free from excessive dust, dirt, explosive
and corrosive fumes, and extremes of temperature and humidity. If processing flammable liquids, use
an approved fume hood and do not place the power supply in the fume hood.
When positioning the unit, be sure to leave adequate space behind the unit so that all connections can
be easily disconnected.
WARNING
For your personal safety, do not, under any
circumstances, defeat the grounding feature of the
power cord by removing the grounding prong.

Rev. -16a
12
7. Operating Instructions
CAUTION
Do not operate continuously for more than 1 minute.
Do not operate the power supply unless it is connected to the converter.
Never allow liquid to spill into the converter.
Do not allow a microtip to vibrate in air.
Do not allow the vibrating microtip to contact anything but the sample.
Never place a washer between the probe and the converter.
Never apply grease to the mating surfaces or threads of the converter or microtip.
Should it become necessary to remove a probe, use the wrenches supplied. Never attempt to
remove the probe by twisting the converter housing, as this may damage the electrical connections
within the housing.
Note: Overheating will damage the converter. Standard probes/horns can operate at a maximum
temperature of 140
0
F.
Set-up:
1. Ensure that the amplitude control knob is set to 0.
2. Plug the electrical line cord into the electrical outlet.
3. If the optional foot switch is used, insert the plug into the jack located on the rear panel.
. Probes must be properly tightened. If the convertor and probe assembly is not already
assembled; screw the probe onto the convertor and using the wrenches provided tighten it
securely. Check the tightness of an already assembled probe by using the wrench set.
Please refer to images in the Maintenance section of this manual for tightening instructions. A
loose probe may cause damage to the generator circuitry or parts of the converter and probe. A
loose probe may also show a fluctuation in wattage readings. Always use the wrenches
supplied with the unit.
5. Small sonicators such as the Q55 should be operated in a pulse mode to prevent the converter
from overheating. Overheating the converter can cause permanent damage and void the warranty.
To prevent sample overheating, sonication can be manuall pulsed on and off b using the
converter thumb switch, foot switch or b manuall turning the amplitude knob setting
up/down as needed.
Important: Do not flip the main power switch on/off to pulse sonication.
6. Overheating the sample and converter/probe assembly could potentially crack the tip.
7. If using a laboratory stand, mount the convertor /probe assembly using a clamp. Be sure to secure
the clamp to the upper section of the convertor housing only. Do not secure the clamp to any other
portion of the convertor/probe assembly.
8. Connect the convertor cable to the power supply.

Rev. -16a
13
Operation:
Continuous mode:
1. Ensure that the amplitude control knob is set to 0.
2. Set the convertor and probe assembly in a stand or hold the convertor in your hand.
3. Turn the unit on.
. Immerse the microtip half way into the sample. If the probe is immersed to an insufficient depth,
air will be injected into the sample, causing the sample to foam. Also ensure that the probe tip is
not touching the wall of the sample vessel as it may be damaged and it will not vibrate properly.
5. Turn the amplitude setting dial to the intensity that you wish to run the unit at.
6. Sonicate sample for the desired amount of time and then turn the amplitude setting dial back to 0.
Remote ThumbSwitch or Footswitch) mode:
1. Ensure that the amplitude control knob is set to 0.
2. Set the switch on the front panel to ThumbSwitch.
3. If needed, connect the foot switch cable to the designated jack on the back of the power supply.
Place the footswitch in a convenient location on the floor in front of the unit.
. Hold the convertor in your hand or set the convertor and probe assembly in a stand.
5. Turn the unit on.
6. Turn the amplitude setting dial to the intensity that you wish to run the unit at.
7. Place the probe tip into the liquid sample being sonicated. Ensure that the probe tip is not
touching the wall of the sample vessel and that it is properly submerged in the sample liquid to
prevent aerosols/foaming.
8. Depress the thumbswitch or footswitch to start sonication of the sample.
9. Sonicate for the desired amount of time and then release the thumbswitch or footswitch to stop
sonication.

Rev. -16a
1
8. Maintenance
It is recommended to periodically inspect the unit, both visually and physically, to insure optimum and
safe performance. This inspection should be scheduled as a routine maintenance procedure, done with
the unit power OFF and with the unit unplugged from the AC power source.
Long exposure to acids or caustics results in corrosion of metal parts or components. Check the
generator, converter, and cables periodically for any signs of rust or discoloration. If discoloration is
found, move the unit away from the source of the contaminant.
Examine the condition of the high voltage cable that attaches the converter to the generator. Inspect
the wire insulation for damage, such as wear, burning from hot plate contact or breakage from extended
use or rough handling. In general use, the cable assembly should not be used to carry the converter or
pull it toward the user. Make certain the cable always has slack and is never tensioned. If necessary,
move the generator or converter assembly closer to one another to accomplish this. ARNING: Do
not use a cable with broken end connections, exposed wires or frayed insulation. High voltage
is present in the cable and will pose a shock hazard. Do not touch the converter assembly until
the power switch is off and the unit is unplugged.
Microtip/ Probe Maintenance
Ultrasonic processors create high intensity vibration which puts stress on the converter and horn
assembly. The sides and end of the probe must never be allowed to come in contact with anything but
the solution. When using a Microtip, the stress resulting at the point of contact with the vessel could
cause the Microtip to fracture.
Proper care of the probe is essential for dependable operation. The intense cavitation will, after usage
for period of time, cause the tip to erode, and the power output to decrease. The smoother and shinier
the tip, the more power will be transmitted into the sample. The vibrations may also cause the probe tip
to loosen over time or the threaded connection to accumulate debris. Note: A loose probe will usually
generate a loud piercing or squealing sound.
For that reason, it is recommended that a preventative maintenance schedule be adopted to
examine the unit at regular intervals. The schedule should depend on frequency of use. Weekly
maintenance schedules are recommended for units used frequently or monthly for those used
infrequently. The tip must be examined for excessive wear and to ensure that the threaded connection
is clean and attached properly to the convertor. Use a cotton swab and alcohol (i.e. ethanol, isopropyl,
etc.) to clean the threaded mating surfaces.
When excessive wear (corrosion/pitting of the probe tip) is detected the probe should be
replaced with a new one.
ARNING: Never hand tighten probes or horns onto the convertor; properly tighten them with
the appropriate rench Set.

Rev. -16a
15
Follow the steps below for attaching and detaching microtip probes:
1. Disconnect probe from convertor. Use the wrench set provided with the system.
2. Clean threaded stud. Use alcohol and a cotton swab to remove any debris on the threading of the
connecting stud. Allow the alcohol to dry completely.
3. Clean threading in converter. Use alcohol and a cotton swab to remove any debris on the
threading. Do not allow liquid to drip into Convertor. Allow the alcohol to dry completely.
4. Reattach probe to convertor. Screw the probe back onto the convertor and tighten with the wrench
set provided.

Rev. -16a
16
System Cleaning Instructions
The generator and converter may be cleaned using an acid-free cleaning solution (i.e. glass cleaner).
Probes should be cleaned using isopropyl alcohol. Probes are made from titanium and can be
autoclaved (the converter is an electrical part and cannot be sterilized in this manner). Before each
procedure place the probe tip in water or alcohol and turn the power on for a few seconds to remove
residue. The tip also can be sterilized using alcohol with the power on.
9. Troubleshooting
Your Ultrasonic Processor was designed to provide you with years of safe and dependable service.
Nevertheless, because of component failure or improper usage, the possibility does exist that it might
not perform as it should, shut down or stop working all together. The most probable causes for
malfunction are listed below and should be investigated.
A connector or cable is damaged.
The microtip is not tightened properly with the wrenches provided.
The convertor and/or microtip has been dropped.
A microtip being operated is damaged or worn past its useful life.
If the problem persists after inspecting all of these, please contact Customer Service for
additional assistance or to replace a worn microtip or damaged part.
10. Return of Equipment
It is suggested that an Ultrasonic Processor in need of repair be sent back to the factory.
In order to receive prompt service; always contact your Customer Service Representative before
returning any instrument. Include date of purchase, model number and serial number.
Please obtain a Return Authorization Number prior to returning the instrument.
Care should be exercised to provide adequate packing to insure against possible damage in shipment.
The Ultrasonic Processor should be sent to the “Service Department” with all transportation charges
prepaid and return of shipment indicated.
Important
The user must certify that the ultrasonic processor and/or the accessories returned for repair are free of
any biohazardous or radioactive material and are safe for handling.
Do not return an equipment unless such a certification can be made.

Rev. -16a
17
11. SAFETY CERTIFICATION FORM
Items being returned:
___________________________________________________________________________
___________________________________________________________________________
___________________________________________________________________________
___________________________________________________________________________
___________________________________________________________________________
Please check only one item below:
___ The equipment was never used or exposed to any radiological, biological or chemical
agents and is safe to handle, use or dispose of.
___ The equipment was used but not in conjunction with or exposed to any radiological,
geological or chemical agents and is safe to handle, use, or dispose of.
___The equipment was used in conjunction with or exposed to radiological, biological, or
chemical agents and has been decontaminated, rendering it safer for handling, use, or
disposal.
Authorization
By accepting authorization to return the equipment listed above, the undersigned assumes all
responsibility and liability for radiological, biological and chemical decontamination. Delivery of
the equipment can be refused if necessary documentation is not provided or where it is
determined that the equipment has not been properly decontaminated. If it is determined that
the equipment was not properly decontaminated, the Authorized Repair Facility reserves the
right to bill the customer for any and all costs associated with the decontamination and/or
appropriate disposal of the equipment. In the event the equipment has been exposed to
radiological contamination, the signature of the Radioactive Safety Officer is required.
Print name: ___________________________________ RA # ___________________
Signature: ____________________________________ Date: __________________

Rev. -16a
18
Addendum
Frequently Asked Questions (FAQ)
See website for more details and additional information
Probe size vs. Sample volume
Selecting the proper size probe is a critical factor when sonicating a sample. The sample volume to be
processed must correlate with the tip diameter. Each probe has a recommended sample volume
range. This range may overlap with other probes. For example the 1/8” probe can process
approximately 1-15ml. Depending on the type of sample you may be able to process a little less than
1ml or slightly more than 15ml.
Small volumes require a small tip to fit inside the sample tube. Small tips or probes are recommended
for processing samples inside small, thin vessels and never samples larger than 50ml. Probes ¼” or
less are high intensity and made for short processing times. Using a small probe tip for long time
periods will generate a considerable amount of heat. Pulse mode should be used to reduce heat
buildup.
While there is no absolute sample volume range for any probe/horn, below is a general guideline to
follow. Using a sample volume outside each tip diameter’s range is generally not recommended.
Tip Diameter Processing Volume Range
1/16" (2mm) 0.2ml - 5ml
1/8" (3mm) 0.5ml - 15ml
1/4" (6mm) 5ml - 50ml
Vessel shape and size
A narrow vessel is preferable to a wide vessel. The ultrasonic energy is generated from the tip and is
directed downward. As a sample is processed the liquid is pushed down and away in all directions. If
the vessel is too wide it will not mix effectively and some sample will remain untreated at the periphery.
Twice the volume in a narrow vessel takes a shorter time to process than the same volume in a wider
vessel. The probe should never touch the sides or bottom of the vessel.
How to prevent foaming (small sample issue)
Foaming is a problem that often occurs with samples volumes below 1ml. The cause of foaming is
generally 2 issues: too high of an amplitude setting or the tip is not immersed deep enough.
Tip depth
The depth of the probe inside the sample vessel is another important issue. If the probe is too close to
the surface of the liquid it can create foam. If the probe is too deep it may sonicate against the bottom
of the vessel and not effectively processing the sample. The sample must flow freely below the tip in
order to be mixed effectively. Without effective mixing you cannot ensure the entire sample volume will
pass below the tip and become processed. The probe should be immersed at least 1.5 times the tip
diameter. Before processing actual samples, it is recommended to test the probe in a vessel filled with
water to observe the ultrasonic energy and the flow pattern of the liquid. During this test you can adjust
the probe’s depth until you see adequate mixing and movement of the water.
Power vs. intensity
Power is the measure of the electrical energy that is being delivered to the convertor. It is measured in
watts and displayed on the sonicator’s screen. At the convertor, the electrical energy is transformed

Rev. -16a
19
into mechanical energy. It does this by exciting the piezoelectric crystals causing them to move in the
longitudinal direction within the convertor. This change from electrical into mechanical energy causes a
motion that travels through the horn/probe causing the tip to move up and down.
The distance of one movement up and down is called its amplitude. The amplitude is adjustable. Each
probe has a maximum amplitude value. For example, with a 1/8” diameter probe at setting 100%, the
probe will achieve an amplitude of approximately 180μm. At setting 50% the amplitude is
approximately 90μm. Note: this is approximate and not perfectly linear. Qsonica measures the
amplitude of each probe at 100% and these values are published in the brochure.
Amplitude and intensity have a direct relationship. If you operate at a low amplitude setting, you will
deliver low intensity sonication. If you operate at a high amplitude setting, you will have high intensity
sonication. In order to be able to reproduce results, the amplitude setting, temperature, viscosity and
volume of the sample are all parameters that need to remain consistent. The amplitude, not the power,
is most critical when trying to reproduce sonication results.
Power has a variable relationship with amplitude/intensity. For example, sonicating water requires less
wattage when compared to a viscous sample (such as oil). While sonicating both samples at the same
amplitude setting the power/wattage will differ because the viscous sample will require more watts in
order to drive the horn. The viscous sample puts a heavier load on the probe so they system must work
harder to vibrate up and down at the same amplitude setting. The oil may draw double the watts when
operated at the same amplitude as the water sample.
Small fluctuation in the wattage during sonication is normal. Major swings in wattage (+/- 30 watts)
may indicate a problem with the sample, setup or the sonicator itself.
Table of contents
Other Qsonica Laboratory Equipment manuals
Popular Laboratory Equipment manuals by other brands

Kurabo
Kurabo QuickGene-Auto12S Operation manual

Hach
Hach TenSette 19700-01 manual

Grace Medical
Grace Medical 990-001 quick start guide

Hermle
Hermle Z 207 M user manual

Kasanova
Kasanova KGS000001NOC instruction manual

Scientific Industries
Scientific Industries MULTI VORTEX-GENIE SI-M236 operating instructions

AB Sciex
AB Sciex 4000 QTRAP Hardware guide

H.E. Anderson
H.E. Anderson Feeder J Plus Installation Guidelines and Operation

Apex Digital
Apex Digital STURDY SA-300MB instruction manual

Beckman Coulter
Beckman Coulter Optima XL Series instruction manual

Auxilab
Auxilab ZFP010 instruction manual

Cuisinart
Cuisinart CS-7 SERIES Quick reference guide