quadral AURUM Series User manual

USER INSTRUCTIONS
BEDIENUNGSANLEITUNG
NOTICE D´UTILISATION

EN
3
Thank you for choosing the AURUM active loudspeakers from quadral. It is music lovers like you
for whom we manufacture audio products in a quality class that meets the highest demands.
Even if you already know a few things, the following is a list of some principles that will enable
you to make the most of your equipment.
Please read these operating instructions carefully so that you can enjoy your AURUM active
loudspeakers for many years to come!
Important information!
You have the possibility to subscribe to a special newsletter for this system. The newsletter is purely for update
information and further assistance. This way you will not receive any advertising.
EXPLANATION OF SYMBOLS
Device of protection class I, all electrically conductive housing parts are connected to the protective
conductor of the electrical installation.
The lightning flash symbol alerts the user to the presence of uninsulated dangerous voltage within
the product. There is a danger of electric shocks!
The exclamation point draws the user’s attention to important operating and maintenance
instructions in the operating instructions.
This product is not suitable for outdoor use. Only use it inside buildings.
The device and/or its packaging may contain small parts that can be swallowed and pose a
suffocation hazard. Not suitable for children under the age of three.
The symbol shown on the left may appear on the housing of a product, its packaging and in the
documentation or operating instructions. It indicates that the product must never be disposed of
with household waste. It must be disposed of in an environmentally sound manner (in accordance
with local directives or European Directives 2012/19/EU).
Please find out where the nearest electronic scrap collection point or recycling facility is near
you. Correct handling of the product helps to conserve resources and prevents physical and
environmental damage.
quadral GmbH & Co. KG hereby declares that this product meets the essential requirements
and other relevant provisions of Directive 2014/53/EU and other EU directives. The complete
declaration of conformity can be viewed at www.quadral.com/downloads
Contents
Explanation of symbols 3
Safety instructions 4
Line up 5
Connectors/Operating elements 6
Commissioning 7-8
Streaming functions/inputs 9
DIRAC Live® calibration 10
DIRAC Live® Quick Guide 10-13
Settings 14
Firmware Update 14-15
Troubleshooting 15-16
Technical data 17
Inhalt
Symbolerklärung 18
Sicherheitshinweise 19
Aufstellung 20
Anschlüsse/Bedienelemente 21
Inbetriebnahme 22-23
Streaming-Funktionen/Eingänge 24
DIRAC Live® Einmessung 25
DIRAC Live® Schnellanleitung 25-28
Einstellungen 29
Firmware Update 29-30
Problembehebung 30-31
Technische Daten 31
Sommaire
Explication des symboles 32
Consignes de sécurité 33
Alignement 34
Raccordements/Eléments de commande 35
Mise en service 36-37
Fonctions de streaming / Entrées 38
DIRAC Live® Calibration 39
Guide de démarrage rapide DIRAC Live® 39-42
Paramétrage 43
Mise à jour du micrologiciel 43-44
Dépannage 44-45
Caractéristiques techniques 45

4
EN
5
SAFETY INSTRUCTIONS
Please read these instructions carefully and follow all the steps given for commissioning. Continue to
observe and follow all warnings and safety instructions given on the unit and in the operating instructions.
Keep the instructions for use in a safe place.
• Never operate the speaker unattended.
• Do not squeeze the cables. Lay the cables in such a way that they cannot be damaged by furniture and trip
hazards are avoided.
• Unplug the power cord from the wall outlet during lightning storms or prolonged periods of non-use.
Always disconnect the mains plug from the socket by pulling the plug, not the cable.
• Never use the product near water, in damp rooms or outdoors. As with all equipment not specifically
designed for this purpose, moisture can bridge the electrical insulation and pose a life-threatening risk.
Please make sure that no vessels containing liquids (e.g. vases) are placed on the device.
• Do not place the product near heat sources such as radiant heaters, radiators, stoves or other appliances.
• Slots and openings in the housing are provided for ventilation and reliable operation. Therefore, they must
not be obstructed or covered.
• If the devices are overloaded by very high volume levels, it cannot be completely ruled out that individual
components may burn out despite fuse devices. In extreme cases, a fire can even occur inside a device in
such an overload case. Therefore, the speakers should not be left unattended at high volumes.
• Maintenance of your device may only be carried out by the technical service department. Maintenance is
necessary in the event of any type of damage, i.e. damaged mains cables and plugs, or after objects have
fallen on the unit, or after the unit itself has fallen or after liquids have penetrated. Never open the device
yourself, as any handling of the mains voltage (230V/115V~) is life-threatening.
• Always place the AURUM ALPHA and GAMMA on level, stable surfaces. If you use spikes, be sure to pay
attention to the load-bearing capacity and possible damage to the floor.
• High noise levels in continuous operation can lead to harmful effects for the user!
• Please keep the packaging in a safe place for later transport and keep the polybags away from children, as
there is a risk of suffocation if they are handled improperly.
LINE-UP
The placement of the loudspeakers in the listening room has a decisive influence on their sound. Placing the
speakers close to the corners of the room leads to a loud but noncontoured bass reproduction. In contrast,
loudspeakers standing completely free in the room sound precise, but also quite bright and slim. It is best to
place the speakers in such a way that there is at least 30 cm free space between the rear wall of the cabinet
and the next wall of the room. The distance from the side walls of the room should be at least 1m in order to
avoid loud wall reflections. This is important in order to achieve a good spatial representation and positioning
accuracy of the virtual sound sources. Whether the loudspeakers are aligned to the listening position or parallel
to each other is more a question of personal taste.
The AURUM ALPHA and GAMMA are tuned to sound best when placed in the classic stereo triangle. The
seating position and loudspeakers form an equilateral triangle.
Nevertheless, try out different variants of the setup in a quiet room - the right thing is what you like!
The AURUM ALPHA and GAMMA have M8 threads in the feet to turn in spikes if necessary.
Attention:
Most spikes are so pointed that the floor can easily be damaged. In addition, loudspeakers with
mounted spikes must never be pushed!

CENTER
FRONT
TV
FRONT
SUBWOOFER
REAR
REAR
50 cm
>
–
6
EN
7
CONNECTIONS / OPERATING ELEMENTS
1Service interface. Do not plug-in anything!
2WPS/Update button
3Network connection RJ45
4Standby button
5De-Association button - Reset of the radio bridge
6TosLink - Digital Input
7Power switch - completely disconnects the device from the mains supply
8Mains socket
9Reset button streaming module
10 USB port - for USB mass storage (USB stick, external hard disk)
11 Analogue In - stereo inputs, Cinch unbalanced
12 Analogue In - stereo Inputs, XLR balanced
COMMISSIONING
1First download the “AURUM Player” App for Android from the Google Play™ or for iOS from the Apple
iTunes® App Store.
Apple iTunes® Google Play™
2. Make sure that the power switches of both speakers are turned off.
3. Connect your feeders, if available.
4. Connect the active loudspeakers to the mains with the supplied mains cables.
5. Now switch on the speakers with the power switch on the back.
6. Network integration
A cable connection to the network is the most stable and powerful type of connection.
LAN cable:
Connect the speaker to the network using a network cable. The network connector (3) is located on the
rear panel. The loudspeaker should be immediately on the network.
WLAN via WPS:
Activate the WPS function of your router. Now press the WPS button (2) on the back of the master
loudspeaker (left). The loudspeaker will now automatically connect to your WLAN network.
WLAN via App:
Switch on the loudspeaker. After approx. 3 minutes a WLAN access point opens. Connect your
smartphone/tablet to the loudspeaker network and open the “AURUM Player” App. The loudspeaker
should now be visible on the start page, the device list. Press the device in the device list and scroll
downwards to “Settings” on the new page.
At the top of the settings page is the “Network Wizard”, click on it and turn to “WLAN”. Here click on “Scan”,
now the entire environment will be scanned for WLAN networks. Select your network, enter the network
key at “Password” and press “Connect”.
Now you have successfully connected your AURUM active speakers to the network.
In order to be able to operate the loudspeaker via APP, your device has to be connected to the same network
to which the loudspeaker has been integrated!
1
9
2
10
3
11
12
4
5
6
7
8
SERVICE ONLY !
WPS / UPDATE STREAMING MODUL
POWER STREAMING MODUL
LAN
RESET STREAMING MODUL
UPDATE FINISHED
USB
Analog IN
Right
Left
TOSLINK
Balanced
Unbalanced
ON
STANDBY / ON
STANDBY
LINK
DE-ASSOCIATION
ASSOCIATION
OFF
ON
max. Power Consumption 650 W
Fuse
115 V / T 6,3 A L 250 V
230 V / T 6,3 A L 250 V

8
EN
9
7. Play music
First lower the volume in the App by dragging the slider on the device list to the left. (Attention, in the
submenu “SUMMIT” there is another volume control! This should always be set to 100%, but can also be
set lower if necessary.)
Select one of the inputs on the home side or start a track via USB or UPnP. Now the master and slave
loudspeakers connect to each other via radio transmission. After a short moment the speakers are ready
to play. The loudspeakers do not play simultaneously when starting from standby, as a stable radio
connection must first be established. The radio connection between the loudspeakers is preset so that
you do not have to intend a pairing.
Now you can increase the volume again. The last volume setting before standby is always saved.
8. Use of a preamplifier
You have the possibility to use your AURUM active loudspeakers in a conventional way with a preamplifier.
This enables you to use your usual remote control and feeders.
The first step is to adjust the volume in the app and on the preamplifier. To do this, adjust the preamplifier
to full volume and slowly increase the volume of the speakers with the app until you have reached the
desired maximum volume.
9. Standby
The speakers turn into standby mode after a certain time without signal. The time duration can be set in
the settings. The loudspeakers are designed to remain connected to the mains power supply in standby
mode.
In standby mode, the loudspeakers store the last used analogue input. As soon as the preamplifier has
sent a signal to the loudspeakers, these will automatically wake up from standby mode and play the music
that has been started.
Do not operate the power switches until the speakers are in standby mode. The standby mode can be
initialized immediately by pressing the standby key (4) on the back panal of the master loudspeaker.
STREAMING FUNCTIONS / INPUTS
To be able to use TIDAL®, set your user account in the App under “TIDAL”.
Note: A TIDAL® account is required for this function and may occur costs.
You find the internet radio under “Airable” on the main page. You can search for stations directly or have
them sorted by language and genre under “Filter”. Once you have found your favourite station, you can
save it to your favourite list by pressing the arrow to the right of the station name.
USB (stick/ hard disk)
The USB port (10) is located on the back of the master device. Larger hard disks require a separate
power connection. The medium should be formatted in FAT32. MP3, ACC, FLAC, WMA and WAV files are
supported.
UPnP
To use the UPnP function, the speaker must be connected to the same network as the music server. Turn
to “UPnP” in the App and you will find your UPnP server on the new page. Here you can click through the
folder structure you have created and select and play the desired music file. MP3, ACC, FLAC, WMA and
WAV files are supported.
Line In (Analogue Unbalanced)
Stereo chinch connector.
Line In (Analogue Balanced)
Stereo XLR connector.
Pin assignment of the XLR connector: Pin 1= Ground; Pin 2= Signal/Plus; Pin 3= Signal/Minus
TosLink
Optical stereo digital input

Input gain
Output volume
Channel name Output channel Test Level
20.0 dB
Left
Right
Left
Right -36 -24 -12 -6 -3 0
-36 -24 -12 -6 -3 0
0 +20
10
EN
11
DIRAC LIVE® CALIBRATION
Warning: quadral GmbH & Co. KG does not accept any responsibility for possible damage caused by
operation or adjustment. Please read the instructions carefully.
DIRAC Live® is a software that enables you to counteract the negative room influence on the sound of your
loudspeakers.
It does not eliminate fundamental problems in room acoustics! Only the effects on the sound are reduced. For
a perfect sound experience, we therefore recommend that you design the room accordingly and carefully select
the position of the speakers.
You can set different target curves in the software and save up to four results.
We recommend you to firstly follow the specified target curve and use it. For further personal settings, you
should not set too much level in the bass range, as this can significantly limit the overall dynamics of the
loudspeaker. For example, frequency holes should not necessarily be completely filled - a slight depression is
usually hardly noticeable acoustically.
In the high-frequency range, a significant increase in level can even lead to damage! If you are unsure both your
specialist dealer or the quadral Service Team will be happy to assisting you.
The software for Windows® and Mac® is available for downloading at www.quadral.com/download . Make
sure that the speakers and your computer are connected to the same network. DIRAC Live® requires an
Internet connection for calibration.
Before you start measuring the speakers, the speakers must be set up correctly and the final listening position
must be set.
You can save multiple sound profiles. The profiles can be saved in the App under settings->DIRAC can be
selected.
A detailed DIRAC Live® manual is available at www.quadral.com/downloads .
DIRAC LIVE® QUICK GUIDE
1Install the DIRAC Live® Live software.
2. Download the microphone calibration file from the www.minidsp.com website. To do this, select “UMIK-
1” from the products list on the website. A little further down on the product page you will find the tab
“Unique Calibration Download”, where you enter the serial number of the microphone in the fields. The
serial number can be found on the microphone box and on the microphone itself.
3. Connect the microphone to your computer using the USB cable supplied.
The microphone does not require any additional drivers.
4. System setting
Start the DIRAC Live® software on your computer. Your AURUM active speakers should appear directly on
the start page under “Test signal playback device”. If this is not the case, make sure your computer and
your speakers are connected to the same network. Both connections WiFi and wired with LAN cable are
possible. Click on “Proceed” at the right bottom.
5. Microphone setting
Under “Recording device”, select the “Umik-1” microphone. Now load the microphone calibration file into
the program via “Load file”. Now click on “Proceed” again in the lower right corner. The “Recording Channel”
must remain “1”.
6. Level setting
On the “Output & Level” page the levels have to be adjusted. Drag the “Output volume” slider to the left
to decrease the volume. Now click on one of the two “Test” fields. Now drag the slider to the right until the
volume reaches about the volume of a loud conversation. Now drag the “Input gain” slider to the right until
the blue bar in the “Level” field is approximately the centre of the green Area reached. If the input gain is
too low, the software will inform you during the measurement. Now continue with the “Proceed” button.

12
13
Linear
Linear
On
Filter
Output volume
Left
Right
Left
Right
20.0 dB
Channel Slot 1 Slot 2 Slot 3 Slot 4
Quadral - AURUM aktiv 'AURUM Alpha'
EN
7. Measurement
On the page “Measurements” you can now start measuring. Make sure that it is as quiet as possible
during measurements in the room. The quieter it is, the better the DIRAC Live® algorithm can process the
measurement. The best way to perform the measurements is with a large microphone tripod.
Position the microphone in the listening position according to the yellow marking of the software. Be
sure to align the microphone at ear level. The outermost measurements should be taken at a distance of
approx. 50 cm from the midpoint measurement. The height difference between the measurements and
the midpoint should be 30 cm. If the measurements are too close together, the result may sound very dry
and matt.
Below the seat display, in addition to the “Top View”, you can also display the “Frontal View” and “Oblique
View”. Now click on “Start”, 3 measurement signals from the loudspeakers will be played. After each
measurement, the position shown in the display becomes green, and you have to change the microphone
position according to the display. Once all 9 measurements have been performed, click “Proceed”.
8. Filter design
Measured curve
(Avg. Spectrum before)
Target curve
Optimized curve
(Avg. Spectrum after)
On the page “Filter Design” you can now see the measurement result (light blue lines). The orange curve
is the target curve. DIRAC Live® will try to match the measured curves as close as possible to the targeted
curve. The first thing you should do is to use the targeted curve you have already defined. DIRAC Live®
computes the required filters by clicking on the “Optimize” button. This can take a short moment. After the
computing the green improved curve appears.
Now save the project and click “Save Project” at the left bottom of the window. The named project will
appear at the listening profile. The default location of the project files is: Documents\Quadral\Projects.
Now click on the “Proceed” button.
9. Export
On the page “Export” page you only have to click on the blue box of the project at the top left with the
mouse, hold it down and drag it into one of the “Slots”. You can activate or deactivate the DIRAC Live®
filters with the “On/Off” button.
If all 4 slots are occupied, you can delete the projects from the loudspeaker by dragging them to the trash
can in the upper right corner.
Press “Reset Streaming Modul” to take over the DIRAC Live® calibration.

14
EN
15
SETTINGS
Radio link
At the “SummitTX” tab you will find the settings for the radio connection between the loudspeakers. If “0”
is displayed under “Speakers”, click on “Update Speaker Info”.
With “Full Scan” the master speaker searches for the slave. After a short moment, the speakers
automatically got connected to each other. Press “Save Speaker Configuration” to save the connection.
With “Reset Speaker Configuration” you reset the stored radio connection.
Power Management / Standby
You can select how fast you want the speakers to turn into standby mode.
The “Standby Timeout when playing” option allows to set the time the speaker should turn into standbye
mode while the music is still playing. Similar to a sleep timer on TVs.
Factory settings
You can reset the speakers to their factory defaults. All settings done will be deleted. This function can be
found in the “Settings” menu at “Reset device”, press “Confirm reset” to confirm. Resetting process may
take 1-2 minutes. The master loudspeaker must then be newly integrated into the network.
FIRMWARE UPDATE
At “Settings”, go to “Firmware update”, then select “Check for update”. If the speaker finds a new update on the
server, the update will be downloaded and installed.
Do not switch off the device during the update!
Note: For the update process, the speaker must be connected to the Internet.
Manual firmware update via computer (recommended)
1. Enter the IP address of the speaker in the browser of your computer.
The IP address can be found in the AURUM Player App on the main page.
2. Go to the “Device Settings” tab, at “Firmware Update” file you can select the file from your
computer. The update process may take a few minutes.
Manual firmware update via USB stick
1. Download the firmware file from the website “www.quadral.com/downloads”.
2. Load the file onto an empty USB stick (the USB stick should be FAT32 formatted).
3. Turn off the standby master speaker at the power switch.
4. Connect the USB stick to the USB port of the master speaker.
5. Press and hold the WPS/Update button
6. Switch on the power switch again.
7. Press and hold the WPS/Update button for 10 seconds.
8. As soon as the update LED lights up, the update is ready.
Restart streaming module
The button (9) “Reset Streaming Module” is located on the back of the master loudspeaker. Pressing this
button restarts the streaming module. This is only necessary if you have connection problems or if the
device does not respond correctly to the app.
TROUBLESHOOTING
The speakers are not recognized in the LAN network:
- Check whether DHCP is enabled in the settings of your router.
The loudspeakers are not detected in the WLAN network:
- Check that your wireless network is working properly.
- Make sure your speakers are close enough to your wireless router.
- Restart the speakers.
- Connect speakers to the network using a network cable.
- Reset to factory settings.
- Repeaters may interfere with the connection.
Music is only played through one speaker:
- Turn the speakers off and on again. Activate standby mode first.
The speakers no longer sound:
- Check the status „DIRAC On/Off”.
- Check whether the selected signal source provides a high-quality audio signal.
- Repeat the DIRAC Live® measurement and change the microphone position.
App problems:
- Make sure your smartphone operating system is up-to-date.
- Restart speakers and smartphone / tablet
Hard disk is not running:
- The hard disk may need an extra power supply.
- Make sure the drive is FAT32 formatted.
- Check the USB connection: cable inserted correctly? Cable technically OK?

16
EN
17
LED Codes
Loudspeakers are connected Loudspeakers interconnected, Loudspeaker
but muted (restart may be required) in standby mode
(LED´s are permanently lit) (LED´s are permanently lit) (“LINK” LED flashes)
TECHNICAL DATA
AURUM ALPHA AURUM GAMMA
Power Total: 700W 1% THD 350W 1%THD
Frequency range: 17Hz-48kHz 20HZ-48kHz
Crossover frequencies: 110/2900Hz 115/3000Hz
quadral quSense® ribbon tweeter: 90mm 70mm
quadral ALTIMA® midrange driver: 2x 180mm 2x 155mm
quadral ALTIMA® woofer: 2x 265mm 2x 235mm
Input Sensitivity (XLR): +12dBV
Input Sensitivity (RCA): +12dBV
Standby consumption: <6W
Maximum power consumption: 650W 450W
Voltage supply: 115V/230V~
Dimensions (HxWxD): 1210x280x510mm 1110x250x460mm
Weight: 71,0 kg 54,9 kg
Wi-Fi 802.11b/g/n
Ethernet 10/100 Mbit/s
Supported file formats USB/UPnP:
- MP3
- AAC
- WAV
- FLAC
- WMA
- LPCM
- ALAC
ON
STANDBY/ON
STANDBY
LINK
DE-ASSOCIATION
ASSOCIATION
ON
STANDBY/ON
STANDBY
LINK
DE-ASSOCIATION
ASSOCIATION
ON
STANDBY/ON
STANDBY
LINK
DE-ASSOCIATION
ASSOCIATION

18 19
DE
Vielen Dank, dass Sie sich für die AURUM aktiv Lautsprecher aus dem Hause quadral entschieden
haben. Es sind Musikliebhaber wie Sie, für die wir Audio-Produkte in einer Güteklasse fertigen,
der höchstem Anspruch gerecht wird. Auch wenn Ihnen einiges schon bekannt sein sollte,
führen wir im Folgenden einige Grundsätze auf, die es Ihnen ermöglichen, Ihre Geräte optimal
zu nutzen.
Damit Sie viele Jahre Freude an den AURUM aktiv Lautsprechern haben, bitten wir Sie, diese
Bedienungsanleitung aufmerksam zu lesen!
Wichtige Information!
Sie haben die Möglichkeit sich bei einem speziellen Newsletter für dieses System anzumelden. Der Newsletter
ist rein für Update Informationen und weitere Hilfestellungen gedacht. Sie bekommen über diesen Weg
keinerlei Werbung zugesandt.
Schreiben Sie uns zur Anmeldung bitte eine formlose E-Mail mit „Anmeldung“ an:
SYMBOLERKLÄRUNG
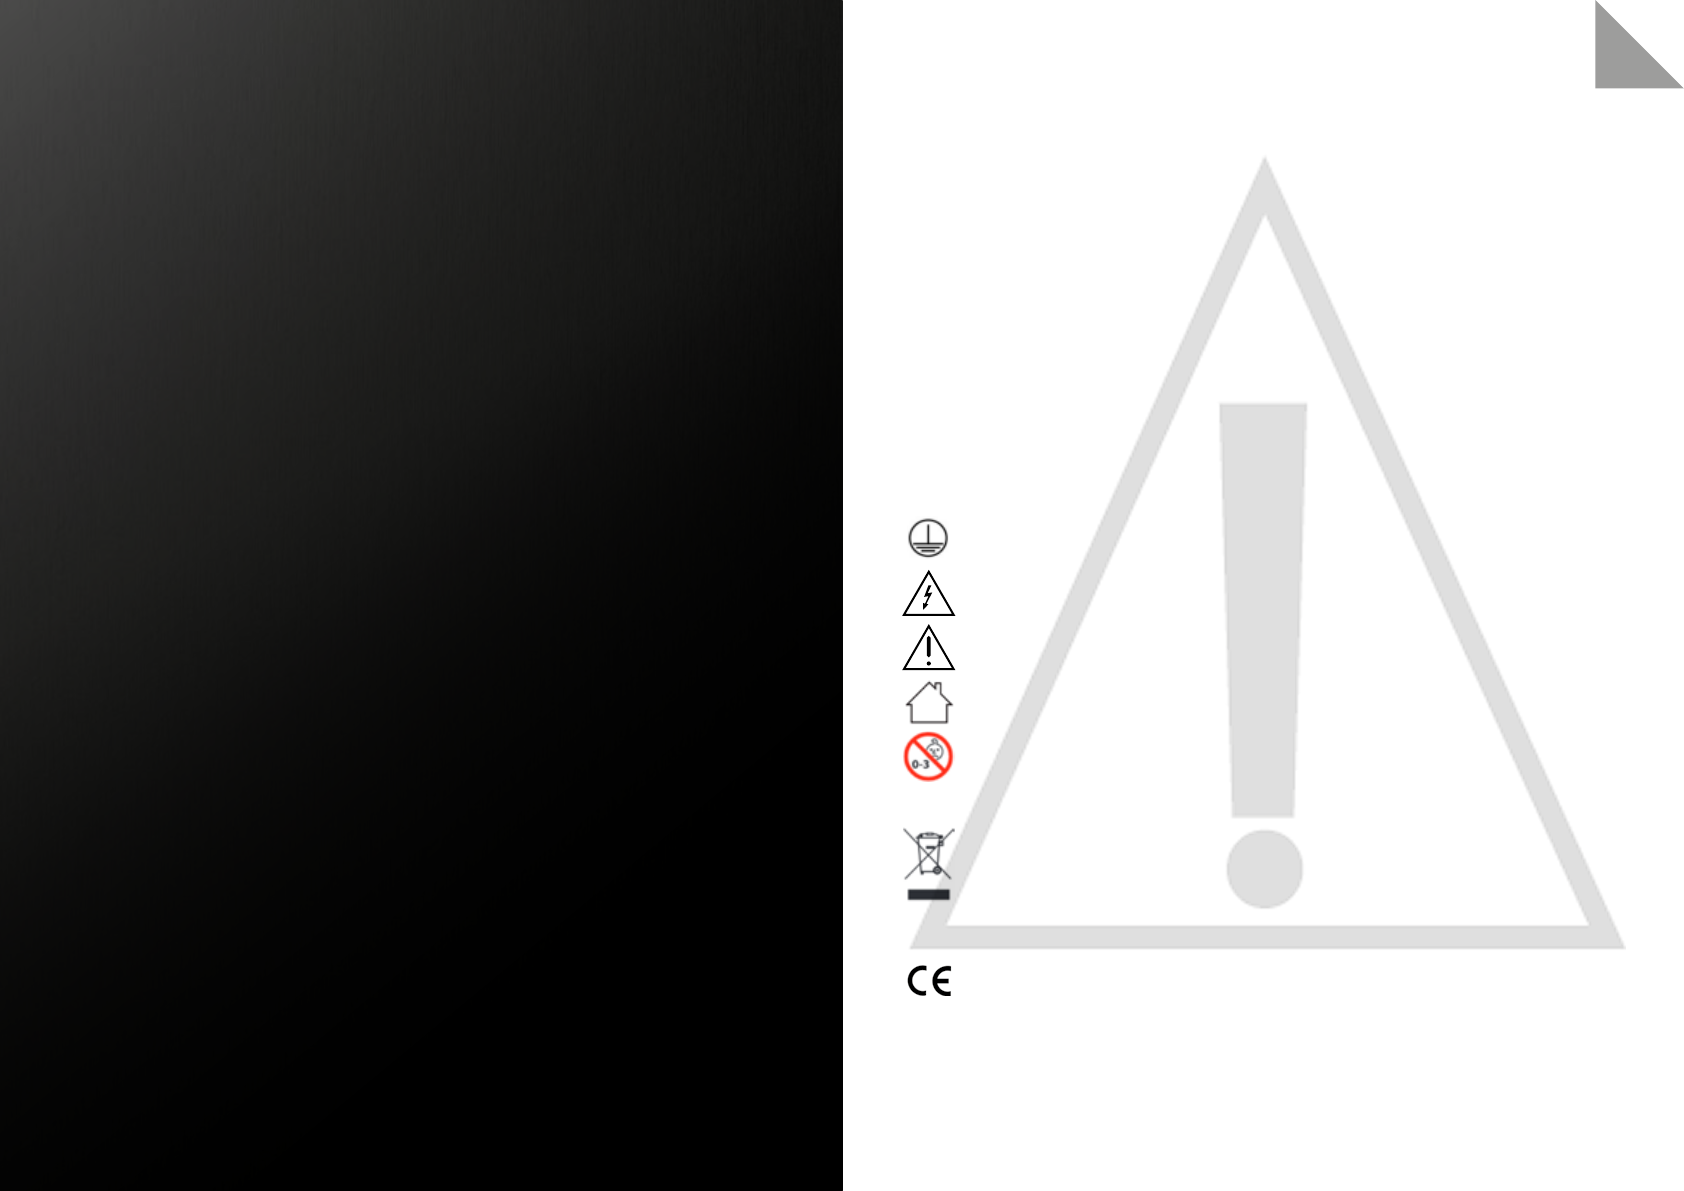
Gerät der Schutzklasse I, alle elektrisch leitfähigen Gehäuseteile sind mit dem Schutzleiter der
Elektroinstallation verbunden.
Das Blitzsymbol weist den Benutzer auf nicht isolierte, gefährliche elektrische Spannung innerhalb
des Produktes hin. Es besteht die Gefahr von Stromschlägen!
Das Ausrufezeichen macht den Benutzer auf wichtige Bedienungs- und Wartungsanweisungen in
der Bedienungsanleitung aufmerksam.
Dieses Produkt ist nicht für den Einsatz im Freien geeignet. Verwenden Sie es nur innerhalb von
Gebäuden.
Das Gerät und/oder die Verpackung können Kleinteile enthalten, die verschluckt werden können und
eine Erstickungsgefahr darstellen. Nicht geeignet für Kinder unter drei Jahren.
Das links abgebildete Symbol kann auf dem Gehäuse eines Produkts, dessen Verpackung sowie in
den Unterlagen oder der Bedienungsanleitung auftreten. Es zeigt an, dass das Produkt niemals in
den Hausmüll gelangen darf. Es muß umweltgerecht (entsprechend lokaler Richtlinien oder gemäß
der Europäischen Richtlinien 2012/19/EU) entsorgt werden.
Bitte informieren Sie sich, wo in Ihrer Nähe die nächste Abgabestelle für Elektronikschrott oder ein
Recycling-Hof ist. Der korrekte Umgang mit dem Produkt hilft Ressourcen zu schonen und beugt
körperlichen und Umweltschäden vor.
Die quadral GmbH & Co. KG erklärt hiermit, dass dieses Produkt die wesentlichen Anforderungen
und andere relevante Bestimmungen der Richtlinie 2014/53/EU und weitere EU-Richtlinien erfüllt.
Die vollständige Konformitätserklärung ist einsehbar unter www.quadral.com/downloads
SICHERHEITSHINWEISE
Lesen Sie diese Anleitung bitte sorgfältig und befolgen Sie alle Schritte, die für die Inbetriebnahme
angegeben sind. Beachten und befolgen Sie weiterhin alle Warnungen und Sicherheitshinweise, die auf dem
Gerät und in der Bedienungsanleitung angegeben sind. Bewahren Sie die Gebrauchsanleitung auf.
• Betreiben Sie den Lautsprecher nie unbeaufsichtigt.
• Die Kabel dürfen nicht gequetscht werden. Verlegen Sie die Kabel so, dass sie nicht durch Möbel
beschädigt werden können und Stolperfallen vermieden werden.
• Entfernen Sie das Netzkabel bei Gewitter oder bei längerer Nichtverwendung aus der Steckdose. Ziehen
Sie den Netzstecker immer am Stecker aus der Steckdose, nicht am Kabel.
• Verwenden Sie das Produkt niemals in der Nähe von Wasser, in Feuchträumen oder im Freien. Wie bei
allen nicht speziell hierfür konstruierten Geräten, kann Nässe die elektrische Isolierung überbrücken
und somit ein lebensgefährliches Risiko darstellen. Achten Sie bitte darauf, dass keine Gefäße, die
Flüssigkeiten enthalten (z.B. Vasen), auf dem Gerät abgestellt werden.
• Stellen Sie das Produkt nicht in der Nähe von Wärmequellen wie Heizstrahler, Heizkörper, Öfen oder
anderen Geräten auf.
• Schlitze und Öffnungen im Gehäuse dienen der Entlüftung und sorgen für zuverlässigen Betrieb. Daher
dürfen sie nicht verstellt oder abgedeckt werden.
• Bei einer Überlastung der Geräte durch sehr große Lautstärken ist das Durchbrennen einzelner
Bauelemente trotz Sicherungseinrichtungen nicht vollständig auszuschließen. Im Extremfall kann sogar
ein Brand innerhalb eines Gerätes in einem derartigen Überlastungsfall entstehen. Daher sollten die
Lautsprecher bei hohen Lautstärken nicht unbeaufsichtigt bleiben.
• Die Wartung Ihres Gerätes darf ausschließlich durch den technischen Service erfolgen. Eine Wartung
wird notwendig bei jeglicher Art von Schäden, d.h. bei beschädigten Netzkabeln und Steckern, oder nach
dem Herabfallen von Gegenständen auf das Gerät, sowie dem Sturz des Gerätes selbst oder nach dem
Eindringen von Flüssigkeiten. Öffnen Sie das Gerät nie selbst, da jeder Umgang mit der Netzspannung
(230V/115V~) lebensgefährlich ist.
• Stellen Sie die AURUM ALPHA und GAMMA grundsätzlich nur auf ebene, stabile Untergründe. Sollten Sie
Spikes verwenden, achten Sie unbedingt auf die Belastbarkeit und mögliche Bodenbeschädigungen.
• Hohe Lautstärken im Dauerbetrieb können für den Anwender zu gesundheitsschädlichen Auswirkungen
führen!
• Bitte heben Sie die Verpackung für einen eventuell späteren Transport auf, und halten Sie die Polybeutel
von Kindern fern, da hier bei unsachgemäßem Umgang ein Erstickungsrisiko besteht.

20 21
DE
AUFSTELLUNG
Die Platzierung der Lautsprecher im Hörraum hat einen maßgeblichen Einfluss auf deren Klang. So führt die
Aufstellung nahe der Raumecken grundsätzlich zu einer lauten, aber unkonturierten Basswiedergabe. Völlig
frei im Raum stehend klingen Lautsprecher dagegen zwar präzise, aber auch recht hell und schlank. Am besten
stellen Sie die Lautsprecher so auf, dass zwischen ihrer Gehäuserückwand und der nächsten Zimmerwand
mindestens 30 cm Freiraum bleiben. Von seitlichen Zimmerwänden sollte der Abstand mindestens 1m
betragen, um lautstarke Wandreflexionen zu vermeiden. Dies ist wichtig, um eine gute räumliche Darstellung
und Ortungsgenauigkeit der virtuellen Schallquellen zu erzielen. Ob die Lautsprecher auf die Hörposition
ausgerichtet werden oder parallel zu einander stehen, ist eher eine Frage des persönlichen Geschmacks.
Die AURUM ALPHA und GAMMA sind so abgestimmt, dass sie am besten klingen, wenn sie im klassischen
Stereo-Dreieck aufgestellt werden. Hierbei bilden Sitzposition und Lautsprecher ein gleichseitiges Dreieck.
Probieren Sie aber dennoch in aller Ruhe verschiedene Varianten der Aufstellung aus – richtig ist, was gefällt!
Die AURUM ALPHA und GAMMA verfügen über M8 Gewinde in den Füßen um bei Bedarf Spikes einzudrehen.
Achtung!:
Die meisten Spikes sind so spitz, dass der Boden sehr leicht beschädigt werden kann. Außerdem dürfen
Lautsprecher mit montierten Spikes niemals geschoben werden!
ANSCHLÜSSE/BEDIENELEMENTE
1Service Schnittstelle. Nichts einstecken!
2WPS/Update Taster
3Netzwerkanschluss RJ45
4Standby Taster
5De-Association Taster – Reset der Funkbrücke
6TosLink - Digital Eingang
7Netzschalter - trennt das Gerät komplett von der Netzversorgung
8Netzbuchse
9Reset Taster Streaming Modul
10 USB Anschluss - für USB Massenspeicher (USB-Stick, externe Festplatte)
11 Analog In - Stereo Eingänge, Cinch unsymmetrisch
12 Analog In - Stereo Eingänge, XLR symmetrisch
1
9
2
10
3
11
12
4
5
6
7
8
SERVICE ONLY !
WPS / UPDATE STREAMING MODUL
POWER STREAMING MODUL
LAN
RESET STREAMING MODUL
UPDATE FINISHED
USB
Analog IN
Right
Left
TOSLINK
Balanced
Unbalanced
ON
STANDBY / ON
STANDBY
LINK
DE-ASSOCIATION
ASSOCIATION
OFF
ON
max. Power Consumption 650 W
Fuse
115 V / T 6,3 A L 250 V
230 V / T 6,3 A L 250 V

22 23
DE
INBETRIEBNAHME
1. Laden Sie sich als erstes die „AURUM Player“ App für Android im Google Play™ oder für iOS im Apple
iTunes® App Store herunter.
Apple iTunes® Google Play™
2. Stellen Sie sicher dass die Netzschalter beider Lautsprecher ausgeschaltet sind.
3. Schließen Sie nun, falls vorhanden, Ihre/n Zuspieler an.
4. Schließen Sie die Aktiv Lautsprecher mit den beiliegenden Netzkabeln am Stromnetz an.
5. Schalten Sie die Lautsprecher nun mit dem Netzschalter an der Rückseite an.
6. Netzwerk Einbindung
Eine Kabelverbindung mit dem Netzwerk ist die stabilste und leistungsfähigste Verbindungsart.
LAN Kabel:
Verbinden Sie den Lautsprecher über ein Netzwerkkabel mit dem Netzwerk. Die Netzwerkbuchse (3)
befindet sich auf der Rückseite. Der Lautsprecher sollte sofort im Netzwerk zu finden sein.
WLAN per WPS:
Aktivieren Sie die WPS Funktion Ihres Routers. Drücken Sie nun auf den WPS-Taster (2) auf der Rückseite
des Master-Lautsprechers (Links). Der Lautsprecher verbindet sich nun automatisch mit Ihrem WLAN
Netzwerk.
WLAN per App:
Schalten Sie den Lautsprecher ein. Nach ca. 3 Minuten öffnet sich ein WLAN Access Point. Verbinden Sie
ihr Smartphone/Tablet mit dem Lautsprechernetzwerk und öffnen Sie die „AURUM Player“ App. Auf der
Startseite, der Geräteliste, sollte nun der Lautsprecher zu sehen sein. Drücken Sie auf das Gerät in der
Geräteliste und gehen Sie auf der neuen Seite nach unten auf „Einstellungen“.
Ganz oben auf der Einstellungsseite ist der „Netzwerk Assistent“, klicken Sie diesen an und gehen Sie
auf „WLAN“. Hier klicken Sie auf „Scannen“, nun wird die gesamte Umgebung nach WLAN Netzwerken
abgesucht. Wählen Sie Ihr Netzwerk aus, geben Sie bei „Passwort“ den Netzwerkschlüssel ein und
drücken Sie dann auf „Verbinden“.
Nun haben Sie Ihre AURUM aktiv Lautsprecher erfolgreich mit dem Netzwerk verbunden.
Um den Lautsprecher nun per APP bedienen zu können, müssen Sie sich in das gleiche Netzwerk einwählen,
in das auch der Lautsprecher eingebunden wurde!
7. Musik abspielen
Regeln Sie die Lautstärke in der App zuerst ganz runter, in dem Sie den Schieberegler auf der Geräteliste
ganz nach links ziehen. (Achtung, im Untermenü „SUMMIT“ gibt es einen weiteren Lautstärkeregler! Dieser
sollte grundsätzlich auf 100% stehen, kann aber bei Bedarf auch niedriger eingestellt werden.)
Wählen Sie auf der Home Seite einen der Eingänge oder Starten sie einen Titel über USB oder UPnP. Jetzt
verbinden sich der Master und Slave Lautsprecher per Funk miteinander. Nach einem kurzen Moment sind
die Lautsprecher spielbereit. Die Lautsprecher spielen bei einem Start aus dem Standby nicht gleichzeitig
los, da erst eine stabile Funkverbindung hergestellt werden muss. Die Funkverbindung zwischen den
Lautsprechern ist voreingestellt, so dass Sie keine Kopplung vornehmen müssen.
Jetzt können Sie die Lautstärke wieder erhöhen. Die letzte Lautstärke Einstellung vor dem Standby wird
immer abgespeichert.
8. Nutzung eines Vorverstärkers
Sie haben die Möglichkeit Ihre AURUM aktiv Lautsprecher ganz herkömmlich mit einem Vorverstärker zu
nutzen. Dies ermöglicht es Ihnen, Ihre gewohnte Fernbedienung und Zuspieler zu nutzen.
Pegeln Sie als erstes die Lautstärke in der App und am Vorverstärker ein. Dazu regeln Sie den Vorverstärker
auf die volle Lautstärke und erhöhen langsam die Lautstärke der Lautsprecher mit der App, bis Sie die
gewünschte Maximal Lautstärke erreicht haben.
9. Standby
Die Lautsprecher gehen nach einer gewissen Zeit ohne Musik in den Standby. Die Dauer kann in den
Einstellungen verändert werden. Die Lautsprecher sind so konzipiert, dass Sie immer im Standby am
Stromnetz angeschlossen bleiben.
Die Lautsprecher speichern im Standby den zuletzt verwendeten Analog Eingang. Sobald Sie mit der
Vorstufe ein Signal auf die Lautsprecher geben, erwachen die Lautsprecher aus dem Standby und spielen
die eingespeiste Musik ab.
Betätigen Sie die Netzschalter immer erst, sobald sich die Lautsprecher im Standby befinden. Der Standby
Modus kann durch Betätigen der Standby-Taste (4) auf der Rückseite des Master-Lausprechers sofort
initialisiert werden.

24 25
DE
STREAMING-FUNKTIONEN/EINGÄNGE
Um TIDAL® Nutzen zu können geben Sie in der App unter „TIDAL“ Ihre Benutzerdaten ein.
Hinweis: Für diese Funktion ist ein kostenpflichtiger TIDAL® Account notwendig.
Das Internet-Radio finden Sie unter dem Punkt „Airable“ auf der Hauptseite. Sie können Stationen direkt
suchen oder unter dem Punkt „Filter“ nach Sprache und Genre sortiert anzeigen lassen. Haben Sie Ihren
Lieblingssender gefunden, können Sie diesen durch Drücken des Pfeils rechts neben dem Sendernamen
in Ihrer Favoritenliste speichern.
USB (Stick/ Festplatte)
Der USB Anschluss (10) befindet sich auf der Rückseite des Master-Gerätes. Größere Festplatten
benötigen einen separaten Stromanschluss. Das Medium sollte in FAT32 formatiert sein. Es werden MP3,
ACC, FLAC, WMA und WAV Dateien unterstützt.
UPnP
Um die UPnP Funktion nutzen zu können, muss sich der Lautsprecher in demselben Netzwerk wie der
Musikserver befinden. Gehen Sie in der App auf den Punkt „UPnP“, auf der neuen Seite sehen Sie nun
Ihren UPnP Server. Hier können Sie sich durch Ihre angelegte Ordnerstruktur klicken und die gewünschte
Musikdatei auswählen und abspielen. Es werden MP3, ACC, FLAC, WMA und WAV Dateien unterstützt
Line In ( Analog Unsymmetrisch)
Stereo Chinch Anschluss.
Line In (Analog Symmetrisch)
Stereo XLR Anschluss.
Belegung des XLR-Anschlusses: Pin 1= Masse; Pin 2= Signal/Plus; Pin 3= Signal/Minus
TosLink
Optischer Stereo Digital Eingang
DIRAC LIVE® EINMESSUNG
Warnung: quadral GmbH & Co. KG übernimmt keine Verantwortung für mögliche Schäden durch falsche
Bedienung oder Einstellung. Bitte lesen Sie sich die Anleitung sorgfältig durch.
DIRAC Live® ist eine Software, die es Ihnen ermöglicht, dem negativen Raumeinfluss auf den Klang Ihrer
Lautsprecher entgegenzuwirken.
Grundsätzliche Probleme der Raumakustik werden damit nicht beseitigt! Es werden lediglich die Auswirkungen
auf den Klang verringert. Wir empfehlen daher grundsätzlich für ein perfektes Klangerlebnis, den Raum
entsprechend zu gestalten und die Aufstellung der Lautsprecher sorgfältig zu wählen.
Sie können in der Software verschiedene Zielkurven vorgeben und bis zu vier Ergebnisse abspeichern.
Wir empfehlen, zunächst der vorgegebenen Zielkurve zu folgen und diese einzusetzen. Bei weiteren
persönlichen Einstellungen sollten Sie im Bassbereich nicht zu viel Pegel vorgeben, da dies die Gesamtdynamik
des Lautsprechers deutlich einschränken kann. So sollten Frequenzlöcher nicht zwingend vollständig aufgefüllt
werden – eine leichte Senke ist akustisch in der Regel kaum zu bemerken.
Im Hochtonbereich kann eine deutliche Pegelanhebung sogar zu Schäden führen! Bei Unsicherheiten steht
Ihnen Ihr Fachhändler mit Rat und Tat gerne zur Seite. Auch das quadral Service Team hilft Ihnen gerne weiter.
Die Software für Windows® und Mac® steht ihnen unter www.quadral.com/downloads als Download zur
Verfügung. Stellen Sie sicher dass sich die Lautsprecher und Ihr Computer im selben Netzwerk befinden. DIRAC
Live® benötigt für die Einmessung eine Internetverbindung.
Bevor Sie anfangen die Lautsprecher einzumessen müssen die Lautsprecher richtig aufgestellt werden und der
endgültige Hörplatz festgelegt sein.
Sie können mehrere Sound Profile abspeichern. Die Profile können in der App unter Einstellungen->DIRAC
ausgewählt werden.
Eine ausführliche DIRAC Live® Anleitung steht Ihnen unter www.quadral.com/downloads zur Verfügung.
DIRAC LIVE® SCHNELLANLEITUNG
1. Installieren Sie die DIRAC Live® Live Software.
2. Laden Sie von der Website www.minidsp.com die Mikrofon Kalibrierungsdatei herunter. Wählen Sie
dafür auf der Website unter den Produkten das „UMIK-1“ aus. Etwas weiter unten auf der Produktseite
finden Sie den Reiter „Unique Calibration Download“, dort geben Sie in die Felder die Seriennummer des
Mikrofones ein. Die Seriennummer finden Sie auf dem Mikrofon Karton und dem Mikrofon selbst.
3. Verbinden Sie nun das Mikrofon mit dem beiliegendem USB-Kabel mit Ihrem Computer.
Das Mikrofon benötigt keine zusätzlichen Treiber.

Input gain
Output volume
Channel name Output channel Test Level
20.0 dB
Left
Right
Left
Right -36 -24 -12 -6 -3 0
-36 -24 -12 -6 -3 0
0 +20
27
DE
26
4. System Einstellung
Starten Sie die DIRAC Live® Software auf Ihrem Computer. Auf der Startseite sollten unter „Test signal
playback device“ Ihre AURUM aktiv Lautsprecher direkt auftauchen. Ist dies nicht der Fall, vergewissern
Sie sich, dass sich Ihr Computer und Ihre Lautsprecher in demselben Netzwerk befinden. Ob die Geräte mit
WLAN oder Netzwerk Kabel angebunden sind spielt keine Rolle. Klicken Sie unten rechts auf „Proceed“.
5. Mikrofon Einstellung
Wählen Sie unter „Recording device“ das „Umik-1“ Mikrofon aus. Laden Sie nun über „Load file“ die
Mikrofon Kalibrierungsdatei in das Programm. Klicken Sie nun wieder unten rechts auf „Proceed“. Der
„Recording Channel“ muss „1“ bleiben.
6. Pegel Einstellung
Auf der „Output & Level“ Seite müssen die Pegel angepasst werden. Ziehen sie den „Output volume“
Regler nach links um die Lautstärke zu verringern. Klicken Sie nun auf eines der beiden „Test“ Felder. Ziehen
Sie jetzt den Regler so weit nach rechts, bis die Lautstärke in etwa die Lautstärke eines lauten Gesprächs
erreicht. Ziehen Sie jetzt den „Input gain“ Regler so weit nach rechts, bis der blaue Balken im „Level“ Feld
ungefähr die Mitte der grünen Fläche erreicht. Sollte der Input gain zu gering sein, wird Sie die Software
bei der Messung darauf hinweisen. Gehen Sie nun mit der „Proceed“ Schaltfläche weiter.
7. Messung
Auf der „Measurements“ Seite können Sie nun mit den Messungen beginnen. Achten Sie darauf, dass es
während der Messungen im Raum so leise wie möglich ist. Je leiser es ist, desto besser kann der DIRAC
Live®-Algorithmus die Messung verarbeiten. Die Messungen lassen sich am besten mit einem großen
Mikrofon Stativ durchführen.
Positionieren Sie das Mikrofon auf dem Hörplatz entsprechend der gelben Markierung in der Software.
Achten Sie darauf, das Mikrofon auf Ohrhöhe auszurichten. Die äußersten Messungen sollten mit einem
Abstand von ca. 50 cm von der Mittelpunkt-Messung durchgeführt werden. Der Höhenunterschied bei den
Messungen sollte zum Mittelpunkt jeweils 30 cm betragen. Wenn die Messungen zu dicht nebeneinander
sind, kann das Endergebnis sehr trocken und matt klingen.
Unter der Sitzflächen-Darstellung können Sie sich neben dem „Top View“ (Oben) auch noch die „Frontal
View“ (Vorne) und „Oblique View“ (Schräg) Ansicht anzeigen lassen. Klicken Sie nun auf „Start“, es werden
3 Mess-Signale von den Lautsprechern wiedergegeben. Nach jeder Messung wird die Position in der
Darstellung grün, und Sie müssen die Mikrofon- position entsprechend der Darstellung ändern. Sobald alle
9 Messungen durchgeführt wurden, klicken Sie auf „Proceed“.
8. Filter Design
Gemessene Kurve
(Avg. Spectrum before)
Zielkurve (Target)
Optimierte Kurve
(Avg. Spectrum after)

Linear
Linear
On
Filter
Output volume
Left
Right
Left
Right
20.0 dB
Channel Slot 1 Slot 2 Slot 3 Slot 4
Quadral - AURUM aktiv 'AURUM Alpha'
28 29
DE
Auf der Seite „Filter Design“ sehen Sie nun das Messergebnis (hellblaue Linien). Die orange Kurve ist
die Zielkurve. DIRAC Live® wird versuchen, die gemessenen Kurven so nah wie möglich der Zielkurve
anzugleichen. Als erstes sollten Sie die bereits vorgegebene Zielkurve benutzen. Durch klicken auf die
„Optimize“-Schaltfläche errechnet DIRAC Live® die benötigten Filter. Dies kann einen kurzen Moment
dauern. Nach der Berechnung erscheinen die grünen verbesserten Kurven.
Speichern Sie nun das Projekt mit „Save Project“ unten links im Fenster. Der Name, den Sie dem Projekt
geben, wird anschließend auch in den Lautsprechern als Hörprofilname auftauchen. Der Standard-
Speicherort der Projektdateien ist: Dokumente\Quadral\Projects
Klicken Sie nun mit der „Proceed“ Schaltfläche“ weiter.
9. Export
Auf der „Export“ Seite müssen Sie nur noch das blaue Kästchen des Projektes oben links mit der Maus
anklicken, gedrückt halten und in einen der „Slots“ ziehen. Sie können die DIRAC Live® Filter mit der „On/
Off“ Schaltfläche aktivieren oder deaktivieren.
Falls alle 4 Slots belegt sind, können Sie die Projekte durch ziehen auf den Mülleimer oben rechts aus dem
Lautsprecher löschen.
Drücken Sie „Reset Streaming Modul“, um die DIRAC Live® Einmessung zu übernehmen.
EINSTELLUNGEN
Funkverbindung
UnterdemReiter„SummitTX“findenSie dieEinstellungen zurFunkverbindungzwischen denLautsprechern.
Wird unter „Lautsprecher“ „0“ angezeigt, klicken Sie auf „Update Speaker Info“.
Mit „Full Scan“ sucht der Master Lautsprecher nach dem Slave. Nach einem kurzen Moment verbinden
sich die Lautsprecher miteinander. Drücken Sie auf „Save Speaker Configuration“ um die Verbindung zu
speichern.
Mit „Reset Speaker Configuration“ setzen sie die gespeicherte Funkverbindung zurück.
Energie Management /Standby
Hier können Sie auswählen, wie schnell die Lautsprecher in den Standby Modus gehen sollen.
Über „Bereitschafts-Auszeit bei Wiedergabe“ können Sie einstellen, wann der Lautsprecher ausgehen soll,
während die Musik noch spielt. Ähnlich eines Sleep-Timers bei Fernsehern.
Werkseinstellungen
Sie können die Lautsprecher auf die Werkseinstellungen zurücksetzen. Dabei werden alle von Ihnen
getätigten Einstellungen gelöscht. Diese Funktion finden Sie im Menü „Einstellungen“ unter „Gerät
zurücksetzen“, drücken Sie zum Bestätigen auf „Zurücksetzen bestätigen“. Das Zurücksetzen kann 1-2
Minuten dauern. Danach muss der Master Lautsprecher erneut ins Netzwerk eingebunden werden.
FIRMWARE UPDATE
Gehen Sie unter „Einstellungen“ auf „Firmware Aktualisierung“, dort wählen Sie „Auf Aktualisierung prüfen“
aus. Wenn der Lautsprecher ein neues Update auf dem Server findet, wird das Update heruntergeladen und
installiert.
Schalten Sie das Gerät während der Aktualisierung auf keinen Fall aus!
Hinweis: Für den Update Vorgang muss der Lautsprecher mit dem Internet verbunden sein.
Manuelles Firmware Update per Computer (empfohlen)
1. Geben Sie im Browser Ihres Computers die IP-Adresse des Lautsprechers ein.
Die IP-Adresse finden Sie in der AURUM Player App auf der ersten Seite.
2. Gehen Sie auf den Reiter „Device Settings“, unter „Firmware Update“ File können Sie die Datei von
Ihrem Computer auswählen. Der Update-Vorgang dauert einige Minuten.

30 31
DE
Manuelles Firmware Update per USB Stick
1. Firmware Datei von der Website „www.quadral.com/downloads“ herunterladen.
2. Die Datei auf einen leeren USB Stick laden (der USB Stick sollte FAT32 formatiert sein).
3. Den im Standby befindenden Master Lautsprecher am Netzschalter ausschalten.
4. USB Stick in den USB Anschluss des Master Lautsprechers anschließen.
5. WPS/Update Taster drücken und halten.
6. Netzschalter wieder einschalten.
7. WPS/Update Taster 10 Sekunden gedrückt halten.
8. Sobald die Update LED Leuchtet, ist das Update fertig.
Neustart Streaming Modul
Auf der Rückseite des Master Lautsprechers befindet sich der Taster (9) „Reset Streaming Modul“.
Durch drücken dieses Tasters wird das Streaming Modul neu gestartet. Dies ist nur nötig, falls Sie
Verbindungsprobleme haben, oder das Gerät nicht richtig auf die App reagiert.
PROBLEMBEHEBUNG
Die Lautsprecher werden nicht im LAN Netzwerk erkannt:
- Überprüfen Sie, ob in den Einstellungen Ihres Routers DHCP aktiviert ist.
Die Lautsprecher werden nicht im WLAN Netzwerk erkannt:
- Prüfen Sie, ob Ihr WLAN Netzwerk ordnungsgemäß funktioniert.
- Stellen Sie sicher, dass sich Ihre Lautsprecher nah genug an Ihrem WLAN Router befinden.
- Lautsprecher neu starten.
- Lautsprecher mit Netzwerkkabel ans Netzwerk anbinden.
- Auf Werkseinstellungen zurücksetzten.
- Repeater können die Verbindung stören
Musik wird nur über einen Lautsprecher Wiedergegeben:
- Schalten sie die Lautsprecher aus und wieder an. Vorher den Standby-Modus aktivieren.
Die Lautsprecher klingen nicht mehr:
- Prüfen Sie den Status „DIRAC Ein/Aus“
- Prüfen Sie, ob die ausgewählte Signalquelle ein hochwertiges Audiosignal bereitstellt
- Wiederholen Sie die DIRAC Live®-Messung und verändern Sie die Mikrofon Position
App Probleme:
- Stellen Sie sicher, dass Ihr Smartphone Betriebssystem auf dem neusten Stand ist.
- Lautsprecher und Smartphone / Tablet neu starten
Festplatte läuft nicht:
- Eventuell benötigt die Festplatte ein Extra-Netzteil.
- Stellen Sie sicher, dass das Laufwerk eine FAT32 Formatierung aufweist.
- Prüfen Sie die USB Verbindung: Kabel richtig eingesteckt? Kabel technisch in Ordnung?
LED Codes
Lautsprecher sind Lautsprecher sind verbunden, Lautsprecher
miteinander verbunden aber stumm (evtl. Neustart erforderlich) im Standby
(LED´s leuchten dauerhaft) (LED´s leuchten dauerhaft) („LINK“ LED blinkt)
TECHNISCHE DATEN
AURUM ALPHA AURUM GAMMA
Leistung Gesamt: 700W 1% THD 350W 1%THD
Frequenzbereich: 17Hz-48kHz 20HZ-48kHz
Übergangsfrequenzen: 110/2900Hz 115/3000Hz
quSense® Bändchen Hochtöner: 90mm 70mm
ALTIMA® Mitteltöner: 2x 180mm 2x 155mm
ALTIMA® Tieftöner: 2x 265mm 2x 235mm
Eingangsempfindlichkeit (XLR): +12dBV
Eingangsempfindlichkeit (RCA): +12dBV
Standby-Verbrauch: <6W
Maximaler Stromverbrauch: 650W 450W
Versorgungsspannung : 115V/230V~
Maße (HxBxT): 1210x280x510mm 1110x250x460mm
Gewicht: 71,0 kg 54,9 kg
Wi-Fi 802.11b/g/n
Ethernet 10/100 Mbit/s
Unterstützte Dateiformate USB/UPnP:
- MP3
- AAC
- WAV
- FLAC
- WMA
- LPCM
- ALAC
ON
STANDBY/ON
STANDBY
LINK
DE-ASSOCIATION
ASSOCIATION
ON
STANDBY/ON
STANDBY
LINK
DE-ASSOCIATION
ASSOCIATION
ON
STANDBY/ON
STANDBY
LINK
DE-ASSOCIATION
ASSOCIATION

33
FR
Merci d‘avoir choisi les enceintes actives AURUM de quadral. Ce sont les mélomanes comme
vous pour qui nous fabriquons des produits audio dans une classe de qualité qui répond aux plus
hautes exigences. Même si vous connaissez déjà quelques notions, voici une liste de quelques
principes qui vous permettront d‘utiliser votre équipement de façon optimale.
Veuillez lire attentivement ce mode d‘emploi afin de pouvoir profiter de vos enceintes AURUM
actives pendant de nombreuses années encore !
Informations importantes !
Vous avez la possibilité de vous abonner à une newsletter spéciale pour ce système. La lettre d‘information est
uniquement destinée à fournir des informations actualisées et une assistance complémentaire. De cette façon,
vous ne recevrez aucune publicité.
Pour vous inscrire, veuillez nous envoyer un e-mail informel avec la mention „Inscription“ à :
EXPLICATION DES SYMBOLES
Dispositif de classe de protection I, toutes les parties du boîtier conductrices de l’électricité sont
reliées au conducteur de protection de l’installation électrique.
Le symbole de l’éclair avertit l’utilisateur de la présence d’une tension dangereuse non isolée à
l’intérieur du produit. Risque d’électrocution !
Le point d’exclamation attire l’attention de l’utilisateur sur d’importantes instructions d’utilisation et
d’entretien figurant dans la notice d’utilisation.
Ce produit ne convient pas pour une utilisation à l’extérieur. N’utiliser qu’à l’intérieur des bâtiments.
L’appareil et/ou l’emballage peuvent contenir de petites pièces qui peuvent être avalées et présenter
un risque d’étouffement. Ne convient pas aux enfants de moins de trois ans.
Le symbole figurant à gauche peut apparaître sur le boîtier d’un produit, son emballage et dans
la documentation ou le mode d’emploi. Il indique que le produit ne doit jamais être jeté avec les
ordures ménagères. Ils doivent être éliminés dans le respect de l’environnement (conformément
aux directives locales ou aux directives européennes 2012/19/EU).
Renseignez-vous auprès du point de collecte des déchets électroniques ou du centre de recyclage le
plus proche de chez vous. Une manipulation correcte du produit permet de préserver les ressources
et d’éviter les dommages physiques et environnementaux.
quadral GmbH & Co. KG déclare par la présente que ce produit est conforme aux exigences
essentielles et aux autres dispositions pertinentes de la Directive 2014/53/EU et des autres
directives européennes. La déclaration de conformité complète peut être consultée à l’adresse
www.quadral.com/downloads
CONSIGNES DE SÉCURITÉ
Veuillez lire attentivement ces instructions et suivre toutes les étapes de la mise en service. Respectez en
outre tous les avertissements et consignes de sécurité figurant sur l’appareil et dans le mode d’emploi.
Conservez le mode d’emploi dans un endroit sûr.
• N’utilisez jamais le haut-parleur sans surveillance.
• Les câbles ne doivent pas être écrasés. Posez les câbles de manière à ce qu’ils ne puissent pas être
endommagés par les meubles et que les risques de trébuchement soient évités.
• Débranchez le cordon d’alimentation de la prise murale pendant les orages ou les périodes prolongées de
non-utilisation. Débranchez toujours la fiche du secteur de la prise de courant en tirant sur la fiche et non
sur le câble.
• Ne jamais utiliser l’appareil près de l’eau, dans des pièces humides ou à l’extérieur. Comme pour tous les
appareils qui ne sont pas spécialement conçus à cet effet, l’humidité peut faire le pont entre l’isolation
électrique et l’isolant et mettre ainsi la vie en danger. Veillez à ce qu’aucun récipient contenant des liquides
(par ex. vases) ne soit placé sur l’appareil.
• Ne placez pas l’appareil à proximité de sources de chaleur telles que radiateurs radiants, radiateurs, poêles
ou autres appareils.
• Des fentes et des ouvertures dans le boîtier assurent la ventilation et un fonctionnement fiable. Par
conséquent, ils ne doivent pas être ajustés ou couverts.
• Si les appareils sont surchargés par des volumes très élevés, il n’est pas totalement exclu que des
composants individuels puissent brûler malgré des fusibles. Dans des cas extrêmes, un incendie peut
même survenir à l’intérieur d’un appareil dans un tel cas de surcharge. Par conséquent, les enceintes ne
doivent pas être laissées sans surveillance à des volumes élevés.
• L’entretien de votre appareil ne peut être effectué que par le service technique. L’entretien est nécessaire
en cas d’endommagement de tout type, c’est-à-dire en cas d’endommagement des câbles d’alimentation
et des prises, de chute d’objets sur l’appareil, de chute de l’appareil lui-même ou de pénétration de liquides.
N’ouvrez jamais l’appareil vous-même, car toute manipulation de la tension secteur (230V/115V~)
représente un danger de mort.
• Toujours placer l’AURUM ALPHA et le GAMMA sur des surfaces planes et stables. Si vous utilisez des
pointes, faites attention à la capacité de charge et aux dommages possibles au sol.
• Des niveaux de volume élevés en fonctionnement continu peuvent avoir des effets néfastes pour
l’utilisateur !
• Conservez l’emballage dans un endroit sûr pour le transport ultérieur et éloignez les sacs polybags des
enfants car ils risquent d’étouffer s’ils ne sont pas manipulés correctement.
32

34 35
FR
ALIGNEMENT
L’emplacement des haut-parleurs dans la salle d’écoute a une influence décisive sur leur son. Ainsi, le
placement près des coins de la pièce conduit généralement à une reproduction des basses forte mais non
contournée. En revanche, les haut-parleurs qui se tiennent complètement libres dans la pièce sonnent précis,
mais aussi très clairs et minces. Il est préférable de placer les enceintes de telle sorte qu’il y ait un espace
d’au moins 30 cm entre la paroi arrière de l’enceinte et le mur suivant de la pièce. La distance par rapport aux
murs latéraux de la pièce doit être d’au moins 1 m afin d’éviter les reflets forts du mur. Ceci est important pour
obtenir une bonne représentation spatiale et une bonne précision de positionnement des sources sonores
virtuelles. Que les enceintes soient alignées sur la position d’écoute ou parallèles entre elles est plus une
question de goût personnel.
L’AURUM ALPHA et le GAMMA sont réglés pour un son optimal lorsqu’ils sont placés dans le triangle stéréo
classique. La place assise et le haut-parleur forment un triangle équilatéral.
Essayez néanmoins différentes variantes de l’installation en toute tranquillité - ce que vous aimez, c’est ce
qu’il vous faut !
L’AURUM ALPHA et le GAMMA ont des filetages M8 dans les pieds pour tourner les pointes si nécessaire.
Attention : La plupart des pointes sont tellement pointues que le sol peut facilement être endommagé. En
outre, les haut-parleurs avec des pointes montées ne doivent jamais être enfoncés !
RACCORDEMENTS / ELÉMENTS DE COMMANDE
1Interface de service. Ne prenez rien !
2Boutons WPS/Mise à jour
3Connexion réseau RJ45
4Touche Standby
5Touche De-Association - Remise à zéro du pont radio
6TosLink - Entrée numérique
7Interrupteur d’alimentation - déconnecte complètement l’appareil du secteur
8Prise secteur
9Module de réinitialisation du bouton de lecture en continu
10 Port USB - pour stockage de masse USB (clé USB, disque dur externe)
11 Entrées analogiques - entrées stéréo, Cinch asymétrique
12 Entrées analogiques - Entrées stéréo, XLR symétriques
1
9
2
10
3
11
12
4
5
6
7
8
SERVICE ONLY !
WPS / UPDATE STREAMING MODUL
POWER STREAMING MODUL
LAN
RESET STREAMING MODUL
UPDATE FINISHED
USB
Analog IN
Right
Left
TOSLINK
Balanced
Unbalanced
ON
STANDBY / ON
STANDBY
LINK
DE-ASSOCIATION
ASSOCIATION
OFF
ON
max. Power Consumption 650 W
Fuse
115 V / T 6,3 A L 250 V
230 V / T 6,3 A L 250 V

36 37
FR
MISE EN SERVICE
1. Téléchargez d’abord l’application «AURUM Player» pour Android sur le Google Play™ Store ou pour iOS sur
l’Apple iTunes® App Store..
Apple iTunes® Google Play™
2. Assurez-vous que les interrupteurs d’alimentation des deux enceintes sont éteints.
3. Connectez maintenant votre ou vos lecteur(s), si disponible.
4. Connectez les enceintes actives à l’alimentation électrique à l’aide des câbles d’alimentation fournis.
5. Allumez maintenant les haut-parleurs avec l’interrupteur d’alimentation à l’arrière.
6. intégration du réseau
Une connexion par câble au réseau est le type de connexion le plus stable et le plus puissant.
Câble LAN :
Connectez le haut-parleur au réseau à l’aide d’un câble réseau. Le connecteur réseau (3) se trouve sur le
panneau arrière. Le haut-parleur doit être immédiatement disponible dans le réseau.
WLAN via WPS :
Activez la fonction WPS de votre routeur. Appuyez maintenant sur le bouton WPS (2) à l’arrière de
l’enceinte maître (à gauche). Le haut-parleur se connecte maintenant automatiquement à votre réseau
WLAN.
WLAN par App :
Allumez le haut-parleur. Après environ 3 minutes, un point d’accès WLAN s’ouvre. Connectez votre
téléphone/tablette au réseau du haut-parleur et ouvrez l’application «AURUM Player». Le haut-parleur
doit maintenant être visible sur la page d’accueil, la liste des appareils. Appuyez sur l’appareil dans la liste
des appareils et descendez à «Settings» sur la nouvelle page.
En haut de la page des paramètres se trouve l’»Network wizard», cliquez dessus et allez dans «WLAN».
Ici vous cliquez sur «Scan», l’environnement entier est maintenant scanné pour les réseaux WLAN.
Sélectionnez votre réseau, entrez la clé réseau dans «Password» et appuyez sur «Connect».
Vous avez maintenant connecté avec succès vos haut-parleurs actifs AURUM au réseau.
Pour pouvoir utiliser le haut-parleur via APP, vous devez vous connecter au même réseau que celui dans
lequel le haut-parleur a été intégré !
7. Jouer de la musique
Tout d’abord, baissez le volume de l’application en faisant glisser le curseur de la liste des périphériques
vers la gauche. (Attention, dans le sous-menu «SUMMIT» il y a une autre commande de volume ! Cette
valeur doit toujours être fixée à 100 %, mais peut également être abaissée si nécessaire.)
Sélectionnez l’une des entrées de la page d’accueil ou lancez une piste via USB ou UPnP. Les haut-parleurs
maître et esclave se connectent maintenant l’un à l’autre par radio. Après un court instant, les enceintes
sont prêtes à jouer. Les haut-parleurs ne jouent pas simultanément à partir du mode veille, car une
connexion radio stable doit d’abord être établie. La connexion radio entre les haut-parleurs est préréglée
de façon à ce que vous n’ayez pas à effectuer de couplage.
Vous pouvez maintenant augmenter à nouveau le volume sonore. Le dernier réglage du volume avant la
mise en veille est toujours sauvegardé.
8. Utilisation d’un préamplificateur
Vous avez la possibilité d’utiliser vos enceintes actives AURUM de manière conventionnelle avec un
préamplificateur. Cela vous permet d’utiliser votre télécommande et votre lecteur habituels.
Réglez d’abord le volume dans l’application et sur le préamplificateur. Pour ce faire, réglez le préamplificateur
à plein volume et augmentez lentement le volume des enceintes avec l’application jusqu’à ce que vous
ayez atteint le volume maximum souhaité.
9. Veille
Les enceintes se mettent en veille après un certain temps sans musique. La durée peut être modifiée
dans les réglages. Les haut-parleurs sont conçus pour vous permettre de rester connecté à l’alimentation
électrique pendant que vous êtes en mode veille.
En mode veille, les haut-parleurs mémorisent la dernière entrée analogique utilisée. Dès que vous envoyez
un signal aux haut-parleurs avec le préamplificateur, les haut-parleurs se réveillent du mode veille et
jouent la musique qui leur a été transmise.
N’actionnez pas les interrupteurs d’alimentation avant que les enceintes ne soient en veille. Le mode veille
peut être initialisé immédiatement en appuyant sur la touche veille (4) à l’arrière du haut-parleur maître.

38
FR
39
FONCTIONS DE STREAMING / ENTRÉES
Pour pouvoir utiliser TIDAL®, entrez vos données utilisateur dans l’application sous «TIDAL».
Note : Un compte TIDAL® est requis pour cette fonction; ceci pourrait vous engendrer des coûts.
Vous trouverez la radio Internet sous «Airable» sur la page d’accueil. Sous «Filter», vous pouvez rechercher
directement des chaînes ou les afficher en fonction de la langue et du genre. Une fois que vous avez trouvé
votre chaîne préférée, vous pouvez l’enregistrer dans votre liste de favoris en appuyant sur la flèche à
droite du nom de la chaîne .
USB (clé/ disque dur)
Le port USB (10) se trouve à l’arrière de l’appareil maître. Les disques durs plus grands nécessitent une
connexion d’alimentation séparée. Le support doit être formaté en FAT32. Les fichiers MP3, ACC, FLAC,
WMA et WAV sont supportés.
UPnP
Pour utiliser la fonction UPnP, le haut-parleur doit être sur le même réseau que le serveur de musique.
Allez dans «UPnP» dans l’application, sur la nouvelle page vous verrez votre serveur UPnP. Ici, vous
pouvez cliquer sur la structure de dossiers que vous avez créée et sélectionner et lire le fichier musical
désiré. Les fichiers MP3, ACC, FLAC, WMA et WAV sont supportés.
Affectation des broches du connecteur XLR : Pin 1= Masse ; Pin 2= Signal/Plus ; Pin 3= Signal/Moins
Entrée de ligne (asymétrique analogique)
Connecteur stéréo chinch.
Entrée de ligne (analogique symétrique)
Connecteur XLR stéréo.
TosLink
Entrée numérique optique stéréo
DIRAC LIVE® CALIBRATION
Avertissement : quadral GmbH & Co. KG décline toute responsabilité pour d’éventuels dommages causés
par une utilisation ou un réglage incorrects. Veuillez lire attentivement les instructions.
DIRAC Live® est un logiciel qui vous permet de contrer l’impact négatif de l’espace sur le son de vos enceintes.
Les problèmes fondamentaux de l’acoustique d’une pièce ne sont pas éliminés ! Seuls les effets sur le son
sont réduits. Pour une expérience sonore parfaite, nous vous recommandons donc de concevoir la pièce en
conséquence et de choisir soigneusement la position des haut-parleurs.
Vous pouvez spécifier différentes courbes cibles dans le logiciel et enregistrer jusqu’à quatre résultats.
Nous vous recommandons de suivre d’abord la courbe cible spécifiée et de l’utiliser. Pour d’autres réglages
personnels, ne réglez pas trop de niveau dans la plage des basses, car cela peut limiter considérablement la
dynamique globale du haut-parleur. Par exemple, les trous de fréquence ne doivent pas nécessairement être
complètement remplis - une légère dépression est généralement à peine perceptible sur le plan acoustique.
Dans le domaine des hautes fréquences, une augmentation importante du niveau peut même entraîner des
dommages ! En cas de doute, votre revendeur spécialisé se fera un plaisir de vous conseiller et de vous aider.
L’équipe de service quadral se fera également un plaisir de vous aider.
Le logiciel pour Windows® et Mac® est disponible en téléchargement sur www.quadral.com/downloads.
Assurez-vous que les haut-parleurs et votre ordinateur sont sur le même réseau. DIRAC Live® nécessite une
connexion Internet pour l’étalonnage.
Avant de commencer à mesurer les enceintes, celles-ci doivent être correctement positionnées et la position
d’écoute finale doit être déterminée.
Vous pouvez enregistrer plusieurs profils sonores. Les profils peuvent être modifiés dans l’application sous
Paramètres->DIRAC peut être sélectionné.
Un manuel détaillé de DIRAC Live® est disponible sur www.quadral.com/downloads .
GUIDE DE DÉMARRAGE RAPIDE DIRAC LIVE®
1 Installez le logiciel DIRAC Live®.
2. Télécharger le fichier d’étalonnage du microphone sur le site Web www.minidsp.com Pour ce faire,
sélectionnez «UMIK-1» dans les produits du site. Un peu plus bas sur la page du produit, vous trouverez
l’onglet «Téléchargement du calibrage unique», où vous entrez le numéro de série du microphone dans les
champs. Le numéro de série se trouve sur le boîtier du microphone et sur le microphone lui-même.
3. Connectez le microphone à votre ordinateur à l’aide du câble USB fourni.
Le microphone ne nécessite aucun pilote supplémentaire.
This manual suits for next models
2
Table of contents
Languages:
Other quadral Speakers manuals