Quality Commercial Macines QCM-8200M User manual

USER'S MANUAL
QUALITY COMMERCIAL MACHINES CORPORATION
Copyright © 2001-2007 Quality Commercial Machines Corporation
QCM DESKTOP CUTTER
FOR QCM-8200M AND QCM-8700M

INTRODUCTION
Congratulations on your selection of a QCM desktop cutter. We are certain you will be pleased with the
purchase of this fine machine. Please read this manual carefully before putting the machine into operation.
Keep this manual handy for future reference. It is considered a permanent part of the machine and should
remain with the machine if resold.
PRODUCT DESCRIPTION
ծCutting bar lever
կBlade safety lock
հBlade adjustment
ձFront cover
ղSide gauge with scale
ճBack gauge lock knob
մBack gauge
յFront cover lock knobs
նClamp wheel
շPaper clamp
ոCutting blade
չBase with grid
պBack cover
ջSupport extender
ռCutting bar head
սBlade carrier
վCutting stick
տBlade screws
— 2 —
հ
Figure 1
ձ
ղ
ճ
մ
յ
ն
շ
ծ
կ
ո
չ
Figure 2
պ
ջ
ռ
ս
ո
վ
յ
տ

SAFETY PRECAUTIONS
When operating this machine the following safety precautions must be observed.
● This machine is designed for single person operation only. No more than one person is allowed to operate
the machine at a time.
● Under no circumstances should children be allowed to operate the machine. Keep the machine out of the
reach of children.
● Never place fingers beneath the blade edge inside the cutting area.
● After each cutting operation, make sure that the cutting bar lever ծis in the up position with the safety
lock կengaged.
● Do not remove or install the blade without hand protection.
● Do not transport or leave the blade unprotected without proper packaging.
INSTALLATION
1.
Open the shipping container box, take out the cutting bar lever
ծ
that is packed separately in the box
with the machine.
2.
Carefully take out the machine. Put the machine on a steady flat table top.
3.
Mount the cutting bar lever
ծ
onto the cutting bar head
ռ
.
4.
Fold out the clamp wheel
ն䎃
handle.
5. Place the tools (one blade holder
ց
and two allen wrenches, required for blade replacement and
adjustment) in a safe place. S
ave the box for future transport of the machine.
OPERATION
1.
Lock the blade in the up position by lifting the cutting bar lever
ծ
until the blade safety lock
կ
is
engaged.
2.
Raise the paper clamp
շ
to the required height by rotating the clamp wheel
ն
counter- clockwise.
3.
Set the back gauge
մ
to the desired measurement position on the side gauge
ղ
scale. Hold the back
gauge down on the base
չ
and lock the back gauge
մ
with the lock knob
ճ
. If the length of the stack
extends beyond the base
ջ
, slide the back gauge
մ
off the side gauge
ղ
.
4.
Place the paper stack on the base
չ
. Fold down the support extender
ջ
as needed. Hold the stack
flush with the side gauge
ղ
and the back gauge
մ
. Turn the clamp wheel
ն
clockwise to clamp down
and secure the position of the stack.
Note: Do not over tighten the clamp wheel
ն
which may cause damage to the clamp mechanism and
void the warranty.
5.
Release the blade safety lock by pressing the lock
կ
and complete the cut by lowering the cutting bar
lever
ծ
.
Note: Tough to cut or rough cuts are indications of a dull blade. Countinuing operation with a dull blade
may cause damage to the cutting mechanism and void the warranty.
6.
Lock the blade back in the up position by lifting the cutting bar lever
ծ
.
— 3 —

Caution: After each cutting operation, always make sure to lift the cutting bar lever
ծ
back to the up
position until the blade safety lock
կ
is engaged.
7.
Release the clamp
շ
by rotating the clamp wheel
ն
counter-clockwise. Remove the paper stack
from the machine.
MAINTENANCE
This machine may only be used for cutting paper or similar materials. Do not use it to cut any hard
substances or material that may splinter. Hard materials such as paper clips and staples will damage the
cutting blade.
Occasionally lubricate and oil the motion parts of the blade assembly. For long-time storage, coat the blade
and the blade carrier with anti-rust lubricant.
This machine must not be placed outdoor. Do not operate the machine in the vicinity of flammable liquids or
gasses.
It is strongly suggested to keep a spare blade kit (QCM-8200B/QCM-8700B) available in case the blade
needs to be sent for sharpening.
Blade Removal and Installation
The blade can be sharpened or replaced. It may only be sharpened by qualified workshops.
Caution: Even a dull blade is a very dangerous item. Extra care must be taken in handling the blade to
prevent personnel injury or blade-edge damage in the process of removal and reinstallation.
Do not handle the blade without hand protection.
Do not transport or leave the blade exposed without proper packaging.
Read all the instructions below carefully before proceeding.
The following instructions are intended for qualified technicians only. Quality Commercial Machines
Corporation assumes no responsibility for any accident or injury incurred while attempting to repair any QCM
machine.
— 4 —
Figure 3
վջ ցշո
նյր
կ
ս
հռ

Figure 4
1. Locate the necessary tools. You need
one blade holder
ց䎃
(supplied with the machine) and one #2
philips screwdriver.
2.
Place the machine on a flat, stable surface located in a traffic-free area and face the blade carrier
ս䎃
side towards you. Fold down the support extender
ջ
as shown in figure 2.
3.
Lower down the paper clamp
շ
to the bottom position.
4.
Release the blade safety lock
կ
and bring down the cutting bar lever
ծ
.
5.
Do not release the center blade screw
ր
at this time! Release the rest of the blade screws
տ
with a
#2 philips screwdriver.
6.
Raise the cutting bar lever
ծ
until the lever is locked.
7.
Hold the blade knife edge
ո
with the
blade holder
ց
as shown in figure 3.
Release the center blade screw
ր
with
a #2 phillips screwdriver. Once the
screw is released, lower down the
blade and remove from the blade
carrier
ս
.
8.
Remove the blade from the blade holder and place the blade on a flat surface in a traffic-free area.
Place
a new (or resharpenered) blade on the blade holder as shown in figure 4.
9. Follow the above listed steps 5 through 7 in reversed order to reinstall the blade back on to the blade
carrier
ս
.
Once the blade has been replaced, follow the operating procedure and cut a piece of paper. If it does not
make a clean cut, it is necessary to rotate or flip the cutting stick.
Cutting Stick Rotation
The cutting stick is a white plasitc square rod that is installed on the base underneath the blade. A new cutting
stick can be used eight times.
1.
Place the machine on a flat, stable surface in a traffic-free area, facing the front of the machine
towards you as shown in figure 1.
2. Raise the cutting bar lever
ծ
until the safety lock
կ
engages.
3.
Rotate the clamp wheel
ն
counter-
clockwise to raise the paper clamp
շ
to
the up position.
4. Lift the front end of the base up as shown
in figure 5. Release the two cutting stick
holding screws
փ
underneath the base.
5. Insert a #2 philips screwdriver into the
two cutting stick ejecting holes
ք䎃
to eject
the cutting stick.
6. Place the base back to the position shown in figure 1.
— 5 —
Figure 5
ււփք
փ

— 6 —
7. Rotate or turn the cutting stick to an unused surface or side. Insert the cutting stick back to its slot
underneath the blade. Make sure the stick is well seated.
8.
Raise the front end of the base as shown in figure 5. Place the two cutting stick holding screws
փ䎃
back in place. Once the screws are hand-tight, place the base back to the position shown in figure 1.
Once the cutting stick has been rotated, follow the operating procedure to cut a piece of paper. It may be
necessary to apply excessive pressure the first time to place a groove into the cutting stick surface. If it does
not make a clean cut, it is necessary to level the blade.
Blade Leveling
1.
Place the machine on a flat, stable surface in a traffic-free
area, facing the front of the machine towards you as shown in
figure 1.
Raise the cutting bar lever
ծ
until the safety lock
կ
engages.
2.
Rotate the clamp wheel
ն
clockwise to lower down the paper
clamp
շ
to the bottom position. Release the two front cover
holding screws
յ
.
3. Lift the front end of the base up as shown in figure 5. Release
the two front cover holding screws
ւ
underneath the base.
4. Place the base back to the position shown in figure 1.
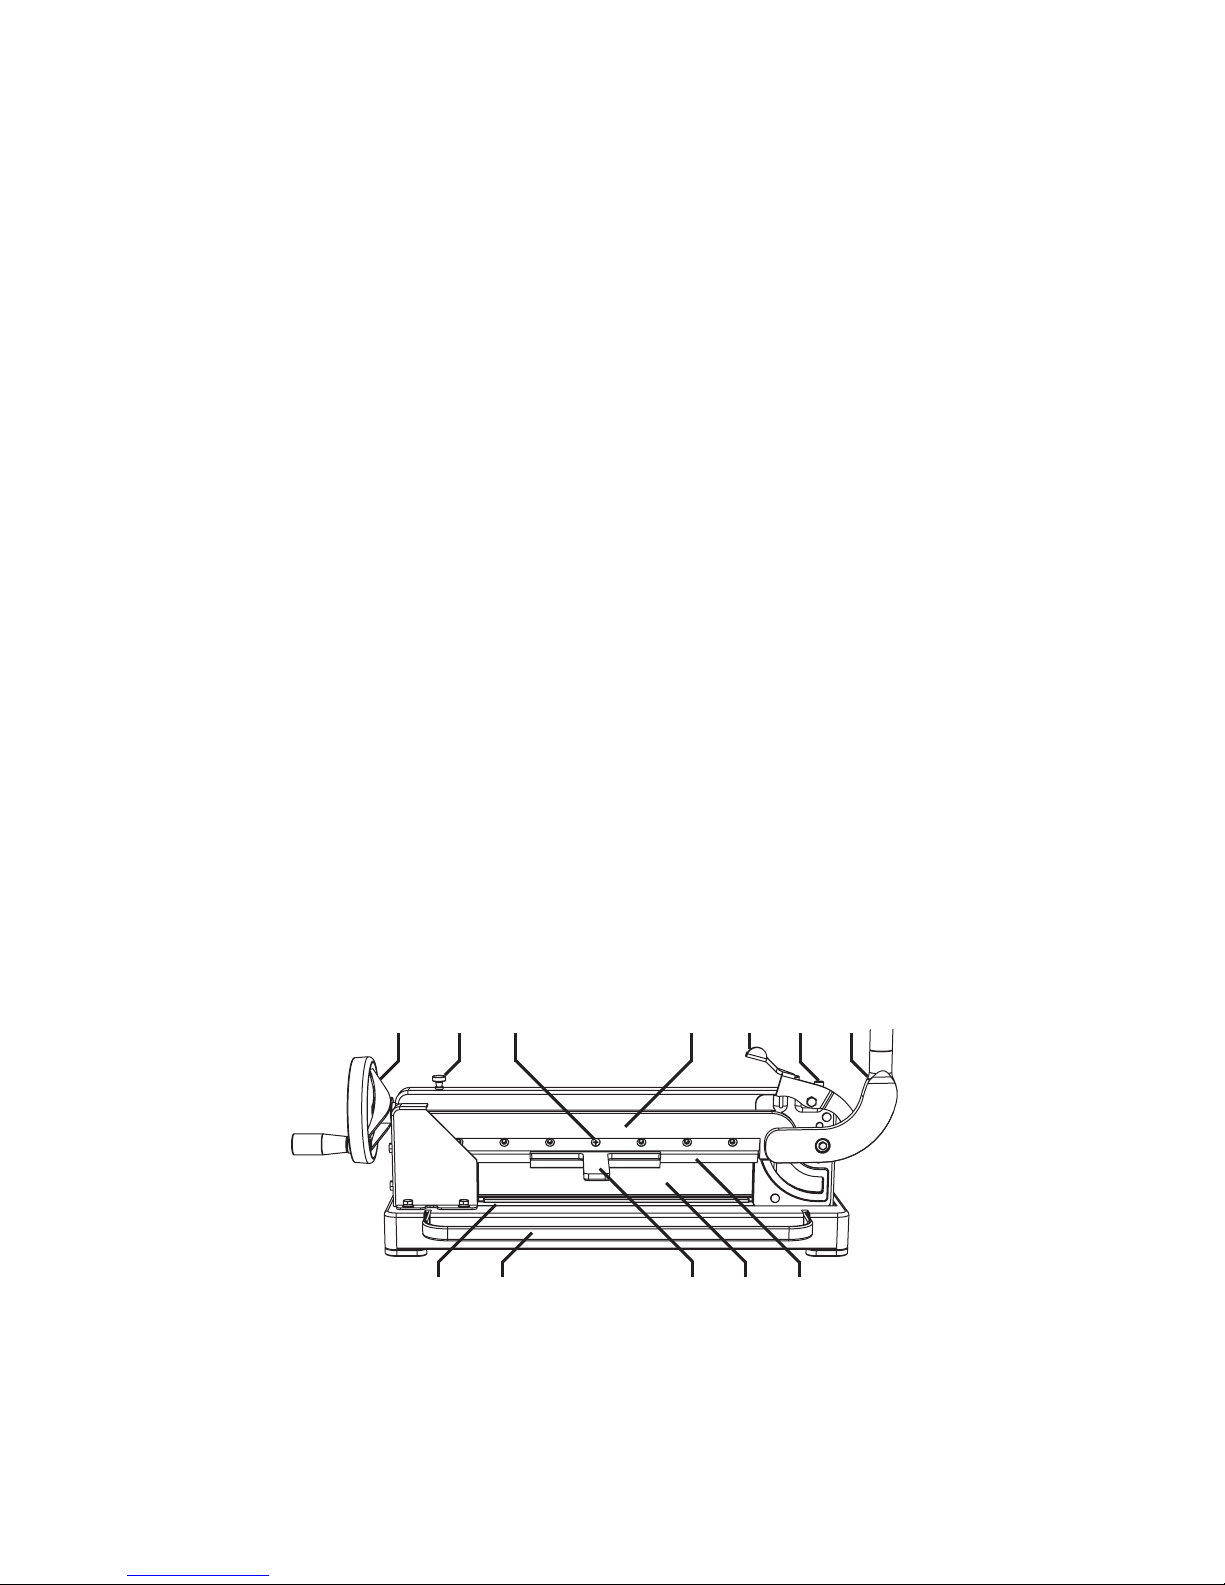
Remove the front cover.
5. Loosen both blade holding bolts
օ
as shown in figure 6, with the bigger allen wrench included with
the mahcine.
6. Adjust the blade adjustment screw
հ䎃
with the smaller allen wrench included with the machine.
Note: If the blade does not cut through the paper at the clamp wheel side, turn the adjustment screw
clockwise. Otherwise turn counter-clockwise.
Tighten both blade holding bolts
օ
. Once the blade holding bolts are tightened, cut a trial piece of
paper.
7. Repeat steps 5 and 6 until it a clean cut through a piece of paper is made.
8. Follow steps 2 through 4 in reversed order to mount the front cover.
TECHNICAL SPECIFICATIONS
Model Number: QCM-8200M QCM-8700M
Cutting Width: 12-3/8″17-1/4″
Capacity: 360 sheets 360 sheets
Base Size: 20-3/4″x 15-1/4″25-1/4″x 19″
Unit Weight: 38 lbs 52 lbs
Dimensions: 26″x 18″x 12″30″x 22″x 12″
Shipping Weight: 46 lbs 64 lbs
Figure 6
օ
հ
This manual suits for next models
1
Table of contents