manuals.online logo
Brands
  1. Home
  2. •
  3. Brands
  4. •
  5. Quality Water Treatment
  6. •
  7. Water Dispenser
  8. •
  9. Quality Water Treatment SOFTPRO ELITE User manual

Quality Water Treatment SOFTPRO ELITE User manual

Quick Start Install Guide
Easy Step-by-Step Instructions for Removing and Installing SoftPro Salt
Based Water Softeners
SOFTPRO ELITE SYSTEM
Salt Based
CITY WATER
Congratulations on your purchase of your new SoftPro Water Softener System.
Below are the installation instructions to get you up and running in no time. We highly
recommend that you follow along in our simple installation videos.
Typical Install Times:
● 3 Hours for a Handyman/ Plumber
● 4 Hours for DIY
Tools Required:
● Flathead Screwdriver
● Phillips Head Screwdriver
● Tongue-and-Groove Pliers (ie. Channellock)
● Adjustable Wrench
● Pipe Cutter
Additional Parts Required:
● Teflon Tape
● ½” ID Teflon Tubing (length to your drain or drain pipe)
● ½” Hose Clamp
● Additional Pipe Fittings for Rigid Drain Pipe (optional)
● For PVC Pipe:
○ PVC Primer and Glue
● For Copper, PEX, and CPVC pipe:
QualityWaterTreatment.com
INSTALL GUIDE v20.4
○ Quick Connect Fittings (ie. Optional Quick-connect Kit/ Hose or
SharkBite fittings)
Guides:
1) Unpacking and Inspecting Your New System
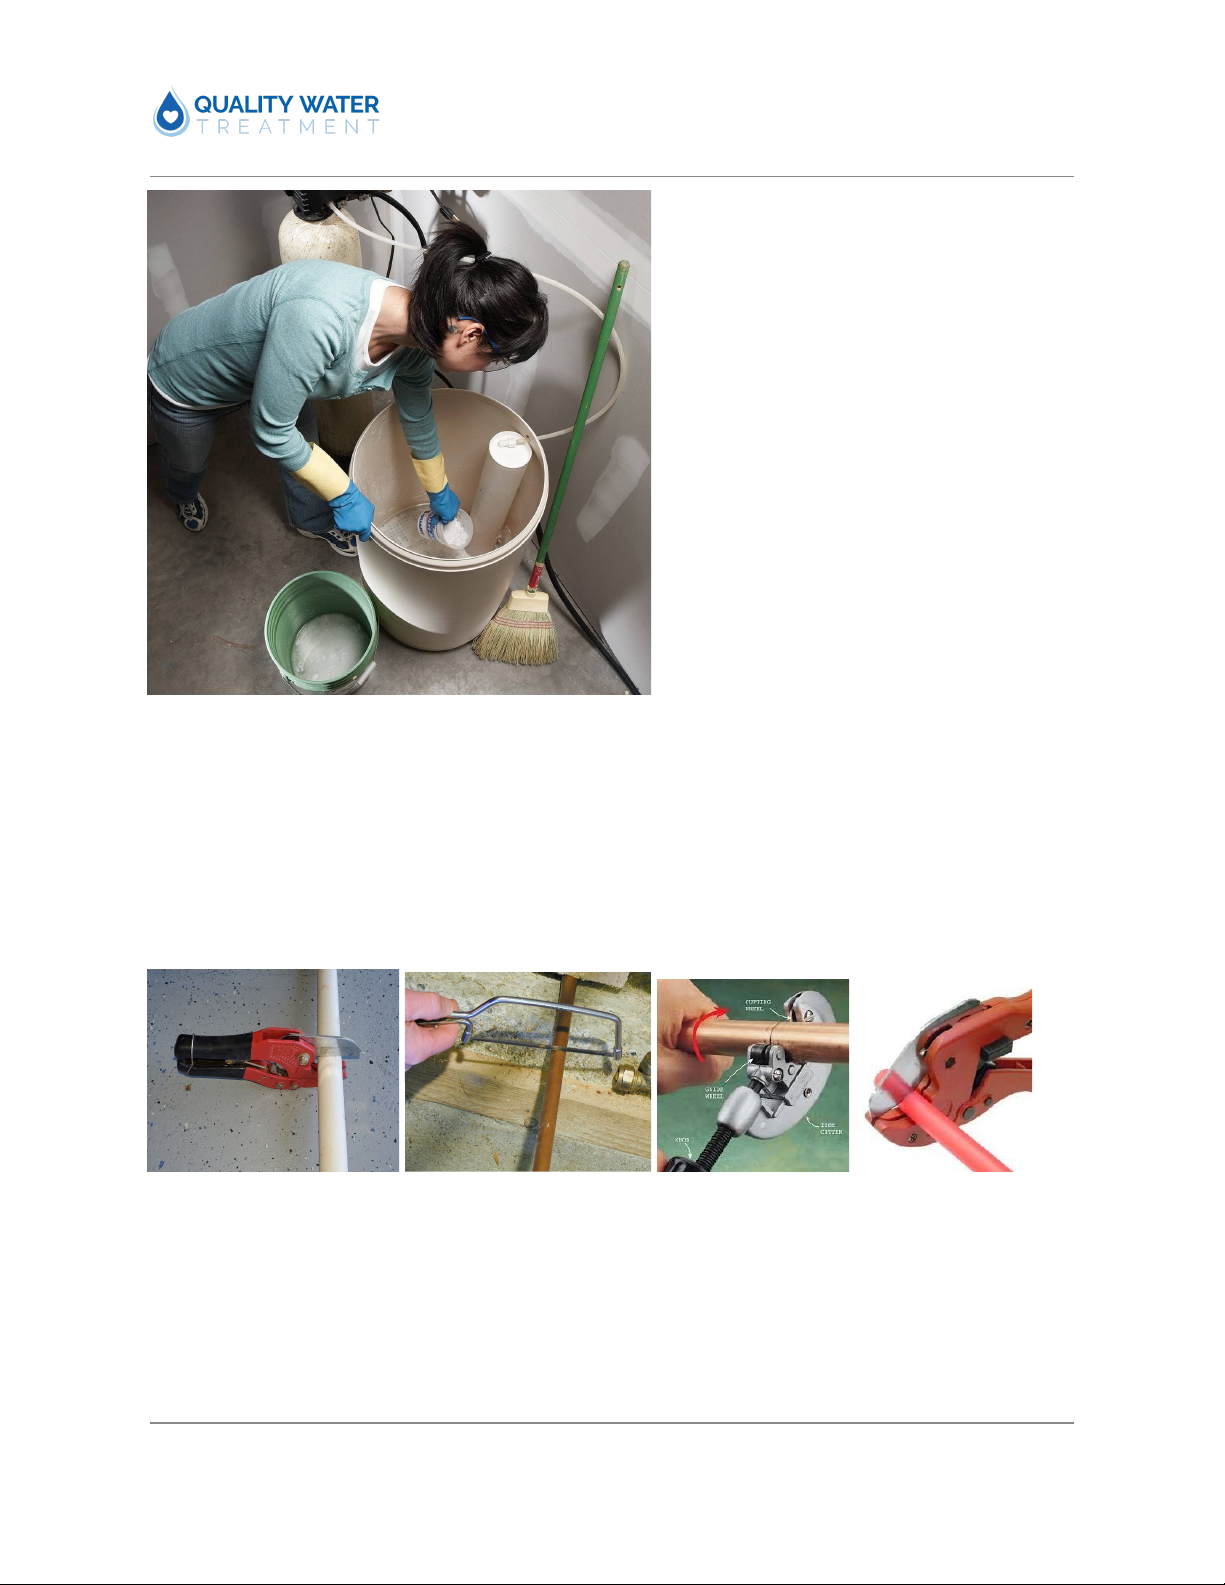
2) Removing an Old, Existing Water Softener System
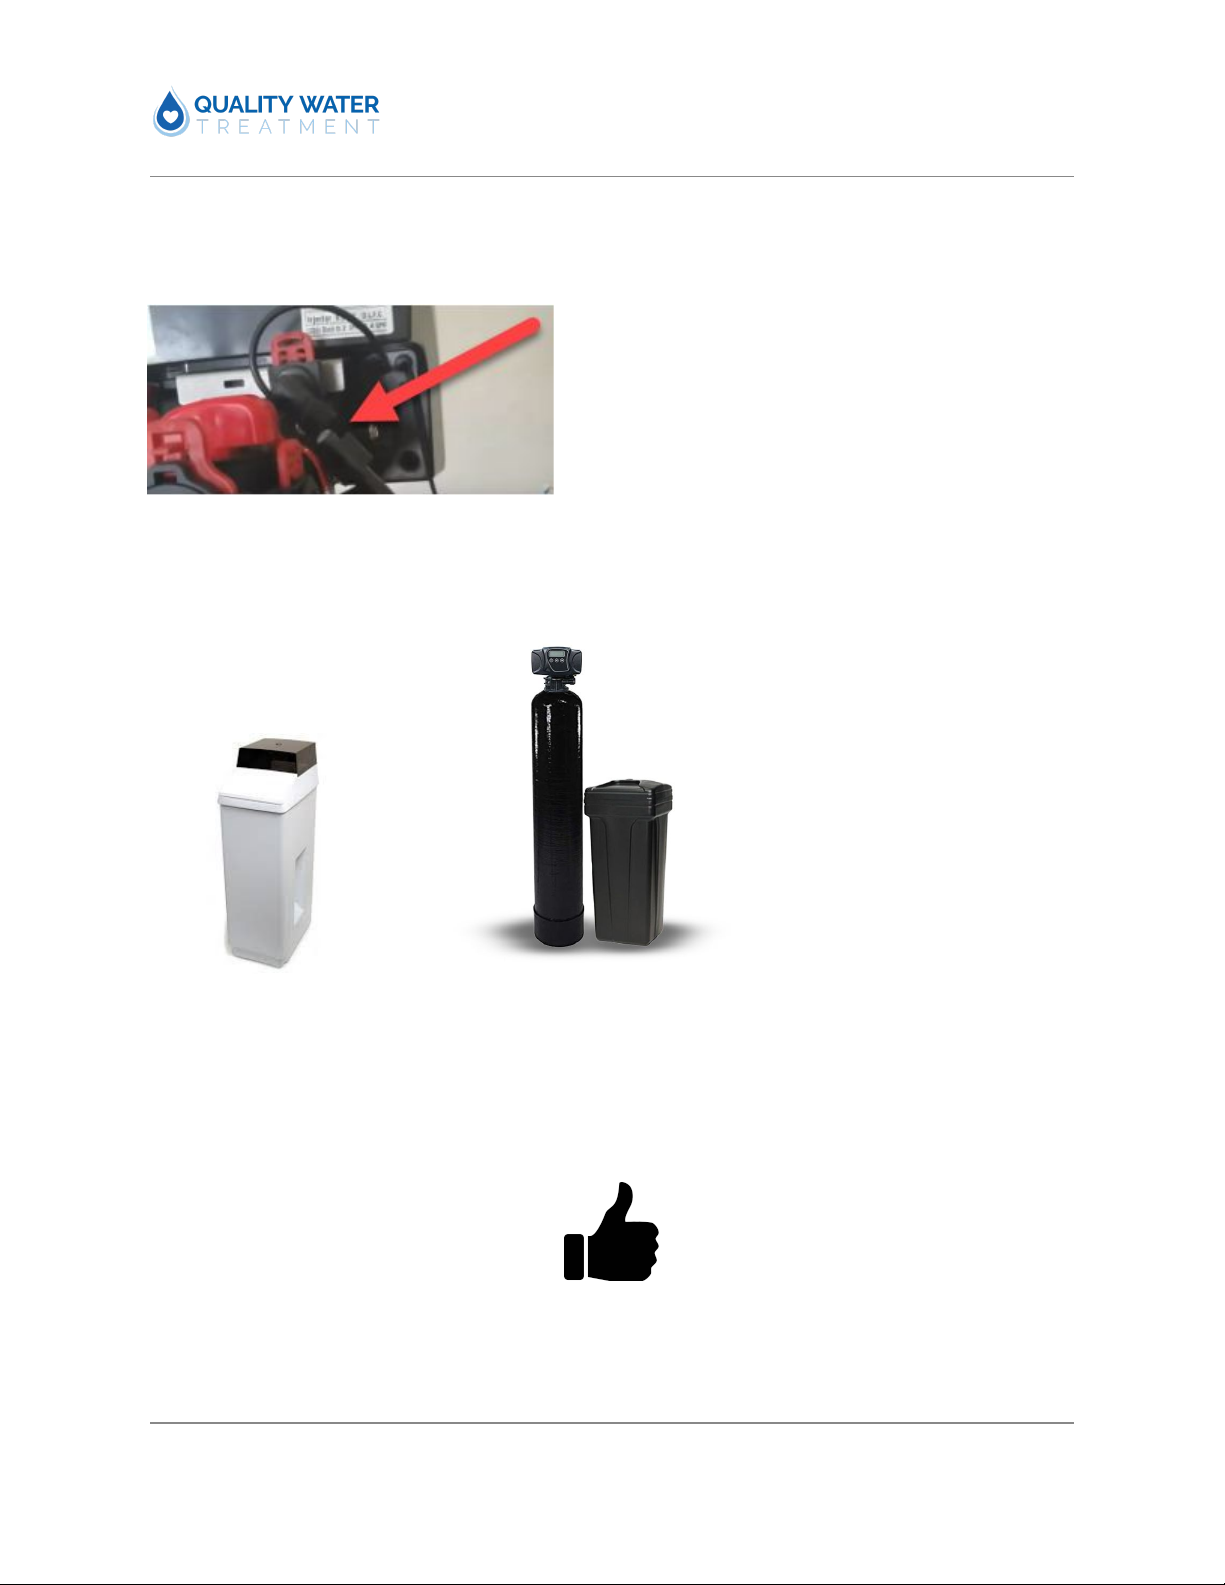
3) Installing Your New SoftPro Water Softener System
i) Step-by-Step Install Video
ii) QualityWaterTreatment.com/Install
4) Programming Your New SoftPro Control Valve
Unpacking and Inspecting Your New System
Your new SoftPro water softener system will include the following items below. Before starting,
please check that you have all of the items, and inspect for any possible damage that may have
occurred during shipment. (This new system may have multiple shipments.)
Shipment FAQ’s
● Is it OK if some items are delivered on its side or upside-down?
Yes, it is OK.
If your shipment, boxes or other items are delivered to you on its side or upside-down,
don't be alarmed. Our team takes additional precautions to ensure that your new system
is properly protected. Simply turn the shipment or box rightside up and unpack it.
● What if there is damage to the exterior of the shipment or boxes?
We got your back. If you find visual damage to the exterior of the boxes, take pictures
of the boxes and/or video of the damage before unpacking them. Just because boxes
are damaged does not mean the system is damaged we make sure they are protected.
2
INSTALL GUIDE v20.4
● After unpacking, what if there is damage to the valve, tank or other
equipment?
We got you. If you find visual damage to any of the parts, please take pictures and/or
video of the damage. Then please immediately send us the images/ video, and we will
get parts shipped to you.
● After unpacking, what if there is a missing item?
Easy. If you are missing a part, please contact us to help get you set up properly.
Contact Support:
https://qualitywatertreatment.com/support
[email protected]
Items Included:
1. SoftPro Control Valve
2. Mineral Tank with Preloaded Media and Pre-installed Distributor Tube
3. Neoprene Tank Jacket
4. Brine Tank Assembly
5. Optional - Quick-Connect Kit / Hoses
6. Optional - Whole House Carbon Filter. If purchased, the Whole House Carbon Filter, the
following will be included:
3
INSTALL GUIDE v20.4
a. Carbon Filter Tank
i. Note: The tank comes pre-loaded with carbon media.
b. Neoprene Jacket
c. Upflow Head
d. Upper Basket
e. Bypass Valve
f. 2 x 1” Connectors
7. Optional - Chlorine Removal KDF-55. If purchased, the Chlorine Removal
KDF-55 will be pre-installed inside the mineral tank.
Note:
The new SoftPro control valve will be shipped inside the brine tank.
Small parts are placed in the small parts bag, please leave them in there until ready to
install. (Let's not lose them...
😃
)
There is no small parts bag All parts are in a small box in the control valve box
Pre-Loaded Mineral Tanks
● Up to 64,000 Grain Capacity Tanks:
○ Your new Softpro Water Softener tank is already fully loaded with the
appropriate amount of resin up to 64,000-grain capacity.
● 80,000 Grain Capacity Tanks and larger
○ 80,000-grain capacity and larger softener will come partially loaded and
include additional resin that you will add to the tank.
4
INSTALL GUIDE v20.4
8. Optional - Whole House Carbon Filter Package below.
Now that you have verified that you have all components listed let’s get started
on installing your new softener.
5
INSTALL GUIDE v20.4
For Removal of Old Softener System
If applicable, the following guide is typical of how many common water softeners are
removed. If you find that your existing setup is unconventional, please take pictures and
videos to send to our support team to review.
Step 1) Disconnect power.
Unplug the power supply to your existing water softener.
2) Shut-off the main water supply.
Close the water main shut-off valve to the home. It’s usually located in the front of the
property. If you have a shut off as water enters home you can also shut it off there.
6
INSTALL GUIDE v20.4
Step 3) Open the nearest cold water faucet to help empty the remaining water in the
pipes.
We don’t want a flood. Helpful tip: Open a cold water faucet in the home, Removing a
shower head because it is up high will create a good vacuum so pipes can drain faster
and better.
Step 4) Set the bypass valve in the bypass (off) position.
The bypass valve is located at the rear of the water softener. It is where the pipe
(copper/ PEX or PVC) connects to the water softener pipe.
7
INSTALL GUIDE v20.4
If the bypass valve includes the inlet and outlet valves, then close both the inlet and
outlet valves. If the bypass valve has one stem, close the plunger into the stem or pull
handle as shown in the first image.
Step 5) Reclaim salt or potassium chloride.
Remove any good salt or potassium chloride that you would like to keep and reuse from
your old unit. Discard any clumps.
Disposal: Dispose unusable salt or potassium chloride properly into the garbage. Do
not dispose onto lawns, gardens, plants or trees.
8
INSTALL GUIDE v20.4
6) Disconnect inlet and outlet lines.
Remove the holding clips at the water softener inlet and outlet. Disconnect the water
softener from the water pipes.
If there are no clips, then cut the water line pipe as it enters the water softener. Use the
appropriate cutting tool for the different types of pipes (copper, PVC, PEX, CPVC, etc.)
9
INSTALL GUIDE v20.4
Step 7) Disconnect brine line.
Disconnect the brine line from the side of the softener valve.
Step 8) Remove the old brine tank and mineral tank.
Step 9) Clear and clean the area for your new SoftPro Water Softener System.
You are now ready to install your new SoftPro Water Softener System.
10
INSTALL GUIDE v20.4
11
INSTALL GUIDE v20.4
Step-by-Step Install Video
We highly recommend that everyone refer to our install videos. Makes it easy and fast!
Step-by-Step Install Video:
QualityWaterTreatment.com/Install
Installing your New Water Softener
Installing your new SoftPro Water Softener is straightforward. The following step-by-step guide
accompanied by our install videos ( QualityWaterTreatment.com/Install ), will get your new
system up and running for you to enjoy fantastic soft water.
Pre-Loaded Tanks
● Up to 64,000 Grain Capacity Tanks:
○ Your new Softpro Water Softener tank is already fully loaded with the appropriate
amount of resin up to 64,000-grain capacity.
● 80,000 Grain Capacity Tanks and larger
○ 80,000-grain capacity and larger softener will come partially loaded and include
additional resin that you will add to the tank.
12
INSTALL GUIDE v20.4
Assemble your water softener:
Step 1 ) Setup your brine tank.
a) Remove the grid plate and legs from the brine tank, and snap the legs into the
bottom of the grid plate. You will hear a “click” sound after securing each leg. (
Note: If the plastic tabs are still on the outer sides of the grid plate you will want
to break them off).
13
INSTALL GUIDE v20.4
b) Place the grid plate with legs facing downward into the bottom of the brine
tank and push down firmly.
i) Align the brine well cylinder to the small brine line hole near the top of the
brine tank. (This is where the brine line will slip through.)
c) Insert the brine well with float into the large hole on the grid plate (round or
rectangle).
14
INSTALL GUIDE v20.4
d) Connect the brine line to the float in the brine well cylinder.
ii) Run the brine line tubing through the small hole near top of the brine tank.
iii) Attach the plastic nut and insert the plastic sleeve into the tubing end.
iv) Only hand tighten the brine line nut to the float assembly.
The brine tank setup is complete.
15
INSTALL GUIDE v20.4
Step 2) Setup the optional Whole House Carbon Filter*. (*If not purchased, skip to the
next step.)
Note: The Whole House Carbon Filter is pre-loaded with carbon media.
Install the neoprene jacket.
i) Wrap the black neoprene jacket around the carbon filter tank. Zip it up and
pull the bottom of the jacket down to remove wrinkles.
b) Remove the protective cap from the top of the carbon filter tank
c) Install the upper basket to the upflow head.
16
INSTALL GUIDE v20.4
d) Lower upflow head with upper basket attached over the distributor tube located in
the carbon filter tank. Only hand tighten the head onto the tank.
i) Note: Do not use lubricants or Teflon tape.
e) Install the bypass valve to the upflow head.
17
INSTALL GUIDE v20.4
f) Attach the two connection fittings onto the bypass valve.
g) Plumb the main water supply line to the Inlet side of the carbon filter.
i) Note: The “arrow” pointing away from the valve is the INLET side.
ii) Note: The “arrow” pointing in to the valve is the OUTLET side.
h) Plumb the main water supply line to the Inlet side of the carbon filter.
i) Note: The “arrow” pointing away from the valve is the INLET side.
ii) Note: The “arrow” pointing in to the valve is the OUTLET side.
iii) Note: See diagram below
18
INSTALL GUIDE v20.4
i) Install a hose bib.
i) Install a “T” fitting and a hose bib on the OUTLET side of the carbon filter.
a) Note: This will be used to initially clean out any carbon dust from
your carbon filter tank prior to the water entering your water
softener.
Note: Once the water softener is set up, then plumb the OUTLET side of the carbon
filter to the INLET side of the water softener valve as instructed later.
.
19
INSTALL GUIDE v20.4
Step 3) Install the neoprene jacket.
ii) Wrap the black neoprene jacket around the carbon filter tank. Zip it up and
pull the bottom of the jacket down to remove wrinkles.
Step 4) Unscrew media spill cap from the top of the tank.
Step 5) Attach upper basket to bottom of control valve by twisting into place, gently pull
on basket to make sure it is secure.
20

Other manuals for SOFTPRO ELITE

1

Other Quality Water Treatment Water Dispenser manuals

Quality Water Treatment SoftPro Natural Soft Series User manual

Quality Water Treatment

Quality Water Treatment SoftPro Natural Soft Series User manual

Quality Water Treatment SoftPro User manual

Quality Water Treatment

Quality Water Treatment SoftPro User manual

Quality Water Treatment Prosoft Elite User manual

Quality Water Treatment

Quality Water Treatment Prosoft Elite User manual

Quality Water Treatment SOFTPRO ELITE User manual

Quality Water Treatment

Quality Water Treatment SOFTPRO ELITE User manual

Quality Water Treatment Fleck 5600 SXT User manual

Quality Water Treatment

Quality Water Treatment Fleck 5600 SXT User manual

Quality Water Treatment SoftPro Elite CITY WATER User manual

Quality Water Treatment

Quality Water Treatment SoftPro Elite CITY WATER User manual

Popular Water Dispenser manuals by other brands

InSinkErator Invite H770-SS Specifications

InSinkErator

InSinkErator Invite H770-SS Specifications

Kenmore 625.388200 manual

Kenmore

Kenmore 625.388200 manual

Avanti WD50 instruction manual

Avanti

Avanti WD50 instruction manual

GE GXSM01HWW Use and care & installation instructions

GE

GE GXSM01HWW Use and care & installation instructions

Kenmore 625.348235 owner's manual

Kenmore

Kenmore 625.348235 owner's manual

Honeywell HWB2052 Series owner's manual

Honeywell

Honeywell HWB2052 Series owner's manual

Cillit Access 10 Fitting and operating instructions

Cillit

Cillit Access 10 Fitting and operating instructions

Watts W110 LXT Installation, operation and maintenance manual

Watts

Watts W110 LXT Installation, operation and maintenance manual

vitapur VWD5446BLS Use & care guide

vitapur

vitapur VWD5446BLS Use & care guide

Follett Symphony 12CI400A-LI Installation, operation and service manual

Follett

Follett Symphony 12CI400A-LI Installation, operation and service manual

Trebs Comfortemp 99341 manual

Trebs

Trebs Comfortemp 99341 manual

Bryan Boilers BKS2000 Specifications

Bryan Boilers

Bryan Boilers BKS2000 Specifications

Kenmore IntelliSoft 370 Series owner's manual

Kenmore

Kenmore IntelliSoft 370 Series owner's manual

Whirlpool WHES20 Installation and operation manual

Whirlpool

Whirlpool WHES20 Installation and operation manual

Huawei NetCol5000-C065 quick guide

Huawei

Huawei NetCol5000-C065 quick guide

Everpure EV9273-93 Specification sheet

Everpure

Everpure EV9273-93 Specification sheet

DVA GIX 5 instruction manual

DVA

DVA GIX 5 instruction manual

Ecosoft P'URE Series manual

Ecosoft

Ecosoft P'URE Series manual

manuals.online logo
manuals.online logoBrands
  • About & Mission
  • Contact us
  • Privacy Policy
  • Terms and Conditions

Copyright 2025 Manuals.Online. All Rights Reserved.