manuals.online logo
Brands
  1. Home
  2. •
  3. Brands
  4. •
  5. Quintezz
  6. •
  7. Fan
  8. •
  9. Quintezz UCF-100 User manual

Quintezz UCF-100 User manual

1.
2.
3.
4.
1.
2.
3.
4.
QUICK REFERENCE GUIDE
1. PARTS & BUTTONS
1. Fan
2. Suction cup
3. Speed selection button
4. USB cable
2. INSTALLATION
A. SUCTION CUP
• Click the ball at the end of the suction cup
into the backside of the fan.
• Tighten the fixation part.
• Place the suction cup on a clean and
dust-free surface. Fix it using the fixation
lever.
• Thanks to the ball, you can rotate and tilt the
fan.
B. MOUNTING PLATE
• Place the round plastic plate with 3M tape on
a clean and dust-free surface.
• Fix the suction cup on the round plate.
3. OPERATION
Connect the USB cable (4) of the fan to any USB
charging device (1A or higher): USB car charger,
USB home charger, Powerbank, etc.
The USB Fan has 3 different speed modes:
1. Low speed: Press the Speed selection button
(3) 1x to turn the fan ON in low speed mode.
2. Medium speed: Press the Speed selection
button (3) a second time.
3. High speed: Press the Speed selection
button (3) a third time.
4. Press the Speed selection button (3) a fourth
time to turn the fan OFF.
4. SAFETY INSTRUCTIONS
• Keep the product away from children, it is not
a toy.
• Do not cover the unit during use.
• Do not use the unit if you suspect that it is
damaged. Do not try to open or repair the
unit yourself.
• When not in use, make sure to store the
product in a safe and dry location, avoid
extremely high or low temperatures.
• Never place the device in the vicinity of
excessive heat or cold sources.
5. SUPPORT
For more information, spare parts, technical
questions and return requests concerning this
product, you should contact
support@quintezz.com
.
DECLARATION OF CONFORMITY
1. ONDERDELEN & TOETSEN
1. Ventilator
2. Zuignap
3. Snelheidsselectieknop
4. USB-kabel
2. INSTALLATIE
A. ZUIGNAP
• Klik de bal aan het einde van de zuignap in de
achterkant van de ventilator.
• Draai het bevestigingsgedeelte vast.
• Plaats de zuignap op een schoon en stofvrij
oppervlak. Bevestig met de bevestigingshen-
del.
• Dankzij de bal kunt u de ventilator draaien en
kantelen.
B. MONTAGEPLAAT
• Plaats de ronde plastic plaat met 3M tape op
een schoon en stofvrij oppervlak.
• Bevestig de zuignap op de ronde plaat.
3. WERKING
Sluit de USB-kabel (4) van de ventilator aan op om
het even welk USB-oplaadapparaat (1A of hoger):
USB-autolader, USB-thuislader, Powerbank, enz.
De USB-ventilator heeft 3 verschillende snelheids-
modi:
1. Lage snelheid: druk 1x op de snelheidsselec-
tieknop (3) om de ventilator AAN te schakelen
in de lage snelheidsmodus.
2. Gemiddelde snelheid: druk een tweede keer
op de snelheidsselectieknop (3).
3. Hoge snelheid: druk een derde keer op de de
snelheidsselectieknop (3).
4.
Druk een vierde keer op de de snelheidsselectie-
knop (3) om de ventilator UIT te schakelen.
4. VEILIGHEIDSINSTRUCTIES
• Houd het product uit de buurt van kinderen,
het is geen speelgoed.
• Bedek het apparaat niet tijdens gebruik.
• Gebruik het apparaat niet als u vermoedt dat
het beschadigd is. Probeer het apparaat niet
zelf te openen of te repareren.
• Als u het product niet gebruikt, bewaar het
dan op een veilige en droge plaats, vermijd
extreem hoge of lage temperaturen.
• Plaats het apparaat nooit in de buurt van over-
matige hitte- of koudebronnen.
5. KLANTENONDERSTEUNING
Voor meer informatie, reserveonderdelen, tech-
nische vragen en retouraanvragen betreffende dit
product, neem contact op met support@quintezz.com.
Hereby,
Par la présente,
Company:
Entreprise:
Address:
Adresse:
declare that the following equipment:
déclare que le dispositif suivant:
Product name:
Nom du produit:
Product type:
Type de produit:
conforms with the following safety requirements of the
directives 2011/65/EU, 2015/863/EU, 2104/30/EU. Conformi-
ty is guaranteed by the CE-symbol. This product has been
tested against following standards and specifications. The
full text of the EU declaration of conformity is available at the
following internet address:
www.quintezz.be/wp-content/uploads/2020/07/DOC_UCF-100.pdf
est conforme aux exigences de sécurité suivantes des directives
2011/65/EU, 2015/863/EU, 2104/30/EU. La conformité est
garantie par le symbole CE. Ce produit a été testé par rapport
aux normes et spécifications suivantes. Le texte complet de la
déclaration de conformité UE est disponible à l’adresse internet
suivante:
www.quintezz.be/wp-content/uploads/2020/07/DOC_UCF-100.pdf
EN 55014-1:2017
EN 61000-3-2:2019
EN 61000-3-3:2013+A1:2019
EN 55014-2:2015
J. Van Os, Product & Research Manager
Authorized Signature, Kapellen, June 2020
TE-Group NV
Kapelsestraat 61, 2950 Kapellen, Belgium
Quintezz UCF-100
USB Fan
GB NLFR D
UCF-100
GB NL
1.
2.
3.
4.
1.
2.
3.
4.
GUARANTEE
Copyright © Quintezz. Quintezz is a registered
trademark of TE-Group NV. The Quintezz brand
stands for superior product quality and
outstanding customer service. That is why
Quintezz warrants this product against all
defects in material and workmanship for a
period of two (2) years from the date of original
purchase of the product. The conditions of this
guarantee and the extent of responsibility of
Quintezz under this guarantee can be
downloaded from our website:
www.quintezz.com
GARANTIE
Copyright © Quintezz. Quintezz is een
gedeponeerd handelsmerk van TE-Group NV.
Het merk Quintezz staat voor producten van
superieure kwaliteit en een uitstekende
klantenservice. Daarom garandeert Quintezz
dat dit product vrij is van materiaal- en
fabricagefouten gedurende een periode van
twee (2) jaar na de oorspronkelijke
aankoopdatum van het product en de batterij.
De voorwaarden van deze garantie en de
omvang van de verantwoordelijkheid van
Quintezz onder deze garantie kunt u bekijken
op www.quintezz.com
GARANTIE
Copyright © Quintezz. Quintezzest une marque
commerciale déposée de TE-Group NV. La
marque Quintezz est synonyme de produits de
qualité supérieure et d’un service à la clientèle
exceptionnel. C’est la raison pour laquelle
Quintezz garantit ce produit contre tout vice de
fabrication ou défaut matériel pour une période
de deux (2) ans à compter de la date de son
achat à l’état neuf. Les conditions de cette
garantie et l’étendue de la responsabilité de
Quintezz selon cette garantie peuvent être
téléchargées sur notre site Web:
www.quintezz.com
GARANTIE
Copyright © Quintezz. Quintezz ist ein einge-
tragenes Warenzeichen der TE-Group NV. Die
Marke Quintezz steht für höchste
Produktqualität und hervorragenden
Kundendienst. Daher gewährt Quintezz
Garantie bei Verarbeitungs- oder
Materialfehlern für einen Zeitraum von zwei (2)
Jahren ab dem ursprünglichen Kaufdatum des
Produkts. Die Bedingungen dieser Garantie und
das Ausmaß der Verantwortung von Quintezz
im Rahmen dieser Garantie können von
unserer Website geladen werden:
www.quintezz.com
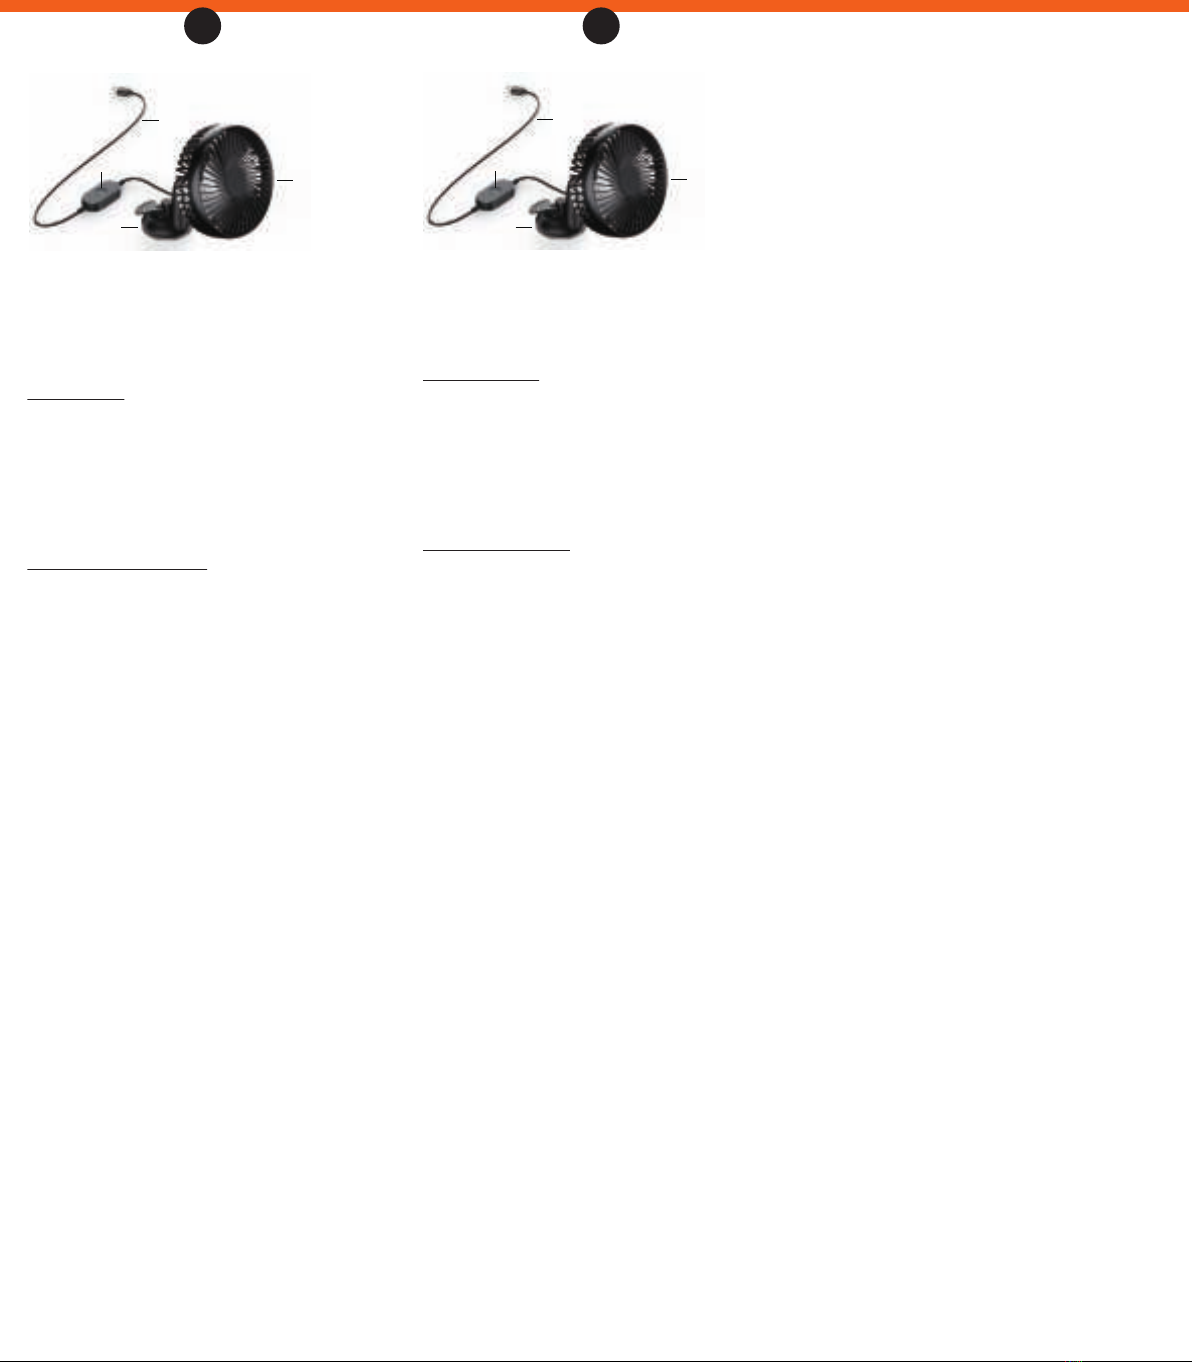
1. PIÈCES ET TOUCHES
1. Ventilateur
2. Ventouse
3. Bouton de sélection de vitesse
4. Câble USB
2. INSTALLATION
A. VENTOUSE
• Enfoncez la balle à l'extrémité de la ventouse
dans l'arrière du ventilateur.
• Serrez la pièce de fixation.
• Placez la ventouse sur une surface propre et
sans poussière. Fixez-la à l'aide du levier de
fixation.
• Grâce à la balle, vous pouvez faire pivoter et
incliner le ventilateur.
B. PLAQUE DE MONTAGE
• Placez la plaque ronde en plastique avec du
ruban 3M sur une surface propre et sans
poussière.
• Fixez la ventouse sur la plaque ronde.
3. OPÉRATION
Connectez le câble USB (4) du ventilateur à
n'importe quel appareil de charge USB (1A ou
supérieur): chargeur de voiture USB, chargeur
USB domestique, Powerbank, etc.
Le ventilateur a 3 modes de vitesse différents:
1. Basse vitesse: Appuyez 1x sur le bouton de
sélection de vitesse (3) pour allumer le
ventilateur en mode basse vitesse.
2. Vitesse moyenne: Appuyez une 2ième fois sur
le bouton (3).
3. Haute vitesse: Appuyez une 3ième fois sur le
bouton (3).
4. Appuyez une 4ième fois sur le bouton (3)
pour éteindre le ventilateur.
4. CONSIGNES DE SÉCURITÉ
• Gardez le produit hors de la portée des
enfants, ce n'est pas un jouet.
• Ne couvrez pas l'appareil pendant son
utilisation.
• N'utilisez pas l'appareil si vous pensez qu'il
est endommagé. N'essayez pas d'ouvrir ou
de réparer l'appareil vous-même.
• Lorsqu'il n'est pas utilisé, veillez à stocker le
produit dans un endroit sûr et sec, en évitant
les températures extrêmement basses ou
élevées.
• Ne placez jamais l'appareil à proximité de
sour- ces de chaleur ou de froid excessifs.
5. SUPPORT
Pour plus d'informations, des pièces de
rechange, des questions techniques et des
demandes de retour, concernant ce produit,
veuillez contacter
support
@
quintezz.com
.
1. TEILE UND TASTEN
1. Lüfter
2. Saugnapf
3. Geschwindigkeitsauswahltaste
4. USB-Kabel
2. INSTALLATION
A. SAUGTASCHE
• Klicken Sie mit der Kugel am Ende des
Saugnapfes auf die Rückseite des Lüfters.
• Ziehen Sie das Fixierungsteil fest.
• Stellen Sie den Saugnapf auf eine saubere
und staubfreie Oberfläche. Befestigen Sie es
mit dem Befestigungshebel.
• Dank der Kugel können Sie den Lüfter
drehen und kippen.
B. MONTAGEPLATTE
• Legen Sie die runde Kunststoffplatte mit 3M
Klebeband auf eine saubere und staubfreie
Oberfläche.
• Befestigen Sie den Saugnapf auf der Platte.
3. BETRIEB
Schließen Sie das USB-Kabel (4) des Lüfters an
ein USB-Ladegerät (1A oder höher) an: USB-Au-
toladegerät, USB-Heimladegerät, Powerbank
usw. Der USB-Lüfter verfügt über 3 Geschwind-
igkeitsmodi:
1. Niedrige Geschwindigkeit: Drücken Sie die
Geschwindigkeitsauswahltaste (3) 1x, um der
Lüfterim langsamen Modus einzuschalten.
2. Mittlere Geschwindigkeit: Drücken Sie die
Taste (3) ein zweites Mal.
3. Hohe Geschwindigkeit: Drücken Sie die Taste
(3) ein drittes Mal.
4. Drücken Sie die Taste (3) ein viertes Mal, um
den Lüfterauszuschalten.
4. SICHERHEITSHINWEISE
• Halten Sie das Produkt von Kindern fern, es
ist kein Spielzeug.
• Decken Sie das Gerät während des
Gebrauchs nicht ab.
• Verwenden Sie das Gerät nicht, wenn Sie ver-
muten, dass es beschädigt ist. Versuchen Sie
nicht, das Gerät selbst zu öffnen oder zu
reparieren.
• Bewahren Sie das Produkt bei Nichtgebrauch
an einem sicheren und trockenen Ort.
Vermeiden Sie extrem hohe oder niedrige
Temperaturen.
• Stellen Sie das Gerät niemals in der Nähe von
übermäßiger Hitze oder Kälte auf.
5. KUNDENDIENST
Weitere Informationen, Ersatzteile, technische
Fragen und Rückfragen zu diesem Produkt
erhalten Sie von
support
@
quintezz.com
.
GB NL

Popular Fan manuals by other brands

NuTone HEAT-A-VENTLITE 9965 installation instructions

NuTone

NuTone HEAT-A-VENTLITE 9965 installation instructions

emmeti RECUPERA SLIM B-110 Installation manual and using instructions

emmeti

emmeti RECUPERA SLIM B-110 Installation manual and using instructions

Birtman P-18CR operating manual

Birtman

Birtman P-18CR operating manual

Fogco SNAP-FAN SF.P12BLDC24 installation instructions

Fogco

Fogco SNAP-FAN SF.P12BLDC24 installation instructions

Ruck Ventilatoren DVA 220 E2 Assembly instruction

Ruck Ventilatoren

Ruck Ventilatoren DVA 220 E2 Assembly instruction

Modern Forms Aviator 5 Flush installation instructions

Modern Forms

Modern Forms Aviator 5 Flush installation instructions

All Seasons Hire Cyclone 50 operating instructions

All Seasons Hire

All Seasons Hire Cyclone 50 operating instructions

SURIA X Series Operation manual

SURIA

SURIA X Series Operation manual

Clas Ohlson FZ10-17K manual

Clas Ohlson

Clas Ohlson FZ10-17K manual

Thermador VCI 230/236/248 DS installation manual

Thermador

Thermador VCI 230/236/248 DS installation manual

Westinghouse Marino WH20 owner's manual

Westinghouse

Westinghouse Marino WH20 owner's manual

Progress Lighting AirPro P250100 installation manual

Progress Lighting

Progress Lighting AirPro P250100 installation manual

Aero Storm 52 Installation & user manual

Aero

Aero Storm 52 Installation & user manual

RenewAire HE Series Installation, operation and maintenance manual

RenewAire

RenewAire HE Series Installation, operation and maintenance manual

NEFF T48CB1AX2 manual

NEFF

NEFF T48CB1AX2 manual

KLASS Fan L1S user manual

KLASS Fan

KLASS Fan L1S user manual

Infiniton BOX-55N instructions

Infiniton

Infiniton BOX-55N instructions

Swegon CASA R7H Smart Installation, commissioning and maintenance instruction

Swegon

Swegon CASA R7H Smart Installation, commissioning and maintenance instruction

manuals.online logo
manuals.online logoBrands
  • About & Mission
  • Contact us
  • Privacy Policy
  • Terms and Conditions

Copyright 2025 Manuals.Online. All Rights Reserved.