Qvidium QVDEC4K User manual

QVidium®TECHNOLOGIES, INC.
QVDEC4K™ 4K/UHD HEVC/AVC
Streaming Internet Video Decoder
For Live Internet Streaming and Professional Video
Applications
Model: #QVDEC4K
User Manual v.1
Sept. 13, 2023
Application Firmware Version 34.59.14
2023 QVidium®Technologies, Inc.
San Diego, CA 92130
Phone 858.792.6407 • e-mail: info@qvidium.com

User Manual v.1 QVidium®QVDEC4K™ UHD/HEVC Video Decoder
Copyright 2023 QVidium®Technologies, Inc. Page 2 of 34
Table of Contents
1Introduction.............................................................................................................3
1.1
Overview
..........................................................................................................3
1.2
Network Setup
................................................................................................4
1.3
Reconfiguring and Resetting Network Settings
....................................6
1.4
Ping and Traceroute
.....................................................................................6
1.5
Passwords and Security
..............................................................................9
1.6
Updating
..........................................................................................................9
1.7
System View –QVDEC4K
..........................................................................10
1.8
IMPORTANT SAFETY INFORMATION –PLEASE READ
....................12
2
Decoder Configuration
.......................................................................................13
2.1
Quickstart Decoder Configuration
..........................................................13
2.2
Detailed Decoder Configuration
..............................................................14
2.3
QVidium ARQ Video Transport & Error Correction
............................18
2.4
Additional Protocol-Specific Parameters
..............................................20
3
Decoder Operation
..............................................................................................21
3.1
Starting and Stopping the Decoder .......................................................21
4
CodecManager
& System Reset......................................................................22
4.1
CodecManager.............................................................................................22
4.2
Resetting the QVDEC4K............................................................................22
4.3
Command-Line Interface...........................................................................22
6
Troubleshooting & Support
..............................................................................24
6.1
Troubleshooting –Common Problems
.......................................................24
6.2
Support
............................................................................................................27
7
Appendices
...........................................................................................................28
7.1
Appendix A: Decoder Configuration Parameters
......................................28
7.2
Appendix B: Video Decoder™ Bit Rate Limits
..........................................30
7.4
Appendix D: Technical Specifications
........................................................31
7.5
Appendix E: Product Warranty Terms and Conditions
............................33
7.6
Appendix F:
FCC
Notice
..............................................................................34
QVidium provides the capability to inter-operate with most Content Delivery Networks (CDNs). As
a result, the QVDEC4K can send to a CDN in one of four common protocols, SRT, RIST,
RTMP/RTMPS and HLS. These capabilities are described in Chapter 6. This feature allows the
QVDEC4K to interoperate with large content gathering points such as Facebook and YouTube.

User Manual v.1 QVidium®QVDEC4K™ UHD/HEVC Video Decoder
Copyright 2023 QVidium®Technologies, Inc. Page 3 of 34
1 Introduction
Congratulations on purchasing your new QVidium
®
Live Internet Streaming video decoder.
QVidium
®
QVDEC4K UHD/4K video decoder –Front View (top), Rear View (bottom)
1.1 Overview
QVidium’s QVDEC4K™streaming video decoder is a high performance, high resolution video over
IP networking device capable of decoding broadcast quality video at resolutions up to 3840x2160
and at frame rates up to 60 frames per second. Utilizing a high-end, state-of-the-art multi-core
CPU with a specialized on-chip hardware video decoding core, the QVDEC4K can process video
in real-time using HEVC/H.265, MPEG4-AVC/H.264, or MPEG-2 compression. The QVDEC4K can
receive 4:2:0, 10-bit, UHD/4K video. Along with the video, the QVDEC4K can process up to 8
channels of audio (4 stereo pairs) with a selection of common audio decoding formats, including
surround sound 7.1 and AC3.
QVidium was the first company to invent a negative-acknowledgement feedback-based video
transport and error correction mechanism, called QVidium ARQ (Automatic Retransmission
request), for which it holds 2 U.S. patents and an Emmy© Award. QVidium ARQ enables the
transport of broadcast quality video over nearly any Internet and wireless network, provided that it
has sufficient bandwidth to carry the stream.
Like all other QVidium video encoder, decoder, gateway and server products, the QVDEC4K
employs QVidium’s patented ARQ. In addition, the QVDEC4K also offers other video transport and
error correction with protocols such as Zixi, SRT, RIST for live video error correction and transport,
and RTMP/RTMPS,and HLS for compatibility with Content Delivery Networks (CDNs) such as
Facebook, YouTube, and Ustream.
The following sections and chapters explain how to configure and operate the QVDEC4K using
screen snapshots with explanations of the various settings, and provide examples of the output
you should expect.

User Manual v.1 QVidium®QVDEC4K™ UHD/HEVC Video Decoder
Copyright 2023 QVidium®Technologies, Inc. Page 4 of 34
1.2 Network Setup
The QVDEC4K™includes two built-in gigabit Ethernet ports, labeled GigE 1 and GigE 2. The
default factory setting enables DHCP on both built-in GigE 1 and GigE 2 ports to automatically set
its IP address and network configuration. You can also add additional Ethernet ports by inserting
an Ethernet to USB dongle into the USB3-Type A port situated adjacent to the two built-in Ethernet
ports.
QVidium provides a software application, called CodecManager, that you can download from the
Support page at https://www.qvidium.com to configure and determine the IP address of the
Ethernet port of your QVDEC4K. Alternatively, you can use the QVDEC4K’s built-in Web interface
to change the network settings –assuming that you know the address assigned to your QVDEC4K
by the DHCP server.
To configure the network settings of your QVDEC4K using CodecManager, follow these steps:
1) Download and install the QVidium CodecManager application from the Support page at
https://www.qvidium.com. Before running CodecManager, please have your QVDEC4K
connected to an Ethernet switch via a Cat5 or equivalent cable. Then have your PC or
other network device connected to another port on that same switch and disable any
wireless or other wireline network ports on your PC.
2) Make certain that your QVDEC4K is powered on and operational. It takes about 20
seconds for it to completely boot up into its operational state.
3) Run the CodecManager application. You should see the IP address of the QVDEC4K and
any other QVidium devices connected to that switch. To avoid confusion, we recommend
disconnecting or powering off any other QVidium devices or products that may be
connected to that Ethernet switch.
4) Click once on the entry for the QVDEC4K that you want to configure and click on Edit to
configure the IP address and device name. For setting a static IP address, please be
certain to disable DHCP mode. After clicking OK, you should see the IP address for the
QVDEC4K entry change to the new address.
5) If a static IP address is desired, you can enter any valid IP address, Gateway, and
Netmask. However, please be aware that if you want to connect to, and interact with the
web interface of the QVDEC4K, your PC must be on the same IP subnet that you had
assigned to the QVDEC4K or have avalid route to that device through a router.
6) Assuming that you set up a valid IP address in Step 5, then you can then Double-click on
the entry for the QVDEC4K to pull up a browser and enter the Graphical User Interface
(GUI) to interact with the QVDEC4K.
TROUBLESHOOTING: If your QVDEC4K™does not show up in CodecManager or if you have a
Linux or MAC or other non-Windows PC, you can install Java and run the Java version of
CodecManager. This version will try all your PC’s network interfaces to find the QVDEC4K. You
can also log into your DHCP server to see what IP address was assigned to your QVDEC4K.
NOTE: The QVDEC4K™requires user authentication to enter the web interface. The factory
preset username is “admin” and the password is preset to the serial number of your unit
(found on the barcode label on the bottom of the unit). Enter these settings when prompted to
access the system. The serial number that you will use for the default factory-preset password is
case-sensitive and is of the form QVD4Kdddddddddd, where “dddddddddd” is a 10-digit number.
To reconfigure the network interface using a Web browser, follow these steps:
1) Determine the IP address of the QVDEC4K™from your DHCP server
2) Make certain that the IP address of your PC is on the same subnet as the QVDEC4K
3) Enter the IP address of the QVDEC4K into a web browser on your PC
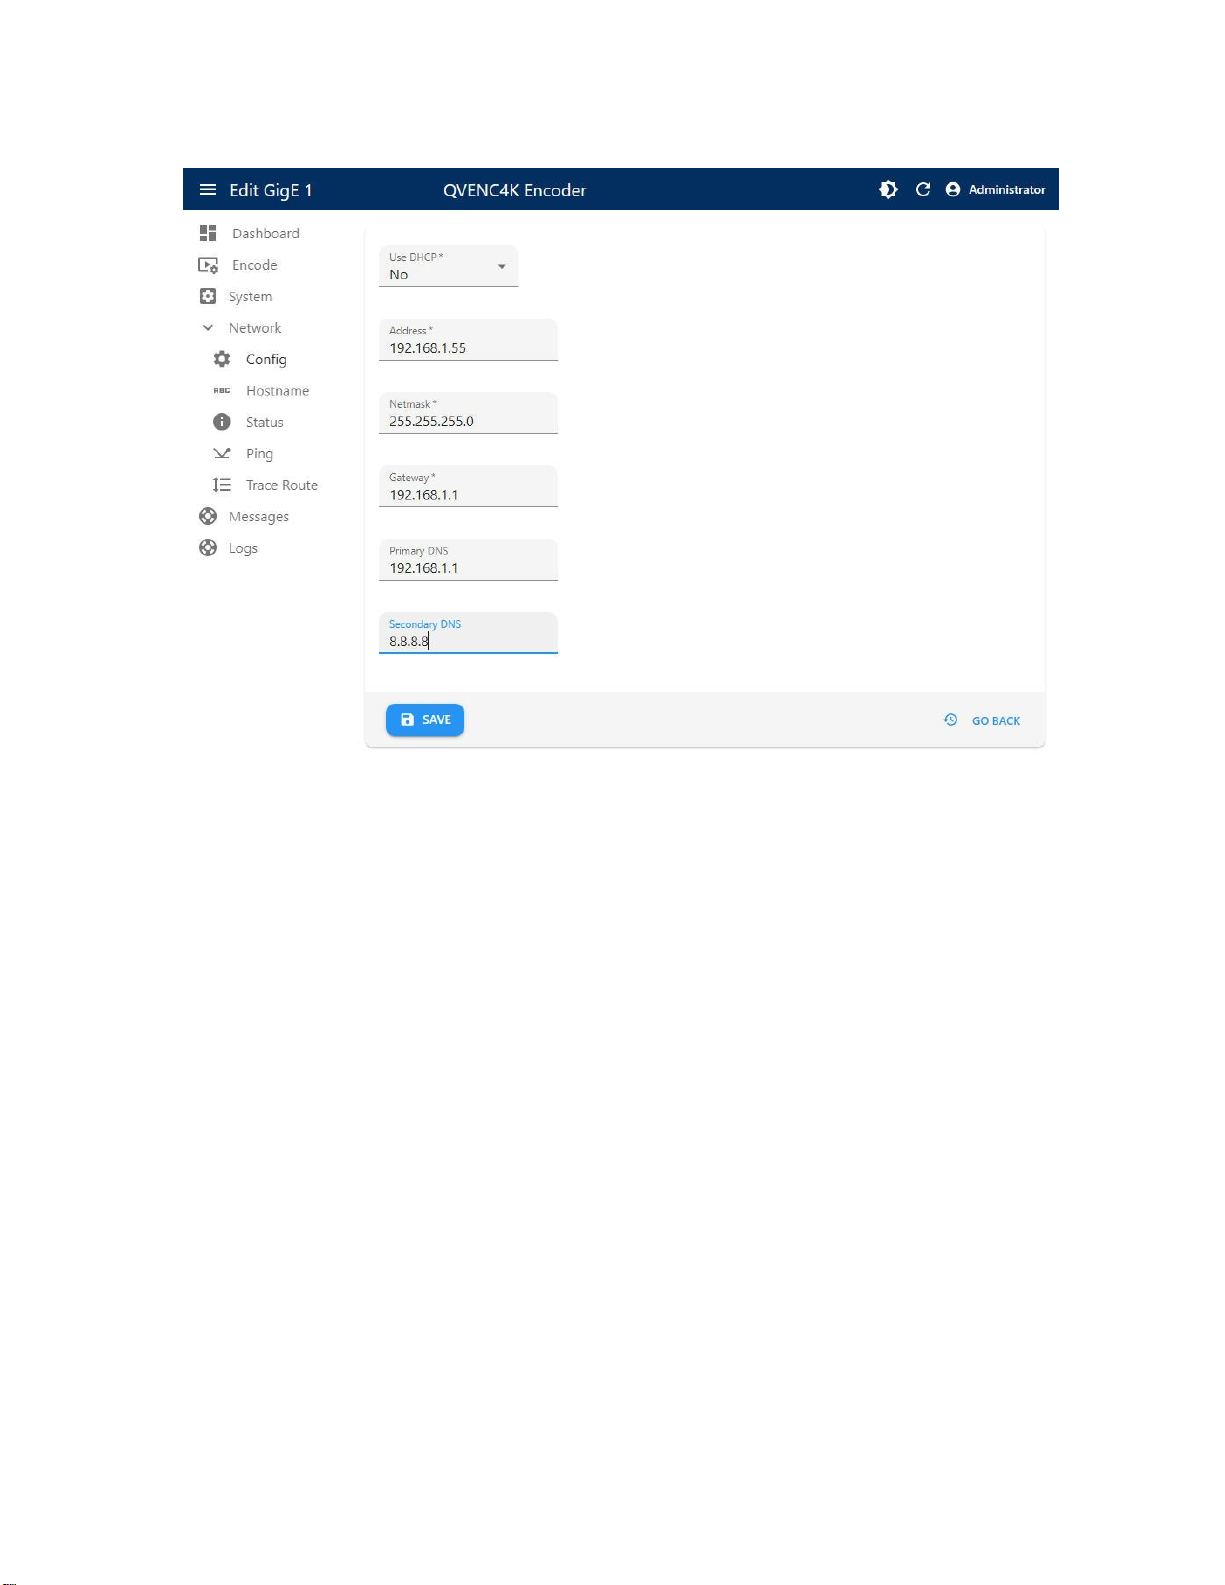
4) Click on “Configure” under the “Network” menu on the left.
You should see a web page similar to the following network configuration web page:

User Manual v.1 QVidium®QVDEC4K™ UHD/HEVC Video Decoder
Copyright 2023 QVidium®Technologies, Inc. Page 5 of 34
3) Change settings as desired and click “Save”.
4) If you change the IP address, you will need to change the URL in the web browser to point to
the new address after clicking on “Save”.
The Network/Config page allows you to modify the static IP address parameters and DNS server
settings, or to have these settings automatically configured through DHCP. A Network/Hostname
page allows you to specify the host name for use in conjunction with a DNS server to assign a
predetermined IP address.

User Manual v.1 QVidium®QVDEC4K™ UHD/HEVC Video Decoder
Copyright 2023 QVidium®Technologies, Inc. Page 6 of 34
1.3 Reconfiguring and Resetting Network Settings
In case you are not able to connect to the QVDEC4K™through the network port(s) to a web
browser, we have provided 2 alternate mechanisms for resetting the IP addresses and network
settings: through CodecManager and through the USB console serial port. Any one of these 2
methods we describe in this section will allow you to recover in case the IP address was changed
or set to DHCP and you do not know its current value.
CodecManager: As previously described in the last section, if you have a Windows PC or a Mac
running a PC emulator, you can download and run the QVidium application, CodecManager™, to
change or set the IP address for the built-in Ethernet port. You can download CodecManager from
the Support page at http://www.qvidium.com. If you have more than one network adapter on your
PC, you may need to select the proper Network Interface from the pull-down control in the lower
left corner of the CodecManager application. Also, because CodecManager relies on low-level
Ethernet-level multicasts, we recommend having both the QVDEC4K and your PC connected
through a switch, and not via a direct Ethernet cable. If you do not see the QVDEC4K on
CodecManager, even after clicking on the Discover button, then you should try connecting to the
other LAN port on the QVDEC4K. If you still do not see the QVDEC4K, then we suggest resetting
the network interface using the USB Console Port method.
USB Console Port: To reset the network settings or the entire state of the QVDEC4K, you can
connect a USB cable to the Console USB port to log into the Linux shell. From the Linux command
shell, you can change the IP address or reset the entire device to its factory default settings. To
reset just the network settings to their factory defaults, connect a PC running a terminal emulator,
such we Hyperterm or TeraTerm. You should then see a new COM port on your PC after
connecting a USB cable to the USB command port on the QVDEC4K, even if the QVDEC4K is
powered off. Set the Baud rate to 1500000 and try connecting the terminal emulator to the new
USB port. The other serial port settings should be set to 8-N-1, no flow control. Upon power-on,
you should see a stream of characters as the system is booting, ending with the login prompt.
Login as user “qvidium” with the barcode serial number as the password,then hit Enter. From this
prompt, type resetnetwork followed by hitting the Enter key (<CR>, carriage return) to reset the
network settings to use DHCP. You can also type ifconfig eth0 (and <CR>) to see the current IP
address. Typing “clean<CR>” will reset all of the device settings to their factory defaults.
If you have experience with network monitoring software, such as Wireshark (www.wireshark.org),
please note that upon power-up, the Decoder will emit a gratuitous ARP packet from which you
can determine its IP address by looking for the ARP packets that the QVDEC4K generates and
analyzing its contents.
1.4 Ping and Traceroute
Selecting Ping allows you to test network connectivity by sending ping packets to an address or
hostname you specify. However, to use a hostname in place of an IP address, you must have
configured at least one DNS server.
The following figures show the Ping configuration page and a typical Ping output:

User Manual v.1 QVidium®QVDEC4K™ UHD/HEVC Video Decoder
Copyright 2023 QVidium®Technologies, Inc. Page 7 of 34

User Manual v.1 QVidium®QVDEC4K™ UHD/HEVC Video Decoder
Copyright 2023 QVidium®Technologies, Inc. Page 8 of 34
Likewise, you can use Traceroute (shown above) to ping every router along the route from the
QVDEC4K to the IP or DNS address you specify. Traceroute is very helpful in locating instances
where an ISP might employ dynamic load balancing and other routing problems that can affect the
quality of the video transport. Dynamic Load Balancing occurs where an ISP might specify an
alternate route to send packets to balance the load across its network. This is fine for web pages
that use TCP and can tolerate random delays. However, this can cause the packets within a video
stream to become mis-ordered, jumbling the video content. Using the Jitter Buffer in the QVidium
decoder or ARQ software can often restore correct packet order and stream integrity, at the cost of

User Manual v.1 QVidium®QVDEC4K™ UHD/HEVC Video Decoder
Copyright 2023 QVidium®Technologies, Inc. Page 9 of 34
additional delay. However, there may be situations where the dynamic load balancing can lose too
many packets or switch to a mis-configured route, causing breaks in the video. You may be able to
avoid Dynamic Load Balancing by requesting a static route or MPLS (Multi-Protocol Labeled
Switching) service from your ISP.
1.5 Passwords and Security
The QVDEC4K™requires a username and password to protect access to its configuration
settings. This includes both Web access and SSH access. The default user name for the web
interface is “admin” and the default password is set to its serial number. Logging in as the user
root is not allowed.
Note on Resetting Password: If you lose the password and need to reset it, you can go to
https://www.qvidium.com/reset, click on Reset Password, copy the “autorun” file onto a USB flash,
and plug flash into QVDEC4K. (File must be saved as “autorun” and not “autorun.txt”.). This will
reset the admin password back to the serial number of the unit You must have physical access to
the USB ports on the QVDEC4K to use this procedure.
As shipped from the factory, the QVDEC4K comes with SSH and root access disabled. The RPM
update system used, as discussed in the next section on Updating, prevents any unauthorized
firmware from entering the unit. Should the user require shell or SSH access to the unit, a public-
private certificate-based system can be enabled that disallows shell login via username/password
as a further security enhancement.
1.6 Updating
QVidium provides firmware updates from time to time to add new features, overcome limitations, or
to fix bugs. The QVDEC4K firmware builds upon the Ubuntu/Linux RPM Package Manager to
catalog, manage, automate, secure, and simplify the update process. With a click to
System/Update from the web interface, the QVDEC4K will connect to the QVidium update server
via the Internet to take inventory of which packages need to be updated and seamlessly keep the
QVDEC4K running with the latest features and more robust firmware available. This secure
mechanism forms a part of the overall protections that help to prevent malware and all non-
authorized firmware from infecting the QVDEC4K.
To update to the latest firmware, make certain that your unit has access to the Internet and click on
System/Update, then confirm that you wish to proceed. The system will connect to the QVidium
server, take inventory of the packages loaded on your QVDEC4K, and then proceed to determine
which packages need to be updated and download and install only those packages that need to be
updated. After this completes, you may need to reboot your system for the update to take effect by
clicking on System/Reboot from the web browser interface. You should also clear your web
browser’s cache or at least refresh the web pages after updating the firmware in case the new
firmware had changed some of the web pages.

User Manual v.1 QVidium®QVDEC4K™ UHD/HEVC Video Decoder
Copyright 2023 QVidium®Technologies, Inc. Page 10 of 34
1.7 System View –QVDEC4K
Front
View
–Power Indicator
Indicator Description
Power Glows amber when power is first applied.
Glows green when powered on and operational.
Glows red upon encountering an error condition.
Note:
A USB2-MicroB Console port and USB3-TypeC USB port are primarily for system
maintenance purposes and should rarely, if ever, be needed by the customer.

Rear View
–Power, SDI Video/Audio I/O, USB and Ethernet Ports
Ref Component Description
1DC Power 6VDC @ 3A to 24VDC @ 1A
2SDI Lock SDI lock indicator
3SDI 12G-SDI Output port, all SDI rates up to 12Gbps.
4SDI SFP port for 2nd SDI I/O port (optical or copper), 12G-SDI max.
5USB USB-3.0 type A connector for additional memory or Ethernet port
6GigE 1 First 10/100/1000 Ethernet port
7GigE 2 Second 10/100/1000 Ethernet port
Note: Serial number barcode label (not shown) would be located on this back
plate.

User Manual v.1 QVidium®QVDEC4K™ UHD/HEVC Video Decoder
Copyright 2023 QVidium®Technologies, Inc. Page 12 of 34
1.8 IMPORTANT SAFETY INFORMATION –PLEASE READ
Use this product only as specified in the manual. If the
instrument is used in a manner not specified by the manufacturer,
the protection provided by the instrument may be impaired,
resulting in personal injury or damage to the product.
Only product safety-approved DC power supply unit based on
all applicable local, state/provincial, and/or national regulations
shall be used with this product.
This equipment is not suitable for use in locations where children
are likely to be present.
NO USER SERVICABLE COMPONENTS.

User Manual v.1 QVidium®QVDEC4K™ UHD/HEVC Video Decoder
Copyright 2023 QVidium®Technologies, Inc. Page 13 of 34
2
Decoder Configuration
You can configure and operate the decoder from a web browser. From the Decode menu, you can
create, start, edit, and delete a multitude of profiles that save the decoder parameters to allow you
to quickly restart the QVDEC4K in various configurations and applications, and shown in the
following screen shot.
All settings are stored in non-volatile flash memory, allowing the decoder to automatically recover
after a power failure. This section explains how to configure the QVDEC4K decoding parameters
with full access to the capabilities of the decoder.
2.1 Quickstart Decoder Configuration
Below is a simple procedure to quickly start streaming from a compatible encoder to a QVDEC4K
decoder for decoding and displaying a video stream.
1. Enter http://<IPAddress> where <IPAddress>is the IP address of the QVidium
QVDEC4K™HEVC UHD-HDR Video Decoder that you want to configure as a decoder. (See
section 1.2 Network Settings1.2 to get or set the IP address.)
2. Click Decode from the menu on the left. Then, either click to highlight an existing decoder
profile you wish to edit and click Edit, or click Create or “+”to create a new decoder profile.
The “Decoder Profile”interface should then display in the main area to the right of the
menu system, as shown in Figure 2.
3. At this point, the web interface displays a list of all the configurable video and audio decoding
parameters, We recommend that you initially use all of the defaut settings for these
parameters, unless there is an obvious change required for your application.
4. Next click on Main Feed from last setting in the parameter list. Click to select the desired
video transport protocol, and enter the source UDP port. For “Caller Mode” (aka. “Pull Mode”),
you must also enter the IP address of the encoder or video server.
Figure 1. Sample Decoder Profiles Page

User Manual v.1 QVidium®QVDEC4K™ UHD/HEVC Video Decoder
Copyright 2023 QVidium®Technologies, Inc. Page 14 of 34
5. When sending a video stream over a LAN or other private hardwired network, we recommend
selecting UDP. You can also select QVidium ARQ, SRT, RIST, RTSP, or HTTP (HLS) to
receive from a third-party encoder over the Internet.
6.
Click on Update URL and the Save button to save your changes. None of your changes will
be saved nor have any effect unless you first save them. These changes are stored in
permanent memory and will persist even after a power failure.
7.
Click on Decode, select the desired profile, to then click Start to start receiving the stream.
If you have connected an SDI video display to one of the SDI outputs (BNC or SFP) you should
now see your video.
NOTE: The QVDEC4K is only designed to accommodate HD-SDI, 3G-SDI, 6G-SDI, and 12G-SDI
SDI interfaces for video resolutions from 720p through 2160p. The QVDEC4K cannot output
standard definition (480i/576i) video output. However, you can upscale (or downscale) the IP input
stream to higher (or lower) video output resolutions and frame rates from the Video Output setting
in the profile.
2.2 Detailed Decoder Configuration
As shown in Figure 2, the decoder profile configuration page lets you set the video output
resolution and frame rate and audio channel processing. The QVDEC4K decoder will automatically
detect and decode the video and audio formats from the input IP stream. The decoder contains a
built-in video scalar that provides the QVDEC4K the ability to change the video resolution before it
is decoded and output as a stream. The QVDEC4K can pass-through AC3 and multichannel audio,
or downmix it to stereo. It also automatically detects and passes through CEA-708 Closed
Captions, SCTE-35 to SCTE-104, and HDR Metadata.
Figure 2. Basic Decoder Settings

User Manual v.1 QVidium®QVDEC4K™ UHD/HEVC Video Decoder
Copyright 2023 QVidium®Technologies, Inc. Page 15 of 34
2.2.1
Basic Decoding Parameters
All the basic parameters you normally would need to set when creating a new decoding profile are
grouped together under the Decoder menu when editing or creating a profile, as shown in Figure
2, above. Below is a list of the basic decoding parameters and a short description for each setting:
Video Output: 2160p60, 2160p59.94, 2160p50, 2160p30, 2160p29.97, 2160p25, 2160p24,
2160p23.98; 1080p60, 1080p59.94, 1080p50, 1080p30, 1080p29.97, 1080p25, 1080p24,
1080p23.98; 1080i59.94, 1080i50; 720p60, 720p59.94, 720p50. Default is 1080p59.94. The
Video Output setting scales the raw SDI output video to the selected resolution and frame
rate, regardless of the decoded video resolution and frame rate.
Audio Stream: Auto, 1, 2, 3, and 4. Default is Auto. When in Auto, the QVDEC4K will decode all
of the Opus, AAC, or MPeg1/2 audio channels contained within the stream. Setting this to a
value from 1 to 4 allows you to select only that audio stream for decoding to the embedded
SDI output.
AC-3 Audio: Pass-through or Decode. Default is Pass-through. This setting only applies when
the decoded audio/video stream contains AC-3 or Enhanced AC3 (aka., E-AC3 or Dolby-Plus).
For AC-3 audio, the QVDEC4K can decode the audio. However when encountering E-AC3,
the QVDEC4K can only pass-through the Dolby-encoded audio unchanged, and the "Decode"
option does not apply.
Downmix Audio: No or Yes. Default is No. This setting only applies when the audio embedded
within the stream is AC-3 or AAC Surround-Sound with more than 2 channels. Setting this to
Yes will process the multiple audio channels by mixing the audio to output a single stereo
output. This is particularly useful when the playback device can only output a left and right
audio pair.
Main Feed: No default. This is the primary configuration for the decoder whereby the user can
select the IP Transport and the parameters associated with the selected IP Transport. The
QVDEC4K supports the following IP video transport protocols: SRT, RIST (main and simple
profiles), QVidium ARQ, HTTP (aka. HLS), RTSP, UDP, or file playback. Additional fields,
such as Encryption parameters, UDP port or URL string, server IP address for Caller (Pull)
Mode, etc. appear as appropriate for the IP transport mode that you select. As an example, the
settings for SRT are shown below in Figure 3:

User Manual v.1 QVidium®QVDEC4K™ UHD/HEVC Video Decoder
Copyright 2023 QVidium®Technologies, Inc. Page 16 of 34
Figure 3. Main Decoder Feed: Example showing SRT transport settings
2.2.2
The Dashboard: IP Stream Statistics
The first menu item, called Dashboard, shows the current state of the QVDEC4K decoder. The first
line indicates whether the decoder is running or stopped. If running, that line shows the currently
selected IP protocol and video output resolution and frame rate. The second line is the profile that
is running. If no data is being received, the third line, Sender, says, "nodata,". Otherwise, it would
display the source IP address of the incoming stream. Following this are the network statistics.
In the example below, Figure 4, we shows the network statistics when receiving a QVidium ARQ
stream with a 2160p59.94 video stream. If the decoder is not running, then the statistics are
omitted from the dashboard. A subset of these statistics are available for RIST and SRT. The
specific statistics for QVidium ARQ are as follows:
Net Dropped: Raw count of packets dropped by the Internet from the source to the decoder.
Recovered: Number of packets recovered by QVidium ARQ.
Ideally, this should match the Net Dropped value. If this remains at zero, then a
firewall may be blocking the encoder from receiving the ARQ retransmission
request packet.
ARQ Dropped: Number of packets that the ARQ mechanism were not able to recover.
Ideally, this value should be 0. If this number is increasing, you can try increasing
the Target Latency. It could also be an indication of a serious network problem.
Packets: Raw count of packets received by the decoder.

User Manual v.1 QVidium®QVDEC4K™ UHD/HEVC Video Decoder
Copyright 2023 QVidium®Technologies, Inc. Page 17 of 34
Round Trip: This is a measurement of the round-trip transit time for a retransmission request
packet sent by the decoder to be received by the source, plus the time for the
replacement packet to then travel from the source back to the QVDEC4K decoder.
The next section of the Dashboard shows the system uptime since it was powered up. followed by
the memory usage.
Lastly, the Dashboard shows the Send and Receive network usage for the two Ethernet ports. In
the example below, we see that GigE 2 is receiving an instantaneous value of 11.2 Mbps for the
4K stream that it is receiving.
Figure 4. Dashboard: Statistics, example showing the decoder receiving an ARQ 2160p stream on GigE 2.

User Manual v.1 QVidium®QVDEC4K™ UHD/HEVC Video Decoder
Copyright 2023 QVidium®Technologies, Inc. Page 18 of 34
Figure 3. List of Available Transport Protocols.
2.2.3
Optional UDP Output
The QVDec4K can also output a UDP stream copy of the input stream after processing to correct
for packet loss. This can be a multicast stream and is often helpful for monitoring the video that the
decoder is processing. This second copy of the decoded video stream does not include any error
correction, so it is best suited for sending over a local area network (LAN)
2.2.4
Stream Encryption
Stream encryption is available SRT and RIST Main Profile IP transport modes. SRT and RIST
both use a pre-shared key that you must choose beforehand and provide to both the QVDEC4K
decoder and IP stream source device. Please be aware that the encryption is only as good as the
ability to keep this key private. Although RIST is capable of DTLS public-private key exchange, the
version of RIST that the QVDEC4K does not currently implement DTLS.
2.3 QVidium ARQ Video Transport & Error Correction
The QVidium QVDEC4K Video Decoder™features some of the most powerful and advanced error
correction capabilities found in any video over IP product. The QVDEC4K implements QVidium’s
patented ARQ error correction and clock synchronization (US Patents #7,551,647 and #7,522,528)
for robust video transmission with the lowest delay. QVidium’s ARQ (Automatic Retransmission
Request) is a dynamically responsive feedback error correction mechanism designed specifically
to enable the highest quality video transport over wireless networks and the Internet. ARQ senses
packet loss at the receiver and requests replacement packets from the server. ARQ can provide
nearly flawless reproduction of a video stream even through extremely lossy or congested
networks.
The QVDEC4K HEVC UHD Video decoder minimizes network bandwidth and loading due to the
high efficiency of HEVC decoding and ARQ video transport. The QVDEC4K™ implements HEVC
(H.265) Main Profile video decoding, providing advanced coding techniques in hardware.
The QVDEC4K supports QVidium’s patented ARQ error correction as well as new industry
standard RIST and SRT protocols for interoperability with third-party decoders and decoders. ARQ
is a robust feedback-based error correction that can successfully recover nearly all packet loss,
even in harsh network environments.
In contrast with Forward Error Correction (FEC), ARQ employs a feedback mechanism that detects
packet loss at the receiver and requests the retransmission of only those lost packets from a video
source. A user-configurable buffer at the receiver (decoder) delays the video stream just long
enough to allow the system to replace any missing packets and re-insert them in their proper order
without disturbing play out of the video stream. Because ARQ senses actual packet loss, rather
than attempt to predict packet loss, it can precisely and completely restore all lost packets without
disturbing timing of the video play out. In contrast to FEC, ARQ can successfully recover lost
packets regardless of the magnitude or pattern of the packet losses, provided that the network
connection has enough capacity to send both the original video stream and the replacement
packets.
ARQ shares similarities with robust packet transport protocols, such as TCP/IP in that both use
feedback to create robust network packet transport. However TCP/IP uses a sliding window that

User Manual v.1 QVidium®QVDEC4K™ UHD/HEVC Video Decoder
Copyright 2023 QVidium®Technologies, Inc. Page 19 of 34
limits the number of packets that a source can have in transit and requires a positive
acknowledgement for each window of packets. This limits TCP’s throughput, especially over links
with long latencies. Furthermore, under heavy loss conditions, TCP/IP scales back the data
transmission rates and provides no concise deadlines or constraints on packet delivery times. For
real-time video, this limits the usefulness of TCP/IP, making it unacceptable for low-latency uses.
In contrast with TCP/IP, QVidium designed its patented ARQ error correction specifically for live,
interactive, real-time video and audio signals to automatically recover nearly all lost packets with
minimal latency and over nearly any link loss conditions. It adds a small configurable amount of
delay to the network transport in exchange for significantly improving the robustness and reliability
of video transport.
2.3.1
Configuring Video over IP Network Parameters
To configure the IP network parameters, within the Network Parameters section of the decoder
profile, first select an IP Transport mode. Depending upon the IP Transport more that you select,
tables of additional optional parameters relevant to that IP Transport will then appear. For more
protocols, you will also be required to specify the destination IP address and UDP port number.
The destination IP address is usually a unicast IP address, but for UDP and RIST Simple Profile, it
can also be a multicast address.
For QVidium ARQ, you may specify up to 4 comma-separated destination IP addresses for
sending copies of the output to multiple destinations. For sending more than 4 output copies of a
stream, either use an IP Transport that allows multicasting (and UDP, RTP, or RIST Simple Profile)
or send the stream to a server or PC running the QVidium QVARQ-TxRep QoS Proxy server (see
http://www.qvidium.com/proxy).
The decoder internally encapsulates the video and audio signals as UDP packets in all cases,
regardless of the type of packet transport you select. Specifying UDP eliminates the RTP header
and encapsulates the decoder’s multiplexed MPEG-2 transport stream directly as the payload of
the UDP packet. All the other transport selections (except SRT, RTMP and HLS) add an RTP
header to the UDP packet stream. In the case of RTMP and HLS, the QVDEC4K converts the
stream to TCP protocol. SRT uses a proprietary protocol called UDT that was originally designed
for reliable file transfer.
The RTP header adds a timestamp and packet sequence number to the UDP packet and then
adds the 188-byte MPEG-2 Transport Stream sections into the IP packet payload. A typical
Ethernet/IP packet contains 7 of these MPEG Transport Stream sections. RTP protocol is a
commonly used and widely interoperable protocol for sending video. The IP encapsulation adheres
to the IETF/RFC3550 standard for video over IP that specifies that the packet payload must
comprise an integral number of whole 188-byte MPEG-2 transport stream sections within an RTP
header.
2.3.2
Error Correction - ARQ: Automatic Retransmission Request
To enable Automatic Retransmission Request (ARQ), you must first select ARQ transport from the
Profile dialog. ARQ transport must also be enabled at the decoder. With ARQ selected and the
decoder started, the decoder will begin to save outgoing packets for later retransmission, when
necessary. Normally, the ARQ port should be set to the same value as the outgoing UDP port for
the video stream, with a default value of 10000. This will allow the upstream ARQ retransmission-
request packets to travel back through most decoder-side firewalls without requiring any special
configuration at the decoder-side firewall. If you use a different ARQ port than video UDP port,
then you must also be certain to configure any decoder-side firewalls to allow the upstream ARQ
retransmission request packets through to the decoder. You may change the value of the ARQ
port, but the ARQ and UDP port settings must match on both the decoder and decoder.

User Manual v.1 QVidium®QVDEC4K™ UHD/HEVC Video Decoder
Copyright 2023 QVidium®Technologies, Inc. Page 20 of 34
At the receiver, the ARQ error correction mechanism first buffers incoming packets in a
synchronized network de-jitter buffer that maintains a constant, configurable delay for incoming
packets. The de-jitter buffer processes RTP sequence numbers and reorders packets as
necessary to restore proper packet sequence and to buffer against erratic network delays. Its goal
is to output a smooth, consistent flow of packets with increasing sequence numbers. This output
feeds the ARQ error correction mechanism.
The ARQ unit at the receiver watches for gaps in RTP sequence number from the de-jitter buffer
output, and immediately sends out retransmission requests when necessary. Incoming
rereceiveted ARQ packets bypass the de-jitter queue and find their correct place in the ARQ
buffer, so that by the time packet are output by the ARQ buffer, the ARQ error correction
mechanism should no longer contain any missing packets.
When the decoder and decoder are both started, the decoder automatically measures the round-
trip delay and packet jitter to the decoder and automatically configures ARQ for optimal operation
according to a few basic user-specified parameters, as described in Section 2.3.2.
Note: For testing ARQ error correction, select ARQ transport at both the decoder and decoder and
use the default ARQ parameters at the decoder (receiver).
2.4 Additional Protocol-Specific Parameters
Certain protocols, specifically RIST Main Profile, RTMP, and Zixi have additional features with their
associated additional parameters that will appear in the configuration settings when selected.
RIST Main Profile creates a virtual private network tunnel when started. It therefore has additional
parameters to configure related to this feature. RTMP adds a Key and URL. Zixi has
username/password authentication for connecting to their server and a bonding feature that allows
you to use both of the QVDEC4K Ethernet network ports for bonding and failover features. Please
contact QVidium for further details, should you require any assistance in these additional
configurations.
Table of contents
Other Qvidium Media Converter manuals