Rackmount UIP-1602 User manual

www.rackmountsolutions.net
1-866-207-6631
sales@rackmountsolutions.net
IP High Density Cat 5 KVM User Manual
UIP-1602 / UIP-3202
Installation
C
e
b
y r
V
ei w
C
eby r
V
ei w
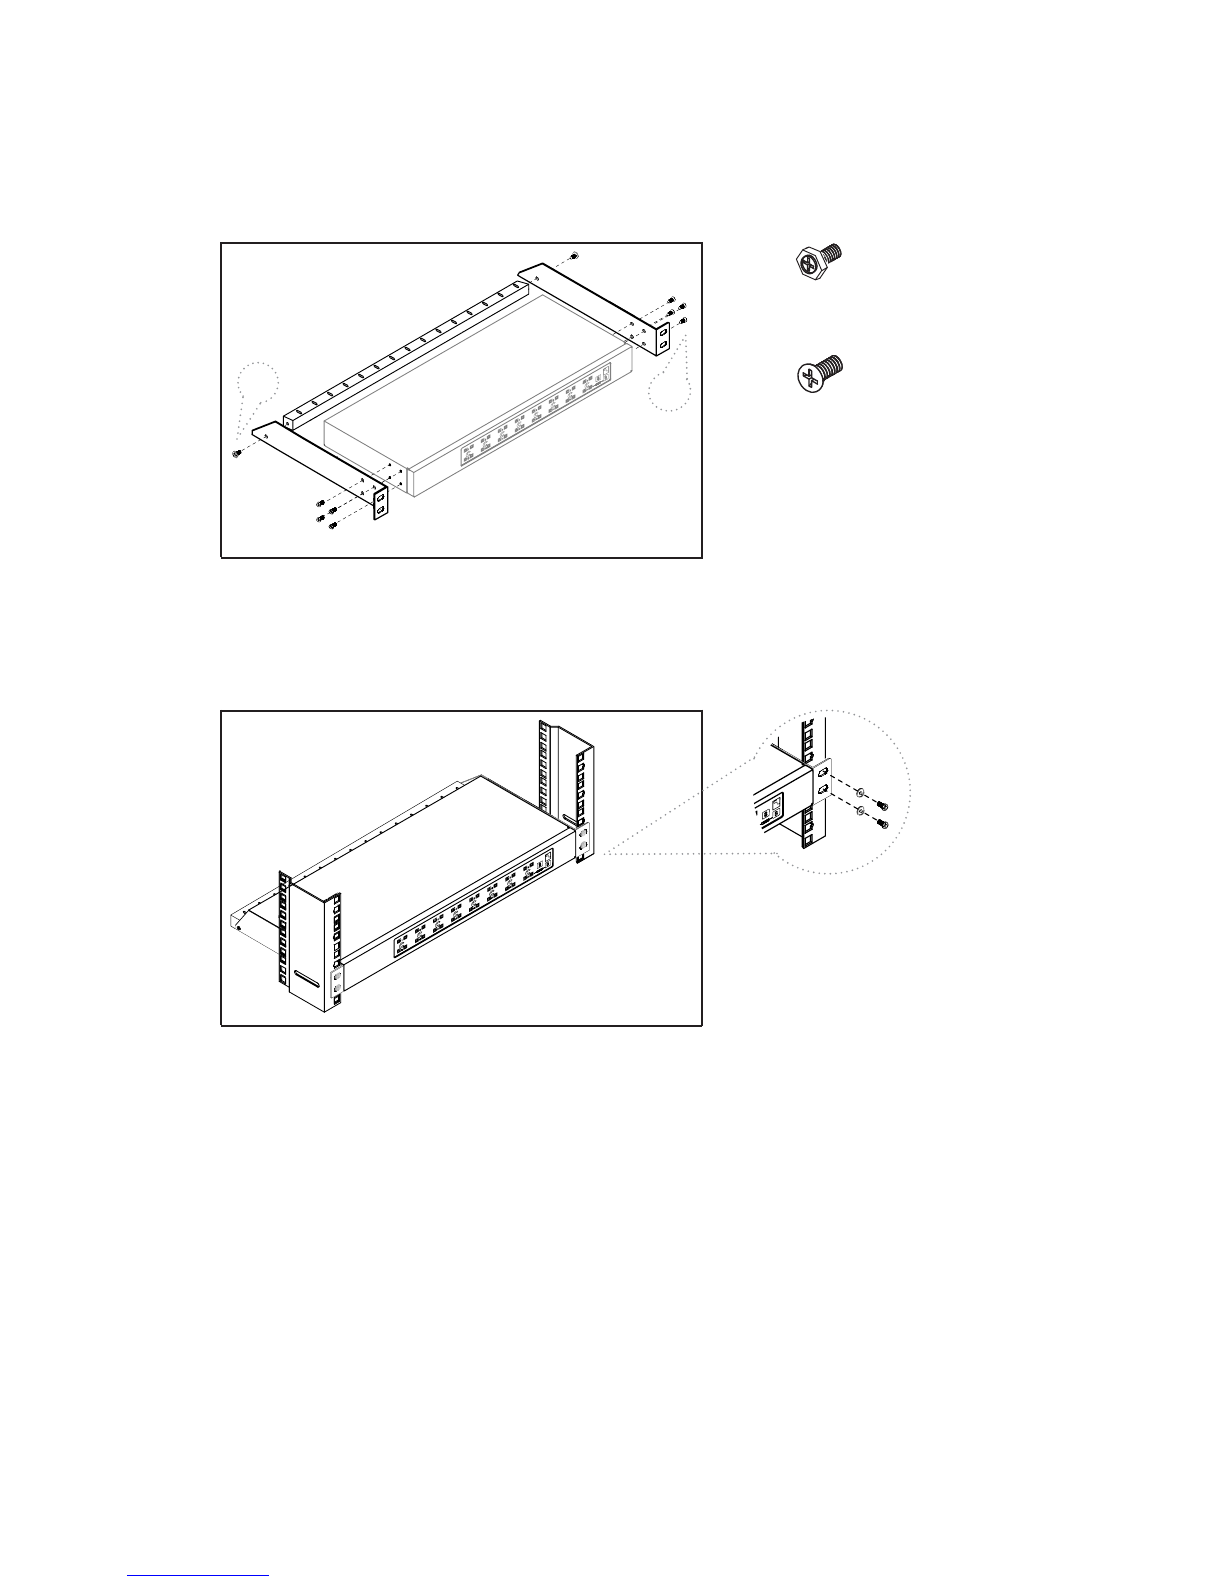
■Install each bracket using screws pro-
vided shown in Figure 1.
■Fix the KVM into the rack
* Hardware for fixing the mounting bracket
to the rack is not provided
Figure 1. Installing the bracket to the KVM.
Figure 2. Fixing the KVM into the rack.
AB
screw A: M3.2 x 4.5 mm
screw B: M4 x 10 mm
UIP-1602 / UIP-3202 IP Cat5 KVM

UIP-1602 / UIP-3202 IP Cat5 KVM
Package Content (only for rackmount KVM)
User manual x 2 sets (KVM x 1 set ; IP KVM + CD disc x 1 set)
5
Bracket x 1 set
4
Screw M3.2 x 4.5mm x 4 pcs
2
Power cord x 1 pc
6
KVM switch x 1 pc
1
Screw M4 x 10mm x 8 pcs
3
User Manual
1
6
5
4
32
7
CD disc x 1 pc (for IP KVM setup)
7
UIP-1602
UIP-3202
Local
Console
Cascade
Internet hub
Dual power
with failover
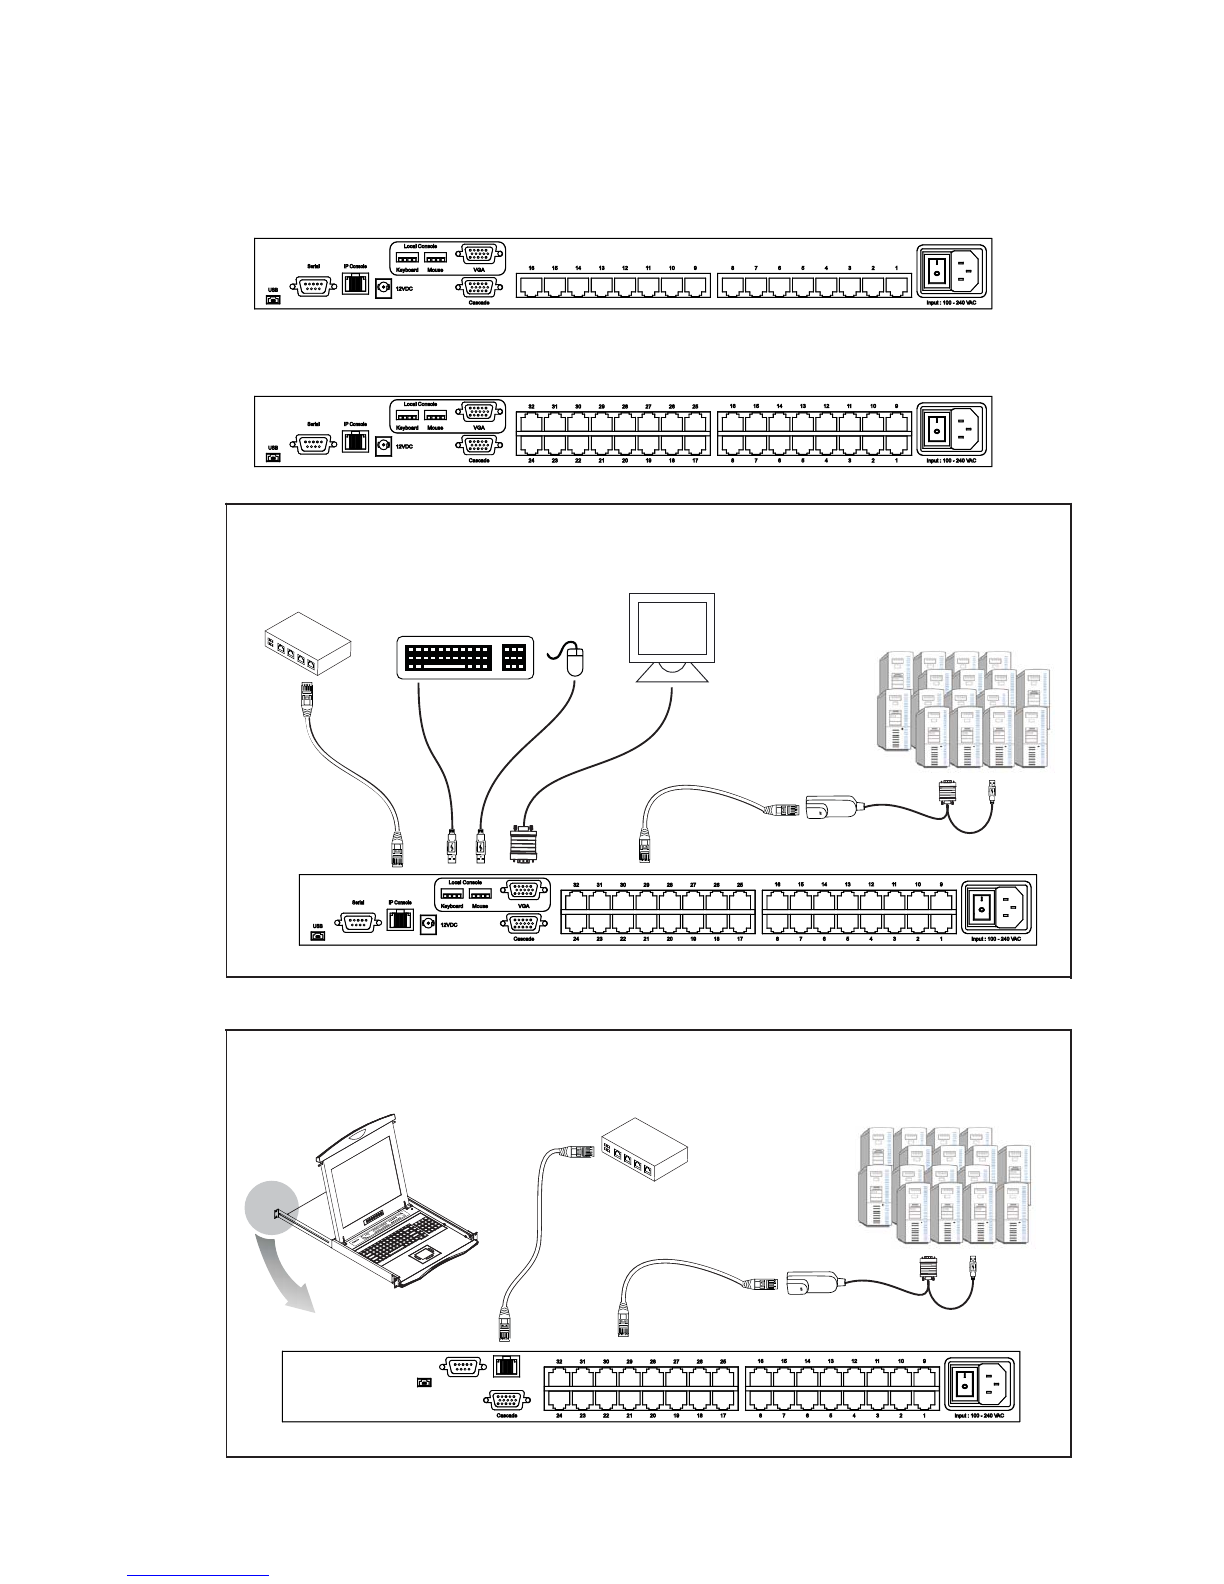
UIP-1602 / UIP-3202 IP Cat5 KVM
Connection
Cat5 cable
(up to 132 ft)
DG-100S dongle
DG-100S dongle
Cat5 cable
Cat5 cable
(up to 132 ft)
Cat5 cable
USB Serial Ethernet
Connection
Rackmount KVM
Connection
KVM modules
back
■For USB & serial connection, please refer to the attached IP KVM user manual
Internet hub
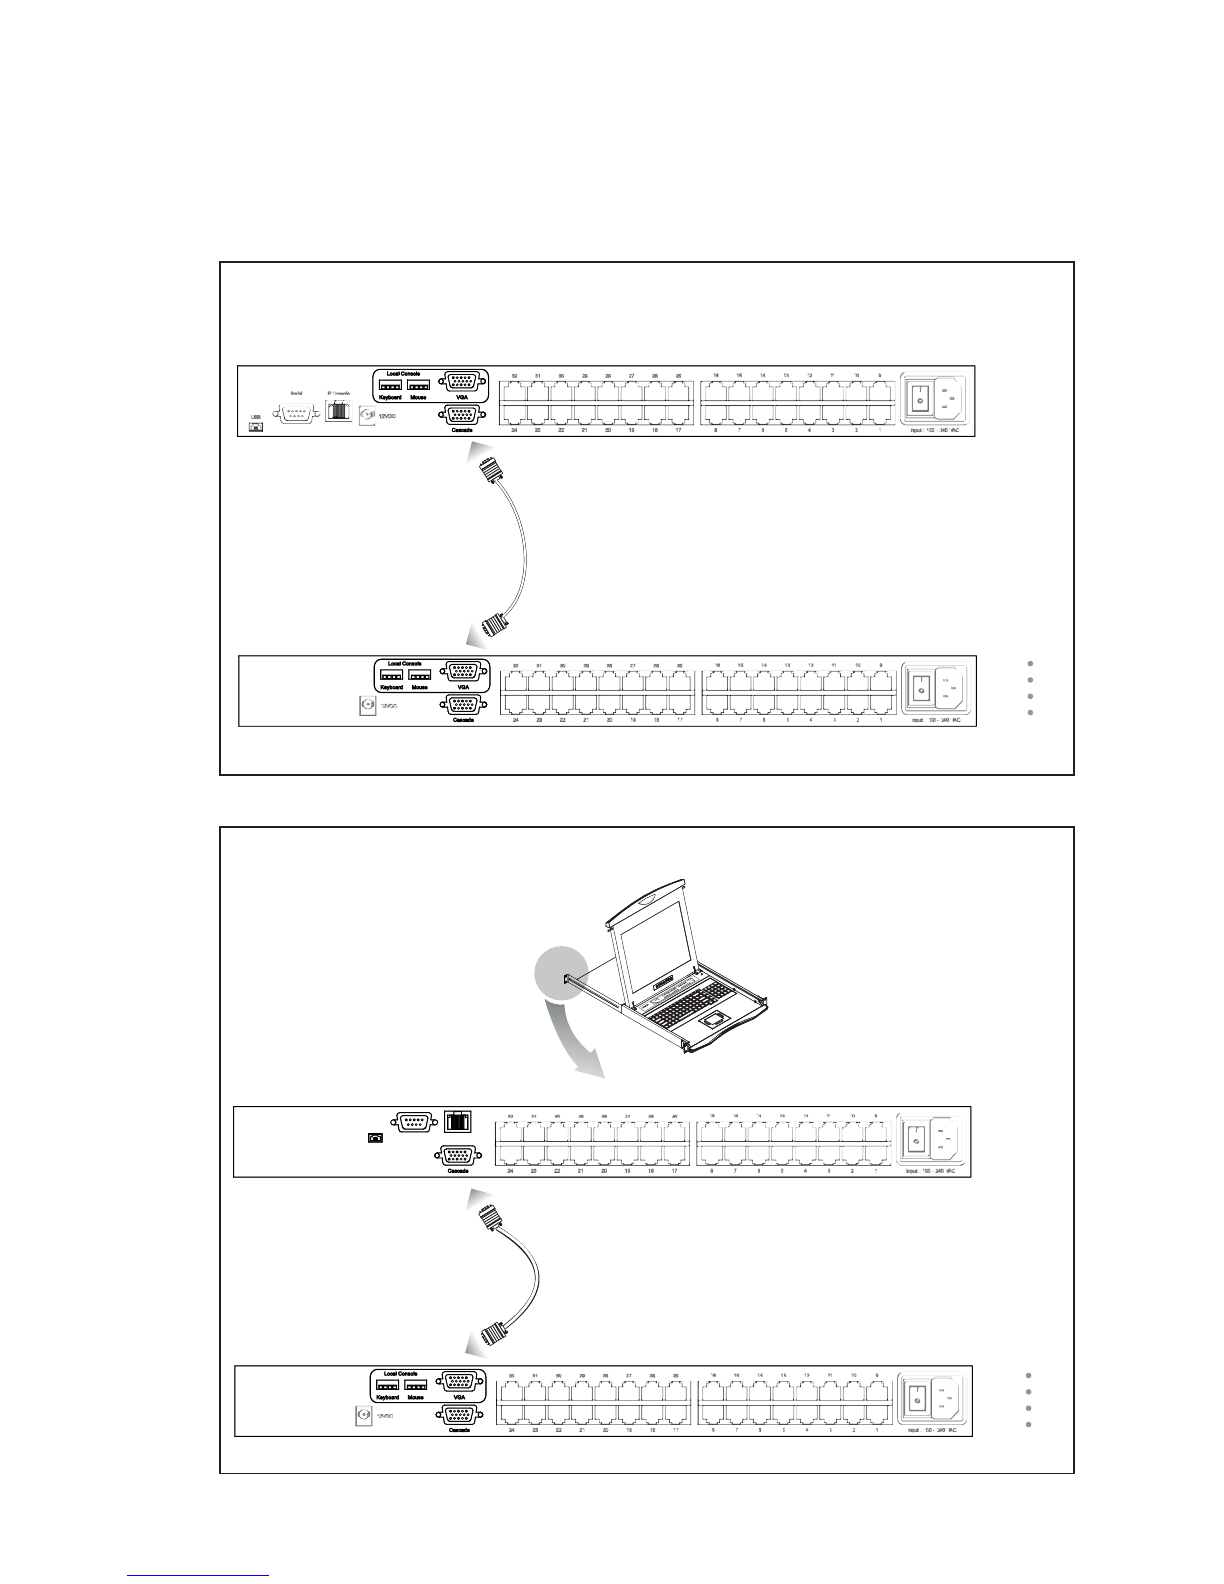
Cascade
■Cascaded KVM ( Bank 2 to 8 ) must be single console Cat5 KVM - U-1601 / U-3201
■With the UIP-1602 cascade up to 128 servers. With the UIP-3202 cascade up to 256 servers.
■Cascading multiple KVM by CBC-6 cable
UIP-1602 / UIP-3202 IP Cat5 KVM
Local Console
Bank 1
CBC-6 cascade cable
Cascade
Local Console
CBC-6 cascade cable
Bank 2
Bank 1
Bank 8
Cascade
Bank 2
Bank 8
back
Cascade
Rackmount KVM
Cascade
KVM modules
UIP-3202 IP Cat5 KVM
U-3201 Cat5 single console KVM
UIP-3202 IP Cat5 KVM
U-3201 Cat5 single console KVM
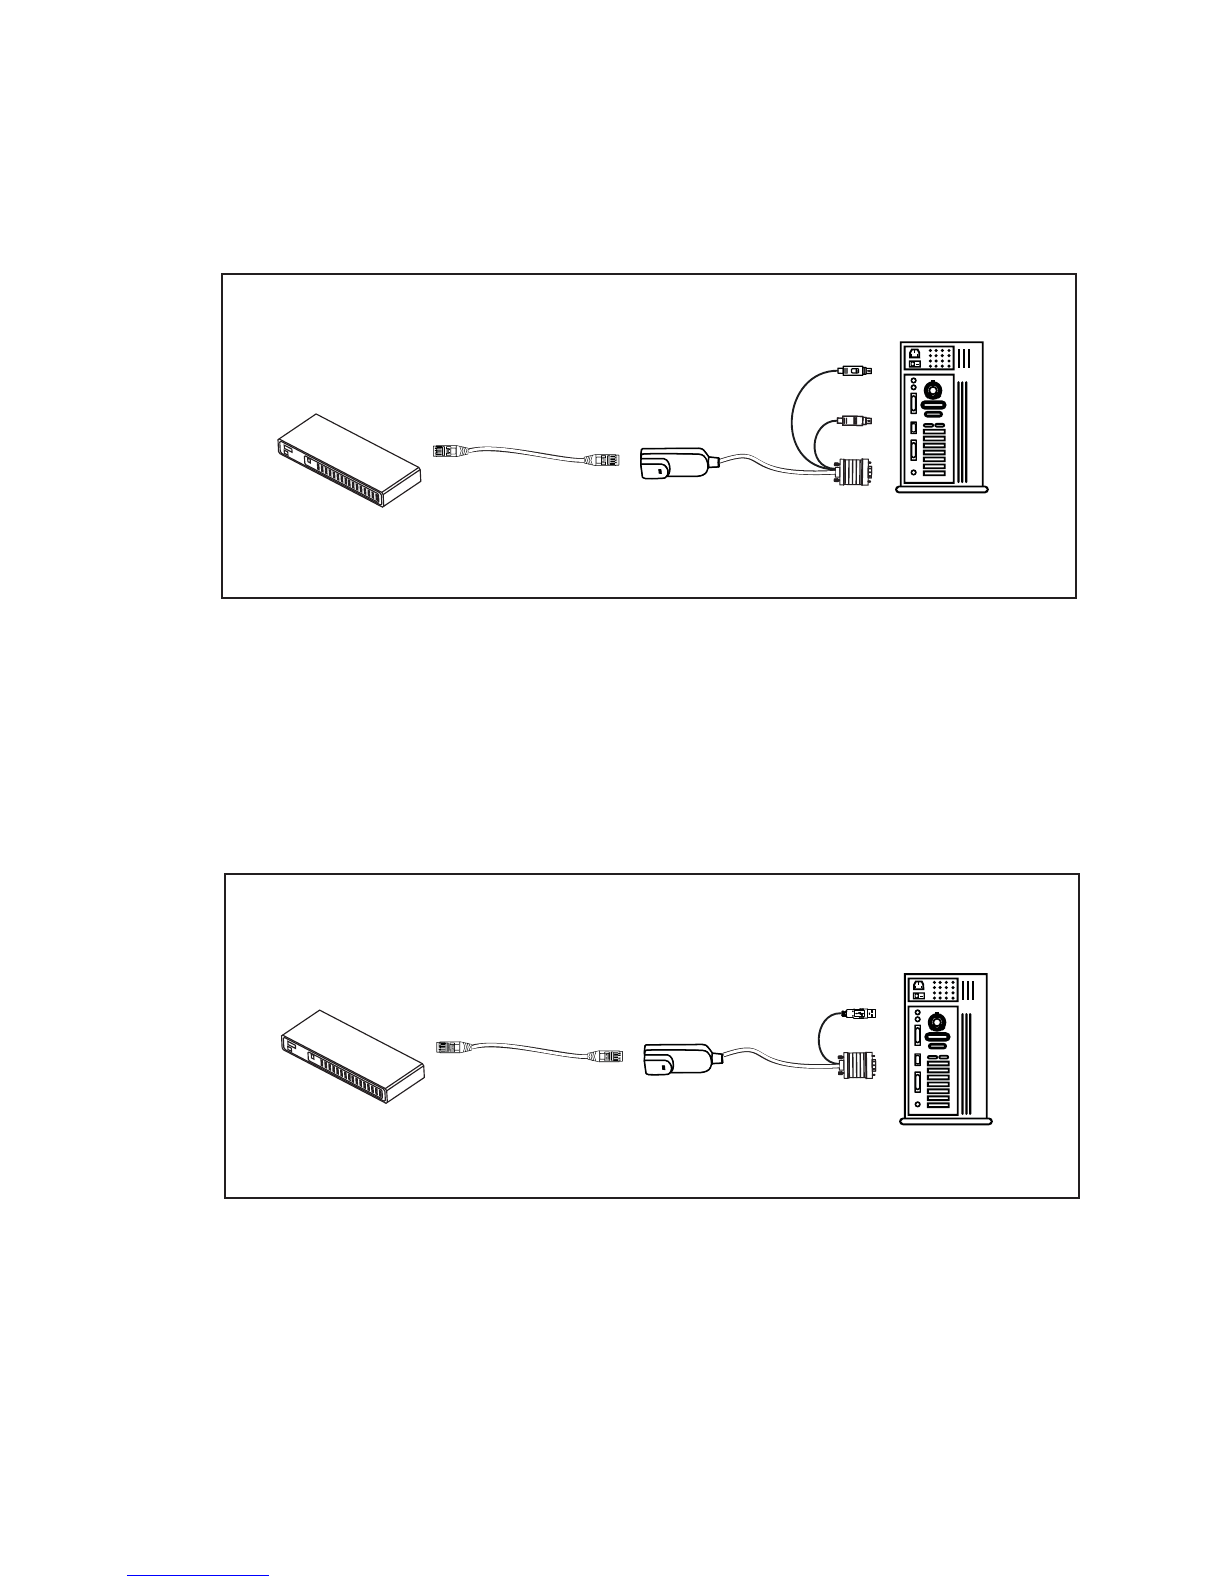
DG-100 / DG-100S Dongle Connection
DG-100 PS/2 dongle
■To connect DB-15 connector to the computer’s video card
■To connect keyboard connector to the computer’s keyboard port
■To connect mouse connector to the computer’s mouse port
Keyboard
mouse
DB-15
Cat5 KVM switch
DG-100S USB dongle
■To connect DB-15 connector to the computer’s video card
■To connect USB connector to the computer’s USB port
USB
DB-15
DG-100
PS/2 dongle
Cat5 cable
(up to 132 ft)
PS/2
server
USB
server
Cat5 KVM switch
DG-100S
USB dongle
Cat5 cable
(up to 132 ft)
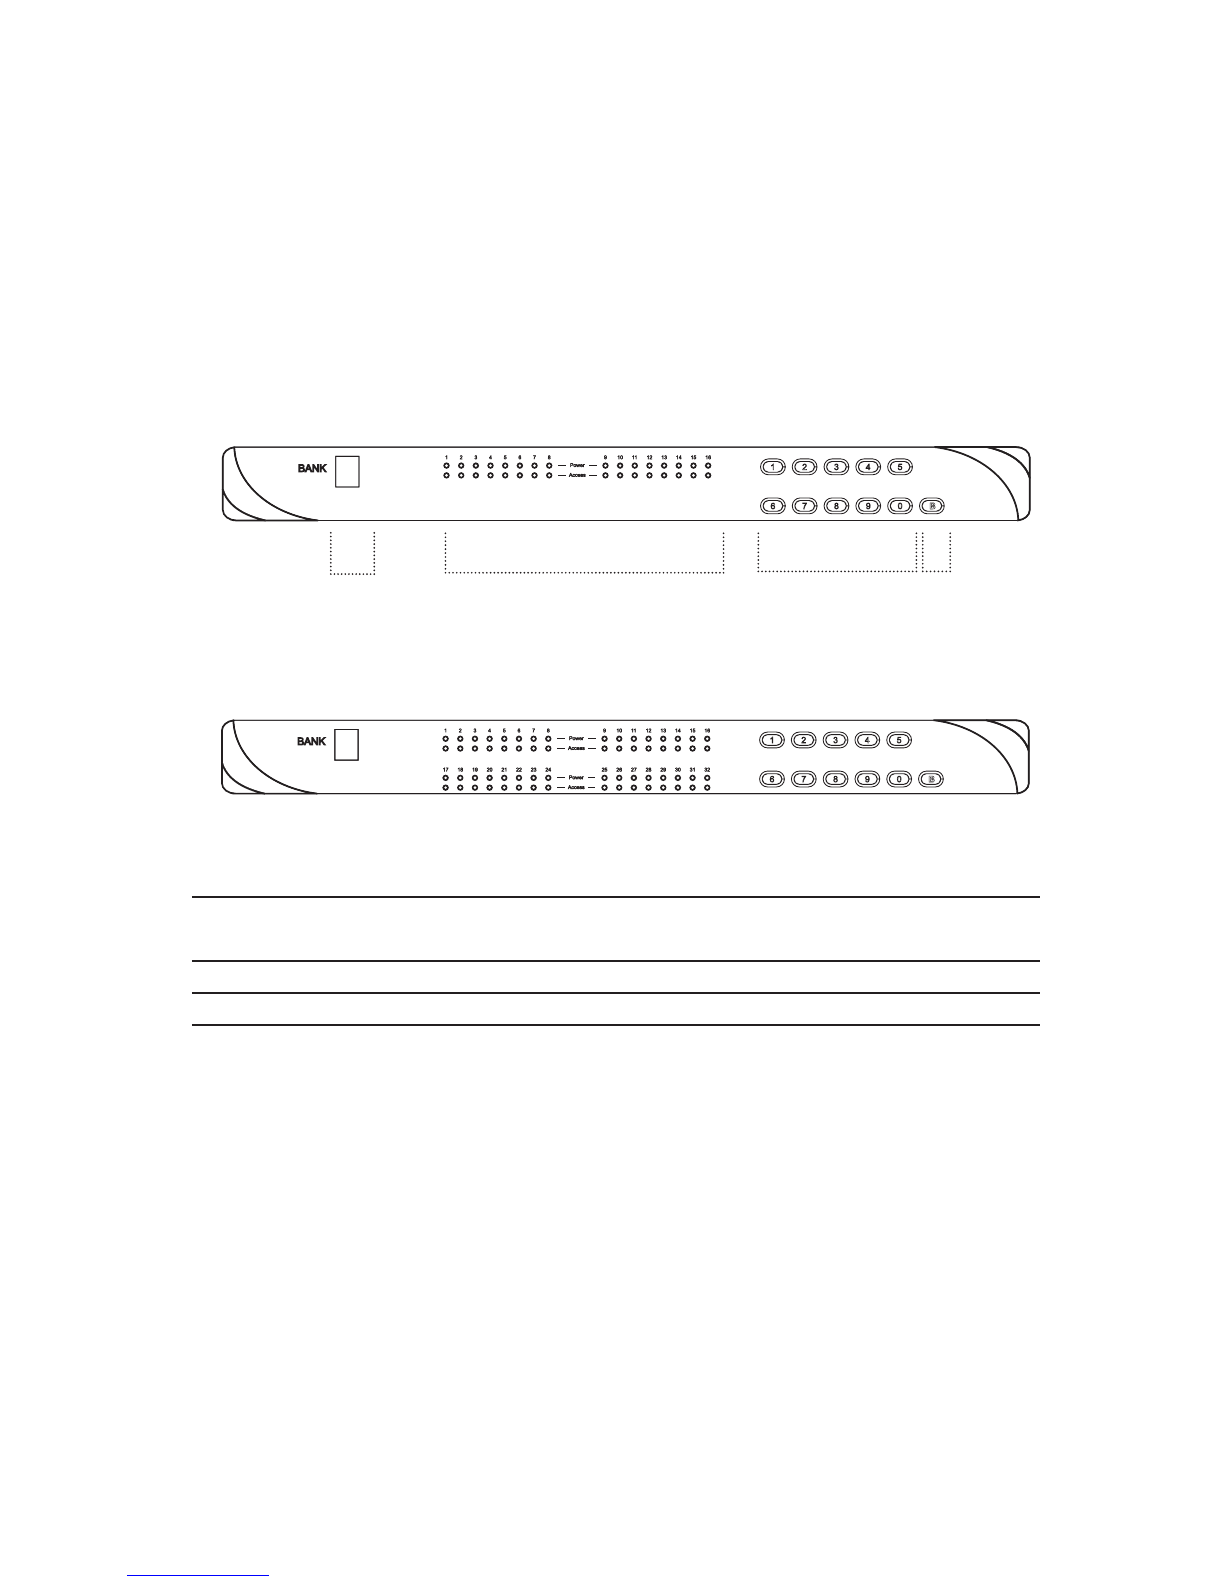
KVM Membranes
Power ON
■Turn off all servers and KVM switches
■Make sure all cables / connectors are properly connected
■Recommend Power ON sequence is monitor, KVM switch finally computer
16 ports
32 ports
Bank no. PC port LEDs Channel
button
Bank
button
Bank no. 7-Segment BANK LED indication
PC port LEDs Power : Orange LED on indicating a PC is connecting to the port
Access : Red LED on indicating a selected channel
Channel button Press to select channel from 01 to 32
Bank button Select the bank from 1 to 8
Front Panel - Port LED Indications

Password
The password is disabled by default ( i.e. There is no password required when you power on the KVM switch
for the first time)
■Enable password
1. Press the KVM hotkey Scroll Lock + Scroll Lock + U
2. Logout the KVM by pressing the hotkey Scroll Lock + Scroll Lock + P
3. In SUPERVISOR level, enter “00000000” eight zeros in user name & password field
(Do not use “0” on number pad)
4. In USER level, press Space bar + Enter in user name & password field
Remark: Automatic logout after 10 minutes of inactivity
■Set your own user name & password
1. Login the KVM in SUPERVISOR level by pressing “00000000” eight zeros in user name & password
field
2. Call KVM OSD menu by pressing the KVM hotkey Scroll Lock + Scroll Lock + Space Bar
3. Press F1 to the MAIN MENU
4. Select “USER SECURITY”
5. Set password in SUPERVISOR & USER level
a. In the left-top row “S” (SUPERVISOR), press Enter to set your own user name & password
b. In the row 1 to 8 (USER), press Enter to set your own user name & password
6. Press Enter to save the setting or press Esc to cancel the editing without any change
Remark: a. Blank has underscore, while SPACE doesn’t have
b. Press any alphanumeric key to move to next input item. SPACE is treated as a valid
character
■Change your password
1. Login the KVM in SUPERVISOR level by pressing your own user name & password
2. Call KVM OSD menu by pressing the KVM hotkey Scroll Lock + Scroll Lock + Space Bar
3. Press F1 to the MAIN MENU
4. Select “USER SECURITY”
5. Change password in SUPERVISOR & USER level
a. In the left-top row “S” (SUPERVISOR), press Enter to change your user name & password
b. In the row 1 to 8 (USER), press Enter to change your user name & password
6. Press Enter to save the setting or press Esc to cancel the editing without any change
Remark: a. Blank has underscore, while SPACE doesn’t have
b. Press any alphanumeric key to move to next input item. SPACE is treated as a valid
character
■Disable your password
1. Press the KVM hotkey Scroll Lock + Scroll Lock + U
2. Logout the KVM by pressing the KVM hotkey Scroll Lock + Scroll Lock + P
3. You don’t need user name & password to access the KVM OSD menu
■Forget your password
Please contact your supplier for further support
Remark:
■You must press the KVM hotkey within 2 seconds
■A beep sound will be heard for successful entering KVM hotkey

OSD operation
next to the system name The PC is powered on
next to the system name The PC is selected
F1 Access F1 MAIN MENU
F2 Logout the OSD menu
F3 Previous menu
Esc Cancel / Quit
Enter Complete / Switch to selected port
Switch to previous or next port
PgUp/PgDn Switch to previous bank or next bank
1 / 2 / 3 / 4 Display port 01 ~ 08 / 09 ~ 16 / 17 ~ 24 / 25 ~ 32
Remark: Display port 17 ~ 32 for 32 port model only
KVM OSD
OSD Menu
F1 Main Menu
egnahcegaugnalDSOEGAUGNAL10
eDTIDEEMANTROP20 fine port name
emantropybgnihcraeskciuQHCRAESTROP30
drowssapegnahCYTIRUCESRESU40
eDTSILSSECCA50 fine user access authority
yektohegnahCYEKTOH60
lavretniemityalpsidnacsyfidoMSGNITTESEMIT70
deepsesuomDSOyfidoMESUOMDSO80

KVM Hotkey
Hotkey Function
Scroll Lock + Scroll Lock + Space Bar Calling OSD menu
Right-button mouse + Esc Calling OSD menu
Scroll Lock + Scroll Lock + Switch to previous port
Scroll Lock + Scroll Lock + Switch to next port
Scroll Lock + Scroll Lock + PgUp / PgDn Switch to previous bank or next bank
Scroll Lock + Scroll Lock + Bank no. + Port no. Switch to specific port
Scroll Lock + Scroll Lock + BTurn the buzzer ON and OFF
* Default the buzzer is ON
Scroll Lock + Scroll Lock + PLogout the KVM if password security is
ON. Show up the status windows
Advance hotkeys (for Supervisor login only)
Scroll Lock + Scroll Lock + S
Activate auto-scan mode for connected
servers
*Press any key to exit the auto-scan
mode
Scroll Lock + Scroll Lock + R
Reset all the KVM settings to factory
default
*Except User Security settings
Scroll Lock + Scroll Lock + UDisable and enable password security
*Default security is OFF
Scroll Lock + Scroll Lock + L
To enable / disable the screen saving
function and 10 mintues auto-logout
*Default the screen saving is OFF
Local Console Hotkey
Hotkey Function
Caps Lock + Caps Lock + F1 Show up the Help OSD windows
Caps Lock + Caps Lock + F2 Select Hotkey
*Default is Caps Lock
Caps Lock + Caps Lock + CToggle switch between remote & local port
Caps Lock + Caps Lock + QTurn the buzzer ON & OFF
*Default the buzzer is ON
Caps Lock + Caps Lock + SActivate auto-scan mode for remote & local port
*The scan time interval is 5 seconds
Caps Lock + Caps Lock + AAuto-adjust the video signal
Remote Console Hotkey
Remarks:
■Example of “Scroll Lock + Scroll Lock + Bank no. + Port no.”
- Bank No. : 1 to 8
- Port No. : 01 to 16
- e.g. Bank 1 Port 4 : Scroll Lock + Scroll Lock + 1+ 0+ 4
- e.g. Bank 2 Port 16 : Scroll Lock + Scroll Lock + 2+ 1+ 6
■You must press the hotkey within 2 seconds
■A beep sound will be heard for successful entering
■The numeric keypad is not supported, while in OSD screen, the arrow keys, PgUp, PgDn, and Enter keys
are supports
This manual suits for next models
1
Table of contents
Other Rackmount Switch manuals


