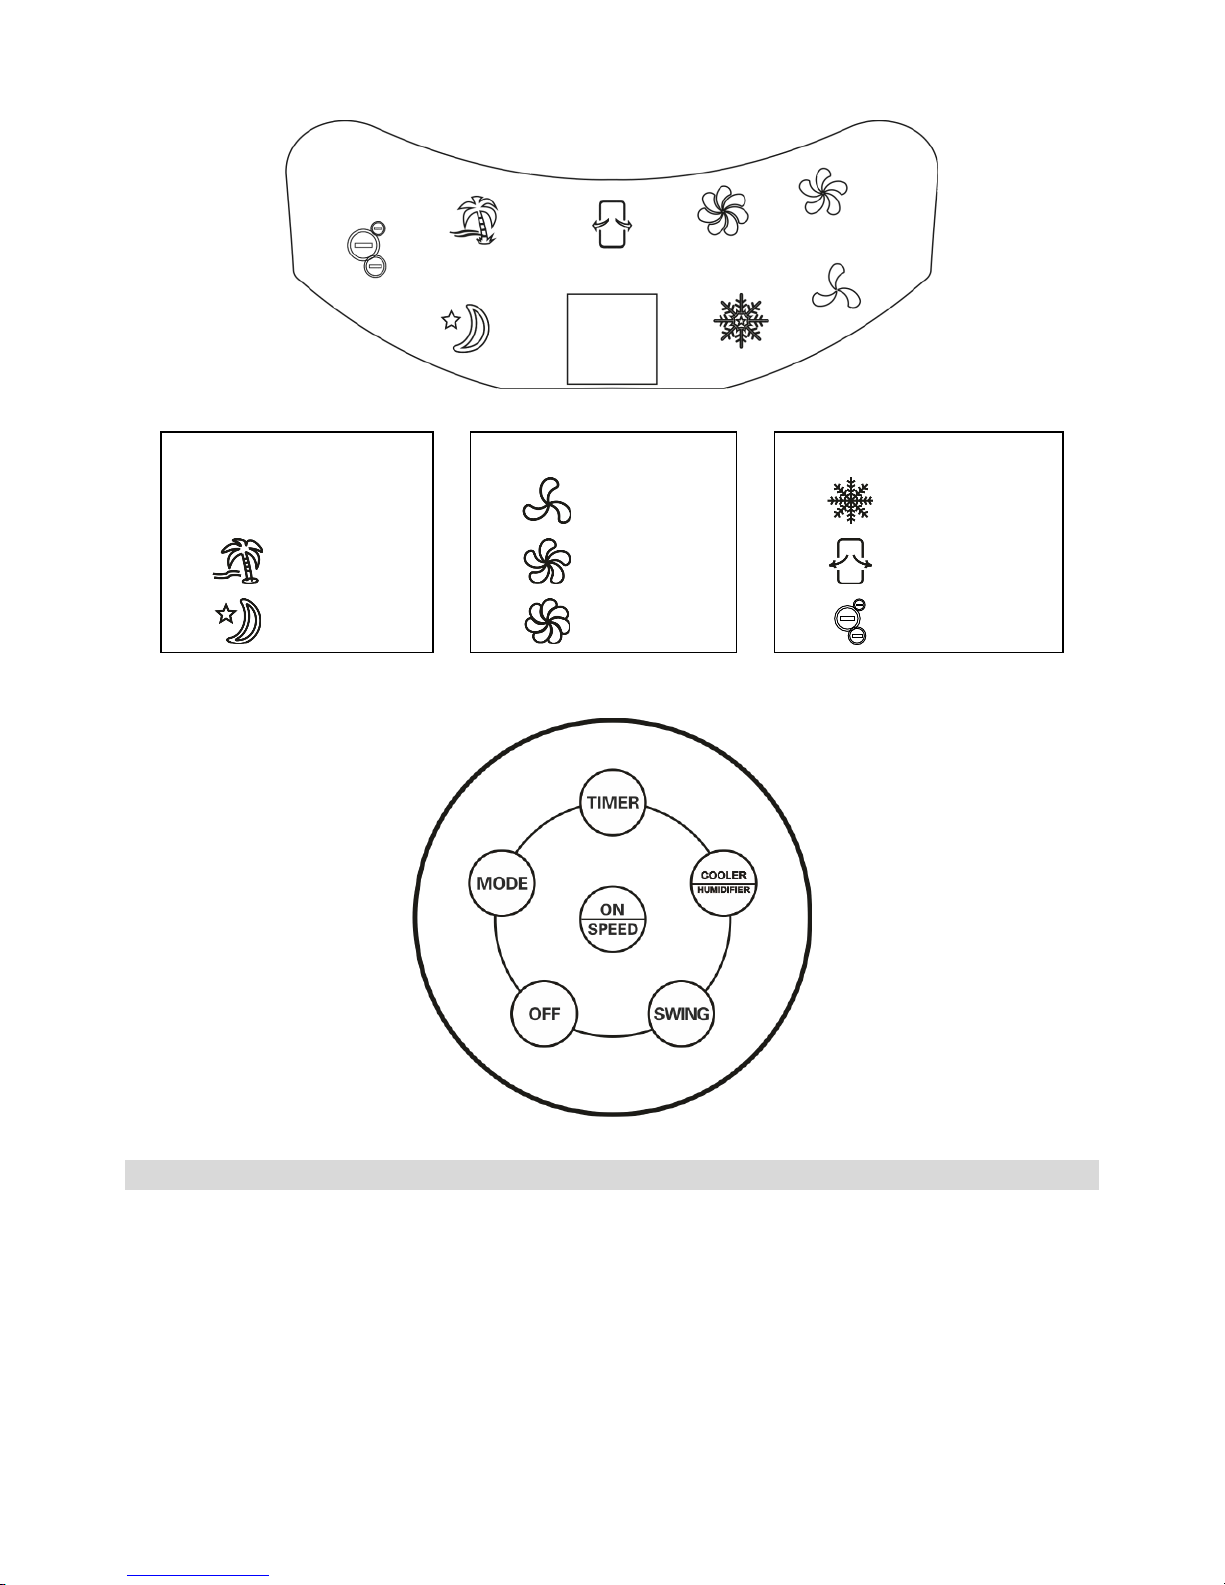
Radialight AER Domus User manual

1
AER Domus
GB - Please retain these instructions in a safe place for future reference
IT - Si prega di conservare con cura questo libretto d’istruzioni per future consultazioni

2
ENGLISH
OPERATING INSTRUCTIONS
Before operating the appliance, please read these instructions thoroughly to avoid damage and hazardous
situations. Any use of this product other than that stipulated in this instruction manual may cause fire,
electric shock or injury, and voids all warranties.
Warranty does not apply to any defect, deterioration, loss, injury or damage caused by, or as a result of, the misuse or
abuse of this heater. The rights dictated by State law are not prejudiced. None of the terms of this warranty are to be
taken as excluding any conditions or warranties implied by State law, which cannot be excluded or modified.
Before any operation remove the packaging and check product integrity. In case of defects or damages do not try to
repair it yourself but contact your dealer.
Do not let children play with the packaging and protect the environment by disposing of the packaging in accordance
with the national regulations for waste processing.
1. For your safety
This appliance is intended for normal household use and not for
use in commercial/industrial environment, in vehicles or on board
ships or aircrafts.
This appliance can be used by children aged from 8 years and
above and persons with reduced physical, sensory or mental
capabilities or lack of experience and knowledge if they have been
given supervision or instruction concerning use of the appliance in
a safe way and understand the hazards involved. Children shall
not play with the appliance. Cleaning and user maintenance shall
not be made by children without supervision.
Children of less than 3 years should be kept away unless
continuously supervised.
Children aged from 3 years and less than 8 years shall only switch
on/off the appliance provided that it has been placed or installed in
its intended normal operating position and they have been given
supervision or instruction concerning use of the appliance in a safe
way and understand the hazards involved. Children aged from 3
years and less than 8 years shall not plug in, regulate and clean
the appliance or perform user maintenance.
If the supply cord is damaged, it must be replaced by the
manufacturer, its service agent or similarly qualified persons in
order to avoid a hazard.
Unplug the appliance during filling and cleaning.
Ensure that the fan is switched off from the supply mains before
removing the guard and the filter.
This appliance is to be used on a smooth and flat (not inclined)
floor.

3
2. Features
Three Ventilation Modes: Normal, Natural, Sleep wind.
Three Ventilation Speeds: Low, Medium and High.
Advanced Cooler Master, higher efficiency of evaporating and cooling effort.
With 2pcs Ice packs, better and longer cooling time.
Adjustable grid wings to blow wind to all directions.
Timer: 0.5-7.5 hours.
Remote control.
3. Components and accessories
Parts list
1 - control panel
2 - display panel
3 - IR remote receiver
4 –air outlet
5 - water level display
6 - caster
7 - dust-proof filter
8 - cooler master holder
9 - water tank
10 - power cord
11 - water tank knob
Accessory
Ice box (x 2)

4
Display panel
VENTILATION MODES
VENTILATION SPEEDS
FUNCTIONS
---
NORMAL
LOW
COOLER
HUMIDIFIER
NATURAL
MEDIUM
SWING
SLEEP
HIGH
IONIZER
Control panel
4. Installation and usage
Install
Remove the packaging and use the appliance directly.
FUNCTION KEYS
Press the functional keys to active corresponding function:
1. Plug in and you would hear “beep beep”, the appliance is under standby mode, you can only use ON/SPEED
button.
2. ON/SPEED: Under standby mode, press this key and the appliance starts from MEDIUM speed then change to
LOW speed within 3 seconds, the corresponding led light goes on: the appliance is under NORMAL wind mode.
Press the key again to set the speed, once to MEDIUM speed, second to HIGH speed. The corresponding led
lights on.
3. OFF: Press this button to exit functions and enter into Standby mode.
4. MODE: Press the button once to switch from NORMAL to NATURAL mode, press again to enter into SLEEP
mode, Press for a third time to enter NORMAL mode again and restart the sequence.

5
①MODE = Normal wind
Available speeds: Low, Medium, High.
In the normal wind mode the product works continuously at the set speed (Low→ Medium → High)
②MODE = Natural wind
Available speeds: Low, Medium or High.
Operation profile of natural wind mode is as following pictures (Low→ Medium → High).
High speed
Medium speed
Low speed
Stop
10s
5s
10s
5s
3s
10s
5s
5s
3s
5s
5s
5s
3s
Natural mode in low speed
High speed
Medium speed
Low speed
Stop
5s
5s
5s
5s
5s
5s
3s
10s
10s
3s
5s
10s
3s
Natural mode in medium speed
High speed
Medium speed
Low speed
Stop
5s
5s
5s
3s
10s
10s
5s
5s
3s
5s
10s
5s
5s
Natural mode in high speed
③MODE = Sleep wind
Available speeds: Low, Medium or High.
In the sleep wind mode the product works as follows (Low→ Medium → High):
Low speed = low speed natural wind
Medium speed = 30 minutes medium speed natural wind+
low speed natural wind (maintain).
High speed = 30 minutes high speed natural wind +
30 minutes medium speed natural wind +
low speed natural wind (maintain).
5. TIMER: Press this button to set timing from 0.5~7.5 hours.
6. COOLER/HUMIDIFIER: Press this button to activate the Cooling/Humidifying function, the corresponding led
goes on simultaneously.
7. SWING: Press this button once to active the rotation function. Press again to exit. The corresponding led turns
on and off accordingly.
Ionizer
The ionizer is always active when the product is on. The corresponding light on the display panel goes on and off
accordingly.
Refilling water
Do refill water before use Cooler/Humidifier. Turn the tank knob left, half pull out the tank and pour the water slightly.
Re-lock the water tank again after refilling water.
Note: the water tank cannot be removed, you just have to pull it out from the product

6
Water Level Indication
Pay attention to the water level when refilling water .
1. Keep water not lower than Min. level and not higher than Max. level.
2. Push back the water tank after refilling water.
3. Use clean water.
4. After refilling the water, push back into the drawer and lock the water tank.
5. Kindly Reminder:For the first usage, possibly there would be some scent and discoloring in the water. NO harm
to health at all.
Ice Box
The ice-box has the particular specialties of cooling preservation, it is able to absorb the heat in the water, which
makes the water temperature below the environment temperature.
1. Put the ice-box in refrigerator till completely icing up.
2. Put the freezed ice-box to the water tank, lock the water tank door, after 10 minutes, the temperature of the
water tank will be lower than the environment temperature .
3. There are two ice-boxes, ensure continual use. Once the firs box is exhausted you can use the second one and
so on.
4. Don’t open the ice box or swallow the ice.

7
Remote Control
1. Open the battery cover at the back of remote controller, install a battery of Mode 3V CR2032 in it, then you can
use it.
2. Please aim at the receiver window when using
3. Insert the coin or similar tool into groove, rotating it as shown in below picture to open the battery cover.
4. Please pay attention to the positive and negative poles when replace the battery.
5. Cleaning and maintenance
Cleaning of Dust-proof filter and Cooler Master Filter
To avoid the overload of dust-proof filter, please clean the filter at least once a month
1. Take off the dust-proof filter, turn the knob of cooling pad as shown in below picture:
2. Clean the dust-proof filter with abstergent or soft brush.
3. Turn off the appliance, disassemble the cooling pad into detergent water, then clean in water and dry it.
Cleanness of Water tank
1. Unplug the unit and pull out the water tank according to instruction.
2. Clean it with washrag or abstergent, and then scour away the slops
Cleanness of the Appliance
1. Clean the surface of the unit with damp cloth, never scouring it directly.
2. Do not use corrosive detergent or solvent to clean.
3. Unplug the appliance to avoid electric hazard.

8
Reinstallation
1. Reinstall the filters back in sequence: water tank, Cooler Master and Dust-proof filter
2. Plug the unit to make sure it works.
3. Otherwise please check the installation of dust-proof filter.
Maintenance
1. Unplug the power cord and packing it to prevent from the dust when not using long time.
2. Make sure the cooling pad, filter and water tank dry before package.
3. Store the appliance in a dry and ventilated place.
6. Technical data
Model
AER Domus
voltage
230V~
frequency
50Hz
Input
45W
Dimension
298,0 x 298,0 x 944,7mm
7. Legal notice
Environment and recycling
Please help us to protect the environment by disposing of the packaging in accordance with the national
regulations for waste processing.
Recycling of obsolete appliances
Appliances with this label must not be disposed off with the general waste. They must be
collected separately and disposed off according to local regulations.

9
ITALIANO
ISTRUZIONI PER L’USO
Si prega di leggere attentamente queste istruzioni, prima di utilizzare il prodotto, in modo da evitare
danneggiamenti o comunque il verificarsi di situazioni di pericolo. Qualsiasi utilizzo del prodotto diverso da
quanto indicato nel presente manuale può causare incendi, pericoli elettrici o ferite e rende nulla qualsiasi
garanzia.
La garanzia non si applica ad alcun difetto, deterioramento, perdita, ferimento o danneggiamento riconducibili ad un
uso non corretto del prodotto. Rimangono garantiti tutti i diritti di legge in materia. Nessuna condizione di garanzia può
escludere o modificare le condizioni di garanzia regolamentate da leggi dello Stato che non possono essere a nessun
titolo escluse o modificate.
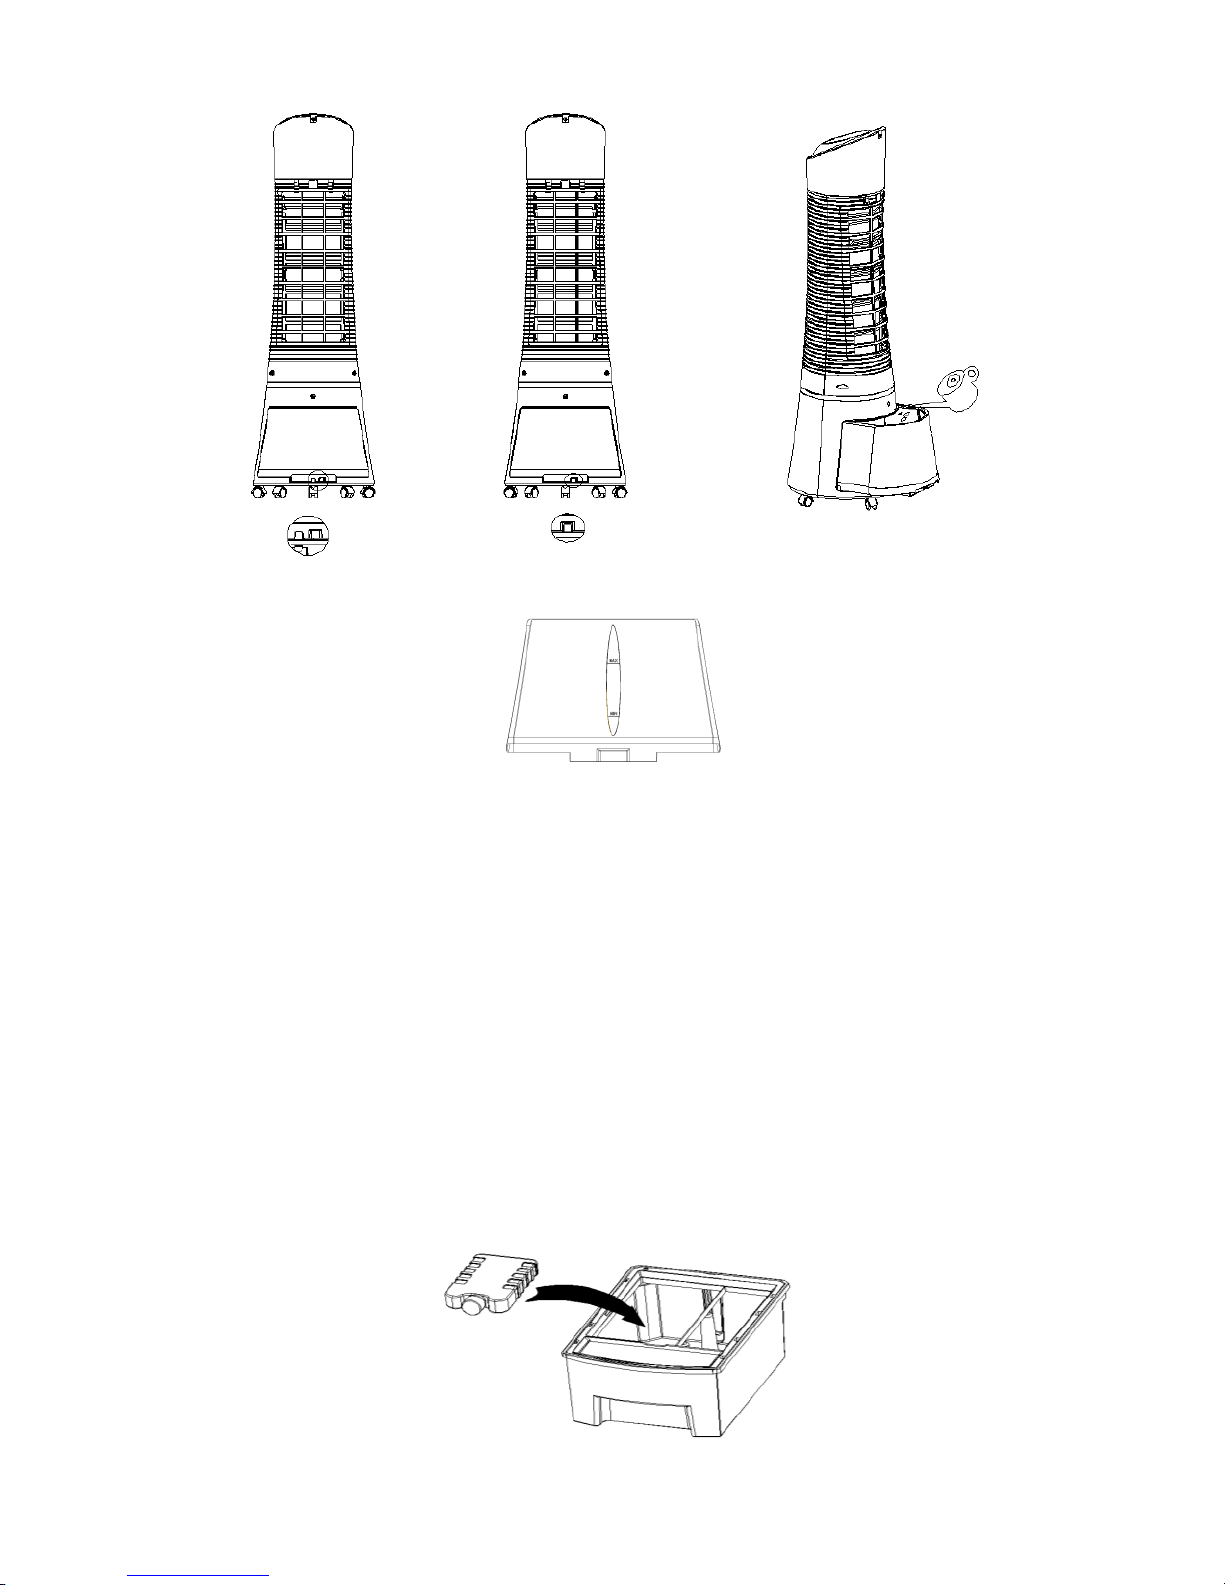
Prima di ogni operazione, rimuovere con cura l’imballo e controllare la perfetta integrità del prodotto. Nel caso si
evidenziassero dei difetti o danni, non installare né cercare di riparare l’apparecchiatura, ma rivolgersi al rivenditore.
Non lasciare l’imballo alla portata dei bambini e smaltirne le parti in conformità con le disposizioni vigenti.
1. Per la Vostra sicurezza
Questo prodotto è peruso domesticoe non è adatto per l'utilizzo in
ambienti commerciali/industriali o su veicoli, imbarcazioni o
aeromobili.
L’apparecchio può essere utilizzato da bambini di età non inferiore
a 8 anni e da persone con ridotte capacità fisiche, sensoriali o
mentali, o prive di esperienza o della necessaria conoscenza,
purché sotto sorveglianza oppure dopo che le stesse abbiano
ricevuto istruzioni relative all’uso sicuro dell’apparecchio e alla
comprensione dei pericoli ad esso inerenti. I bambini non devono
giocare con l’apparecchio. La pulizia e la manutenzione destinata
ad essere effettuata dall’utilizzatore non deve essere effettuata da
bambini senza sorveglianza.
I bambini di età inferiore a 3 anni non devono avvicinarsi al
prodotto se non costantemente supervisionati.
I bambini di età compresa fra 3 e 8 anni possono solamente
accendere e spegnere l’apparecchio purché esso sia stato
installato e posizionato secondo le normali condizioni d’uso e loro
siano supervisionati o adeguatamente istruiti riguardo al corretto e
sicuro utilizzo del prodotto e ne abbiano compresa la pericolosità. I
bambini di età compresa fra 3 e 8 anni non possono collegare il
prodotto, regolarlo, pulirlo o effettuare manutenzione
Se il cavo di alimentazione del prodotto é danneggiato, deve
essere sostituito dal produttore o da un centro di assistenza
tecnica qualificator, al fine di evitare pericoli.

10
Durante il riempimento d’acqua del serbatoio o la pulizia il prodotto
deve essere spento e scollegato dall’alimentazione.
Il prodotto deve essere spento e scollegato dall’alimentazione
prima di rimuovere il filtro dell’aria.
Il prodotto deve essere usato esclusivamente su un pavimento
privo di ostacoli ed asperità e soprattutto non inclinato.
2. Caratteristiche
Tre modalità di ventilazione: NORMALE, NATURALE, NOTTE.
Tre diverse intensità di ventilazione: SILENZIOSA, MEDIA, FORTE.
Ventilazione normale –Ventilazione raffrescata.
Due panetti ghiaccio in dotazione , per un effetto di raffrescamento più intense e prolungato.
Ventilazione oscillante per direzionare l’aria in senso orizzontale su un fronte più ampio.
Possibilità di orientare l’aria in senso verticale muovendo le alette della griglia manualmente.
Uso continuo –Uso temporizzato da 30 ‘ sino a 7 h.e 30’.
Uso manuale (comandi sul prodotto) –Uso con telecomando (in dotazione).
3. Componenti e accessori
Elenco delle parti
1 –pannello di controllo
2 - Display
3 –Ricevitore IR telecomando
4 - Griglia uscita aria
5 - Indicatore livello acqua
6 - Ruote girevoli
7 - Filtro polvere
8 - Filtro raffrescatore acqua
9 - Serbatoio acqua
10 - Cavo alimentazione
11 - Manopola blocco serbatoio

11
Accessori
Ice box (x 2)
Display
MODALITA’ DI
VENTILAZIONE
VELOCITA’ DI VENTILAZIONE
FUNZIONI
---
NORMALE
SILENZIOSA
VENTILAZIONE
RAFFRESCATA
NATURALE
MEDIA
OSCILLAZIONE
NOTTE
FORTE
IONIZZATORE
Pannello di controllo

12
4. Installazione ed uso
Primo utilizzo
Togliete il prodotto dall’imballo. Potete iniziarne l’uso da subito, senza ulteriori operazioni di preparazione –
installazione.
Tastiera comandi
I comandi sono a pressione:
1. Inserite il cavo nella presa di alimentazione. Sentirete 2 “beep” e il prodotto si porta in modalità standby.
2. ACCENSIONE (ON/SPEED)
Dallo stato di standby premere il tasto ON/SPEED per accendere il prodotto. L’apparecchio si mette in funzione
a velocità MEDIA e dopo poco passa alla velocità SILENZIOSA. Premendo ulteriormente il tasto ON/SPEED
la velocità di ventilazione cambia: SILENZIOSA → MEDIA → FORTE... e via in sequenza. I rispettivi led si
illuminano
3. SPEGNIMENTO (OFF)
Premendo il tasto OFF il prodotto si spegne.
4. MODALITA’ di VENTILAZIONE (MODE)
Vi sono 3 diverse modalità di ventilazione: NORMALE, NATURALE e NOTTE. Premendo il pulsante MODE si
attivano le 3 diverse modalità in sequenza.
①MODO = Ventilazione normale
Velocità disponibili: Silenziosa, Media e Forte.
In ventilazione normale il prodotto funziona continuamente alla velocità di funzionamento impostata
(SILENZIOSA → MEDIA → FORTE).
②MODO = Ventilazione naturale
Velocità disponibili: Silenziosa, Media e Forte.
In questa modalità la ventilazione varia nel tempo e lo fa in modo diverso a seconda della velocità impostata
simulando la ventilazione della brezza secondo i seguenti profili di funzionamento:
Velocità forte
Velocità media
Velocità silenziosa
Stop
10s
5s
10s
5s
3s
10s
5s
5s
3s
5s
5s
5s
3s
Ventilazione naturale –velocità SILENZIOSA
Velocità forte
Velocità media
Velocità silenziosa
Stop
5s
5s
5s
5s
5s
5s
3s
10s
10s
3s
5s
10s
3s
Ventilazione naturale –velocità MEDIA
Velocità forte
Velocità media
Velocità silenziosa
Stop
5s
5s
5s
3s
10s
10s
5s
5s
3s
5s
10s
5s
5s
Ventilazione naturale –velocità FORTE
③MODO = Ventilazione notte
Velocità disponibili: Silenziosa, Media e Forte
In modalità ventilazione notte il prodotto funziona nel seguente modo:
Velocità silenziosa = Ventilazione naturale a velocità silenziosa.
Velocità media = 30 minuti in ventilazione naturale a velocità media +
Mantenimento in ventilazione naturale a velocità silenziosa.

13
Velocità forte = 30 minuti in ventilazione naturale a velocità forte +
30 minuti in ventilazione naturale a velocità media +
Mantenimento in ventilazione naturale a velocità silenziosa.
5. FUNZIONAMENTO TEMPORIZZATO (TIMER)
Normalmente il prodotto funziona in continuo ma se volete potete temporizzarne l’uso in modo che funzioni per
un periodo limitato e poi si spenga automaticamente. Premendo il tasto TIMER si imposta la durata della
temporizzazione 0.5h → 1.0h → 1.5h → 2.0h ...... 7.5h → no timer → 0.5h e via in sequenza. Il led
corrispondente mostra la durata impostata
6. VENTILAZIONE RAFFRESCATA (COOLER/HUMIDIFIER)
Premendo il tasto COOLER/HUMIDIFIER si attiva la funzione di VENTILAZIONE RAFFRESCATA. Questa
funzione si attiva solo se è presente acqua nel serbatoio. Il led corrispettivo (fiocco di neve) si accenderà . L’aria
uscirà umidificata e raffrescata fornendovi una piacevole sensazione di benessere. Premendo di nuovo il tasto il
raffrescamento cessa e il prodotto torna in modalità VENTILAZIONE
7. OSCILLAZIONE (SWING)
Quando il prodotto é in funzione, premendo il tasto SWING si attiva l’oscillazione automatica. Il led
corrispondente si accende. L’aria viene direzionata su un fronte più ampio, raffrescando un’area più vasta.
Ionizzatore
Lo ionizzatore e sempre attivo quando il prodotto è in funzione. La corrispondente icona luminosa sul display si
accende e si spegne insieme al prodotto.
Riempimento del serbatoio
Per riempire il serbatoio dell’acqua girate la manopola di blocco in senso anti orario. Estraete quindi leggermente il
serbatoio e riempitelo controllando dall’indicatore posto sul frontale che il livello dell’acqua sia sopra il minimo e sotto il
massimo. Dopo averlo riempito riposizionatelo correttamente e bloccatelo di nuovo girando la manopola in senso
orario. Utilizzate solo acqua potabile. Attenzione: Il serbatoio non può essere completamente rimosso dal
prodotto.
Indicatore livello acqua
Durante il primo utilizzo é possibile che sentiate un leggero odore dell’aria. Questo non é assolutamente tossico e
scomparirà dopo breve tempo.

14
Panetti ghiaccio
L’uso di questi panetti é raccomandato perché aiutano a mantenere bassa nel tempo l’acqua nel serbatoio ed
assicurano un effetto di raffrescamento più intense e prolungato
1. Mettete I due panetti in un congelatore.
2. Mettete uno dei 2 panetti nel serbatoio e dopo 10 minuti l’acqua sarà ad una temperatura raffreddata.
3. I due panetti sono in dotazione per un uso continuo del prodotto ( quando l’acqua si sarà riscaldata , all’incirca
dopo 4 ore, é tempo di sostituire il panetto 1 con il panetto 2, mettendo l’1 di nuovo nel congelatore).
4. Non aprire mai il tappo del panetto ghiaccio.
Telecomando
1. Aprire il portellino che si trova nella parte posteriore del telecomando inserendo una moneta nel taglio e
ruotando il portellino in senso anti orario.
2. Inserire una batteria rotonda, da 3V Mod. CR2032
3. Puntate il telecomando verso il prodotto per farlo funzionare.
4. Quando non utilizzate il telecomando per lungo tempo vi consigliamo di rimuovere la batteria e di conservarlo in
un luogo sicuro

15
5. Pulizia e manutenzione
Pulizia del filtro polvere e del filtro dell’acqua
Vi consigliamo di pulire il filtro dell’aria almeno una volta al mese
1. Spegnete il prodotto e scollegate la spina.
2. Rimuovete il filtro dell’aria asportando la griglia protettiva che si trova nella parte posteriore del prodotto:
3. Pulite il filtro polvere con un panno o con dell’acqua, avendo poi cura di asciugarlo perfettamente.
4. Riposizionate il filtro e rimettete in posizione la griglia protettiva
Pulizia del filtro dell’acqua
Vi consigliamo di eseguirla al termine della stagione d’uso del prodotto e all’inizio della nuova stagione:
1. Ripetete le operazioni precedenti (1 e 2).
2. Rimuovere il filtro dell’acqua, pulirlo sotto acqua fredda e farlo asciugare perfettamente prima dell’uso.
3. Riposizionate il filtro dell’acqua , il filtro anti polvere e la griglia protettiva.
Pulizia del serbatoio dell’acqua
Vi consigliamo di eseguirla al termine della stagione d’uso del prodotto e all’inizio della nuova stagione
1. Spegnete il prodotto e scollegate la spina.
2. Pulite il serbatoio con acqua calda e risciacquate più volte asciugandolo con cura al termine
Pulizia del prodotto
1. Spegnete il prodotto e scollegate la spina.
2. Pulire il prodotto utilizzando solo acqua
Come conservare il prodotto quando non lo usate
Se prevedete di non utilizzare il prodotto per lungo tempo:
1. Svuotate il serbatoio e pulitelo con cura rimettendolo in posizione.
2. Pulite bene sia il filtro anti polvere sia il filtro dell’acqua, ricordandovi di farlo asciugare perfettamente.
3. Riponete il prodotto in un sacchetto e custoditelo in un luogo asciutto unitamente ai suoi panetti ghiaccio.

16
6. Dati tecnici
Model
AER Domus
Voltaggio
230V~
Frequenza
50Hz
Potenza assorbita
45W
Dimensioni
298,0 x 298,0 x 944,7mm
7. Informazioni legali
Tutela dell'ambiente e riciclaggio
Affinché il vostro apparecchio non subisca danni durante il trasporto, esso è stato imballato con cura. Per
contribuire alla tutela del nostro ambiente, vi chiediamo di smaltire in modo appropriato il materiale
utilizzato per l'imballaggio dell'apparecchio.
Smaltimento degli apparecchi usati
Gli apparecchi che recano il contrassegno riportato a fianco non devono essere smaltiti insieme ai rifiuti
urbani, ma vanno raccolti e smaltiti separatamente. Lo smaltimento degli apparecchi usati va eseguito a regola d'arte,
in conformità con le prescrizioni e leggi vigenti localmente in materia.
Ermete Giudici S.p.A.
Via L. da Vinci, 27
20090 Segrate (MI) –Italia
www.radialight.com
R4_20170224
Table of contents
Languages:
Other Radialight Air Conditioner manuals
Popular Air Conditioner manuals by other brands

Retro Aire
Retro Aire R40C Installation, operation & maintenance manual

SPT
SPT WA-1511S user manual

Mitsubishi Electric
Mitsubishi Electric Mr.Slim MSZ-A24NA operating instructions

Daikin
Daikin R32 Split Series installation manual

Frigidaire
Frigidaire FFRE103WA1 use & care

GE
GE AEC14 Owner's manual and installation instructions

Sanyo
Sanyo SAP-CMRV1923GJH Technical & service manual

Mitsubishi Electric
Mitsubishi Electric Mr. Slim PUZ-M200YKA2.UK Service manual

York
York YNKFZC024-055BAADAFX owner's manual

Diplomat
Diplomat DX-80CHRC instruction manual

Samsung
Samsung AW05F05EA Owner's instructions

Daikin
Daikin RX15RMVJU installation instructions