Radialight AER Pro User manual

1
AER Pro
IT - Si prega di conservare con cura questo libretto d’istruzioni per future consultazioni
GB - Please retain these instructions in a safe place for future reference

2
ENGLISH
OPERATING INSTRUCTIONS
Before operating the appliance, please read these instructions thoroughly to avoid damage and hazardous
situations. Any use of this product other than that stipulated in this instruction manual may cause fire,
electric shock or injury, and voids all warranties.
Warranty does not apply to any defect, deterioration, loss, injury or damage caused by, or as a result of, the misuse
or abuse of this heater. The rights dictated by State law are not prejudiced. None of the terms of this warranty are to
be taken as excluding any conditions or warranties implied by State law, which cannot be excluded or modified.
Before any operation remove the packaging and check product integrity. In case of defects or damages do not try to
repair it yourself but contact your dealer.
Do not let children play with the packaging and protect the environment by disposing of the packaging in accordance
with the national regulations for waste processing.
Used in air cooling mode (COOLER/AIR WASHER FUNCTION) this product delivers cool and humid air due to the
cold water in the tank , thus giving a pleasant feeling of freshness
1. For your safety
This appliance is intended for normal household use and not for
use in commercial/industrial environment, in vehicles or on board
ships or aircrafts.
This appliance can be used by children aged from 8 years and
above and persons with reduced physical, sensory or mental
capabilities or lack of experience and knowledge if they have
been given supervision or instruction concerning use of the
appliance in a safe way and understand the hazards involved.
Children shall not play with the appliance. Cleaning and user
maintenance shall not be made by children without supervision.
Children of less than 3 years should be kept away unless
continuously supervised.
Children aged from 3 years and less than 8 years shall only
switch on/off the appliance provided that it has been placed or
installed in its intended normal operating position and they have
been given supervision or instruction concerning use of the
appliance in a safe way and understand the hazards involved.
Children aged from 3 years and less than 8 years shall not plug
in, regulate and clean the appliance or perform user
maintenance.
If the supply cord is damaged, it must be replaced by the
manufacturer, its service agent or similarly qualified persons in
order to avoid a hazard.
Unplug the appliance during filling and cleaning.
Ensure that the fan is switched off from the supply mains before
removing the guard and the filter.

3
This appliance is to be used on a smooth and flat (not inclined)
floor.
2. Features
Humidification and cooling function.
Timer function: working time adjustable from 0.5 to 7.5 hours.
Infrared remote control.
Automatic water refilling and water pump protection function in case the tank is empty.
4 wind speed: Strong, high, medium and low.
3 wind modes: normal, natural, and sleeping.
Electronic keypad control, LED display.
Automatic oscillation for vertical louver, adjustable horizontal louver.
Omni-directional wheel design for easy moving.
Sound alerts when power on, shutdown, pressing buttons (power on: double beep, button-pressing: single beep,
power off: long beep).
Smart memory for unexpected power cut off : resume to original setting if the power resumes within 30 seconds
After working for 200 hours, the filter clearness indicator goes on (the machine will not automatic turn off, nor will
the cooling function shut down if the function is started before); Pressing the Cooling / Air washer key for 3
seconds to eliminate the warning.
3. Components and accessories
Product structure diagram
1. Operation panel
2. Function display window
3. Air outlet
4. Water inlet
5. Water level display window
6. Rear wheels
7. Caster
8. Remote control depository
9. Handle
10. Reel
11. Power cord
12. Dust-proof filter
13. Automatic filling component
14. Water tank
15. Water plug

4
Accessories
Remote Control
Operation panel
Display panel
VENTILATION MODES
VENTILATION SPEEDS
FUNCTIONS
NORMAL
LOW
COOLER
AIR WASHER
NATURAL
MEDIUM
SWING
SLEEP
HIGH
FILTER
CLEARNESS
INDICATOR
STRONG
Remote control operation panel

5
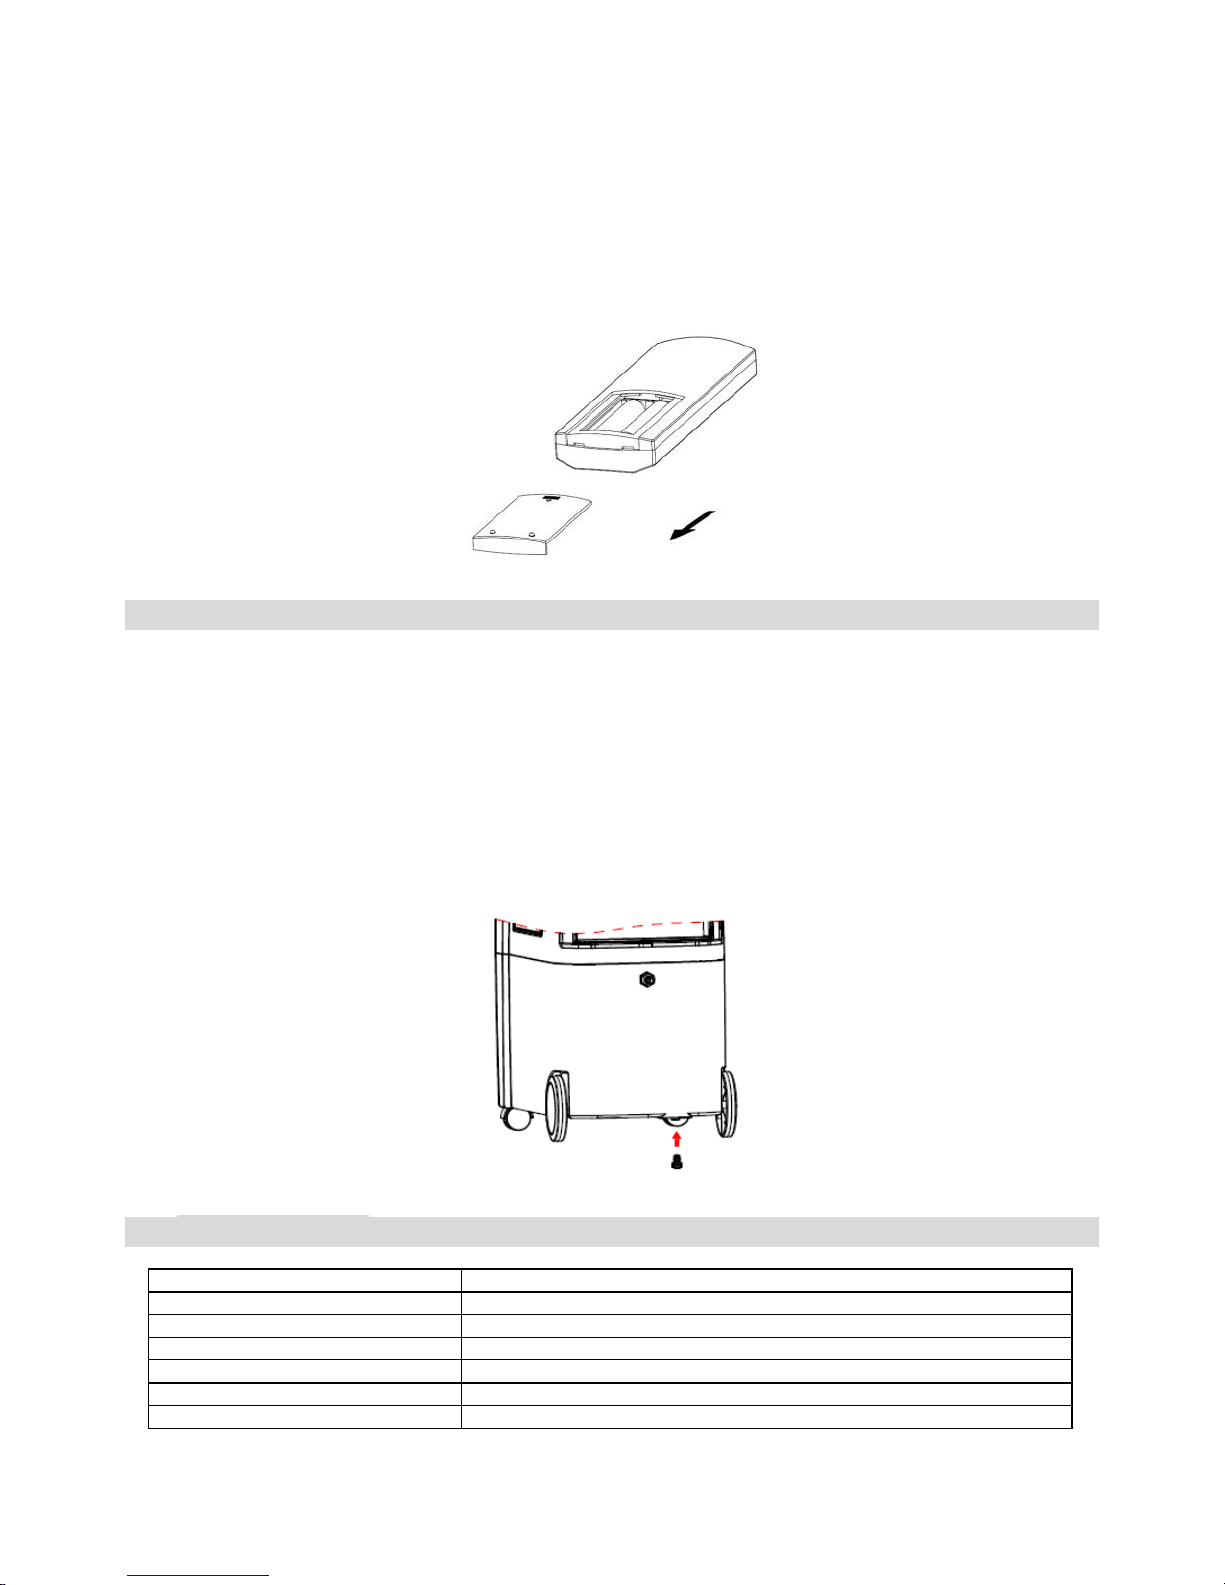
4. Installation and usage
Installation method
The product can be used directly after unpacked (without installation).
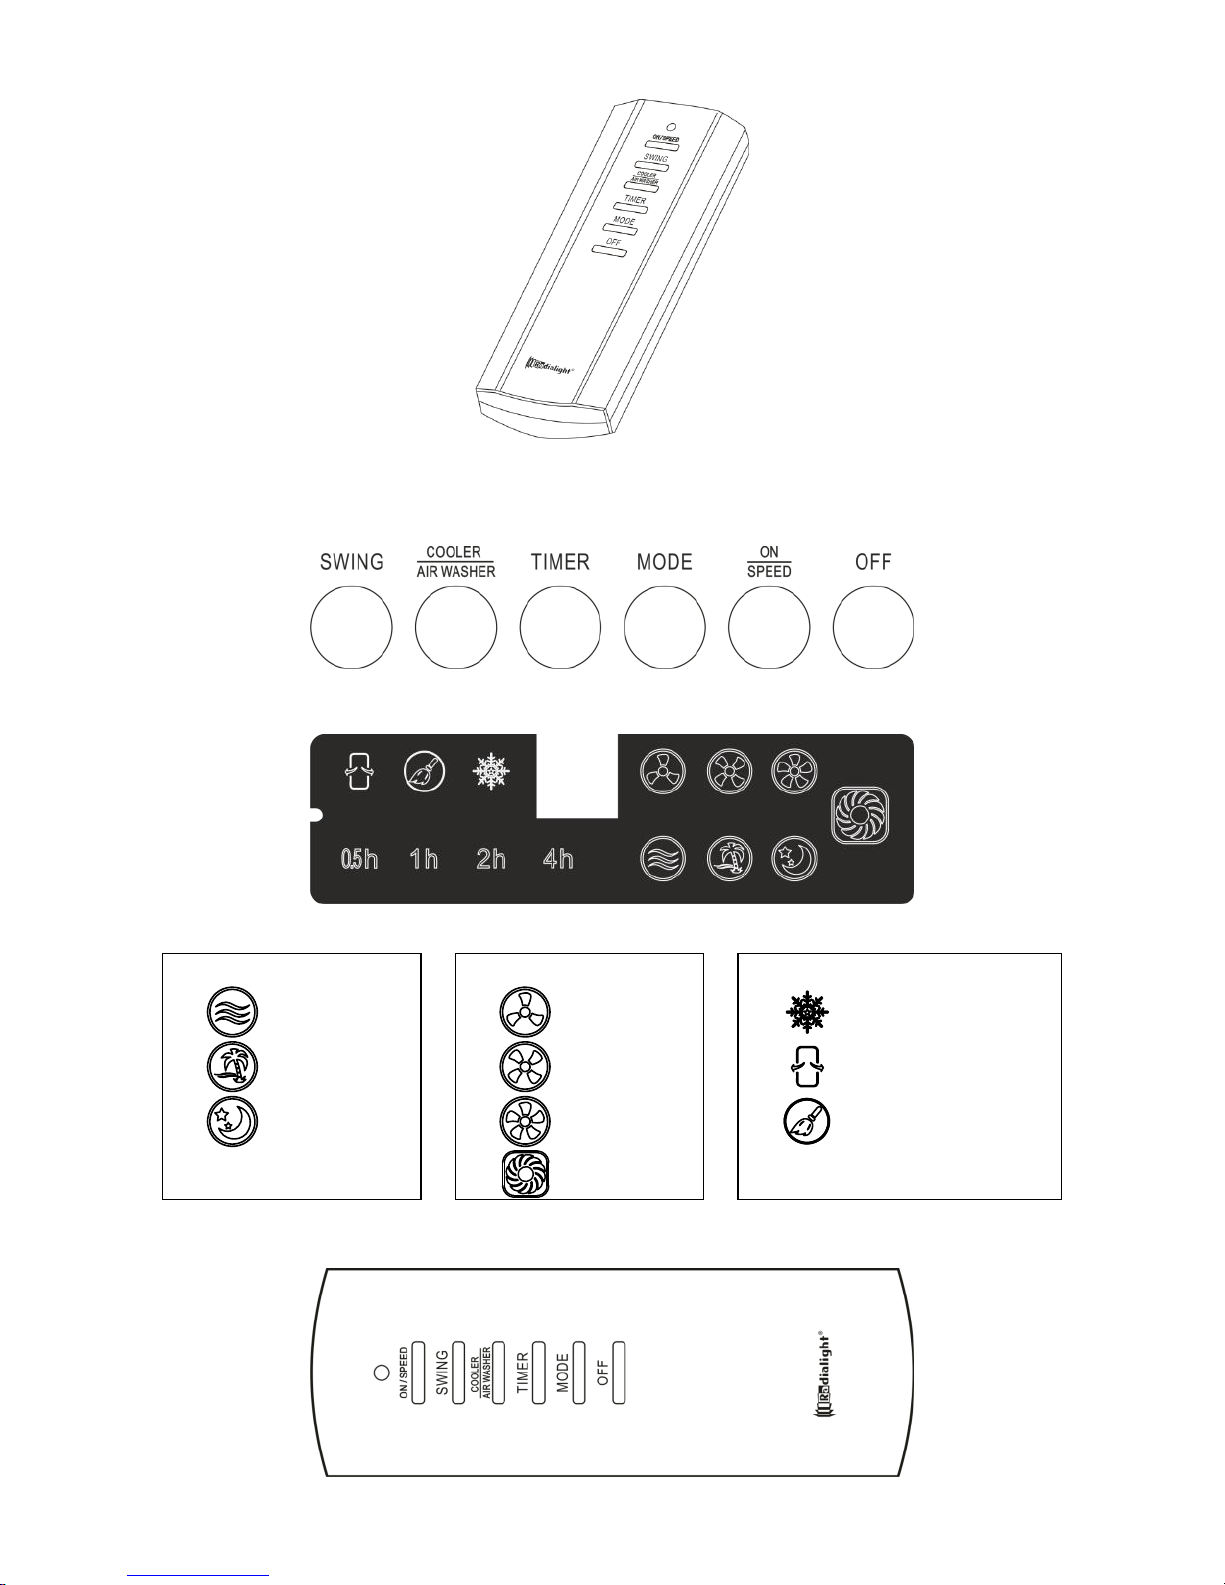
Usage of keys
The keys are tapping type. You can tap the operation panel to trigger respective function.
1. When the power is initially turned on, the buzzer beeps twice and enters the standby state; except power/speed
key, other keys are invalid.
2. Power ON/SPEED key
In standby mode, all keys except the Power on / Speed key are invalid; press this key to turn on the device,
and the circuit enters the working state. The initial speed of the device is medium, and turns to low
automatically after 3 seconds, corresponding LED lamp lights up, and it is normal mode, and the timer, wind
direction, and cooling / humidification function are invalid.
In power-on state, press this key to switch the wind speed in the sequence: Low → Mid → High → Strong →
Low ...... and so on. The speed LED indicator in this process also changes accordingly.
3. Power OFF key
In power on state, press this key to turn off the device, and the system returns to standby.
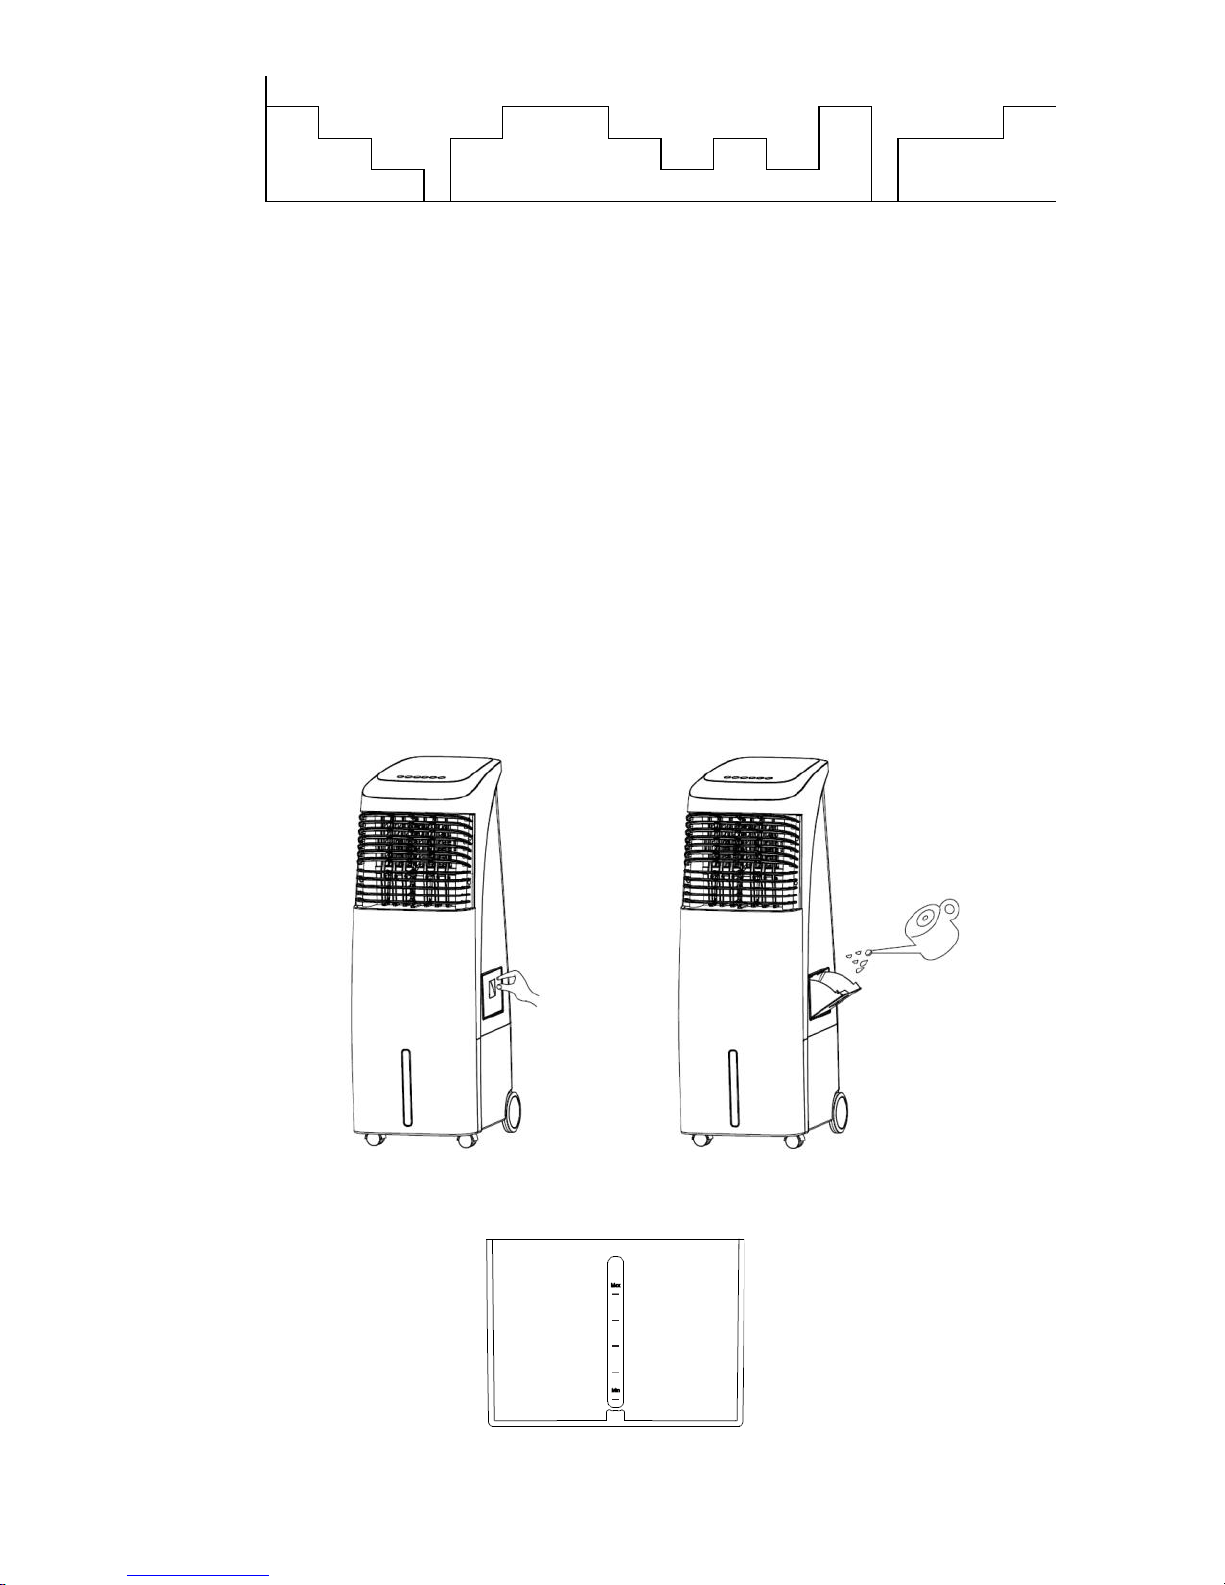
4. COOLER / AIR WASHER key
In power on state, press this key to switch on/off the cooling / humidification function, press this key once to
turn on the cooling / humidification function, the pump starts, and cooling / humidification LED lamp lights up,
and press this key again to turn off the cooling / humidification function.
5. SWING key
In power on state, press this key to switch on/off the left and right wind direction adjustment function; press this
key once to turn on the swing function and swing LED light, and press it again to turn off the swing function.
6. TIMER key
After turned on, the device doesn’t have timer by default, and timer LED light is not displayed. Press this key to
set the timer: 0.5h → 1.0h → 1.5h → 2.0h ...... 7.5h → no timer → 0.5h; in this process, the timer LED indicator
also changes accordingly.
7. MODE key
After turned on, the initial mode is normal by default; press this key to switch the mode in the sequence:
normal→ natural→ sleeping→ normal ......; in this process, the mode LED indicator also changes accordingly
(no natural and sleeping mode in strong level).
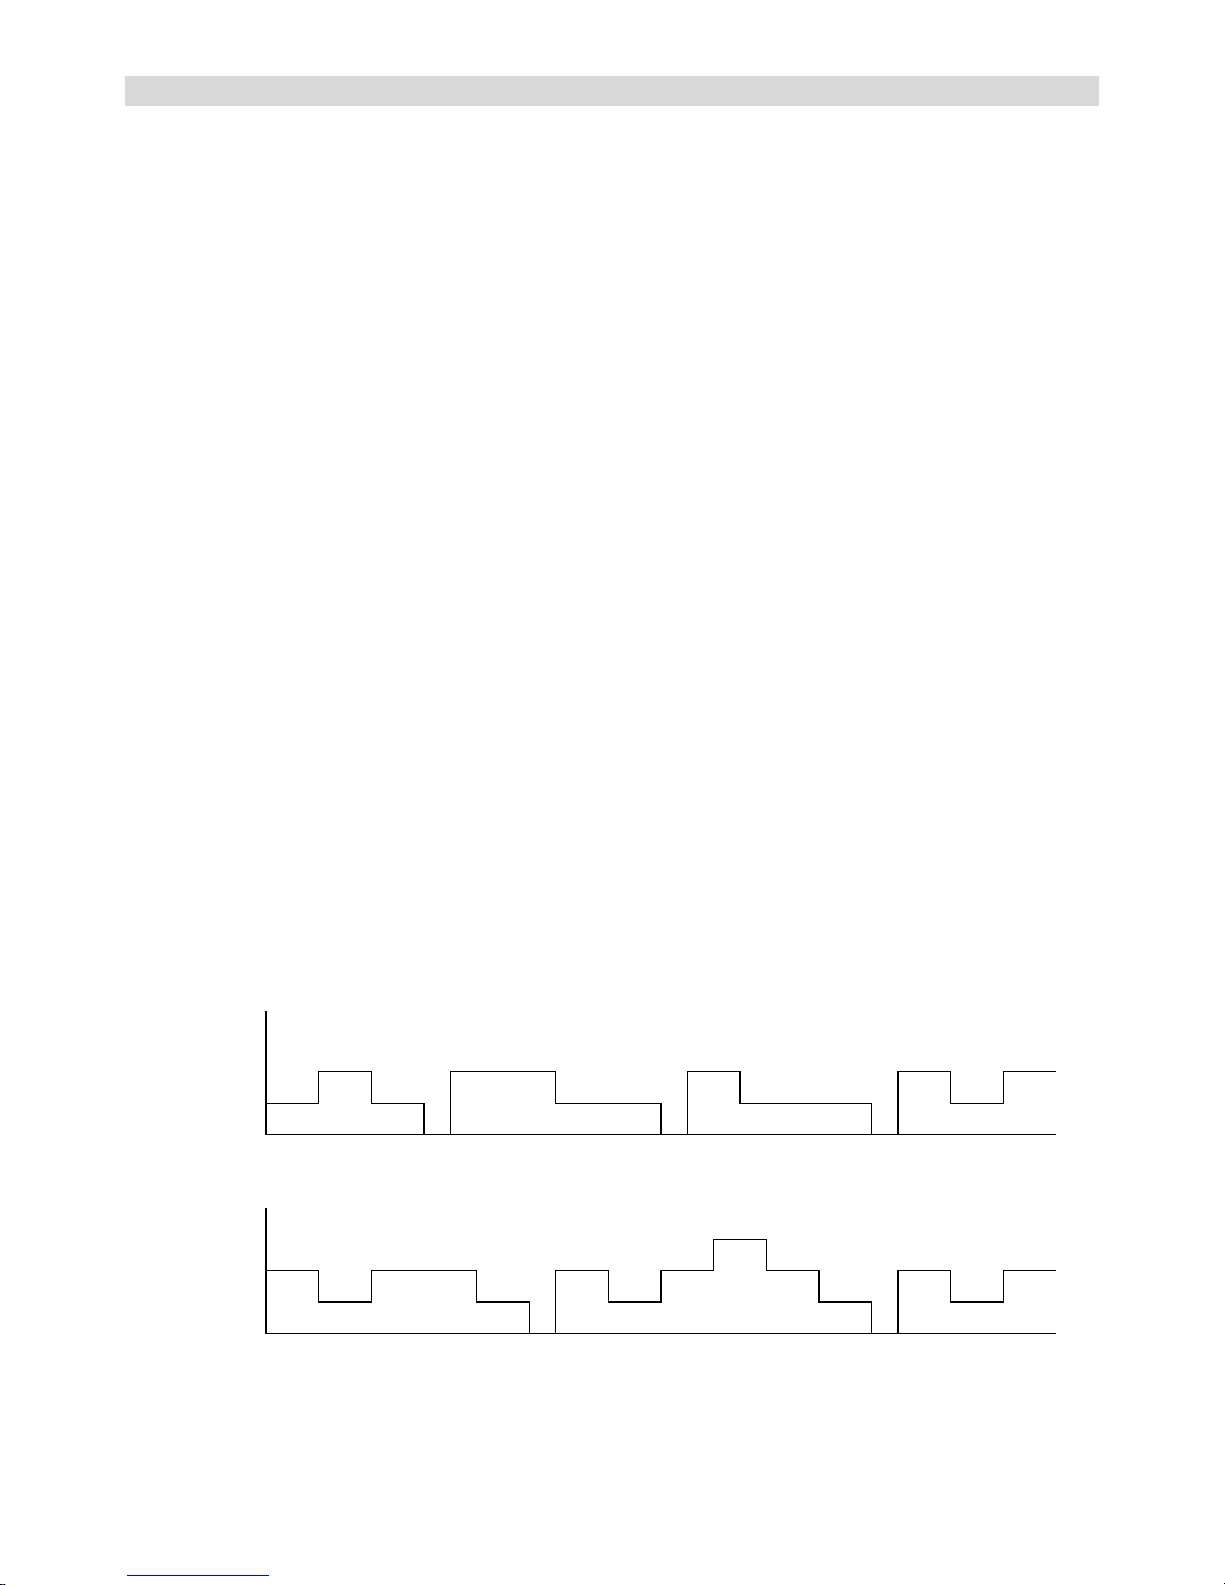
Press the Mode key to switch the wind mode, and the operation is as follows:
①MODE = Normal wind
Available speeds: Low, Medium, High or Strong.
In the normal wind mode the product works continuously at the set speed (Low→ Medium → High → Strong)
②MODE = Natural wind
Available speeds: Low, Medium or High.
Operation profile of natural wind mode is as following pictures (Low→ Medium → High).
High speed
Medium speed
Low speed
Stop
6s
6s
6s
3s
12s
12s
3s
6s
15s
3s
6s
6s
6s
Natural mode in LOW speed
High speed
Medium speed
Low speed
Stop
6s
6s
12s
6s
3s
6s
6s
6s
6s
6s
6s
3s
6s
6s
6s
Natural mode in MEDIUM speed

6
High speed
Medium speed
Low speed
Stop
6s
6s
6s
3s
6s
12s
6s
6s
6s
6s
6s
3s
12s
6s
Natural mode in HIGH speed
③MODE = Sleep wind
Available speeds: Low, Medium or High.
In the sleep wind mode the product works as follows (Low→ Medium → High):
Low speed = low speed natural wind
Medium speed = 30 minutes medium speed natural wind+
low speed natural wind (maintain).
High speed = 30 minutes high speed natural wind +
30 minutes medium speed natural wind +
low speed natural wind (maintain).
8. This product has water pump protection function; if the water level is low, it will automatically turn off the cooling
and humidification function, and the buzzer beeps continuously for five seconds.
Filling water
Before turning on the cooling and humidification function, please add water to the tank. Automatic filling and manual
filling are available.
Automatic filling: Connect the device to the faucet with a piece of hose, and then turn on the faucet.
Manual filling: Before filling water, open the water inlet , fill water into the tank slowly (Fig. 1&2), and then put the
water inlet into the original position. For a more intense performance of the product we suggest to use cold water or
to add some ice in the water tank after filling it with water. In this case wait 10 minutes before starting using the
product.
Opening water inlet (Fig. 1) Filling Water (Fig. 2)
Water Level Schematic (Fig. 3)

7
For manual water filling, please note the level indicator in the front of the air cooler (Fig. 3).
1. Do not fill the water exceeding the maximum water level (Fig. 3).
2. Be sure to use clean tap water.
3. Tip: It is normal, non-toxic, and will not affect your health if the device has slight odor or the water in the tank
has a slight discoloration when it is used for the first time.
Using the remote control:
1. Open the battery cover of the remote control, and insert two 1.5V AAA batteries.
2. Please point to the receiver when using the remote control.
3. If the battery voltage is low, please open the battery cover as shown in the figure and replace with new
batteries. Please note the positive pole and the negative pole of the battery; then, put on the battery cover.
5. Cleaning and maintenance
Do not use chemical agents for cleaning.
Turn off the power and unplug the power cord.
Always unplug the power cord before cleaning the device, or else it may cause electric shock.
If dust is accumulated on the surface, please wipe with soft cloth: if the surface is dirty, mix water lower than
50°C and neutral detergent, wipe with soft cloth and dry.
Do not use gasoline, thinner and any substance that damages the surface easily for cleaning
Product Storage:
If the product won’t be used for a long time, pull out the bottom plug of the water tank, drain the water inside the tank,
and re-insert the water plug. Blow with constant wind, fully dry the wet curtain, unplug the power cord, wrap the
device to prevent dust from entering, and place in dry and ventilated place.
6. Technical data
Product model
AER Pro (DF-AF9001C)
Rated voltage
230V~
Rated frequency
50Hz
Rated power
170W
Dimensions
360.5mm×523.5mm×1030mm
Net weight
10.7kg
Package weight
13.7kg

8
7. Legal notice
Environment and recycling
Please help us to protect the environment by disposing of the packaging in accordance with the national
regulations for waste processing.
Recycling of obsolete appliances
Appliances with this label must not be disposed off with the general waste. They must be
collected separately and disposed off according to local regulations.

9
ITALIANO
ISTRUZIONI PER L’USO
Si prega di leggere attentamente queste istruzioni, prima di utilizzare il prodotto, in modo da evitare
danneggiamenti o comunque il verificarsi di situazioni di pericolo. Qualsiasi utilizzo del prodotto diverso da
quanto indicato nel presente manuale può causare incendi, pericoli elettrici o ferite e rende nulla qualsiasi
garanzia.
La garanzia non si applica ad alcun difetto, deterioramento, perdita, ferimento o danneggiamento riconducibili ad un
uso non corretto del prodotto. Rimangono garantiti tutti i diritti di legge in materia. Nessuna condizione di garanzia
può escludere o modificare le condizioni di garanzia regolamentate da leggi dello Stato che non possono essere a
nessun titolo escluse o modificate.
Prima di ogni operazione, rimuovere con cura l’imballo e controllare la perfetta integrità del prodotto. Nel caso si
evidenziassero dei difetti o danni, non installare né cercare di riparare l’apparecchiatura, ma rivolgersi al rivenditore.
Non lasciare l’imballo alla portata dei bambini e smaltirne le parti in conformità con le disposizioni vigenti.
Se utilizzato come raffrescatore (tasto COOLER/ AIR WASHER) questo prodotto eroga aria ad una temperatura più
bassa di quella dell’ambiente sfruttando l’umidità e la temperatura dell’acqua presenti nel serbatoio e dandovi una
piacevole sensazione di fresco.
1. Per la Vostra sicurezza
Questo prodotto è per uso domestico e non è adatto per l'utilizzo
in ambienti commerciali/industriali o su veicoli, imbarcazioni o
aeromobili.
L’apparecchio può essere utilizzato da bambini di età non
inferiore a 8 anni e da persone con ridotte capacità fisiche,
sensoriali o mentali, o prive di esperienza o della necessaria
conoscenza, purché sotto sorveglianza oppure dopo che le
stesse abbiano ricevuto istruzioni relative all’uso sicuro
dell’apparecchio e alla comprensione dei pericoli ad esso
inerenti. I bambini non devono giocare con l’apparecchio. La
pulizia e la manutenzione destinata ad essere effettuata
dall’utilizzatore non deve essere effettuata da bambini senza
sorveglianza.
I bambini di età inferiore a 3 anni non devono avvicinarsi al
prodotto se non costantemente supervisionati.
I bambini di età compresa fra 3 e 8 anni possono solamente
accendere e spegnere l’apparecchio purché esso sia stato
installato e posizionato secondo le normali condizioni d’uso e loro
siano supervisionati o adeguatamente istruiti riguardo al corretto
e sicuro utilizzo del prodotto e ne abbiano compresa la
pericolosità. I bambini di età compresa fra 3 e 8 anni non
possono collegare il prodotto, regolarlo, pulirlo o effettuare
manutenzione

10
Se il cavo di alimentazione del prodotto é danneggiato, deve
essere sostituito dal produttore o da un centro di assistenza
tecnica qualificator, al fine di evitare pericoli.
Durante il riempimento d’acqua del serbatoio o la pulizia il
prodotto deve essere spento e scollegato dall’alimentazione.
Il prodotto deve essere spento e scollegato dall’alimentazione
prima di rimuovere il filtro dell’aria.
Il prodotto deve essere usato esclusivamente su un pavimento
privo di ostacoli ed asperità e soprattutto non inclinato.
2. Caratteristiche
Ventilazione normale –Ventilazione raffrescata.
Uso continuo –Uso temporizzato da 30min a 7h e 30min.
Uso manuale (comandi sul prodotto) –Uso con telecomando in dotazione
Riempimento del serbatoio manuale –Riempimento in automatico, collegato al rubinetto dell’acqua. Blocco
automatico del funzionamento della pompa e della funzione ventilazione raffrescata in caso in cui l’acqua nel
serbatoio non sia sufficiente.
Quattro diverse intensità di ventilazione: TURBO, FORTE, MEDIA, SILENZIOSA
Tre diverse modalità di ventilazione: NORMALE, NATURALE, NOTTE
Display a icone che mostra lo stato di funzionamento del prodotto
Ventilazione oscillante per direzionare l’aria in senso orizzontale su un fronte più ampio.
Possibilità di orientare l’aria in senso verticale muovendo i flap manualmente e ruote girevoli per un facile
spostamento del prodotto.
Segnalatore sonoro che avverte dell’attivazione dei comandi: doppio beep in caso di collegamento
all’alimentazione; singolo beep in caso di attivazione comandi; beep prolungato in caso di spegnimento.
Sistema automatico di ripristino del funzionamento nel caso in cui vi sia un’interruzione di corrente sino a un
Massimo di 30sec.
Dopo 200 ore di funzionamento (anche non consecutive) il prodotto avvisa di pulire il filtro dell’aria e l’indicatore
di pulizia del filtro si accende. Il prodotto continua a funzionare comunque. Per spegnere l’avviso è sufficiente
tenere premuto il pulsante Cooling / Air washer per almeno 3 secondi.

11
3. Componenti e accessori
Elenco delle parti
1. Tastiera comandi manuali
2. Display
3. Griglia uscita aria
4. Sportello riempimento serbatoio
5. Indicatore livello serbatoio
6. Ruote posteriori
7. Ruote girevoli anteriori
8. Alloggiamento telecomando
9. Maniglia
10. Avvolgicavo
11. Cavo alimentazione
12. Filtro antipolvere
13. Attacco alimentazione automatica
14. Serbatoio acqua
15. Rubinetto serbatoio
acqua
Accessori
Remote Control

12
Tastiera comandi
Display
MODALITA’ DI
VENTILAZIONE
VENTILATION SPEEDS
FUNCTIONS
NORMALE
SILENZIOSA
VENTILAZIONE
RAFFRESCATA
NATURALE
MEDIA
OSCILLAZIONE
NOTTE
FORTE
INDICATORE
PULIZIA FILTRO
TURBO
Telecomando
4. Installazione ed uso
Primo utilizzo
Togliete il prodotto dall’imballo. Potete iniziarne l’uso da subito, senza ulteriori operazioni di preparazione -
installazione
Tastiera comandi
I comandi sono a pressione
1. Inserite il cavo nella presa di alimentazione. Sentirete un doppio beep.
2. ACCENSIONE (ON/SPEED)
Premete il tasto ON/SPEED. Il prodotto si mette in funzione a velocità MEDIA e dopo poco passa a velocità
SILENZIOSA. Premendo ulteriormente il tasto ON-SPEED la velocità di ventilazione cambia : SILENZIOSA →
MEDIA → FORTE → TURBO → SILENZIOSA ...... e via in sequenza. I rispettivi led si illuminano.
3. SPEGNIMENTO (OFF)
Premendo il tasto OFF il prodotto si spegne.
4. VENTILAZIONE RAFFRESCATA (COOLER/AIR WASHER)
Premendo il tasto COOLER/ AIR WASHER si attiva la funzione di VENTILAZIONE RAFFRESCATA. Questa
funzione si attiva solo se presente acqua nel serbatoio. Il led corrispettivo (fiocco di neve) si accenderà . L’aria

13
uscirà umidificata e raffrescata fornendovi una piacevole sensazione di benessere. Premendo di nuovo il tasto
il raffrescamento cessa e il prodotto torna in modalità VENTILAZIONE.
5. OSCILLAZIONE (SWING)
Quando il prodotto é in funzione, premendo il tasto SWING si attiva l’oscillazione automatica. Il led
corrispondente si accende. L’aria viene direzionata su un fronte più ampio, raffrescando un’area più vasta.
6. FUNZIONAMENTO TEMPORIZZATO (TIMER)
Normalmente il prodotto funziona in continuo ma se volete potete temporizzarne l’uso in modo che funzioni per
un periodo limitato e poi si spenga automaticamente. Premendo il tasto TIMER si imposta la durata della
temporizzazione 0.5h → 1.0h → 1.5h → 2.0h ...... 7.5h → no timer → 0.5h e via in sequenza. Il led
corrispondente mostra la durata impostata.
7. MODALITA’ DI VENTILAZIONE (MODE)
Vi sono 3 diverse modalità di ventilazione : NORMALE → NATURALE → NOTTE. Premendo il pulsante MODE
si attivano le 3 diverse modalità in sequenza:
①MODO = Ventilazione normale
Velocità disponibili: Silenziosa, Media, Forte e Turbo.
In ventilazione normale il prodotto funziona continuamente alla velocità di funzionamento impostata
(SILENZIOSA → MEDIA → FORTE → TURBO).
②MODO = Ventilazione naturale
Velocità disponibili: Silenziosa, Media e Forte.
In questa modalità la ventilazione varia nel tempo e lo fa in modo diverso a seconda della velocità impostata
simulando la ventilazione della brezza secondo i seguenti profili di funzionamento:
Velocità forte
Velocità media
Velocità silenziosa
Arresto
6s
6s
6s
3s
12s
12s
3s
6s
15s
3s
6s
6s
6s
Ventilazione naturale –velocità SILENZIOSA
Velocità forte
Velocità media
Velocità silenziosa
Arresto
6s
6s
12s
6s
3s
6s
6s
6s
6s
6s
6s
3s
6s
6s
6s
Ventilazione naturale –velocità MEDIA
Velocità forte
Velocità media
Velocità silenziosa
Arresto
6s
6s
6s
3s
6s
12s
6s
6s
6s
6s
6s
3s
12s
6s
Ventilazione naturale –velocità FORTE
③MODO = Ventilazione notte
Velocità disponibili: Silenziosa, Media e Forte
In modalità ventilazione notte il prodotto funziona nel seguente modo:
Velocità silenziosa = Ventilazione naturale a velocità silenziosa.
Velocità media = 30 minuti in ventilazione naturale a velocità media +
Mantenimento in ventilazione naturale a velocità silenziosa.
Velocità forte = 30 minuti in ventilazione naturale a velocità forte +
30 minuti in ventilazione naturale a velocità media +
Mantenimento in ventilazione naturale a velocità silenziosa.

14
8. Allarme fine acqua. Nel caso in cui l’acqua nel serbatoio finesse o scendesse al di sotto del livello minimo, si
attiva la protezione della pompa dell’acqua. La funzione raffrescamento si spegne automaticamente e il
prodotto emette un bip continuo per 5 secondi.
Riempimento del serbatoio
Per potere usufruire della funzione di raffrescamento é necessario riempire il serbatoio con acqua. Potete riempire il
serbatoio automaticamente o manualmente.
Riempimento automatico : collegate il prodotto a un rubinetto utilizzando un tuboben affrancato al prodotto e poi
aprite il rubinetto. Il serbatoio si riempirà e si manterrà pieno automaticamente senza necessità di aprire e chiudere il
rubinetto.
Riempimento manuale : Aprite lo sportello laterale del serbatoio e riempite lentamente con acqua versata da una
bottiglia o da un innaffiatoio (Fig. 1&2), richiudete poi lo sportello. Per una migliore resa del prodotto consigliamo di
utilizzare acqua fresca oppure di aggiungere all’acqua nel serbatoio alcuni cubetti di ghiaccio.
Apertura sportello serbatoio (Fig. 1) Riempimento (Fig. 2)
Indicatore frontale serbatoio (Fig. 3)
Riempimento manuale
1. Quando riempite fate attenzione che il livello dell’acqua non sia troppo basso e non troppo alto, controllando
dalla finestra trasparente nella parte frontale del serbatoio. (Fig. 3).
2. Utilizzate sempre acqua potabile.
3. Durante il primo utilizzo é possibile che sentiate un leggero odore dell’aria. Questo non é assolutamente
tossico e scomparirà dopo breve tempo.
Uso del telecomando
1. Aprite il vano batteria ed inserite 2 batterie da 1,5V tipo AAA rispettando le polarità.
2. Quando lo azionate, rivolgete sempre il telecomando verso il prodotto.
3. Se le batterie sono scariche, aprite il vano batterie come indicato nella figura seguente e sostituitele facendo
attenzione a rispettare le polarità e a richiudere il vano batterie ad operazione ultimata.

15
5. Pulizia e manutenzione
Pulire il prodotto utilizzando solo acqua.
Durante la pulizia, verificate che il prodotto sia spento
Durante la pulizia verificate che il cavo di alimentazione sia scollegato perché diversamente c’è rischio di scosse
elettriche.
Se la griglia di uscita dell’aria é sporca di polvere, rimuovetela solo con un panno imbevuto di acqua calda a
temperature non superiore a 50°C.
Non usate benzina o solventi per la pulizia poiché le varie superfici potrebbero facilmente rovinarsi.
Filtro aria
Raccomandiamo di pulire il filtro dell’aria ogni mese per evitare che la polvere e le impurità che vi si depositano
inquinino il flusso d’aria fresca.
Come conservare il prodotto quando non lo usate
Se prevedete di non utilizzare il prodotto per lungo tempo svuotate il serbatoio svitando il tappo che si trova nella
parte posteriore, al di sotto del prodotto. Successivamente riavvitate il tappo del serbatoio come illustrato in figura.
Aprite il portello posteriore ed estraete il filtro dell’aria. Pulitelo con acqua e asciugatelo perfettamente.
Se potete, asciugate perfettamente il filtro ad alveare dove passa l’acqua utilizzando un getto d’aria.
Riponete il prodotto in un sacchetto e custoditelo in un luogo asciutto
6. Dati tecnici
Product model
AER Pro (DF-AF9001C)
Voltaggio di alimentazione
230V~
Frequenza
50Hz
Potenza
170W
Dimensioni
360,5mm×523,5mm×1030mm
Peso netto
10,7kg
Peso lordo
13,7kg

16
7. Informazioni legali
Tutela dell'ambiente e riciclaggio
Affinché il vostro apparecchio non subisca danni durante il trasporto, esso è stato imballato con cura.
Per contribuire alla tutela del nostro ambiente, vi chiediamo di smaltire in modo appropriato il materiale
utilizzato per l'imballaggio dell'apparecchio.
Smaltimento degli apparecchi usati
Gli apparecchi che recano il contrassegno riportato a fianco non devono essere smaltiti insieme ai rifiuti
urbani, ma vanno raccolti e smaltiti separatamente. Lo smaltimento degli apparecchi usati va eseguito a regola
d'arte, in conformità con le prescrizioni e leggi vigenti localmente in materia.
Ermete Giudici S.p.A.
Via L. da Vinci, 27
20090 Segrate (MI) –Italia
www.radialight.com
R5_20170607
Table of contents
Languages:
Other Radialight Air Conditioner manuals