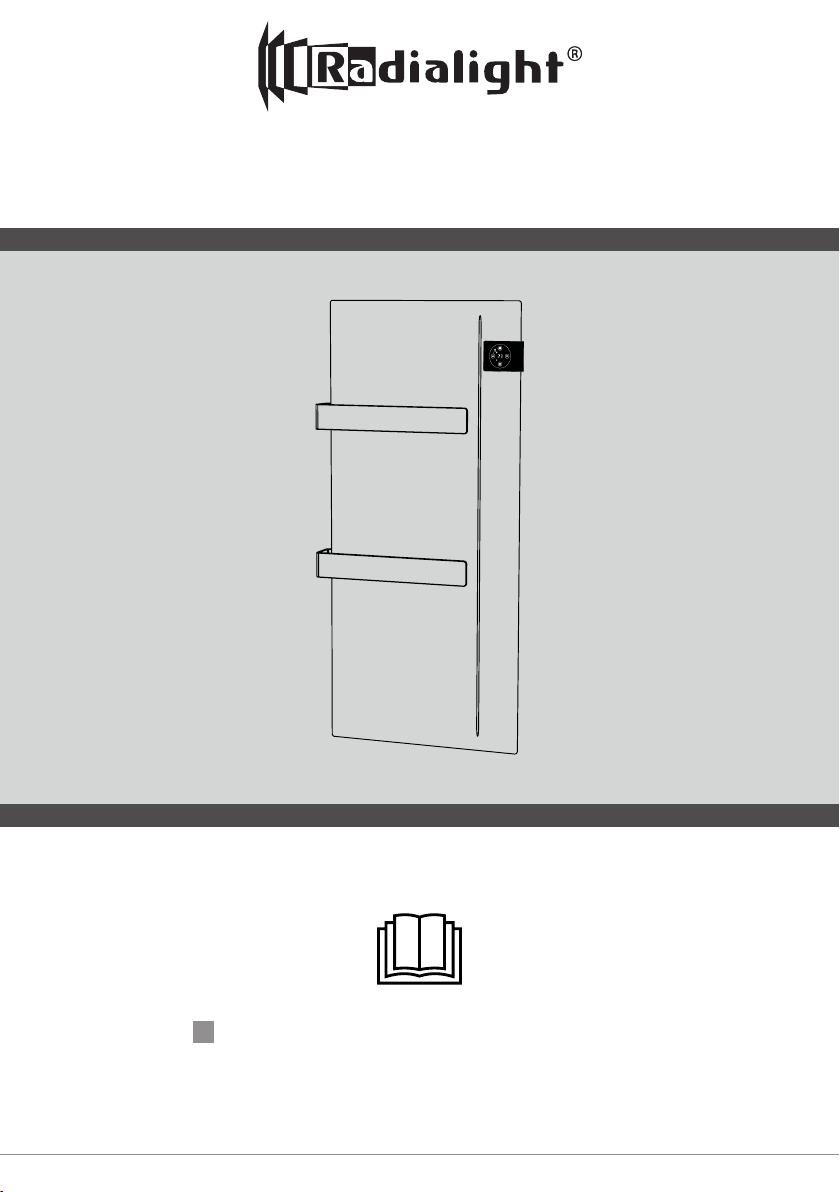
Radialight ONSEN User manual

ONSEN
EN Please retain these instructions in a safe place for further reference.

2
Volume
3
Volume
1
Volume
2
60cm
60cm
2,25m
60cm
11
22
3344
min
15cm
min
15cm
min
30cm
min
50cm
min
15cm

3
66
99
55
Ø:6mm / L:35mm
A
B
C
88
OK NO! NO!
77
A B C

4
ENGLISH
INSTALLATION AND OPERATING MANUAL
Before operating the heater, please read these instructions thoroughly to avoid damage and hazardous situations.
and voids all warranties.
Warranty does not apply to any defect, deterioration, loss, injury or damage caused by, or as a result of, the misuse or abuse of
this heater. The rights dictated by State law are not prejudiced. None of the terms of this warranty are to be taken as excluding
any conditions or warranties implied by State law, which cannot be excluded or modied.
Before any operation remove the packaging and check product integrity. In case of defects or damages do not try to repair it
yourself but contact your dealer.
Do not let children play with the packaging and protect the environment by disposing of the packaging in accordance with the
national regulations for waste processing.
1.
• This appliance is intended for normal household use and not for use in
vehicles or on board ships or aircrafts.
• This appliance can be used by children aged from 8 years and above
and persons with reduced physical, sensory or mental capabilities or
lack of experience and knowledge if they have been given supervi-
sion or instruction concerning use of the appliance in a safe way and
understand the hazards involved. Children shall not play with the ap-
pliance. Cleaning and user maintenance shall not be made by children
without supervision.
• Children of less than 3 years should be kept away unless continuously
supervised.
• Children aged from 3 years and less than 8 years shall only switch
on/o the appliance provided that it has been placed or installed in
its intended normal operating position and they have been given su-
pervision or instruction concerning use of the appliance in a safe way
and understand the hazards involved. Children aged from 3 years and
less than 8 years shall not plug in, regulate and clean the appliance or
perform user maintenance.
• CAUTION — Some parts of this product can become very hot and
cause burns. Particular attention has to be given where children
and vulnerable people are present.
• Make sure that your supply rating corresponds to what specied on
the rating plate: 230-240V~, 50Hz.
• This heater is water resistant to IPX4. It can therefore be used in
bathrooms or other areas subject to humidity AS LONG AS IT IS NOT

5
INSTALLED WITHIN THE PERIMETER OF BATH TUBS OR SHOW-
ERS. This means that it cannot be installed in the areas marked as
VOLUME 1 in picture 2.
• During function, place the heater in a safe position:
- at least 1m far from inammable objects or furnitures;
- leaving not less than 1m of free space in front of the heater;
- not located immediately below a socket-outlet.
• Do not leave animals or children touch or play with the appliance. Pay
attention! The air outlet grille gets hot during operation (more than
90°C)
• Do not use the heater in rooms with explosive gas or while using in-
ammable solvents or varnish or glues.
• If the cordset is damaged and you have to change it, do not do the job
yourselves! Take the product to an after sales authorised repair centre
or to a person with similar skill and knowledge, in order to avoid any
risk of danger.
• The appliance must be positioned so that the plug is always accessi-
ble.
• Do not mount the product on walls made of synthetic material.
• WARNING: Do not use this heater in small rooms when they are occu-
pied by persons not capable of leaving the room on their own, unless
constant supervision is provided.
• WARNING: To reduce the risk of re, keep textiles, curtains, or any
other ammable material a minimum distance of 1 m from the air outlet.
2.
• Other than the heater you have chosen the package includes (picture 1):
-N° 1 metal brackets for wall mounting (xed to the radiator);
- N° 4 nylon plug expansion 8x50mm;
- N° 4 5x60mm cross head screws to x wall brackets;
- N° 2 bars for towels;
- N° 4 3,9x13mm screws to x the bars to the heater.
• Refer to your dealer is something is broken or missing.
3.
• Only x the heater in vertical position;
• This heater is tted with a double electrical insulation circuit (class II) and therefore does not require an earth connection.
• This heater must be correctly installed in compliance with the regulations in force in the country of installation.
• In wet spaces like bathrooms or kitchens, the connection terminal must be installed at least 25 cm above the oor. The
electrical connection to the power supply must also be tted with a two-pole switch with a minimum gap between the
contacts that allows complete disconnection according to excess voltage III category conditions.
• If you want to x one or both towel rails to the product, before xing the appliance to the wall bracket use the supplied
screws as illustrated in picture 3.

6
• Always make observe the minimum distances from walls, furniture and/or objects, as indicated in picture 4. Never install
the product so that the distance between the oor and the lower side of the product is less than 30cm:
- Remove the wall-mounting bracket xed to the back of the radiator, by releasing the 2 lower springs;
- Use a pencil to mark the position of the xing points (picture 5).
- Drill the 4 holes at the points marked previously, and insert the plastic anchors;
- Fix the bracket to the wall using the 4 screws supplied (picture 6);
- Hook the radiator to the bracket starting with the 2 upper xing points, and then click the 2 lower xing points into
position (picture 7);
- Should you have to remove the radiator from the bracket at a later stage, we recommend releasing the lower two
xing points rst and then the upper xings.
4. TOWELS
• Always outspread the towels over the support bars (picture 8-A);
• Do not place the towels on top of the product (picture 8-B);
• Do not roll up the towels between the bar and the front surface (picture 8-C).
5.
• The following controls are available on the front panel (picture 9):
A - Stand-by
B - Increase
C - Decrease
D - Mode
E - Display
The product can be operated in 3 dierent modes: automatic, programmed or frost free.
Automatic Mode
In this mode the product works to reach and maintain the Comfort temperature set by the user. An automatic power manage-
ment system allows optimum control of consumption and precise adjustment of the comfort level automatically maintaining the
selected temperature constant over time, in accordance with what has been set on the electronic thermostat.
In automatic mode is also available a special feature, which is activated at user’s choice, which allows to detect the possible
opening of a window and force the functioning to the Frost free mode to minimize energy waste.
Programmed Mode
The product can be programmed, on hour base, for each day of the week. For each hour of the day it is possible to dene
the reference temperature to be reached/maintained, choosing between Comfort, Eco (whose value is equal to the Comfort
temperature reduced by 3,5°C) or Frost free.
In programmed mode the open window detection function is disabled so that the product can correctly follow the
temperature prole dened by the user.
Frost free Mode
In this mode the thermostat is automatically set to maintain 7±3°C.

7
6.
STAND-BY BUTTON
Use the button to turn on or put the product in Stand-by. When the product is in Stand-by, two white dashes appear on
the display:
When the product is turned on, it activates in Automatic mode. The message "AU" is shown for 3 seconds on the display and,
after, the set temperature is shown:
3"
OPERATING MODES
By pressing the
M
button it is possible to select Automatic, Programmed or Frost free mode as described in paragraph 5:
Press the
M
key to switch from automatic to pro-
grammed mode. The display shows "Pr".
The clock symbol and the icon relating to the opera-
ting mode set for the current time and day (comfort,
eco or antifreeze) also light up on the display.
Press the
M
key to switch from programmed to
frost free mode. The display shows "FF" for 3 se-
conds and then the expected temperature of 7.0 ° C
(not modiable) and the antifreeze mode symbol also
lights up on the display.
Press the
M
button again to return to automatic
mode and restart the cycle.
3"

8
SETTINGS
The buttons
M
, and allow you to set the current time and day, the Comfort temperature and to activate or deactivate
the detection of the opening of a window. Day "1" corresponds to MONDAY.
3"
Press the
M
button for at least 3 seconds to view/
change the settings starting from the time.
Set the current hour using and buttons.
Press the
M
button to switch to the setting of the
minutes.
Set the current minutes using and buttons.
Press the
M
button to switch to the setting of the
day.
Set the current day of the week using and
buttons (1 = Monday).
Press the
M
button to switch to the open window
detection setting.
Set the function ON or OFF using and
buttons.
Press the
M
button to exit the settings and resume
the normal functioning.
OPEN WINDOW DETECTION
This function makes it possible to detect an open window and automatically activate the Anti-freeze operating mode. When
the function is enabled and ready to set the Frost-free mode if an open windows is detected, a window icon is visible on the
lower area of the display.
If a temperature drop is observed in the room during the normal functioning, the Frost-free mode is automatically activated to
save energy consumption. The display shows the antifreeze temperature and the window icon ashes to show that the open
window function operates.
The reset of the normal functioning is not automatic but is achieved by pressing one of the buttons of the product.
Correct operation of this function may depend on where the radiator is positioned in the room, the presence of
draughts, the outside temperature, and how long the window stays open.

9
DISPLAY / CHANGE THE COMFORT TEMPERATURE
The Comfort temperature is shown in the Automatic mode and can be changed by pressing the or key.
The Eco temperature, used in programmed mode, cannot be changed and is always the same as the Comfort temperature
-3.5°C. The Antifreeze temperature is also xed and equal to 7°C.
Note: The temperature measured by the inner sensor of the product is representative of the ambient temperature nearby it and
it may dier from the temperature measured using other instruments in other areas of the room. That dierence may depend
on many factors including, for example:
- the installation position: some areas of the room may be aected by drafts or hot air sacs that modify the sensor measure-
ment;
- the xation to an external wall that, being normally colder than internal walls, may imply the measurement of a temperature
lower than the real room temperature;
- unstable conditions: any evaluation must be done in stable working conditions. For this purpose comfort temperature should
be changed only 120min after a previous change . It is not possible, indeed, to evaluate the room temperature maintained by
the product correctly if the comfort level temperature is continually changed in a short time.
If a dierence between set temperature and room temperature is detected in stable working conditions, it is possible to adjust
the measurement made by the electronic thermostat of the product. This operation is also particularly useful when installing
the heater very close to the oor or ceiling.
To set this correction proceed as follows:
Press and HOLD the
M
key: the display will
show the current time.
While continuing to hold down the
M
key,
press the
and
keys at the same time.
The display shows "AL" (alignment) for 2 secon-
ds and then the actual alignment value (the de-
fault value is 0).
Use the
and
keys to set the desired ali-
gnment by choosing a value between -5 and +5.
Alignment example:
If the product has been set at 19°C but in the
room 20°C is measured in stable conditions, the
alignment to be inserted is equal to 20-19 = 1;
If, on the other hand, the product is set at 19°C
but in the room, for example, 17°C is measured,
the alignment to be set is equal to 17-19 = -2.
Press the
M
button to exit the alignement and re-
sume the normal functioning.

10
WEEKLY PROGRAM
The Programmed mode allows to set, for every hour of day and for every day of the week independently, the desired tempe-
rature choosing between the Comfort, Eco (equal to that of Comfort decreased by 3.5 ° C) or Frost-free.
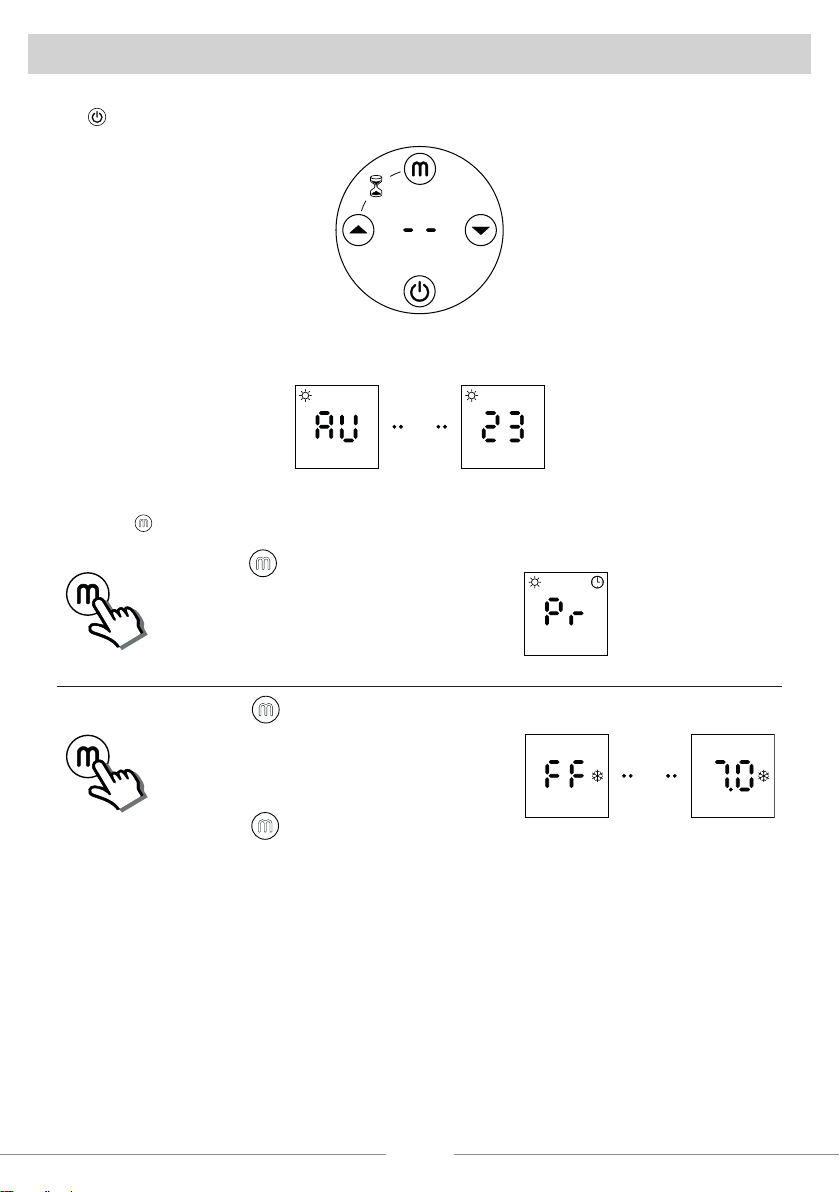
To activate the Programmed mode, press the
M
key until the display shows "Pr". If the product is brand new the default
program is the following:
Always Frost-free mode except Comfort mode in the following hours:
- from 06:00 to 08:00 on Monday-Friday;
- from 08:00 to 10:00 on Saturday-Sunday.
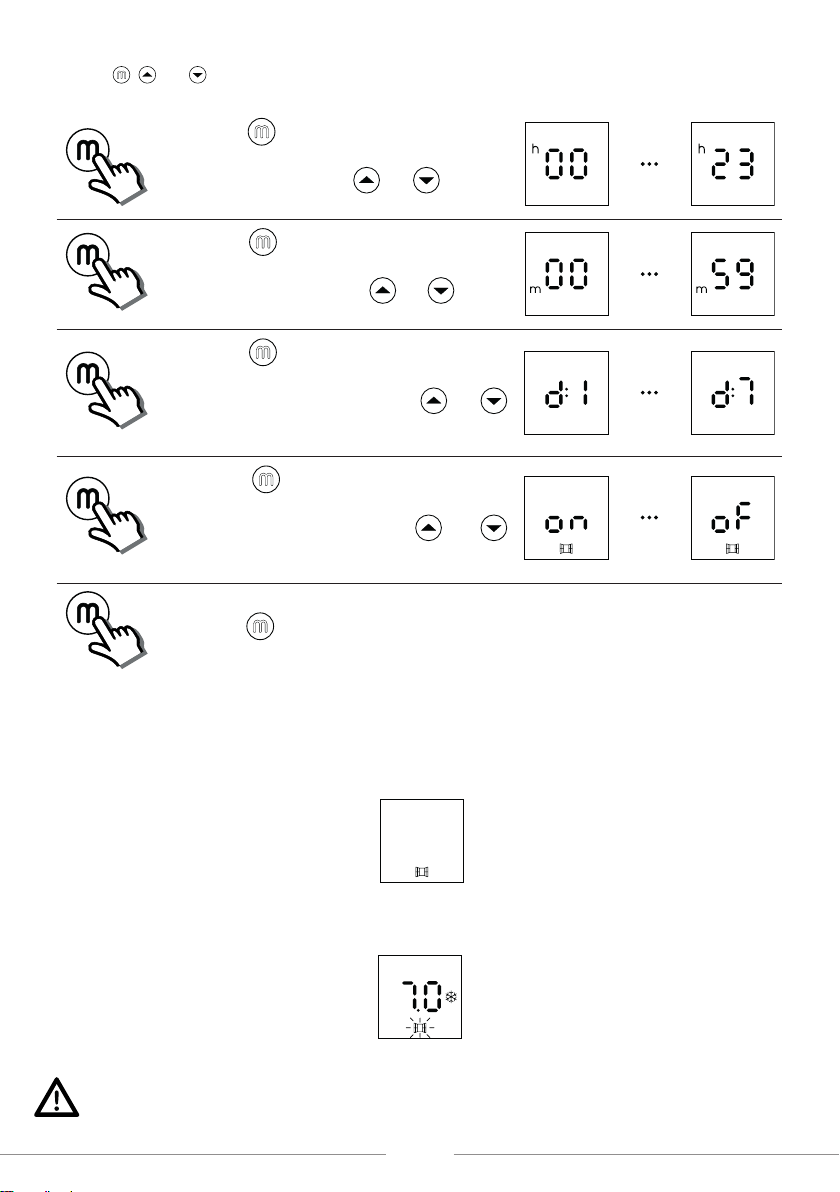
When in Programmed mode you can display/modify the program
by pressing the and keys together.
The display shows day 1 (Monday).
By pressing the and keys, the dierent hours of the day
are displayed starting from “00” (time between 00:00 and 00:59).
The reference temperature set for the selected time is indicated
by turning on the antifreeze icon (temperature of 7 ° C), the Eco
icon (Eco temperature = Comfort - 3.5 ° C) or the Comfort one
(Comfort temperature set by the user).
The desired temperature can be changed by pressing the
M
key. The lighting in sequence of the icons described above indi-
cates the reference temperature.
Use the and keys to view/modify the temperature set
for each of the hours of day 1, from 00 to 23.
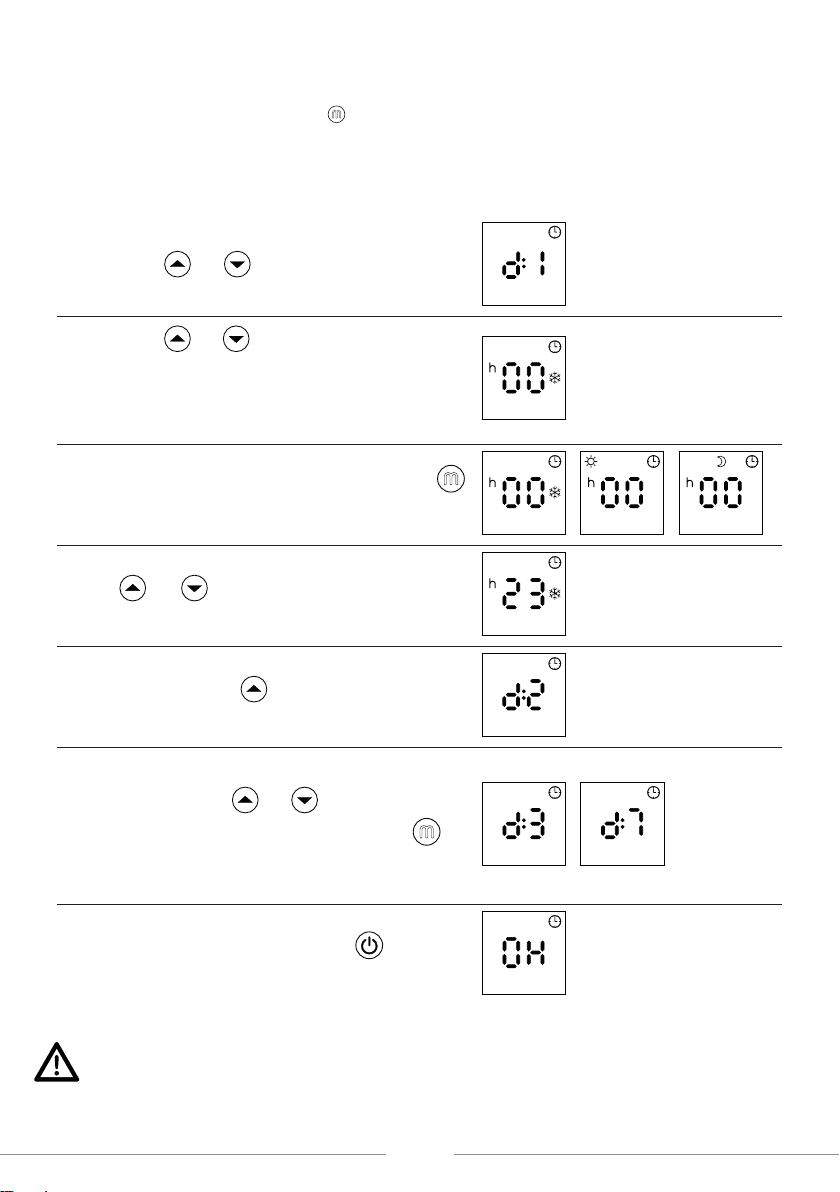
At 11 pm (23), pressing the key again allows access to the
programming for day 2.
Now it is possible to choose whether to display/modify the tem-
perature of the single hours of day 2 or set day 2 identical to day
1. In the rst case, use the and keys as already descri-
bed for day 1, in the second just press again the button
M
. By
doing so, day 2 is automatically set equal to day 1 and the system
moves to the beginning of day 3. This procedure can be repeated
until programming for day 7.
At the end of the programming on day 7, or in any intermediate
phase of the programming, after pressing the key, you ac-
cess the program saving phase. The message “OK” appears on
the display and the program just dened is stored.
Note:
- At any time it is possible to abandon the viewing/modication procedure by deleting the modications not yet saved
by waiting 30 seconds without touching any key;
-During the programming the heating elements are disconnected and the product doesn't heat.

11
BOOST FUNCTION
The Boost function allows you to activate timed operation at maximum power without the thermostat control. At the end of this
forced operation, the heater returns to the operating mode prior to activation.
To activate the function press and at the same time the buttons and
M
. The default duration of 60min ashes on the di-
splay. The duration can be chosen between the values of 60, 90 or 120 minutes (2h) using the buttons and . 5 seconds
after the last selection the function is activated.
If the remaining time is less than or equal to 59min the display shows the remaining minutes of heating. If higher the display
shows the remaining minutes preceded by the word "1h" shown for 3 seconds.
7.
• In the event of overheating, the safety device on the appliance automatically disabled the heating element. In this case:
- Turn o the radiator and allow it to cool down for about 15/20 minutes.
- Eliminate any other possible reasons for overheating (e.g.: obstructions in front of the air inlet/outlet grilles, build-
ups of dirt).
- Turn on the radiator and check it works correctly.
• If the touch control commands are blocked or don't properly answer to digital pressure, turn o the heater for 1min and
then try again.
8.
• This product does not require any special maintenance.
• Clean the product with a dry cloth once every 6 months.
• If the product requires repairing, contact an authorised technical service centre.
• When replacing the power cable, use a 2x1,00mm2 H05V2V2-F HAR type. This operation must be performed by qua-
lied personnel and never by the end user in order to avoid damaging the appliance and jeopardising personal safety.
9.
Environment and recycling
Please help us to protect the environment by disposing of the packaging in accordance with the national
regulations for waste processing.
Recycling of obsolete appliances
Appliances with this label must not be disposed o with the general waste. They must be
collected separately and disposed o according to local regulations.

Information requirements for electric local space heaters
Model identier(s): ONSEN
Item Symbol Value Unit Item Unit
Heat output Type of heat input, for electric storage local space heaters only (select
one)
Nominal heat
output Pnom 0,75 kW manual heat charge control, with integrated thermostat no
Minimum heat
output (indicative) Pmin 0,75 kW manual heat charge control with room and/or outdoor
temperature feedback
no
Maximum
continuous heat
output
Pmax,c 0,75 kW
electronic heat charge control with room and/or outdoor
temperature feedback
no
Auxiliary
electricity con-
sumption
fan assisted heat output no
At nominal heat
output elmax 0,000 kW Type of heat output/room temperature control (select
one)
At minimum heat
output elmin 0,000 kW single stage heat output and no room temperature control no
In standby mode elSB 0,343 W Two or more manual stages, no room temperature control no
with mechanic thermostat room temperature control no
with electronic room temperature control no
electronic room temperature control plus day timer no
electronic room temperature control plus week timer yes
Other control options (multiple selections possible)
room temperature control, with presence detection no
room temperature control, with open window detection yes
with distance control option no
with adaptive start control no
with working time limitation no
with black bulb sensor no
Contact details: Ermete Giudici S.p.A. - via L. da Vinci, 27 - 20090 Segrate (MI) Italy
Reference valueas at 230V 50Hz
ISONS001_R1
This manual suits for next models
1
Table of contents
Popular Heating System manuals by other brands

RenewAire
RenewAire LE6 Series SHIPPING, RIGGING, HOISTING AND ASSEMBLY MANUAL

Watlow
Watlow Rapid Response Electric Heat Exchanger Specifications

OSTBERG
OSTBERG HERU 62 T Directions for use

ELwell
ELwell Timberline user manual

aldes
aldes Dee Fly Cube 550+ installation instructions

American Standard
American Standard AERVR100A9P00A Installer's guide

PAW
PAW HeatBloC MC46 DN 25 Installation and operation instructions

Hotstart
Hotstart OSE Installation & operation manual

Alfalaval
Alfalaval HEV Series General information

WarmlyYours
WarmlyYours Ember installation manual

HydroQuip
HydroQuip TRANQUILITY Series installation manual

Kerbl
Kerbl Heat Box operating instructions