manuals.online logo
Brands
  1. Home
  2. •
  3. Brands
  4. •
  5. radiance
  6. •
  7. Commercial Food Equipment
  8. •
  9. radiance TARG-6B24RG Specifications

radiance TARG-6B24RG Specifications

This manual suits for next models

31

Other radiance Commercial Food Equipment manuals

radiance TACM-24 Specifications

radiance

radiance TACM-24 Specifications

radiance RST-2P Specifications

radiance

radiance RST-2P Specifications

Popular Commercial Food Equipment manuals by other brands

Costco 5P-08WT manual

Costco

Costco 5P-08WT manual

Beper BT.651Y manual

Beper

Beper BT.651Y manual

Blue Seal EF30 Installation & operation manual

Blue Seal

Blue Seal EF30 Installation & operation manual

Tecfrigo Snelle 400 GS installation instructions

Tecfrigo

Tecfrigo Snelle 400 GS installation instructions

Follett PFT Series Operation and maintenance manual

Follett

Follett PFT Series Operation and maintenance manual

MEFE CAT 206 PTR User manual and maintenance

MEFE

MEFE CAT 206 PTR User manual and maintenance

Diamond AL1TB/H2-R2 Installation, Operating and Maintenance Instruction

Diamond

Diamond AL1TB/H2-R2 Installation, Operating and Maintenance Instruction

Salva IVERPAN FC-18 User instructions

Salva

Salva IVERPAN FC-18 User instructions

Allure Melanger JR6t Operator's manual

Allure

Allure Melanger JR6t Operator's manual

saro FKT 935 operating instructions

saro

saro FKT 935 operating instructions

Hussmann Rear Roll-in Dairy Installation & operation manual

Hussmann

Hussmann Rear Roll-in Dairy Installation & operation manual

Cornelius IDC PRO 255 Service manual

Cornelius

Cornelius IDC PRO 255 Service manual

Moduline HSH E Series Service manual

Moduline

Moduline HSH E Series Service manual

MINERVA OMEGA DERBY 270 operating instructions

MINERVA OMEGA

MINERVA OMEGA DERBY 270 operating instructions

Diamond OPTIMA 700 Installation, use and maintenance instructions

Diamond

Diamond OPTIMA 700 Installation, use and maintenance instructions

Diamond G9/PLCA4 operating instructions

Diamond

Diamond G9/PLCA4 operating instructions

Cuppone BERNINI BRN 280 Installation

Cuppone

Cuppone BERNINI BRN 280 Installation

Arneg Atlanta Direction for Installation and Use

Arneg

Arneg Atlanta Direction for Installation and Use

manuals.online logo
manuals.online logoBrands
  • About & Mission
  • Contact us
  • Privacy Policy
  • Terms and Conditions

Copyright 2025 Manuals.Online. All Rights Reserved.

OWNER & OPERATOR
INSTRUCTION MANUAL
For service contact:
German Knife Inc.
1-800-500-3519
www.turboairinc.com
Model No.
www.turboairinc.com
IMPORTANT SAFETY NOTICE
THIS MANUAL HAS BEEN PREPARED FOR PERSONNEL QUALIFIED TO INSTALL GAS EQUIPMENT, WHO SHOULD
PERFORM THE INITIAL FIELD START-UP AND ADJUSTMENTS OF THE EQUIPMENT COVERED BY THIS MANUAL.
POST IN A PROMINENT LOCATION THE INSTRUCTIONS TO BE FOLLOWED IN THE EVENT THE SMELL OF GAS IS
DETECTED. THIS INFORMATION CAN BE OBTAINED FROM THE LOCAL GAS SUPPLIER.
IMPORTANT
In the event a gas odor is detected, shut down units at main shutoff valve and contact the local gas company or gas supplier for service.
FOR YOUR SAFETY
Do not store or use gasoline or other flammable vapors or liquids in the vicinity of this or any other appliance.
WARNING
Improper installation, adjustment, alteration, service or maintenance can cause property damage, injury or death. Read the installation,
operating and maintenance instructions thoroughly before installing or servicing this equipment.
TAR-6 / TAR-36G / TAR-36RB
TAR-4 / TAR-24G / TAR-24RB
TARG-2B24G / TARG-24G2B
TARG-4B12G / TARG-12G4B
TARG-6B12G / TARG-12G6B
TAR-8
TARG-2B36G / TARG-36G2B
TARG-4B24G / TARG-24G4B
TARG-8B12G / TARG-12G8B
TAR-10
TARG-6B24G / TARG-24G6B
TARG-4B36G / TARG-36G4B
TARG-2B48G / TARG-48G2B
TARG-6B24RG / TARG-24RG6B
2
TABLE OF CONTENTS
INSTALLATION & OPERATION INSTRUCTION
GENERAL / RATING PLATE
CLEARANCE / CAUTION / HIGH SHELF ASSEMBLY
LEVELING / AIR SUPPLY & VENTILATION
GAS CONNECTION / MANUAL SHUT-OFF VALVE
PRESSURE REGULATOR
60” RANGE REQUIRES TWO GAS CONNECTIONS
RIGID CONNECTIONS
FLEXIBLE COUPLINGS
INITIAL PILOT LIGHTING
FINAL PREPARATION
CLEANING AND MAINTENANCE
WARRANTY INFORMATION
3
4
5
6
6
7
8
8
9 - 10
11
12 - 13
14
PAGE
SHIPPING DAMAGE CLAIM PROCEDURE
The equipment is inspected & crated carefully by skilled personnel before leaving factory. The transportation company
assumes full responsibility for safe delivery upon acceptance of this equipment if shipment arrives damaged ;
1. VISIBLE LOSS OR DAMAGE : Note on freight bill or express delivery and have signed by person making delivery.
2. FILE CLAIM FOR DAMAGES IMMEDIATELY : regardless of extent of damages.
3. CONCEALED LOSS OR DAMAGES : If damages are noticed after unpacking, notify transportation company
immediately and file “Concealed Damage” claim with them. This should be done within fifteen(15) days from date
delivery is made to you. Return container for inspection.
German Knife Inc
4184 E. Conant St., Long Beach, CA 90808
Phone : 800-500-3519
Fax : 310-900-1066
www.turboairinc.com
3
INSTALLATION & OPERATION INSTRUCTION
GENERAL
(1) A manual gas shut-off valve must be installed in the gas supply (service) line ahead of the
appliance and gas pressure regulator in the gas stream for safety and ease of future service.
(2) The gas pressure regulator supplied must be installed on the appliance prior to connecting the
equipment to the gas line failure to install a regulator will void the equipment warranty and result in
a potentially hazardous condition.
(3) The appliance and its individual shut off valve must be disconnected from the gas supply piping
system during any pressure testing of that system at test pressure in excess of 1/2PSI.
(4) The appliance must be isolated from the gas supply piping system by closing its individual
manual shut off valve during any pressure testing of the gas supply piping system at test pressure
equal to or less than 1/2PSI.
(5) Please contact the factory, the factory representative , or a local service company to perform
maintenance and repairs.
RATING PLATE
The rating plate is located in the right panel of the range. Information on this plate includes the
model and serial numbers. When communicating with factory about a unit or requesting special
parts or information, this data is essential for proper identification. Other information on this plate is
the BTU/hr input of the burners, operating gas pressure in inches WC, and whether the unit is
orificed for natural or propane gas. Pilot lighting instructions(ovens only) are also located in the
same area. The Salamander broiler, or Cheesemelter(if provided) is supplied with its own rating
plate located on the unit.
RADIANCE COOKING APPLIANCES MUST BE CONNECTED
ONLY TO THE TYPE OF GAS IDENTIFIED ON THE RATING PLATE!
4
INSTALLATION & OPERATION INSTRUCTION
CLEARANCE
Combustible Construction
BACK
SIDES
FLOOR
8”
12”
Non-Combustible
0
0
6”
Non-Combustible Construction
The appliance area must be kept free and clear of all combustible. This unit is design-certified for
the following installation only:
The clearances from combustible and non-combustible construction for ranges and range mounted
salamander broiler or cheesemelter are as follows:
CAUTION
DO NOT PUSH against the end of the valve cover/landing ledge in an attempt to adjust the ranges
position. Although this part is deburred during manufacturing,an accident could occur if the range
should move suddenly while being pushed unto position by hand.
HIGH SHELF ASSEMBLY
(1) Mount the high shelf riser to the range with #10 sheet metal screws(pointed tips) in the back.
(2) Mount the high shelf to the riser with #10 sheet metal screws provided (See attachment at the
end of this manual for a diagram that describes the installation of the backguard/flue riser).
NOTE: If a Salamander broiler / Cheesemelter is to be mounted on range, read installation instruc-
tions for Salamander broiler / Cheesemelter before installing high shelf. Special care must be taken
to ensure that the gas supply piping and/or gas pressure regulator is not exposed to exhaust gases
or elevated temperatures.
If legs or casters are not used, the unit must extend 2" beyond the front edge of a noncombustible
curb or platform.
5
INSTALLATION & OPERATION INSTRUCTION
LEVELING (Ranges Equipped with Ovens)
A carpenter's spirit level should be placed on the oven's center baking rack and/or across the range
top and the unit leveled both front to-back and side-to-side. If it is not leveled, cakes, casseroles,
and any other liquid or semi-liquid batter will not bake evenly, burner combustion may be erratic,
and the unit will not function efficiently.
If the floor is relatively smooth and level, the unit may be leveled further with adjustment in the foot
of the leg. Adjust to the high corner and level the unit with metal shims if the adjustment required
exceeds the 1-1/4" adjustment available. Units with casters must be leveled with shims. A unit will
probably not return to the same position after being moved, requiring re-leveling after each move.
AIR SUPPLY & VENTILATION
The area in front of , around and above the appliance must be kept clear to avoid any obstruction of
the flow of combustion and ventilation air. Adequate clearance must be maintained at all times in
front and the sides of the appliances for servicing and proper operation.
Means must be provided for any commercial, heavy-duty cooking appliance to exhaust combustion
waste products to the outside of the building. Usual practice is to place the unit under an exhaust
hood. Filters and drip thoughs should be part of any industrial hood, but consult local codes before
constructing and installing through a hood.
Strong exhaust fans in this hood or in the overall air conditioning system can produce a slight
vacuum in the room and/or cause air drafts, either of which can interfere with pilot or burner
performance and can also be hard to diagnose. Air movement should be checked during installa-
tion; if pilot or burner outage problems persist, make-up air openings or baffles may have to be
provided in the room.
NOTE: This appliance is not capable of being operated in the event of power failure.
NO attempt should be made to operate this appliance during a power failure
6
INSTALLATION & OPERATION INSTRUCTION
GAS CONNECTION
NOTE : The gas supply(service) line must be the same size or greater than the inlet line of the
appliance. Radiance ranges and ovens use a 3/4" NPT inlet. Sealant on all pipe joint must be
resistive to LP gas.
MANUAL SHUT-OFF VALVE
This installer-supplied valve must be installed in the gas service line ahead of the appliance and
regulator in the gas stream and in a position where it can be reached quickly in the event of an
emergency.
PRESSURE REGULATOR
All commercial cooking equipment must have a pressure regulator on the incoming service line for
safe and efficient operation, since service pressure may fluctuate with local demand. The manual
shut-off valve is normally supplied by the installer, however a pressure regulator is packed inside
each Radiance Range.
The regulators supplied for Radiance Ranges, have 3/4"inlet/outlet openings and are adjusted at
the factory for 5" WC(natural gas) or 10"WC(propane)depending on the customer's ordering
instructions.
Prior to connecting the regulator, check the incoming line pressure, as these regulators can only
withstand a maximum pressure of 1/2PSI(14"WC). If the line pressure is beyond this limit, a
step-down regulator will be required. The arrow forged into the bottom of the regulator body shows
gas flow direction; it should point downstream to the appliance. The red air vent cap on the top
regulator is part of the regulator and should not be removed.
Any adjustments to regulators must be made only by qualified service personnel with the proper
test equipment.
Failure to install a pressure regulator will void the equipment warranty!
7
INSTALLATION & OPERATION INSTRUCTION
60” RANGE REQUIRES TWO GAS CONNECTIONS
The gas inlet line size of this unit is ¾” NPT. For proper installation, the gas service supply line must
be the same size or greater than the inlet line size of the unit. Each gas connection or inlet should
have an individual, dedicated line to the main gas supply.
The gas pressure regulator must be installed in each gas line (failure to install a pressure regulator
will void the warranty). The arrow on the bottom of the regulator should be pointing toward the unit
The regulators supplied with ranges have ¾” NPT connections. Be sure the regulator matches the
gas type that is being used on the unit.
- Natural gas: 5” W.C. manifold gas pressure
- Propane gas : 10” W.C. manifold gas pressure
Before connecting the regulator, check the incoming line pressure – as these regulators can only
withstand a maximum inlet pressure of 14” W.C. (exceeding this pressure will damage them).
IMPROPER INSTALLATION
PROPER INSTALLATION
- Natural gas: 5” W.C. manifold gas pressure
- Propane gas : 10” W.C. manifold gas pressure
8
INSTALLATION & OPERATION INSTRUCTION
RIGID CONNECTIONS
Double-check any installer-supplied intake pipes visually and/or blow them out with compressed air
to clear any dirt particles, threading chips , or other foreign matter before installing a service line.
Those particles will clog orifices when gas pressure is applied.
All connections must be sealed with a joint compound suitable for LP gas, and all connections must
be tested with a soapy water solution before lighting any pilots!
FLEXIBLE COUPLINGS, CONNECTORS, AND CASTERS
If the unit is to be installed with flexible couplings and/or quick-disconnect fitting, the installer must
use a heavy-duty, AGA design certified commercial flexible connector of at least 3/4" NPT (with
suitable strain reliefs). The flexible connector must comply with the standard for Connectors for
Movable Gas Appliances, ANSI Z21.69 and addendum Z21.69a(or latest edition) and a quick-
disconnect device that complies with the standard for quick-disconnect devices for use with Gas
Fuel should comply with ANSI Z21.41 and addendum Z21.41a(or latest edition). If disconnection of
the restraint is necessary , make sure to reconnect restraint after the appliance has been returned
to its originally installed position. Domestic gas or water connectors are not suitable!
Restraining device may be attached to the back frame/panel of the unit.
If the unit is to be installed with casters, a flexible connector must be used and the same ANSI
standards apply. Locking front casters are provided to limit the movement of the appliance without
depending on the connector or associated piping. A suitable strain relief must be installed with the
flexible connector.
All connections must be sealed with a joint compound suitable for LP gas all connections must be
tested with a soapy water solution before lighting pilots.
9
INITIAL PILOT LIGHTING
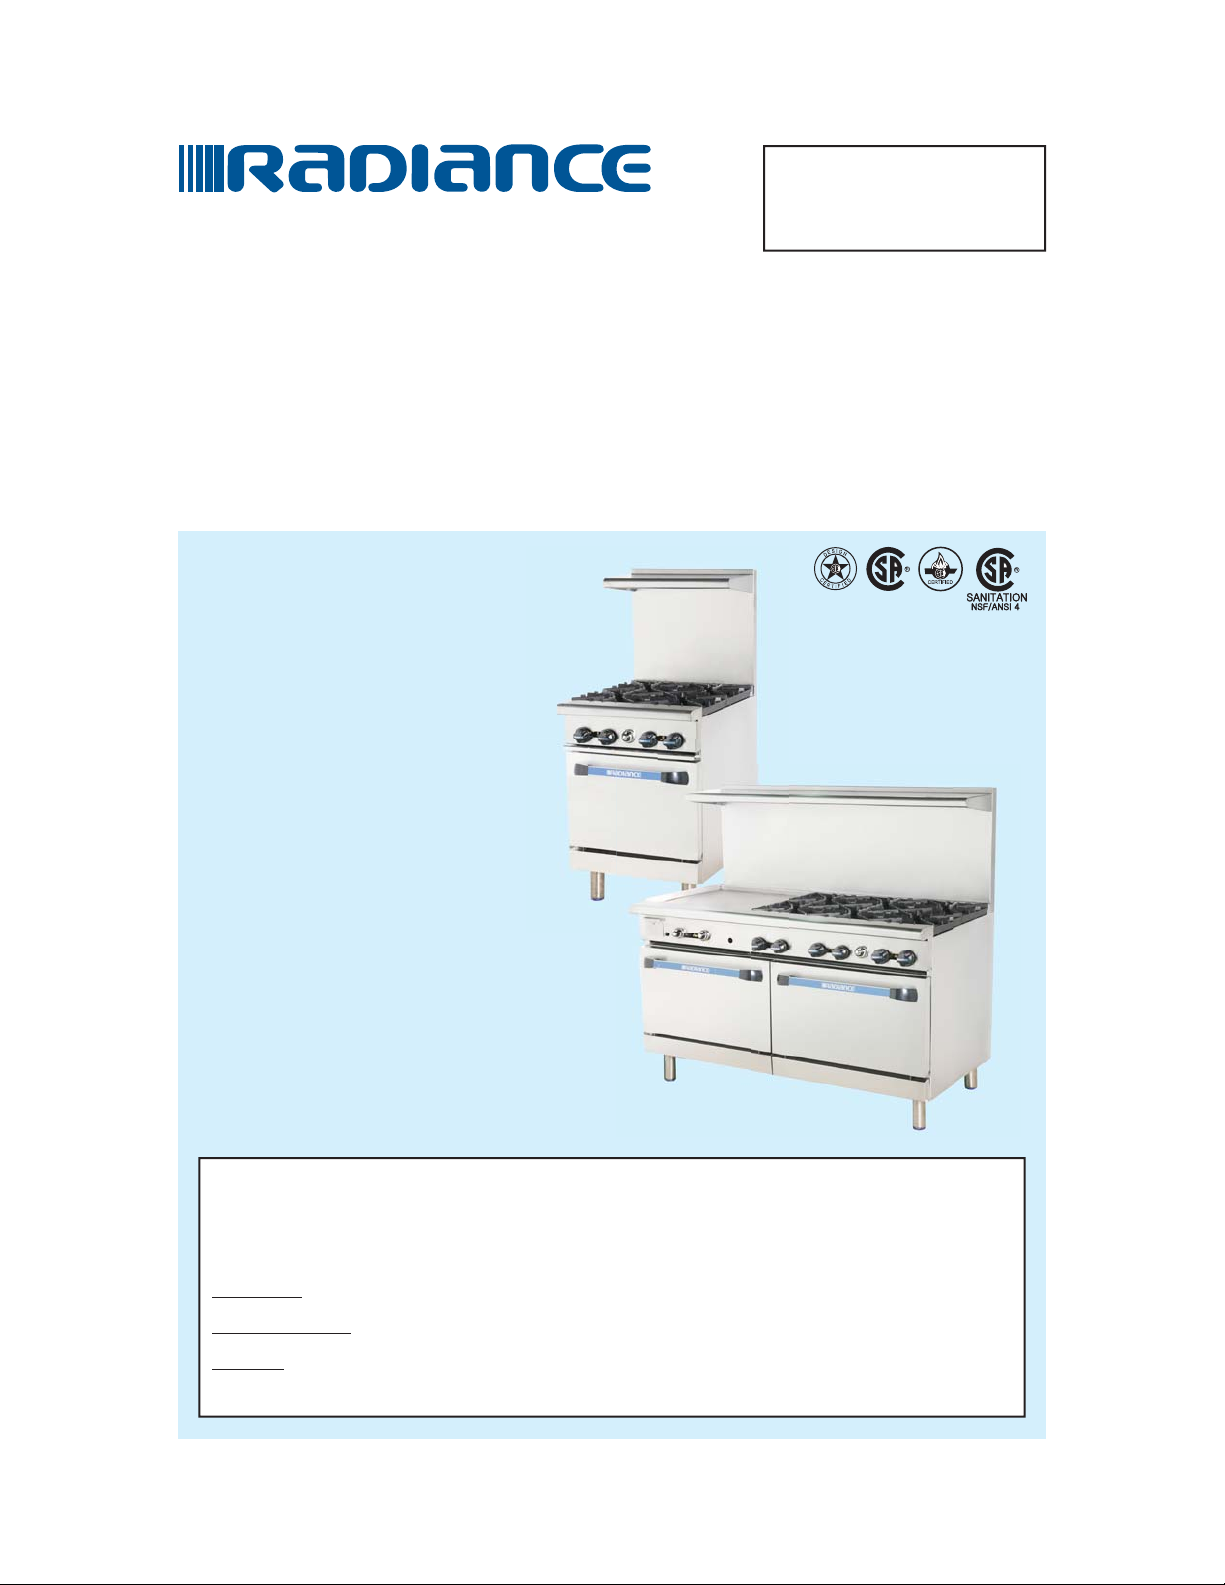
A. TOP BURNERS / RAISED GRIDDLE-BROILER
All Radiance appliances are adjusted and tested before leaving the factory, effectively matching
them to sea level conditions. Adjustments and calibrations to assure proper operation may be
necessary on installation to meet local conditions, low gas characteristics, to correct possible
problems caused by rough handling or vibration during shipment, and are to be performed only by
qualified service personnel. These adjustments are the responsibility of the customer and/or dealer
and are not covered by our warranty.
Check all gas connections for leaks with a soapy water solution before lighting any pilots. DO NOT
USE AN OPEN FLAME TO CHECK FOR LEAKS! Putting an open flame beside a new gas connec-
tion is extremely dangerous.
Before lighting any pilots, make sure that burner valves and thermostats are turned "off".
All top section burners are equipped with constant-burning pilots. These are to be manually lighted
immediately after the gas is turned on and the system is checked for leaks. Burner pilots are
provided for each burner and can be rechecked for proper adjustment. Adjustments can be made
with a screwdriver to the brass pilot valve accessible through the valve cover.
B. HOT TOP
The pilot should be lighted immediately after the gas is turned on and the system is checked for
leaks. The pilot can be reached with a long match through the valve cover, or by lifting the plate
upward and accessing through the top.
C. GRIDDLES
The griddle pilot is ignited in the same fashion as the Hot Top section, using a long lighted match
placed through the front control panel opening. Adjustment of the pilot flame can be made with a
screwdriver to the pilot valve, accessible through the valve cover.
For detailed service instructions to adjust by-pass(minimum burner) flame and to recalibrate oven
and griddle thermostatic controls.
When lighting pilots and checking for leaks, do not
stand with your face close to the combustion chamber.
CAUTION
10
INITIAL PILOT LIGHTING
D. STANDARD OVEN
Pilot gas is tapped from the main burner manifold pipe, routed through tubing to a pilot safety valve,
and then to the pilot burner. Gas flow is controlled by the safety valve.
Oven pilot lighting or relighting is to be completed in the following sequence:
(1) Turn the oven thermostat knob to "off" and wait 5 minutes.
(2) Remove the oven's lower kick plate by lifting up and out. This exposes the pilot safety valve and
the burner.
(3) Make sure any accumulated gas has dispersed. Since propane gas is heavier than air, check
near the floor area for the odor of propane gas before attempting to light any pilot burners.
(4) Depress the button on the safety valve and hold it in throughout the lighting procedure.
(5) Light the pilot while continuing to depress the button on the safety valve until the pilot remains lit
when released.
(6) If pilot is extinguished, repeat steps 4 & 5 above.
(7) Turn the oven thermostat knob "on" and set to desired temperature setting; watch to make sure
the oven burner ignites from the pilot and that there are no yellow flames from the burner.
(8) Turn the oven thermostat to "off" and replace the lower kick plate.
NOTE: It may be necessary to relight the pilot several times until the lines are purged of any
trapped air and a constant gas flow is attained.