RADIO.CUBO TS522D+ User manual


MENU/SELECT
DOWN UP
MODE
MIN MAX
BT PAIR / BACK
AUX
VOL /
MODE SCANINFO
SNOOZE
1/6 2/7 3/8
4/9 5/10 SHIFT
MENU ENTER
EQ
BACK
SCAN
1
4 5
2
6
7
3
8 9 11
10
1 2
1 2

54
PANNELLO FRONTALE
1 Indicatore stato Bluetooth: lampeggiante durante l’accoppiamento del dispositivo,
acceso quando connesso.
2 Schermo display: schermo LCD
3 Ricevitore Infrarossi (IR): riceve il segnale dal telecomando
4 MENU/SELECT:
4.1
Pressione lunga per accedere alle varie voci riguardanti il Menu globale della radio (MENU)
4.2 Pressione veloce per confermare la selezione (ENTER)
4.3 Ruotare in senso orario o antiorario per accedere alle varie voci del Menu globale
4.4
Ruotare in senso orario o antiorario per regolare la stazione successiva o precedente
in modalità DAB
4.5 Ruotare in senso orario o antiorario per regolare la frequenza in modalità FM
5 MODE:
premere per navigare tra le modalità DAB/FM/Bluetooth (BT) e AUX
6 BT PAIR/ /SCAN
6.1 in modalità BT, premere e tenere premuto per l’accoppiamento del dispositivo
Bluetooth fino a quando il led blu comincia a lampeggiare in rapida successione
6.2 quando il dispositivo Bluetooth è connesso, una pressione rapida del pulsante
permette di mettere in pausa o riavviare la riproduzione del dispositivo BT.
6.3 in modalità DAB e FM permette di eseguire la scansione delle stazioni radio disponibili
7 BACK: all’interno del Menu, premere per tornare al precedente livello del menu
8 Ingresso audio cuffie
9 Barra volume: visualizza il livello del volume dell’unità (spento quanto in MUTE).
10 VOL/STANDBY:
10.1 ruotare questa manopola in senso orario per aumentare il volume o in senso
antiorario per diminuirlo
10.2 premere per spegnere o accendere la radio
10.3 in modalità allarme, premendolo una volta permette di ripetere l’allarme (Snooze),
premendolo nuovamente ne spegne la ripetizione.
N.B: Se l’unità è alimentata unicamente dalle batterie, la pressione di questo pulsante spegnerà
l’alimentazione di modo da ridurne il consumo e aumentare la durata delle batterie. In questa
modalità la funzione orologio e l’allarme verranno disabilitate.
PANNELLO FRONTALE
1 Ingresso DC: utilizzare l’adattatore CA fornito per connetterlo alla presa di
corrente elettrica (12VDC 2A)
2 R-SPR OUT: utilizzare per connettere lo speaker destro per ottenere un sistema
stereo (venduto separatamente)
PANNELLO SUPERIORE
1 Maniglia: estrarre la maniglia per il trasporto della radio
2 Antenna radio: allungare e piegare l’antenna per ottenere la posizione migliore
per la ricezione
PAIR
ITALIANO
TELECOMANDO
STANDBY Premere questo pulsante per accendere o
spegnere la radio
MODE
MODE
premere per navigare tra le Modalità DAB/
FM/Bluetooth (BT) e AUX.
INFO
INFO
In modalità DAB, FM, mentre si sta ricevendo
un segnale di trasmissione, premere questo
pulsante per visualizzare informazioni
riguardanti la stazione selezionata
EQ
EQ
Premere per accedere alle equalizzazioni
pre-imposate o per creare la propria
personalizzata.
SCAN
SCAN
Permette di eseguire una scansione completa
delle radio in modalità DAB. Premere per
cercare la successiva stazione radio in
modalità FM
Pulsanti per la navigazione all’interno del
menu nelle varie modalità disponibili.
Incrementa o decrementa la frequenza nella
modalità FM o seleziona la successiva o la
precedente stazione DAB disponibile.
PLAY/
PAUSE/
PAIR
PAIR
Durante la riproduzione Bluetooth, premere
per avviare o mettere in pausa l’ascolto del
dispositivo associato. Tenere premuto per
l’accoppiamento di un dispositivo Bluetooth.
MENU
MENU
Premere questo pulsante per accedere alle
impostazioni del menu.
VOLUME + Premere per aumentare il volume di ascolto.
VOLUME - Premere per decrementare il volume di
ascolto.
MUTE Premere questo pulsante per selezionare o
deselezionare la funzione muto.
1/6
2/7
3/8
4/9
5/10
Pulsanti per memorizzare o per richiamare le
stazioni radio impostate (solo nella modalità
DAB e FM)
ALARM
1 & 2
1
Premere questo pulsante per impostare
l’allarme (allarme 1 / allarme 2)
SNOOZE
SNOOZE
Questo pulsante ha tre diverse funzionalità:
1. arresta la riproduzione dell’allarme
quando questo è attivo.
2. imposta la dimmabilità del display LCD
quando l’unità è spenta (4 livelli di
luminosità).
3. imposta l’intervallo di tempo per la
ripetizione dell’allarme quando l’unità
è accesa

76
IMPORTANTE
Il simbolo del lampo con terminale a forma di freccia situato all’interno di
un triangolo equilatero serve ad avvisare l’utilizzatore della presenza di una
“tensione pericolosa” non isolata nella struttura del prodotto che potrebbe
essere di un’intensità tale da provocare scosse elettriche all’utilizzatore.
AVVERTENZE RIGUARDANTI L’UTILIZZO E L’IMPIEGO DELL’UNITA’
AVVERTENZA:
L’interruttore principale dell’apparecchio non stacca completamente il flusso di corrente
elettrica dalla presa di corrente alternata di rete. Dal momento che il cavo di alimentazione
costituisce l’unico dispositivo di distacco dell’apparecchio dalla sorgente di alimentazione,
il cavo stesso deve essere staccato dalla presa di corrente alternata di rete per sospendere
completamente qualsiasi flusso di corrente. Verificare quindi che l’apparecchio sia stato installato
in modo da poter procedere con facilità al distacco del cavo di alimentazione dalla presa di
corrente, in caso di necessità. Per prevenire pericoli di incendi, inoltre, il cavo di alimentazione
deve essere staccato dalla presa di corrente alternata di rete se si pensa di non utilizzare
l’apparecchio per periodi di tempo relativamente lunghi (ad esempio, durante una vacanza).
AVVERTENZA PER LA VENTILAZIONE
Installare l’apparecchio avendo cura di lasciare un certo spazio attorno allo stesso per
consentire una adeguata circolazione dell’aria e migliorare la dispersione del calore (almeno
10 cm sulla parte superiore, 10 cm sul retro e 10 cm su ciascuno dei lati).
ATTENZIONE
• La scocca del prodotto è dotata di piccole aperture che servono anche per la ventilazione
dello stesso, allo scopo di garantirne un funzionamento affidabile, e per proteggerlo dal
surriscaldamento. Per prevenire possibili pericoli di incendi le aperture non devono mai
venire bloccate o coperte con oggetti vari durante il funzionamento (quali giornali, tovaglie,
tende o tendaggi, ecc.), e l’apparecchio non deve essere utilizzato appoggiandolo su
tappeti spessi o sul letto.
• Se la spina del cavo di alimentazione di questo apparecchio non si adatta alla presa di
corrente alternata di rete nella quale si intende inserire la spina stessa, questa deve essere
sostituita con una adatta allo scopo. La sostituzione della spina del cavo di alimentazione
deve essere effettuata solamente da personale di servizio qualificato. Dopo la sostituzione,
Per evitare il rischio di scosse elettriche, non rimuovere le viti
poste nel retro del prodotto. Non ci sono parti interne la cui
manutenzione possa essere effettuata dall’utente. In caso di
necessità, rivolgersi esclusivamente a personale di servizio
qualificato.
Il punto esclamativo in un triangolo equilatero serve ad avvisare l’utilizzatore
della presenza di importanti istruzioni di funzionamento e manutenzione nel
libretto allegato al prodotto.
la vecchia spina tagliata dal cavo di alimentazione, deve essere adeguatamente eliminata per
evitare possibili scosse o folgorazioni dovute all’accidentale inserimento della spina stessa
in una presa di corrente sotto tensione. Se si pensa di non utilizzare l’apparecchio per un
periodo relativamente lungo (ad esempio durante una vacanza), staccare la spina del cavo di
alimentazione dalla presa di corrente alternata di rete.
• Per evitare il pericolo di incendi, non posizionare sull’apparecchio dispositivi con fiamme
vive (ad esempio una candela accesa, o simili)
• Prima di collegare per la prima volta l’apparecchio alla sorgente di alimentazione leggere
attentamente la sezione che segue.
• La tensione della sorgente di elettricità differisce da Nazione a Nazione e da regione a
regione. Verificare che la corrente elettrica di rete della zona dove verrà utilizzata questa
unità sia del voltaggio richiesto (ad esempio 240 V o 110 V), valore riportato sull’etichetta
dell’adattatore CA.
• Questo prodotto è destinato esclusivamente all’uso domestico. Eventuali disfunzioni
dovute ad usi diversi (quali uso prolungato a scopi commerciali, in ristoranti, o uso in auto
o su navi) e che richiedano particolare riparazioni, saranno a carico dell’utente, anche se
nel corso del periodo di garanzia.
• Prima di usare questo prodotto, leggere sempre le informazioni riguardanti la sicurezza
poste sul retro di questa unità e sull’etichetta dell’adattatore CA.
• Tenere il prodotto ed i suoi accessori fuori della portata dei bambini e lattanti. Se inghiottiti
accidentalmente, contattare immediatamente un medico.
• Conservare l’adattatore CA lontano dalla portata di bambini e lattanti.
• Il cavo dell’adattatore CA potrebbe accidentalmente avvolgersi attorno al collo e causare
soffocamenti.
AVVERTIMENTO RIGUARDANTE IL FILO DI ALIMENTAZIONE
Prendete sempre il filo di alimentazione per la spina. Non tiratelo mai agendo per il filo stesso
e non toccate mai il filo con le mani bagnate, perché questo potrebbe causare cortocircuiti
o scosse elettriche. Non collocate l’unità, oppure altri oggetti sopra al filo di alimentazione
e controllate che lo stesso non sia schiacciato. Non annodate mai il filo di alimentazione ne
collegatelo con altri fili. I fili di alimentazione devono essere collocati in tal modo che non possano
essere calpestati. Un filo di alimentazione danneggiato potrebbe causare incendi o scosse
elettriche. Controllare il filo di alimentazione regolarmente. Quando localizzate un eventuale
danno, rivolgetevi al più vicino centro assistenza autorizzato BV Srl oppure al vostro rivenditore
per la sostituzione del filo di alimentazione.
ITALIANO

9
CONDIZIONI AMBIENTALI DI FUNZIONAMENTO
Gamma ideale della temperatura ed umidità dell’ambiente di funzionamento:
da +5°C a +35°C, umidità relativa inferiore all’85% (prodotto non coperto).
Non installare l’apparecchio in luoghi poco ventilati, o in luoghi esposti ad alte umidità o alla
diretta luce del sole (o a sorgenti di luce artificiale molto forti).
AVVERTENZA SULLE ONDE RADIO
Questa unità usa frequenze radio da 2,4 GHz di frequenza, una banda usata anche da altri
sistemi wireless (ad esempio forni a microonde e telefoni senza fili).
Se sullo schermo del televisore appare del rumore, è possibile che questa unità (o unità da
essa supportata) stia causando interferenze con i segnali provenienti dal connettore di ingresso
dell’antenna del televisore, apparecchio video, sintonizzatore satellitare, ecc.
In tal caso, aumentare la distanza fra il connettore di ingresso dell’antenna e questa unità
(compresi i prodotti da essa supportati).
BV Srl non è responsabile di malfunzionamenti del prodotto dovuto ad errori/malfunzionamenti
associati alla propria connessione e/o alle attrezzature cui si è collegati. Contattare il fabbricante
del prodotto che si vuole associare.
ATTENZIONE ALL’ADATTATORE CA
Prestate attenzione ad afferrare saldamente l’involucro dell’adattatore CA se dovete rimuoverlo
dalla presa di correte. Se tirate il cavo della corrente, lo stesso potrebbe danneggiarsi provocando
un incendio e/o folgorazione. Non cercate di rimuovere l’adattatore CA tirandolo con le mani
nude. Ciò potrebbe causare folgorazione.
Non lasciare la spina del cavo di alimentazione dell’adattatore CA nella presa di corrente se il
collegamento rimane poco affidabile anche a spina del tutto inserita nella presa. Si potrebbe
generare del calore che potrebbe provocare un incendio. Rivolgetevi a un rivenditore o a un
elettricista per sostituire la presa di corrente.
AMBIENTE E SMALTIMENTO
Questo prodotto potrebbe contenere sostanze ritenute pericolose per l’ambiente e per la
salute. Al fine di prevenire il rilascio nell’ambiente di sostanze nocive, BV Srl fornisce le seguenti
informazioni relative allo smaltimento e al riciclaggio dei materiali a seguito della dismissione del
prodotto.
Puoi dare il tuo contributo all’ambiente seguendo le seguenti semplici norme:
Quando il tuo dispositivo elettrico o elettronico non ti è più utile portalo presso il gestore locale
dello smaltimento dei rifiuti affinché il prodotto possa essere riciclato.
Il tuo prodotto può essere reso gratuitamente al tuo rivenditore acquistando un apparecchio di
tipo equivalente o che svolga le stesse funzioni della nuova apparecchiatura fornita.
Contatta BV Srl per informarti sul rivenditore più vicino.
Se avete bisogno di ulteriore assistenza riguardante il riciclaggio, riuso o il cambio del prodotto,
potete contattarci presso l’assistenza clienti, al numero telefonico riportato nel manuale utente
e saremo lieti di aiutarVi.
Suggeriamo infine alcune precauzioni ulteriori per la tutela dell’ambiente quali, il riciclaggio
dell’imballo interno ed esterno (incluso quello utilizzato per la spedizione) con il quale questo
prodotto è stato consegnato.
Con il vostro aiuto, potremo ridurre la quantità di risorse ambientali richieste per la costruzione
di dispositivi elettrici ed elettronici, ridurre l’uso di discariche per collocare i prodotti usati e, in
generale, migliorare la nostra qualità di vita assicurando che sostanze potenzialmente dannose
non siano disperse nell’ambiente ma smaltite correttamente.
La gestione non corretta del prodotto a fine vita e lo smaltimento non conforme a quanto sopra
esposto rende l’utente passibile delle sanzioni previste a tale scopo dalla normativa nazionale
vigente nel suo paese.
ATTENZIONE
Questo apparecchio non è impermeabile. Per prevenire pericoli di incendi o folgorazioni, non
posizionare nelle vicinanze di questo apparecchio contenitori pieni di liquidi (quali vasi da fiori, o
simili), e non esporre l’apparecchio a sgocciolii, schizzi, pioggia o umidità.
I rifiuti dei dispositivi elettrici ed elettronici (WEEE) non dovrebbero mai essere
depositati nei comuni raccoglitori di rifiuti urbani (raccolta rifiuti residenziale).
Questo simbolo sui prodotti, confezioni, e/o documenti allegati significa
che vecchi prodotti elettrici ed elettronici devono essere collocati in maniera
appropriata al termine del proprio periodo di vita utile.
Per l’appropriato trattamento, recupero e riciclaggio di vecchi prodotti, fate
riferimento ai punti di raccolta autorizzati in conformità alla vostra legislazione
nazionale.
ITALIANO
8

1110
NORME DI SICUREZZA
PERICOLO
Seguire le istruzioni date.
Non gettare il dispositivo nel fuoco e non esporlo al calore.
Non lanciare il dispositivo, non colpirlo con un martello o altro oggetto e non conficcarvi chiodi.
Non usare o lasciare questo dispositivo vicino a luoghi a temperatura molto elevata, ad esempio
vicino a stufe, in automobili chiuse o alla luce diretta del sole.
Non lasciare che il prodotto venga bagnato da sostanze liquide.
AVVERTENZA
Non usare il dispositivo se emette odori insoliti, si riscalda, cambia colore o forma o si nota
qualsiasi altra anomalia durante l’uso, la ricarica o lo stoccaggio.
ATTENZIONE - USO IN AMBIENTI UMIDI
La TS522D+ non è un dispositivo impermeabilizzato.
Nell’usarlo, proteggerlo dall’acqua e non utilizzarlo in ambienti umidi.
Se dovesse venire a contatto con qualsiasi tipo di liquido togliere immediatamente l’umidità con
un panno asciutto. Installare questa unità solo su superfici stabili ed in piano. Non usare questa
unità rovesciata o inclinata.
Installare questa unità in un luogo dove l’acqua non possa penetrarvi.
Non ribaltare questa unità o tenerla inclinata quanto è stata esposta ad acqua o gocce di acqua.
Dato che l’acqua potrebbe entrare nell’unità, non inclinarla se è bagnata
Dell’acqua potrebbe essere entrata nel dispositivo. Non trasportare questa unità se è bagnata.
Non usare l’adattatore CA in vicinanza dell’acqua.
Tenere la batteria del telecomando lontana dai bambini.
Essa può causare incendi o ustioni da sostanze chimiche se maneggiata in modo scorretto.
Non ricaricare, smontare o surriscaldare oltre i 100°C.
Sostituirla solamente con una batteria dello stesso tipo e modello (CR2025).
ISTALLAZIONE DELL’UNITÀ
Quando si installa l’unità, avere cura di collocarla su una superficie piana e stabile.
Evitare di installare l’apparecchio nei seguenti luoghi:
• su un televisore a colori (potrebbero verificarsi distorsioni dello schermo a causa della
connessione Bluetooth);
• in prossimità di una piastra a cassette (o ad un dispositivo che emette un campo
magnetico). Ciò potrebbe interferire con il suono;
• sotto la luce solare diretta;
• in ambienti estremamente caldi o freddi;
• in luoghi soggetti a vibrazioni o altri movimenti;
• in luoghi estremamente polverosi;
• in luoghi in cui vi siano fumi o oli caldi (ad esempio ad una cucina economica)
ATTENZIONE
• Se è in uso, non appoggiare il dispositivo su di un lato, non appoggiarlo e non appenderlo
a nulla.
• Non sedere e non stare in piedi sul prodotto
• Non applicare questa unità ad un muro o al soffitto. Esso potrebbe altrimenti cadere e
causare ferimenti.
• Alcuni elementi degli altoparlanti sono magnetici. Gli oggetti metallici potrebbero essere
attratti dagli altoparlanti. Non lasciare carte di credito o altri supporti di memorizzazione
magnetici vicino agli altoparlanti in quanto le informazioni memorizzate potrebbero venire
cancellate.
VI RINGRAZIAMO PER AVERE ACQUISTATO QUESTO PRODOTTO CUBO.
Con la Radio FM/DAB/DAB+ Bluetooth TS522D+ sarà possibile ascoltare la musica trasmessa
dalle frequenze FM/DAB/DAB+, quella che si trova sul vostro dispositivo audio o sul telefono
cellulare compatibile mediante la connessione Bluetooth, e quella collegata all’ingresso AUX.
Prima di utilizzare il prodotto leggere attentamente queste istruzioni per l’uso in modo da
imparare come utilizzare correttamente il dispositivo. Finito di leggerlo conservarlo in un luogo
sicuro per poterlo riutilizzare in futuro.
TECNOLOGIA SENZA FILI BLUETOOTH
La tecnologia senza fili Bluetooth consente di collegare dispositivi compatibili senza usare cavi.
Per stabilire una connessione tramite tecnologia senza fili Bluetooth non è necessario che l’unità
e l’altro dispositivo si trovino uno di fronte all’altro, ma è sufficiente che i due dispositivi si trovino
ad una distanza massima di 10 metri l’uno dall’altro. La connessione potrebbe essere soggetta
ad interferenze dovute ad ostacoli quali pareti o altri dispositivi elettronici.
L’unità è conforme alla specifica Bluetooth v2.1. Rivolgersi ai produttori degli altri dispositivi
da associare per accertarne la compatibilità con questo dispositivo. Potrebbero esserci delle
limitazioni relative all’uso della tecnologia senza fili Bluetooth in alcuni Paesi. Rivolgersi alle
autorità locali o al proprio operatore.
CONTENUTO DELLA CONFEZIONE
• La confezione contiene:
• Radio TS522D+
• Alimentatore Esterno CA
• Telecomando con batteria
• Manuale d’istruzioni
• Sacchetto porta radio
Se nella vostra confezione mancasse qualche elemento contattate il vostro rivenditore.
ITALIANO

1312
INSTALLAZIONE E SOSTITUZIONE DELLA BATTERIA DEL TELECOMANDO
Il telecomando viene fornito con una batteria di tipo “CR2025” che deve essere installata.
Quando la portata del telecomando risulta inferiore o se cessa di funzionare correttamente, è il
momento di sostituire la batteria.
Per eseguire questa semplice operazione procedere come di seguito descritto:
ATTENZIONE:
Le batterie al litio possono esplodere o provocare ustioni se smontate, cortocircuitate, ricaricate,
esposte all’acqua, al fuoco, o ad alte temperature. Non lasciare batterie in tasca, in borsa o in
un altro contenitore contenente oggetti metallici, mescolarle con batterie esauste di altro tipo, o
stoccarle con materiali pericolosi o combustibili. Conservare in luogo fresco, asciutto e ventilato.
Seguire le leggi e le normative applicabili per il trasporto e lo smaltimento.
PER INIZIARE
1. Rimuovere la plastica di protezione dal vano batteria del telecomando come mostrato in figura.
2. Connettere l’alimentatore in dotazione all’ingresso DC posto nel pannello posteriore
della radio. Connettere l’altra estremità dell’alimentatore ad una presa AC. Se si desidera
alimentare la radio con le batterie, inserire 6 pezzi di batteria tipo “C” all’interno del vano
batterie posto nella parte inferiore della radio.
3. Alla prima accensione il display mostrerà il messaggio “00:00”
4. Accendere il dispositivo premendo il pulsante di standby nell’unità principale oppure sul
telecomando. La radio entrerà in modalità DAB e inizierà la scansione delle stazioni. A fine
scansione, l’unità automaticamente utilizzerà le informazioni di data e orologio raccolte
dalle emittenti DAB
ATTENZIONE:
Se l’unità viene alimentata dalle batterie (quindi l’alimentatore non è connesso), utilizzare il
pulsante di standby posto nell’unità principale.
Con la radio alimentata dalle batterie il telecomando non ha alcuna funzione.
1. Estrarre il vano batteria come indicato nelle istruzioni
stampate nel retro del telecomando
2. Nel caso di sostituzione, rimuovere la batteria, inserire
la nuova batteria CR2025 come indicato nell’immagine
sottoriporata (facendo attenzione che il lato con il
simbolo “+” sia rivolto verso l’alto)
3. Reinserire il vano batteria all’interno dell’apposito
alloggiamento.
ASCOLTARE LA RADIO DAB
1. L’operazione di scansione deve essere eseguita alla prima accensione. L’icona DAB sul
display si accenderà e la procedura di scansione inizierà (questa operazione potrebbe
durare qualche minuto)
2. Utilizzando il telecomando, mediante il pulsante MODE selezionare la modalità DAB.
Dall’unità principale premere la manopola MODE per entrare nelle varie modalità e
selezionare DAB.
3. Premere il pulsante INFO per visualizzare sul display le informazioni relative alla stazione
radio selezionata (dipendente dalla disponibilità offerta dell’emittente - broadcaster)
4. Mediante il telecomando premere i pulsanti per navigare all’interno dell’elenco delle
stazioni DAB scansionate. Dall’unità principale utilizzare la manopola MENU/SELECT per
ascoltare la stazione DAB successiva o precedente scansionata.
5. Premere il pulsante SCAN per eseguire una scansione completa delle stazioni radio in
modalità DAB.
ASCOLTARE LA RADIO FM
1. Utilizzando il telecomando, mediante il pulsante MODE selezionare la modalità FM. Il
display mostrerà una frequenza FM, ad esempio “102.5”. L’icona FM si accenderà nel
display. Dall’unità principale premere la manopola MODE per entrare nelle varie modalità
e selezionare FM.
2. Mediante il telecomando premere i pulsanti per navigare all’interno delle frequenze
FM: una pressione incrementa o decrementa la frequenza di 50 kHz. Dall’unità principale
utilizzare la manopola MENU/SELECT per incrementare o decrementare la frequenza FM.
3. Tenere premuto uno dei due pulsanti per trovare la successiva o precedente
frequenza radio disponibile oppure premere il pulsante SCAN da telecomando per cercare
direttamente la successiva stazione. Quando una stazione radio viene trovata, la ricerca
automatica si ferma. Dall’unità principale utilizzare la manopola BT PAIR/SCAN per trovare
la successiva frequenza radio disponibile.
4. Premere il pulsante INFO per visualizzare sul display le informazioni relative alla stazione
radio selezionata (dipendente dalla disponibilità offerta dell’emittente)
5. Premere 4 volte il pulsante INFO per poter accedere alla funzione MONO/STEREO della
stazione FM. Premere il pulsante ENTER per passare da MONO a STEREO o viceversa.
In modalità STEREO questa icona si accenderà sul display .
MEMORIZZARE E RICHIAMARE UNA STAZIONE RADIO (PRESETS)
1. Per memorizzare le vostre stazioni preferite nelle locazioni di memoria (Presets) da 1 a 5
procedere come di seguito descritto:
Tenere premuto il pulsante
1/6
2/7
3/8
4/9
5/10
del numero della memoria dove
si vuole memorizzare tale stazione fino a che il display non mostra
l’indicazione “STORED #” (# sta ad indicare il numero della memoria nella quale
verrà memorizzato, ad esempio “STORED 3” – memorizzato nel preset nr. 3)
2. Per memorizzare le vostre stazioni preferite nelle locazioni di memoria (Presets) da 6 a 10
procedere come di seguito descritto:
ITALIANO

1514
3. Premere il pulsante SHIFT una volta;
Tenere premuto il pulsante
1/6
2/7
3/8
4/9
5/10
del numero della memoria dove
si vuole memorizzare tale stazione fino a che il display non mostra l’indicazione
“STORED #” (# sta ad indicare il numero della memoria nella quale verrà
memorizzato, ad esempio “STORED 6” – memorizzato nel preset nr. 6)
4. E’ possibile memorizzare fino a 10 stazioni radio DAB e 10 stazioni radio FM (la frequenza
radio della stazione FM salvata di default su tutti i preset è 87.50 MHz).
5. Per richiamare uno dei 10 preset memorizzati procedere come di seguito riportato:
Per i preset memorizzati da 1 a 5 premere uno dei pulsanti
1/6
2/7
3/8
4/9
5/10
6. Per i preset memorizzati da 6 a 10 premere una volta il pulsante SHIFT (il display
dell’unità principale visualizzerà la dicitura “SHIFT”) e successivamente il pulsante
relativo al preset desiderato.
MODALITÀ DI ACCOPPIAMENTO, COLLEGAMENTO E FUNZIONAMENTO DELL’UNITÀ
ATTRAVERSO LA TECNOLOGIA SENZA FILI BLUETOOTH
La radio TS522D+ può essere accoppiata con la maggior parte dei dispositivi Bluetooth 2.0 e
2.1. L’accoppiamento può differire da dispositivo a dispositivo. Fare riferimento al manuale di
istruzioni del proprio dispositivo Bluetooth per il corretto accoppiamento all’unità.
1. Al primo accesso a tale modalità l’unità andrà nello stato di “attesa di connessione”, il led
lampeggerà lentamente ed in questa condizione sarà possibile associare un dispositivo
che è già stato accoppiato. Se il dispositivo che si vuole collegare ha Bluetooth acceso,
esso si connetterà automaticamente alla radio.
2. Per collegare un nuovo dispositivo premere il pulsante PAIR per circa 4 secondi fintanto
che il LED lampeggerà velocemente (condizione dello stato di attesa di accoppiamento).
3. Accendere il proprio dispositivo Bluetooth (per esempio uno SmartPhone), entrare nel
menu di impostazione Bluetooth ed eseguire una scansione dei dispositivi disponibili. Nella
lista dei dispositivi trovati verrà mostrata l’etichetta TS522D+.
4. Connettere il dispositivo all’unità TS522D+, il dispositivo mostrerà lo stato di “Connesso” e il
LED della radio passerà dallo stato di lampeggiante a quello di acceso (se l’accoppiamento
è avvenuto con successo).
5. A questo punto sarà possibile mediante la radio TS522D+ riprodurre senza fili la musica
contenuta all’interno del dispositivo associato.
6. Mentre un dispositivo è connesso mediante la tecnologia Bluetooth, se si desidera
accoppiare un altro dispositivo Bluetooth, è necessario disconnettere la connessione
corrente tenendo premuto per circa 3 secondi il pulsante PAIR fintanto che non si avverte
un suono tipo “beep”, oppure disabilitando la connessione stabilita direttamente dal
menu Bluetooth del dispositivo associato. L’unità passera direttamente in modalità di
accoppiamento e a questo punto sarà possibile connettere un altro dispositivo.
ATTENZIONE:
Per i telefoni cellulari con Bluetooth 2.0, verrà richiesto di inserire una password durante
l’accoppiamento. Premere la seguente stringa: 0000 (zerozerozerozero)
RIPRODUZIONE DELLA MUSICA
Il dispositivo che intendete associare a TS522D+ deve supportare il profilo AVRCP (Audio
Video Remote Control Profile) al fine di poter controllare la riproduzione attraverso esso. Fare
riferimento al manuale utente del vostro dispositivo. Quando la musica è in riproduzione:
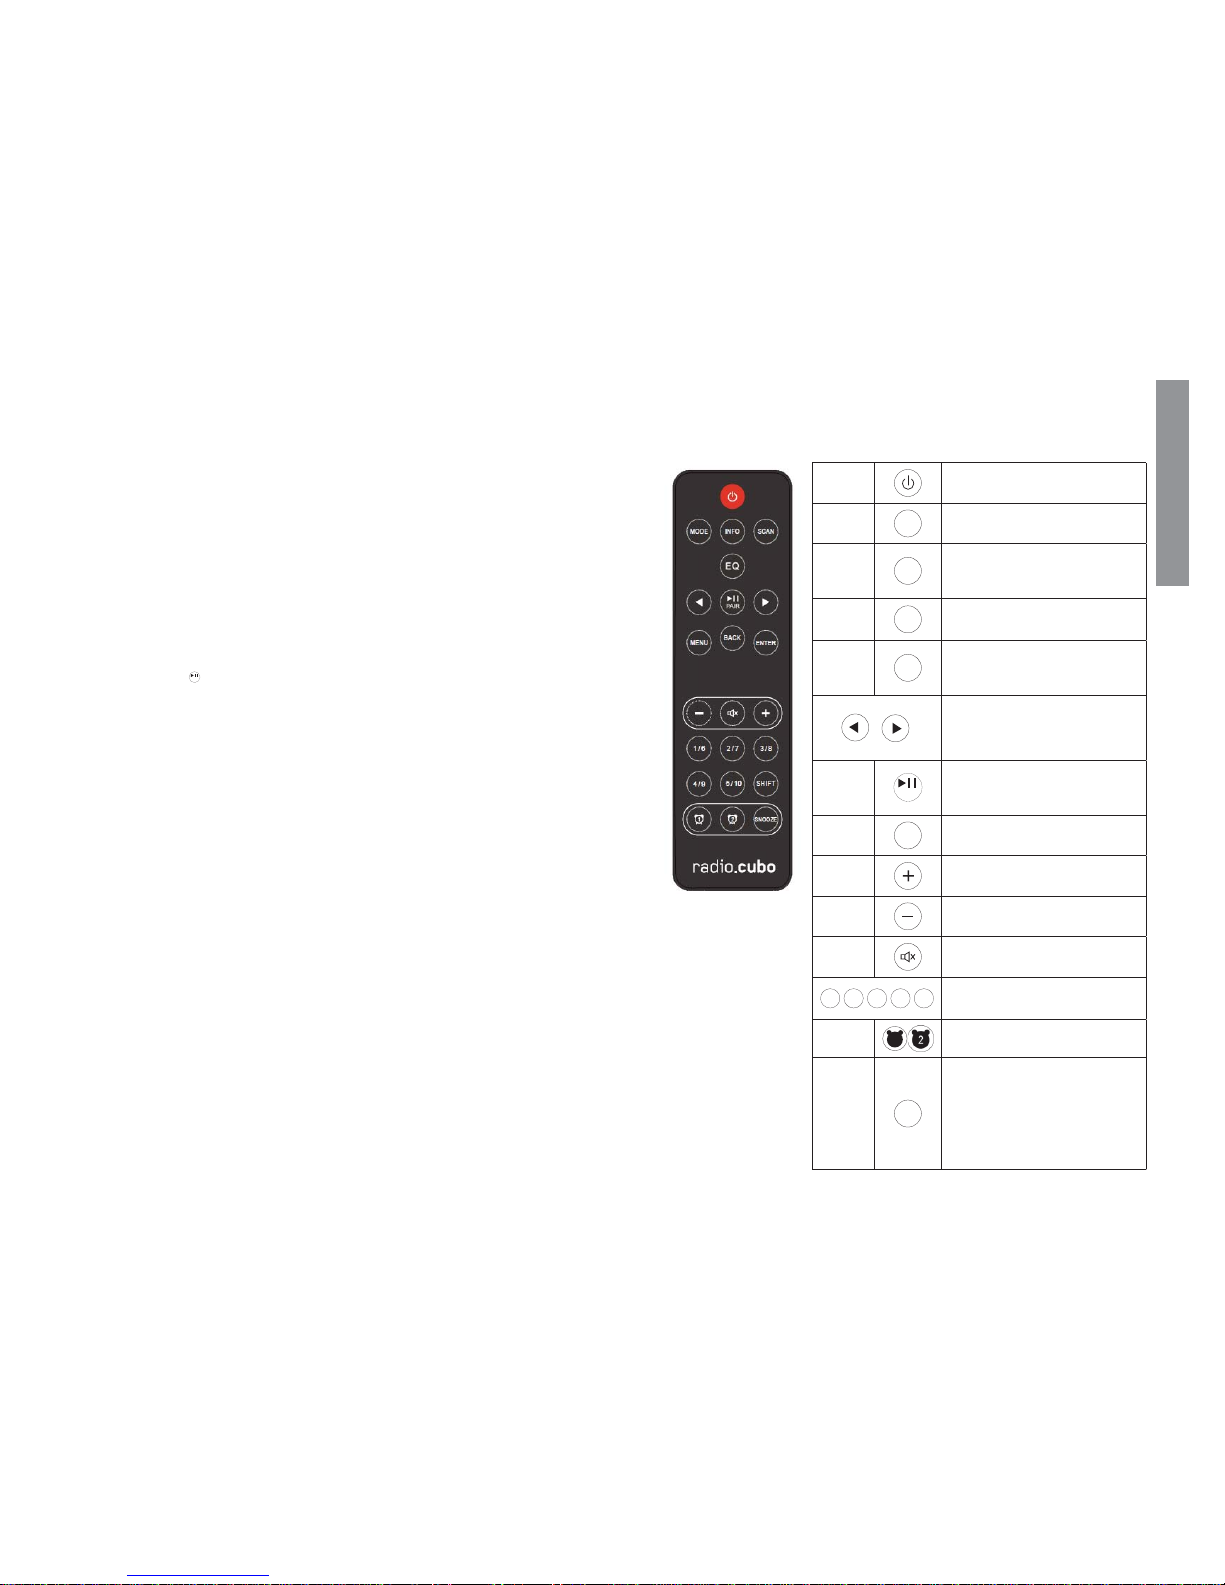
1. Pulsante PLAY/PAUSE
a. Premere una volta per mettere in pausa la riproduzione
b. Premere un’altra volta per far riprendere la riproduzione
2. Pulsante VOL – (dall’unità principale ruotare in senso antiorario la manopola VOL/STB)
a. Premere una volta per diminuire il volume di uno step
b. Tenerlo premuto per diminuire il volume in modo costante
3. Pulsante VOL + (dall’unità principale ruotare in senso antiorario la manopola VOL/STB)
a. Premere una volta per aumentare il volume di uno step
b. Tenerlo premuto per aumentare il volume in modo costante (quando verrà
raggiunto il livello massimo il display mostrerà l’etichetta VOL MAX)
ATTENZIONE:
ascoltare la musica a un volume moderato. L’esposizione continua ad un volume elevato
potrebbe danneggiare l’udito.
CONNETTERE L’ULTIMO DISPOSITIVO BLUETOOTH ACCOPPIATO
4. Di seguito viene riportato un metodo veloce per connettere TS522D+ all’ultimo dispositivo
accoppiato.
Quando il prodotto è in modalità standby, premere il pulsante STANDBY ed entrare nella modalità
BT mediante il pulsante MODE (se l’unità è accesa, ma in una modalità diversa, premere il
pulsante MODE fino a visualizzare BT). Accendere il dispositivo Bluetooth da associare.
Esso si connetterà automaticamente. Il LED della modalità Bluetooth si accenderà quando la
connessione sarà avvenuta con successo. Se il prodotto non riesce a trovare l’ultimo dispositivo
accoppiato, esso andrà in modalità di attesa di connessione. In questo stato altri dispositivi
accoppiati precedentemente potranno essere collegati all’unità.
RIPRISTINO DELLA MEMORIA DELL’UNITÀ
L’unità può memorizzare fino a 8 dispositivi Bluetooth diversi. Per cancellare la memoria
manualmente bisogna essere all’interno della modalità BT, nello stato di accoppiamento (LED
lampeggia velocemente), premere il pulsante PAIR due volte (con un intervallo di circa un secondo tra
le pressioni) fintanto che non viene riprodotto un suono tipo “beep”. A questo punto il LED indicativo
dello stato del Bluetooth da lampeggiante passa a spento per poi ricominciare a lampeggiare.
ATTENZIONE:
Dopo aver cancellato completamente la memoria l’unità entrerà subito nella modalità di
accoppiamento e sarà necessario seguire nuovamente la procedura di accoppiamento e
collegamento di un nuovo dispositivo Bluetooth.
Ricordarsi di eliminare il nome della radio anche dal dispositivo al quale la si desidera connettere
nuovamente, questo per ripristinare completamente l’accoppiamento tra i due dispositivi
ITALIANO

1716
RIPRODUZIONE DI UN DISPOSITIVO CONNESSO ALL’INGRESSO AUX
1. Collegare all’ingresso AUX IN il jack del cavo (non fornito) proveniente dal dispositivo
esterno (per esempio un riproduttore MP3)
2. Utilizzare il pulsante MODE sul telecomando per accedere alla modalità AUX IN oppure
premendo la manopola MODE nell’unità principale fino a visualizzare la sorgente AUX IN.
Nel display verrà visualizzata l’etichetta AUX IN.
3. Utilizzare il proprio dispositivo per controllare la riproduzione, il livello del volume può essere
controllato sia dal dispositivo collegato che dall’unità principale. Mediante il pulsante MUTE
del telecomando è possibile silenziare la riproduzione e riavviarla premendo nuovamente
lo stesso pulsante.
IMPOSTARE L’UNITÀ
Premere il pulsante MENU sul telecomando o tener premuto la manopola MENU/SELECT
nell’unità principale per entrare all’interno del menu delle varie modalità.
Premere i pulsanti sul telecomando, oppure ruotare la manopola MENU/SELECT
nell’unità principale per selezionare la voce del menu desiderata e premere ENTER sul
telecomando o premere la manopola MENU/SELECT per entrare nel sottomenu oppure per
salvare le impostazioni. Premere il pulsante BACK per ritornare al livello precedente, oppure
premere MENU nuovamente per uscire.
MENU DISPONILI IN MODALITÀ DAB
Premere il pulsante MENU per accedere alle molteplici funzioni della modalità DAB.
Mediante i pulsanti è possibile navigare attraverso le varie voci del menu.
Premere il pulsante ENTER per entrare all’interno della voce del menu selezionata.
FULL SCAN: permette di compiere la scansione completa dei canali DAB
MANUAL TUNE: permette di impostare la frequenza DAB da sintonizzare
Premere i pulsanti
per regolare la frequenza e premere
ENTER
per confermare (p.e.
174.928 MHz)
Il display mostrerà la potenza del segnale della frequenza impostata manualmente per la
sintonizzazione.
Il simbolo > è un indicatore che segnala la potenza del segnale; significa che la potenza del
segnale di tale stazione è abbastanza forte per permettere la sintonizzazione di tale stazione
DAB. Il simbolo --- è un indicatore che segnala la mancanza di segnale.
Premere il pulsante MENU due volte per ritornare alla modalità DAB, oppure premere BACK tre
volte per riprodurre la stazione DAB sintonizzata.
DRC (DYNAMIC RANGE COMPRESSION)
Permette di impostare il livello DRC in High, Low o Off.
Per selezionare uno delle tre possibilità sopramenzionate premere i pulsanti .
MENU DISPONIBILE IN MODALITÀ FM
Premere il pulsante MENU per accedere alle molteplici funzioni della modalità FM.
Mediante i pulsanti è possibile navigare attraverso le varie voci del menu.
Premere il pulsante ENTER per entrare all’interno della voce del menu selezionata.
SCAN
Permette di impostare la qualità della ricezione delle stazioni FM per la scansione.
STRONG: verranno scansionate solo le stazioni radio ricevute con segnale forte.
ALL: verranno scansionate le stazioni radio ricevute sia con segnale forte che con segnale debole.
ITALIANO

1918
AUDIO
Permette di impostare l’ascolto MONO o STEREO in modalità FM.
MENU DISPONIBILE IN TUTTE LE MODALITÀ
Premere il pulsante MENU per accedere alle funzioni comuni a tutte le modalità della TS522D+.
Mediante i pulsanti è possibile navigare attraverso le varie voci del menu.
Premere il pulsante ENTER per entrare all’interno della voce del menu selezionata.
DATE/TIME
Permette di impostare manualmente la data e l’orologio oppure attraverso il segnale ricevuto
dalle emittenti delle stazioni DAB.
MANUAL
Premere i pulsanti sul telecomando, ruotare la manopola MENU/SELECT posta sull’unità
principale, per regolare l’orologio e la data, premere il pulsante ENTER sul telecomando oppure la
manopola MENU/SELECT sull’unità principale per confermare e salvare le informazioni inserite.
AUTO
Selezionando questa opzione, la radio utilizzerà le informazioni di data e orologio fornite
dall’emittente.
ATTENZIONE:
Se l’unità è alimentata dalle batterie, quando la radio è spenta, le informazioni riguardanti la data e
l’orologio verranno perse. Quando la radio viene riaccesa, andando in modalità DAB, essa eseguirà
una scansione automatica e riceverà le informazioni di data e orologio dall’emittente DAB.
TIME MODE
Permette di impostare il formato dell’orologio in 12 o 24 ore.
SNOOZE
Permette di impostare l’intervallo di tempo per la ripetizione dell’allarme (snooze).
Premere i pulsanti sul telecomando o ruotare la manopola MENU/SELECT sull’unità
principale per regolare l’intervallo da 5 minuti a 15 minuti con passi da un minuto.
Premere il pulsante ENTER sul telecomando o la manopola MENU/SELECT sull’unità principale
per salvare il valore scelto
.
Per disabilitare la funzione Snooze premere il pulsante STANDBY nel telecomando oppure
dall’unità principale
DISPLAY SET
Permette di impostare la luminosità del display.
Premere i pulsanti sul telecomando o ruotare la manopola MENU/SELECT sull’unità
principale per regolare la luminosità per la modalità normale e/o per la modalità standby.
Modalità standby Normale modalità operativa
Premere il pulsante ENTER sul telecomando o la manopola MENU/SELECT sull’unità
principale per accedere alle due modalità operative e mediante i pulsanti incrementare
o decrementare la luminosità del display.
ITALIANO

2120
SET EQ
Permette di impostare l’equalizzazione della radio.
Premere i pulsanti sul telecomando oppure ruotare la manopola MENU/SELECT
sull’unità principale per selezionare uno dei preset di equalizzazione memorizzato: NORMAL,
ROCK, POP JAZZ. Premere il pulsante ENTER sul telecomando o la manopola MENU/
SELECT sull’unità principale per confermare il preset selezionato.
Mediante l’opzione MY EQ, è possibile impostare il valore delle frequenze alte (treble) e basse
(bass) in modo personalizzato. Premere i pulsanti sul telecomando oppure ruotare la
manopola MENU/SELECT sull’unità principale per incrementarne o decrementarne il valore.
Premere il pulsante ENTER sul telecomando o la manopola MENU/SELECT sull’unità
principale per confermare i valori impostati.
LOUDNESS
Permette di impostare il valore loudness tra ON e OFF.
Premere i pulsanti sul telecomando o ruotare la manopola MENU/SELECT sull’unità
principale per selezionare uno dei due possibili stati. La selezione tra ON e OFF del loudness è
possibile solo nell’equalizzazione NORMAL (le altre equalizzazioni hanno il loudness impostato
su ON di default).
RESET
Permette di cancellare tutte le impostazioni e ripristinare la configurazione di fabbrica. Scegliere
l’opzione YES e premere il pulsante ENTER sul telecomando oppure la manopola MENU/
SELECT sull’unità principale per avviare il reset alle impostazioni di fabbrica, oppure NO per
cancellare l’operazione.
ATTENZIONE: tutte le impostazioni riguardanti data, orologio, allarme, equalizzatore e preset
delle stazioni radio verranno perse.
FIRMWARE VERSION
Permette di visualizzare la versione firmware installata nell’unità.
UTILIZZARE L’ALLARME
Impostazione dell’allarme
1. Accendere la radio, premere il pulsante
1
oppure il pulsante sul telecomando per
selezionare l’allarme 1 oppure l’allarme 2.
L’icona
1
oppure l’icona inizierà a lampeggiare sul display.
Premere il pulsante ENTER per entrare nel menu dell’allarme, premere i pulsanti sul
telecomando o ruotare la manopola MENU/SELECT sull’unità principale per regolare l’orario
desiderato per l’allarme. Premere il pulsante ENTER o la manopola MENU/SELECT per
confermare la scelta
1
e per passare alla successiva funzione , oppure premere il pulsante
BACK per tornare alla precedente voce di menu.
Successivamente all’impostazione dell’orario dell’allarme è possibile selezionare la sorgente di
allarme (DAB/FM/Buzzer). Impostando DAB o FM è possibile impostare una radio memorizzata
nei preset da associare all’allarme oppure l’ultima stazione radio ascoltata.
L’opzione successiva è quella della frequenza di ripetizione dell’allarme che può avere le seguenti
opzioni:
Once (una volta) – Daily (giornaliera) – Weekdays (Giorni lavorativi) – Weekends (Fine settimana).
Selezionando l’opzione Once è necessario confermare la data dell’allarme prima di passare al
passo successivo. Impostare il volume di riproduzione dell’allarme.
Quando l’allarme è stato impostato su ON e salvato l’icona relativa all’allarme 1 e/o 2 verrà
mostrata sul display ad indicare lo stato attivo.
ITALIANO

2322
ATTIVARE O DISATTIVARE L’ALLARME
In modalità standby, premere il pulsante
1
oppure il pulsante sul telecomando per attivare
o disattivare gli allarmi; oppure, accendere la radio, premere il pulsante
1
oppure il pulsante
per selezionare l’allarme 1 o 2, premere sul telecomando i pulsanti per selezionare
l’opzione ON/OFF e confermare la scelta mediante il pulsante ENTER.
Le icone verranno mostrare sul display a conferma che l’allarme è stato attivato.
OPZIONE SNOOZE E SOSPENSIONE DELL’ALLARME
Mentre l’allarme è attivo, premere il pulsante SNOOZE nel telecomando per far ripetere l’allarme
dopo un certo intervallo (in base alle impostazioni inserite nel relativo menu - valore di default è
5 minuti) oppure premendo la manopola VOL/STANDBY sull’unità principale.
Durante il funzionamento della funzione SNOOZE sul display verrà visualizzata l’icona
Zz
Zz che
ne identifica lo stato attivo di funzionamento.
Per sospendere l’allarme premere qualsiasi pulsante del telecomando tranne lo SNOOZE
oppure qualsiasi manopola dell’unità principale tranne quella di VOL/STANDBY.
FRONT PANEL
1 Bluetooth status indicator: flashing during the device pairing, solid when connected.
2 Display: LCD display
3 Infrared receiver (IR): receives the signal from the remote control
4 MENU/SELECT:
4.1
Long press to access the various entries of the radio global menu (MENU)
4.2 Quick press to confirm the selection (ENTER)
4.3 Turn clockwise or counter-clockwise to access the items in the global Menu
4.4
Turn clockwise or counter-clockwise to adjust the next or previous station
in DAB mode
4.5 Turn clockwise or counter-clockwise to adjust the frequency in FM mode
5 MODE:
press to toggle between the DAB/FM/Bluetooth (BT) and AUX modes
6 BT PAIR/ /SCAN
6.1 in BT mode, press and hold for pairing the
Bluetooth device until the blue LED starts flashing in quick succession
6.2 when the Bluetooth device is connected, a quick press of the button
allows you to pause or resume the BT device.
6.3 in DAB and FM mode it allows you to scan for available radio stations
7 BACK: from the menu, press to return to the previous menu level
8 Headphones audio input
9 Volume bar: displays the volume level of the unit (off when MUTE)
10 VOL/STANDBY:
10.1 turn this knob clockwise to increase the volume or counter-clockwise to decrease it
10.2 press to turn the radio off or on
10.3 in the alarm mode, press once to repeat the alarm (Snooze), press again to stop the
repetition.
NOTE: If the unit is powered solely by batteries, pressing this button will turn off the power so
as to reduce consumption and increase battery life. In this mode, the clock function and the
alarm are disabled.
FRONT PANEL
1 DC input: use the supplied AC adapter to connect it to the electrical outlet (12VDC 2A)
2 R-SPR OUT: use it to connect the right speaker to obtain a stereo system
(sold separately)
TOP PANEL
1 Handle: pull out the handle for carrying the radio
2 Radio antenna: stretch and bend the antenna to find the best position for the reception
PAIR
ENGLISH

2524
REMOTE CONTROL
STANDBY Press this button to turn the radio on or off
MODE
MODE
press to toggle between the DAB/FM/
Bluetooth (BT) and AUX modes
INFO
INFO
In DAB FM mode, while receiving a broadcast
signal, press this button to display information
about the selected station
EQ
EQ
Press to access the preset equalization or to
create a customized one.
SCAN
SCAN
Allows you to run a full scan of the radio in
DAB mode. Press to search for the next
available station in FM mode
Buttons to browse the menu in the various
modes.
Increases or decreases the frequency in the
FM mode, or selects the next or previous
DAB station available.
PLAY/
PAUSE/
PAIR
During playback via Bluetooth, press to start
or pause listening to the associated device.
Hold for pairing a Bluetooth device.
MENU
MENU
Press this button to access the menu settings
VOLUME + Press to increase the listening volume.
VOLUME - Press to decrease the listening volume.
MUTE Press this button to select or deselect the
mute function.
1/6
2/7
3/8
4/9
5/10
Buttons to store or retrieve the set radio
stations (only in DAB and FM modes)
ALARM
1 & 2
1
Press this button to set the alarm
(Alarm 1/Alarm 2)
SNOOZE
SNOOZE
This button has three different functions:
1. it stops the alarm when it is active.
2. it sets the dimmability of the LCD when
the unit is off (4 levels of brightness).
3. it sets the time interval for repeating
the alarm when the unit is on
PAIR
IMPORTANT
The lightning bolt arrow located within an equilateral triangle is intended to
alert the user of the presence of non-insulated "dangerous voltage" within the
product that may be of sufficient magnitude to cause electric shock to the user.
WARNINGS ABOUT THE USE AND THE OPERATION OF THE UNIT
WARNING:
The main switch does not completely shut off all power from the AC outlet. Since the
power cord serves as the main disconnecting device for the unit from the power source,
the cord should be unplugged from the AC outlet to shut down all current flow. Then, verify
that the unit has been installed so as to easily unplug the power cord from the wall outlet, if
necessary. In addition, to avoid fire hazard, the power cord should be unplugged from the AC
outlet if the unit is not going to be used for relatively long periods of time (for example, when
on vacation).
VENTILATION WARNING
Install the unit ensuring to leave room around it for proper air circulation and for improving heat
radiation (at least 10 cm from top, 10 cm from rear, and 10 cm from each side).
CAUTION
• The product case is equipped with small openings which also serve for ventilation, in
order to ensure reliable operation and to protect it from overheating. To prevent fire
hazard, the openings should never be blocked or covered during operation (by objects
such as newspapers, tablecloths, curtains, or drapes, etc.) and the device should not be
placed on thick carpet or on the bed.
• If the plug of the power cord of this unit does not match the AC outlet into which you want
to insert the plug itself, it must be replaced with one fit for the purpose. The replacement
of the plug of the power cord must be performed only by qualified service personnel.
After replacement, the old plug cut off from the power cord must be properly disposed
of, to avoid possible severe electrical shock due to accidental insertion of the plug itself
into a live power outlet. If you do not plan to use the unit for a relatively long period
(e.g. during a holiday), unplug the power cord from the AC outlet.
To avoid the risk of electric shock, do not remove the
screws located on the back of the product. There are no
parts whose maintenance can be performed by the user. If
necessary, contact qualified service personnel.
The exclamation point within an equilateral triangle is intended to alert the user
of the presence of important operating and maintenance instructions in the
literature accompanying the product.
ENGLISH

2726
• To avoid fire hazard, do not place any naked flame sources (e.g. lighted candles or similar)
on the unit
• Before plugging in the device to a power source for the first time, carefully read the section
below.
• The voltage of the available power supply differs from country to country and from region to
region. Check that the mains power supply in the area where this unit will be used provides
the required voltage (e.g. 240 V or 110 V); the value is on the label of the AC adapter.
• This product is intended for household use only. Any failure due to different uses (such
as long-term use for business purposes, in a restaurant, or use in a car, or ship), which
requires particular repair shall be charged to the user, even if occurred during the warranty
period.
• Before using the product, always read the safety information on the back of this unit and
the AC adapter label.
• Keep the product and its accessories out of the reach of children and infants. If accidentally
swallowed, contact a doctor immediately.
• Keep the AC adapter away from the reach of children and infants.
• The AC adapter cord may accidentally wrap around the neck and cause choking.
WARNING REGARDING THE POWER CORD
Always hold the power cord by the plug. Do not pull the cord by the cable and never touch the
power cord when your hands are wet, as this could cause short circuit or electric shock. Do not
place the unit, or other objects, on the power cord and check that it is not pinched. Never tie a
knot in the cord or tie it with other cords. The power cords should be routed so that they cannot
be stepped on. A damaged power cord can cause fire or electric shock. Check the power cord
regularly. If it is damaged, ask your nearest BV Srl authorized service center or your dealer for a
replacement power cord.
ENVIRONMENTAL OPERATING CONDITIONS
Ideal range of operating temperature and humidity:
from +5°C to +35°C, relative humidity less than 85% (uncovered product).
Do not install the unit in a poorly ventilated area, or in locations exposed to high humidity or
direct sunlight (or strong artificial light sources).
ENGLISH
AIRWAVE WARNINGS
This unit uses 2.4 GHz radio frequencies, also used by other wireless systems (such as
microwave ovens and cordless telephones).
If there is noise on the TV screen, it is possible that this unit (or units supported by it) is causing
interference with the signals from the input connector of your TV, VCR, satellite tuner, etc.
In this case, increase the distance between the antenna input connector and this unit (including
the products it supports).
BV Srl is not responsible for any malfunction of the product due to errors/malfunctions
associated with its connection and/or equipment it is connected to. Contact the manufacturer
of the product you want to pair.
ATTENTION TO THE AC ADAPTER
Ensure to firmly grasp the case of the AC adapter if you need to unplug it from the outlet. If you
pull the power cord, it may get damaged, causing a fire and/or electric shock. Do not try to
unplug the AC adapter with your bare hands. This may cause electric shock.
Do not leave the power cord of the AC adapter into the socket if the connection is unreliable,
also when the plug is completely inserted into the socket. This may generate enough heat to
cause a fire. Consult a dealer or an electrician to replace the outlet.

2928
ENVIRONMENT AND DISPOSAL
It may contain materials which constitute a health and environmental hazard. To prevent harmful
materials from being released into the environment, BV Srl provides the following information
regarding the disposal and recycling, following the decommissioning of the product.
You can give your contribution to the environment by following these simple steps:
When you no longer wish to use your electrical and electronic equipment, take it to your local
waste disposal facility for recycling.
You may return your old equipment to your dealer free of charge when you buy a new product
which is equivalent to or has the same functions as the old one.
Contact BV Srl to find your local dealer.
If you need more information regarding recycling, reuse, and product exchanges, please contact
our customer service at the number provided in the manual.
Lastly, we suggest further measures to safeguard the environment, such as recycling of internal
and external packaging (including the one used for shipping) the product was delivered in.
With your help, we can reduce the amount of environmental resources required to manufacture
electric and electronic equipment, reduce the use of waste landfills for used equipment and, in
general, improve our quality of life by ensuring that hazardous materials are correctly disposed of.
Incorrect treatment of the product at the end of life and failure to follow the above disposal
instructions are punishable under local legislation.
CAUTION
This unit is not waterproof. To prevent fire or shock hazards, do not place this unit near water-
filled containers (such as flower pots, or similar), and do not expose it to dripping, splashing,
rain, or moisture.
Waste electrical and electronic materials (WEEE) should never be disposed
of in normal urban waste disposal facilities (residential garbage collection).
This symbol on the products, packaging, and/or accompanying documents,
means that used electrical and electronic equipment should be disposed of
in an appropriate manner at the end of useful life.
For proper treatment, recovery, and recycling of used products, please
refer to the applicable collection points, in accordance with your national
legislation.
ENGLISH
SAFETY REGULATIONS
DANGER
Follow the instructions provided.
Do not throw the unit into fire or expose it to heat.
Do not throw the device, hit it with a hammer or other object, and do not pierce it.
Do not use or store this device near places at very high temperature, such as a heater, or a
closed car in direct sunlight.
Do not allow the product to be splashed with liquids.
WARNING
Do not use the device if it emits unusual odors, heats up, changes color or shape, or if you
notice any other abnormal circumstances during use, recharging or storage.
CAUTION - USAGE IN HUMID ENVIRONMENTS
TS522D+ is not a waterproofed device.
When using it, protect it from water and do not use in humid environments.
If it should come into contact with any type of liquid, immediately remove the moisture with a
dry cloth. Install the unit only on stable and level surfaces. Do not operate the unit upside down
or in tilted position.
Install the unit in a place where water cannot penetrate.
Do not tilt the unit or keep it tilted after it has been exposed to water or drops of water.
Since water may enter the unit, do not tilt it when it is wet
Water may enter the device. Do not transport the unit if it is wet.
Do not use the AC adapter near water.
Keep the remote control battery away from children.
It may cause a fire or chemical burn if mishandled.
Do not recharge, disassemble, or heat above 100°C.
Replace only with a battery of the same type and model (CR2025).
INSTALLATION OF THE UNIT
When installing the unit, be sure to place it on a flat, stable surface.
Avoid installing the unit in the following places:
• on a color TV (the screen may be distorted because of the Bluetooth connection);
• near a cassette deck (or a device that emits a magnetic field). This could interfere with the
sound;
• under the direct sunlight;
• in an extremely hot or cold environment;
• in places subject to vibration or other movement;
• in extremely dusty places;
• in places where there are fumes or hot oils (e.g. a stove)
CAUTION
• If it is in use, do not place the unit on its side, do not lean it against anything, and do not
hang it.
• Do not sit or stand on the product
• Do not fix the unit to a wall or ceiling. It may fall and cause harm.
• Some elements of the speakers are magnetic. The metallic materials may be attracted
by the speakers. Do not place credit cards or other magnetic storage media near the
speakers, because the stored information may be erased.

3130
THANK YOU FOR PURCHASING THIS PRODUCT CUBO.
With FM/DAB/DAB+ Bluetooth TS522D+ you can listen to music played at FM/DAB/DAB+
frequencies: the music stored on your audio device or compatible mobile phone using Bluetooth
connectivity, and the one connected to the AUX input.
Before using the product, please read these instructions for use, in order to learn how to properly
use the device. After reading, keep the instructions in a safe place for later use.
BLUETOOTH WIRELESS TECHNOLOGY
The Bluetooth wireless technology allows you to connect compatible devices with no cable.
To establish a connection via Bluetooth wireless technology the unit and the other device do
not need to be in line of sight, but it is sufficient that the two devices are at a maximum distance
of 10 meters from each other. The connection can be subject to interference from obstructions
such as walls or other electronic devices.
The unit is compliant with Bluetooth Specification v2.1. Contact the manufacturers of the other
devices to be paired, in order to determine their compatibility with this device. There may be
restrictions on using Bluetooth technology in some countries. Contact your local authorities or
service provider.
PACKAGE CONTENTS
• The package contains:
• Radio TS522D+
• External AC Power Supply
• Remote control with battery
• Instruction Manual
• Soft case
If something is missing from your package, please contact your dealer.
ENGLISH
INSTALLING AND REPLACING THE REMOTE CONTROL BATTERY
The remote control is supplied with a battery of the "CR2025" type that must be installed.
When the remote controllable distance is lower, or if it ceases to function properly, it is time to
replace the battery.
To perform this simple operation, proceed as follows:
CAUTION:
Lithium batteries can explode or cause burns if disassembled, shorted, recharged, exposed to
water, fire, or high temperatures. Do not leave batteries in your pocket, purse, or other container
with metal objects, do not mix them with other types of batteries, and do not store them with
hazardous materials or fuels. Store in a cool, dry and ventilated place. Follow the laws and
regulations for transport and disposal.
GETTING STARTED
1. Remove the protective plastic from the battery compartment of the remote control as
shown in the figure.
2. Connect the supplied power adapter to the DC input on the rear panel of the radio. Connect
the other end of the power supply to an AC outlet. If you want to power the radio with the
battery, insert 6 "C" batteries inside the battery compartment on the bottom of the radio.
3. When you first turn it on, the display will show “00:00”
4. Turn on the device by pressing the standby button on the main unit or on the remote
control. The radio will enter DAB mode and start scanning for stations. At the end of the
scan, the unit will automatically use the date and clock information gathered from the DAB
stations
CAUTION:
If the unit is powered by batteries (the power adapter is not connected), use the standby button
placed on the main unit.
When the radio is powered by batteries, the remote control has no function.
1. Remove the battery compartment as indicated in the
instructions printed on the back of the remote control
2. In case of replacement, remove the battery, insert the
new CR2025 battery as shown in the figure below
(making sure that the "+" side is facing upwards)
3. Replace the battery in the slot.

3332
LISTEN TO THE DAB RADIO
1. The scan operation must be performed at first start-up. The DAB icon on the display will
light up and the scanning process will start (this might take a few minutes)
2. On the remote control, use the MODE button to select the DAB mode. From the main unit,
press the MODE knob to enter the various modes and select DAB.
3. Press INFO to visually display information about the selected radio station (depending on
availability offered by the station - broadcaster)
4. Using the remote control, press the buttons to navigate through the list of scanned
DAB stations. From the main unit, use the MENU/SELECT knob to listen to the next or
previous scanned DAB station.
5. Press SCAN to perform a full scan of the radio stations in DAB mode.
LISTEN TO THE FM RADIO
1. On the remote control, use the MODE button to select the FM mode. The display will show
an FM frequency, e.g. "102.5". The FM icon will light on the display. From the main unit,
press the MODE knob to enter the various modes and select FM.
2. Using the remote control, press the buttons to browse the FM frequencies: one
press increases or decreases the frequency by 50 kHz. From the main unit, use the MENU/
SELECT knob to increase or decrease the FM frequency.
3. Press and hold either button to find the next or previous available radio frequency,
or press SCAN from the remote control to directly search for the next available station.
When a station is found, the search stops automatically. From the main unit, use the BT
PAIR/SCAN knob to find the next available FM frequency.
4. Press INFO to visually display information about the selected radio station (depending on
availability offered by the station)
5. Press INFO 4 times to access the MONO/STEREO function of the FM station. Press
ENTER to toggle between MONO and STEREO. In STEREO mode, this icon will light up
on the display .
STORING AND RECALLING A RADIO STATION (PRESETS)
1. To store your favorite stations to memory locations (presets) from 1 to 5, proceed as
follows:
Press and hold the button
1/6
2/7
3/8
4/9
5/10
corresponding to the number where
you want to store that station until the display shows “STORED #” (# indicates the number
where will be stored, e.g. “STORED 3” – stored in the preset no. 3)
2. To store your favorite stations in memory locations (presets) from 6 to 10, proceed as follows:
3. Press SHIFT once;
Press and hold the button
1/6
2/7
3/8
4/9
5/10
corresponding to the number where
you want to store that station until the display shows “STORED #” (# indicates the number
where it will be stored, e.g. “STORED 6” – stored in the preset no. 6)
ENGLISH
4. You can store up to 10 DAB radio stations and 10 FM radio stations (the radio
frequency of the FM station saved by default on all presets is 87.50 MHz).
5. To retrieve one of the 10 stored presets, proceed as follows:
For stored presets 1 to 5 press one of the buttons
1/6
2/7
3/8
4/9
5/10
6. For stored presets 6 to 10 press SHIFT once (the display of the main unit will show
“SHIFT”) and then the button corresponding to the desired preset.
PAIRING, CONNECTION AND OPERATION MODE OF THE UNIT THROUGH THE
BLUETOOTH WIRELESS TECHNOLOGY
The TS522D+ radio can be paired with most Bluetooth devices 2.0 and 2.1. The pairing may
differ from device to device. Refer to the instruction manual of your Bluetooth device for the
correct pairing with the unit.
1. On the first access to this mode, the unit will go into the "waiting for connection" status,
the LED will flash slowly, and in this condition it will be possible to associate a device that
has already been paired. If the device you want to connect has Bluetooth turned on, it will
automatically connect to the radio.
2. To connect a new device, press the PAIR button for about 4 seconds until the LED flashes
quickly ("waiting for pairing" status). Turn on your device.
3. Turn on your Bluetooth device (for example a SmartPhone), enter the Bluetooth setup
menu and scan for available devices. In the list of found devices the label TS522D+ will
be shown.
4. Connect the device to the TS522D+ unit, the device will show the "Connected" status and
the radio LED will change from flashing to solid (if the pairing was successful).
5. At this point, with the TS522D+ radio it will be possible to wirelessly play the music stored
inside the associated device.
6. While a device is connected via Bluetooth, if you want to pair it with another Bluetooth
device, you must first disconnect it by pressing and holding the PAIR button for about 3
seconds until you hear a "beep" sound, or by disabling the connection established directly
from the Bluetooth menu of the associated device. The unit will switch directly to pairing
mode and, at this point, you can connect another device.
CAUTION:
For mobile phones with Bluetooth 2.0, you will be prompted to enter a password during the
pairing process. Press the following string: 0000 (zerozerozerozero)

3534
MUSIC PLAYBACK
The device you wish to associate with TS522D+ must support AVRCP (Audio Video Remote
Control Profile) in order to control playback through it. Refer to the user manual of your device.
When the music is playing:
1. Button PLAY/PAUSE
a. Press once to pause playback
b. Press again to resume playback
2. VOL - button (from the main unit, rotate the VOL/STB knob counter-clockwise)
a. Press once to decrease the volume by one step
b. Press and hold to decrease the volume in a consistent manner
3. VOL + button (from the main unit, rotate the VOL/STB knob counter-clockwise)
a. Press once to increase the volume by one step
b. Press and hold to increase the volume in a consistent manner
after reaching the maximum level, the display will show the label VOL MAX)
CAUTION:
listen to music at a moderate volume. Continuous exposure to high volume may damage your
hearing.
CONNECT THE LAST PAIRED BLUETOOTH ENABLED DEVICE
4. The following is a quick way to connect TS522D+ to the last paired device.
When the product is in standby mode, press the STANDBY button and enter the BT mode
using the MODE button (if the unit is on, but in a different mode, press the MODE button until
you see BT). Turn on the Bluetooth device to be associated. It will be connected automatically.
The Bluetooth Mode LED will light when the connection is successful. If the product fails to find
the last paired device, it will go into standby mode waiting for connection. In this status, the
previously paired devices may be connected to the unit.
RESETTING THE UNIT'S MEMORY
The unit can store up to 8 different Bluetooth devices. To clear the memory manually you must
be in the BT mode, in the pairing status (LED flashes quickly), press the PAIR button twice (with
an interval of about one second between presses) until it plays a "beep" sound. At this point, the
LED indicating the status of the Bluetooth switches off, and then it starts to flash again.
CAUTION:
After erasing all memory, the unit will go immediately into pairing mode and you will need to
follow the pairing and connection procedure of a new Bluetooth device.
Remember to delete the name of the radio also from the device you want to connect it to again,
in order to completely reset the pairing between the two devices.
ENGLISH
PLAYING A DEVICE CONNECTED TO THE AUX INPUT
1. Connect the jack cable (not supplied) from the external device (such as an MP3 player) to
the AUX IN
2. Use the MODE button on the remote control to access the AUX IN mode, or press the
MODE knob on the main unit until the AUX IN source is displayed. The display will show
the AUX IN label.
3. Use your device to control the playback, the volume level can be controlled either from the
connected device, or from the main unit. Use the MUTE button on the remote control to
mute the sound, and then restart it by pressing the same button again.
SETTING THE UNIT
Press the MENU button on the remote or press and hold the MENU/SELECT knob on main
unit to enter the menu of the various modes.
Press on the remote, or rotate the MENU/SELECT knob on the main unit to select
the desired menu item and press ENTER on the remote control or press the MENU/SELECT
knob to enter the submenu or to save the settings. Press BACK to return to the previous level,
or press MENU again to exit.
MENU AVAILABLE IN DAB MODE
Press MENU to access the multiple functions of the DAB mode.
Use the buttons to browse the various menu items.
Press ENTER to enter the selected menu item.
FULL SCAN: allows to perform a full scan of the DAB channels
MANUAL TUNE: allows to set the DAB frequency to be tuned

3736
Press buttons
to adjust the frequency and press
ENTER
to confirm (e.g. 174.928 MHz)
The display will show the signal strength of the frequency set manually for the tuning.
The > symbol indicates the power of the signal; it means that the signal of that station is strong
enough to allow the tuning of such DAB station. The --- symbol indicates the absence of signal.
Press MENU twice to return to the DAB mode, or press BACK three times to play the tuned
DAB station.
DRC (DYNAMIC RANGE COMPRESSION)
Allows you to set the DRC level to High, Low, or Off.
To select one of the three options mentioned above press the buttons .
MENU AVAILABLE IN FM MODE
Press MENU to access the multiple functions of the FM mode.
Use the buttons to browse the various menu items.
Press ENTER to enter the selected menu item.
SCAN
Allows you to set the quality of the reception of FM stations for the scanning.
STRONG: only the stations with a strong signal will be scanned.
ALL: the stations with both strong and weak signal will be scanned.
ENGLISH
AUDIO
Allows you to set the listening to MONO or STEREO in FM mode.
MENU AVAILABLE IN ALL MODES
Press MENU to access features common to all modes of TS522D+.
Use the buttons to browse the various menu items.
Press ENTER to enter the selected menu item.
DATE/TIME
Allows you to set the date and time manually or through the signal received from the DAB
stations.
MANUAL
Press on the remote control, turn the MENU/SELECT knob on the main unit, to set the
time and date, press the ENTER button on the remote control or the MENU/SELECT knob on
the main unit to confirm and save the entered information.
AUTO
By selecting this option, the radio will automatically use the date and clock information gathered
from the station.

3938
CAUTION:
If the unit is battery-powered, when the radio is turned off all information regarding the date and
clock will be lost. When the radio is turned back on, going in DAB mode, it will perform an automatic
scan and receive the clock and date information from the DAB station.
TIME MODE
Allows you to set the clock format to 12 or 24 hours.
SNOOZE
Allows to set the time interval to repeat the alarm (snooze).
Press the buttons on the remote or turn the MENU/SELECT knob on the main unit to
adjust the time interval from 5 to 15 minutes with 1-minute routers.
Press the ENTER button on the remote or the MENU/SELECT knob on the main unit to save
the chosen value
.
To disable the Snooze function, press the STANDBY button on the remote control or on the
main unit.
DISPLAY SET
Allows to set the brightness of the display.
Press on the remote control or turn the MENU/SELECT knob on the main unit to adjust
the brightness for normal and/or standby-mode.
Standby mode Normal operating mode
ENGLISH
Press ENTER on the remote or the MENU/SELECT knob on the main unit to access the two
operating modes and increase or decrease the brightness of the display with the buttons.
SET EQ
Allows to set the equalization of the radio.
Press on the remote control or turn the MENU/SELECT knob on the main unit to select
one of the stored equalization presets: NORMAL, ROCK, POP, JAZZ. Press the ENTER button
on the remote or the MENU/SELECT knob on the main unit to confirm the chosen preset.
By the MY EQ option, you can set the value of the high (treble) and low (bass) frequencies in a
personalized way. Press on the remote control or turn the MENU/SELECT knob on
the main unit to increase or decrease the value. Press the ENTER button on the remote or the
MENU/SELECT knob on the main unit to confirm the set values.
LOUDNESS
Allows to set the loudness level to ON and OFF.
Press on the remote control or turn the MENU/SELECT knob on the main unit to select
one of two possible statuses. The loudness can be toggled between ON and OFF only when
the equalization mode is NORMAL (the other equalization modes have the loudness set to ON
by default).
Table of contents
Languages: