In standby status, press the microphone key, the
top left corner will display “Func”, then press KEY,
the LCD bottom left corner will display Save to XXX,
now press key to select a channel number,
hold key to store the new frequency and return to
standby.
03 04
2. In channel mode, input three numbers by number
key for its direct selection (eg: 001 for channel 1).
XXX reflects for the channel number, if LCD displays
“Null” under “Save TO XXX”, means that the current
channel is empty.
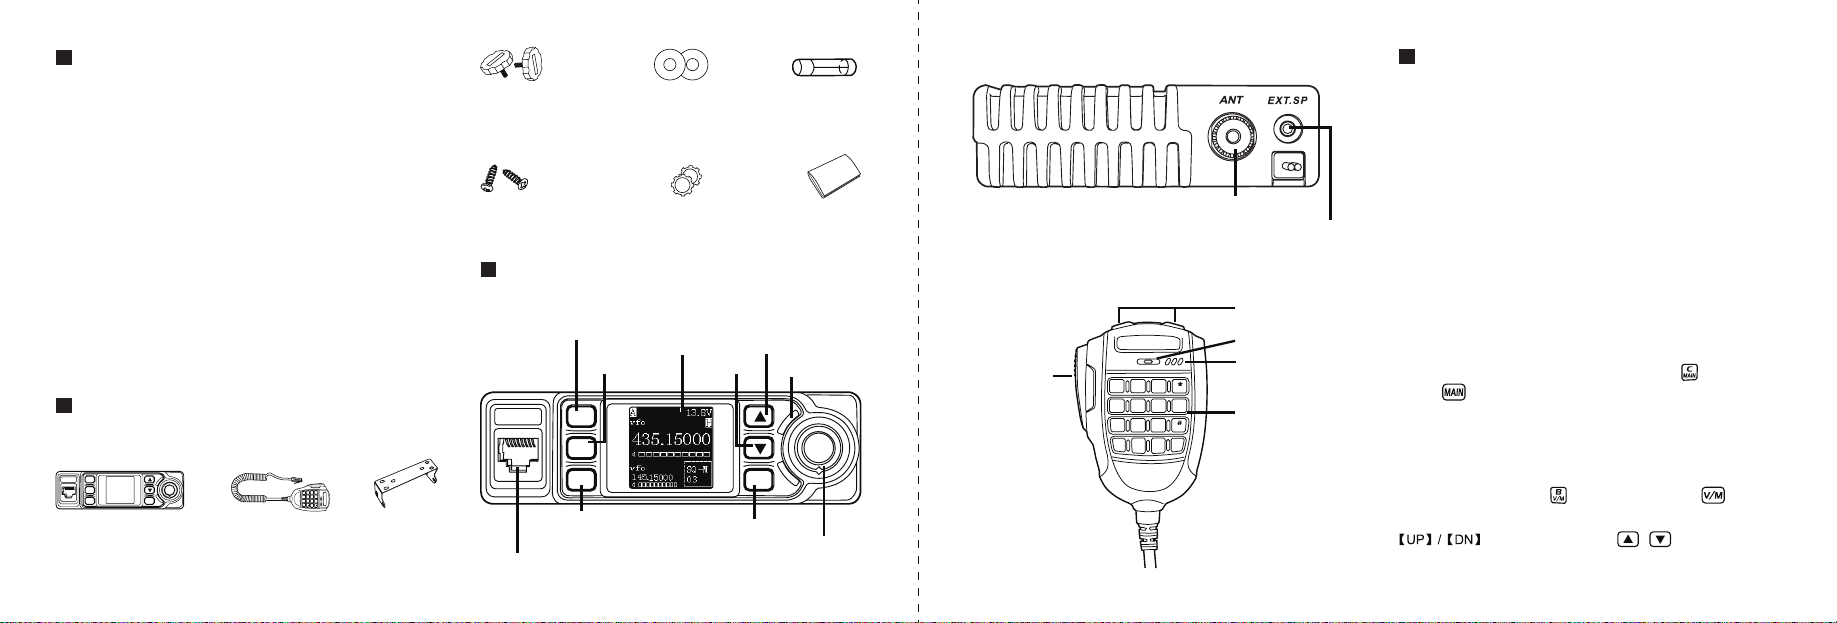
4.5 Store channel
Select a receiving channel or frequency for receiving
call, if the RX signal is week, hold front panel key or
microphone key to monitor weak signals.
RX frequency range.
1. GMRS channel: GMRS frequency
2. UHF/VHF Full band: 136-174/400-490MHz
3. FM radio 65-108Mhz: available in freuqency mode
only. user can input frequency by microphone number
key like 8,8,,0,0,0,0,0, is 88Mhz.
4.7 Receiving
In standby, press microphone key or front panel
key to turn off squelch, the radio will monitor weak
signal.
4.9 Squelch Off
Hold PTT and [DN] key will transmit selected
Pre-programmed tone pulse frequency
Note:
PL and PH is valid when current working frequency is
within PL1-PH1 or PL2-PH2.
2. Channel Scan: In channel mode press microphone
key and then press key to start channel scan.
Channel scan setting shall be programmed by PC
software.
4.12 Transmit Tone Pulse Frequency
In standby, hold key until LCD displays VOX icon,
repeater this step or repower on radio to turn off VOX
function.
4.14 VOX On/Off contro
1. VFO scan: In VFO mode, press microphone key
or key to start VFO scan. If the radio has program
PL1, PH1, PL2, PH2, frequency (in the bottom of
channel list), VFO scan will between PL1-PH1 and
PL2-PH2.
4.13 VFO Scan and Channel Scan
In standby, hold key, release it until the LCD
displays ALARM, the alarm function turns on. Program
emergency alarm rule shall be programmed by PC
software.
4.10 Emergency Alarm
In standby, hold key or key, the radio emit Du
sound, the LCD displays LOCK.
Now release the key, the keypad is locked. To turn off
key lock, hold key or key until a “Du Du” tone
signal is heard, the LOCK icon disappears, now you
may release the key.
4.11 Keypad Lockout
In channel mode, press microphone key, then
press key, the LCD displays “Delete XXX” and
frequency, presss key to select the
channel to be deleted, then hold key for deleting
the current channel.
4.6 Channel Delete
Hold [PTT] and speak into microphone. the radio start
transmit, the screen shows red TX and field strength.
Hold the microphone approximately 2.5-5.0cm from
your lips and speak into the microphone at your normal
voice level: it will help to transfer best audio signal.
Note:
1. According to FCC Part 95E standard, CH8-CH14
4.8 Transmitting
“XXX” reflects for the channel number, the LCD
displays “Null” after the channel is deleted.
When the RX icon and field strength flashes, but
can not hear the calling, it means current channel
receive a matching carrier but unmatching signaling.
Refer to CTCSS/ DCS CODE or Optional Signaling
setup)
Before turn on VOX, please set VOX level in 26th
menu.
LAM
are for 0.5W FRS channels, DB20-G minimum power
5W, maximum power 20W, so CH8-CH14 not allow
transmiting.
2. Follow Part 95E rule, DB20-G only allow transmitting
on GMRS frequencies.