Radioddity GA-510 User manual

User Manual
GA-510
Thank You for Shopping at Radioddity!
FIND TUTORIALS, SUPPORT AND MORE
https://www.radioddity.com/
https://www.facebook.com/radioddity
https://www.youtube.com/c/Radioddityradio
Two Way Radio

Table of Contents
Part I. Getting started
Chapter 1. – Initial setup
Safety Information
What's in the box
Available Accessories: www.radioddity.com
Assembly
Antenna
Belt clip
Battery
Charging and battery maintenance
Charging
Battery Maintenance
Chapter 2. - Getting to know your radio
The main display
Battery Level Indicator
Status
Side key 1 - FM Broadcast
Side key 2 -Monitor&Switching Power
Orange Key-SOS
VFO /MR-Mode Switching Key
A/B key
Numeric keypad
Pound # Key
Star * Key
Menu and function keys
Accessory jack
Chapter 3. - Basic Use
Power and volume
Turning the unit on
Turning the unit off
Adjusting the volume
Making a call
Channel selection
Frequency (VFO) mode
Channel (MR) mode
Frequency (VFO) mode
Channel (MR) mode
Part ll. Advanced topics
Chapter 4. - Working the menu system
····································································································01
·············································································································02
···························································································································02
······························································································································03
··········································································03
····································································································································04
···································································································································04
····································································································································04
·····································································································································05
·························································································05
··································································································································05
················································································································07
················································································09
························································································································10
············································································································11
··········································································································································11
·······································································································12
·····················································································12
························································································································12
···································································································12
·········································································································································12
··························································································································13
···························································································································13
································································································································13
············································································································13
····························································································································14
················································································································15
·······················································································································15
····················································································································15
····················································································································15
···············································································································15
································································································································16
·······················································································································16
···············································································································16
····················································································································17
·············································································································17
··················································································································17
······························································································18
··················································································19

Basic use
Using short-cuts
Chapter 5. - Scanning
Scanning modes
Time operation
Carrier operation
Search operation
Tone Scanning
Scanning for CTCSS and DCS Tones/Codes
Chapter 6. - Dual Watch
Chapter 7. - DTMF
Chapter 8. - Selective calling
CTCSS
DCS
Chapter 9. - Programming
Manual programming
Simplex channels
Duplex channels
Computer programming
Part lll. How-to and setup guides
Chapter 10. - Repeaters
Appendix A. – Troubleshooting
Appendix B. - Menu definitions
Appendix C. - Technical specifications
General
Transmitter
Receiver
DCS table
CTCSS table
·····································································································································19
························································································································20
···················································································································21
························································································································21
·························································································································21
······················································································································21
······················································································································22
···························································································································22
··········································································22
··············································································································23
·························································································································24
····································································································25
·········································································································································26
··············································································································································27
··········································································································28
·················································································································28
·····················································································································28
······················································································································28
···········································································································29
·········································································30
···············································································································31
··································································································33
·································································································34
···················································································44
·········································································································································44
··································································································································45
·······································································································································45
······································································································································46
·································································································································49

Inhalt
Teil I Erste Schritte
Kapitel 1.-Grundeinstellungen
Sicherheitsinformationen
Was ist im Karton?
Available Accessories: www.radioddity.com
Hinweis
Antenne
Gürtelclip
Akku
Installation
Entfernen des Akkus
Laden und Pflege des Akkus
Laden
Battery Maintenance
Pflege des Akkus
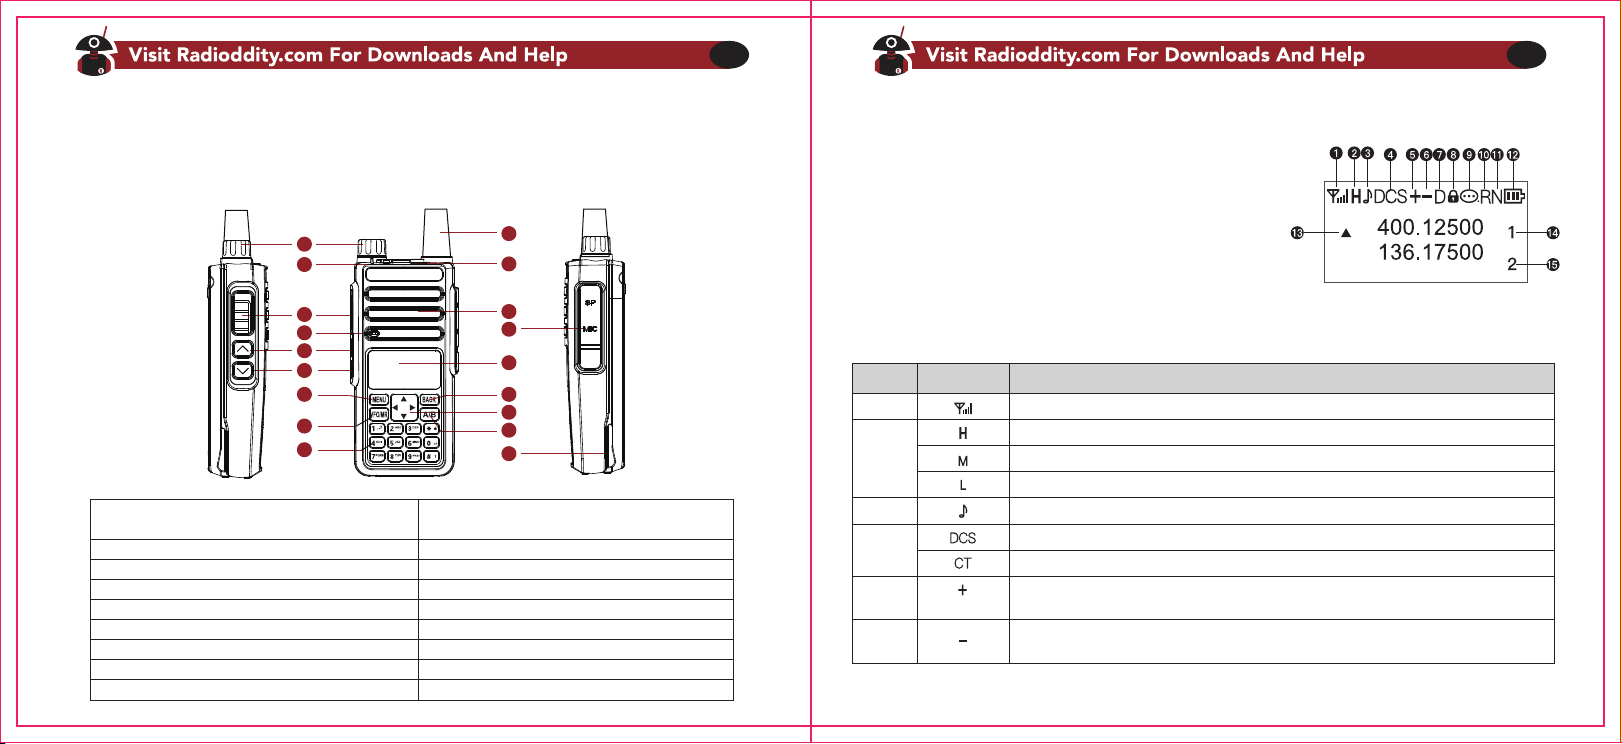
Kapitel 2. – Mit dem Funkgerät vertraut werden
LCD-Display
Ladestandsanzeige
Status LED
Seitentaste 1 - UKW Radio
Seitentaste 2 - MONI-Funktion und Umschalttaste für die Sendeleistung
Orange Taste - SOS
VFO / MR - Taste
A / B -Taste
Nummerntasten
Rautetaste #
Sterntaste *
Menu- und Funktionstasten
Zubehörbuchse
Kapitel 3. - Grundlegende Funktionsweise
Betrieb und Lautstärke
Einschalten
Abschalten
Lautstärke einstellen
Sendebetrieb
Kanalwahl
Frequenzmodus (VFO)
Kanalmodus (MR)
Teil II. Fortgeschrittene Bedienung
Kapitel 4. - Arbeiten mit dem Menu
···········································································································50
··································································································51
················································································································51
···························································································································52
·········································································52
·······································································································································52
···································································································································52
··································································································································53
·········································································································································53
································································································································53
················································································································54
····································································································54
·······································································································································54
················································································································55
·····················································································································55
·································································57
································································································································58
·················································································································59
··································································································································59
········································································································59
····························60
····················································································································60
·························································································································60
··································································································································60
···························································································································60
·····························································································································61
·······························································································································61
······································································································61
···························································································································61
···········································································63
···············································································································63
································································································································63
································································································································63
·················································································································63
·······························································································································63
····································································································································64
···············································································································64
·······················································································································65
····································································66
··························································································67

Grundnutzung
Abkürzungen
Kapitel 5. - Scannen
Scanmodi
Zeitsteuerung (Time)
Trägersteuerung (Carrier)
Suchmodus (Search)
Töne scannen
CTCSS/DCS-Scan
CTCSS-Töne scannen
DCS-Töne scannen
Kapitel 6.-Dual Watch
Kapitel 7 -DTMF
Kapitel 8 -Selektivruf
CTCSS
DCS
Kapitel 9. - Programmierung
Manuelle Programmierung
Kanäle Löschen
Teil Ill. Leitfaden
Kapitel 10. - Repeater
Anhang A. - Fehlersuche
Ahang B. - Menu Definitionen
Anhang C- Technische Daten
Allgemein
Sender
Empfänger
DCS Tabelle
CTCSS Tabelle
····························································································································67
······························································································································68
·····················································································································68
····································································································································69
················································································································69
········································································································69
················································································································69
·····························································································································70
···················································································································70
··············································································································70
··················································································································71
·················································································································71
·····························································································································72
···················································································································73
·········································································································································74
·············································································································································75
·····································································································76
········································································································76
·······················································································································77
··················································································································78
···················································································································79
·············································································································81
····································································································82
·····································································································90
·····································································································································90
···········································································································································91
····································································································································91
··································································································································92
·····························································································································95

01 02
Part I Getting started
Part one covers the basic setup and use of your hand-held two-way transceiver.
CHAPTER 1 INITIAL SETUP
CHAPTER 2 GETTING TO KNOW YOUR RADIO
CHAPTER 3 BASIC USE
Chapter 1.-Initial setup
Qualified technicians shall service this equipment only.
Do not tamper the radio for any reason.
Use only Radioddity radio supplied or approved batteries and chargers.
Do not use any portable radio with a damaged antenna. If a damaged antenna comes into contact
with your skin, a minor burn can result.
Turn off your radio prior when entering any area with explosive and flammable materials.
Do not charge your battery in the area with explosive and flammable materials.
To avoid electromagnetic interference and/or compatibility conflicts, please turn off your radio in any
area where posted notices instruct you to do so
Turn off your radio before boarding an aircraft; any use of a radio must be in accordance with airline
regulations or crew instructions.
Turn off your radio before entering a blasting area.
Do not place a radio over an airbag area or in the airbag deployment area for vehicles with an airbag.
Do not expose the radio under direct sunlight over a long time, nor place it close to the heating source.
When transmitting with a portable radio, hold the radio in a vertical position with the microphone 3 to 4
centimeters away from your lips; also make sure the antenna stays at least 2.5 centimeters away
from your body when transmitting.
Safety Information
The following safety precautions should always be observed during operation, service and
repair of this equipment.

03 04
FIND TUTORIALS, SUPPORT AND MORE
https://www.radioddity.com/
https://www.facebook.com/radioddity
https://www.youtube.com/c/Radioddityradio
What’s in the box
This transceiver comes shipped with below items and accessories in the box:
Dual-band Radio
2200mAh Battery
Dual Band Antenna
Desktop Charger
Adapter
Earpiece Kit
Wrist Strap
Belt Clip
User manual
Assembly
Before the radio is ready for use we need to attach thew antenna and battery pack, as well as charge
the battery .
Antenna
This transceiver is fitted with a Male SMA connector. To mount your antenna (Female SMA connector),
align the two connectors and turn clockwise until it stops.
Notice
Please make sure to install the antenna and battery is charged when start using a radio.
Do not over-tighten your antenna to avoid damage to the outer materials and the connect base.
When installing the antenna, please remember to grip it by the base and screw.
When you choose using an external antenna, make sure its SWR is about 1.5:1 or lower to avoid
damage to the transceiver.
Do not hold the antenna with your hand or wrap the outside of it to avoid interference to the transceiver.
Never transmitting without an antenna.
Belt clip
There are two parallel screws mounted on rear radio body, remove them and thread through the holes
on the belt clip as you screw them back into the radio body.
Do not add any form of glue to fix the screws on the battery clip.
The solvents in the glue may cause damage to the battery casing.

05 06
Battery
Before attaching or removing the battery make sure your radio is turned off by turning the power/volume
knob all the way counter-clockwise.
Installation
Make sure the battery is aligned in parallel with the radio body with the lower edge of the battery about
1-2cm below the edge of the radio.
Once aligned with the guide-rails, slide the battery upward until you hear a click sound to lock the
battery in place.
Removal
To remove the battery, press “PUSH” buckle on the middle top (see Figure 2. 1,”Radioddity GA-510
Radio, overview”), as you slide the battery downward.
Charging and battery maintenance
Charging
Battery should be fully charged before initial use. Optimum battery efficiency will be achieved after the
three full battery charge and discharge cycles.
How to hook up and use the charger correctly:
1. Plug the DC connector of the power adaptor into the charger base.
2. Plug the AC connector of the power adaptor into an AC wall outlet.
3. Place the radio in the charging base.
4. Make sure the radio is making contact with the charger. When the red LED comes on steady, your
radio is charging.
5. The radio is fully charged once the charger’s green status LED goes steady. Please remove the radio
at that time to avoid over-charging.
Table 1.1. Charger LED codes
Green LED
Steady
Off
Steady
Standby (charger empty)
Error (charger with radio)
Charging
Charge complete.
StatusRed LED
Flashing
Steady
Off
The charger and battery are fitted with matching notches so that the battery can be charged individually!
That is very practical if you have two batteries, that you can charge one battery while still using your radio.
Radio should be POWERED OFF during charge cycle.

07 08
Battery Maintenance
The battery is provided without power from the factory; please let it charged for at least four to five
hours before you start using your radio.
Use only batteries approved by the original manufacturer.
Never attempt to disassemble your battery pack.
Do not expose your batteries to fire or intense heat
Dispose of batteries in accordance with local recycling regulations.
Prolonging your battery’s life
Only charging batteries in normal room temperatures.
When charging a battery attached to the radio, power off the radio for a faster charge.
Before the charging is completed, do not unplug the power to the charger or remove the battery.
Never charge or use a wet battery.
Batteries wear out over time. When the radio is operated in a shorter time, please consider
purchasing a new battery to replace.
Battery’s performance will be reduced in temperatures below Zero. When working in cold
environments, it is suggested to prepare a spare battery. Preferably inside your jacket or in a similar
location in order to keep the battery warm.
Dust can interfere with the connection between the battery and the radio. If necessary wipe the
contacts with a clean cloth to ensure proper contact with radio and charger.
If your battery has become wet, take it down from the radio, wipe it dry with a towel or soft tissue, and
put it in a plastic bag with a handful of dry rice. Tie the bag up and leave there overnight.
The rice will absorb any remaining moisture in the battery.
This method is only effective against minor splashes (light rain for instance). A soaked radio may
possibly be defective to use.
Storage
In order to prevent damage from over-discharge, the battery must be left with partial power. This radio
uses a lithium-based battery and a 40% charge is recommended. This level minimizes age-related
capacity loss while keeping the battery in operating condition and allowing self-discharge.

09 10
1. Power/ Volume knob, usage discussed
in the section called "Power and volume".
2. LED Indicator
3. PTT Button
4. Microphone
5. Side Key 1
6. Side Key 2
7. MENU Key
8. VFO/MR Key
9. Keypad
10. Antenna
11. SOS Button
12. Loud speaker
13. Mic/Speaker/Programming cable Jack
14. LCD
15. BACK Key
16. Direction Key
17. A/B Key
18. Battery Pack
1
2
10
11
12
14
13
15
16
17
18
3
4
5
6
7
8
9
Table 2.1 Displays
iconNo. Description
1
2
3
4
5
6
The channel signal indication
The channel transmits at high power
The channel transmits at medium power
When the DTMF is set to DT-ST/DT+ANI/ANI-ST, the symbol appears
The current is CDCSS
The current is CTCSS
The current transmission frequency is the reception frequency plus a frequency
biac (Set in menu 24th)
The current transmission frequency is the reception frequency mins a frequency
bias (Set in menu 24th)
Chapter 2. - Getting to know your radio
Figure 2.1. Radioddity GA-510, overview
The main display
Figure 2,2. Radioddity GA-510, display
The LCD screen is used to display all the working status of
the two way radio. The corresponding function icons are
displayed on the screen during operation. The screen
allows you to know the meaning of the icons and how to set
the functions more quickly.

11 12
Has been set to dual-band double-waiting function, and allows waiting on two
frequency bands displayed on the screen at the same time
iconNo. Description
7
8
9
10
11
12
13
14
15
The keyboard lock is locked; Press the [*] to unlock
The VOX has been turned on
In channel or frequency mode the invert the receiving and transmitting frequencies
The radio work in narrowband mode
The more bars, the more battery power, The icon flashes when the intercom
is disabled
A/B band pointer
In channel mode, the current channel number for A
In channel mode, the current channel number for B
Battery Level Indicator
When the battery level indicator reads the battery is depleted. At this point the radio will start beeping
periodically as well as flashing the backlight of the display and when voice prompts are enabled, a "Low
Voltage" announcement will be heard, indicating that you need to change your battery or put your radio
in the charger.
Status LED
The status LED has a very simple and traditional design. When you receive a signal it turns green,
when you transmit it turns red, and it's off in standby.
Side Key 1 - FM Broadcast
Press the button momentarily to start the broadcast FM receiver. Another momentary press turns the
broadcast FM receiver off. If a signal is received on the active frequency or channel while you are
listening to the broadcast FM, the squelch will be activated to that frequency (as if scanning) and remain
there until the signal goes away; it will then switch back to broadcast FM.
Side Key 2 - Monitor & Switching Power
Press and hold the button to monitor the signal. This will open up the squelch so you can listen to the
unfiltered signal.
Press the button momentarily to switch the power output for the current frequency (channel).
Orange Key - SOS
Press and hold this button to turn on the alarm function, short press again to close.
VFO / MR - Mode Switching Key
Press this button to switch between Frequency (VFO) Mode and Memory (MR) mode. Memory mode
is sometimes also referred to as Channel mode.
To save frequencies to channel memory you must be in Frequency (VFO) mode.
A / B key
The key switches between A (upper) and B (lower) displays. The frequency or channel on the selected
display becomes the active listening and transmit frequency or channel.
To save frequencies to channel memory you must be on the A display.

13 14
To attach accessories such as headsets, speaker-mics or programming cables, align the
connectors and push in fully.
Numeric Keypad
Radioddity GA-510 comes with a standard full numeric keypad. For enter information into the
programming menu of a radio; in the non-standard CTCSS editing status, the non-standard CTCSS
can be directly input, and the corresponding DTMF encoding will be issued when the number key is
pressed in the transmit status.
Pound # Key
To enable the scanner, press and hold the # key for about two seconds. See Chapter 5, Scanning for
details.
When listening to broadcast FM a momentary press will start the scanning. Scanning in broadcast FM
will stop as soon as an active station is found, regardless of scanner resume method.
Star * Key
A short momentary press of the key enables the reverse function (see Chapter 10. Repeaters).
Radioddity GA-510 features a keypad lock that locks out all keys except for the three side keys.
To enable or disable the keypad lock, press and hold the * key for about two seconds. You can also
enable so that the radio automatically locks the keypad after ten seconds from the menu, see Chapter 4,
Working the menu system
Menu and function keys
The [MENU] key, used to enter the menu and confirm menu options.
The [ ] and [ ] keys are used to navigate through the menu as well as select channels and step up
or down in frequency (depending on operating mode).
The BACK key is used to exit menus and cancel menu options.
For a more in-depth explanation on how to work the menu see Chapter4, Working the menu system.
Accessory jack
The accessory jack on the Radioddity GA-510 is a Kenwood compatible two (2)-pin design
Figure 2.3. Typical 2 pin Kenwood headset configuration.

15 16
Chapter 3. - Basic Use Making a call
Press and hold the PTT button on the side of the radio body to transmit. While transmitting, speak
approximately 3-5cm from the microphone. When you release the PTT your transceiver will go back
to receive mode.
Channel selection
There are two modes of operation: Frequency (VFO) mode, and Channel or Memory (MR) mode.
For daily use, Channel (MR) mode is going to be a whole lot more practical than Frequency (VFO) mode.
However, Frequency (VFO) mode is very handy for experimentation out in the field. Frequency (VFO)
mode is also used for programming channels into memory. For details on how to program your
transceiver see Chapter 9, Programming.
Ultimately which mode you end up using will depend entirely on your use case.
Frequency (VFO) mode
In Frequency (VFO) mode you can navigate up and down the band by using the [ ] and [ ] keys.
Each press will increment or decrement your frequency according to the frequency step you've set your
transceiver to. For details on how to set the frequency step on your transceiver see Chapter 4, Working
the menu system and the section called "1 STEP" in Appendix B, Menu definitions.
Power and volume
Before we turn the power on, make sure you have attached the battery and antenna as described in
Chapter 1, Initial setup.
Turning the unit on
To turn the unit on, simply rotate the volume/power knob clockwise until you hear a “click”. If your radio
powers on correctly there should be an audible double beep after about one second and the display
will show a message or flash the LCD depending on settings for about one second (see "35 PON
MSG - Power On Message" in Appendix B' Menu definitions). Then it will display a frequency or
channel. If the voice prompt is enabled, the voice will announce "frequency mode" or "channel mode”.
Turning the unit off
Turn the volume/power knob counter-clock wise all the way until you hear a "click". The radio is now off.
Adjusting the volume
To turn up the volume, turn the volume/power knob clock-wise.
To turn the volume down, turn the volume/power knob counter-clock-wise. Be careful not to turn it too
far, as you may inadvertently turn your radio off.
Just because you can program in a channel does not mean you're automatically authorized to
use that frequency.
Transmitting on frequencies you're not authorized to operate on is illegal, and in most
jurisdictions a serious offence. If you get caught transmitting without a license you can and will
get fined, and in worst case sent to jail.
However, it is legal in most jurisdictions to listen. Contact your local regulatory body for further
information on what laws, rules and regulations apply to your area.

17 18
Part II. Advanced topics
Part two covers the more advanced topics, such as setup of repeater
offset and programming via computer link.
CHAPTER 4 WORKING THE MENU SYSTEM
CHAPTER 5 SCANNING
CHAPTER 6 DUAL WATCH
CHAPTER 7 DTMF
CHAPTER 8 SELECTIVE CALLING
CHAPTER 9 PROGRAMMING
If you have channels programmed with Transmit power set to Law, you can use the side key 2
momentarily switch over to high power if you're having trouble getting through.
Channel (MR) mode
The use of Channel (MR) mode is dependent on actually having programmed in some channels to
use. To find out more on how to program channels see Chapter 9, Programming.
Once you have channels programmed and ready, you can use the [ ] and [ ] keys to navigate
between channels.

19 20
Using short-cuts
As you may have noticed if you looked at Appendix B, Menu definitions, every menu item has a
numerical value associated with it. These numbers can be used for direct access of any given menu
item.
Procedure 4.2. Using the menu with short-cuts
1. Press [MENU] the key to enter the menu.
2. Use the numerical keypad to enter the number of the menu item.
3. To enter the menu item, press the [MENU] key.
4. For entering the desired parameter, you have two options:
a. Use the arrow keys as we did in the previous section; or
b. Use the numerical keypad to enter the numerical short-cut code.
5. And just as in the previous section;
a. To confirm your selection, press [MENU] and it will save your setting and bring you back to the
main menu.
b. To cancel your changes, press BACK and it will reset that menu item and bring you out of the
menu entirely.
6. To exit out of the menu at any time, press the BACK key.
7. All further examples and procedures in this manual will use the numerical menu shortcuts.
Basic use
Procedure 4.1. Using the menu with arrow keys
1. Press the [MENU] key to enter the menu.
2. Use the [ ] and [ ] keys to navigate between menu items.
3. Once you find the desired menu item, press [MENU] again to select that menu item.
4. Use the [ ] and [ ] keys to select the desired parameter.
5. When you've selected the parameter you want to set for a given menu item;
a. To confirm your selection, press [MENU] and it will save your setting and bring you back to the
main menu.
b. To cancel your changes, press [MENU] and it will reset that menu item and bring you out of the
menu entirely.
6. To exit out of the menu at any time, press the BACK key.
Chapter 4. - Working the menu system
For a complete reference on available menu items and parameters, see Appendix B, Menu definitions.
If your radio is set to Memory (MR) mode. The following menu items will not take any effect:
STEP, TX Power,Bandwidth, CTCSS, DCS, S-CODE, PTT-ID, Busy Lockout.OFFSET

21 22
Chapter 5. - Scanning
Radioddity GA-510 features a built-in scanner for the VHF and UHF bands. When in Frequency (VFO)
mode it will scan in steps according to your set frequency step. In Channel (MR) mode it will scan your
channels.
Scanning modes
The scanner is configurable to one of three ways of operation: Time, carrier or search, each of which
is explained in further details in their respective section below.
Procedure 5.1. Setting scanner mode
1. Press the [MENU] key to enter the menu.
2. Enter 1 and 8 on your numeric keypad to turn to scanner mode.
3. Press the [MENU] key to select.
4. Use the [▲] and [
▲
] keys to select scanning mode.
5. Press the [MENU] key to confirm and save.
6. Press the BACK key to exit the menu.
Time operation
In Time Operation mode, the scanner stops when it detects a signal, and after a factory pre- set time
out, it resumes scanning.
Carrier operation
In Carrier Operation mode, the scanner stops when it detects a signal, and after a factory preset time
with no signal it resumes scanning.
Search operation
In Search Operation mode, the scanner stops when it detects a signal.
To resume scanning you must press and hold the # key again.
Tone Scanning
Scanning for CTCSS and DCS Tones/Codes
CTCSS tone and DCS code scanning mode can be accessed with or without a signal being present.
The scanning process itself only occurs while signal is being received.
Not all repeaters require a CTCSS tone or DCS code for access will transmit one back. In that case,
the transmitter of a station that can access the repeater would need to be scanned. In other words:
this would be done by listening to stations on the repeater's input frequency.
Before setting CTCSS/DCS scanning, set the receiving frequency to ensure that the signal can be
received at the receiving frequency, and cancel the dual standby function, and make the radio work in
the frequency mode.
Scanning for CTCSS Tone
1. Press the [MENU] key to enter the menu.
2. Enter 2 and 8 on your numeric keypad to come to Menu 28: Scan CTCSS
3. Press the [MENU] key to begin CTCSS scanning.
4. CTCSS code keep changing to indicate that the radio is in CTCSS scanning mode. In this mode,
the lower display will cycle through the CTCSS tones as they are being tested. Once the frequency
of the received CTCSS tone is determined, the CTCSS tone will stop changing.
5. Press the BACK key to exit the menu.

23 24
In certain situations, the ability to monitor two channels simultaneously can be a valuable asset.
Radioddity GA-510 features Dual Watch with the ability scans between two frequencies at a fixed
intervals and to lock the transmit frequency to one of the two channels it monitors.
Procedure 6.1. Enabling or disabling Dual Watch mode
1. Press the [MENU] key to enter the menu
2. Enter 7 on the numeric keypad to get to Dual Standby.
3. Press [MENU] to select.
4. Use the [ ] and [ ] keys to enable or disable.
5. Press the [MENU] key to confirm.
6. Press the BACK key to exit the menu.
DTMF is an in-band signaling method using dual sinusoidal signals for any given code. Originally
developed for telephony systems, it has proved a very versatile tool in many other areas.
In two-way radio systems, DTMF is most commonly used for automation systems and remote control.
A common example would be in amateur radio repeaters where some repeaters are activated by
sending out a DTMF sequence (usually a simple single-digit sequence)
Table 7.1. DTMF frequencies and corresponding codes
Scanning for DCS Tone
1. Press the [MENU] key to enter the menu.
2. Enter 2 and 9 on your numeric keypad to come to Menu 29: Scan DCS
3. Press the [MENU] key to scan.
4. The DCS changes indicate that the machine has entered the DCS scanning status, then DCS
changes rapidly according to the standard sequence. When the radio finds that the DCS in the
receiving signal is consistent with one of the standard sets of DCS, the radio stops scanning and
receives the speech.
5. Press the BACK key to exit the menu.
Chapter 6.-Dual Watch
Chapter 7 -DTMF
1209 Hz 1336 Hz 1477 Hz 1633 Hz
697 Hz 1 2 3 A - [MENU]
770 Hz 4 5 6 B - VFO/MR
852 Hz 7 8 9 C - [▲]
941 Hz * 0 # D - [
▲
]
GA-510 has a full implementation of DTMF, including the A, B, C and D codes.
The numerical keys, as well as the *, and #, keys correspond to the matching DTMF codes as you
would expect The A, B, C and D codes are located in the MENU, VFO/MR, [▲] and [
▲
] keys
respectively (+).
To send DTMF codes, press the key(s) corresponding to the message you want to send while holding
down the PTT key.

25 26
Chapter 8 -Selective calling
Some times when you're working with larger groups of people using the same channel, communication
can get very crowded or disorderly. To minimize this problem, several methods of blocking out unwanted
transmissions on your frequency have developed. In general, there are two forms of selective calling
in two-way radio systems: Group calling, and individual calling.
Group calling, as the name suggest, is a one-to-many form of communication. Every radio in your
working group is configured the same way and any radio will make contact with every other radio in
the group.
Individual calling, sometimes also known as paging, is a one-to-one form of communication.
Every radio is programmed with a unique ID code. And only by sending out a matching code can you
get that radio to open up to your transmissions.
Radioddity GA-510 features three different ways of group calling
CTCSS
DCS
Tone-burst (1000Hz, 1450HZ, 1750Hz,2100Hz)
Radioddity GA-510 does not feature any form of individual calling
CTCSS and 1750Hz tone-burst are also popular methods among amateur radio operators to open up
repeaters.
CTCSS
CTCSS is set with menus 11 RX CTCSS and 13 TX-CTCSS.
For a complete list of available CTCSS codes and corresponding sub-tone frequencies, see Table C.2,
"CTCSS Frequencies" in Appendix C, Technical specifications.
Procedure 8. 1. CTCSS setup how-to
1. Press the [MENU] key to enter the menu.
2. Enter 1and 1 on the numeric keypad to get to receiver CTCSS.
3. Press [MENU] to select.
4. Enter desired CTCSS sub-tone frequency in hertz on the numeric keypad.
5. Press [MENU] to confirm and save.
6. Enter 1 and 3 son the numeric keypad to go to transmitter CTCSS.
7. Press [MENU] to select.
8. Enter desired CTCSS sub-tone frequency in hertz on the numeric keypad. Make sure it's the same
frequency as that you entered for receiver CTCSS.
9. Press [MENU] to confirm and save.
10. Press BACK to exit the menu system.
If you have the keypad lock enabled on your radio, you can still send DTMF tones the regular
way without having to unlock your radio.
Using these features does NOT mean that others won't be able to listen in on your transmissions.
They only provide a method to filter out unwanted incoming transmissions. Any communications
mode while using these features will still be heard by anyone not employing filtering options of
their own.
Also, you cannot change the CTCSS or DCS settings while in memory (MR) mode.

27 28
To turn CTCSS off, follow the same procedure but set it to off with the 0 key instead of selecting a
CTCSS sub-tone frequency.
For more operation details, see the section called"11- RX CTCSS" and the section called"13- TX CTCSS"
in Appendix B, Menu definitions.
DCS
DCS is set with menus 10 RX DCS and 12 TX DCS
For a complete list of available DCS codes, see Table C.1, "DCS Codes" in Appendix C,
Technical specifications.
Procedure 8. 2. DCS setup how-to
1. Press the [MENU] key to enter the menu.
2. Enter 1and 0 on the numeric keypad to get to receiver DCS.
3. Press [MENU] to select.
4. Enter desired DCS code on the numeric keypad.
5. Press [MENU] to confirm and save.
6. Enter 1 and 2 on the numeric keypad to go to transmitter DCS.
7. Press [MENU] to select.
8. Enter desired DCS code on the numeric keypad. Make sure it's the same code as that you entered
for receiver DCS.
9. Press [MENU] to confirm and save.
10. Press BACK to exit the menu system.
To turn DCS off, follow the same procedure but set it to off with the 0 key instead of selecting a DCS
code.
For more operation details, see the section called"10 RX DCS" and the section called"12 TX DCS" in
Appendix B, Menu definitions.
Memory channels are an easy way to store commonly used frequencies so that they can easily be
retrieved at a later date.
Radioddity GA-510 features 128 memory channels that each can hold: Receive and transmit frequencies,
transmit power, group signaling information, bandwidth, ANI/ PTT-ID settings and a six-character
alphanumeric identifier or channel name 1.
Frequency Mode vs. Channel Mode
Switch between Modes by Using Pressing the VFO/MR Button
Frequency Mode (VFO) - Used for a temporary frequency assignment, such as a test frequency or
quick field programming if permitted.
Channel Mode (MR) - Used for selecting pre-programmed channels.
Manual programming
Manual programming is somewhat difficult until you get used to it, especially when programming in
duplex channels. Note that the ANI S-CODE IDs can only be set from a computer. When programming
channels it is important to remember that you can only save memory channels when working on the
upper display in VFO mode.
Chapter 9. - Programming

29 30
Part Ill. How-to and setup guides.
Part three covers is a collection of how-to documents to help you set up your
radio for specific working environments.
CHAPTER 10 REPEATERS
On manual programming you cannot overwrite an existing channel. You must first delete the
channel before updating or replacing it.
To create a new channel, start by switching your radio to Frequency (VFO) mode using VFO/MR key.
When in Frequency (VFO) mode, select your desired receive frequency using the numerical keypad.
After that, use the menu system to configure the finer details of the channel you're wanting to program
to memory, such as transmit power, bandwidth, CTCSS or DCS and more.
For more information on how to use the menu system see Chapter 4, Working the menu system and
Appendix B, Menu definitions. Information regarding how to set up CTCSS and DCS can be found in
Chapter 8, Selective calling
Delete channels
1. Press [MENU] to enter menu mode.
2. Press [▲] and [
▲
] to select “Delete”, or enter the number 26 directly into the menu item.
3. Press [MENU] to select, then the radio voice prompts “Delete Channel”.
4. Press [▲] and [
▲
] to select the channel to delete.
If the numeric prefix displays the character “CH-”, it indicates that the channel number already has
channel parameters, which can be deleted.
If the number prefix does not have the display character “CH-”, it means that the channel number
has no parameters, does not need to be deleted, and can be stored.
5. Press [MENU] the radio voice prompts “confirm” to save and return to the previous menu. If the
channel has no parameters, press [MENU] key to directly return to the previous menu (no voice
prompt).
Other manuals for GA-510
1
Table of contents
Languages:
Other Radioddity Two-way Radio manuals

Radioddity
Radioddity PR-T6 PMR EU User manual

Radioddity
Radioddity GS-5B User manual

Radioddity
Radioddity FS-T1 User manual

Radioddity
Radioddity GA-5S User manual

Radioddity
Radioddity FS-T2 User manual

Radioddity
Radioddity GD-73 Series User manual

Radioddity
Radioddity GC-5 Series User manual

Radioddity
Radioddity GA-5E User manual

Radioddity
Radioddity GA-2S User manual

Radioddity
Radioddity FS-T3 User manual