RADLEY 1325-500 User manual

OWNER’S MANUAL

1
NEED ASSISTANCE?
Call us on our toll- free customer support line:
1-866-349-8665 (Monday through Friday 9am –5pm Eastern Standard Time)
Technical questions
Replacement parts
Parts missing from package
Rating
120V~ 60 Hz, 2.1 Amp Induction motor
Max Wheel Diameter
6” (152mm)
Max Wheel Face
3/4” (19mm)
No Load Speed
3,450 RPM
Arbor Size
1/2’’ (12.7mm)
Cord
6 foot SJT
Replacement Wheels
1362-600 & 1362-601
Weight
17.2 Lb (7.8kg)

2
Product Specifications...................................................................................................................................................................... 1
Table of Contents............................................................................................................................................................................. 2
General Safety Warnings...............................................................................................................................................................3-4
Specific Safety Rules......................................................................................................................................................................5-6
Symbols ............................................................................................................................................................................................ 7
Extension Cord Safety ...................................................................................................................................................................... 8
Know Your Bench Grinder ............................................................................................................................................................... 9
Assembly and Operation.............................................................................................................................................................9-10
Maintenance ..................................................................................................................................................................................11
Explosion Drawing..........................................................................................................................................................................12
Parts List....................................................................................................................................................................................13-14
Warranty ........................................................................................................................................................................................15

3
WARNING:
Before using this tool or any of its accessories, read this manual and follow all Safety Rules and Operating
Instructions. The important precautions, safeguards and instructions appearing in this manual are not
meant to cover all possible situations. It must be understood that common sense and caution are factors
which cannot be built into the product.
ALWAYS WEAR EYE PROTECTION THAT CONFORMS
WITH CSA Z94.3 or ANSI SAFETY STANDARD Z87.1
FLYING DEBRIS can cause permanent eye damage.
Prescription eyeglasses ARE NOT a replacement for
proper eye protection.
Non-compliant eyewear can cause serious injury if
broken during the operation of a power tool.
Use hearing protection, particularly during extended
periods of operation of the tool, or if the operation is
noisy.
WEAR A DUST MASK THAT IS DESIGNED TO BE USED
WHEN OPERATING A POWER TOOL IN A DUSTY
ENVIRONMENT.
Dust that is created by power sanding, sawing,
grinding, drilling, and other construction activities may
contain chemicals that are known to cause cancer, birth
defects, or other genetic abnormalities.
These chemicals include:
• Lead from lead-based paints
• Crystalline silica from bricks, cement, and other
masonry products
• Arsenic and chromium from chemically treated
lumber the level of risk from exposure to these
chemicals varies, according to how often this type of
work is performed. In order to reduce exposure to
these chemicals, work in a well-ventilated area, and use
approved safety equipment, such as a dust mask that is
specifically designed to filter out microscopic particles.

4
WARNING! Read and understand all instructions before using this tool. The operator must follow
basic precautions to reduce the risk of personal injury and/or damage to the equipment.
1. KEEP GUARDS IN PLACE and in working order.
2. REMOVE ADJUSTING KEYS AND WRENCHES. Form habit of checking to see that keys and adjusting wrenches are
removed from tool before turning it on.
3. KEEP WORK AREA CLEAN. Cluttered areas and benches invite accidents.
4. DON’T USE IN DANGEROUS ENVIRONMENT. Don’t use power tools in damp or wet locations, or expose them to
rain. Keep work area well lighted.
5. KEEP CHILDREN AWAY. All visitors should be kept safe distance from work area.
6. MAKE WORKSHOP KID PROOF with padlocks, master switches, or by removing starter keys.
7. DON’T FORCE TOOL. It will do the job better and safer at the rate for which it was designed.
8. USE RIGHT TOOL. Don’t force tool or attachment to do a job for which it was not designed
10. WEAR PROPER APPAREL. Do not wear loose clothing, gloves, neckties, rings, bracelets, or other jewelry which
may get caught in moving parts. Nonslip footwear is recommended. Wear protective hair covering to contain long
hair.
11. ALWAYS USE SAFETY GLASSES. Also use face or dust mask if cutting operation is dusty. Everyday eyeglasses only
have impact resistant lenses, they are NOT safety glasses.
12. SECURE WORK. Use clamps or a vise to hold work when practical. It’s safer than using your hand and it frees both
hands to operate tool.
13. DON’T OVERREACH. Keep proper footing and balance at all times.
14. MAINTAIN TOOLS WITH CARE. Keep tools sharp and clean for best and safest performance. Follow instructions
for lubricating and changing accessories.
15. DISCONNECT TOOLS before servicing; when changing accessories, such as blades, bits, cutters, and the like.
16. REDUCE THE RISK OF UNINTENTIONAL STARTING. Make sure switch is in off position before plugging in.
17. USE RECOMMENDED ACCESSORIES. Consult the owner’s manual for recommended accessories. The use of
improper accessories may cause risk of injury to persons.
18. NEVER STAND ON TOOL. Serious injury could occur if the tool is tipped or if the cutting tool is unintentionally
contacted.
19. CHECK DAMAGED PARTS. Before further use of the tool, a guard or other part that is damaged should be carefully
checked to determine that it will operate properly and perform its intended function –check for alignment of moving
parts, binding of moving parts, breakage of parts, mounting, and any other conditions that may affect its operation.
A guard or other part that is damaged should be properly repaired or replaced.
20. DIRECTION OF FEED. Feed work into a blade or cutter against the direction of rotation of the blade or cutter
only.
21. NEVER LEAVE TOOL RUNNING UNATTENDED. TURN POWER OFF. Don’t leave tool until it comes to a complete
stop
SERVICE
Have your power tool serviced by a qualified repair person using only identical replacement parts. This will ensure
that the safety of the power tool is maintained. Use only identical replacement parts.

5
WARNING! DO NOT let comfort or familiarity with product (gained from repeated use) replace strict
adherence to the tool safety rules. If you use this tool unsafely or incorrectly, you can suffer serious
personal injury.
DANGER! When the tool is in operation, keep hands away from the saw blade and the area it is being applied to.
Failure to follow this warning will result in amputation, serious personal injury or death.
Do not operate with any guard disabled, damaged, or removed. Moving guards must move freely and close
instantly.
Never operate the grinder with broken wheels. The grinding wheels operate at 3 450 RPM. A broken wheel
could turn into a missile.
Never leave the tool running while unattended.
Avoid unintentional starting. Prepare to begin work before turning on the tool.
Never stick an object against a wheel to stop the grinder. Let it slow on its own.
Always use the tool rest and safety guard. Supports and guards are essential for safe grinder operation.
Use only properly sized wheels. The wrong sized wheel can dangerously increase or decrease operating speed
at the
grinding surface. A wheel that is too large could come in contact with the wheel housing, potentially damaging
the machine.
Do not overtighten wheel nut.
Always wear eye protection. The grinder can throw off sparks and tiny metal shards. Use eye protection to avoid
operator injury.
Adjust tool rest properly. The grinder has the potential for binding against a workpiece introduced at an
improper angle - and send it flying. Avoid grinding your workpiece at angles greater than 90。to the direction
of wheel travel.
Allow grinder to reach full speed. Let the grinding wheel reach its full operating speed before using the grinder.
Secure grinder. Attach the grinder firmly to your benchtop. Secure attachment will ensure your grinder will not
move when operated.
Avoid overheating workpiece. Excessive or prolonged grinding on a workpiece can heat it to the point where it
becomes dangerous to the operator. Excessive grinding can also soften your workpiece and ruin its edge.
Never grind small stock. Do not attempt to grind or sharpen anything that cannot be adequately supported by
the tool rest. Use clamping pliers or a similar holder when grinding parts which cannot be held easily by hand.
Keep a clean work area. The chances of an accident are far less if the area around your grinder is kept free of
clutter.
Avoid loose fitting clothing and tie back long hair. A grinder’s spindle, spinning at 3,450 RPM, can suck a
tremen-dous amount of material in a very short time - given the chance. Don’t give it the chance.
Accessories must be rated for at least the speed recommended on the tool warning label. Wheels and other
accessories running over the rated speed can fly apart and cause injury.
Never start the tool with a person in line with the wheel. This includes the operator
Do not operate the grinder near flammable liquids, gases or dust. Sparks or hot chips from grinding may ignite
combustible materials.
Maintain labels and nameplates on the tool. These carry important safety information. If unreadable or missing,
contact Harbor Freight Tools for a replacement.
WARNING! Some dust created by power sanding, sawing, grinding, drilling, and other construction activities,
contains chemicals known to the State of California to cause cancer, birth defects or other reproductive harm.
Some examples of these chemicals are: Lead from lead-based paints, Crystalline silica from bricks and cement or
other masonry products, Arsenic and chromium from chemically treated lumber. Your risk from these exposures
varies, depending on how often you do this type of work. To reduce your exposure to these chemicals: work in a
well ventilated area, and work with approved safety equipment, such as those dust masks that are specially
designed to filter out microscopic particles.
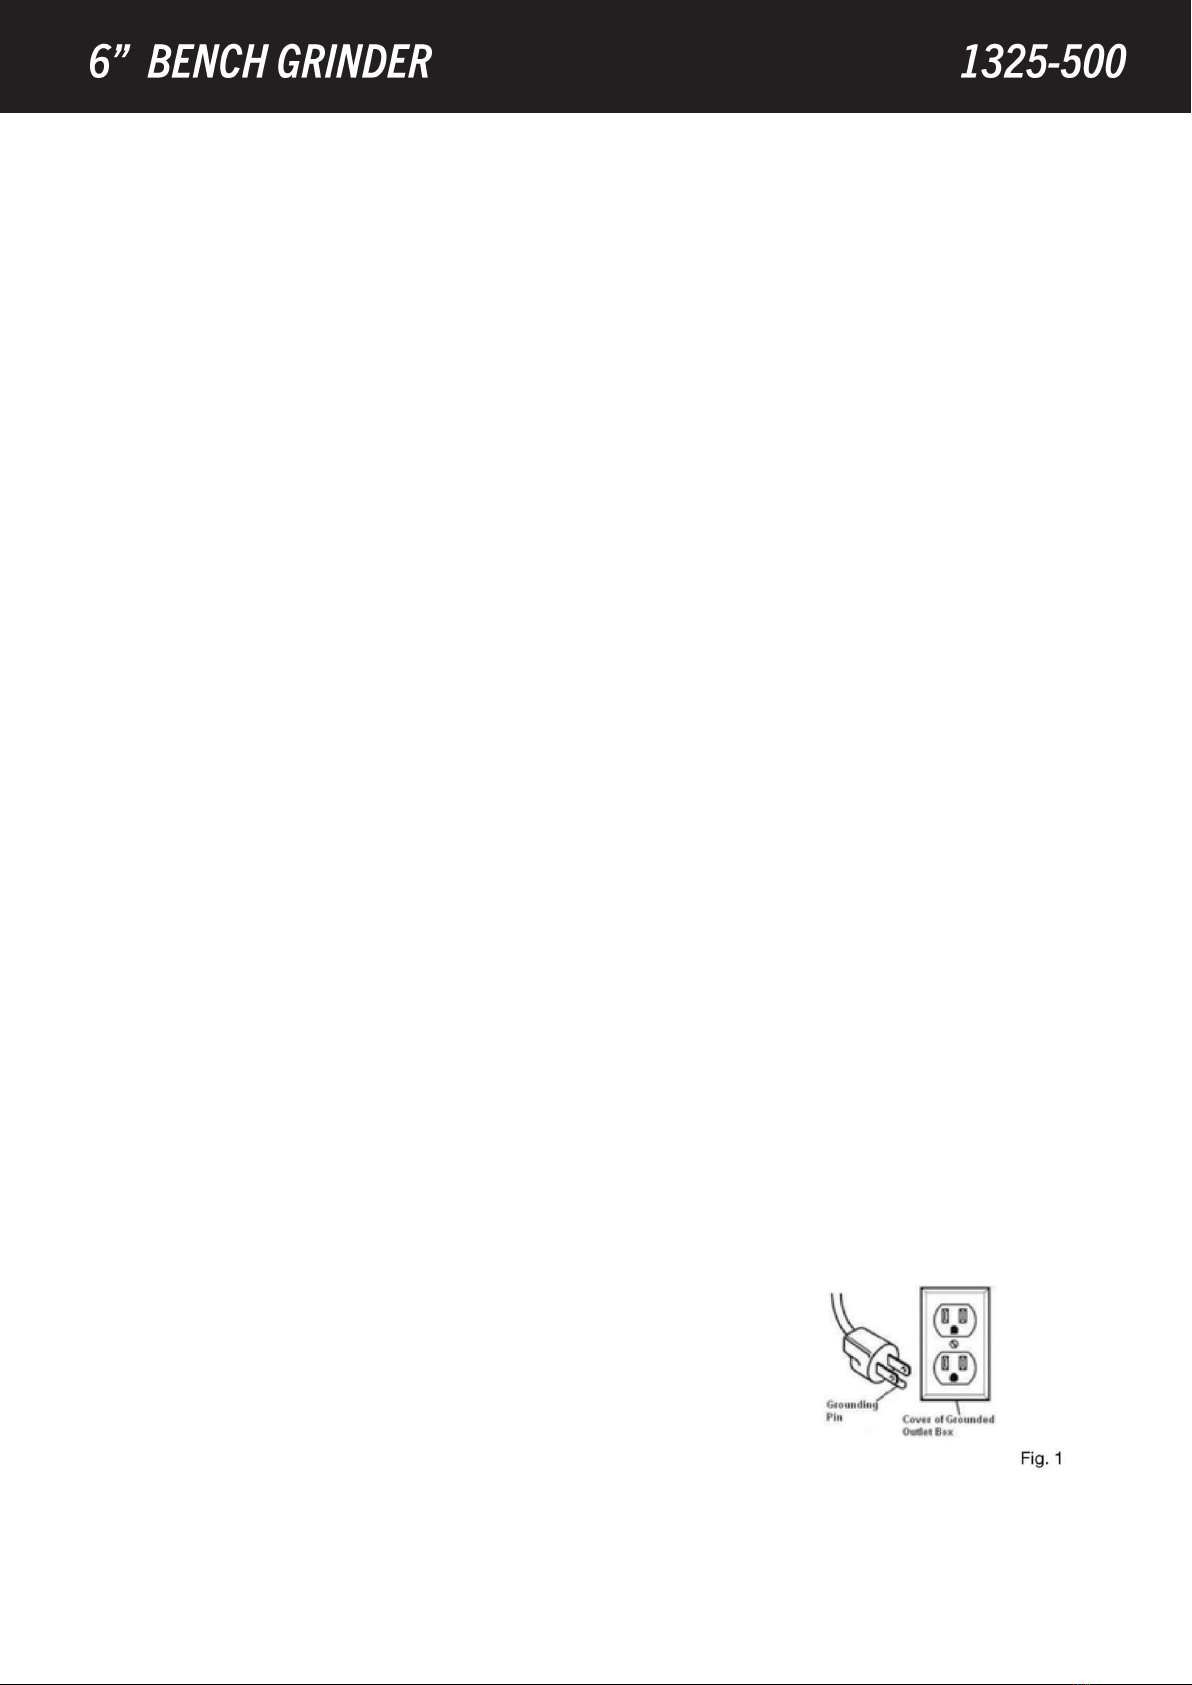
WARNING! Handling the cord on this product will expose you to lead, a chemical known to the State of California
to cause cancer, and birth defects or other reproductive harm. Wash hands after handling.

6
Vibration Safety
This tool vibrates during use. Repeated or long-term exposure to vibration may cause temporary or permanent
physical injury, particularly to the hands, arms and shoulders. To reduce the risk of vibration-related injury:
1. Anyone using vibrating tools regularly or for an extended period should first be examined by a doctor and then
have regular medical check-ups to ensure medical problems are not being caused or worsened from use. Pregnant
women or people who have impaired blood circulation to the hand, past hand injuries, nervous system disorders,
diabetes, or Raynaud’s Disease should not use this tool. If you feel any medical or physical symptoms related to
vibration (such as tingling, numbness, and white or blue fingers), seek medical advice as soon as possible.
2. Do not smoke during use. Nicotine reduces the blood supply to the hands and fingers, increasing the risk of
vibration-related injury.
3. Use tools with the lowest vibration when there is a choice between different processes.
4. Include vibration-free periods each day of work.
5. Grip workpiece as lightly as possible (while still keeping safe control of it). Let the tool do the work.
6. To reduce vibration, maintain the tool as explained in this manual. If any abnormal vibration occurs, stop use
immediately
Double insulation
Double insulation is a concept in safety in electric power tools, which eliminates the need for the usual three-wire
Grounded power cord. All exposed metal parts are isolated from the internal metal motor components with
protecting insulation. Double insulated tools do not need to be grounded. The double insulated system is intended
to protect the user from shock resulting from a break in the tool’s internal wiring . Observe all normal safety
precautions to avoid electrical shock. The double insulated system is intended to protect the user from shock
resulting from a break in the tool’s internal wiring.
Observe all normal safety precautions to avoid electrical shock.
NOTE: Servicing of a tool with double insulation requires extreme care and knowledge of the system and shouId
Be Performed only by a qualified service technician. For service, we suggest you return the tool to the nearest
authorized service center for repair. Always use original factory replace-ment parts when servicing.
Electrical Connection
This tool has a precision-built electric motor. It should be connected to a power supply that is 120 volts, 60 Hz, AC
only (normal household current). Do not operate this tool on direct current (DC). A substantial voltage drop will
cause a loss of power and the motor will overheat. If your tool does not operate when plugged into an outlet,
double-check the power supply.
Grounding Instruction
In the event of a malfunction or break-down, grounding provides a path of least resistance for electric current to
reduce the risk of electric shock. This tool is equipped with an electric cord having an equipent-grounding
conductor and a grounding plug. The plug must be plugged into a matching outlet that is properly installed and
grounded in accordance with all local codes and ordinances.
Do not modify the plug provided. If it will not fit the outlet, have the proper outlet installed by a qualified
electrician.
Improper connection of the equipment-grounding conductor can result. It in electrical shock. The conductor with
Insulation having an outer surface that is green with or without yellow stripes is the equipment-grounding
conductor. If repair or replacement of the electric cord or plug is necessary, do
not connect the equipment grounding conductor to a live terminal.
Check with a qualified electrician or service personnel if the grounding
instructions are not completely understood, or if in doubt as to whether the
tool is properly grounded. Repair or replace a damaged or worn cord
immediately.
This tool is intended for use on a circuit that has an outlet like the
one shown in Fig.1. It also has a grounding pin like the one shown.

7
WARNING: Some of the following symbols may appear on your tool. Study these symbols and learn their
meaning. Proper interpretation of these symbols will allow for more efficient and safer operation of this tool.
WARNING: Please read all the safety and operating instructions carefully before using this
tool. Please pay particular attention to all sections of this User Guide that carry warning
symbols and notices. Some of the following symbols may be used on this tool.
Observe caution and safety notes.
To reduce the risk of injury, user must read and understand User Guide before using this
tool.
Wear ear protection.
Wear protective helmet and eye protection.
Switch off and remove plug from power source before cleaning or maintenance.
Do not use in the rain or leave outdoors while it is raining.
Keep bystanders away.
Don’t touch the inlet and outlet when the vacuum cover is opened, or the tube is removed.
Double insulation.
Remove plug from the power source immediately if the power cord is damaged or cut.
This symbol designates that this tool is listed with Canadian and U.S.
requirements by UL
UL 987,Stationary and Fixed Electric Tools
CSA C22 . 2 No . 71.2-10 Electric Bench Tools

8
WARNING
Keep the extens1on cord clear of the working area.
Position the cord so it will not get caught on the workpiece, tools or any other obstructions while you are working with
the power tool.
1. Make sure any extension cord used with this tool is in good condition. When using an extension cord, be sure to use
one of heavy enough gauge to carry the current the tool will draw. An undersized cord will cause a drop in line
voltage resulting in loss of power and overheating.
2. The table below shows the correct size to use according to cord length and nameplate ampere rating. If in doubt,
use the next heavier gauge. The smaller the gauge number the heavier the cord.
3. Be sure your extension cord is properly wired and in good condition. Always replace a damaged extension cord or
have it repaired by a qualified electrician before using it. Protect your extension cord from sharp objects, excessive
heat and damp or wet areas.
4. Use a separate electrical circuit for your power tools. This circuit must not be less than 14 gauge wire and should be
protected with either a 15 A time delayed fuse or circuit breaker. Before connecting the power tool to the power
source, make sure the switch is in the OFF position and the power source is the same as indicated on the nameplate.
Running at lower voltage will damage the motor.
MINIMUM GAUGE(AWG)EXTENSION
CORDS(120V)USE ONLY
Amperage rating
Total length
More
than
Not
more than
25'
(7.5 m)
50'
(15 m)
100'
(30 m)
150'
(45 m)
0
6
18
16
16
14
6
10
18
16
14
12
10
12
16
16
14
12
12
16
14
12
Not Applicable

9
1 Eye Shield
2 Spark Deflector
3 Wheel Cover
4 Power Switch
5 Interlocking Knob
6 Tool Rest
7 Magnifier Shield
8 Eye Shield Rod
9 Grinding Wheel
10 Grinding Wheel
WARNING: Read the entire important safety information section at the beginning of this manual including All text
Under subheadings therein before assembling or use of this power tool.
WARNING: To prevent serious injury from accidental operation, disconnect the power plug before carrying out any
adiustements or maintenance.
WARNING: Always make sure your bench grinder is securely mounted to
aworkbench or an approved workstand. Failure to do so could result in
an accident resulting in possible serious personal injury.
Mounting Eye Shield Rod and Eye Shield
•Mount the left and right eye shield rod (8) to the inside of the wheel guards
using the clamp brackets and Interlocking Knob.
•Use the illustration (Fig.3) as a guide to determine which eye shield rod is
mounted on the left and which eye shield rod is mounted on the right of the
grinder.
•Once eye shield rods are firmly in place, slide the shield bracket onto the shield
rod. Tighten the carriage bolt leaving it loose enough to allow the eye shield to
be raised and lowered easily.
Mounting Spark Deflector
•Using hex bolts and washers attach the spark deflector (2) to the inside of the
wheel guard. (Fig.4)
•Adjust the spark deflectors to within 1/16 in. of the grinding wheel. Tighten the
hex bolts securely.
Eye Shield Rod
Clamp Bracket
Interlocking
Knob

10
Mounting and Adjusting Tool Rest
•Mount the tool rests (Part # 6 on the “Know your Grinder” page)
to the tool rest bracket using the Interlocking knob (Part # 5 on
the “Know your Grinder” page). (Fig.5)
•Before tightening the Interlocking knob (Part # 5 on the “Know
your Grinder” page), adjust the gap between the grinding wheel
and the tool rest to a maximum of 1/ 16 in. Tighten securely.
WARNING: The tool rest should only be adjusted when the
grinding wheel is completely stationary, and the tool is
disconnected from the power supply
WARNING: Before connecting your power tool to a power supply, always check to be sure switch is not in lock-on
Position. Failure to do so could result in accidental starting of your power tool.
Switching ON/OFF
1. Check that the switch (Part # 4 on the “Know your Grinder” page) is in the “OFF” position before connecting the
machine to the power supply.
2. Press the power switch into the “ON” position to start your bench grinder. (Fig.6)
3. Always keep the power cord out of the way of the tool’s moving parts.
4. To switch off the grinder, press the power switch into the “OFF” position.
Grinding
WARNING: Always wear safety goggles or safety glasses with side shields during power tool operation or when
blowing dust. If operation is dusty, wear a dust mask.
1. Make sure that the Switch is in the off-position, then plug in the tool.
2.. Turn on the tool.
3. Allow the tool to come up to full speed before touching the wheel.
4. Apply the workpiece to the wheel, allowing the tool to operate at full speed. If the tool bogs down, use lighter
pressure.
5. To create a smoother surface, keep the workpiece moving over the wheel.
6. To prevent accidents, turn off the tool and unplug the tool from its electrical outlet after use. Clean, then store the
tool indoors out of children’s reach.
Replacing a Grinding Wheel
The Grinding Wheel MUST be:
Rated to at least 3,450 RPM.
No larger than 6″(152.4 mm) in diameter.
Fitted with a 1/2″round arbor hole.
3/4″thick.
Suitable for edge grinding, not surface grinding.
Dry and clean.
Inspected for damage.
Steps
1. Loosen the three screws and remove the wheel cover. (Fig.7)
2. Turn the nut clockwise with a wrench. (Fig.7)
3. Remove the grinding wheel and fit the new one over the motor
spindle,
Put the outside flange and the nut back. Tighten the nut by hand.
4. Use the wrench to turn the nut counterclockwise and tighten the
nut.
5. Mount the wheel cover and eye shield in reverse ord
WARNING: Always disconnect the bench grinder from the power
supply before performing any assembly or adjustment
Failure to do so could result in accidental started resulting in
possible serious personal injury

11
WARNING: To prevent serious injury from accidental operation Turn the Power switch of the tool to its “OFF” position
and
unplug the tool from its electrical outlet before performing any inspection, maintenance, or cleaning procedures.
Cleaning
Clean out dust and debris from vents and electrical contacts by blowing with compressed air. Keep tool handles
clean, dry
and free of oil or grease.
Certain cleaning agents and solvents are harmful to plastics and other insulated parts. Some of these include gasoline,
turpentine, lacquer thinner, paint thinner, chlorinated cleaning solvents , ammonia and household detergents
containing
ammonia. Never use flammable or combustible solvents around tools.
WARNING: Tool service must be performed only by qualified repair personnel. Service or maintenance performed
by
unqualified personnel could result in a risk of injury. If the tool does not work properly, return the tool to a service
facility for
repairs.
Lubrication
All of the bearings in this tool are lubricat-ed with a sufficient amount of high grade lubricant for the life of the unit
under
normal operating conditions . Therefore, no further lubrication is required.
TROUBLESHOOTING
Problem
Possible
Causes
Likely Solutions
Machine
switched on
but will not
run
There is a
break in the
power supply
to the machine
The switch
may be
damaged
Check power at outlet
Check that cord is plugged in
The electric
motor
becomes hot
The motor has
become
overloaded
The motor is
defective
Give the motor a chance to
cool down
Contact Customer Service @ 1-866-349-8665
Follow all safety precautions whenever diagnosing or servicing the tool.
Disconnect power supply before service.

12

13
WARNING!
When servicing, use only original equipment replacement parts.
The use of any other parts may create a safety hazard or cause damage to the tool.
Any attempt to repair or replace electrical parts on this saw may create a safety hazard unless repairs are
performed by a qualified technician. For more information, call the Toll-free Helpline, at 1-866-349-8665.
Always order by PART NUMBER, not by key number.

14
E

15
6” BENCH GRINDER
If this Radley tool fails due to a defect in material or workmanship within three years from the date of purchase,
return it to any Home Hardware store with the original bill of sale for exchange. Two years for battery and charger.
This warranty does not include expendable parts including but not limited to blades, brushes, belts, and light bulbs.
This warranty covers defects in material or workmanship only. It does not cover normal wear and tear, failure due to
abuse/misuse, or defects caused by careless or accidental mishandling. If this Radley product is used for
commercial or rental purposes, this warranty does not apply.

16
Table of contents
Other RADLEY Grinder manuals