Rae RAELink3 User manual

The RAELink3 compact, portable radio-frequency modem provides long-range
wireless communication between remote portable air monitors and a base
station/computer for comprehensive monitoring. Up to 64 RAELink3-equipped
monitors can be networked with a single Host. For applications requiring long-
distance monitoring or monitoring in locations with obstructions to clear line-of-
sight communication, RAELink3s configured as Repeaters extend the effective reach
of the system.
RAELink3
QUICK REFERENCE
The RAELink3 can be configured in the following three modes:
1. Remote. The RAELink3 Remote functions as a slave modem and communicates
sensor data and GPS coordinates to a host modem with the same network ID.
2. Host. The RAELink3 Host functions as a host modem and communicates with
multiple wireless modems (such as the RAELink3 Remote and RAELink3 Repeater,
as well as AreaRAE products equipped with RAELink-family Remote modems) with
the same network ID.
3. Repeater. The RAELink3 Repeater functions as a repeater for RAELink3
Remote slave modems (or AreaRAE or RAELink series products) with the same
network ID.
Battery Replacement
The RAELink3 can use a rechargeable lithium-ion battery or an alkaline battery
pack. It can also be operated on its charger. To take the rechargeable battery or
alkaline battery pack out of the RAELink3, remove the 3 hex-socket screws and
lift it out. To replace the AA batteries in the alkaline battery pack, remove the
two hex-socket screws on the inside, remove the cover, and replace the 5 AA
batteries (Duracell MN1500 or Energizer E91 only). Make sure that the polarity
(“+” and “-”) for each battery is correct. Do not mix old and new batteries. Only
change batteries in a non-hazardous location.
Additional Information And Support
Read the RAELink3 User’s Guide for additional information and details on
features and settings not covered in this Quick Reference. For support, contact
RAE Systems Technical Support at (888) 723-8823, or email
RAE Systems, Inc.
3775 N. First St.
San Jose, CA 95134-1708 USA
Toll-free: 888-723-8823
Website: www.raesystems.com

Note: For continuous operation or use beyond a day, keep the RAELink3 in the charger
before turning on RAELink3 and other equipment.
ppbRAE Plus,
e cables
a dapter
Setup & Battery Charging
Before using the RAELink3, charge the Li-ion battery by setting the instrument in the
Charging Cradle. Contacts on the back of the RAELink3 meet the Charging Cradle’s
contacts to transfer power.
1. Plug AC/DC adapter’s connector into the side of the Charging Cradle.
2. Plug AC/DC adapter into the wall outlet.
3. Place RAELink3 into the Charging Cradle.
Connect AC/DC
adapter to cradle
Place
RAELink3
into cradle Charge
Contacts
LED Charge
Indicator
LED: Red = charging.
Green = fully charged.
or use the alkaline battery pack.
Connections
Attach all antennas
emote For the Remote, connect a portable gas monitor (PGM) such as aR
MiniRAE 2000, or MultiRAE Plus to the RAELink3 using an optional Portable Coiled Cable
(part number 400-0189-000), or cordlessly with Bluetooth to monitors such as the
MiniRAE3000 and ppbRAE3000. Third-party portable monitors require uniqu
to connect to the RAELink3. Make sure Bluetooth is turned on in any monitors that use
Bluetooth.
PlugHost the multi-function cable into the RAELink3 and the other end into
computer. If the computer does not have a serial port, use a USB-to-9-pin Serial A
(part number 410-0210-000) to connect the cable to the computer.
For repeater operation, no connections are necessary.Repeater

ser Interface nsists of the display and three “soft” keys: [Y/+], [MODE], and
/+] increas ODE] acts as on/off and sav
ctions as “yes,” “mode select,” and “no,” [Y/+], [MODE],
ess and hold [MODE] until the display is on. a 5-second countdown,
cklight: P seconds, it shuts off.
led monitor. Make sure it is set up to run Bluetooth
should be in Remote Mode, and Bluetooth turned on.
n
or a Bluetooth-
Link3
n a network must have the same Network ID. ] for 3 seconds.
MODE key
U
The user interface co
[N/-]. The LCD display provides visual feedback that includes the reading, time,
battery condition, and other functions.
Controls Display
Radio
S Battery
Signal GPS
Charge
trength Satellite
BT Linked to xxxxxxxx
Bluetooth and other status
Y/+ key
N/- key
[Y es values, [M e, and [N/-] selects “no” and
displayed here
advances to next function.
In addition to their labeled fun
and [N/-] act as “soft keys” that control different parameters and make selections within
the instrument’s menus.
perationO
Turn On Pr
Turn Off Press and hold the [MODE] for 3 seconds. After
you see “Unit off...” Release your finger.
ress any key to turn on backlight. After 15Ba
stablish Bluetooth LinkE 1. Turn on the Bluetooth-enab
(Bluetooth is turned on).
2. Turn on the RAELink3. It
3. *The two units connect, and exchange ID numbers. The ID number of the
monitor is shown below the icons. They are now connected.
*The RAELink3 can scan for Bluetooth-enabled monitors, and stores up to 2 connections i
memory for faster re-deployment. Upon powering on, the RAELink3 automatically searches
for the primary Bluetooth device indicated by the asterisk in memory.
o perform the initial pairing of a detector with RAELink3, scan fT
enabled monitor: Press and hold [MODE] and [N/-] for 3 seconds. When the “BT
Search” message appears, press [Y/+]. For fastest operation, only turn on one RAE
and one monitor at a time during this initial pairing.
et Network IDS
Important! All units i
With the RAELink3 turned on, press and hold both [MODE] and [N/-

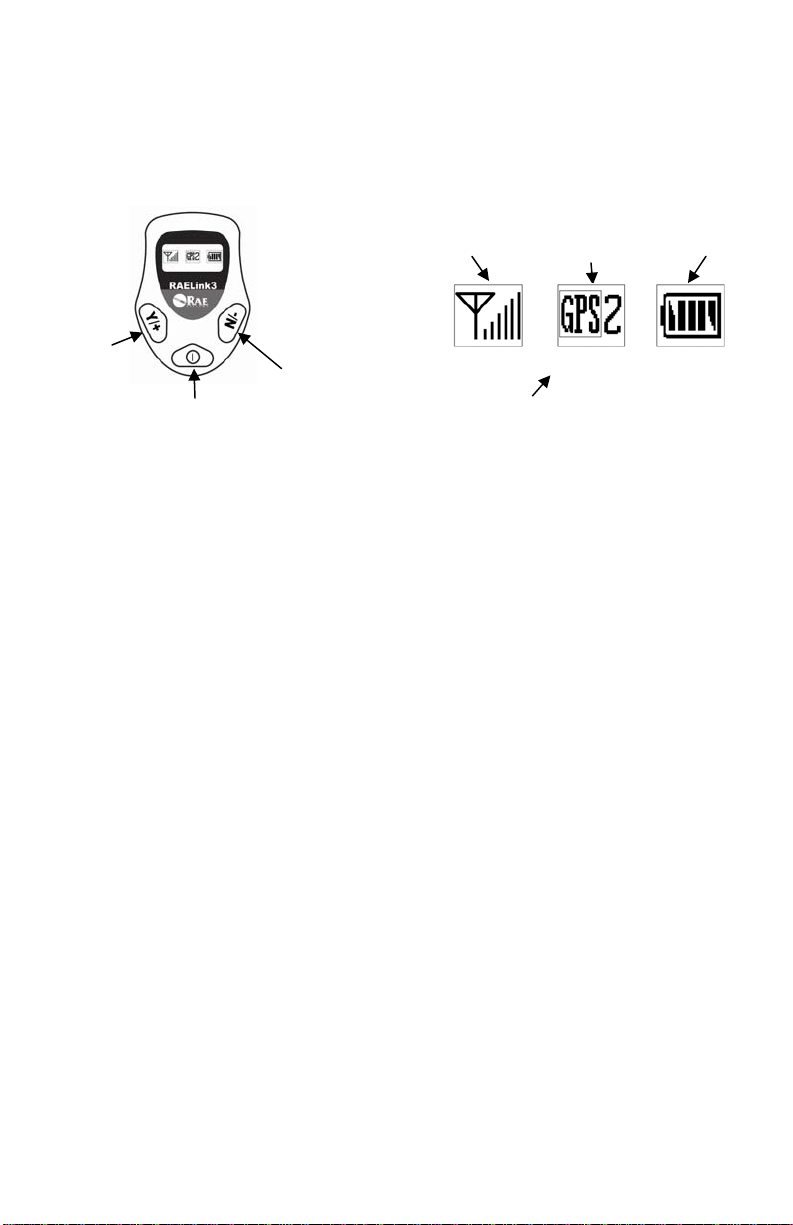
he RAELink3 enters programming mode:
o change the Network ID, press [Y/+].
.
When chan work ID, th cursor flashes on the selected digit:
.Press [Y/+] to increase the number or [N/-] to decrease the number.
5).
for 2 seconds.When the .
y remote unit in a network must have a unique Unit ID. quire a Unit
hold both
e
t to change the Unit ID. When chan D, the cursor
e number or [N/-] to decrease the number.
[MODE] for 2 seconds. When the confirmation
r Remote transmitting modems in the AE
ote
T
T
To advance without changing, press [N/-].
Network ID: 0001 To exit Programming Mode, press [MODE]
Chan
g
e?
ging the Net e
Network ID: 0001
0001
1
2. Press [MODE] to advance to the next digit.
3. Input a network ID from 1 to 4095 (except 25
o aT ccept the new Network ID, press and hold [MODE]
confirmation screen appears, press [Y/+] to save, or press [N/-] to abort the change
et Unit IDS
Important! Ever
Note: When RAELink3 is configured as a Repeater or Host, it does not re
ID. Some portable monitors require setting of the Unit ID on the monitor. Refer to the
operation manual for the monitor.
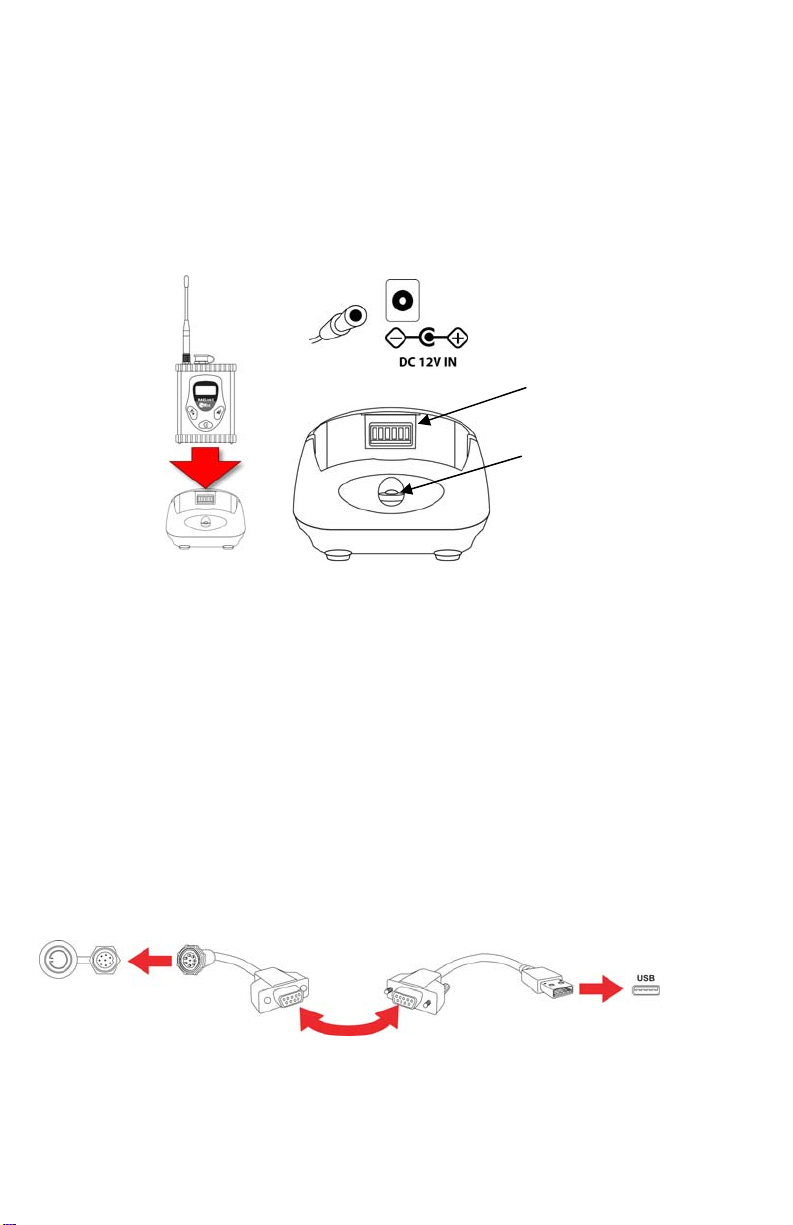
ith the RAELink3 turned on, press andW
[MODE] and [N/-] for 3 seconds. The RAELink3
enters programming mode. Press [N/-] until you se
the screen at right.
ress [Y/+] if you wanP ging the Unit I
Unit ID: 01
Change?
flashes on the selected digit.
.Press [Y/+] to increase th1
2. Press [MODE] to advance to the next digit.
3. Input a network ID from 00 to 99.
o aT ccept the new Unit ID, press and hold
screen appears, press [Y/+] to save, or press [N/-] to abort the change.
eMonitoring Via ProRAE Remot
Turn on each monitor and RAELink3 and all othe
network. Turn on the Host connected to a computer running ProRAE Remote. Start ProR
Remote to begin monitoring. If deploying Repeaters, sequence is key. Turn off all Remote
modems prior to turning on Repeaters. Turn on Repeaters to allow them to link with Host
modem. Then turn on Remote modems. For further information, refer to the ProRAE Rem
User’s Guide.
Rev A May 2008 PN: 029-4506-000

Other manuals for RAELink3
5
Table of contents
Other Rae Modem manuals