Rainman Electric User manual

Table of Contents
Introduction 1
About this manual 1
Rainman concept 2
Getting to know your system 3
Desalination basics 3
Detailed schematic 4
Rainman models 5
Preparing system for first use 6
Using the system 7
Setup - Portable 7
Setup - Installed 8
Run –Portable or Installed 9
Shutdown - Portable 10
Shutdown - Installed 10
Desalinating while under way 11
Desalinating brackish water 12
Care and maintenance 12
Storage 12
Reverse osmosis membrane care 13
Fresh water flushing 13
Pickling your watermaker 14
Pickling in cold climates 14
Changing the pre-filter 15
High pressure pump maintenance 15
Lift pump service 16
Push-fit instructions 17
Shipping 17
Service 17
Warranty 17
Appendix 1 - Troubleshooting 18
Appendix 2 –Installation Instructions
Appendix 3 –Autoflush Module

Rainman Electric Manual –Page 1
Introduction
About this manual
This instruction manual is for our range of electric powered watermakers. Our petrol (gasoline) powered
watermaker is supplied with its own specific manual. Rainman Watermakers in a case (referred to as cased
from now on) can be run either portable or installed, while our naked systems are designed for installed
application only. This manual covers both portable and installed use of our systems. Understanding both
options will give you better appreciation of how your watermaker operates.
Several icons are used throughout the text to indicate the purpose of the particular paragraph:
The electric plug icon means the paragraph only applies to AC electric systems (either
230VAC/50Hz or 115VAC/60Hz systems).
The battery icon means the paragraph only applies to the 12VDC systems.
This icon indicates a specific warning, indicating actions to be taken to ensure safety or
protection of your watermaker.
The portable icon indicates the paragraph only applies to those users running their system
as portable, without installation.
The installed icon indicates the paragraph only applies to systems that have been either fully
or semi-installed. Occasions occur in the text where a photo is of a portable system in the
case, but it equally applies to both portable and installed versions. For the purposes of
brevity, we do not include separate sections/photos when this is obvious (eg. Preparing
system for first use or High pressure pump maintenance).

Rainman Electric Manual –Page 2
Rainman concept
All Rainman systems consist of two main components - a pressure supply unit (PSU) and a reverse osmosis unit
(RO). The PSU will lift water to the system, pre-filter it down to five microns and feed it into a high pressure
pump. The RO unit is attached to the PSU via a high pressure hose. The membrane(s) extract a small amount
of fresh water from the pressurised seawater stream and diverts it into your tank. The bulk of the seawater
goes to waste as a supersaline brine output.
The systems can be operated as completely portable units, with hoses in the sea and water buckets, or they
can be partially or fully installed into a boat or other location. It is possible to install either the traditional
Rainman in a blue case or the uncased naked system. Below are four of many possibilities for operating a
Rainman Watermaker.
Six common configurations for Rainman Watermakers

Rainman Electric Manual –Page 3
Getting to know your system
Desalination basics
Desalination sounds complex, but it’s quite simple in principle.
The Rainman watermaker operates through a process called reverse osmosis
(RO). In its most simple terms, the system draws seawater up, filters out
sediment and particulates, then puts the clean seawater under high pressure
to pass through an RO membrane. The RO membrane is a semi-permeable
polyamide thin-film composite.
A traditional filter, like our prefilter, works by passing all the water through it.
The fine construct prevents larger particles from getting through and they are
captured on the filter material. When a lot of particles have been captured on
the filter and it’s dirty, you change it.
In contrast to a traditional filter, the RO process has filtered seawater passed
across the membrane surface at high pressure. Keeping the description simple,
the system is essentially extracting a small percentage of the freshwater from
the seawater stream. The majority of the water and all of the salt continues in
the flow and out the brine waste water hose. The salt does not accumulate on
the membrane, which is why RO membranes do not need to be cleaned or
replaced regularly.
Since bacterias and viruses are much larger than salt molecules, they stay in
the main seawater stream and are passed out with the brine waste water.

Rainman Electric Manual –Page 4
Detailed schematic
1. An impeller lift pump draws seawater up to the pressure supply unit (PSU) and creates positive pressure
for the high pressure pump.
2. The pre-filter removes particulates larger than 5 microns from the seawater.
3. A plunger pump pressurises the system for the reverse osmosis membranes to operate.
4. The relief valve only opens if the control valve is closed excessively.
5. A high pressure hose
carries filtered seawater
to the reverse osmosis
membranes.
6. Multiple membranes are
connected in series
(double RO membrane
configuration).
7. The pressure control
valve at the end of the
system is used to set
system pressure to
approximately 55 bar
(800 psi).
8. Brine water is released
to the sea while fresh
water is routed to your
drinking water tank.

Rainman Electric Manual –Page 5
Rainman models
Rainman offers multiple versions of watermakers. Various options are shown here.
Rainman AC naked PSU
Rainman AC PSU in case
Rainman 12VDC naked PSU
Rainman 12VDC PSU in case
Rainman petrol/gasoline PSU
Compact RO in case
High output RO in case
Economy RO in case
Compact naked RO
Economy naked RO
High output naked RO

Rainman Electric Manual –Page 6
Preparing system for first use
If you plan to install your Rainman Watermaker, please consult Appendix 2 Installation Guide.
When initially delivered, the high pressure pump will have a travel oil plug fitted to contain the oil during
shipping. You will need to swap it for the oil breather plug (supplied). To swap the oil plugs:
1. Remove the high pressure pump access cover from the
Pressure Supply Unit by unscrewing 2 screws and lifting
upwards.
2. Remove the black travel oil plug from the high-pressure
pump using an 8mm (5/16’) allen key.
3. Replace with the supplied breather plug.
4. The breather plug has the world OIL on it.
Save the travel plug in case the unit needs to be shipped
in the future.
Note that the breather or travel plugs may be different
colour than the photo suggests.
5. Replace the high pressure pump access cover.
Failure to use the breather plug will eventually lead to oil and or water leaks in the high
pressure pump as it heats up during use.

Rainman Electric Manual –Page 7
Using the system
This section explains how to operate the system on a regular basis, including set up, starting, stopping, and
flushing the system.
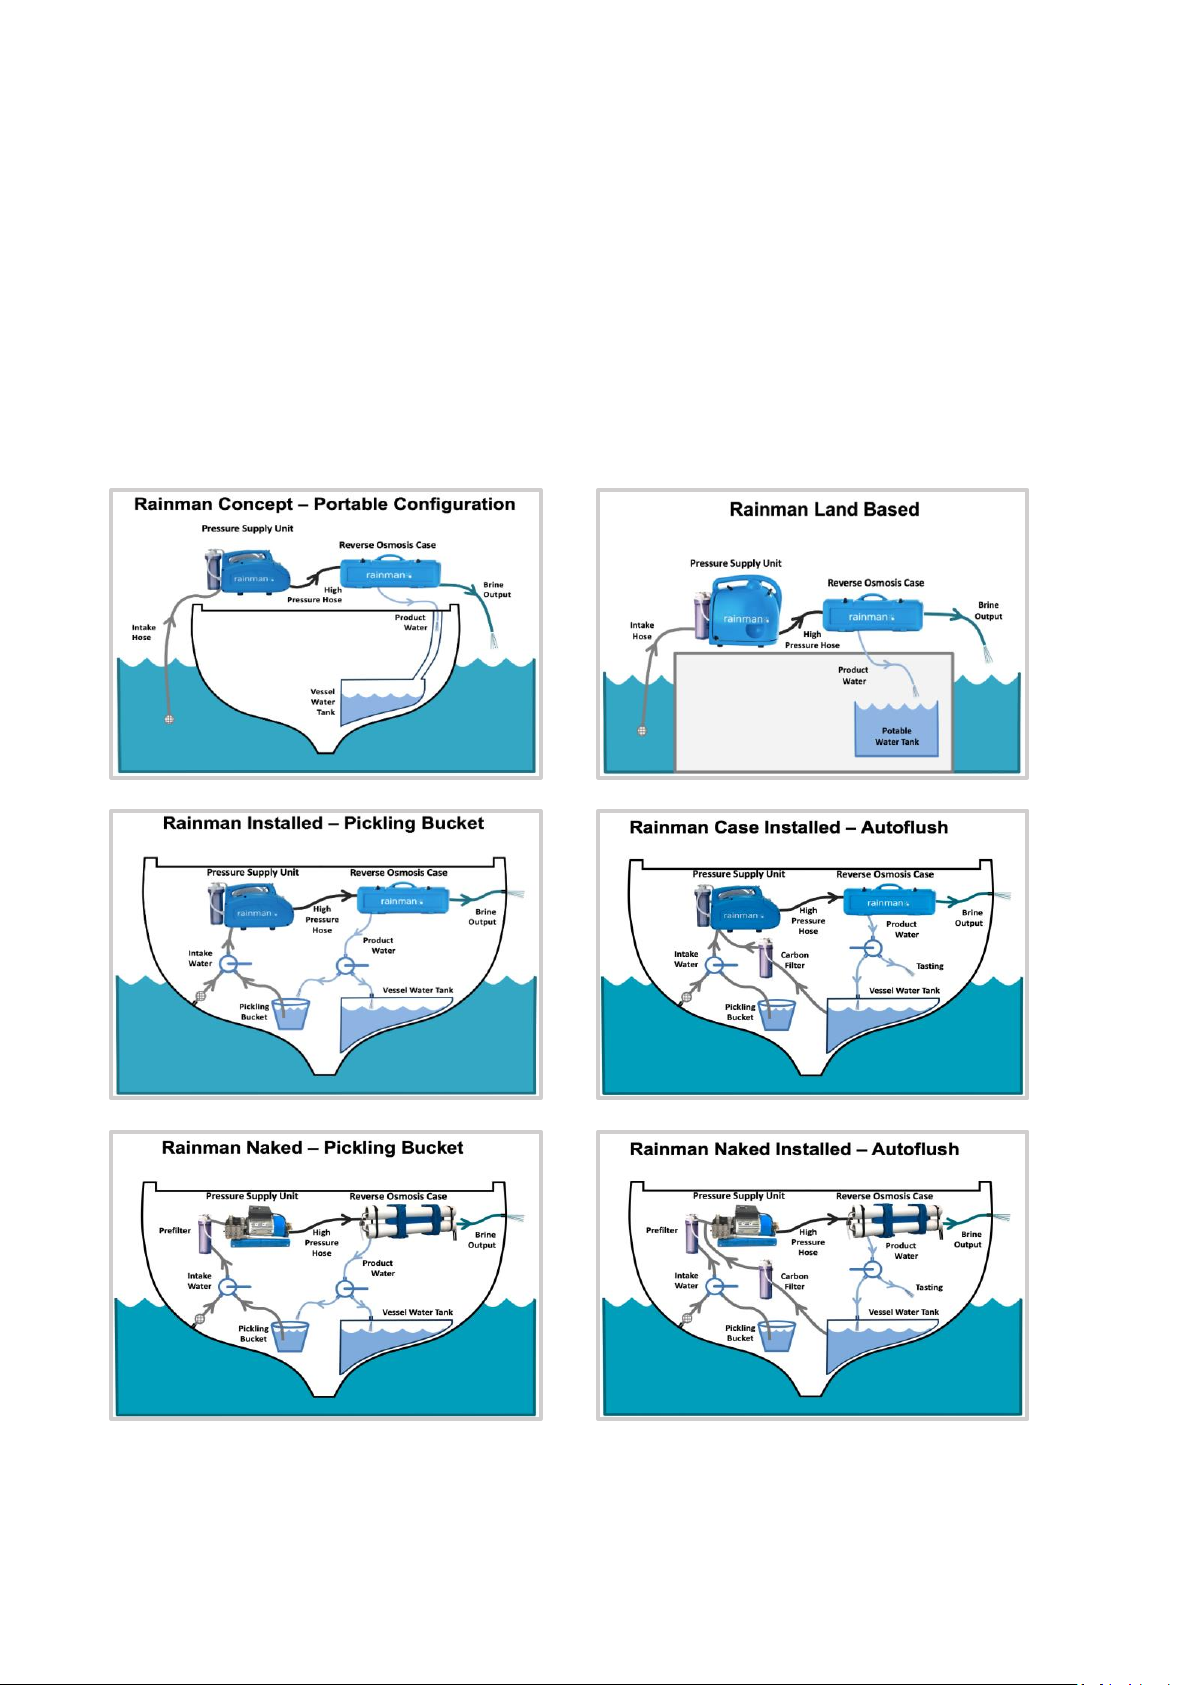
Setup - Portable
1. Place the Rainman Pressure Supply Unit (PSU) and Reverse Osmosis (RO) unit in a stable
place on the deck of your vessel. A swim platform is an ideal location.
Certain positions on some vessels will resonate causing excess noise. In this case, place the
unit on a towel or foam mat.
Make sure the PSU is no more than 2 metres (6 feet) above water level. The unit will work
best operating as close to water level as possible.
Do not use on a swim platform if there is any chance of the unit getting wet.
2. Open the RO unit. Remove and uncoil the three hoses. Remove the white travel plug from
the quick connect on the outside of the PSU. Connect the black high-pressure hose to the
PSU. Make sure the high-pressure hose doesn’t chafe around hard corners.
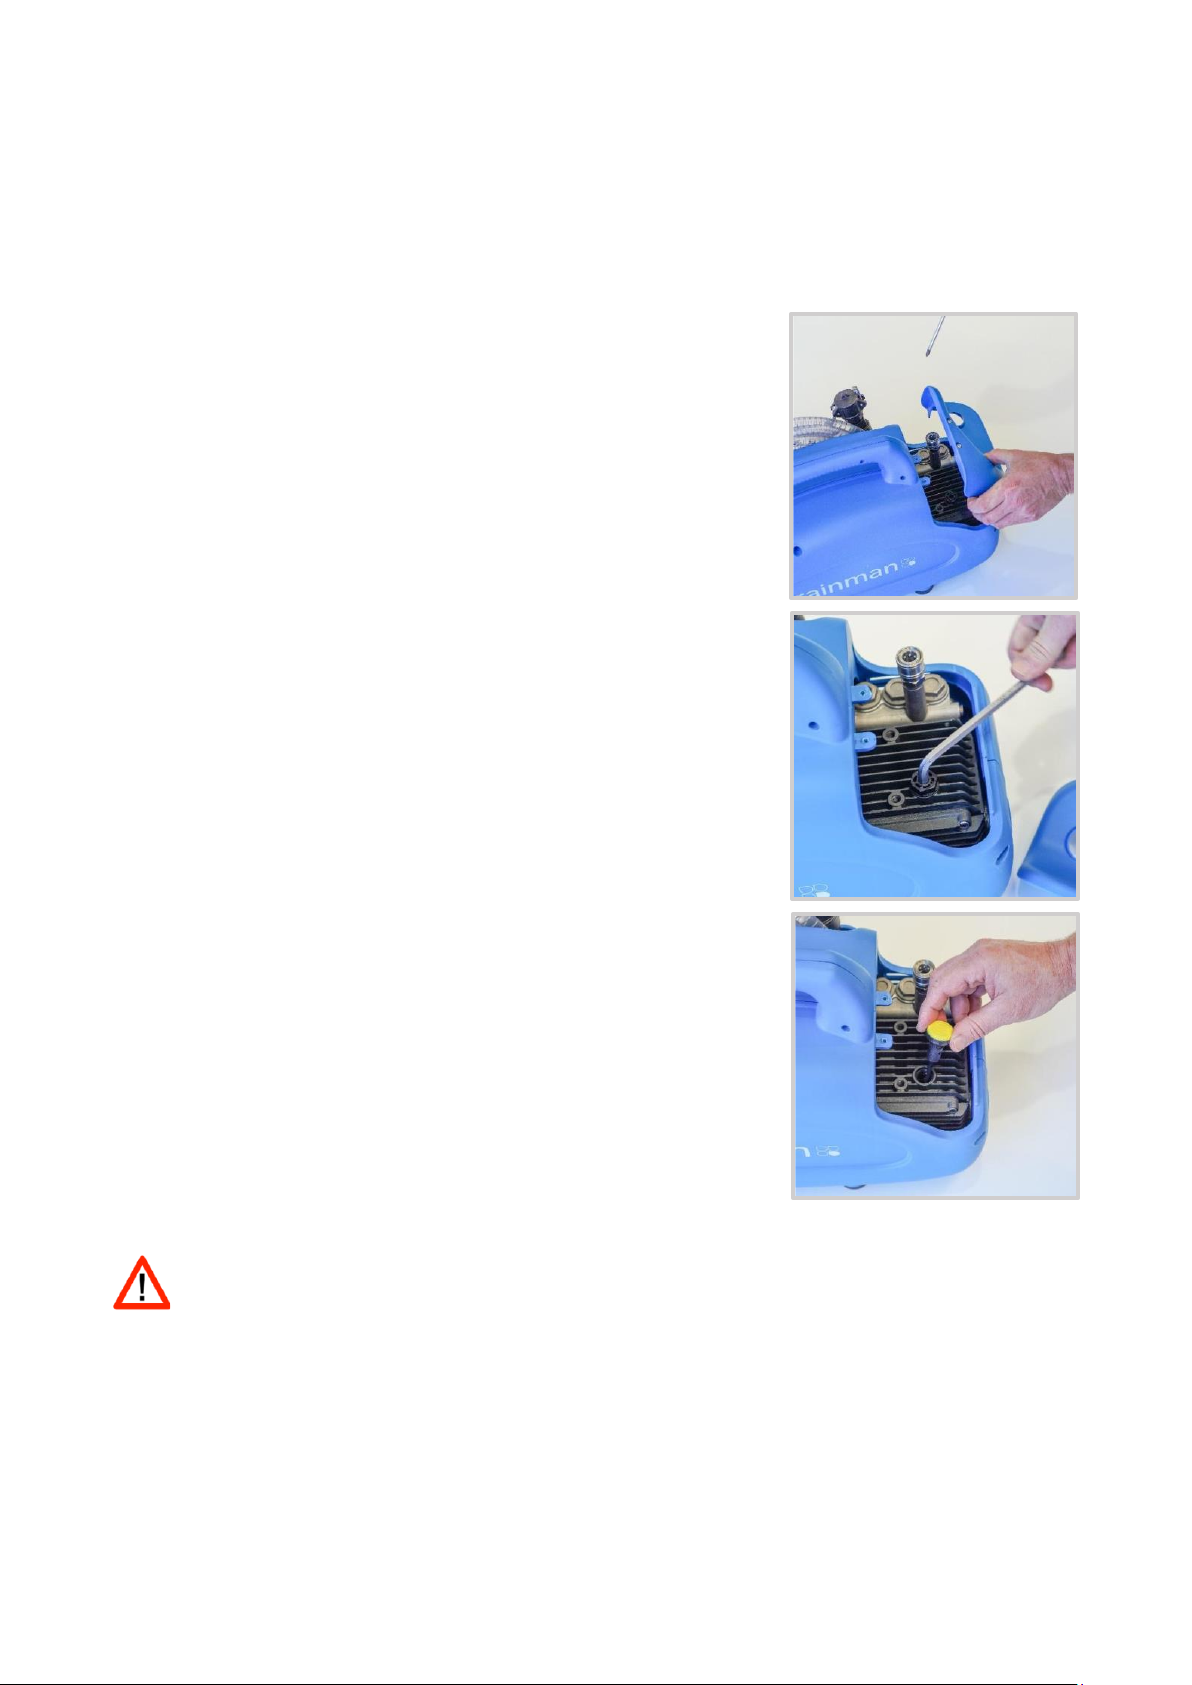
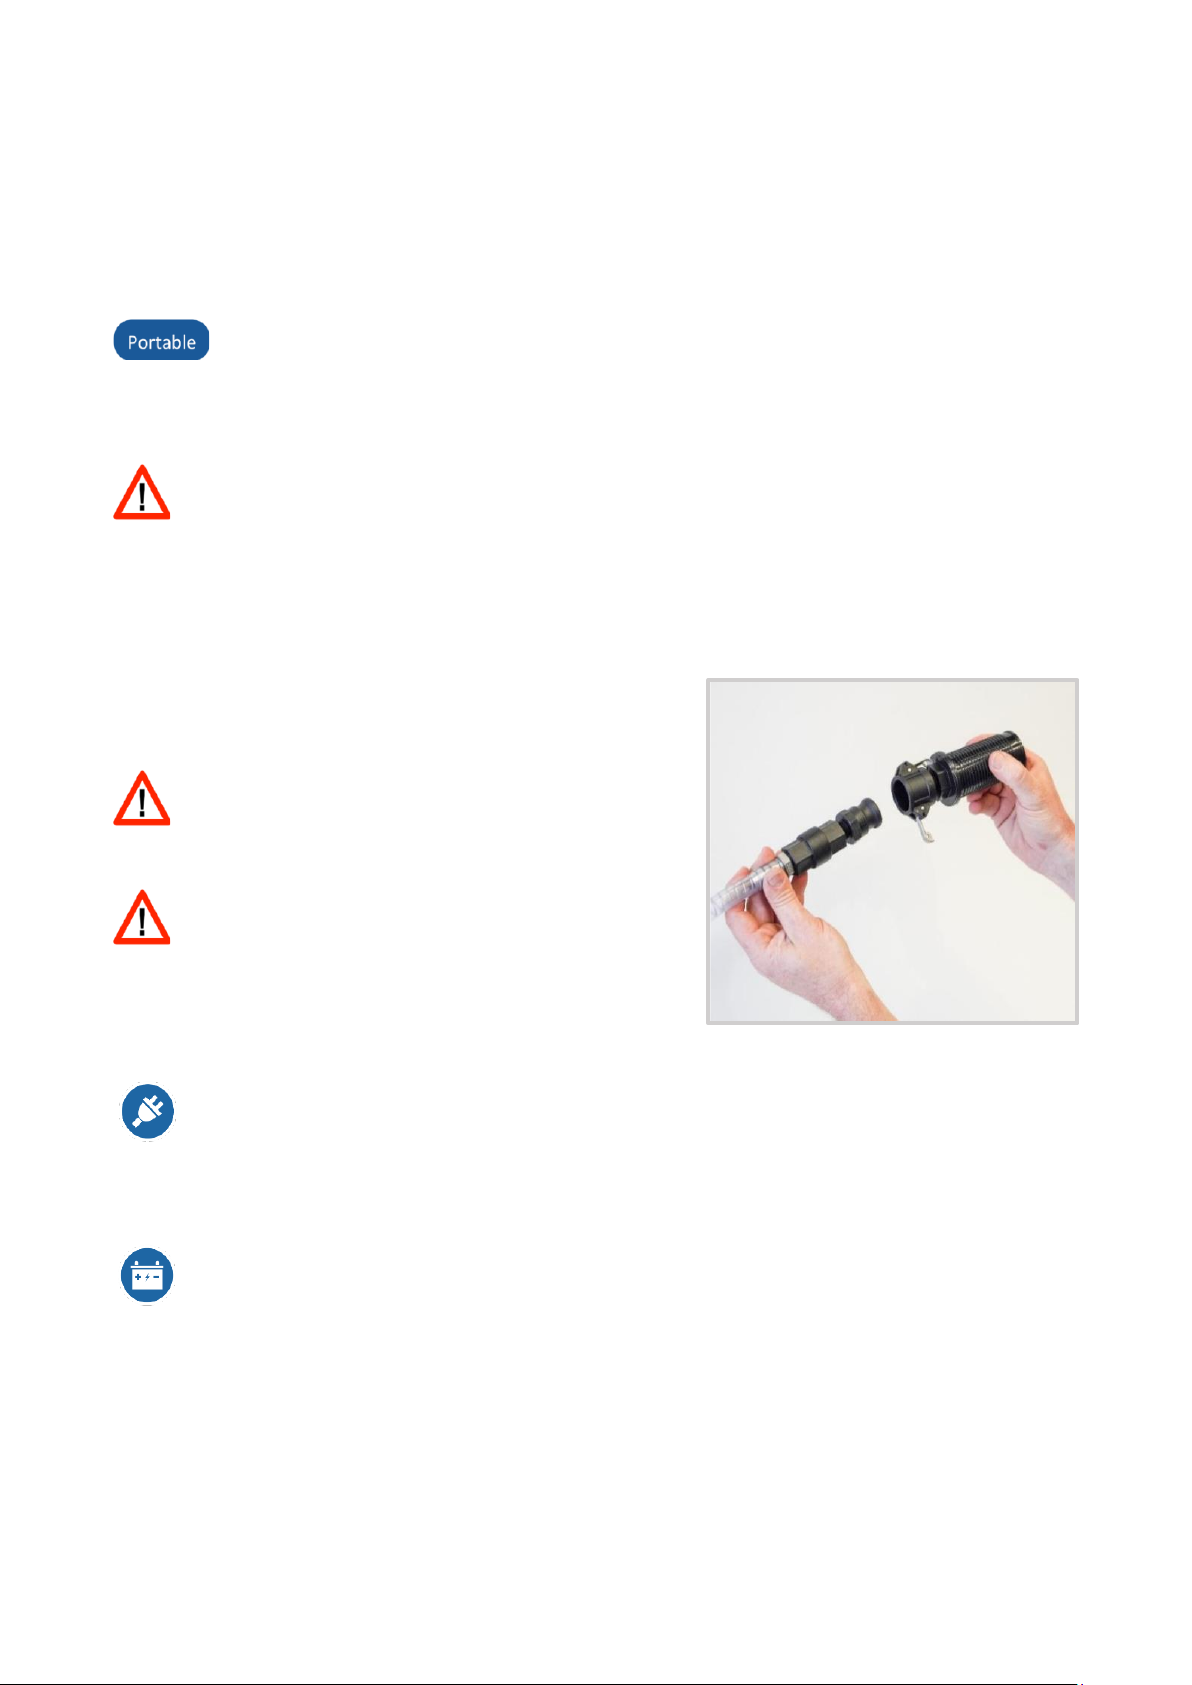
3. Remove the plastic spiral intake hose from the
PSU and remove the cap. Attach the strainer to
the end of the pickup hose.
Starting the unit with the cap in place will
damage the pumps.
4. Place the intake hose in the source water.
Make sure the intake hose is submerged and is
not on the sea floor or among seaweed, which
can cause blockage.
5. Direct the green brine hose overboard.
6. Direct the white product hose overboard. Do not put it into your water tank at this stage.
7. Ensuring the power switch is off, plug the power cord into an AC power source. If using a
generator, make sure it is rated to at least 2000 Watts peak, 1600 Watts continuous power.
If using a Honda portable generator, make sure the eco-throttle is off. Once the Rainman is
running, you can switch the eco-throttle back on. Make sure the voltage and frequency
match the unit (eg. 115VAC/60Hz or 230VAC/50Hz).
Ensuring the power switch/circuit breaker is in the off position, connect the unit to a 12VDC
power supply. During startup, the 12v PSU might draw up to 40A for a brief period and will
settle down to 28-32A in normal operation once the motor and crank case have reached
normal operating temperature. Therefore, it is important that the 12V supply can support
this current draw without a significant drop in voltage.
Cable runs should be kept to a minimum. If an extension cable is used, it must be of sufficient
gauge to minimise voltage drop. Several easy to use ‘voltage drop calculators’ are available
online.
8. Ensure the pressure valve in the RO unit is in an open position (fully anti-clockwise).

Rainman Electric Manual –Page 8
9. To use the flow meter, it needs to be set up
vertically. Remove it from the centre of the RO
assembly by sliding it slightly to the right and lifting
it up as shown.
For normal seawater use, the product water flow
meter need not be used and can be left in its
horizontal position in the RO assembly.
10. Hold the flow meter in a vertical position to read
the flow rate or place it in the stand provided in
the RO assembly.
It is very important to use the product water flow meter if you are desalinating brackish
water, or water that you suspect might be brackish. See the section Desalinating Brackish
Water.
Never allow water containing chlorine to enter your watermaker. That includes town or tap
water, which contains chlorine, or water from a vessel’s tanks, which also may contain
chlorine. Chlorine damages RO membranes.
Never run the unit dry. It will damage the pumps.
Setup - Installed
1. Ensure that the intake 3 way valve is turned to ‘sea water intake’ position. Ensure that any
other valves in the intake plumbing are open and that the strainer is free of blockage.
2. Ensure that the brine output is free from blockage.
3. Ensure that the product water output is directed to ‘test’ and not to a water tank.
4. Set the pressure control valve to fully open position (anti-clockwise).

Rainman Electric Manual –Page 9
Run –Portable or Installed
1. Switch on the Pressure Supply Unit.
2. Water will start flowing out the green brine output water hose. Wait until the stream of
water is free of bubbles. Upon first use, it may take up to 15 seconds to see water come out
of the green hose.
The 12V Pressure Supply Unit requires considerably more time to push all bubbles through
the system. The flow rate of the 12V pump is less than the AC or petrol / gasoline units, which
means that a small amount of air can cause the pump to cavitate. For these reasons 12V
users, particularly upon first use of the system, or when air has entered the system for some
reason, should wait 2-5 minutes for all bubbles to exit the system.
3. Gradually close the pressure control valve on the reverse osmosis unit by turning clockwise
until the pressure gauge reads 55 Bar (800 psi). The correct pressure is indicated by the dark
green area on the pressure gauge dial. For maximum membrane life, take about one minute
to build to full pressure. Within 15 seconds water will start flowing out the white product
hose.
Never exceed 58 Bar (850 psi). If you over-tighten the pressure control valve, the relief valve
in the PSU will release and water will recirculate within the high pressure pump. This
prevents damage to the RO membranes from excess pressure. However, prolonged
operation of the relief valve can damage the unit.
Note: the clear liquid inside the pressure gauge is glycerine. This is to reduce vibration inside
the gauge and ensure long and reliable service. It is normal to see a large bubble inside the
gauge.
If you are using your watermaker for the first time, run for at least half an hour to flush all
preservatives from the system.
4. Every time you use the unit, let fresh water flow out the white product hose for
approximately 60 seconds to clear water or pickle solution that may be in the system. You
should test the product water at this point by taste or with a TDS hydrotester.
5. When the product water is pure, direct the product water hose into a fresh water tank and
allow the system to run uninterrupted until full. Check the pressure gauge approximately
every ten minutes. Although the ideal pressure is 55 Bar (800 psi), the acceptable range is
between 51-58 Bar (750-850 psi). A small amount of pressure drift is normal. Adjust if
necessary.
6. If you are desalinating brackish water, or water that you suspect might be lower salinity than
normal sea water, check that the product water flow rate is no higher than the
recommended maximum for your system using the flow meter. See the section Desalinating
Brackish Water for more details.
Variations in load and voltage will cause variation in rpm of the motor. This in turn causes
variation in pressure. Therefore, the system pressure should be checked and/or adjusted
after changes in voltage occur. These changes may occur when turning on or off an
alternator, switching between battery banks, or because of gradual variations in output from
solar panels and/or batteries.

Rainman Electric Manual –Page 10
7. Use the white 10 metre (30 foot) product water
extension hose to fill multiple tanks without the need to
move the desalination system. Use the push-fit joiner
provided.
Product water flow will vary depending on several
factors, including temperature and salinity. Warmer or
lower salinity water will lead to higher levels of product
water output. Natural membrane variability and other
factors will play a role in product water output.
As a guideline every degree Celsius increase in water
temperature, product water flow increases approximately 3%.
Shutdown - Portable
1. To switch the unit off, first slowly turn the pressure control valve in an anti-clockwise
direction until the pressure reads less than 20 bar (300 psi).
2. Switch off the PSU.
3. If you intend to flush or pickle your system, refer to the Care and Maintenance section below.
4. Replace the cap on the intake hose to keep the unit primed during storage.
5. Replace the rubber boots on each of the other hoses to keep the system clean and prevent
water dripping while stowed.
6. Wait 60 seconds for internal pressure to dissipate before disconnecting the black high-
pressure hose from the Pressure Supply Unit.
7. Rinse the strainer in fresh water before storage.
Switching off the PSU while system is under pressure will cause pressure shock to the
membranes and may damage them.
Shutdown - Installed
1. Slowly turn the pressure control valve in an anti-clockwise direction until the pressure reads
less than 20 bar (300 psi).
2. Switch off the PSU.
3. Turn the product water 3 way valve back to the test position.
4. If you intend to flush or pickle your system, refer to the Care and Maintenance section below.
5. Close the sea water intake valve in accordance with your normal routine.
Switching off the PSU while system is under pressure will cause pressure shock to the
membranes and may damage them.

Rainman Electric Manual –Page 11
Desalinating while under way
Your Rainman watermaker can be operated while under way. Ideally, your unit should be installed and
connected to a through hull that is always underwater at all angles of heel and roll. In this case you can operate
your system as per the normal procedure outlined above.
Depending on hull shape, speed, and the sea state, air bubbles can find their way to a through hull fitting even
if it is well below the water. Some boats, speeds and sea states are not suitable for making water underway.
Several Rainman owners have been
successful in using their portable
watermaker while under way without a
dedicated through hull by trailing the
intake hose in the wash at the stern of
their vessel. To prevent air working into
the system, customers have used either
weights or a down pole to hold the
intake below the surface.
Slide the intake cap up the intake hose
and securing it on board the vessel so
that the end of the intake hose can sink
sufficiently below the surface.
Do not use the detachable suction strainer when towing the intake
hose.
If the intake hose is sucking air, the membranes may be damaged.
Another method of using a portable system whilst underway is by supplying it via a deckwash pump, providing
that it is fed from an intake that is below the waterline at all angles of heal and has a minimum flow rate of 10
litres/min, and a maximum output pressure of 3 bar (45 psi).
If using a portable Rainman whilst underway, make sure the system is placed securely and protected from
getting wet.

Rainman Electric Manual –Page 12
Desalinating brackish water
Brackish water contains some level of salt but is less salty than seawater. Examples include estuaries, harbours
and saline aquifers (bore water). After heavy rain, some sources of seawater can become less saline.
The product water output levels increase when operating in this decreased salinity source water. If the product
water output level goes above the maximum rated output, it may damage the membrane. When desalinating
brackish water, use the product water flow meter.
To desalinate brackish water, follow the setup and run instructions as described above, however, whilst
increasing the pressure, observe the flow meter. If it reaches the rated maximum product water flow for your
system, stop increasing the pressure at this point. Note that in instances of very low salinity water, this
pressure can be as low as 13 bar (200 psi).
When desalinating brackish water, it is important to monitor the fresh water production rate
using the flow meter, so as not to exceed the maximum flow rate for the membranes.
Rated maximum outputs
PSU / RO Type
High Output
Compact
Economy
AC Electric
140 lph (37 gph)
70 lph (18 gph)
70 lph (18 gph)
Petrol / gasoline
140 lph (37 gph)
70 lph (18 gph)
70 lph (18 gph)
12VDC
Not Compatible
Not Compatible
34 lph (9 gph)
Exceeding the maximum fresh water production rate may damage the membranes.
Care and maintenance
Storage
Always store your Rainman watermaker upright in a dry and ventilated area. Dry any obvious moisture off the
unit before putting it away. Water can drip from the unit during storage, particularly in hot weather, and it is
very important that there is sufficient ventilation to avoid creating an overly humid environment.
Always store the pickle solution mix away from the watermaker.
Seawater and/or pickle solution in an unventilated sealed enclosure in the presence of
metals can quickly become a highly corrosive environment, causing anaerobic corrosion to
any metal, including marine grade 316 stainless steel.
These photos show severe anaerobic corrosion to a system that was stored in an
unventilated locker with pickle solution for just 1 month.

Rainman Electric Manual –Page 13
Reverse osmosis membrane care
The Dupont Filmtec membrane or membranes in your Rainman watermaker should last between five and ten
years if well cared for. The primary way RO membranes are damaged is through biological growth or ‘fouling’
on the surface of the membranes. This occurs if seawater is left sitting inside the RO pressure vessels for
extended periods of time.
In temperate climates, growth can occur in less than two weeks, in tropical climates, growth can occur in as
little as a few days. There are no precise times in which fouling can occur, only general guidelines. A
conservative approach to membrane care will maximise membrane life.
Regular use of your watermaker is the most effective prevention against fouling. That means using your system
at least weekly in temperate climates and every few days in the tropics.
If you are not using your watermaker frequently enough to prevent fouling, then it should be flushed with
fresh water or a ‘pickle’ solution.
The following table is a guide to when you might need to flush or pickle:
If unused for 2 days or less
No treatment necessary
If unused for between 2 and 7
days
Fresh water flush
If unused for between 7 and 30
days
Pickle the system
If unused for 30 days +
Pickle the system, discard the pre-filter and drain the pre-filter
housing. Some pre-filters can turn black if stored too long in pickling
solution.
When storing the unit for more than a month, discard the pre-filter and drain the pre-filter housing. Some
marine deposits can continue to decompose even when immersed in a pickling solution.
Fresh water flushing
The Rainman automatic fresh water flush system is an optional unit that automatically flushes your system
with fresh water from your boats water tanks every 7 days. Instructions for the Rainman automatic fresh water
flush system are in Appendix 3.
To flush your system manually:
1. After the fresh water tank is full, use the product water direct from the watermaker to fill an open
container of water with approximately 10 litres (2.5 gallons) of fresh water.
2. Open the pressure control valve completely and switch off the unit. Remove the intake hose from the
source water and place it in the open container of fresh water. Ensuring the pressure control valve
remains open, start the unit and run the entire contents through the system. If the watermaker is
installed, use the 3 way valve on the intake to draw water from the bucket.
3. When the bucket is almost empty, switch off your watermaker, leaving the fresh water in the system.

Rainman Electric Manual –Page 14
Never allow the bucket to run dry while the pump is running or the system may be damaged.
Never flush your watermaker with water containing chlorine, which will damage the
membranes. That includes town or tap water, which often contains chlorine, or water from
a vessel’s tanks, which also may contain chlorine.
Pickling your watermaker
Pickling fills the membrane housings with a preservative that prevents fouling for up to twelve months.
The best preservative is propylene glycol. Since propylene glycol is a liquid, it is impractical and expensive to
ship and store useful amounts. The most commonly used preservative is food grade Sodium Meta-Bisulphate
(SMBS) mixed from powder. 1 kg of SMBS powder is supplied with your system. This section describes pickling
your system. If you wish to use propylene glycol, instructions are included under the next heading, Pickling in
cold climates.
1. To pickle your watermaker, add 3 X 29ml scoops (approx. 3 heaped tablespoons) of SMBS powder to a
10 litre (2.5 gallon) bucket of fresh water, making a 1% solution of SMBS. After opening the pressure
control valve completely, switch off the unit, remove the intake hose from the source water and place
it in the open container of fresh water. Start the system again, keeping the pressure control valve open
and run the entire contents through the system.
2. When the bucket is almost empty, switch off your watermaker, leaving the pickling fluid in the system.
Do not allow the pickling solution bucket to run completely dry while the PSU is running.
When storing the unit for more than a month, discard the pre-filter and drain the pre-filter housing.
Your watermaker is now pickled and can be stored for up to twelve months.
Do not use SMBS solution at greater concentrations than specified above. High
concentrations of SMBS can be corrosive and damage your system.
Avoid inhaling SMBS dust or fumes from SMBS solution. Inhalation of SMBS dust or fumes
can cause respiratory problems.
Always store SMBS in a sealed container, in a dry, ventilated place. Even small amounts of
air-borne moisture in an enclosed space can react with the SMBS and create a corrosive
environment.
Pickling in cold climates
If there is a chance that your watermaker will be exposed to freezing temperatures, you’ll need to pickle the
unit with Propylene Glycol (PG), otherwise known as potable antifreeze. This will prevent damage to the unit
through freezing, as well as preventing biological growth.
There are various brands of potable antifreeze available. It is important to note the percentage of PG in the
product. Potable antifreeze labelled ‘concentrate’ is usually near to 100% PG, however, some brands are pre-
diluted.

Rainman Electric Manual –Page 15
For freeze protection to -15°C (+5°F), use a solution of 30% PG / 70% fresh water.
For freeze protection to -40°C (-40°F), use a solution of 50% PG / 50% fresh water.
Note: if your system has already been pickled with SMBS, flush this out with 10 litres (2.5 gallons) of fresh
water before pickling with PG. Mixing SMBS and PG can damage your system.
1. To pickle your watermaker with potable antifreeze, fill a bucket with 10 litres (2.5 gallons) of PG/fresh
water solution. With the unit switched off, place the intake hose in the open container of potable
antifreeze solution.
2. Start the unit with the pressure control valve wide open. When the bucket is almost empty, switch off
your watermaker, leaving the pickling fluid in the system. Do not allow the pickling solution bucket to
run completely dry while the PSU is running.
Your unit is now protected from freezing and from biological growth for up to twelve months.
Changing the pre-filter
Pre-filters should be changed when they become visibly fouled.
1. To change the pre-filter, place the Pressure Supply Unit (PSU) on the
deck of your vessel. Use the supplied filter wrench to remove the
clear filter housing.
2. Replace the cartridge.
3. Fill the housing with water before screwing it back on. This will aid
the priming of the pump.
Note: the correct type of cartridge is a ‘sediment’ or ‘particle’ type cartridge with a 5 micron
rating. Do not use a carbon cartridge. Some carbon cartridges also function as sediment
filters, and therefore may be labelled as ‘sediment’ cartridges and have a 5 micron rating.
These are NOT suitable for use with your Rainman watermaker as they will restrict flow rates
and cause problems with your high pressure pump.
High pressure pump maintenance
We recommend you change the pump’s crankcase oil annually. It is important to check the oil level from time
to time, particularly if you have had oil leak or spill from the pump at any time.
The correct oil to use is SAE 30 oil. Any grade that ends in 30 is suitable i.e. 5W-30, 10W-30 and 15W-30 are
all suitable. These are the most common grades of automotive engine oil. The equivalent ISO oil grade is
ISO100.
1. Crankcase oil can be drained by removing the stainless hexagonal
plug on the underside of the high-pressure pump.

Rainman Electric Manual –Page 16
2. To refill the crankcase oil, remove the high pressure pump access
panel by undoing 2 screws and then remove the breather plug on
the top of the high-pressure pump. Using a funnel as shown, add
330ml (11.2 ounces) of oil.
3. Oil levels can be checked through the hole in the end of the case. The
oil level should be visible in the clear window.
Lift pump service
The impeller in the brass lift pump is a consumable item. We recommend
inspecting the impeller for signs of wear or cracking every 12 months or 500
hours and replacing if appropriate. The photo on the right shows a heavily
worn impeller.
As a matter of preventative maintenance, replace the impeller every 2
years or 1000 hours.
The lift pump impeller can be accessed through the triangular port after
removing the pre-filter bowl.
1. Using a 7mm socket, remove the 3 bolts and the triangular plate.
2. The impeller can then be removed with needle-nose pliers.

Rainman Electric Manual –Page 17
3. Replace impeller with needle-nose pliers using a rotating motion to
bend the fins and align the cross-screw with the slot in the shaft.
Push-fit instructions
Rainman watermakers use push-fit connectors for brine
waste and product water.
To connect, simply press the hose firmly into the connector.
To remove a hose from the Push-fit, press in the collet as
shown in the diagram.
Shipping
To prepare the unit for shipping:
1. The travel plug must be in the high-pressure pump.
2. The machine should be put inside a plastic bag before it is packed.
Service
If your watermaker exhibits any of the following problems, stop the unit immediately and consult a qualified
technician:
•Unusual noises or vibration.
•The system pressure will not reach 55 bar (800 psi).
•With the unit running, there is no water flow through the green brine output water hose.
•The white product hose continues to make salty tasting water after several minutes at 55 bar (800 psi).
•Major leaks of water in the PSU or the RO unit.
Warranty
Rainman watermaker are guaranteed to be free of manufacturer defects and to perform within the published
specifications for a period of two years from the date of shipment to the original purchaser.
In the event of a warranty claim, Rainman Technology will inspect the defective component and repair or
replace at our discretion. Shipping charges are the responsibility of the purchaser to and from our facility in
Sydney, Australia.
The warranty is void if the system was mis-handled, abused, or not operated/maintained as directed by the
user manual. Consumable items, such as the filter cartridges, lift pump impeller, high pressure pump oil, high
pressure pump packings, or RO membranes are not covered under the terms of this warranty.
Rainman Technology’s liability under this warranty is limited to repair or replacement of our systems to the
original purchaser. Under no circumstances is Rainman Technology liable for consequential damages related
to failure of the system to perform.

Appendix 1 - Troubleshooting
Symptom
Possible Cause
Resolution
HP hose vibration, and/or
Excessive pressure fluctuation,
and/or
System unable to come up to
55 bar (800 psi)
HP pump is starved of water
and is cavitating
A black high pressure hose vibration or the system inexplicably failing to come up to pressure is usually
a simple issue to resolve. 95% of the time the issue is due to a blockage or flow restriction upstream
from the high pressure pump, causing it to cavitate. Several possible causes exist and there are a
number of things to explore. You are looking for items that can restrict flow to the high pressure pump,
so you are searching upstream from there. Check the following:
1. Replace the pre-filter if dirty. A dirty filter can block flow, starving the high pressure pump of water
supply. Do not just clean it as sometimes it can look clean but is still clogged.
2. Ensure the pressure supply unit is within 2 metres (6 feet) of sea level. The system being too high
can make the lift pump work too hard and decrease its effectiveness. This can starve the high
pressure pump of water supply.
3. If you recently changed the pre-filter, did you leave any small parts of the plastic wrapping on it,
which may now be clogging the flow in the filter housing?
4. Ensure the pre-filter cartridge is only a particle filter, not a combination carbon and particle filter.
Some carbon or dual carbon/particle cartridges are labelled with micron ratings and look like
particle filters. These can restrict flow and cause cavitation.
5. The seawater end of the intake hose has a check valve. If something gets in there, it can jam and
restrict flow. It is easy to disassemble and check, but be careful of small parts. Turn both sides of
check valve counter clockwise against each other and it will separate in the middle. Inspect for
items that are small enough to get through the strainer and clog the valve.
6. Is the intake hose damaged and sucking air in? This could be from continual rubbing against a part
of the boat that wore a small hole in the hose. If so, this hose needs repair or replacement.
7. If you have installed your Rainman system, check all items upstream from the pressure supply unit
to see if something is starving the Rainman of free flowing water. We recommend all fittings on
the intake side should be a 3/4’ inner diameter. The Rainman system should have exclusive use of
the through hull while in operation.
8. Inspect the impeller on the lift pump for wear. Replace if necessary.
Table of contents