RAM 08-355-295 User manual

Operating instructions
400 mm (16”)
Ventilateur Mural
Instructions d’utilisation
Ventilador de Pared
Instrucciones de funcionamiento
Wandventilator
Bedienungsanleitung
Ventilatore a Muro
Istruzioni d’uso
Nástěnný Ventilátor
Operativní instrukce

IMPORTANT SAFETY INSTRUCTIONS
When using electrical appliances, basic safety precautions should always
be followed including the following:
Please read all instructions before using this fan.
Use only for intended purpose, as oscillating wall fan for household use.
Install fan only in strict adherence to these instruction, failure to do so
might create a safety hazard or result in property damage.
Do not place fan by open window, immerse fan, plug or cord into water
or spray with liquids.
Do not hang other objects from the fan.
Unplug from outlet when not in use, particularly if cleaning, moving or
otherwise maintaining fan.
Do not place fan or any parts near an open flame,
cooking or other heating appliances.
Do not operate with a damaged cord or plug or after the fan
malfunctions, or has been dropped or damaged in
any manner.
The use of attachments not recommended by the manufacturer may
cause hazards.
Do not operate without fan grill properly in place.
Avoid contact with moving parts.
This product is intended for household use only and
not for commercial or industrial use.
If the supply cord is damaged, it must be replaced by the manufacturer,
its service agent or a similarly qualified person to avoid a hazard.
GB Please read these instructions carefully
WARNING: TO REDUCE THE RISK OF FIRE OR ELECTRICAL SHOCK,
DO NOT USE THIS FAN WITH ANY SOLID STATE FAN SPEED CONTROL DEVICE.
Assembly
1) Remove all parts from the carton:
Motor Assembly (with grill nut, blade knob and control panel).
Grill set (front and rear) and fan blade.
2) Assemble the fan head:
Remove the grill nut and blade knob from the motor assembly. Note the blade knob is reverse
threaded and should be turned clockwise to remove from the motor shaft.
Place the motor assembly on a flat surface with the shaft facing up. Place the rear grill over the
motor shaft and on to the motor assembly, the rear grill handle should be positioned toward the
top of the fan and the two holes in the rear grill should be aligned with the two small plastic pins
on the motor assembly. Thread and tighten the grill nut on to the motor housing, securing the
rear grill to the motor assembly.
Mount the fan blade on to the motor shaft by aligning the D shaped hole in the fan blade with
the D shaped motor shaft. Insert the fan blade as far as possible on to the motor shaft and secure
with the blade knob turning the blade knob counter-clockwise. Do not over tighten.
Mount the front grill cover on to the rear grill cover by fully opening the clips around the outer
edge of the front grill. Align the top center non-opening hook of the front grill with the top
center of the rear grill aligning the 2 holes. Hold the front grill against the rear grill and push the
open clips on the front grill inward until the front grill is secure against the rear grill.
To complete this assembly screw the 2 halves together using the screw and nut provided.
The fan head assembly is now complete.
Front grill hook
Front grill
clip (4)
Front grill
Blade knob
Fan blade
Handle
Rear grill
Grill nut
Motor assembly
Control panel
Motor shaft
Hang front grill hook over
top of rear grill
Push clip to assemble grill
Screw hole Screws

GB
Please read these instructions carefully
Operation
The fan must be mounted on a solid flat wall using the fixtures
provided, and in the correct orientation – as per the picture on the
front of this manual.
Plug the power cord into a compliant 220-240 volt AC wall outlet.
Turn the fan on and select the desired running speed with the speed
control switch located at the front of the fan below the front grill, or the
right-hand pull cord below the unit
The fan’s direction can be adjusted relative to the base by loosening
the thumb screw at the bottom of the motor assembly, and rotating
the fan head.
To set the fan into oscillation, pull the left-hand pull cord below the
unit, the fan head will pivot side-to-side. To stop oscillation, pull the
cord again.
Care, Cleaning & Storage
The fan blade and grill set should be cleaned regularly for most efficient
operation. Unplug the fan, then reverse the assembly procedure to
remove those parts from the motor assembly before cleaning, wipe with
a damp cloth, then towel dry.
Never immerse any fan components in water, wipe the motor housing
only with a dry or lightly moist cloth, then immediately towel dry.
Always store the fan in a cool dry location.
Name Sp (mm) Rated Voltage (V) Rated Frequency (Hz ) Rated Power (W)
Wall Fan 400 220-240 50 40
Major Parameters
WARRANTY:
Valid for one year from date of purchase
This warranty applies only to repair or replacement of product found
to be defective in material or workmanship. This warranty does not
apply to damage resulting from commercial, abusive or unreasonable
use. Supplier is not liable for incidental or consequential damage of any
nature. This warranty applies only to original purchase of this product.
All instructions should be read before attempting to use this product.
At suppliers discretion, we will repair or replace this products if it is found
to be defective in material or workmanship. Defective products should
be returned to place of purchase in accordance with the store policy.
This warranty does not cover damage resulting from any unauthorized
attempt to repair or from any use not in accordance with this manual.
The provisions of this warranty are in addition to and not modification or
subtraction from the statutory warranties and other rights and remedies
contained in any applicable legislation and to the extent that any such
provision, purports to disclaim, exclude or limit any such statutory
warranties or other rights or remedies, such provisions shall be deemed
to be amended to the extent necessary to comply therewith.
WARNING!
·If the supply cord is damaged, it must be replaced by the
manufacturer, its service agent or similarly qualified persons
in order to avoid a hazard.
·This appliance is not intended for use by persons (including
children) with reduced physical, sensory or mental capabilities,
or lack of experience and knowledge, unless they have been given
supervision or instruction concerning use of the appliance by a
person responsible for their safety.
·Children should be supervised to ensure that they do not
play with the appliance.
rapidairmovement.co.uk
RAM is a HydroGarden brand. HydoGarden Ltd., 2 Progress Way, Binley, Coventry, CV3 2NT, UK | www.hydrogarden.com | Made in PRC
Help the environment by disposing of your product responsibly. The wheelie bin symbol
indicates the product must not be disposed of in the domestic waste as it contains
substances which can be damaging to the environment and health. Check your local
authority for recycling points and advice.

FR Veuillez lire attentivement les instructions suivantes
CONSIGNES DE SÉCURITÉ IMPORTANTES
Lorsque vous utilisez un appareil électrique, vous devez toujours prendre
des précautions élémentaires pour garantir la sécurité, comme celles
indiquées ci-dessous.
Veuillez lire toutes les instructions avant d’utiliser ce ventilateur.
Ne l’utilisez qu’aux fins prévues : ventilateur oscillant à usage domestique.
Suivez strictement les instructions d’installation du ventilateur.
Le non-respect de ces instructions peut entraîner un risque pour la
sécurité ou des dommages matériels.
Ne placez pas le ventilateur près d’une fenêtre ouverte. Ne plongez pas le
ventilateur, la fiche ou le cordon d’alimentation dans l’eau, et ne pulvérisez
pas de liquide dessus.
Ne suspendez aucun objet au ventilateur.
Débranchez le ventilateur lorsque vous ne l’utilisez pas, et surtout lorsque
vous le nettoyez, le déplacez ou effectuez des tâches de maintenance.
Ne placez ni le ventilateur ni ses composants près d’une flamme, d’un
appareil de cuisson ou de toute autre source de chaleur.
N’utilisez pas le ventilateur si le cordon d’alimentation ou la fiche sont
endommagés, s’il ne fonctionne pas correctement ou s’il est tombé ou
présente des dommages de quelque nature que ce soit.
L’utilisation d’accessoires non recommandés par le fabricant peut
présenter un risque.
N’utilisez pas le ventilateur si sa grille de protection n’est pas en place.
Évitez tout contact avec les pièces en mouvement.
· Ce produit est destiné uniquement à un usage ménager. Toute utilisation
commerciale ou industrielle est déconseillée.
Si le cordon d’alimentation est endommagé, il doit être remplacé par le
fabricant, son personnel de maintenance ou toute personne dûment
qualifiée afin d’éviter tout risque.
AVERTISSEMENT : AFIN DE RÉDUIRE LE RISQUE D’INCENDIE OU DE DÉCHARGE
ÉLECTRIQUE, N’UTILISEZ CE VENTILATEUR AVEC AUCUN DISPOSITIF À
SEMI-CONDUCTEURS DE CONTRÔLE DE LA VITESSE DU VENTILATEUR.
Montage
1) Sortez toutes les pièces du carton :
Bloc moteur (avec l’écrou de la grille, le bouton de l’hélice et le panneau de commande)
Bloc grille (avant et arrière) et hélice du ventilateur
2) Montez la tête du ventilateur :
Retirez l’écrou de la grille et le bouton de l’hélice du bloc moteur. Notez que le bouton de
l’hélice a un filetage inversé et doit être tourné dans le sens des aiguilles d’une montre pour être
retiré de l’arbre du moteur.
Placez le bloc moteur sur une surface plane avec l’arbre pointant vers le haut. Placez la grille
arrière sur l’arbre du moteur et sur le bloc moteur ; la poignée de la grille arrière doit pointer
vers le haut du ventilateur et les deux trous dans la grille arrière doivent être alignés sur les deux
petites broches en plastique situées sur le bloc moteur. Vissez et serrez l’écrou de la grille sur le
boîtier du moteur pour fixer la grille arrière au bloc moteur.
Montez l’hélice du ventilateur sur l’arbre du moteur en alignant le trou en forme de D de l’hélice
du ventilateur sur l’arbre du moteur en forme de D. Insérez l’hélice du ventilateur aussi loin que
possible sur l’arbre du moteur, puis fixez-la à l’aide du bouton de l’hélice en tournant ce dernier
dans le sens contraire des aiguilles d’une montre. Ne serrez pas trop fort.
Montez la grille avant sur la grille arrière en ouvrant complètement les clips autour du bord
extérieur de la grille avant. Alignez le crochet fixe situé en haut et au centre de la grille avant
sur le haut et le centre de la grille arrière aligner les 2 trous. Tenez la grille avant contre la grille
arrière et poussez les clips ouverts vers l’intérieur sur la grille avant jusqu’à ce que celle-ci soit
fixée à la grille arrière. Pour finaliser l’ensemble, assemblez les 2 moitiés en utilisant le boulon et
l’écrou fournis.
Le montage de la tête du ventilateur est maintenant terminé.
Crochet de la grille avant
Clip de la
grille avant (4)
Front grill
Bouton de
l’hélice
Hélice du ventilateur
Poignée
Grille arrière
Écrou de
la grille
Bloc moteur
Panneau de
commande
Arbre du moteur
Placer le crochet de la grille avant
sur le dessus de la grille arrière
Pousser le clip pour monter
la grille
Trou de vis Vis

FR
Veuillez lire attentivement les instructions suivantes
Fonctionnement
Le ventilateur doit être monté sur un mur plat et solide à l’aide des
fixations fournies et dans le bon sens, conformément à l’illustration
figurant sur la couverture de ce manuel.
Branchez le cordon d’alimentation dans une prise murale de
220-240 V CA.
Mettez le ventilateur en marche et choisissez la vitesse de
fonctionnement souhaitée à l’aide de l’interrupteur de commande de
la vitesse situé sur le devant du ventilateur sous la grille avant ou du
cordon à tirer situé à droite sous l’appareil.
La direction du ventilateur par rapport à la base peut être réglée en
desserrant la vis de serrage située en bas du bloc moteur, puis en faisant
tourner la tête du ventilateur.
Pour faire osciller le ventilateur, tirez le cordon situé à gauche sous
l’appareil. La tête du ventilateur pivotera dans le sens latéral. Pour arrêter
le ventilateur, tirez à nouveau le cordon.
Entretien, nettoyage et stockage
L’hélice du ventilateur et le bloc grille doivent être nettoyés
régulièrement pour un fonctionnement plus efficace. Débranchez le
ventilateur, puis suivez la procédure de montage dans le sens inverse
pour retirer ces pièces du bloc moteur avant de les nettoyer. Pour ce
faire, utilisez un linge humide, puis essuyez bien avec une serviette.
Ne plongez jamais aucune partie du ventilateur dans l’eau. Nettoyez
le boîtier du moteur avec un linge sec ou légèrement humide, puis
essuyez immédiatement avec une serviette.
Rangez toujours le ventilateur dans un endroit frais et sec.
Nom Taille (mm) Tension nominale (V) Fréquence nominale (Hz) Puissance nominale (W)
Ventilateur Mural 400 220-240 50 40
Principaux paramètres
GARANTIE : Valide pendant un an à partir
de la date d’achat
Cette garantie ne s’applique qu’à la réparation ou au remplacement
d’un produit reconnu défectueux en raison d’un vice de matériau ou de
fabrication. Cette garantie ne s’applique pas aux dommages découlant
d’une utilisation commerciale, abusive ou déraisonnable. Le fournisseur
n’est pas responsable des dommages accessoires ou indirects de
quelque nature que ce soit. Cette garantie ne s’applique qu’à l’achat
initial de ce produit.
Toutes les instructions doivent être lues avant de tenter d’utiliser
ce produit.
· À la discrétion du fournisseur, nous réparerons ou remplacerons ce
produit s’il est reconnu défectueux en raison d’un vice de matériau ou
de fabrication. Les produits défectueux doivent être retournés au lieu
d’achat conformément à la politique du magasin.
Cette garantie ne couvre pas les dommages découlant d’une tentative
non autorisée de réparation ou de toute utilisation non conforme à
ce manuel.
Les dispositions de cette garantie s’appliquent en addition, et non en
modification ou soustraction des garanties légales et autres droits et
recours figurant dans toute législation applicable. En outre, dans la
mesure où une telle disposition prétend nier, exclure ou limiter toute
garantie légale ou autre droit ou recours, ces dispositions doivent être
réputées être modifiées dans la mesure nécessaire pour s’y conformer.
AVERTISSEMENT :
·Si le cordon d’alimentation est endommagé, il doit être remplacé
par le fabricant, son personnel de maintenance ou toute personne
dûment qualifiée afin d’éviter tout risque.
·Cet appareil n’est pas destiné à être utilisé par des personnes
(y compris des enfants) avec des capacités physiques, sensorielles
ou mentales réduites, ou un manque d’expérience et de
connaissances, à moins qu’elles ne soient sous la supervision ou
aient reçu des instructions sur l’utilisation de l’appareil d’une
personne responsable de leur sécurité.
·Les enfants doivent faire l’objet d’une surveillance afin de veiller
à ce qu’ils ne jouent pas avec l’appareil.
rapidairmovement.co.uk
RAM est une marque d’HydroGarden. HydroGarden Ltd., 2 Progress Way, Binley, Coventry, CV3 2NT, Angleterre | www.hydrogarden.com | Fabriqué en PRC
Pour préserver l’environnement, votre produit doit être mis au rebut de façon responsable. Le symbole
représentant une poubelle à roulettes indique que le produit ne doit pas être mis au rebut avec les
déchets domestiques car il contient des substances nocives pour l’environnement et la santé. La liste des
points de recyclage est disponible auprès de votre municipalité.

ES Lea con atención las instrucciones
INSTRUCCIONES IMPORTANTES DE SEGURIDAD
Siga siempre las precauciones básicas de seguridad cuando utilice
aparatos eléctricos, entre las que cabe destacar:
Lea todas las instrucciones antes de usar este ventilador.
Use este dispositivo exclusivamente para el fin previsto: como
ventilador de pared oscilante para uso doméstico.
Instale el ventilador siguiendo estrictamente estas instrucciones;
en caso contrario, podría crearse un riesgo para la seguridad o
provocarse daños materiales.
No coloque el ventilador junto a ventanas abiertas, no sumerja el
ventilador, el enchufe o el cable en agua ni los rocíe con líquidos.
No cuelgue otros objetos del ventilador.
Desenchufe el ventilador de la toma de corriente cuando no lo
utilice, especialmente si lo limpia, mueve o revisa.
No coloque el ventilador ni partes del mismo cerca de una llama
abierta, aparatos de cocción u otros equipos que desprendan calor.
No ponga en marcha el ventilador con el cable o el enchufe dañados
o si presenta alguna avería, se ha caído o sufrido algún daño.
El uso de accesorios no recomendados por el fabricante puede
resultar peligroso.
No accione el ventilador sin la rejilla colocada correctamente en su
posición. Evite el contacto con las piezas móviles.
Este producto está destinado exclusivamente para uso doméstico y
no para uso comercial ni industrial.
Si el cable de alimentación está dañado, debe ser sustituido por
el fabricante, su agente de servicio o una persona cualificada para
prevenir riesgos.
ADVERTENCIA: PARA REDUCIR EL RIESGO DE INCENDIO O DE DESCARGA
ELÉCTRICA, NO USE ESTE VENTILADOR CON NINGÚN DISPOSITIVO DE CONTROL
DE VELOCIDAD DE ESTADO SÓLIDO.
Montaje
1) Saque todas las piezas de la caja de cartón:
Conjunto del motor (con tuerca de rejilla, perilla del aspa y panel de control)
Juego de rejillas (frontal y trasera) y aspa del ventilador
2) Montaje del cabezal del ventilador:
Retire la tuerca de la rejilla y la perilla del aspa del conjunto del motor. Tenga en cuenta que la
rosca de la perilla del aspa es inversa, por lo que deberá girarla en el sentido de las agujas del reloj para
quitarla del eje del motor.
Ponga el conjunto del motor sobre una superficie plana con el eje hacia arriba. Coloque la rejilla trasera
sobre el eje del motor y en el conjunto del motor, el asa de la rejilla trasera debe quedar situada hacia la
parte superior del ventilador y los dos agujeros de la rejilla trasera deben quedar alineados con los dos
pequeños pasadores de plástico del conjunto del motor. Enrosque y apriete la tuerca de la rejilla a la
carcasa del motor, fijando la rejilla trasera al conjunto del motor.
Monte el aspa del ventilador en el eje del motor alineando el agujero en forma de D del aspa con el eje del
motor en forma de D. Introduzca el aspa del ventilador tanto como sea posible en el eje del motor y fíjelo
con la perilla girándola en el sentido contrario de las agujas del reloj. No apriete demasiado.
Monte la cubierta de la rejilla frontal sobre la cubierta de la rejilla trasera abriendo totalmente los clips
situados alrededor del borde exterior de la rejilla frontal. Alinee el gancho fijo del centro superior de la
rejilla frontal con el centro superior de la rejilla trasera alineando los 2 agujeros. Sujete la rejilla frontal
contra la rejilla trasera y empuje hacia dentro los clips abiertos de la rejilla frontal hasta que ésta quede
bien fijada a la rejilla trasera. Para completar este ensamblaje, atornille las 2 mitades usando el tornillo y la
tuerca suministrados.
De este modo concluye el montaje del cabezal del ventilador.
Gancho de la rejilla frontal
Clip de
la rejilla
frontal (4)
Rejilla frontal
Perilla del
aspa
Aspa del ventilador
Asa
Rejilla trasera
Tuerca de
la rejilla
Conjunto del motor
Panel de control
Eje del motor
Cuelgue el gancho de la
rejilla frontal sobre la parte
superior de la rejilla trasera
Presione el clip para
instalar la rejilla
Orificio del tornillo Tornillo

ES
Lea con atención las instrucciones
Funcionamiento
El ventilador debe instalarse en una pared plana sólida con los accesorios
suministrados y en la orientación correcta, tal como se muestra en la
imagen de la portada de este manual.
Enchufe el cable de alimentación en una toma de corriente de 220-240
voltios CA compatible.
Encienda el ventilador y seleccione la velocidad que desea con el
conmutador de control de velocidad situado en la parte delantera del
ventilador bajo la rejilla frontal, o con el cordón de tiro derecho situado
bajo la unidad.
La dirección del ventilador se puede regular con relación a la base
aflojando el tornillo moleteado situado en la parte inferior del conjunto
del motor y girando el cabezal del ventilador.
Para configurar el ventilador en modo de oscilación, tire del cordón de
tiro izquierdo situado bajo la unidad, el cabezal del ventilador girará de
un lado a otro. Para detener la oscilación, vuelva a tirar del cordón.
Cuidados, limpieza y almacenamiento
El aspa del ventilador y el juego de rejillas deben limpiarse
periódicamente para un funcionamiento más eficiente. Desenchufe el
ventilador e invierta el procedimiento de montaje para retirar las piezas
del conjunto del motor antes de limpiarlas con un paño húmedo y
secarlas con un trapo.
No sumerja nunca ningún componente del ventilador en agua, limpie
la carcasa del motor únicamente con un paño seco o ligeramente
humedecido y luego séquela inmediatamente con un trapo.
Almacene siempre el ventilador en un lugar frío y seco.
Nombre Tamaño (mm) Tensión nominal (V) Frecuencia nominal (Hz) Potencia nominal (W)
Ventilador de Pared 400 220-240 50 40
Parámetros principales
GARANTÍA: Válida durante un año desde
la fecha de compra
Esta garantía cubre solo la reparación o sustitución del producto por
defectos de materiales o fabricación. Esta garantía no cubre los daños
derivados de un uso comercial, indebido o inaceptable. El proveedor
no se hace responsable de daños fortuitos o indirectos de cualquier
naturaleza. Esta garantía cubre únicamente la compra original de este
producto.
Antes de intentar utilizar este producto se deben leer todas
las instrucciones.
Este producto se reparará o sustituirá, a elección del proveedor, si
se detectan defectos de materiales o de fabricación. Los productos
defectuosos deben ser devueltos al establecimiento de compra de
acuerdo con la política de la tienda.
Esta garantía no cubre los daños derivados de cualquier intento
no autorizado de reparación o de cualquier uso no autorizado en
este manual.
Las disposiciones de esta garantía constituyen un añadido, no una
modificación o sustracción, de las garantías legales y otros derechos
y recursos contemplados en cualquier legislación aplicable y, en caso
de que estas disposiciones supongan una exoneración, exclusión o
limitación de dichas garantías legales u otros derechos y recursos, se
considerarán modificadas en la medida que se estime necesario para
cumplir con la legislación.
¡ADVERTENCIA!
·Si el cable de alimentación está dañado, debe ser sustituido por
el fabricante, su agente de servicio o una persona cualificada para
prevenir riesgos.
·Este aparato no está diseñado para ser utilizado por personas
(incluidos los niños) con capacidades físicas, sensoriales o mentales
limitadas, ni por personas sin experiencia o conocimientos
técnicos, salvo que cuenten, por intermediación de una persona
responsable de su seguridad, de una vigilancia o de instrucciones
preliminares concernientes a la utilización del aparato.
·Es conveniente vigilar a los niños para evitar que jueguen con
este aparato.
rapidairmovement.co.uk
RAM es una marca HydroGarden. HydoGarden Ltd., 2 Progress Way, Binley, Coventry, CV3 2NT, UK | www.hydrogarden.com | Hecho en PRC
Respete el medio ambiente haciendo un uso responsable de su producto. El símbolo del contenedor con ruedas
tachado indica que el producto no debe desecharse en la basura doméstica, ya que contiene sustancias que
pueden dañar el medio ambiente y la salud. Consulte a las autoridades locales sobre los puntos limpios y los
consejos de reciclaje.

DE Bitte lesen Sie diese Anleitung sorgfältig durch
WICHTIGE SICHERHEITSHINWEISE
Bei der Verwendung von Elektrogeräten sollten immer grundlegende
Sicherheitsvorkehrungen beachtet werden, wie unter anderem:
Lesen Sie vor der Verwendung dieses Ventilators die gesamte Anleitung.
Verwenden Sie den Ventilator nur für den vorgesehenen
Verwendungszweck als oszillierenden Wandventilator für den
Haushaltsgebrauch.
Installieren Sie den Ventilator unter strengster Einhaltung dieser
Anleitung, da andernfalls Sicherheitsrisiken oder Sachschäden
entstehen können.
Legen Sie den Ventilator nicht an einem offenen Fenster ab, tauchen Sie
den Ventilator, den Stecker oder das Kabel nie in Wasser und besprühen
Sie diese nie mit Flüssigkeiten.
Hängen Sie keine anderen Gegenstände an den Ventilator.
Ziehen Sie den Stecker aus der Steckdose, wenn der Ventilator nicht
benutzt wird, insbesondere wenn Sie diesen reinigen, bewegen oder auf
eine andere Weise warten.
Bringen Sie den Ventilator oder Teile davon nie in die Nähe von offenem
Feuer, Koch- oder Heizgeräten.
Benutzen Sie den Ventilator nicht, wenn ein Kabel oder Stecker
beschädigt ist, nachdem eine Störung des Ventilators aufgetreten ist
oder nachdem dieser heruntergefallen ist oder auf irgendeine Weise
beschädigt wurde.
Die Verwendung von Anbauteilen wird vom Hersteller nicht empfohlen
und kann zu Sicherheitsrisiken führen.
Betreiben Sie den Ventilator nicht ohne ordnungsgemäß angebrachtes
Schutzgitter. Vermeiden Sie Kontakt zu beweglichen Teilen.
· Dieses Produkt ist nur für den Haushaltsgebrauch vorgesehen und nicht
für den gewerblichen oder industriellen Gebrauch.
· Wenn das Stromkabel beschädigt ist, muss es vom Hersteller, dessen
Dienstleister oder ähnlich qualifizierten Personen ersetzt werden, um
jegliches Sicherheitsrisiko zu vermeiden.
WARNUNG: UM DIE GEFAHR EINES BRANDES ODER STROMSCHLAGS ZU
VERRINGERN, DARF DIESER VENTILATOR NICHT MIT EINER KONTAKTLOSEN
VENTILATORGESCHWINDIGKEITSSTEUERUNG VERWENDET WERDEN.
Montagezeichnung
1) Nehmen Sie alle Teile aus dem Karton:
· Motorbaugruppe (mit gittermutter, halteknopf für die flügel und bedienfeld)
· Gitterbausatz (vorderes und hinteres gitter) und ventilatorflügel
2) Montieren Sie den Kopf des Ventilators:
· Entfernen Sie die Gittermutter und den Haltknopf für die Flügel von der Motorbaugruppe.
Beachten Sie, dass der Halteknopf für die Flügel über ein umgekehrtes Gewinde verfügt und
im Uhrzeigersinn gedreht werden muss, um von der Motorwelle entfernt zu werden.
· Legen Sie die Motorbaugruppe mit der Welle nach oben auf eine flache Oberfläche. Führen Sie das hintere
Schutzgitter über die Motorwelle und setzen Sie es auf die Motorbaugruppe. Der Griff des hinteren Schutzgitters
sollte sich dabei an der Oberseite des Ventilators befinden und die zwei Löcher im hinteren Schutzgitter sollten an
den zwei kleinen Kunststoffstiften an der Motorbaugruppe ausgerichtet sein. Schrauben Sie die Gittermutter auf
das Motorgehäuse und drehen Sie diese fest, um das hintere Schutzgitter an der Motorbaugruppe zu befestigen.
· Montieren Sie die Ventilatorflügel auf der Motorwelle, indem Sie das D-förmige Loch in den Ventilatorflügeln an
der D-förmigen Motorwelle ausrichten. Schieben Sie die Ventilatorflügel so weit wie möglich auf die Motorwelle
und sichern Sie diese mit dem Halteknopf für die Flügel, indem Sie den Halteknopf entgegen dem Uhrzeigersinn
drehen. Nicht zu fest anziehen.
· Montieren Sie das vordere Schutzgitter auf dem hinteren Schutzgitter, indem Sie die Klemmen an der Außenkante
des vorderen Schutzgitters vollständig öffnen. Richten Sie den sich nicht öffnenden Haken oben in der Mitte des
vorderen Schutzgitters an der oberen Mitte des hinteren Schutzgitters aus ausrichten der 2 Löcher. Halten Sie
das vordere Schutzgitter gegen das hintere Schutzgitter und drücken Sie die offenen Klammern am vorderen
Schutzgitter nach innen, bis das vordere Schutzgitter am hinteren Schutzgitter befestigt ist. Um die Montage zu
abschliessen, verschrauben Sie beide Hälfte mit der beiliegenden Schraube und Mutter fest.
· Der Ventilatorkopf ist jetzt fertig montiert.
Den haken des vorderen
schutzgitters über der
oberseite des hinteren
schutzgitters einhängen
Klemme drücken, um gitter
zu montieren
Haken vorderes schutzgitter
Klemmen
(4) vorderes
schutzgitter
Vorderes
schutzgitter
Halteknopf
für flügel
Ventilatorflügel
Griff
Hinteres
schutzgitter
Gittermutter
Motorbaugruppe
Bedienfeld
Motorwelle
Schraubenloch Schraube

DE
Bitte lesen Sie diese Anleitung sorgfältig durch
Betrieb
Der Ventilator muss an einer stabilen, flachen Wand mit den
mitgelieferten Befestigungen und in der richtigen Ausrichtung - wie
auf der Abbildung auf der Vorderseite dieser Anleitung dargestellt -
montiert werden.
Stecken Sie den Netzstecker in eine ordnungsgemäße Wandsteckdose,
220-240 V, Wechselstrom.
Schalten Sie den Ventilator ein und wählen Sie die gewünschte
Drehgeschwindigkeit mit dem Bedienschalter für die Geschwindigkeit,
der sich auf der Vorderseite des Ventilators unter dem vorderen
Schutzgitter befindet oder mit der Zugleine auf der rechten Seite
unten am Gerät.
Die Richtung des Ventilators kann in Bezug auf die Basis angepasst
werden, indem die Flügelschraube unten an der Motorbaugruppe
gelöst und der Ventilatorkopf gedreht wird.
Wenn Sie die Zugleine auf der linken Seite unten am Gerät ziehen,
können Sie den Ventilator auf Oszillation stellen, sodass der
Ventilatorkopf von Seite zu Seite schwenkt. Ziehen Sie die Leine
erneut, um die Oszillation anzuhalten.
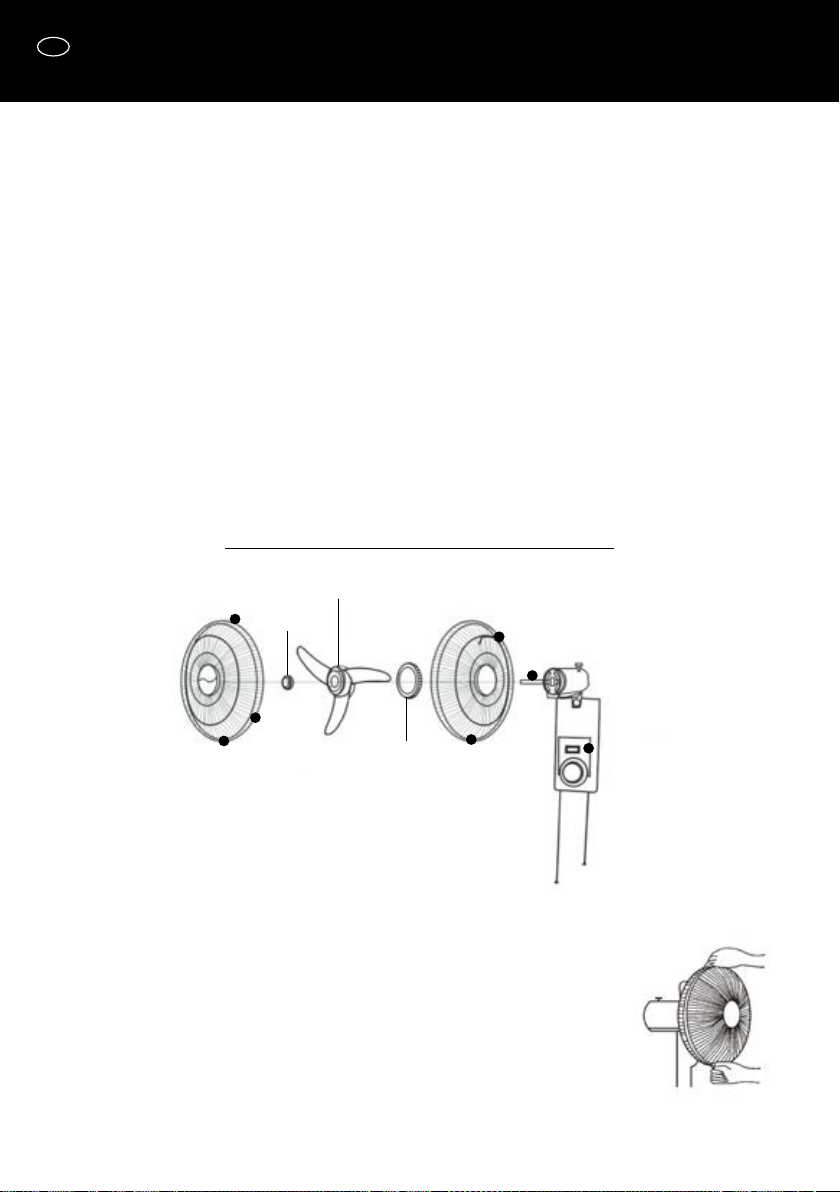
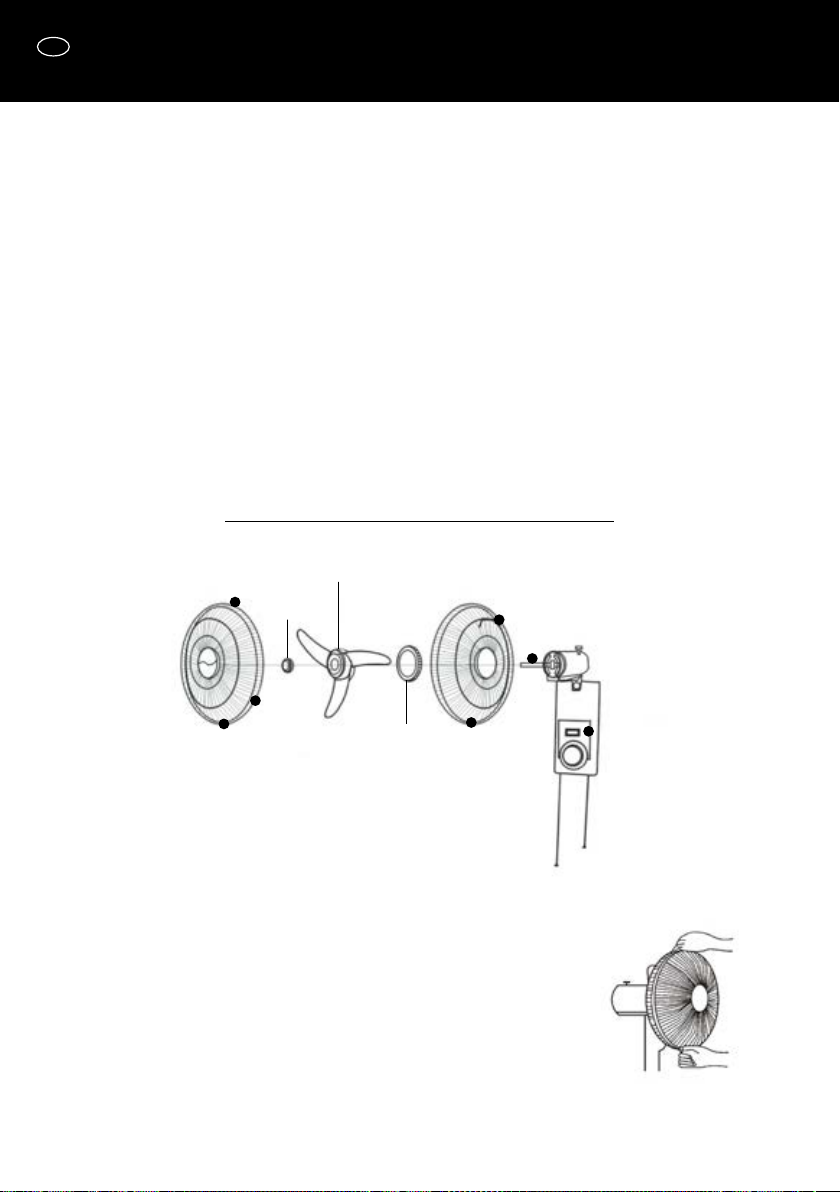
Pflege, Reinigung und Lagerung
Die Ventilatorflügel und der Schutzgitterbausatz sollten regelmäßig
gereinigt werden, um einen möglichst effizienten Betrieb zu
gewährleisten. Ziehen Sie den Stecker des Ventilators ab, führen Sie
das Montageverfahren in umgekehrter Reihenfolge durch, um die
Teile zur Reinigung von der Motorbaugruppe zu entfernen, wischen
Sie diese mit einem feuchten Lappen ab und reiben Sie sie trocken.
Tauchen Sie keine Bestandteile des Ventilators unter Wasser und
wischen Sie das Motorgehäuse nur mit einem trockenen oder leicht
angefeuchteten Lappen ab und wischen Sie es umgehend trocken.
Lagern Sie den Ventilator immer an einem kühlen, trockenen Ort.
Name Sp (mm) Nennspannung (V) Nennfrequenz (HZ) Nennleistung (W)
Wandventilator 400 220-240 50 40
Wesentliche Parameter
GARANTIE: Gültig für ein Jahr ab Kaufdatum
Diese Garantie gilt nur für die Reparatur oder den Ersatz von Produkten,
an denen Material- oder Verarbeitungsfehler festgestellt werden.
Diese Garantie gilt nicht für Schäden, die durch gewerbliche Nutzung,
Missbrauch oder unsachgemäßen Gebrauch entstehen. Der Hersteller
haftet nicht für Nebenschäden oder Folgeschäden jeglicher Art. Diese
Garantie gilt nur für den Ersterwerb dieses Produktes.
Die gesamte Anleitung sollten durchgelesen werden, bevor Sie
versuchen dieses Produkt zu verwenden.
Es liegt im Ermessen des Herstellers dieses Produkt zu reparieren
oder zu ersetzen, wenn an ihm Material- oder Verarbeitungsfehler
festgestellt werden. Defekte Produkte sollte in Übereinstimmung
mit den Richtlinien des entsprechenden Ladens an die Verkaufsstelle
zurückgegeben werden.
Diese Garantie erstreckt sich nicht auf Schäden, die durch einen
nicht genehmigten Reparaturversuch oder jegliche dieser Anleitung
entgegenstehende Verwendung entstehen.
Die Bestimmungen dieser Garantie gelten zusätzlich und ändern oder
verringern die gesetzliche Gewährleistung sowie sonstige Rechte
und Rechtsmittel durch jegliche geltende Gesetzgebung nicht und
insofern eine solche Bestimmung beabsichtigt, jegliche gesetzliche
Gewährleistung oder sonstige Rechte oder Rechtsmittel aufzugeben,
auszuschließen oder einzuschränken, gelten diese Bestimmungen als
dahingehend geändert, dass sie mit diesen übereinstimmen.
WARNUNG!
·Wenn das Stromkabel beschädigt ist, muss es vom Hersteller,
dessen Dienstleister oder ähnlich qualifizierten Personen ersetzt
werden, um jegliches Sicherheitsrisiko zu vermeiden.
·Dieses Gerät ist nicht für die Verwendung durch Personen
(einschließlich Kindern) mit eingeschränkten physischen,
sensorischen oder geistigen Fähigkeiten oder einem Mangel an
Erfahrung und/oder Wissen gedacht, sofern diese nicht von einer
Person, die für ihre Sicherheit verantwortlich ist, beaufsichtigt oder
bezüglich des Gebrauchs des Geräts unterwiesen werden.
·Kinder sollten beaufsichtigt werden, um sicherzustellen, dass sie
nicht mit dem Gerät spielen.
rapidairmovement.co.uk
RAM ist eine Marke der HydroGarden. HydoGarden Ltd., 2 Progress Way, Binley, Coventry, CV3 2NT, UK | www.hydrogarden.com | Hergestellt in der PRC
Tragen Sie zum Umweltschutz bei, indem Sie Ihr Produkt verantwortungsvoll entsorgen. Das
Mülltonnensymbol besagt, dass das Produkt nicht im Hausmüll entsorgt werden darf, da es Substanzen
enthält, die für Umwelt und Gesundheit schädlich sein können. Erkundigen Sie sich bei Ihrer Kommune nach
Recycling-Annahmestellen und Beratung

IT Si prega di leggere le presenti istruzioni d’uso con attenzione
IMPORTANTI ISTRUZIONI DI SICUREZZA
Quando si utilizzano apparecchi elettrici, è necessario adottare sempre le
precauzioni base di sicurezza, compreso quanto segue:
Si prega di leggere tutte le istruzioni prima di utilizzare questo
ventilatore.
Utilizzare esclusivamente in conformità con l’uso previsto, vale a dire
come ventilatore a muro oscillante per uso domestico.
Installare il ventilatore seguendo attentamente queste istruzioni; il
mancato rispetto delle istruzioni relative all’installazione potrebbe dare
origine a un pericolo per la sicurezza o un danno materiale.
Non posizionare il ventilatore nei pressi di una finestra aperta,
non immergere il ventilatore, la spina o il filo nell’acqua o innaffiare
con liquidi.
Non appendere altri oggetti al ventilatore.
Staccare la spina quando non in uso, in particolare in caso di pulizia,
spostamenti o altre attività legate alla manutenzione del ventilatore.
Non posizionare il ventilatore o eventuali componenti in prossimità di
fiamme libere, apparecchi di cottura o altre fonti di calore.
Non azionare in caso di cavo o spina danneggiati o in seguito
a malfunzionamenti del ventilatore, qualora sia caduto o risulti
danneggiato in qualche modo.
L’uso di accessori non indicati dal produttore può essere pericoloso.
· Non azionare senza la griglia montata correttamente. Evitare il contatto
con le parti in movimento.
· Questo prodotto è destinato al solo uso domestico e non commerciale
o industriale.
· In caso di danneggiamento del cavo di alimentazione, quest’ultimo
dovrà essere sostituito dal costruttore, il suo servizio di assistenza tecnica
o da personale similmente qualificato al fine di evitare pericoli.
ATTENZIONE: PER RIDURRE IL RISCHIO DI INCENDIO O DI SCOSSE ELETTRICHE,
NON UTILIZZARE QUESTO VENTILATORE CON DISPOSITIVI DI CONTROLLO DELLA
VELOCITÀ DEL VENTILATORE ALLO STATO SOLIDO.
Montaggio
1) Rimuovere tutti i pezzi dall’imballaggio:
Gruppo motore (con dado griglia, manopola della pala e pannello di controllo)
Set griglia (frontale e posteriore) e pala del ventilatore
2) Montare la testa del ventilatore
Rimuovere il dado della griglia e la manopola della pala dal gruppo motore. Occorre notare che
la manopola della pala ha una filettatura inversa e deve essere girata in senso orario per essere
rimossa dall’albero motore.
Posizionare il gruppo motore su una superficie piana con il motore rivolto verso l’alto. Posizionare la
griglia posteriore sopra l’albero motore e successivamente sul gruppo motore; la manopola della griglia
posteriore deve essere posizionata in cima al ventilatore e i due fori all’interno della griglia posteriore
devono essere allineati con i due piccoli pin di plastica posizionati sul gruppo motore. Filettare e
stringere il dado della griglia sulla scatola motore, fissando la griglia posteriore al gruppo motore.
Montare la pala del ventilatore sull’albero motore allineando il foro a D nella pala del ventilatore con
l’albero motore a D. Inserire la pala del ventilatore il più lontano possibile dall’albero motore e fissare con
la manopola della pala ruotandola in senso antiorario. Non stringere eccessivamente.
Montare la copertura della griglia frontale sopra la copertura della griglia posteriore aprendo
completamente le due clip intorno al lato esterno della griglia frontale. Allineare il gancio non apribile
del lato superiore centrale della griglia frontale con il lato superiore centrale della griglia posteriore
allineamento dei 2 fori. Stringere la griglia frontale contro la griglia posteriore e spingere le clip aperte
sulla griglia anteriore verso l’interno finché la griglia frontale non risulta fissata alla griglia posteriore. Per
l’assemblaggio avvitare le due metà utilizzando la vite ed il dado forniti.
Ora il gruppo testa del ventilatore è completo.
Appendere il gancio
griglia frontale in cima alla
griglia posteriore
Spingere la staffa per
montare la griglia
Gancio griglia frontale
Staffa griglia
frontale (4)
Griglia frontale
Manopola
pala
Pala ventilatore
Impugnatura
Griglia
posteriore
Dado griglia
Gruppo motore
Pannello di controllo
Albero motore
Foro per vite Vite

IT
Si prega di leggere le presenti istruzioni d’uso con attenzione
Utilizzo
Il ventilatore deve essere installato su una parete liscia e solida utilizzando
i dispositivi di fissaggio forniti e seguendo l’orientamento corretto,
come da figura riportata a all’inizio del manuale.
· Inserire il cavo di alimentazione in una presa a muro conforme CA da
220-240 volt.
· Accendere il ventilatore e selezionare la velocità desiderata utilizzando
la manopola di regolazione della velocità situata sulla parte frontale del
ventilatore sotto la griglia frontale, oppure il cordino a destra sotto l’unità.
· La direzione del ventilatore può essere regolata alla base allentando la
vite a testa zigrinata in fondo al gruppo motore e ruotando la testa del
ventilatore.
· Per impostare il ventilatore in modalità oscillazione, tirare il cordino
sinistro sotto l’unità, la testa del motore girerà da un lato all’altro. Per
fermare l’oscillazione, tirare nuovamente il cordino.
Cura, pulizia e conservazione
· La pala del ventilatore e le griglie devono essere pulite regolarmente
per un funzionamento più efficiente. Staccare il ventilatore, poi prima di
pulire seguire la procedura inversa a quella di montaggio per rimuovere i
pezzi dal gruppo motore, usare un panno umido e un asciugamano.
· Non immergere mai i componenti del ventilatore nell’acqua, pulire la
scatola motore esclusivamente con un panno asciutto o leggermente
umido, poi utilizzare immediatamente un asciugamano.
· Tenere sempre il ventilatore in un luogo fresco e asciutto.
Nome Sp (mm) Tensione nominale (V) Frequenza nominale (Hz) Potenza nominale (W)
Ventilatore a Muro 400 220-240 50 40
Major Parameters:
GARANZIA:
Valida per un anno dalla data di acquisto
· La presente garanzia si applica esclusivamente ad attività di riparazione
o di sostituzione del prodotto risultato avere difetti di fabbricazione
o dei materiali. Tale garanzia non si applica a danni derivanti da uso
commerciale, abusivo o non appropriato. Il fornitore non è responsabile
per eventuali danni accidentali o consequenziali di qualsivoglia natura.
Tale garanzia si applica esclusivamente all’acquisto originario.
· Tutte le istruzioni devono essere lette prima dell’uso del prodotto.
· A discrezione del fornitore, verranno effettuate attività di riparazione o
di sostituzione del prodotto risultato avere difetti di fabbricazione o dei
materiali. I prodotti difettosi devono essere restituiti presso il luogo di
acquisto in conformità con le procedure del negozio.
· Tale garanzia non copre i danni derivanti da qualsivoglia tentativo di
riparazione o da qualsivoglia uso non conforme a quanto riportato nel
presente manuale.
· Le disposizioni della presente garanzia si aggiungono e non modificano
né eliminano le garanzie di legge e altri diritti e provvedimenti contenuti
in qualsivoglia norma e laddove una di queste disposizioni intendano
negare, escludere o limitare qualsiasi garanzia di legge o altri diritti o
provvedimenti, tali disposizioni sono da ritenersi modificate in modo tale
da risultare conformi alla presente garanzia.
AVVERTENZE
·In caso di danneggiamento del cavo di alimentazione,
quest’ultimo dovrà essere sostituito dal costruttore, il suo servizio
di assistenza tecnica o da personale similmente qualificato al fine
di evitare pericoli.
·Questo apparecchio non è da intendersi per l’utilizzo da parte di
soggetti (inclusi bambini) con ridotte capacità mentali, sensoriali
e fisiche, o con mancanza di esperienza e conoscenza, fatto salvo
il caso in cui tali soggetti abbiano ricevuto istruzioni o siano
supervisionati da un soggetto responsabile per la loro sicurezza
nell’uso dell’apparecchio.
·I bambini devono essere sorvegliati al fine di assicurare che non
giochino con l’apparecchio.
rapidairmovement.co.uk
RAM è un marchio HydroGarden. HydoGarden Ltd., 2 Progress Way, Binley, Coventry, CV3 2NT, UK | www.hydrogarden.com | Fatto in PRC
Aiutate l’ambiente, smaltendo questo prodotto con responsabilità. Il simbolo raffigurante il bidone con le
rotelle indica che il prodotto non può essere disposto nei normali rifiuti domestici, visto che contiene sostanze
che possono danneggiare l’ambiente e la salute. Contattate le autorità locali per un consiglio e per localizzare
i punti per il riciclaggio.

CZ Přečtěte si prosím pečlivě tyto pokyny
DŮLEŽITÉ BEZPEČNOSTNÍ POKYNY
Při používaní elektrických přístrojů se vždy musí dodržovat bezpečnostní
opatření, včetně následujících:
Před použitím ventilátoru si přečtěte všechny pokyny.
Používejte ventilátor pouze k účelům, ke kterým je určen, tedy jako
oscilační nástěnný ventilátor pro domácí použití.
Při instalaci ventilátoru přesně dodržujte tyto pokyny, jinak by mohlo
hrozit nebezpečí či dojít ke škodám na majetku.
Neumisťujte ventilátor k otevřenému oknu, neponořujte ventilátor,
zástrčku, ani kabel do vody a chraňte je před postříkáním kapalinami.
Nevěšte na ventilátor žádné jiné předměty.
Pokud ventilátor nepoužíváte, odpojte jej z elektrické zásuvky, obzvláště
během čištění, přesouvání či jakékoli jiné údržbě ventilátoru.
Neumisťujte ventilátor ani žádné jeho součásti do blízkosti otevřeného
ohně, varných zařízení, ani jiných přístrojů produkujících teplo.
Nepoužívejte ventilátor s poškozeným kabelem nebo zástrčkou,
případně pokud došlo k závadě nebo spadl a jakkoli se poškodil.
Použití doplňků, které nejsou doporučeny výrobcem, může
představovat riziko.
Zařízení nepoužívejte bez mřížky ventilátoru. Nedotýkejte se
pohyblivých součástí.
Tento produkt je určen pouze k použití v domácnostech, nikoli ke
komerčnímu či průmyslovému použití.
Pokud je napájecí kabel poškozen, musí jej v rámci ochrany bezpečnosti
vyměnit výrobce, jeho servisní zástupce, či osoba s podobnou kvalifikací.
VAROVÁNÍ: V RÁMCI SNÍŽENÍ RIZIKA VZNIKU POŽÁRU ČI ÚRAZU ELEKTRICKÝM
PROUDEM TENTO VENTILÁTOR NEPOUŽÍVEJTE SE ŽÁDNÝM OVLADAČEM OTÁČEK
PRO VENTILÁTORY BEZ POHYBLIVÝCH ČÁSTÍ.
Montáž
1) Vyjměte z krabice všechny součásti:
Sestavu motoru (s maticí mřížky, šroubem lopatky a ovládacím panelem),
Soupravu mřížky (přední a zadní) a lopatku ventilátoru.
2) Montáž hlavy ventilátoru:
Odstraňte matici mřížky a šroub lopatky ze sestavy motoru. Šroub lopatky má obrácený závit
a při demontáži z hřídele motoru je třeba jím otáčet ve směru hodinových ručiček.
Umístěte sestavu motoru na rovný povrch s hřídelí směřující nahoru. Umístěte zadní mřížku
nad hřídel motoru a na sestavu motoru. Rukojeť zadní mřížky by měla směřovat k horní části
ventilátoru a dva otvory v zadní mřížce by měly být zarovnány se dvěma malými plastovými
kolíky na sestavě motoru. Nasaďte a utáhněte matku mřížky na krytumotoru, čímž zajistíte
zadní mřížku na sestavě motoru.
Proveďte montáž lopatky ventilátoru na hřídel motoru tak, že zarovnáte otvor ve tvaru D
na lopatce ventilátoru s hřídelí motoru ve tvaru D. Nasaďte lopatku ventilátoru co nejdále
na hřídel motoru a zajistěte ji otáčením šroubulopatky proti směru hodinových ručiček.
Neutahujte šroubpřespříliš.
Proveďte montáž krytu přední mřížky na kryt zadní mřížky tak, že úplně otevřete spony kolem
vnější hrany přední mřížky. Zarovnejte háček ve středu nahoře na přední mřížce s horním
středem zadní mřížky vyrovnání dvou otvorů. Podržte přední mřížku proti zadní mřížce a
zatlačte otevřené spony na přední mřížce, dokud se přední mřížka nezajistí proti zadní mřížce.
Pro dokončení této montáže sešroubujte obě poloviny pomocí přiložené matice a šroubu.
Montáž hlavy ventilátoru je nyní dokončena.
Pověste háček přední mřížky
přes horní část zadní mřížky
Zamáčknutím spony
uchyťte mřížku
Háček přední mřížky
Spona
přední
mřížky (4)
Front grill
Šroub
lopatky
Lopatka ventilátoru
Rukojěť
Zadní mřížka
Matka mřížky
Sestava motoru
Ovládací panel
Hřídel motoru
Otvor pro šroub Šroub

CZ
Přečtěte si prosím pečlivě tyto pokyny
Provoz
Montáž ventilátoru musí být provedena na pevné rovné zdi pomocí
dodaných montážních dílů a ve správné orientaci – podle obrázku na
přední straně příručky.
Připojte napájecí kabel do vyhovující 220–240V AC elektrické zásuvky.
Zapněte ventilátor a vyberte požadovaný výkon pomocí voliče otáček
umístěného v přední části ventilátoru pod přední mřížkou nebo pomocí
pravé tahací šňůry pod jednotkou.
Směr ventilátoru lze upravit podle základny uvolněním přítlačného
šroubu ve spodní části sestavy motoru a natočením hlavy ventilátoru.
Chcete-li aktivovat oscilaci ventilátoru, zatáhněte za levou tahací šňůru
pod jednotkou a hlava ventilátoru se bude otáčet ze strany na stranu.
Oscilaci ukončíte opětovným zatažením za šňůru.
Péče, čištění a skladování
V rámci zajištění maximálně efektivního fungování by se měly lopatka
a mřížka ventilátoru pravidelně čistit. Odpojte ventilátor od napájení,
poté před čištěním proveďte demontáž součástí obráceným postupem
montáže, očistěte jednotku vlhkým hadrem a následně otřete dosucha.
Nikdy žádnou z komponent ventilátoru neponořujte do vody,
krytmotoru čistěte pouze suchým nebo lehce navlhčeným hadrem,
poté ihned otřete dosucha.
Ventilátor vždy skladujte v chladném a suchém prostředí.
Název Průměr (mm) Jmenovité napětí (V) Jmenovitá frekvence (Hz) Jmenovitý výkon (W)
Nástěnný Ventilátor 400 220–240 50 40
Hlavní parametry
ZÁRUKA: Platí po dobu jednoho roku
od data zakoupení
Tato záruka platí pouze na opravu nebo výměnu produktu, který
bude shledán vadným po stránce materiálu či zpracování. Tato
záruka se nevztahuje na škody způsobené komerčním, nevhodným
či nerozumným použitím. Dodavatel nenese žádnou odpovědnost za
vedlejší či následné škody jakéhokoli charakteru. Tato záruka se vztahuje
pouze na původní zakoupení uvedeného produktu.
Před pokusem o použití produktu je třeba si nastudovat všechny pokyny.
Podle rozhodnutí dodavatele tyto produkty opravíme či vyměníme,
pokud budou shledány vadnými po stránce materiálu či zpracování.
Vadné produkty by se měly vrátit na místo, kde byly zakoupeny, v
souladu se zásadami obchodu.
Tato záruka nepokrývá škody vzniklé z důvodu neoprávněného pokusu o
opravu či z důvodu použití v rozporu s touto příručkou.
Ujednání v této záruce jsou doplňkem a nikoli úpravou či zkrácením
zákonných záruk a jiných práv či nápravných opatření obsažených v
jakékoli platné legislativě, a to v takovém rozsahu, že pokud by jakékoli
zmíněné ujednání znamenalo zrušení, vyloučení či omezení libovolné
zákonné záruky či jiného práva nebo nápravného opatření, bude takové
ujednání považováno za pozměněné do té míry, aby jim vyhovovalo.
VAROVÁNÍ!
·Pokud je napájecí kabel poškozen, musí jej v rámci ochrany před
nebezpečímvyměnit výrobce, jeho servisní zástupce či osoby s
podobnou kvalifikací.
·Tento přístroj není určen pro použití osobami (včetně dětí) se
sníženými fyzickými, smyslovými či duševními schopnostmi nebo
s nedostatečnými zkušenostmi a znalostmi, pokud nejsou pod
dohledem nebo jim nebylo poskytnuto školení o použití přístroje
ze strany osob zodpovědných za jejich bezpečí.
·Je třeba dohlížet na to, aby si děti s přístrojem nehrály.
rapidairmovement.co.uk
RAM je značka společnosti HydroGarden. HydoGarden Ltd., 2 Progress Way, Binley, Coventry, CV3 2NT, Spojené království | www.hydrogarden.com | Vyrobeno v PRC
Pomozte životnímu prostředí tím, že zodpovědně likvidujete svůj výrobek. Symbol koše
na koše označuje, že výrobek nesmí být likvidován v domácím odpadu, protože obsahuje
látky, které mohou poškozovat životní prostředí a zdraví. Zkontrolujte místního úřadu místa
recyklace a rady.

rapidairmovement.co.uk
Table of contents
Languages:
Other RAM Fan manuals