R&T W5100S Operating instructions

We appreciate the trust and confidence you have placed in R&T through the purchase of this
toilet. We strive to continually create quality products to enhance your home. Visit us to see
our full line of products available for your home improvement needs. Thank you for choosing
R&T!
Tankless Toilet
Installation and Operation Guide
Model: W5100S
Questions, problems, missing parts? Before returning to the store,

Content
Installation
01
03
03
Safety instructions
Parts identification
The illustration of Main Unit Buttons
04
04
05
List of materials
Technical drawings
Toilet installation
08
After installation
Maintenance
Others
11
12
09
10
Daily maintenance
1. Main unit care and maintenance
2. Replacement of battery
Emergency troubleshooting
1. No water supply
3. Product unused for a period of time
2. Maintenance of filter net
Warranty terms
Technical specification

Symbol lllustration
Please read the instructions carefully before installation and keep it available for future
maintenance or reference.
Failure to observe this instruction can cause body injury and property damage.
Safety instructions
Indicates that failure to follow the instruction may cause body
injury or property damage.
Symbol Indication
Prohibited activities
Mandatory activities
Caution
Indicates that failure to follow the instruction may cause serious
injury or a fatal.
Warning
Do not throw cigarettes and other burning stuff into toilet, otherwise
it might cause fire.
Warning
Never disassemble, repair or modify this product. Doing so may
cause fire or electrical shock.
Do not wash the main unit or electrical plug with water or detergent.
Doing so may cause fire or electrical shock.
Do not handle the electrical plug with wet hands. Doing so may
cause electrical shock.
If the supply cord is damaged, it must be replaced by the
manufacturer, its service agent or similarly qualified persons in
order to avoid a hazard.
This product is electric appliance, so it must be placed far away
from water. Please don’t drench urine and other liquid to it.
Do not lay on side or upside the product during the electrical circuit,
to avoid fire or burning.
Do not install or use the product in wet or damp locations such as a
steam room.
Only use the factory equipped battery box and 1.5V “AA” alkaline
battery.
The old aging water supply hose cannot be used, otherwise it
might cause leakage, fire or electrical shock. Installation of the bidet
seat should include specified components and new water supply
hose.
When moving the product from a cold or humid environment to
normal room temperature, please wait for 2 hours until the
condensed water is completely volatilized to prevent electrical
short-circuiting of the product.
Mandatory
activities
-
-
-
-
-
-
-
-
-
-
01

Before installation, disassembly, repair and maintenance of the
product, the power plug must be unplugged and the water supply
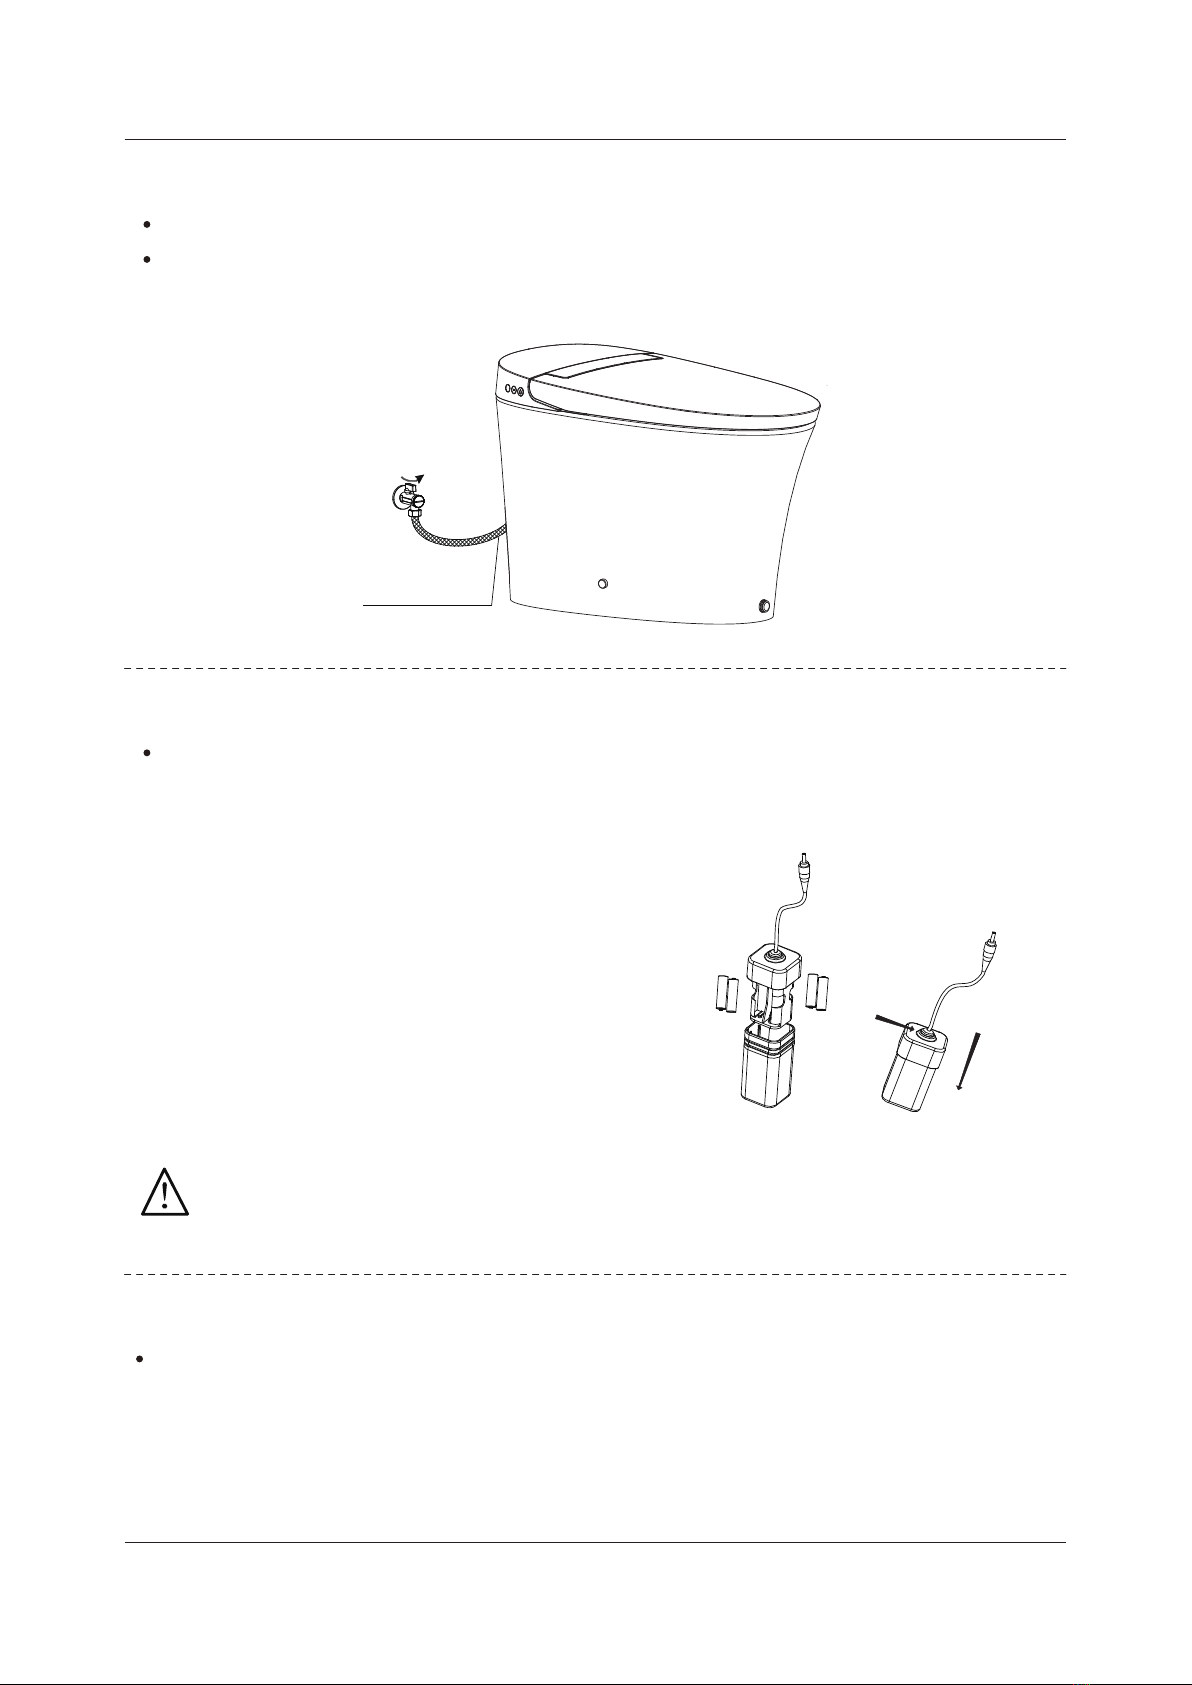
valve must be closed.
Do not use in an environment below 0 °C.
If this product will not be used for an extended period of time (over
3 days), it is recommended to unplug the battery box, remove
batteries, turn off water supply, and drain any water in the product.
When using electrical products, especially when children are
present, basic safety precautions should always be followed,
including the following:
1. This product is not intended for children (without proper adult
supervision).
2. This product is not intended for individuals with reduced physical,
sensory, or mental capabilities.
To prevent damage caused by freezing, please implement warmth
measures to increase the temperature of the toilet.
Caution
Do not place or store product where it can fall or be pulled into a tub
or sink.
Do not place in or drop into water or other liquid.
Do NOT reach for a product that has fallen into water. Unplug the
battery box immediately.
Do not stand on the ceramic toilet. Do not hit the ceramic. A heavy
impact on ceramic leads to damage and water leakage.
Never embed ceramic toilet base in cementitious material ( such as
cement mortar). It may lead to expansion crack.
Do not stand on ceramic toilet bowl, seat and cover.
Do not use varnish thinners, gasoline, liquid chemicals, detergents,
insecticides, toilet cleaners and scrubbing brush to clean the
product.
Only use tap water or potable water, otherwise it may cause
chafing.
Exposure to direct sunlight is prohibited.
This product is equipped with soft-closing seal cover. Heavy
pressing or pushing may damage the soft-closing damper.
Do not connect water supply to heater outlet. Make sure inlet water
temperature at 3~35℃,exceeding the specified range will result in
the built-in heating module not working.
Do not lean against the seat cover when using the product to avoid
damage.
Do not try flushing the newsprint, diapers, sanitary napkins and
other items down the toilet, which may result in toilet clogging.
If this product is malfunctioning, stop using immediately, unplug the
battery box, turn off water supply, and contact the service provider.
Mandatory
activities
-
-
-
-
-
-
-
-
-
-
-
-
-
-
-
-
-
-
02

03
Parts identification
The illustration of Main Unit Buttons
Left side
Right side
Decorative piece
Ceramic toilet
Bumper
Lid
Flush button
Bumper
Seat
kick button for flushing
press the "FLUSH" button to flush (full flush).
Flush
Note:
1. Button light: If the battery is low, when pressing the flush button, the red light will flash.
2. Off-seat auto flushing: In the off-seat auto flushing mode, if a user seated for ≥ 6s,
and leaves the seat for > 3s, the toilet will activate a full flush.

04
1. The product drawing is for reference only, and we
reserve the right to modify the appearance of the
product.
2. Product appearance is subject to change in kind.
List of materials
Technical drawings
※Please refer to the actual product.
Installation Manual
Main Unit Hose
Installation Cardboard
Battery box
Angle Valve
Sealing Flange Mounting Kit Angle Valve
15/16-14UNS NPT 1/2
16 1/8" (410mm)
27 1/8" (690mm)
15 1/2" (395mm)
18 1/2" (471mm)
37" (939mm)
16 3/7" (418mm)

Toilet installation
05
12 in.
305mm
Drain outlet
2. Cardboard installation
Align cardboard with the centerline of drain
outlet.
Draw contour line according to cardboard.
5/8′′
Installation Method 1:
Draw drain outlet centerline on the floor, Install angle valve at proper position on
the wall according to dimension of toilet.
1. Installation of angle valve
Line Drain outlet
Angle valve
Installation Method 2:
15/16-14UNS NPT 1/2
Precaution before installing
Minimum dynamic working water pressure: 0.18+ MPa (5.81+ gal/min or 22+ L/min),
failure to meet this pressure will not achieve the best flushing effect.
Note: Apply the methods below if you don’t have water pressure testing device.
Open the angle valve to check the water volume. If the water volume after 10 seconds is
greater than 0.97 gal (3.7 L), then it is OK to proceed with installation.
Angle valve
Hose
Water storage
barrel

Toilet installation
06
3. Connecting the hose
Connect the water inlet and angle valve
of the toilet with the matching hose and
tighten it.
Angle valve
connector Inlet connector
Flexible hose
Nut
Bolt
4. Mounting bracket installation
Assemble the mounting bracket with
bolts and then install them to the
pre-installed flange plate (not included)
on the ground and lock tight with nuts.
Mounting bracket
Washer
5. Ceramic toilet installation
Install sealing flange into drain outlet.
Install ceramic toilet on the
corresponding position.
Toilet drain outlet
Sealing flange
Note:
1. Two people are required to carry the
toilet.
2. Please clean up the drain outlet.
3. Make sure ceramic toilet outlet sits
perfectly on drain outlet.

Toilet installation
07
Tips:
1. Please clean the drain outlet.
2. Please make sure ceramic toilet
outlet sits perfectly on drain outlet.
7. Glass cement application (optional)
Apply high quality mildew glass glue
around the lower edge of the toilet.
Glass
Cement
6. Screw installation
Put the screw through the fixing sleeve and then install it through the holes (on both
sides of the toilet ceramic) to the mounting bracket on the ground. Lock tight.
Install the decorative cap on the fixing sleeve.
Fixing sleeve
Screw
Decorative cap

After installation
08
1. Turn on the angle valve
Check the thread connection for leaks to ensure complete sealing.
Turn the angle valve anticlockwise to the full open position.
Tips: The angle valve opens with a large torque for the first time.
When the batteries are successfully installed, the red indicator light will flash once.
Take out the battery box from the accessory kit and install 4pcs 1.5V “AA” alkaline
batteries. Plug battery box into the DC socket of toilet and then stick the battery box
to the Velcro on the bottom of the toilet.
When re-installing the cover of battery box, use your fingers to squeeze the side
of rubber plug to exhaust air out of the box and ensure sealing.
2. Power connection
3. Self-inspection
Notes:
1. Must be 1.5V “AA” alkaline battery;
2. Batteries of different brands, new and
used batteries cannot be used together.
3. Battery life will be significantly reduced
when using non-alkaline batteries;
4. When installing the inner box components,
follow the installation direction shown in
the label.
Angle valve

Daily maintenance
09
Use only a soft, damp cloth to clean.
Avoid using harsh chemicals.
Note:
If the toilet is with off-seat auto flushing
function, it may activate auto flushing
during the cleaning.
1. Main unit care and maintenance
2. Maintenance of filter net
When to maintain: Poor flush performance under normal water pressure.
2. Unscrew angle valve nut
1. Turn off power and the angle valve
3. Remove filter net
4. Clean out the filter net under running
water using a toothbrush.
5. Reinstall filter net and angle valve nut
6. Turn on the angle valve and connect
power, then it can work normally after
self-inspection.

Emergency troubleshooting
10
1. No water supply
Put around 2.1Gal (8L) water into a
barrel and flush the bowl .
Note: Avoid water spilling from bowl.
2. Replacement of battery
Unplug the DC plug of the battery box
and remove the battery box from the
bottom of the toilet.
Open the battery box and replace old
batteries.
Insert the DC plug of battery box into the
DC socket of toilet and then stick the
battery box to the Velcro on the bottom
of the toilet.
Notes:
1. Must be 1.5V “AA” alkaline battery.
2. Different brands, different used and new batteries cannot be mixed.
3. Battery life will be significantly reduced when using non-alkaline batteries.
4. When installing the inner box components, follow the installation direction shown in
the label.
Please turn on power and water supply
when using again.
3. Product unused for a period of time
When the product is left unused for a long time, especially in cold weather, it is highly
recommended to drain the water to prevent freezing.
To discharge water
1. Activate flushing, and then turn off angle
valve to stop water supply.
Note: Before water discharging,
the power must be cut off!
4. For your safety, it is recommended to
put antifreeze into the remaining water
in the bowl.
3. Disconnect the hose from angle valve,
drain the water and reconnect.
2. Unplug and cut off the electricity.

Technical specification
11
DC:6V
Model W5100S
Main Unit
Rated Voltage
2.1WRated Power
IPX4Waterproof
1.28Gpf (4.8Lpf)
≤3.9 in. / 100mm
S-trap 12 in. / 305mm
Toilet
Flush volume
Flush Type Siphonic jet
Rough-in Distance
Sewage outlet diameter
Water pressure range
0.09MPa (dynamic water pressure, flow
rate 3.96Gal/min (15.0L/min) or more)--
0.8MPa (static water pressure)
Installation method Glass cement / Floor fixing bolts
seat
Caring device
Open and close device Quiet soft-closing device
Foot-touch flushing
function Kick the foot-touch button to flush
Automatic flushing
Low battery indication
Toilet will automatically flush as user walks
away from bowl
Equipped with a flashing low power light,
which flashes when flush under low battery,
reminding battery replacement.
SeatAntibacterial position

Warranty terms
12
1. One-year limited warranty for commercial installation, and two-year limited warranty for residential
installation.
2. R&T warrants its product to be free from defects in materials and workmanship during normal use when
properly installed and serviced, for a period of one year for commercial or two years for residential from
date of shipment. This limited warranty is only to the ORIGINAL PURCHASER of the Products and is
not transferable to any third party, including but not limited to any subsequent purchaser or owner of the
Product. This warranty applies only to the R&T’s product purchased and installed in USA.
3. R&T’s obligations under this warranty are limited to repair, replacement or other appropriate adjustment,
at R&T’s option, of the Product or parts found to be defective in normal use, provided that such Product
was properly installed, used and serviced in accordance with instructions. R&T reserves the right to
obtain necessary information including the claimed product to conduct investigation in order to
determine the cause of the defect. R&T is not responsible for the cost of removal, return and/or
reinstallation of the Product.
4. This warranty does not apply to the following items:
a)
Damage or loss sustained in a natural calamity such as fire, earthquake, flood, thunder, electrical
storm, etc.
b) Damage or loss resulting from any accident, unreasonable use, misuse, abuse, negligence, improper
care or maintenance of the Product.
c) Damage or loss resulting from sediments or foreign matter contained in a water system.
d) Damage or loss resulting from the quality of water in the region where the product is used.
e) Damage or loss resulting from improper installation or from installation of the Product in a harsh and/
or hazardous environment, or improper removal, repair or modification of the Product. This includes
locations where the water pressure is above local codes or standards.
f) Damage or loss resulting from electrical surges or lightning strikes or other acts which are not the
fault of the manufacturer or which the Product is not specified to tolerate, including failure to use the
factory equipped cord and plug or use of a loose or faulty electrical outlet or use of a current or
socket other than a 110V, 60Hz electrical current from a GFI (ground, fused) socket.
g) Damage or loss resulting from normal and customary wear and tear, such as gloss reduction,
scratching or fading over time due to use, cleaning practices or water or atmospheric conditions,
including but not limited to, the use of bleach, alkali, acid cleaners, dry (powder) cleaners or any
other abrasive cleaners or the use of metal or nylon scrubbers.
5. If the warning label placed on the seat is broken or otherwise not intact, this limited warranty is void.
6. In order for this limited warranty to be valid, R&T needs to investigate each case. During this process,
the customer needs to provide necessary information for R&T to investigate, including but not limited to
photos or videos to demonstrate the reported issue, purchase order number, production date or tracking
information coming with the product.
7. This warranty gives you specific legal rights. You may have other rights which vary from state to state,
province to province or country to country.
WARNING! R&T shall not be responsible or liable for any failure of, or damage to, this Product caused by
either chloramine in the treatment of public water supply or cleaners containing chlorine (calcium
hypochlorite).
NOTE: The use of a high concentrate chlorine or chlorine related products can seriously damage the
fittings. This damage can cause leakage and serious property damage.
THIS WRITTEN WARRANTY IS THE ONLY WARRANTY MADE BY THE MANUFACTURER. REPAIR,
REPLACEMENT OR OTHER APPROPRIATE ADJUSTMENT AS PROVIDED UNDER THIS WARRANTY SHALL
BE THE EXCLUSIVE REMEDY AVAILABLE TO THE ORIGINAL PURCHASER. THE MANUFACTURER SHALL
NOT BE REPONSIBLE FOR LOSS OF THE PRODUCT OR FOR OTHER INCIDENTAL, SPECIAL OR
CONSEQUENTIAL DAMAGES OR EXPENSES INCURRED BY THE ORIGINAL PURCHASER, OR FOR LABOR
OR OTHER COSTS DUE TO INSTALLATION OR REMOVAL, OR COSTS OF REPAIRS BY OTHERS, OR FOR
ANY OTHER EXPENSE NOT SPECIFICALLY STATED ABOVE. IN NO EVENT WILL THE MANUFACTURER’S
RESPONSIBILITY EXCEEDS THE PURCHASE PRICE OF THE PRODUCT. EXCEPT TO THE EXTENT
PROHIBITED BY APPLICABLE LAW, ANY IMPIED WARRANTIES, INCLUDING THAT OF MERCHANTABILITY
OR FITNESS FOR USE OR FOR A PARTICULAR PURPOSE, ARE EXPRESSLY DISCLAIMED.


The picture of product may not entirely consistent with actual appearance and color
because of products improvement, please in kind prevail.
ASWFAF0393000A-1.2
Xiamen R&T Plumbing Technology Co.,Ltd.
Add: No. 18, Houxiang Road, Haicang District, Xiamen, China
Tel: 86-0592-6539788
Fax: 86-0592-6539723
Http: //www.rtplumbing.com
E-mail: [email protected]
Other manuals for W5100S
1
Table of contents
Other R&T Toilet manuals
Popular Toilet manuals by other brands

clivus multrum
clivus multrum CM14 installation manual

Kohler
Kohler Veil Comfort Height Homeowner's guide

American Standard
American Standard Champion 4 MAX 2586.128ST owner's manual

Kohler
Kohler K-5401X installation guide

Toto
Toto NEOREST SE installation guide

Foremost
Foremost JAXTON TL-8320-HC-EW instructions