4
GB
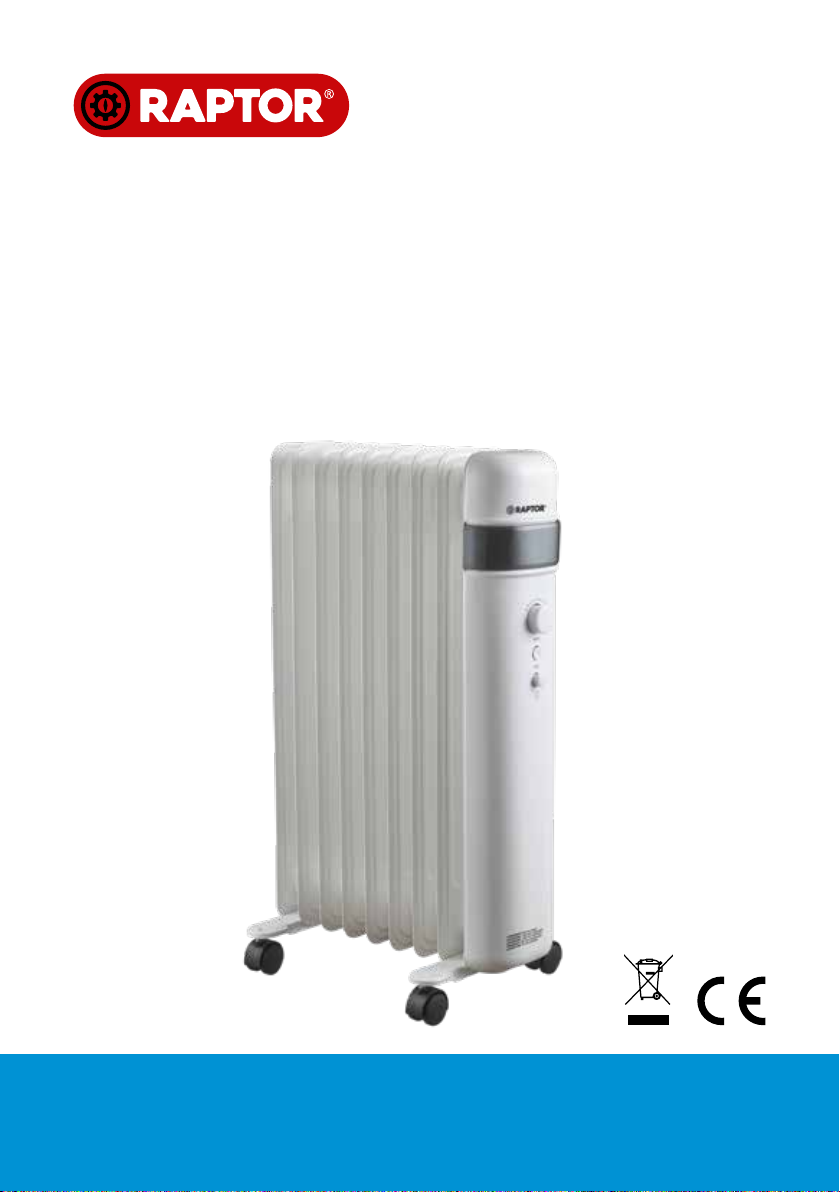
OIL RADIATOR
LIST OF MAIN PARTS:
Installation
1.
To prevent damage, place the radiator up-
side down on a soft surface (e.g., a carpet).
2.
Fix the wheels on two plates with cap nuts.
Wheels should be installed between the
two first and two last fins on the radiator.
3. Insert the U-shaped hook into the wheels
plate, pass it through the radiator and fix
it on the radiator with wing nuts.
4. Turn the heater upright. Wait one minute before to connecting the heater to
a power outlet.
OPERATION:
1. Plug the appliance into an AC 220-240V 50-60 Hz socket.
2. To start the heater, press the ON/OFF button.
3. Select the target temperature (Fr or 5-35°C) on MODE. Anti-frost: When
the target temperature is lower than 5°C, the equipment will work in an-
ti-frost function and the screen will display.
4. Press button again to select the power setting, then rotate the to
set the power as H1-H2-H3 (see power consumption below).
5. Press again to nish the setting.
Setting H1 H2 H3
Power 800W 1200W 2000W
appliance or perform user maintenance.
CAUTION — Some parts of this product can become very hot and cause
burns. Particular attention has to be given where children and vulnerable
people are present.
1. Do not leave the appliance unattended when in use.
2. The most common cause of overheating is deposits of dust or fluff in the appliance.
Ensure these deposits are removed regularly: Disconnect the appliance and vacuum
cleaning air vents and grilles.
3. Do not place the heater on a high pile (long haired) carpet. Do not hide the cable
under carpets. Arrange cord away from traffic areas so that it will not be tripped over.
4. Do not use this heater in the immediate surroundings of a bath, a shower or a
swimming pool.
5. Do not store away until the heater cools down, store the heater in cool, dry location
when not in use.
6. This heater is filled with a precise quantity of special oil. Repairs requiring opening of
the oil container are only to be made by the manufacturer or his service agent who
should be contacted if there is an oil leak.
7. There are no user-serviceable parts inside the heater.
TECHNICAL SPECIFICATIONS:
Installation
1. To prevent damage, place the radiator upside down on a soft surface (e.g., a
carpet).
2. Fix the wheels on two plates with cap nuts.
Wheels should be installed between the two first and two last fins on the radiator.
3. Insert the U-shaped hook into the wheels plate, pass it through the radiator and fix
it on the radiator with wing nuts.
4. Turn the heater upright.
Wait one minute before to connecting the heater to a power outlet.
OPERATION:
1. Plug the appliance into an AC 220-240V 50/60 Hz socket.
2. To start the heater, press the ON/OFF button.
3. Select the target temperature (Fr or 5-35°C) on MODE.
Anti-frost: When the target temperature is lower than 5°C,
the equipment will work in anti-frost function and the
screen will display .
4. Press button again to select the power setting, then
rotate the to set the power as H1-H2-H3 (see power
consumption below).
5. Press again to finish the setting.
1 Wheels
2 Power Switch
3 LED display
4 Front control panel
5 Radiator housing
Installation
1. To prevent damage, place the radiator upside down on a soft surface (e.g., a
carpet).
2. Fix the wheels on two plates with cap nuts.
Wheels should be installed between the two first and two last fins on the radiator.
3. Insert the U-shaped hook into the wheels plate, pass it through the radiator and fix
it on the radiator with wing nuts.
4. Turn the heater upright.
Wait one minute before to connecting the heater to a power outlet.
OPERATION:
1. Plug the appliance into an AC 220-240V 50/60 Hz socket.
2. To start the heater, press the ON/OFF button.
3. Select the target temperature (Fr or 5-35°C) on MODE.
Anti-frost: When the target temperature is lower than 5°C,
the equipment will work in anti-frost function and the
screen will display .
4. Press button again to select the power setting, then
rotate the to set the power as H1-H2-H3 (see power
consumption below).
5. Press again to finish the setting.