RavensBlight MANOR User manual

RAVENSBLIGHT MANOR ASSEMBLY INSTRUCTIONS-
WHAT YOU'LL NEED : Scissors, an X-acto knife, Elmer's glue, Scotch tape, and a ruler.
HELPFULL HINTS: Although these toys can be printed on ordinary paper, they work
best if printed on heavy card stock (80lb paper works great). Start by cutting out the
general area of the piece you're working on, so you won't have extra paper flopping
around. Then carefully cut out the object itself (be careful not to cut off any of the tabs).
Once the item is cut out, you'll want to fold everyplace that needs folding before taping or
gluing anything. The fast easy way to make folds is to fold the paper over the edge of a
ruler or other straight-edge. Once the shape is folded properly you may then tape or glue
everything in place. Elmer's glue works good if you smear a small area and let it set a
moment to firm up before attaching things. Glue sticks also work well.
ASSEMBLY: We begin construction by cutting out the main structure and porch floor on
page 1. Don't remove any black areas, just the white ones. Fold down the tabs at the top
and bottom of the main structure, and then fold down the two side walls between the red
marks. Next fold the long black sides of the porch floor down, and fold the two shorter
sides up. Set the main structure upright and glue one of the long black sides of the porch
floor to the black area at the bottom of the main structure front wall.
Now snip out the parts on page two. Fold both porch sides down between the red marks.
Wrap the porch panel around the porch floor and glue the end planks to the sides of the
main structure. Next fold down the orange tab on the porch roof and fold down the two
triangular sides. Glue the orange strip to the black strip in the center of the main

(RavensBlight Manor Assembly Instructions Page 2.)
structure front wall, and glue both small end planks to the side walls. Why, it's beginning
to look like home already, isn't it?
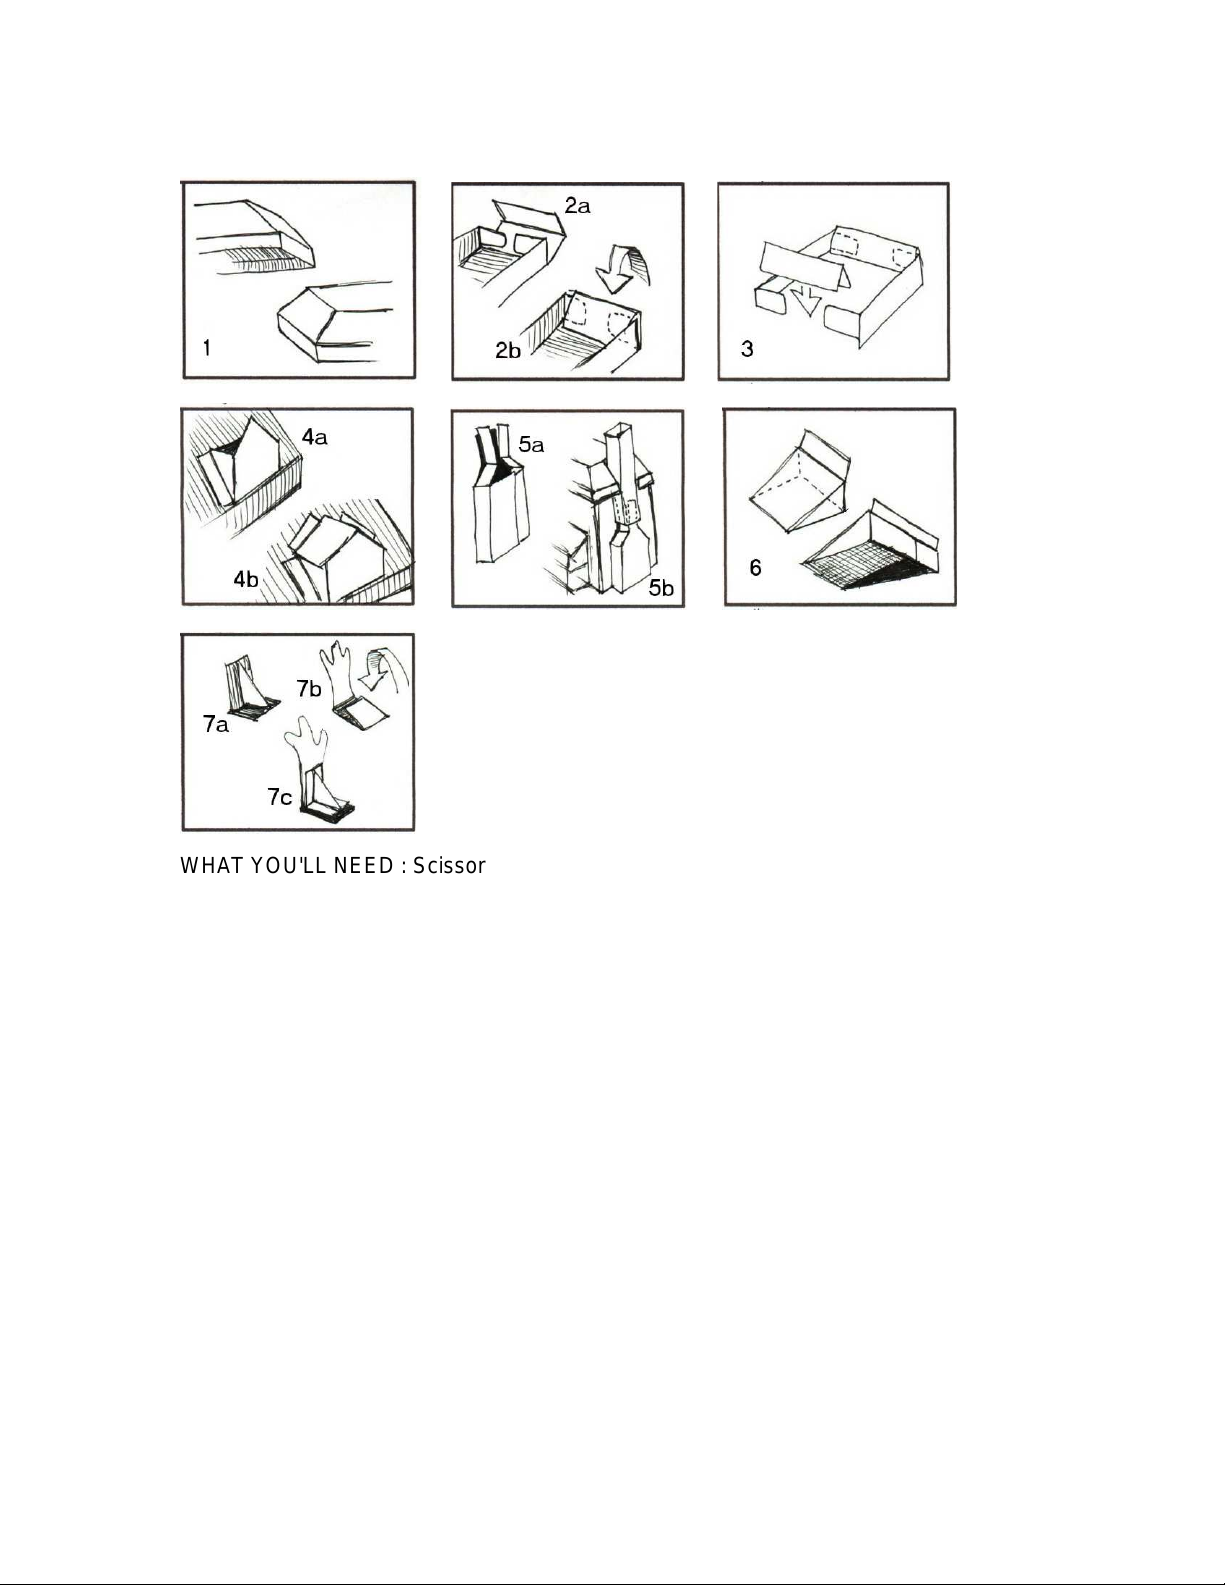
Fold down the black tabs, strips, and triangles on all four sides of the main roof. Fold
down the two orange tabs in the chimney slot. Then fold down the edges of the two long
sides (between the red marks) all the way across, just below the dormer window spaces.
Also fold down the edges of the short sides between the red marks. (The final roof shape
is shown in Figure 1.) Fold down all four sides of the main roof and glue the black
triangles under the sides to hold them in place. Position the end tabs as shown in Figure
2a, and glue the end strips over them as shown in Figure 2b. Now place the roof in
position over the house and glue it to the top wall tabs so it sits level (tabs should more
or less reach the top folds).
Next comes page 3. Cut out the Solarium first. Fold down the two black tabs, and fold
the two end planks up (between the red marks). Then fold the top and side panels down.
Set the Solarium upright and glue the black tabs behind the side walls to hold everything
in place. Now position the solarium over the black area on the Main Structure left wall,
and glue the end planks to the left wall (they should reach the front and back edges of
the building). Once the Solarium is secure, cut out the Solarium rail. Fold the 3 planks up
and then fold the entire piece along the center (between the pointy spikes). Glue the two
sides together, and then fold the rail on either side of the middle plank (between the blue
marks) so it's U shaped with the plank on the inside. Position the rail over the Solarium
and glue the middle plank to the front of the Solarium roof. Glue the end planks to either
side of the Main Structure left wall. The Solarium is now complete, so lets do the rails for
the main roof. Snip out all four panels, and bend the planks up. Bend down the black
tabs on the long panels, and then fold all four panels in half (between the pointy spikes)
just like the Solarium rail. Glue the two long panels closed to strengthen them and then
position the two long panels on the front and back of the rooftop (with the planks on the
inside). Glue the planks down to the rooftop with the black tabs bent towards each other.
Now fold the short panels in half between the spikes and position them over the tabs of
the long panels. Glue the planks down and then glue the short side panels over the tabs
as shown in Figure 3. The top rails are now finished, so no one will be falling to their
deaths from the rooftop (we hope).
Time for the fancy little dormer windows! Cut out the four window pieces on page 4. Fold
the end planks up (between the green lines) and the triangular side sections down
(between the red lines). Now place each window over the black spaces in the main roof
(2 in front, 2 in back) and glue the end planks straight up and down on either side as
shown in Figure 4a. Cut out the four Dormer Window Roofs, and fold the end planks up.
Fold the black sections down and glue them to the back of the roof piece (they're just
there to cover the white underside of the piece). Fold the pieces along the center
(between the green lines) so they're V shaped. Now just set them over the Dormer
Windows as shown in Figure 4b and glue the end planks to the main roof. Ahhh…aren't
they pretty?
Next we'll build the chimney. Start by cutting out the lower chimney section. Leave the
black triangular tabs, but cut them along one side (indicated by the red line). Fold down
the two black sides and the two black triangles. Then fold down the sides (between the
red lines). Glue the small black section to the large black section so the piece is
rectangular (it's OK to smash the thing to glue it and then fold it back into shape). Fold
the side strips down and glue them to the triangles, and then fold them back out between

(RavensBlight Manor Assembly Instructions Page 3.)
the green lines so they're straight up and down, as shown in Figure 5a. Line up the lower
chimney with the black area on the Main Structure right side, and glue the black side of
the chimney to the building. It's handy to press it down from inside the chimney piece
with a pencil. Now cut out the upper chimney piece and fold down the black strip and the
four funny looking black tabs on top. Fold down the sides where indicated between the
red lines. Now with the four top tabs folded down against the blank side, slide the black
panel under the stone panel opposite, tucking it between the stone panel and the folded
down top tab, so you have a rectangular chimney piece with the top tabs folded down
into the inside. Don't worry about gluing down the top tabs, they're just there to make the
interior look black. Put a little glue on the orange tabs in the roof slot and on the black
section of the side wall. Then slide the upper chimney over the three loose sides at the
top of the lower chimney section as shown in Figure 5b. Secure the upper chimney
section to the wall and glue the orange tabs to either side to secure the roof edges. The
orange tabs can be pressed against the chimney from below the roof ledge with a pencil
tip. Now we have a means of keeping warm! All that remains for the exterior is to add the
cellar door, so lets do that next. Snip out the cellar door and fold the black tabs down.
Next fold the two triangular sides down and the top plank up. Overlap the black tabs and
glue them together so the sides are straight up and down as shown in figure 6. Then just
line it up with the black space at the lower right of the wall, behind the chimney, be sure
it sits flat, and glue the black section and the top plank to the side of the house. Now it's
time to step back and admire the finished exterior of RavensBlight Manor. We could
even consider our model finished at this point, but it's much more fun to include the
interior, so lets move on inside and see what we can do…
Cut out the interior on page 5. Fold the two black tabs at the top up, and then fold the top
and sides of the rafter sections up where indicated between the red lines. Now fold the
two building sides up where indicated between the green lines. Set the piece upright and
glue the black tabs to the outside of the folded down rafter sections at either side to hold
the top flaps all in place. Now tuck the entire thing inside the Main Structure and glue it
to the walls of the interior. The interior is now nearly complete and only needs the floor.
Snip out the floor section on page 6. Leave the black tabs but cut along the sides with
the red marks. Fold the black tabs all down. Next fold down the blank panels and the two
long greenish sides (between the red marks).
Flip the piece upside down, position the tabs and fold the short sides over them as
shown in figure 2. Glue the tabs down and turn the piece over. Slide the floor into place
inside the house to be sure it fits properly, and then glue it to the bottom edges of the
interior walls. And there you have it…a damp, musty finished interior!
And again we could call the model finished…but why not include a nice piece of raised
landscaping and a nice gothic fence? Cut out the two long fence sections on page 6.
Don't worry yet about the white area in the center of the gate, we'll get it later. Just cut
out the outer edges and fold the black tabs down. Next fold the grassy tabs up and fold
the pieces along the center (between the pointy spikes). Glue the folded sides together
like you did the roof and Solarium railings. Now snip out the white area at the top of the
gate and trim as needed so it looks good. Cut out the ground piece on page 7. We'll
build the ground piece just like we did the interior floor. Cut the black tabs along the
sides marked red. Fold down the black tabs and sides. Then fold down the four stone
sections, flip the piece over and glue down the tabs as shown in Figure 2a and 2b. Once

(RavensBlight Manor Assembly Instructions Page 4.)
it's all assembled flip it back over and we're ready to glue on the front and back fence
sections from page 6. Be sure the section with the gate is in front of the sidewalk. Place
the sections along the very edge and glue down the grassy tabs to the top lawn area.
They're slightly shorter that the base, so be sure they're centered. Now snip out the two
side fence sections on page 8. Fold the grassy tabs up and fold both pieces down the
center between the pointy spikes. Place the side pieces over the tabs on either side of
the base (with the grassy tabs inside) much like we did the rooftop rails. Trim them if
needed so they fit good, and then glue them into place. As a final touch, you may now
cut the two gate sides apart, being careful not to cut the base (or yourself) and then fold
the gates in slightly for that open inviting sort of look.
You may now place the house onto the base. It should set over the black area with the
back of the building against the rear fence (although you may move it around slightly if
you wish). It can be glued down by adding a few drops of glue to the bottom three tabs
of the Main Structure, or you can simply set it in place and call it good.
You now have the final option of deciding whether or not you wish to include trees
around your new manor house. I could never decide whether I preferred the model with
or without them, but I decided they do add a certain atmosphere, so they're included on
page 9 if you want to use them. The two large trees need only be snipped out and glued
to the back of the rear fence. If you want them on the inside of the rear fence you can
remove the black areas around the bottom and glue them to the inside of the rear fence.
Either way, if you're using good firm card stock as recommended, they should stand up
without flopping over. For the smaller trees cut out both trees and fold down the grassy
tabs and the blank tabs. Cut out both supports, fold their grassy tabs and the black tabs
up, and then fold the pieces down the center (between the red lines) so they look like the
piece in Figure 7a. Fold the small tree tabs as shown in Figure 7b, gluing the grassy tabs
down to the blank tabs. Now glue the supports to the back of the trees with the black
tabs against the trees and the grassy tabs down as shown if Figure 7c. Place the small
trees where you like them in the front yard. They look good placed over the crossed
planks lying in the yard, but can be moved around elsewhere if you prefer. They can just
sit in place, but I recommend gluing them down so they stay put.
And THAT, my friends, is everything. You're now the proud owner of RavensBlight
Manor.
Table of contents
Other RavensBlight Toy manuals
Popular Toy manuals by other brands

Rail King
Rail King NYC Dreyfuss 4-6-4 operating instructions

Blejzyk
Blejzyk RC IGI 2,2 M quick start guide

Topmodel
Topmodel Discus 2c manual

Radica Games
Radica Games 74007 Electronic Barbie Balance Beam instruction manual

Fisher-Price
Fisher-Price Y6600 instruction sheet

Playskool
Playskool 4-in-1 Busy Center instructions