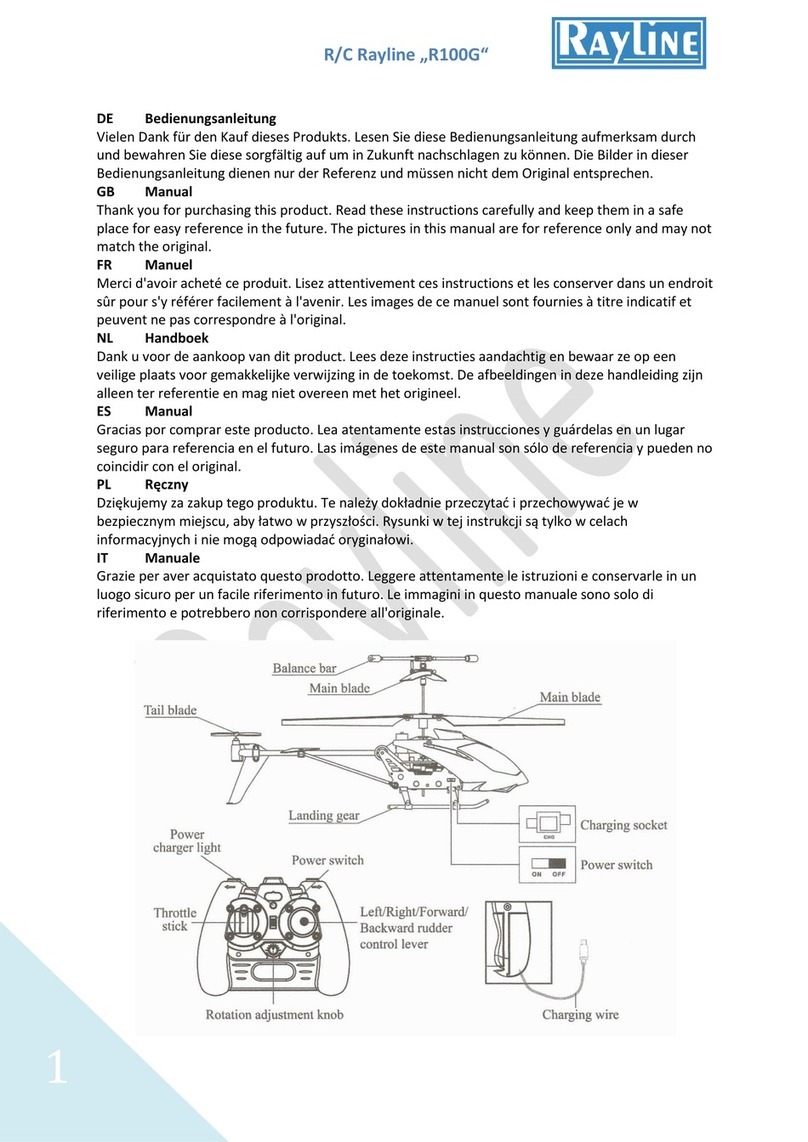
Rayline R120 User manual

R/C Rayline „R120“
1
DE Bedienungsanleitung
Lesen Sie diese Bedienungsanleitung aufmerksam durch und bewahren Sie diese sorgfältig auf um in
Zukunft nachschlagen zu können. Die Abbildungen in diese Bedienungsanleitung dienen nur der
Referenz und müssen nicht dem Original entsprechen.
GB Manual
Read these instructions carefully and keep them carefully to be able to look up in the future. The
illustrations in this manual are for reference only and do not necessarily match the original.
FR Manuel
Lisez attentivement ces instructions et de les conserver soigneusement pour être en mesure de
retrouver à l'avenir. Les illustrations de ce manuel sont fournies à titre indicatif et ne correspondent
pas nécessairement à l'original.
NL Gebruiksaanwijzing
Lees deze instructies aandachtig en zorgvuldig bewaar ze in staat zijn om omhoog te kijken in de
toekomst. De afbeeldingen in deze handleiding zijn alleen ter referentie en niet noodzakelijkerwijs
overeenkomen met de oorspronkelijke.
ES Usuario
Lea atentamente estas instrucciones y guárdelas cuidadosamente para ser capaz de buscar en el
futuro. Las ilustraciones de este manual son sólo de referencia y pueden no coincidir con el original.
PL Instrukcja
Uważnie przeczytać instrukcję i zachować je starannie, aby móc patrzeć w przyszłość. Ilustracje w tej
instrukcji są wyłącznie w celach informacyjnych i nie muszą odpowiadać oryginałowi.
IT Utente
Leggere attentamente queste istruzioni e di conservarle con cura per essere in grado di cercare in
futuro. Le illustrazioni contenute in questo manuale sono solo di riferimento e non corrispondono
necessariamente l'originale.

R/C Rayline „R120“
2
DE Installation der Fernbedienung
Öffnen Sie das Batteriefach auf der Rückseite der Fernbedienung und legen Sie 6x 1.5V „AA“
Batterien in die Fernbedienung ein. Achten Sie hierbei besonders auf die korrekte Polarität.
GB Installing the remote control
Open the battery compartment on the back of the remote control and insert 6 x 1.5V "AA"
batteries into the remote control. Pay particular attention to the correct polarity.
FR Installation de la télécommande
Ouvrez le compartiment à piles à l'arrière de la télécommande et insérer 6 piles 1,5 V "AA" X
dans la télécommande. Portez une attention particulière à la polarité.
NL Installeren van de afstandsbediening
Open het batterijvak aan de achterkant van de afstandsbediening en plaats 6 x 1.5V "AA"
batterijen in de afstandsbediening. Bijzondere aandacht besteden aan de juiste polariteit.
ES Instalación del mando a distancia
Abra el compartimiento de la batería en la parte posterior del control remoto e inserte 6
pilas de 1,5 V "AA" x en el mando a distancia. Preste especial atención a la polaridad
correcta.
PL Instalacja pilota
Otwórz komorę baterii z tyłu pilota zdalnego sterowania i włóż 6 x 1,5 V "AA" baterie do
pilota. Zwróć szczególną uwagę na właściwą polaryzację.
IT Installazione del telecomando
Aprire il vano batterie sul retro del telecomando e inserire 6 batterie da 1,5 V "AA" x nel
telecomando. Prestare particolare attenzione alla corretta polarità.

R/C Rayline „R120“
3
DE Ladevorgang
Es gibt zwei verschiedene Methoden das Modell zu laden. Entweder direkt an der
Fernbedienung oder am USB-Anschluss eines Computers.
Schalten Sie das Modell vor dem Ladevorgang immer aus.
Ladevorgang A: Verbinden Sie das mitgelieferte USB-Ladekabel mit dem Ladeanschluss an
Ihrem Modell. Nun verbinden Sie das USB-Kabel mit dem USB-Anschluss Ihrer
Fernbedienung. Ein Ladevorgang dauert etwa 30-40 Minuten.
Ladevorgang B: Verbinden Sie das mitgelieferte USB-Ladekabel mit dem Ladeanschluss an
Ihrem Modell. Nun verbinden Sie USB-Kabel mit dem USB-Anschluss Ihres Computers. Ein
Ladevorgang dauert etwa 30-40 Minuten.
GB Charging
There is to load the model two different methods. Either directly on the remote control or
USB port of a computer.
Turn the model before charging out forever.
Charging A: Connect the included USB charging cable to the charging port on your model.
Now connect the USB cable to the USB port of your remote control. The charging takes about
30-40 minutes.
Charging B: Connect the included USB charging cable to the charging port on your model.
Now connect USB cable to the USB port on your computer. The charging takes about 30-40
minutes.
FR Charge
Il est de charger le modèle à deux méthodes différentes. Soit directement sur la commande à
distance ou d'un port USB d'un ordinateur.
Tournez le modèle avant de le charger à tout jamais.
Charge A: Branchez le câble USB fourni pour charger le port de chargement de votre modèle.
Maintenant, connectez le câble USB au port USB de votre télécommande. La charge dure
environ 30-40 minutes.
Charge B: Branchez le câble USB fourni pour charger le port de chargement de votre modèle.
Maintenant, connectez le câble USB au port USB de votre ordinateur. La charge dure environ
30-40 minutes.
NL Opladen
Er is het model twee verschillende methoden laden. Hetzij rechtstreeks op de
afstandsbediening of USB-poort van een computer.
Draai het model voor het opladen voorgoed.
Het opladen A: Sluit de meegeleverde USB-oplaadkabel aan de laden-poort op uw model.
Sluit nu de USB-kabel aan op de USB-poort van uw afstandsbediening. Het opladen duurt
ongeveer 30-40 minuten.
Het opladen B: Sluit de meegeleverde USB-oplaadkabel aan de laden-poort op uw model.
Sluit nu USB-kabel aan op de USB-poort op uw computer. Het opladen duurt ongeveer 30-40
minuten.
ES Carga
Hay que cargar los modelos de dos métodos diferentes. Ya sea directamente en el control
remoto o el puerto USB de un ordenador.
Gire el modelo antes de cargar para siempre.
Carga A: Conecte el cable de carga al puerto de carga del modelo de USB incluido. A
continuación, conecte el cable USB al puerto USB de su mando a distancia. La carga tarda
unos 30-40 minutos.
Carga B: Conecte el cable de carga al puerto de carga del modelo de USB incluido. Ahora
conecte el cable USB al puerto USB del ordenador. La carga tarda unos 30-40 minutos.
PL Ładowanie
Jest załadować model dwóch różnych metod. Bezpośrednio na pilocie lub portu USB w
komputerze.

R/C Rayline „R120“
4
Obróć model przed ładowaniem na zawsze.
Ładowanie: Podłącz dołączony kabel USB do ładowania port ładowania modelu. Teraz
podłącz kabel USB do portu USB w pilocie.Ładowanie trwa około 30-40 minut.
Ładowanie B: Podłącz dołączony kabel USB do ładowania port ładowania modelu. Teraz
podłącz kabel USB do portu USB w komputerze.Ładowanie trwa około 30-40 minut.
IT Ricarica
C'è per caricare il modello due metodi differenti. O direttamente sul telecomando o la porta
USB di un computer.
Ruotare il modello prima della carica per sempre.
Ricarica A: Collegare il cavo di ricarica per la porta di ricarica del modello USB incluso. Ora
collegare il cavo USB alla porta USB del vostro telecomando. La ricarica richiede circa 30-40
minuti.
Ricarica B: Collegare il cavo di ricarica per la porta di ricarica del modello USB incluso. Ora
collegare il cavo USB alla porta USB del computer. La ricarica richiede circa 30-40 minuti.
DE Flugvorbereitung
Schalten Sie zuerst die Fernbedienung ein.
Stellen Sie das Modell auf den flache Ebene und schalten Sie das Modell ein.
Nun schieben Sie den linken Hebel nach ganzen oben und sofort wieder nach unten.
Nun ist das Modell mit der Fernbedienung verbunden.
GB Flight preparation
First switch on the remote control.
Set the model on the flat plane and turn the model
Now push the left lever all up and immediately back down
Then the model is connected to the remote control
FR La préparation du vol
Premier commutateur de la télécommande.
Réglez le modèle sur le plan horizontal et tournez le modèle
Maintenant, poussez le levier de gauche tout en haut et tout de suite vers le bas
Ensuite, le modèle est relié à la commande à distance
NL Vluchtvoorbereiding
Eerste schakelaar op de afstandsbediening.
Stel het model op het platte vlak en zet het model
Druk nu de linker hendel helemaal omhoog en meteen weer naar beneden
Vervolgens het wordt aangesloten op de afstandsbediening
ES Preparación del vuelo
Encienda primero el control remoto.
Ajuste el modelo en el plano horizontal y girar el modelo
Ahora empuje la palanca hacia la izquierda todo y de inmediato hacia abajo
A continuación, el modelo se conecta al control remoto
PL Przygotowanie lotu
Pierwszy przełącznik na pilocie zdalnego sterowania.
Ustaw model na płaskiej powierzchni i włącz modelu
Teraz przesunąć dźwignię w lewo i zaraz wszystko się z powrotem w dół
Następnie model jest połączony z pilotem

R/C Rayline „R120“
5
IT Preparazione del volo
Accendere prima il telecomando.
Impostare il modello sul piano piatto e ruotare il modello
Ora, spingere la leva di sinistra tutto e subito di nuovo giù
Allora il modello è collegato al telecomando
DE Flugmodus
Dieses Modell besitzt zwei verschiedene Modi. Einen für Beginner (Werkseinstellung) und
eine für fortgeschrittene Piloten. Sie können per Knopfdrück zwischen diesen Modi wechseln
(siehe Abbildung)
GB Flight mode
This model has two different modes. For a Beginner (default) and one for advanced pilots.
You can switch between these modes by pressing button (see illustration)
FR Mode Avion
Ce modèle dispose de deux modes différents. Pour un débutant (par défaut) et un pour les
pilotes de pointe. Vous pouvez basculer entre ces modes en appuyant sur le bouton (voir
illustration)
NL Vlucht-modus
Dit model heeft twee verschillende modi. Voor een beginner (standaard) en een voor
gevorderde piloten. U kunt schakelen tussen deze modi door te drukken op de knop (zie
afbeelding)
ES Modo de vuelo
Este modelo dispone de dos modos diferentes. Para un principiante (default) y otro para los
pilotos avanzados. Puede cambiar entre estos modos pulsando el botón (vea la ilustración)
PL Tryb samolotowy
Model ten posiada dwa różne tryby. Dla początkujących (domyślnie) i jeden dla
zaawansowanych pilotów. Można przełączać się pomiędzy tymi trybami przez naciśnięcie
przycisku (patrz rysunek)
IT Modalità volo
Questo modello dispone di due diverse modalità. Per un principiante (predefinito) e una per
piloti esperti. È possibile passare da una modalità all'altra premendo il pulsante (vedi
illustrazione)

R/C Rayline „R120“
6
DE Aufwärts- und Abwärtsflug
Drücken Sie den linken Hebel entweder auf
aufwärts oder abwärts.
GB Upward and downward flight
Press the left lever either up or down.
FR Air vers le haut et vers le bas
Appuyez sur le levier gauche vers le haut ou vers le
bas.
NL Opwaartse en neerwaartse lucht
Druk op de linker hendel omhoog of omlaag.
ES Aire hacia arriba y hacia abajo
Presione la palanca izquierda hacia arriba o hacia
abajo.
PL Powietrza w górę iw dół
Naciśnij lewą dźwignię w górę lub w dół.
IT L'aria verso l'alto e verso il basso
Premere la levetta sinistra verso l'alto o verso il
basso.
DE Drehung im Flug
Drücken Sie den rechten Hebel nach links oder
rechts
GB Rotation in flight
Press the right lever to the left or right
FR Rotation en vol
Appuyez sur le levier de droite à gauche ou à
droite
NL Rotatie in de vlucht
Druk op de rechter hendel naar links of rechts
ES Rotación en vuelo
Presione la palanca de la derecha hacia la
izquierda o hacia la derecha
PL Obrót w locie
Naciśnij prawą dźwignię w lewo lub w prawo
IT Rotazione in volo
Premere la leva destra verso sinistra o destra
DE Vorwärtsflug
Drücken Sie den rechten Hebel nach vorne
GB forward flight
Press the right lever forward
FR fuite en avant
Appuyez sur le levier droit vers l'avant
NL voorwaartse vlucht
Druk op de rechter hendel naar voren
ES Forward vuelo
Presione la palanca derecha hacia adelante
PL lot do przodu
Naciśnij prawą dźwignię do przodu
IT fuga in avanti
Premere la leva di destra in avanti

R/C Rayline „R120“
7
DE Rückwärtsflug
Drücken Sie den rechten Hebel nach hinten
GB Backward flight
Press the right lever back
FR vol en arrière
Appuyez sur le droit de retour de levier
NL Achterwaartse vlucht
Druk op de rechter hendel terug
ES vuelo hacia atrás
Pulse la palanca hacia la derecha
PL lot do tyłu
Naciśnij prawy tył dźwignię
IT Volo all'indietro
Premere il terzino destro leva
DE Trimmung
Falls sich das Modell in der Luft drehen sollte ohne das ein Kontrollsignal der Fernbedienung
ausgeht nutzen Sie bitte die Trimmung um dies auszugleichen (siehe Abbildung)
GB Trim
If the model should rotate in the air without a control signal from the remote control runs
out you use the trim to compensate for this (see picture)
FR Coupez
Si le modèle doit tourner dans les airs sans un signal de commande de la télécommande
s'épuise vous utilisez la garniture afin de compenser pour cela (voir photo)
NL Trimmen
Als het model in de lucht moet draaien zonder een stuursignaal van de afstandsbediening
leeg is u de trim te gebruiken om dit te compenseren (zie foto)
ES Recortar
Si el modelo debe girar en el aire sin una señal de control desde el mando a distancia se
queda sin utilizar el ajuste para compensar esto (ver foto)
PL Trym
Jeśli model powinien obracać się w powietrzu bez sygnału od pilota zabraknie użyć trim to
zrekompensować (patrz zdjęcie)
IT Trim
Se il modello deve ruotare in aria senza un segnale di controllo dal telecomando si esaurisce
si usa il trim per compensare questo (vedi foto)

R/C Rayline „R120“
8
DE Ersatzteile
In der unteren Tabelle finden Sie die jeweiligen Ersatzteile für das Modell.
GB Spare parts
In the table below you can find the relevant parts for this model.
FR Pièces
Dans le tableau ci-dessous vous pouvez trouver les éléments pertinents pour ce modèle.
NL Onderdelen
In de onderstaande tabel vindt u de relevante onderdelen van dit model vinden.
ES Regiones
En la siguiente tabla se pueden encontrar las partes relevantes para este modelo.
PL Części
W poniższej tabeli można znaleźć odpowiednie części do tego modelu.
IT Parti
Nella tabella di seguito è possibile trovare i componenti necessari per questo modello
R120-01
Cover
R120-02
Decoration
Blades
R120-03
Upper Rotor
Blades
R120-04
Lower Rotor
Blades
R120-05
Upper Rotor
Holder
R120-06
Lower Rotor
Holder
R120-07
Gear A
R120-08
Gear B
R120-09
Motor Body
Frame
R120-10
Metal Frame
R120-11
Balance Bar
R120-12
Tail Rotor Blade
R120-13
Link Rod
R120-14
Landing Skids
R120-15
PCB Box
R120-16
Motor for upper
Rotor
R120-17
Motor for lower
Rotor
R120-18
Tail Motor Set
R120-19
Battery Pack
R120-20
USB
Table of contents
Other Rayline Toy manuals
Popular Toy manuals by other brands

Seagull Models
Seagull Models SEA 94 Pilatus PC-9 instruction manual

Redman and Associates
Redman and Associates Monster Trax owner's manual

Mega Construx
Mega Construx Pokemon FVK68 instructions

Faller
Faller 222207 manual

Fisher-Price
Fisher-Price W0269 instruction sheet

LEGO
LEGO Ninjago Masters of Spinjitzu Wyplash 4645006 Assembly instructions