Rayrun TT40 User manual

2
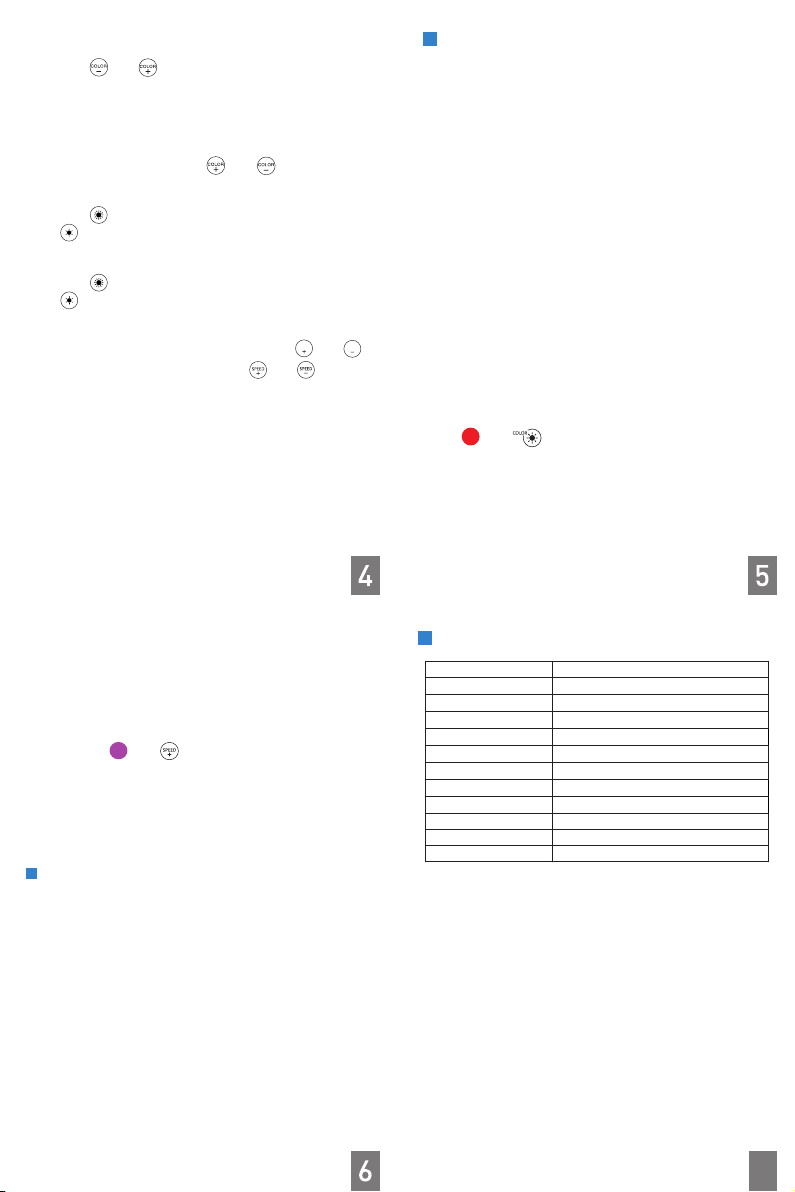
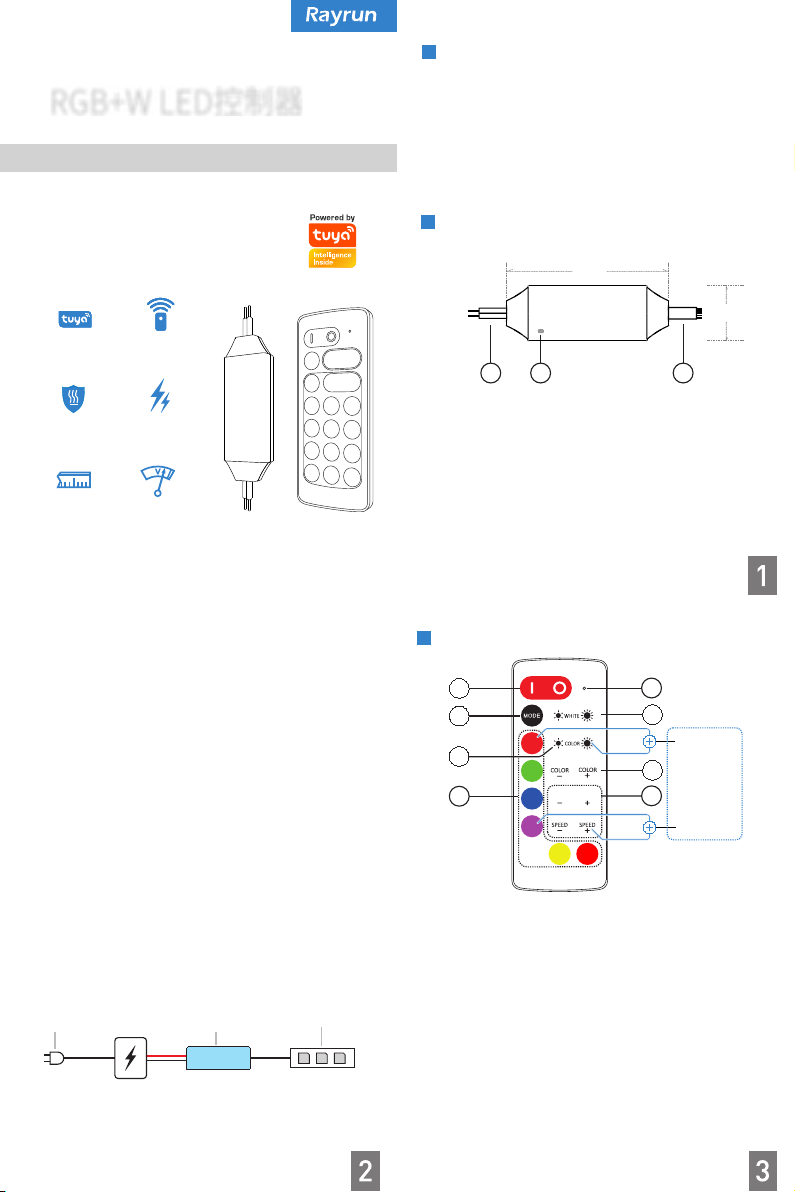
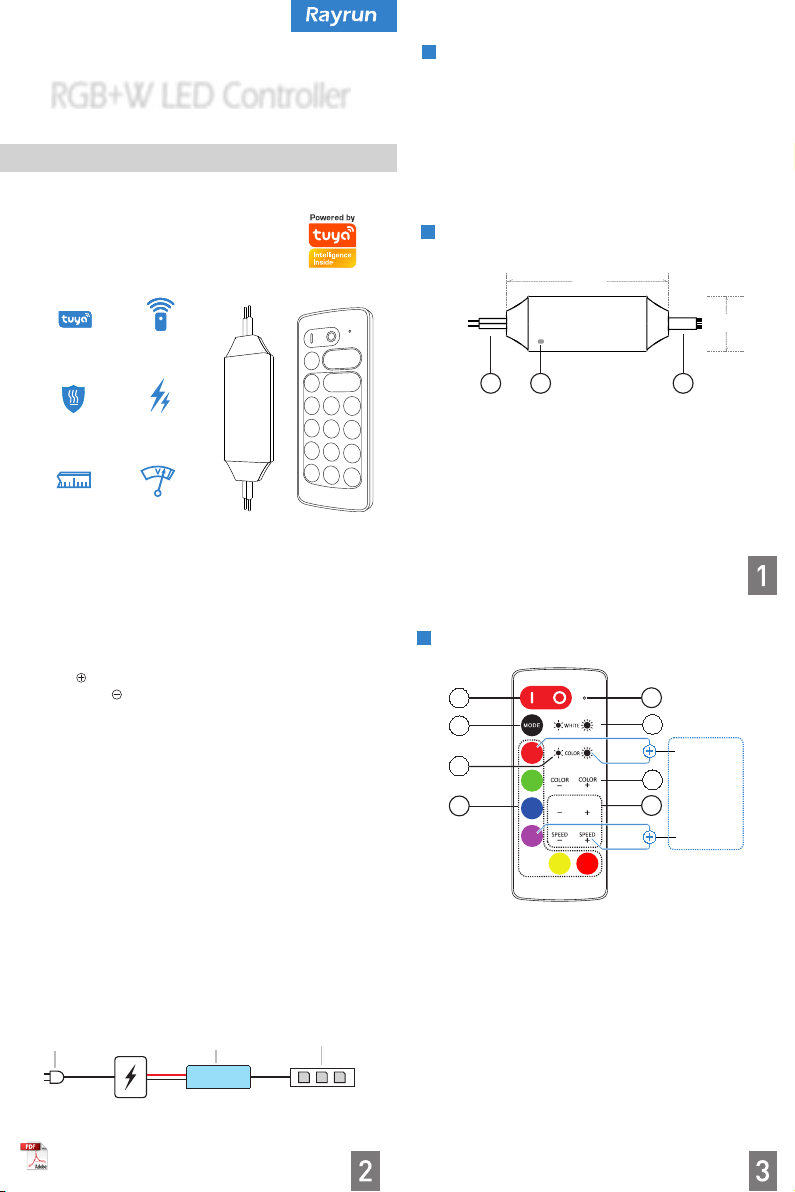
TT40 LED controller is designed to drive constant voltage RGB+White color LED products in voltage range of DC12-24V. It can be controlled by smart phone with Tuya smart app connection or by the stand alone RF remote controller. User can setup LED brightness, color, scene and dynamic effects with the rich function on smart phone Tuya app or the easy operation remote controller.1. Power supply inputConnect positive power to the cable marked with ‘+’ and negative to the cable marked with ‘-’. The controller can accept DC power from 12V to 24V, the output is PWM driving signal with same voltage level as the power supply, so please make sure the LED rated voltage is same as the power supply.2. LED outputConnect to constant voltage type LED load. Connect the LED to black cable, and R, G, B, W cable to the relevant color . Please make sure the LED rated voltage is same as the power supply and the maximum load current is below the controller rated current.CAUTION! The controller will be permanently damaged if output cables short circuited. Please ensure the cables are well insulated to each other.IntroductionFunctionsTo 110/230 AC power12-24V DC outputPower supplyTT40 LEDController12-24V DCLED StripsLED Controller
12-24V Driving
4. Wiring diagram3. Work status indicator (optional)This indicator shows all working status of the controller. It displays different events as following:Steady on: Remote and Tuya smart mode.Flash twice: Tuya not connected.Flash 3 times: Over heat protection.Blink: New command received.Long single blink: Brightness or speed reach limit.Model: TT40 (W/Z/B)Terminal & Size20.5mm60mm1238
12
11
5697EFFECTEFFECTPair newremoteReset tofactoryPress in 10seconds oncereceiver powered
10
5. Turn ON / OFFPress ‘I’ key to turn on unit or press ‘O’ key to turn off. The power on status can be set to last status or default status from app. At last status mode, the controller will memorize the on/off status and will restore to the previous status on next power on. 6. Light mode switchPress this key to switch between RGB, white and RGB+White mode. In RGB mode, white channel will be disabled; In white mode, RGB channel will be disabled; In RGB+White mode, all channels are usable.Smart & Remote Control
RGB+W LED Controller
High PowerCompact Size12V/24V voltageOverheat ProtectionWireless RemoteTuya SmartWireless RemoteTuya Smart

Specification12. Remote indicator13. Using the remote controllerPlease pull out the battery insulate tape before using. The RF wireless remote signal can pass through some nonmetal barrier. For proper receiving remote signal, please do not install the controller in closed metal parts.Operation9. White brightness controlPress key to increase white LED brightness and press key to decrease.10. RGB brightness controlPress key to increase RGB LED brightness and press key to decrease.11. RGB dynamic effectControl the RGB dynamic effects. Press and to select dynamic effects and press and key to set the running speed of the dynamic effects.EFFECTEFFECT8. Shortcut color selectShortcut key to static colors. LED will run the relevant color when pressing the specific color key. The shortcut color is included in and content.15. Pair a new remote controller16. Reset to factory default
Model
TT40(W/Z/B)
Output Mode
PWM constant voltage
Working voltage
DC 12-24V
Rated output current
4x2A
Tuya connection
W: Wifi; Z: Zigbee; B: Bluetooth
PWM grade
4000 steps
Overheat protection
Yes
Remote frequency
433.92MHz
Remote control distance
>15m at open area
Overheat protection
Yes
Controller dimension
60x20.5x9mm
Remote dimension
86.5x36x8mm
This indicator blinks when remote controller working. Please check the remote battery if the indicator does not light up or flash slowly. The battery type is CR2032.77. Select static RGB colorPress and key to select color from the preset library colors.14. Setup Tuya connectionPlease install the Tuya app to setup the connection. Before setup, please make sure the controller is at factory default mode and not connected to any gateway or router. The controller has overheat protection feature and it can protect itself from damage caused by some abnormal usage such as overloading which generates excess heat. At overheat situation, the controller will shutdown the output for a short while and recover when temperature drops to a safe range. Please check the output current and make sure it’s under rated level at this situation.
Overheat Protection
The remote controller and receiver is 1 to 1 paired as factory default. It’s possible to pair maximum 5 remote controllers to one receiver and each remote controller can be paired to any receivers.To pair a new remote controller, please follow two steps:1). Plug off the power of the controller and plug in again after more than 5 seconds.2). Within 10 seconds after controller powered on, press and key simultaneously for about 3 seconds.After this operation, the LED lights will flash 3 times to acknowledge that remote pairing is accomplished.To reset the controller’s Tuya setting and unpair all remote controllers, please operate with following two steps:1). Plug off the power of controller and plug in again after more than 5 seconds.2). Press and key simultaneously for about 3 seconds, within 10 seconds after the receiver powered on.After this operation, the controller will be reset to factory default, the Tuya configuration and remote pairing will all be reset.

2
TT40RGB+WLED控制器是设计⽤于驱动电压范围为DC12-24V的恒压LED产品。⽤⼾可以通过涂鸦智能app或者卡⽚式射频遥控器来调节LED灯具。⽤⼾可以通过涂鸦智能app的功能调节LED灯具的亮度、场景和动态模式,也可以通过操作遥控器来调节LED灯具的亮度、颜⾊和动态模式。简介Model: TT40 (W/Z/B)20.5mm60mm1238
12
11
5697EFFECTEFFECT
10
接线与尺⼨2.LED输出功能配对新遥控恢复出⼚设置控制器通电后10秒内按下6.模式调节按此键可以⾃动切换单⽩光模式、RGB模式和RGB加⽩光模式。在单RGB动态模式下,仅能调节RGB功能;在单⽩光模式下,仅能调节⽩光的亮度;在RGB加⽩光模式下,RGB的颜⾊和亮度以及⽩光的亮度均可以独⽴调节。需注意在RGB动态模式下,单⽩光模式处于关闭状态。5.开关按“I”键开启灯光,按“O”键关闭。控制器会记忆断电前的开关状态,如果在断电前为关机状态,下次通电后请使⽤遥控器或者涂鸦智能app开灯。RGB+WLED控制器涂鸦智能⽆线高功率小尺寸12-24V电压过热保护无线遥控涂鸦智能 1.电源输⼊连接到电源。控制器可接受电压为12V到24V的直流电源供电,请将电源正极连接到标有“+”电缆上,电源负极连接到标有“-”电缆上。请确保LED灯具的额定电压与电源电压相同,且电源的功率满⾜控制器和灯具的需求。为保证安全,在通电前请先确保所有电缆均已可靠连接且绝缘良好。连接到LED灯具。请将LED灯具正极连接到⿊⾊电缆上,LED灯具对应颜⾊的电缆分别连接到⽩、绿、红、蓝电缆上,请确保LED的额定电压与电源相同,并且每个通道的最⼤负载电流在控制器的额定电流范围内。请注意!如果控制器输出电缆被意外短路,可能将导致控制器严重损坏,请确保电缆可靠连接并良好绝缘。该指⽰灯显⽰控制器的⼯作状态,指⽰灯与控制器⼯作状态和对应关系如下:常亮:遥控和智能模式闪烁2次:遥控模式,涂鸦智能未连接闪烁3次:过热保护闪烁:收到命令慢闪:达到亮度或速度极限4.接线图解接交流电12-24V直流电源TT40LED控制器12-24V DCLED恒压灯具3.状态指⽰灯(可选)控制器

规格
型号
TT40(-W/Z/B)
输出⽅式
PWM恒压
⼯作电压
DC12-24V
额定输出电流
3x3A
涂鸦连接
W:Wifi;Z:Zigbee;B:Bluetooth
遥控器⼯作频率
433.92MHz
遥控器⼯作距离
空旷范围>15⽶
PWM分辨率
4000级
过热保护
有
控制器尺⼨
60x20.5x9mm
遥控器尺⼨
86.5x36x8mm
8.颜⾊快捷键按下相应颜⾊快捷键时,LED灯具会跳转成相应的颜⾊。预设的颜⾊库中已包含快捷键所对应的颜⾊。12.遥控器指⽰灯按下遥控器按键时,该指⽰灯会快速闪烁。如果指⽰灯慢闪,则说明遥控器电池电量已耗尽,请更换遥控器电池(CR2032型纽扣电池)。13.使⽤遥控器使⽤前请拔出遥控器电池绝缘⽚。RF⽆线遥控信号可以穿过⼀定的⾮⾦属屏障,为了保证控制器的接收效果,请勿将控制器安装在有⼤⾯积⾦属遮挡的位置。操作⽅法按以下两个步骤操作,即可将涂鸦智能连接恢复到出⼚状态,同时已配对的遥控器也会被清除。1)断开控制器电源,并在超过5秒后重新通电。2)在控制器通电后的10秒内,同时按下遥控器的和键约3秒钟。操作完成后,控制器将恢复成出⼚状态,需要重新配置智能连接以及重新配对遥控器。遥控器和控制器出⼚默认为1对1的配对状态。1个控制器最多可配对5个遥控器,⽽遥控器可配对到任意的控如需配对新遥控器,请按以下两个步骤操作:1)断开控制器电源,并在超过5秒后重新通电。2)在控制器通电后的10秒内,同时按下新遥控器的和键约3秒钟。配对成功后,LED灯具将快速闪烁提⽰配对成功。14.连接涂鸦智能app请通过安装并设置涂鸦智能app来进⾏连接。在设置连接前,请确保控制器是处于出⼚默认模式状态,且没有连接任何⽹关或路由器。15.与新遥控器配对16.恢复出⼚设置77.静态RGB颜⾊调节按与可以从预设的颜⾊库中调节颜⾊。9.单⽩光亮度调节按键增加单⽩光亮度,按键降低单⽩光亮度。按键增加RGB亮度,按键降低RGB亮度。11.RGB动态模式调节按和调节RGB动态模式,按和调节RGB动态模式的运⾏速度。EFFECTEFFECT
过热保护
本机具有过热保护功能,可防⽌控制器因负载过重引起异常发热⽽导致损坏。过热保护时控制器将关断输出,当温度下降到安全范围时,将尝试恢复正常⼯作。过热保护功能仅能在⼀定程度上防⽌控制器损坏,为确保安全,请勿将控制器输出过载或短路。
This manual suits for next models
3
Other Rayrun Lighting Equipment manuals
Popular Lighting Equipment manuals by other brands

Generac Power Systems
Generac Power Systems MLT3060MV owner's manual

Ecco
Ecco 5580 Series Assembly, installation and operation instructions

EuroLite
EuroLite LED OPEN operating instructions

Energetiq
Energetiq LDTLS TLS-EQ77H Operation manual

Rotolight
Rotolight TITAN X2 user manual

Magiline
Magiline FX Series user guide