manuals.online logo
Brands
  1. Home
  2. •
  3. Brands
  4. •
  5. RBC kits
  6. •
  7. Toy
  8. •
  9. RBC kits Komet Instruction Manual

RBC kits Komet Instruction Manual

Thank you for purchasing ME163"Komet" from www.Rbckits.com
For the first time, R/C enthusiasts we have a choice in scale and fun flyer aircraft designs.
Our goal, through computer technology and state-of-the-art production techniques, is to offer aircraft
which in the past have not been modelled simply because they weren’t popular enough to justify mass
production. Our production techniques allow us to produce aircraft which, though not as popular and
well known as P-51s and P-47s, still offer historical significance (good or bad!), Good looks and flying
characteristics, and a uniqueness that is sure to turn heads wherever you take your airplane!
Your airplane has many unique features in its design:
CAD Design
CAD design allows strength to be built into the airplane without sacrificing weight. Accurate parts
design and placement ensures a perfect fit.
CAD Drawn Plans
The plans in this kit are not copied from a master set! They are originals drawn directly from the CAD
program where the airplane was designed. We do this because it allows us to use colour, which helps
you better visualize the various components of the airplane, and we can use better quality paper,
which greatly reduces the possibility of shrinkage.
Since you’re going to build directly on the plans, they ought to be the proper size! Also, parts
placement is guaranteed to be accurate, so you can build a better, straighter model.
Small and hard-to-produce parts are simply a computer file away, so you get a more accurate airplane.
Lightening Holes
Lightening holes are cut into all ribs and formers where possible and justified. This allows us to keep
the weight on each plane to a minimum without sacrificing strength.
The same program that generates the design and plans also drives the cnc cutter, so every part is
reproduced exactly as it was designed. cnc cutting also allows us to fit more parts on each sheet of
wood, reducing the waste, and lowering the cost to you.
Plastics
The cowl and wing tips,tail fairing are accurately reproduced high quality Polystyrene, the canopy is
made from PETG
General Building Information
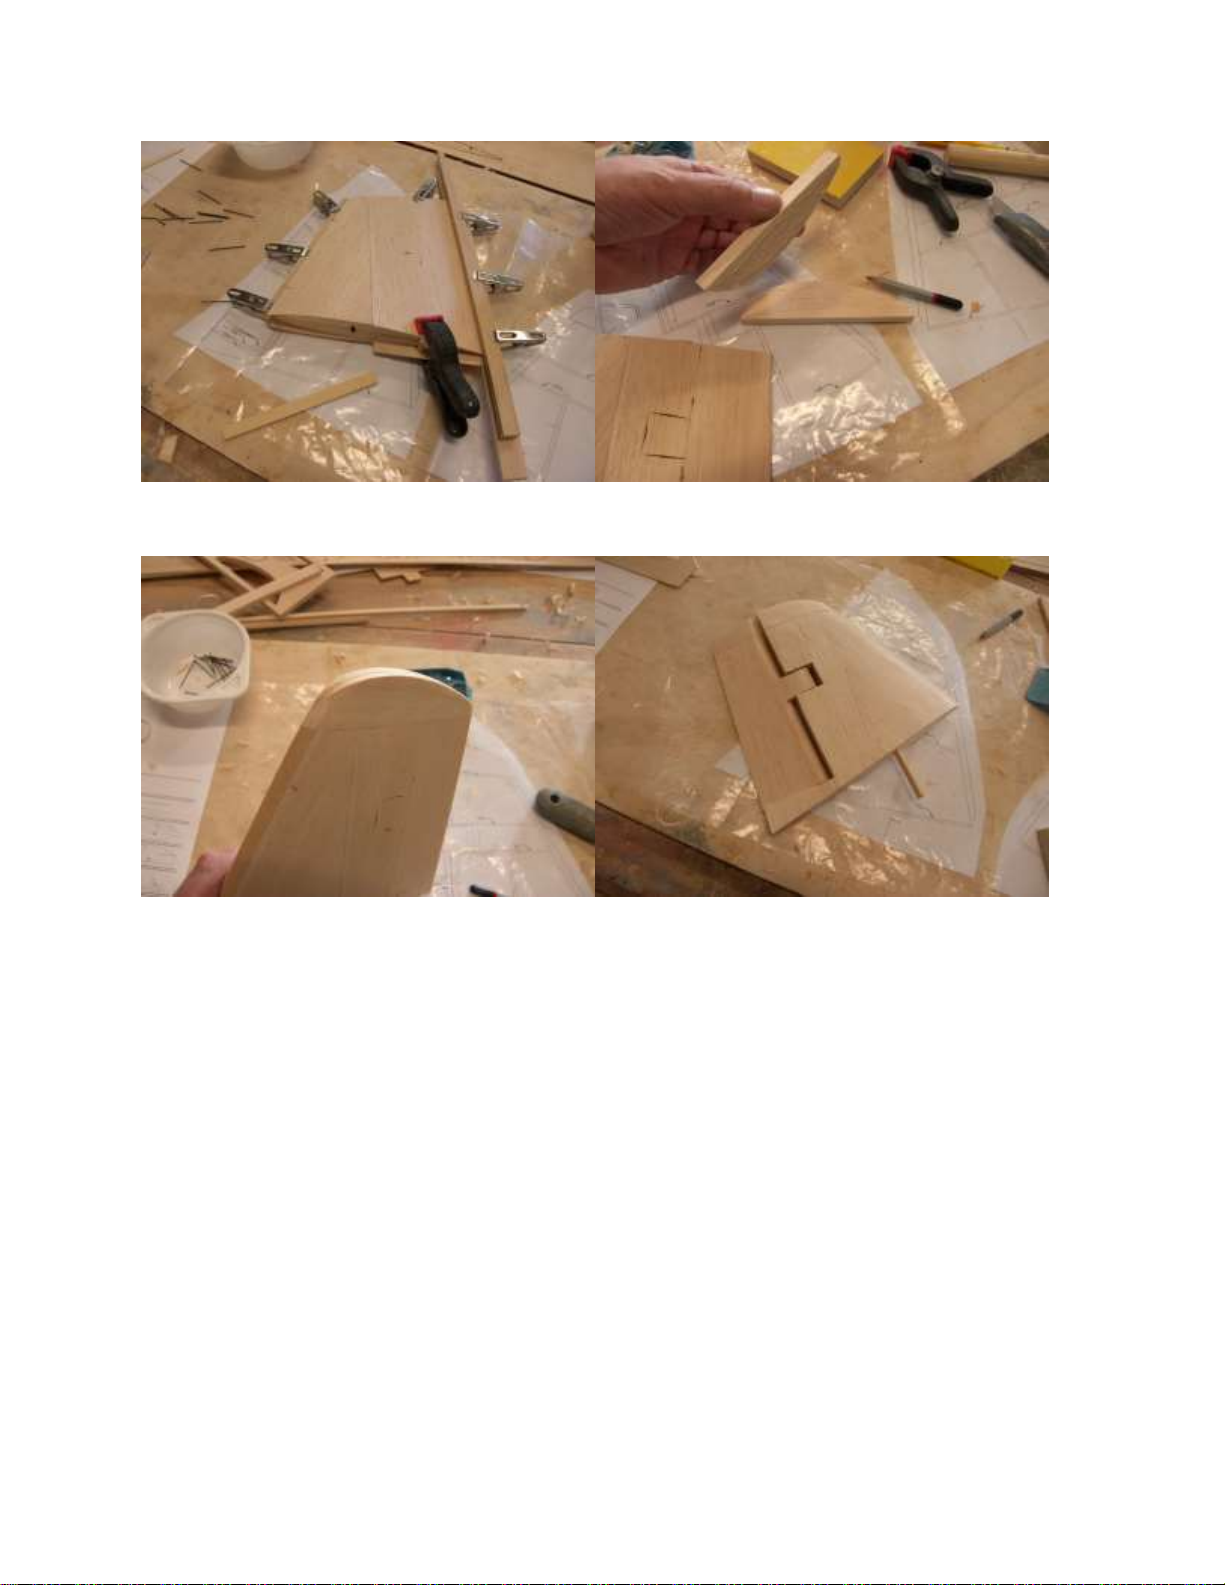
The ME163"Komet" can be built by a person with average building skills. It is designed for someone
who has built a trainer or low wing sport plane. No unusual building techniques are required, although
more difficult areas are explained in detail where necessary. Certain steps in the building process must
be followed as depicted, or you might find yourself digging back into the structure to redo something.
These areas are outlined when necessary. Occasionally hints will be included at certain building steps.
These are not required for completion, rather they are tips intended to ease a particular process. The
cnc router does cut through the wood, As a result of this, occasionally there will be fraying on the
surface of the wood. This is normal, and is only a surface problem and does not affect the wood in any
other way. Similarly, the cnc settings are optimized for wood thickness averages, so occasionally, due
to variations even in individual sheets, some areas might not cut through completely. Simply use care
in cutting the parts from the sheets; most of the time, the parts will break out of the sheets!
Hardware and a motor mount are not included in the kit. There are so many choices for quality
hardware that these choices are left to the individual preferences of the builder, rather than include
something in the kit that you’ll probably throw away anyway.
This aircraft is not a toy. It must be flown in a responsible manner according to the rules set forth by
Law. The builder assumes the responsibility for the proper assembly and operation of this product.
Rbckits shall have no liability whatsoever, implied or expressed, arising out of the intentional or
unintentional neglect, misuse, abuse, or abnormal usage of this product. Rbckits shall have no liability
whatsoever arising from the improper or wrongful assembly of the product nor shall it have any
liability due to the improper or wrongful use of the assembled product. Rbckits shall have no liability
for any and all additions, alterations, and modifications of this product.
Having said that, turn the page and start building the best airplane kits on the market!
Material you might need:
Balsa knife, Stanley knife, straightedge, building board 1500mm
ca glue medium, thin, thick you need approx. 6 bottles, building nails, tape
Or use white glue, and canopy glue, epoxy for the canopy and cowls
Some drilling and bending tools, wire cutter, safety goggles etc. etc.
For finishing you need:
glass 25 gram 1mtr for fuselage japan paper for wings if choosen so or glass and filler dope 1
litre, brushes sanding paper, paint of your choice
Wheels as on the drawing, controls, motor, battery etc.
All vacuumformings should be roughened up before gluing
A picture says more as a 1000 words so do look at the pictures on the cd
Vertical stabilizer:
Is build in two halves that are joined later
Place cnc cut parts on the drawing, place leadineg and trailing edges cut from the supplied balsa as per
drawing and sand the hnge lines flat with the ribs, do not sand the leading edge yet .
Cut and join the sheeting as per plan
Place sheeting to the leading edge and over the ribs to the trailing edge.
Other halve also , take them of the drawing , test fit the spruce 3x10 joiner and join the halves
Use clamps do not glue the spruce joiner yet used it only for alignment, take it out after positioning
and glueing, join the tip bloks mark the hinge line
Sand tip clean edges , cut hinge line and sand to shape, ad the 10x3 spruce joiner
Place hinges make sure for smooth movement in conjunction with the steering cables and horns.
Wings:
Start with a flat building board with the size for the wing and fuselage
Place the drawing of the wing on the building board and protect it with plastic.
Start by making the bottom sheeting from the supplied balsa sheet, place the sheets on the work plate
and nail them down , use cello-tape to connect the edges, take them of and glue the edges with thick
ca , place on the work plate and sand down the glued edge, turn the sheet over and take of the cello
tape and sand the edges, now there will be one smooth side and a lesser smooth side , this is because
of the thickness of the balsa is not even, the non smooth side will be the inside of the sheeting.
Make the sheeting as per plan, do make a bit oversize .
take out all ribs and formers out of their sheets , you can mark the formers with a soft pencil if you like
, sand of all holding tabs.
PLacemain formers and place ribs , check the drawing for the correct position of the Formers
Mark the main-formers ribs on the bottom sheeting, place main-formers on sheeting place ribs , do
not glue yet , make sure for straightness .
if all seems ok then pin down the main former and start glueing the ribs with thin ca one by one to the
bottom sheeting, note roll the ribs over the sheeting and apply ca
Place sub leading edge to the bottom sheeting and to the ribs.
Place ailevon leading edge between the ribs to the bottom sheeting.
Place servo and scrap fill for taking horns and hinges
Place servo and wires into the wing , place servos on extra 1,5mm balsa , we shrinked the servo in
shrinking foil and ca them to the bottom sheeting, with a fill on top, make also a opening for the servo
arm in the bottom sheeting.cut the top sheeting as per plan.
Note the X marked positions on the drawing
Now pin down the outer wing panel on the X marked spots , Place the help-former as displayed on the
drawing (Note for only speedy flying you can make a 0,5 degree less washout , use the speed washout
setting then, ), make them from 6x12 balsa , important is that they all have the same height, this will
give the correct washout, place then under the trailing edge as per drawing and pin down the wing
bottom on the X markings and the at the helpformer position as on the drawing.
Do make small cuts in the bottom sheeting at the aileron hinge line and edges, this will be very helpful
later
.
Apply the top sheeting with slow ca , take of the wing from the workplate and placeleading edge
Clean up the edges of the wing and place leading edge
sand leading edge to shape as per plan , place wing-tips and take out ailerons and sand edges as per
plan.
Sand tip step by step, flatten first then round it of nicely
When sanded cut out ailevons , you did make small cuts from the top before it was sheeted ?
Sand leading edge to shape and clean edges
use the supplied hinges for the ailevons they are easy and do perform very well, but do pin them with
needles or a toothpin and ca.
place hinges, place servo arm and make opening in aileron for the horns, center servo and aileron and
glue in horns we used very secure Z-Bends.
Fuselage :
Is build in two halves on the drawing .
Place formers step by step one by one without glue , pin the mid formers to the building board
It is a but puzzling , fit formers one by one
When Former F11 is added and alignment is ok you can slowly ad some glue points to this.
Work formers up to the tail section , if all alignment is ok the use thin ca to fasten the formers.
Start with a 2x12 strip to give a bit stability to the fuselage.
also place the 3mm bottom sheeting strip 3x12mm
Take of fuselage halves from the building board . ad slow glue to all joining formers
Use clamps and pins to join halves , making sure for straightness Former F2B is placed in the fuselage
to F2 Note that F2b has the M3 and M4 nuts glued in before placing to the fuselage
F16 and F24 is also placed
Place bottom formers and scrap sheeting bottom nose part.and sand to match the formers
As the fuselage sheeting is glued to that parts
Make up the canopy formers (note the kit parts look different), place temporarly canopy closing and
fastener hooks
Now we can place the assembly and make upthe turtle back of the fuselage.
place formers and 3x6 stringers, there is a angle at the canopy former see the drawing
Place layer of 3mm balsa sheeting on top and sand to edges
Sand the bottom edges and start sheeting with strips of 2x12 balsa , shorten them the leftovers are
needed to. Ad strips to give more stability to the fuselage
Place the rudder and test fit wing joiner for all angles .
Place tailwheel steering tube also.
Now ad the sheeting strip by strip , even on each side , you might need to taper some strips or even
wet some for easyer bending if neccesary
The sheeting is overlapping the side former F11, that is a little edge sanded., Turtleback sheeting also
with strips leftovers.
Place top 3mm sheet to fuselage and fin take out a small piece to form over the fin.
The bottom sheeting is also build up in some parts
Place nose fill with some scrap balsa and sand to shape, also for fin fairing
Sand complete fuselage and fill all open edges with lightweigt filler, we thinned down the filler with
water and brushed it up, after dryine it sands of easy with 60gritt sand paper
Leaving only the filler in the depth spots, adding almost no weight
Place the wings to the fuselage with the 6x15 spruce joiner and the 6mm aligning dowels
Check for straightnes or twist , look from behind and check the alignment of the traiking edges, they
should be equal, if not adjust with the opening of the alignment dowel untill it is straight and in line
with the other wing.
Place the formers F12 A,B,C to wing joiner and F12, use slow glue
Join the servo frame , note that the kit version has a 6x15 battery strip glued in F12 and F15 see the
drawing
Cut out the wing fairings along the lines , the small back fairing fits into the large parts , it might be
easy to glue the back fairing into the large frontfairing before fitting all onto the fuselage and wing, cut
out as much as you need, there is a left and a right side fairing the writing is on the wing section of the
fairing and a L is on the small fairing surplus midpiece. Test fit and glue to wing and fuselage, finish
with ultralight filler and sand
Place rudder steering cable through fuselage, straight line from nose to back
Bend 2mm steel wire for tailwheel , glue a short piece of steering cable into the rudder to take the
steel, place hinges and check for free movement , place rudder horn into rudder, harden horn with
thin ca
Befor placing rudder, solder a 2,2mm ring to the steel wire to take the landing load of the tailwheel, a
scrp piece of wood is placed between the tube and ring this makes for enough free space
Now bend the steel wire use 2 pliers taking care not to ruin the fuselage, after this you can place the
rudder to the fin
Make up the canopy, place formers and hooks paint all black before gluing the canopy
Test fit canopy on assembly and carefull cut surplus of canopy for a good fit to fuselage and canopy
formers, we used cellotape to hold canopy and ca to glue to formers
Landing gear dump unit:
Make the cross with the axel retainers, make the 2mm mild steel slot wire and glue with epoxy to
cross, place short piece of 4mm dowel into cross, dowels are slightly tapered for light fit

This manual suits for next models

1

Other RBC kits Toy manuals

RBC kits F-84F Thunderstreak User manual

RBC kits

RBC kits F-84F Thunderstreak User manual

RBC kits Spitfire MKI User manual

RBC kits

RBC kits Spitfire MKI User manual

RBC kits GLOW2 User manual

RBC kits

RBC kits GLOW2 User manual

RBC kits L39 Albatros User manual

RBC kits

RBC kits L39 Albatros User manual

RBC kits JIMMY Instruction Manual

RBC kits

RBC kits JIMMY Instruction Manual

RBC kits DH108 Swallow User manual

RBC kits

RBC kits DH108 Swallow User manual

RBC kits F35 90MM User manual

RBC kits

RBC kits F35 90MM User manual

RBC kits F22 RAPTOR User manual

RBC kits

RBC kits F22 RAPTOR User manual

RBC kits Cessna L19 Birddog User manual

RBC kits

RBC kits Cessna L19 Birddog User manual

RBC kits Pou du Ciel User manual

RBC kits

RBC kits Pou du Ciel User manual

RBC kits G2 User manual

RBC kits

RBC kits G2 User manual

RBC kits F9F-6 Cougar User manual

RBC kits

RBC kits F9F-6 Cougar User manual

RBC kits R700 Roundnose Instruction Manual

RBC kits

RBC kits R700 Roundnose Instruction Manual

RBC kits F35 User manual

RBC kits

RBC kits F35 User manual

Popular Toy manuals by other brands

Accessible Technologies PROCHARGER 2014+ C7 Corvette installation guide

Accessible Technologies

Accessible Technologies PROCHARGER 2014+ C7 Corvette installation guide

Aircraft in Miniature Limited Transport Wings DC-10-30 instructions

Aircraft in Miniature Limited

Aircraft in Miniature Limited Transport Wings DC-10-30 instructions

REVELL Corvette C6 Convertible Assembly manual

REVELL

REVELL Corvette C6 Convertible Assembly manual

Mattel HotWheels Shark Slammer W3405 quick start guide

Mattel

Mattel HotWheels Shark Slammer W3405 quick start guide

Fisher-Price ColorMe Gemz P2170 instruction sheet

Fisher-Price

Fisher-Price ColorMe Gemz P2170 instruction sheet

Tinplate Traditions No. 9 Operation manual

Tinplate Traditions

Tinplate Traditions No. 9 Operation manual

LEGO Disney FROZEN 41147 Assembly instructions

LEGO

LEGO Disney FROZEN 41147 Assembly instructions

Mattel Barbie Pink Label N3930 instructions

Mattel

Mattel Barbie Pink Label N3930 instructions

roco H0e Electric locmotive Rh 1099 operating manual

roco

roco H0e Electric locmotive Rh 1099 operating manual

Hasbro My Little Pony Walking Sweet Steps 61984 instruction manual

Hasbro

Hasbro My Little Pony Walking Sweet Steps 61984 instruction manual

FMS FMM005PGRY F-16 Falcon operating manual

FMS

FMS FMM005PGRY F-16 Falcon operating manual

Nickelodeon Donnie Teenage Mutant Ninja Turtles manual

Nickelodeon

Nickelodeon Donnie Teenage Mutant Ninja Turtles manual

RED TOOLBOX RACING CAR Assembly instructions

RED TOOLBOX

RED TOOLBOX RACING CAR Assembly instructions

Fisher-Price W2811 manual

Fisher-Price

Fisher-Price W2811 manual

Toysrus Radio Control Pterodactyl instruction sheet

Toysrus

Toysrus Radio Control Pterodactyl instruction sheet

REVELL Battleship Tirpitz Assembly manual

REVELL

REVELL Battleship Tirpitz Assembly manual

Mega Construx POKEMON WONDER BUILDERS CFV87 manual

Mega Construx

Mega Construx POKEMON WONDER BUILDERS CFV87 manual

Mattel Disney/PIXAR TOY STORY SHERIFF WOODY instructions

Mattel

Mattel Disney/PIXAR TOY STORY SHERIFF WOODY instructions

manuals.online logo
manuals.online logoBrands
  • About & Mission
  • Contact us
  • Privacy Policy
  • Terms and Conditions

Copyright 2025 Manuals.Online. All Rights Reserved.