manuals.online logo
Brands
  1. Home
  2. •
  3. Brands
  4. •
  5. RCA
  6. •
  7. Range
  8. •
  9. RCA L2B115GEL User manual

RCA L2B115GEL User manual

—
Ii
Anti-TipDevice 3,30 l?roblem Solver 22
.
Appliance Registration 2
Care and Cleaning 16-20
Clock/Timer 9
Safetv Instructions 2-5,23
Surface Cooking 8,9
Burner Grates “16,20
Burners 19,20
Consumer Services 35
Control Panel 16 Clock and Timer 9
Energy-Saving Tips 5Control Settinm 8
Features 6,7 Cookware Titx 9
.Flooring under the Range 24 Drip Pans 16,20
Grounding 27 Flame Size 8
Installation Instructions 23-31 Lighting Instructions 8
Warranty Back Cover
Levelirw 29
Lift-up CooktoP 16
—1 Model and Serial Numbers 2,24
Oven 10,U.
BakindBakin~ Guide 12, 13
Broiling/Broiling Guide 15
Control Settings H
Door Removal 16
Lighting Instructions 10
Preheating 5, 13
Roasting/Roasting Guide 14
Shelves 11,19,20
Thermostat Adjustment 21
—
Read this book Um!flmy.
Itisintendedtohelpyouoperateand
maintainyournewrangeproperly.
Keepithandy foranswersto your
questions.
Ifyoudon’tunderstandsomething
or needmore help, write (include
yourphonenumber):
ConsumerRelations
AppliancePark
Louisville,KY40225
down the model!
and serial nlm’lbers.
You’llfindthemon alabel located
behindthe storagedrawer panelon
theleftside ofthe range front
frame.See page6.
Thesenumbers are also on the
ConsumerProduct Ownership
RegistrationCard that came with
yourrange. Beforesending in this
card, please write these numbers
here:
Model Number
Serial Number
Usethese numbersin any
correspondence or service cak
concerningyour range.
rfea?iwxi
arange. e.
Immediatelycontactthe dealer(or
builder)thatsoldyoutherange.
save time and money.
Before you request
service. ●*
Checkthe ProblemSolveron
page22. It listscausesofminor
operatingproblemsthatYOUcan
correctyourself.
Hyoll need service. ●e
Toobtainservice, seethe
ConsumerServicespage inthe
back ofthis book.
Toobtainreplacementparts,
contactRCA/GEService Centers.
We’reproud ofour serviceand
wantyouto bepleased. If forsome
reasonyou are nothappywiththe
serviceyou receive,here arethree
stepsto followfor further help.
FIRST,contactthepeople who
serviced yourappliance. Explain
whyyou are notpleased. In most
cases, this will solvethe problem.
NEXT, if youare stillnot pleased,
write allthe details-including
yourphone number—to:
Consumer Relations
Appliance Park
Louisville, Kentucky40225
FINALLY, if yourproblem is still
notresolved, write:
Major Appliance
Consumer ActionPanel
20 North WackerDrive
Chicago,Illinois60606
Do or’use
.
-Pmo~rrm~sAF~TYmsTRucTIoNs
.-:
1
-.
he California Safe Drinking
WaterandToxicEnforcerne~t
ActrequirestheGovernorof
California topublish alist of
substances known to the state
tocauseca~cer,birthdefectsor
otherreproductiveharmand
requiresbusinessestowarn
customersofpotentialexposure
tosuchsubstances.
Gasappliancescancause
minorexposuretofourofthese
substances,namelybenzene,
carbonmonoxide,formaldehyde
aridsoot,causedprimarilybythe
incompletecombustionofnatural
gasorLl?fuels.Properly
adjustedburners,indicatedbya
bluishratherthanayellowflame,
willminimizeincomplete
combustion.Exposuretothese
‘-!!!$
ubstancescanbeminimized
–furtherbyventingwithanopen
windoworusingaventilationfan
rhood.
YouG-etYour
@~~~~ the show you
the oftheH%qy?.gas’
fcmMlf’‘valveandhowtoshut
itoffii’necessary.
@
~~~&!your range
and bya
inaccordance
withthektdlation Instructionsd
Anyadjustmentandserviceshould
beperformedonlybyqualified
gasrangeinstallersor service
technicians.
withaproperly-groundedthree-
prongoutletinaccordancewith
theNationalElectricalCode.Do
notuseanextensioncordwith
thisappliance.
mmtipad!
i~”uryQmnkl
I’W!.lkTo
prevent
accidental
tippingofthe
range,attachit
tothewallor
floorby
installingthe
Anti-Tipdevicesupplied.(%x
InstallationInstructions.)To
checkifthedeviceisinstalled
andengagedproperly,carefully
tiptherangeforwarduntilit
engagesthedevice.
Ifyoupulltherangeoutfromthe
wallforanyreason,makesure
thedeviceengagestherange
whenyoupushtherangeback.
~~~ sure an
We removed from the range
beforeoperatingit,topreventfire
orsmokedamageshouldthe
packingmate~ialignite.
mngecanbeconvertedforuse
oneithertypeofgas.See
Instructions.
T(continued)
fkes.Never
pickup a&ning
pm.Turndf’bumier,then
smotherflamingpanbycovering
panCmnpletelyWMlwell-fitting
M,cookiesheet01flattray.
Fkuninggreaseoutsideapan
canbeputoutbycoveringwith
b~ingsodaor,ifavailable,a
multi-purposedryclNMlkXd
orfoam-typefireextinguisher.
e~~ ~g)~ $$~~fj
han‘oven orm?w
the Donotstoreoruse
gasolineorotherflammable
vaporsandliquidsinthevicinity
ofthisoranyotherappliance.
@mlnot Mcookinggrease
Or other IMteriaki
inmI-Mar therange.
@pm-k,follow
thedirectionsexactlyandalways
cookthemeattoaninternal
temperatureofatleast170”F+.
Thisassuresthat,intheremote
possibilitythattrichinamaybe
presentinthemeat,itwillbe
kiliedandmeatwillbesafetoeat.
cookwarehandlestowardtheside
orbackoftherangewithout
extendingoveradjacentburners.
‘@Alwaysturn surface
@watchfoodsbeing
friedathigh!flameSettinge
@pJ~~~~~~~~~&@~@~@(~~~
oftherange.They
providetheairinletandoutlet
whichisnecessaryfortherange
tooperateproperlywithcorrect
combustion.
e~~~~t~~~~~~~~~~~~
surfaceifthewokhasa
ringwhichisphx’d
Wertheburnergratetosupport
thewok.Thisringactsasaheat
trapwhichmaydamagetheburner
grateandburnerhead.Also,it
maycausetheburnertowork
improperly.Thismaycausea
carbonmonoxidelevelabovethat
allowedbycurrentstandards,
resultingiriaheakhhazard.
@~o~~~f’r bea$
dryas Frostonfrozen
foodsormoistureonfreshfoods
cancausehotf%tobubbleupand
oversidesofpan.
~use least of
fatfor effective or deep”
fatfrying.Ming thepantoofull
offatcancausespilloverswhen
foodisadded.
@If ~of#J;]~~~
fatswillbeusedin stir
togetherbeforeheating,orasfats
meltslowly.
sMw~ysheatMand
watchasitheats.
F2J~se deepfat toprevent
fatbeyond.the
smokingpoint.
oUSe~HWpW=pansize—-Avoid.
pansthatare oreasily
tipped.Selectcookwarelarge
enol.lgh$0 Contain.food,
toavoidboiloversaridspillovers,
andwithbottomskirgeenough
tocoverburnergrates.Thiswill
bothsavecleaningandprevent
hazardousaccumulationsoffood,
sinceheavyspatteringorspillovers
leftonrangecanignite.?Jsepans
withhandlesthatcaneasilybe
graspedandwiUremainCOOL
ISvyh~n UWhgg!kisscookware?
makesureitisdesignedfortop-
of-rangecooking.
@KeeptallJ@astksawayfrom
tophmws.
@TOav~idthe Of
bums,alwaysbecertainthat
thecmtrdsford burnersare
dOFF andMgrates
am!cool to
thegrate.
@foodsare
lm.kr the ‘km thefall
foff.Thefan,if may
spread thef’lme.
e~rqgfjiskmktedliWtWa
window9donotuselongcurtains
whichCOUMblowoverthetop
burnersandcreateafirehazard.
@apilotgoesout9(m
modelssoequipped),youwill
detectafaintodorofgasasyour
signaltorelightthepilot.V&m
relightingpilot,makesureburner
controlsarein,oOFFpositionand
followinstructmnsdescribedOH
followingpagestorelight.
eIf YOU SXIW gi3s9 and.youhive
alreadymakesurepilotsarelit,
Wrnoffthegastotherangeand
callaqualifiedservicetechnician.
Neveruseanopenflametolocate
aleak.
/—$.
-k”
@&amiawayfromtherange
whenopeningthedoorda hot
OveneThehotairorsteam
which
escapes can cause Itmrmto
hands, face andhr eyes.
~Keepovenfreefromgrease
!
@Maceovenshehesindesired
position
while oven is cool.
@Pullingoutshelf tothe shelf
stopisaconvenienceinlifting
heavyfoods.Itisalsoa
precautionagainstburnsfrom
touchinghotsurfacesofthe
doororovenwake
~Do#~heat food
htheoven.Pressure
could upandthe
odd burstcausingan
62 ~s~ fo~!j
anywhereintheovenexceptas
hthisbook.Misuse
couldresultinafirehazardor
damagetotherange.
* wingcookingW
bagsinoven,fobv
thernarwfiwturer’sdirections.
@U$eonly$$ass4XdKware
thatis foruse
ingasovens.
~AIw~~sremovebroiler
pan
from Ibroik as
soon8syoufinish
Greaseleftinthepancancatch
fireifovenisusedwithout
removingthegreasefromthe
broilerpan.
aVIWn ifmeatistoo
closetothefkm?, thefatmay
ignite.Trimexcessfattoprevent
excessiveflare-ups.
@MakeSlw’ebroik?rpm isin
placecorrectlytoreducethe
possibilityofgreasefires.
@Ifyou haveagrease
fireinthebroilerpan,turnoff
mm, andkeepovendoorclosed
tocontainfireuntilitburnsc@.
@-&q! range Ckw andfree
of of’grease or
spimers which mayignite.
*Daft torepair
orrepklceanypartofyour
rangetmkssitisspecifically
inthisbook.AH
otherserwicingshouldbereferred
toaqualifiedtechnician.
.
SurfaceCooking
~Usecookwareof medium weight
aluminum, with tight-fittingcovers
and with bottomsthat completely
coverthe heatedportion of the
surface unit.
~Cook fresh vegetableswith a
minimumamount of water in a
coveredpan.
~wat& foodswhen bringing them
quicklyto cooking temperatures at
highheat. When food reaches
cookingtemperature, reduce heat
immediately to lowestsettingthat
willkeep it cooking.
e[Jse re~id~a]heat whenever
F=m
Li;.,:;yossible.For example, when
‘:--Y~ookingeggs in the she]~,bring
waterand eggsto boil, then turn
f~~~?OFF Position and ~ove~.with ]id
~~J complete the cooking.
~Alwaysturn surface unitoff
beforeremovingcookware.
@When boiling water forteaor
coffee, heat only amountneeded.
It isnot economical to boilafull
container ofwater for only
one or two cups.
owl-l Cwking
~Preheat the oven only when
necessary. Most foodswill cook
satisfactorilywithout preheating.
If you find preheating isnecessary,
put food in the ovenpromptly after
the ovenis preheated.
QAlwaysturn ovenoffbefore
removing food.
~During baking, avoidfrequent
door openings. Keep door open as
short atime as possible if it is
opened.
~Cookcompleteovenmeals
insteadofjust onefood item.
Potatoes,other vegetablesand
somedesserts will cook together
with amain-dish casserole, meat
loaf, chicken or roast. Choose
foodsthat cook at the same
temperature and in approximately
the sametime.
@Use residual heat in oven
wheneverpossibleto finish
cookingcasseroles, ovenmeals,
etc. Also add roHsor precooked
dessertsto warm oven, using
residualheat to warm them.
5
L2BU5GPL
with StandingPilotIgnition
LL?DILyi3wHMJ~ .B..J.42H.JAUCJUXK-JLJ
L2BIEWEL
withElectricIgnition t
—see L2BWGE%
page L2BW5GEL LU.M35GEL L2B235GEL
1BroilerDrawer 19 I
2Modeland SerialNumbers
.3Anti-TipDevice
4RemovableOvenBottom
2Ie—
3,30 I
+i--+--
4s
——
5OvenTemperatureControl e
4
4
63
4
4
6SurfaceBurner Controls
7SurfaceBurnersand Grates
8I4
16,19 I4
8OvenLightSwitch
(letsyouturn interiorovenlight
on and off)
9Clock andTimer
H
9
C9 60
DigitalDigital
1
10 Oven Vent
11 Chrome-Plated Drip Pans
al
16,20 Id
54
I
12 Lift-Up Cooktop -3---+- e
13 PorcelainEnamel OvenInterior
14 Continuous-CleaningOven Interior 1’7 ‘
1115 Oven Interior Light
16 Oven Shelves
e
21%
11,19 2“2 xl
(easily removedor repositioned
on shelf supports)
-- @
17 Oven ShelfSupports 11 I
18 RemovableOven Door
(easily removedfor ovencleaning)
19 Window 20 ISJ
~o ~roilerpanand~ack 19,20 I
standingPM Model
L2BI.15GPL
Thesurfaceburnersontheseranges
havestandingpilotsthatmustbelit
initially.TOlightthem:
LBesuresurfaceburnercontrol
knobsareintheOFF position.
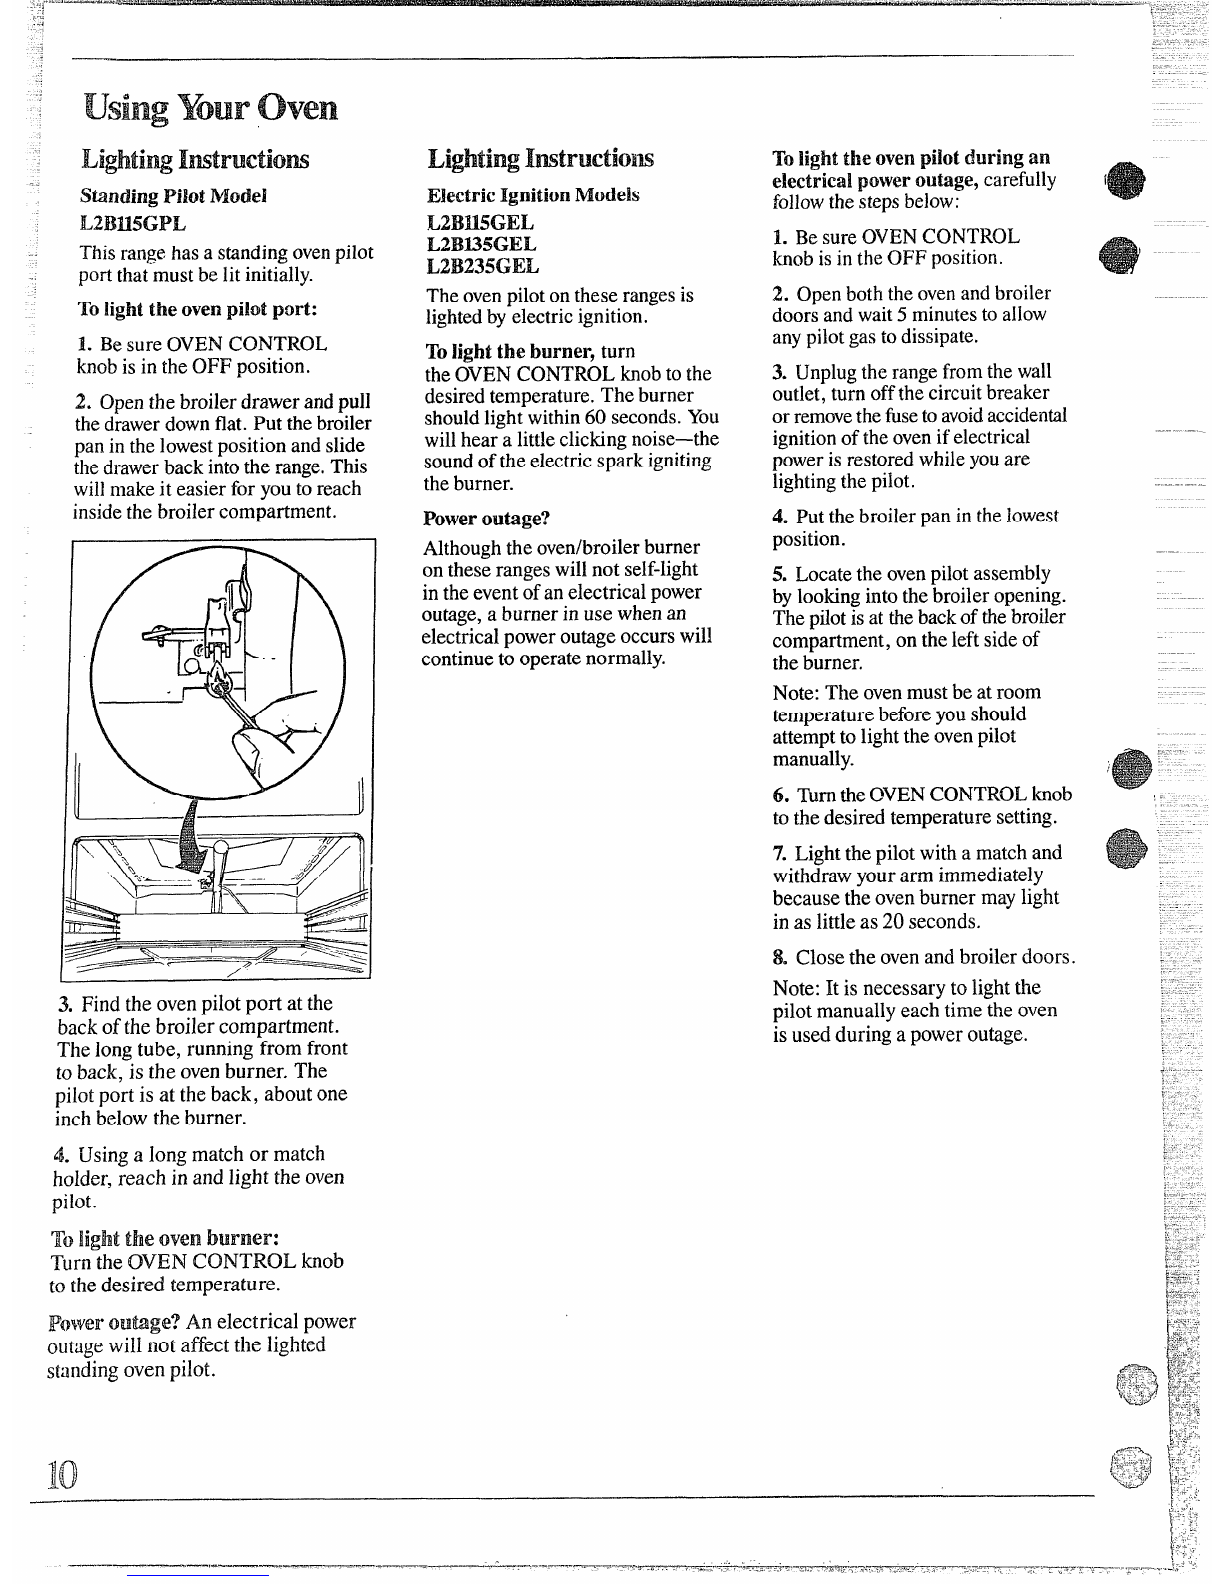
2. Removethegratesand Iiftthe
cooktopup (seepage 16).
3. Locatethetwopilotports and
lighteachofthemwithamatch.
4. Lowerthe cooktop.Yoursurface
burnersarenowready foruse.
Ekctrk IgnitionModels
L2M15GEL
L2M35GHJ
L2B235GEL
Surfaceburners onthese rangesare
lightedbyelectricignition, e~ding
theneedfor standingpilotswith
constantlyburningflames.
hi caseofa poweroutage,youcan
lightthepilotlessignitionsurface
burnersonyourrangewithamatch.
Holdalighted matchtotheburner,
thenturntheknobtotheLITEposition.
use extreme caution when
J@@~ng~urner$ in this mawn!er.
Surfaceburners inuse when an
electricalpoweroutageoccurswill
continuetooperate normally.
8
sd’’ux?EhmRer
Theknobsthatturnthe surface
burnerson andoffare locatedon
thelowercontrolpanelirifrontof
theburners.
Thetwoknobsontheleftcontrol
theleilfrontand leftrear burners.
Thetwoknobsontherightcontrol
therightfrontandrightrearburners.
ToLi@t asurfaceBummer’
How toselect mimesize
The flamesizeonagasburner
shouldmatchthecookwareyou
are using.
FOR SAFE HANDLING OF
COOKWARE,NEVER LET THE
FLAMEEXTEND UP THE SIDES
OF THE COOKWARE.Anyflame
largerthan thebottomofthe
cookwareis wastedand only
servestoheat thehandles.
Pushthe controlknob in andturn it When using aluminumor
toUTE. On electricignitionmodels, almninum”ckwlstainless steel
youwillhear alittleclickingnoise— pots and pans, adjustthe flameso
thesoundoftheelectricspark the circleit makesisabout 1/2inch
ignitingtheburner. smallerthan the bottomofthe
cookware.
Aftertheburner ignites,turn the
knobto adjustthe flamesize.
Note:
@Do notoperateaburner for
extendedperiodsoftime without
havingcookwareon thegrate.The
finishon the grate maychipwithout
cookwareto absorbtheheat.
C+Checkto be surethe burner you
turnedon isthe one youwantto use.
~Be SUrethe burners and grates are
COOIbefore youplace yourhand, a
pot holder, cleaning cloths or other
materials on them.
Vi-Mmboiling, use this same
flame size—1/2inchsmaller than
the bottomof the cookware—no
matterwhat the cookwareis made
of. Foodscookjust as quickly at a
gentleboil as theydo at afurious,
rollingboil. Ahighboil creates
steamand cooks awaymoisture,
flavorand nutrition. Avoiditexcept
for thefew cookingprocesses
which need avigorousboil.
when frying or warmingfoods
instainless stw!lpaast ironor
enamelware keep the flame down
lower—toabout 1/2the diameter
of the pan.
when fryinginglassor Wramic
cookware? lowerthe flame even
more.
--
,
Ckdwvare
Aluminum:
Medium-weight
cookwareisrecommendedbecause
“theatsquicklyandevenly.Most
oocisblownevenlyin analuminum
skillet,Mineralsinfoodandwater
.willstainbutnotharm aluminum.
Aquickscour withasoap-filled
steelwoolpad aftereach-usekeeps
aluminumcookwarelookingshiny
new.UsesauceDanswith ti~ht-
fittinglidsforc~okingwit:
minimumamountsofwater.
Cast Eon: If heatedslowly,most
skilletswillgivesatisfactoryresults.
Emmdware: Under some
conditions,theenamelofsome
cookwaremaymelt.Followcookware
manufacturer’srecommendations
forcookingmethods.
Glass:There aretwotypesofglass
cookware—thosefor ovenuseonly
andthosefor top-of-rangecooking
(saucepans,coffeeand teapots).
G1assconductsheatvery slowly.
eatproof’CHassCeramic:Can
beused for eithersurface or oven
cooking.It conductsheat very
lowlyand coolsvery slowly.Check
cookwaremanufacturer’sdirections
tobesureitcanbeusedongasranges.
StainlessSteel: Thismetalalonehas
poorheatingproperties,andisusually
combinedwith copper, aluminum
or other metals forimprovedheat
distribution. Combinationmetal
skii!etsgenerallywork satisfactorily
ifusedat mediumheat as the
manufacturerrecommends.
and
clack
TosettheClock,turntheknobto
theleftuntilthewords“SETTIME”
appearinthedisplay.Thenturnthe
knobineitherdirectionuntilthe
correcttimeisdisplayed.Aftera
slightpause,timeisset.
mmer
&?Amswws
Q. Howcan Iuse my Minute
Timerto makemysurface
cockingeasier?
A. YourMinuteTimerwillhelp
timetotalcookingwhichincludes
timetoboilfoodandchange
temperatures.Do riotjudge
cookingtimebyvisiblesteam
only.Foodwillcookincovered
containerseventhoughyoucan’t
seeanysteam.
Q. CanIuse theMinuteTimer
duringovencooking?
A. The MinuteTimercan be used
duringanycookingfunction.
Tosetthe Timer,turn theknob
totherightuntilthewords“SET
TIMER” appearinthedisplay.
Thenturn theknobin either
directionuntilthedesiredtime
(minutesandseconds)isdisplayed.
Thetimerwillstartcountingdown.
Tocamel the timer,turntheknob
ineitherdirectionuntil “0:00”
appearsinthedisplay.
Athe endoftk timeroperation,
afterthe3beeps,thedisplayreturns
totimeofdayautomatically.During
thetimer function, thedisplay
flashesbackto thetimeofday
every 10seconds.
..—.—.—.——.——.—..—.— .——..
$=%
----
standing Pilot NhM
L2BU5GPL
Thisrangehasastandingovenpilot
portthatmustbe lit initially.
T“ light the ovenpilot port:
1. Besure OVEN CONTROL
knobisin theOFF position.
.2.Openthe broilerdrawer andpull
thedrawerdownflat. Put thebroiler
pan inthe lowestpositionandslide
thedrawerback intothe range.This
willmakeit easier for youto reach
insidethe broilercompartment.
\.\
3. Find the ovenpilot port at the
backofthe broiler compartment.
The long tube, running from front
to back, is the ovenburner. The
pilotport is at the back, about one
inch below the burner.
4. Usingalong match or match
holder, reach in and light the oven
pilot.
To light the oven burner:
Turn the OVEN CONTROL knob
to thedesired temperature.
Power =m@ge?An electrical power
outagewiHnot affect the Iighted
standingoven pilot.
Electric~gnithm~OddS
L2BJ15GEL
L21KL35GEL
L2B235GEL
Theovenpilotonthese rangesis
lightedbyelectricignition,
3’0light.theburner,turn
theOVENCONTROLknobto the
desiredtemperature.The burner
shouldlightwithin60 seconds.You
willhear alittleclickingnoise—the
soundof the electricspark igniting
theburner.
Power outage?
Althoughthe overdbroilerburner
ontheserangeswillnot self-light
intheeventofan electricalpower
outage,aburner in use whenan
electricalpoweroutageoccurswill
continueto operatenormally.
Tolight the ovenpilotduringan
electricalpoweroutage,carefully
followthestepsbelow:
1. BesureOVENCONTROL
knobisintheOFF position.
2. Openboththeovenandbroiler
doorsand wait5minutesto aHow
anypilotgasto dissipate.
3. Unplugtherangefromthewall
outlet,turn offthe circuitbreaker
orremovethefusetoavoidaccidental
ignitionoftheovenifelectrical
powerisrestoredwhileyouare
lightingthe pilot.
4. Putthe broilerpan inthelowest
position.
5. Locatethe ovenpilotassembly
bylookingintothe broileropening.
Thepilotisat thebackofthebroiler
compartment, on theleft sideof
theburner.
Note:The ovenmustbeat room
temperaturebeforeyoushould
attemptto lightthe ovenpilot
manually.
6. TurntheOVENCONTROLknob
tothedesired temperaturesetting.
7. Lightthe pilot withamatchand
withdrawyour arm immediately
becausetheovenburner maylight
in as littleas 20 seconds.
8. Closethe ovenand broiler doors.
Note: It is necessaryto lightthe
pilotmanually each time the oven
isusedduring apoweroutage.
“j
—
oven control
TheOVENCONTROL knobis
1ocatedon [hecontrolpanelonthe
mntoftherange(seepage6).
Simpiyturn theknobto thedesired
cooki~gtemperatures,whichare
markedin 2501?.incrementsonthe
dial.Rwill normaHytake60
secondsbeforetheflame comeson.
Aftertheovenreachesthe selected
temperature,theovenburnercycles—
offcompletely,thenon withafull
flame-to keeptheoventemperature
controlled.
ownLight
(onmodelsso equipped)
Usethe switchonthe backguardto
turnthe lighton and off.
oven SheIves
Toremove the shelvesfromthe
oven,pullthemtowardyou,tilt
frontendupwardandpullthemout.
Toreplace, place shelfon shelf
supportwithstop-locks(curved
extensionunder shelf)facingup
andtowardrear ofoven.Tiltup
frontand pushshelftowardbackof
ovenuntilit goespast “stop”on
ovenwall.Thenlowerfrontofshelf
andpushit allthe wayback.
shelf Positiom
Theovenhas fourshelfsupports—
A(bottom),B,Cand D(top).
Shelfpositionsfor cookingare
suggestedon Bakingand Roasting
pages.
Theshelvesare designed with stop-
loc.ksso when placed correctly on
theshelf supports, they will stop
beforecoming complete~youtof
theovenand will not tilt whenyou
arc removingfoodfrom them or
phwingfood on them.
Whenplacing cookware on ashelf,
pullthe shelf outto the “stop”
pc}sition.Place the cookware on
theshe~f,then slidethe shelf back
intothe oven. This wil~eliminate
reachinginto the hot oven.
—
ownvent
Theovenisventedthroughduct
openingsat thecenterrear ofthe
range,(seepage6). Do notblock
theseopeningswhencookinginthe
oven—itisimportantthattheflowof
hotair fromtheovenandfreshairto
theovenburnersbeuninterrupted.
@Ventopwings md nearby
surfacesmaybecomeM. Do not
touchthem.
@Hades of potsandpansonthe
Cooktopmaybecomehot if Mt
toodose to the vent.
I . I
@Do notleaveplasticitemson
thecooktop—theymaymelt if
lefttooCIOS63to the vent.
.
oven
As yourovenheats up,the
temperaturechangeofthe air
in the ovenmaycausewater
dropletsto form on the door
glass. Topreventthis, openthe
ovendoor for the first minute
ofovenheat-up toletthe moist
air out.
M9w$0setYil.n-Range
for
1. Positiontheshelfor shelvesin
theoven.If cookingontwoshelves
atthesametime, staggerthepans
forbestheatcirculation.
2. Closeovendoor.Turn
OVENCONTROLknobtodesired
temperature.Preheatovenforat
least15minutesifpreheatingis
necessary.
3. Placefoodinovenon center
ofshelf,Allowat least2inches
betweenedgeofbakewareandoven
wall or adjacentcookware.
4. Checkfoodfordonenessat
minimumtimeon recipe. Cook
longerif necessary.TurnOVEN
CONTROLknobto OFF and
removefood.
Preheatingisveryimportantwhen
usingtemperaturesbelow225”F.
andwhenbakingfoodssuchas
biscuits,cookies,cakesandother
pastries.
Preheatingisnotnecessarywhen
roastingor forlong-timecookingof
wholemeals.
Mostbakingisdone on the second
shelfposition(B)from the bottom.
When~&ingthreeor four items,
usetwoshelvespositionedon the
secondand fourth setsof supports
(B& D) from bottomof oven.
Bakeangel foodcakes on firstshelf
Position(A) from bottomofoven.
-j‘9
.’:..Ad
Tips
eFO11OW atestedrecipeand
measuretheingredientscarefully.
Ifyouareusingapackagemix,
followlabel“directions.
@Donotopentheovendoorduring
abakingoperation-–heatwillbelost
andthebakingtimemightneedto
beextended.Thiscouldcausepoor
bakingresults.Ifyoumustopenthe
door,openitpartially—only3or4
inches—andcloseitasquicklyas
possible.
~Donotdisturbtheheatcirculation
intheovenwiththeuseofaluminum
foil.Iffoilisused,placeasmall
sheetofit, about 10by 12inchesat
themost, onalowershelfseveral
inchesbelowthefood.Do notplace
foilontheovenbottom.
Problem
andPossibksolutions
HIM
Burningaroundedges
~Edgesofcrusttoothin.
eIncorrectbakingtemperature.
Bottomcrustsoggyandunbaked
@
A11ow crust and/orfillingtoCOO1
sufficientlybeforefillingpieshell.
@Fillingmaybe toothin orjuicy.
@Fillingallowedtostandinpieshell
beforebaking. (Fillpie shellsand
bakeimmediately.)
~Ingredientsandproper measuring
affectthequalityofthecrust. Use a
testedrecipeand goodtechnique.
Makesurethere arenotinyholesor
tearsinabottomcrust. “Patching”
apiecrust couldcause soaking.
I% filling runs over
~Topandbottomcrust notwell
sealedtogether.
~Edgesofpiecrust not builtup
highenough.
eToomuch falling.
@Check sizeofpieplate.
Pastry istough; Crust not flaky
QTio much handling.
~Fattoosoftor cutintoo fine.
RoHdough lightlyand handleas
littleaspossible.
CAKES
Cakeriseshigherononeside
@Batterspreadunevenlyinpan.
Qoven shelve~notlevel.
~Usingwarpedpans.
Cakescrackingontop
~Oventemperaturetoohigh.
oBattertoothick,followrecipe
orexactpackagedirections.
echeck forpropershelfposition.
eCheckpansizecalledforinrecipe.
~Impropermixingofcake.
Cake falls
eTOO muchshortening,sugaror
liquid.
~Checkleaveningagent,baking
powderor bakingsodatoassure
freshness.Makeahabittonote
expirationdatesofpackaged
ingredients.
@Cakebakedatincorrect
temperatureor notbakedlong
enough,
~Ifaddingoiltoacakemix, make
certaintheoilisthetypeand
amountspecified.
Crust ishard
~Checktemperature.
ocheck shelfposition.
Cakehassoggylayerorstreaksat
bottom
~Underminingingredients.
*Shorteningtoosoftfor proper
creaming.
~TOO muchliquid.
COOKIES &Blscmm
Doughycenter;heavycruston
surface
~Checktemperature.
eCheckshelfposition.
~~OllOW bakinginstructions
carefullyasgiveninreliablerecipe
or onconveniencefoodpackage.
@Flatcookiesheetswillgivemore
evenbakingresults.Don’tovercrowd
foodson abakingsheet.
~Conveniencefoodsusedbeyond
theirexpirationdate.
more on
Oneside
~Ovendoor notclosed properly,
check gasketseal.
@Check shelfposition.
-. .-
-.
r---a --
1. Preheating isvery important
whenusingtemperatures below
225°F’.and when baking foods
2. Aluminumpansconductheat
quickly.Formostconventional
baking,light, shinyfinishesgive
3. Dark or non-shinyfinishesand
glasscookwaregenerallyabsorb
heatwhichmayresultindry,crisp
such as biscuits~cookies,cakes bestresultsbecausetheyhelp crusts.Reduceovenheat25°F.if
and other pastries. Preheatthe preventoverbrowning.Forbest lightercrustsaredesired. Rapid
ovenforat least 15minutes. browningresults,werecommend browningofsomefoodscan be
Preheatingisnotnecessarywhen dullbottomsurfacesforcakepans achievedbypreheatingcastiron
roastingor forlong-timecooking andpieplates. cookware.
ofwholemeals.
Time,
Minutes
15-20
20-30
20-40
45-55
20-30
45-60
45-60
45-60
10-25
20-30
30-55
10-15
45-60
45-65
20-25
~_4hrs.
20-35
25-30
40-60
25-35
10-20
6-12
7-12
30-60
30-60
50-90
45-70
15-25
45-60
40-60
13-16
60-90
30-60
30-75
Shelf
Positions Oven
Temt)eratures Comments
Food Cookware
ShinyCookieSheet
ShinyMetalPanwith
satin-finishbottom
CastIronor GlassPan
ShinyMetalPanwith
satin-finishbottom
ShinyMetalMuffinPans
DeepGlassor CastIronCups
Metalor GlassLoafPans
ShinyOblongor MuffinPans
Shinl/Oblont?or MuffinPans
Bread
Biscuits(%-in. thick)
Coffeecake
Cornbreador muffins
Gingerbread
Xiuftins
Popovers
Quickloafbread
}k:st bread(2 loaves)
Plainrolls
Sweetrolls
Canned, refrigeratedbiscuitstake2to4
minutesless time.
B,C
B
B
B
B
B
B
A, B
B
B
400°-4750
350°-4000
400°-4500
350°
400°-4250
375°
350°-3750
375°-4250
375°-4250
350°-3750
Preheatcast ironpan forcrispcrust.
Decreaseabout5minutesfor muffinmix.
Or bakeat 450”F.for 25minutes,thenat
350”F.for 10to 15minutes.
Dark metalor glassgivesdeepest
browning.
Cakes
(v;ithoutshortening) ITwopiece panis convenient.
Line pan withwaxedpaper.
A
B
A
325°-3750
375°-4000
325°-3500
325°-3500
350°-3750
275°-3000
350”-375°
350°-3750
350°
325°-3500
350°-4000
400°-4250
375°-4000
~nyl food AluminumTubePan
Jellyroll MetalJellyRollPan
Sponge MetalorCeramicPan
Cakes (
Metalor CeramicPan
ShinyMetalMuffin Pans
h4etalor GlassLoafor
A, B
B
A, B
B
B
B
Paper linersproducemoremoistcrusts.
Use 300”F.and Shelf Bfor stiall or
individualcakes.
If bakingfour layersuse
shelvesBandD.
TubePan
ShinyMetalPanwith
satin-finishbottom
ShinyMetalPanwith
satin-finishbottom
Metalor GlassLoaf Pans
Layer,chocolate
Loaf
C’ookies Barcookies from mix use sametime.
Use Shelf Cand increasetemperature
25 to 50”F.for morebrowning.
Metalor GlassPans
CookieSheet B, C
B,C
B,C
B,C
A, B,C
B
B
Brownies
Drop
Refrigerator ICookieSheet
Rolledor sliced CookieSheet
Fruits,
Other Desserts
B:Aedapples
Custard 350°-4000
300°-3500
325°
400°-4250
325°-3500
400°-4250
400°-4250
450°
Glassor MetalPans
Glass CuslardCups or
Casserole(set in panof hotwater:
Glass CustardCups or
Casserole
Reducetemperatureto 300”F.for large
custard.
Cook bread or rice puddingwithcustard
base 80 to90 minutes.
Puddings,rice
:lnLi custard
Pks
Frozen
Nfrringue Large pies use 400”F.and increasetime.
Toquickly brown meringue use 400”F. for
9to 11minutes.
Custard fillings require lowertemperature,
longer time.
Foil PanonCookie ;heet
Spreadtocrust edges A
B
A. B
Et
B
(>IICcrust Glass or Satin-finishMetal
Tl)i>crust G!t~ssor Satin-finishMetal
I%[ry shell Glass or Satin-l nish MetalPan
.* %isceilaneous
~“’-~Blkedpotatoes Set onOvenShelf
‘“’ Smlloped dishes Glass or Metal
Soutlles Glass Fan
.~.
(;”.,’:;;)
\;VJ-
Increase time for large amount or size.
A, B, C
A, B, C
B
325°-4000
325°-3750
300°-3500
Roastingiscookingbydryheat.
Tendermeator poultrycanbe
roasteduncoveredin youroven.
Roastingtemperatures,which
shouldbe lowandsteady,keep
spatteringtoaminimum.When
roasting,itis notnecessaryto sear,
baste,coveror addwatertoyour
meat. Roastingiseasy,just follow
thesesteps:
Step 1:Positionovenshelfat
secondfrombottomposition(B)
forsmallsizeroast(3 to5Ibs.)and
atbottomposition(A) forlarger
roasts.
Step 2: Checkweightofroast.
Placemeat fat-side-upor poultry
breast-side-upon roastingrackina
shallowpan. The meltingfatwill
bastethemeat. Selectapanas
closetothesizeofthemeatas
possible.(Broilerpanwithrack isa
goodpan forthis.)
Step 3: TurnOVENCONTROL
knobtodesiredtemperature.Check
theRoastingGuidefortemperatures
and approx~matecookingfimes.
I
,
!I
Step 4: Mostmeatscontinueto
cookslightlywhilestandingafter
beingremovedfromtheoven.
Standingtime recommendedfor
roastsis 10to20 minutes.This
allowsroaststo firmup and makes
themeasierto carve.Internal
temperaturewill riseabout5°to
10”F.;tocompensatefortemperature
rise, ifdesired, removethe roast
fromovensoonerat(5°to 10”F.
lessthantemperatureshownon
RoastingGuide).
I’mzen Roasts
Frozenroastsofbeef, pork,
lamb,etc., can be startedwithout
thawing,but allow15to 25 minutes
additionaltimeper pound (15
minutesadditionaltime per pound
for roastsunder 5pounds,more
timefor larger roasts).
Thawmost frozenpoultrybefore
roastingto ensureevendoneness.
Somecommercialfrozenpoultry
can be cookedsuccessfullywithout
thawing.Followdirectionsgiven
on packer’slabel.
Rwting Guide
Type
!Meat
Tendercuts; rib, highquality
sirloin tip, rump or top round*
Lamblegor bone-inshoulder*
Vealshoulder, legor loin*
Porkloin, rib or shoulder*
Ham, pre-cooked
Ham, raw
*Forboneless rolled roastsover6-inches
thick, add 5to IOminutesper lb. to times
~ivenabove.
~
Poultry
Chickenor Duck
Chickenpieces
Turkey
Oven
Temperature
325°
325°
325°
325°
325°
325°
325°
350°
325°
Doneness
Rare:
Medium:
WellDone:
Rare:
Medium:
WellDone:
WellDone:
WellDone:
ToWarm:
WellDone:
WellDone:
WellDone:
WellDone:
Approximate Roasting Time
in Minutes per Pound
3toS-lbs. 6to $-lbs.
24-35 18-25
35-39 25-31
39-45 3i-33
21-25 20-23
25-30 24-28
30-35 28-33
35-45 30-40
35-45 30-40
18-23minutesper lb. (anyweight)
Under 10h. 10to 15-Ibs.
27-35 24-27
3to 5-lbs. Over 5h.
35-40 30-35
35-40
wto M-b. over Eb.
16-22 13-19
Internal
Temperature ‘1!?
130°-1400
150°-1600
170°-1850
130°-1400
150°-1600
170°-1850
170°-1800
170°-1800
115°-1250
170”
185°-1900
185°-1900
hthigh:
185°-1900
.-
——
--
Broihngiscookingfoodbydirect
heatfromabovethefood.Your
rangehasaconvenientcompartment
beiowtheovenforbroiling,Italso
‘MSaspeciallydesignedbroilerpan
ndrackthatallowdrippingfatto
piercedm~atIosesjuices. least1inch thick-forbestbroiling
results.Panbroilthinnerones.
chide
-. drain away from thefoods and be
keptaway-fromthehighheatof
thegasflame. Quantity
andlor
Food Thickness
IstSide
Broil Time,
Position Minute!
2nd Side
Time,
Minutes Comments
Distancefromtheheatsourcemay
bechangedbypositioningthebroiler
panandrackononeofthreeshelf
positionsinthebroilercompartment--
A(bottomofbroilercompartment),
B(middle)andC(top).
Bacon Y2-lb. (about8
thinslices) 3IArrangeinsinglelayer.
Ground Beef l-lb.(4patties)
WellDone Y2 to %-in. thick B8-9
,
BeefSteaks
Rare
Medium
WellDone
Rare
Medium
WellDone
Chicken (450°)
l-in.thick
(1-1k Ibs.)
1%-in.thick
(’2-2YZIbs.)
1whole
(2to2%-lbs.),
splitlengthwise
Boththe ovenandbroiler
mnparhmmt doorsshouldbe
C)osedduring broiling.
9
12
13
10
15
25
7
5-6
8-9
6-7
12-14
16-18
Steakslessthanl-in, cook
throughbeforebrowning.
Panfryingisrecommended.
Slashfat.
B
B
B
B,C
B
B
HowtoBrd!
1. Ifmeat hasfatorgristlenearthe
edge,cutverticalslashesthrough
bothabout2inchesapart, butdon’t
cutintomeat. Werecommendthat
you trim fattopreventexcessive
25-30 IReducetimesabout5to 10min.A30-35 Ipersideforcut-upchicken.
Brusheachsidewithmelted
]butter.Broilwithskinsidedown
firstandbroilwithdoorclosed.
I
2-3
3-5
13-16
Bakery Products
Bread(Toast)or
ToasterPastries
EnglishMuffins
Lobster tails
(6to8-02.each)
smoking,leavingalayerabout
I/S-inchthick.
2. Removebroilerpan andrack
%-1 Spaceevenly.PlaceEnglish
muffinscut-side-upandbrush
withbutterifdesired.
‘2-4slices
1pkg.(2)
2-split
2-4
c
c
Donot
turn
over.
frombroiler com~artmentand BCutthroughbackofshell,spread
open. Brushwithmeltedbutter
beforeandafterhalftime.
lacefoodonrac~.
3. Pulloutdrawerand position B,C55Handleandturnverycarefully.
Brushwithlemonbutterbefore
andduringcookingifdesired.
Preheatbroilertoincrease
browning.
Fish l-lb. fillets Uto
%-in,thick
broilerpanincompartment.Placing
foodclosertoflameincreasesexterior
browningoffood,butalso increases
spatteririgand thepossibilityoffats
andmeatjuices igniting.
4. Closebroilerdoorand, for
mostfoods,turnOVENCONTROL
knobto BROIL. Note: Chicken and
hamare broiled at450°in order
tocookfoodthroughwithout
o~er-browningit.
5e Turnmost foodsonceduring
cooking;(theexceptionisthinfillets
offish;oilone side,place thatside
dowl~onbroilerrackand cookwithout
turninguntildone). Time foodsfor
a[?outone-half thetotalcooking
time,turn food, then continueto
cooktopreferred doneness.
-=%6. TurnOVEN CONTROL knob
~=~o OFF.Removebroiler pan from
compartment andserve food
,,-immediately. Leavepan outside
“’~:&31npartment tO CAN].
‘+&-&-
—.
8Increasetimes5-10min.perside
for 1Y~-in.thickorhomecured.
Slash fat.
Ham slices(450°)
Precooked
Pork chops
WellDone
Lamb chops
Medium
WellDone
Medium
WellDone
Wieners,
similarprecooked
sausages,
bratwurst
1-in.thick
2(% in.)
2(l-in. thick),
about 1lb.
2(1 inch)
about 10-12oz.
2(1Minch),
about 1lb.
l-lb, pkg. (10)
B8
B10
B13
B8
B10
B10
B17
B, C6
4-5
9-12
4-7 ]Slash fat.
10
4-6
12-14
1-2 Ifdesired, splitsausagesinhalf
lengthwise;cutinto5to6-in.
pieces.
;..-
,
!-.
Care
(see (mming chide on page20.)
Propercare andcleaningare
importantso yourrangewillgive
youefficientand satisfactory
service.Followthesedirections
carefullyin caringfor itto help
assuresafeandpropermaintenance.
IF YOURRANGE HAS
ELECTRICIGI’WHOPd,BE
SUREELECTRICI?(NVERIS
(IFFBEFORECLEANING
AP+WR4LRTm? IT.
outerPainted Finish
Whentherangeiscool, washthe
top,frontand, if exposed, thesides
withmildsoapandwater.Neveruse
anyharsh abrasivesor cleaning
powdersthat mayscratchor marthe
paintedsurface. Rinsethe surface
withclean waterand dry withasoft
cloth.If you wish, occasionally
applyathin coatof mild cleaning
waxtohelp protectthe finish.
‘chktop
There are anumber ofprecautions
youcan take toavoidmarring the
porcelainenameled surfaceofthe
cooktopand preventit from
becomingdull. Don’tslideheavy
pansacross it. If you spillfoods
withalot of acid (tomatoes,
sauerkraut, fruitjuices, etc.)or
foodswith high sugar content,
cleanthem up as soon as possible.
If allowedto set, these foodscould
causeaduHspot. Also, no matter
howstubborn the food stain, never
useharsh abrasive cleansers. They
couldpermanently damage the
enamelsurface. Werecommend a
cleanser such as “Soft Scrub””
brand.
It’sagoodideatowipethecontrol
panelcleanaftereach useofthe
oven.Foramorethoroughcleaning,
theknobscanbe remo~~edby
puHingthemofftheknobsterns.
Cleanwithmildsoapandwater,
rinsewithcleanwaterandpolish
dry withasoftcloth.
Do notuse abrasivecleansers,
strongliquidcleanersor oven
cleanerson the controlpanel—
theywilldamagethefinish.
Lift-up
Clean thearea underthecooktop
often. Built-upsoil, especially
grease, maycatchfire.
Tomakecleaningeasier,the
cooktopmaybe liftedup.
Before raisingthe cooktop:
LBesureburners are turned off.
2. Removethe gratesand, on
modelsso equipped, thedrip pans.
Note: Somemodelsare equipped
with dualsupportrodsthat will
snap intoplace whenthe frontof
the cooktopis liftedall the wayup.
Tolowerthe cooktopagain,
supportthe raised cooktopwith
one hand, then carefullypushthe
bottomofeach rod awayfrom you
until rod slidesback downintothe
sideofthe range.
.-
(hates
Gratesshouldbewashedregularly
and, ofcourse,after spillovers.
Washthem inhot, soapywaterand
rinsewithcleanwater.Dry the
grateswithacloth—don’tputthem
backontherangewet,When
replacingthegrates,be surethey’re
lockedintopositionovertheburners.
Togetridofburned-onfood,soak
thegratesin aslightlydiluted
liquidcleaner.
Althoughthey’redurable,the
grateswill graduallylosetheir
shine,regardlessofthebestcare
youcan givethem. This isdue to
theircontinualexposuretohigh
temperatures.
Do notoperateaburner foran
extendedperiodoftimewithout
cookwareon thegrate. The finish
onthegratemaychip without
cookwareto absorbtheheat.
Drip Pm-M
(onmodelsso equipped)
‘-
$xid cared’
own
fodd I,2B235GEL
The Conti~lllous-Cleaning oven
deans itself while cooking. The
insideofthe oven—top,sidesand
back—isfinishedwithaspecial
codng whichcannotbe cleaned
intheusualmannerwith soap,
detergents,steelwoolpads,
commercialovencleaners, coarse
abrasivepadsor coarse brushes.
Useofsuch cleansersand/orthe
useofovensprayswillcause
permanentdamage.
‘Nwspecial coating is aporous
ceramic materialwhich isdark in
colorand feelsslightlyroughtothe
touch.If magnified,the surface
wouldappear aspeaks, valleysand
sub-surface“tunnels:’This rough
finishtendsto preventgrease
spattersfrom forminglittlebeads
_or dropletswhichrun downthe
:.+=walksofahard-surfaceoven
_]inel- leavingunsightlystreaksthat
requirehand cleaning.Instead,
henspatter hitstheporous finish,
isdispersed and is partially
absorbed. This spreadingaction
increasesthe exposureofoven
soiltoheated air, and makesit
somewhatless noticeable.
Soilmay nd disappeareompktdy
and at some timeafter extended
usage,stains mayappear which
cannotbe removed.
The specialcoating works best on
smallamounts of spatter. Itdoes
notwork well with larger spills,
especiallysugars, egg or dairy
mixlures.
Thisspecialcoating is not used
cmovensheks9 oven bottom or
doorliner. Removethese to
preventdamaging the oven’s
continuous-cleaning coating and
clean them with acommercial oven
clraner.
mlawnthe
Cm?n:
LLetrangepartscool before
handling.Werecommendrubber
glovesbeworn when cleaning.
2. Removeshelvesandcookware.
3. Soilvisibilitymaybe reduced
byoperatingthe ovenat 400°F.
Closethedoor andturn OVEN
CONTROLknobto400°F.Timefor
atleast4hours.Repeatedcyclesmay
be necessarybeforeimprovement
in appearanceisapparent.
l?EMEMBER:DURING THE
OPERATIONOFTHEOVEN,THE
DOOR.WINDOW AND OTHER
RANGE SURFACESWILLGETHOT
ENOUGH TOCAUSEBURNS.DO NOT
TOUCH.LET THERANGE COOL
BEFOREREPLACINGOVENSHELVES.
4.If aspilloveror heavy soiling
occurson the poroussurface, as
soonas the ovenhas cooled remove
asmuch ofthe soilas possible
usingasmall amount ofwaterand a
stiffbristle nylonbrush. Use water
sparingly,blottingit up with paper
towels,cloths or sponges, and
changeit frequently,keepingitas
clean as possible. Do not rubor
scrub with paper towels, clothsor
sponges,since they will leave
unsightlylint on the ovenfinish. If
waterleavesawhitering on the
finishas it dries, apply wateragain
and blot itwith aclean sponge,
startingat the edgeof the ring and
workingtowardthe center.
.Donot use soap, detergent,
steelwoolpads,commercial
ovencleaner,siliconeoven
SprQyS9coarsepadsor coarse
brusheson the poroussurface.
Theseproductswillspot, clog
and marthe poroussurfaceand
reduceitsabilitytowork.
Do not scrape the porous
surfacewithaknifeorspfdda-
theycouldpermanentlydamage
the finish.
The ovenbottomandthe inside
of the oven door hve ti porcelain
enamelfinish The door liftsoff
and thebottomcomesoutfor
cleaningawayfromthe continuous
cleaningoven.
(contimiednextpagt
oven
The ovenbottomcan beremovedto
makecleaningeasier.
Fla~ge
l-bremove:
LGrasp ovenbottomat finger
slotson each side.
2. Liftfront edgeofovenbottom
enoughto raise tabsfrom slotsin
frontframe.
3. Pushovenbottomback about
1/4”to release flangefrom front
frame, then pullout.
‘lbreplacetheovenbottom:
1. Slideovenbottomintoovenso
rear tabsfitintoslotsin rear wallof
oven.
2. Graspovenbottomat finger
slotsandpushitbackandthen
downtohooktheflangeunderthe
frontframe.
3. Fit fronttabsintoslotsinfront
frame.
The ovenbottom hasaporcelain
enamelfinish. Tomakecleaning
easier, protecttheovenbottom
fromexcessivespillovers.This is
particularlyimportantwhenbaking
afruit pieor other foodswith high
acid content.Hot fruitfillingsor
foodsthatare acid in contentsuch
as milk, tomatoor sauerkraut, and
sauceswithvinegaror lemonjuice,
maycause pittingand damageto
the porcelainenamelsurface.
Toprotectthe ovenbottomsurface,
place apiece ofaluminumfoil
slightlylarger than the bakingdish
or asmallcookie sheetonalower
shelfor under thebakingdishto
catch anyboilovers.It shouldnot
comp~etelycoverthe shelfas this
wouldcauseunevenheat inthe
oven.Aluminumfoilshouldnotbe
placed on the ovenbottom.
If aspilloverdoes occur on the
ovenbottomallowthe ovento cool
first, Youcan clean the bottomwith
soap and water,amild abrasive
cleanser, soap-filledabrasivepads
or causticovencleaner following
manufacturer’sdirections.
—-...
.—.
Drawer Range TopBurners
ovenDoor
heovendoor isremovableto Theholesin theburnersofyour
rangemustbekeptcleanatall
timesforproperignitionand an
even,unhamperedflame.
Youshouldcleantheburners
routinelyandespeciallyafterbad
spilloverswhichcouldclogthese
holes,Burnersliftrightoutfor
cleaning.
Toremove:
1. Whenbroileriscool, remove
rackandpan.
maketheinteriormore accessible.
Roller Guide BroilerCompartment
/
/
/
“)
FrontFrame
Hinge 2. Pullthe broilerdraweroutuntil
itstops,then pushitback in about
one inch.
3. Grasphandle,liftandpull
broilerdrawerout(lifttherollers
locatedunderthedraweroverthe
rollerguidestopsinthe range).
Toremove the door, open itafew
inchestothe specialstopposition
thatwillhold the dooropen. Grasp
firmlyon each sideandliftthedoor
straightup and offthe hinges. Toreplace: Note: Ascrewholdseachof
the burners inplaceto keepthem
from wobblingaroundduring
shipment.Removeanddiscardthe
shippingscrew.Tiltthe burner to
the rightto release itstwo tabsfrom
slotsin theburner supportand
movetheburner towardtheback of
the range.This disengagesit from
the gasvalveatthe frontofthe
range, and it liftsouteasily.
LPutthe rollersunder thebroiler
drawerbehindtheroller guide
stopsinthe range.
Note:Becareful notto placehands
etweenthe springhingeandthe
ovendoor frame as the hingecould 2. Hold the broiler drawerioqthe
raisedpositionasyouslideIt
partwayinto therange. Then lower
thedrawer andpush itcompletely
closed.
snapback and pinch fingers.
ashwith hot, soapywater.For
stubbornspots, useasolutionof
vinegarand water. Do not immerse
thedoor in water.
TorepIacethe door,make surethe
hingesare in the “out” position.
Positionthe slotsinthe bottomof
thedoor squarely over the hinges.
Then lowerthedoor slowlyand
evenlyover bothhingesat the same
time. If hingessnap back against
the ovenframe, pullthem back out.
Broiler Pm& Rack Toremoveburned-on food, soak
the burner in asolutionof aproducl
usedforcleaningtheinsideof coffee
makers. Soakthe burner for 20 to
30 minutes.If the fooddoesn’t
rinse offcompletely,scrub it with
soap and water or amild abrasive
cleanser and adamp cloth.
After broiling, removethebroiler
rack and carefullypour offthe
grease. Washand rinse the rack
inhot, soapywater.
If foodhas burned on, sprinkle
therack while hotwith detergent
and coverwith wet paper towelsor
adish cloth. That way,burned-on
foodswill soak loose whilethe
meal isbeing served.
ownshelves Beforeputting theburner back, dry
itthoroughlyby settingit in awarn-
ovenfor 30 minutes. Then place it
back in the range, making sure it is
properly seated and level.
O\cn shelves maybe cleaned with
amiidabrasive cleanser following
manufacturer’sdirections. After Do not store asoiled broiler pan
and rack in theovenor broiler
compartment.
chinning,rinsetheshelveswithclean
wtitcrand dry with adry cloth. To
removeheavy,burned-onsoil,soapy
mct:dpads may be used following
~~~~l;l[lllfacturer’sdirections. After
\,:.—
-+&rubbing, wash with soapy water,
rinseand dry.
Note:Letrange/ovenpartscoolbeforetouchingor harding.
--—— ——
GENERAL IIIX4EC’I’K.INS
Drain fat, COOIpan and rackslightly.(Donotletsoiledpanandrackstandinbroiler
compartmenttocool.)Sprinkledetergentonrackandpan.Fill panwith warm waterandspread
clothorpapertoweloverrack.Letpanandrackstandforafewminutes.Wash; scourif
necessary.Rinseanddry.OPHON:Clean pan and rack indishwasher.
Pull offknobs. Washgently but do notsoak.Dryandreturncontrolstorange.
Cleanoutsideofcooledblackglassdoorwithagiasscleanerthatdoesnotcontainammonia.
Washglasscontrolpanelwithclothdampenedinsoapywater.Rinseandpolishwithadry
cloth,Ifknobsareremoved,donotallowwatertorundowninsidesurfaceofglasswhile
PART
Broihx Pan and Rack
MATERIALS TO USE
@SoapandWater
@Soap-FilledScouringPad
@PlasticScouringPad
CIDishwasher
~MildSoapandWater
eSoapandWater
Control Knobs
Outside Glass Finish
cleaning,
Wash,rinseandthenpolishwithadrycloth.
~SoapandWater Ml NOT USE steel wool,
abrasives, ammonia, acidsor
commercial oven cleaners.
These mightdamagethe finish.
Metal, including
Side Trims, Trim
Strips
Werecommend“SoftScrub”brandcleanser.
Ifacidsshouldspillontherangewhileitishot,useadry
papertowelorclothtowipeuprightaway.Whenthesurface
hascooled,washandrinse.
Forotherspills,suchasfatsmatterings,etc., washwithsoap
andwaterwhencooledandthenrinse.Polishwithadry
cloth.
Useamildsolutionofsoapandwaterandasoftcloth.
Porcelain Cooktop* 0PaperTowel
@DryCloth
*SoapandWater
~“SoftScrub”
brandcleanser
DO NOT USE oven c!eaners,
cleansing powders or harsh
abrasives. These might
scratch theenamel.
Painted Surf’aces
(doorfront,broiler
drawerfront,
sidepanels)
DO NOT USE oven cleaners,
cleansing powders or harsh
abrasives. These might
scratch or mar the surface.
PSoapandWater
SoapandWater
Soap-FilledScouringPad
PlasticScouringPad
Shelvescanbecleanedbyhandusingsoapandwater.Rinsethoroughlytoremoveanysoap
aftercleaning.
Liftoutwhencool.Soak5to 10minutesifdesiredinwarmsolutionofdishwasherdetergent.
Scourwithmaterialsmentionedheretoremoveburned-onfoodparticles.
clean asdescribedbeloworindishwasher.Wipedrippansaftereachcookingsounnoticed
jpatterWili not“burnon”nexttimeyoucook.Toremove“burned-on”spatters,useanyorall
cleaningmaterialsmentioned.Rublightlywithscouringpadtopreventscratchingofthe
;urface.
iVipeoffburnerheads.Ifheavyspilloveroccurs,removeburnersfromrange(seepage19)and
;oakthemfor20to30minutesinsolutionofhotwaterandproductforcleaninginsideofcoffee
nakers,suchas Dip-Itbrand.Ifsoildoesnotrinseoffcompletely,scrubburnerswithsoapand
vateroramildabrasivecleanserandadampcloth.Dryburnersinawarmovenfor30minutes
]eforereturningthemtotherange.
Shelves
SurfaceBurner
Grates SoapandWater
Soap-FilledScouringPad
(Non-metallic)
Chrome-Plated
DripPans(onmodels
soequipped)
SoapandWater
Stiff-BristledBrush
Soap-FilledScouringPad
(Non-metallic)
SolutionforCleaning
InsideofCoffeeMakers
SoapandWater
~IMildAbrasiveCleanser
~DampCloth I
SurfaceBurners
UsefollowingdirectionsforStandardPorcelainEnatmeIOvensonly.
Seepage17forContinuous-Cleaningovens(ModelL2B235GEL).
I
OvenLiner*
(C’AUTION:Whenin
USC,lightbulbscan
becomewarmenough
[~~breakiftouchedwith
moistclothortowel.
W-hencleaning,avoid
[~mchingwarmlamps
withcleaningcloths.
@SoapandWater
@Soap-FilledScouringPad
~CommercialOvenCleaner
Coolbeforecleaning.
FORLIGHTSOIL:Frequentwipingwithmildsoapandwater(especiallyaftercookingmeat)
willprolongthetinlebetweenmajorcleaning.Rinsethoroughly.NOTE:SOW-IkftOR~i~e~
causesadditionalstaiaswhenovenisreheated.
FORHEAVYSOIL:Chooseanon-abrasivecleaner andfollowlabelinstructions,usingthin
layerofcleaner.Use ofrubberglovesis recommended.Wipeor rublightlyonstubbornspots.
Rinsewell.Wipeoffanyovencleanerthatgetsonthermostatbulb.Whenrinsingovenafter
cleaningalsowipethermostatbulb.
-.
‘!:Spillageof marinades, fruit juices, tomato sauces and basting materials containing acids maycause discoloration, so should be wipedupimmediately
(i~lt~ttedupifin Continttous-Cleaningoven).Takecare nottotouchhotportionofoven.Whensurfaceiscool, cleanandrinse.

This manual suits for next models

5

Other RCA Range manuals

RCA LEB356GY Manual

RCA

RCA LEB356GY Manual

RCA L3U30L Installation instructions

RCA

RCA L3U30L Installation instructions

RCA LEB356 Installation instructions

RCA

RCA LEB356 Installation instructions

RCA L2B335GEL User manual

RCA

RCA L2B335GEL User manual

RCA LEB356WY Manual

RCA

RCA LEB356WY Manual

RCA LGB116GPR Installation guide

RCA

RCA LGB116GPR Installation guide

RCA LEB131 Installation instructions

RCA

RCA LEB131 Installation instructions

RCA LGB116 Installation guide

RCA

RCA LGB116 Installation guide

RCA L2W20EL Installation instructions

RCA

RCA L2W20EL Installation instructions

RCA LGB600 Installation guide

RCA

RCA LGB600 Installation guide

RCA LGB146 Installation guide

RCA

RCA LGB146 Installation guide

RCA LGB126 Installation guide

RCA

RCA LGB126 Installation guide

RCA L3B315GL Installation guide

RCA

RCA L3B315GL Installation guide

RCA L3B325GL Installation guide

RCA

RCA L3B325GL Installation guide

RCA LGB336GET Installation guide

RCA

RCA LGB336GET Installation guide

RCA L2W20BEL Installation instructions

RCA

RCA L2W20BEL Installation instructions

RCA LEB316GR Installation guide

RCA

RCA LEB316GR Installation guide

RCA L3B355GL User manual

RCA

RCA L3B355GL User manual

RCA L3BI15GL Installation guide

RCA

RCA L3BI15GL Installation guide

RCA LGB336 Training manual

RCA

RCA LGB336 Training manual

Popular Range manuals by other brands

Whirlpool SF367LXSQ0 Use & care guide

Whirlpool

Whirlpool SF367LXSQ0 Use & care guide

Dacor Preference RSD30 Guide

Dacor

Dacor Preference RSD30 Guide

Samsung NE63T8751SG Simple manual

Samsung

Samsung NE63T8751SG Simple manual

Avanti DG240W instruction manual

Avanti

Avanti DG240W instruction manual

Amana ACR4530BA Limited warranty

Amana

Amana ACR4530BA Limited warranty

GE CGS975SEDSS Dimensions and installation information

GE

GE CGS975SEDSS Dimensions and installation information

GE JCGB735SPSS installation instructions

GE

GE JCGB735SPSS installation instructions

GE Cafe CGS700P owner's manual

GE

GE Cafe CGS700P owner's manual

Fisher & Paykel RDV3366N installation guide

Fisher & Paykel

Fisher & Paykel RDV3366N installation guide

GE Cafe C2S985SETSS Dimensions and installation information

GE

GE Cafe C2S985SETSS Dimensions and installation information

Forno FFSGS6444-30 installation guide

Forno

Forno FFSGS6444-30 installation guide

Frigidaire FFGF3012TW Use & care manual

Frigidaire

Frigidaire FFGF3012TW Use & care manual

Whirlpool SS310PEB Use and care guide

Whirlpool

Whirlpool SS310PEB Use and care guide

Whirlpool AGB 592/WP Instructions for installation, use and maintenance

Whirlpool

Whirlpool AGB 592/WP Instructions for installation, use and maintenance

Bertazzoni X365GGVX Installation, use & care manual

Bertazzoni

Bertazzoni X365GGVX Installation, use & care manual

GE JB905 owner's manual

GE

GE JB905 owner's manual

Wolf GR304LP Use and care guide

Wolf

Wolf GR304LP Use and care guide

Amica EHEG 934 112 E instruction manual

Amica

Amica EHEG 934 112 E instruction manual

manuals.online logo
manuals.online logoBrands
  • About & Mission
  • Contact us
  • Privacy Policy
  • Terms and Conditions

Copyright 2025 Manuals.Online. All Rights Reserved.