RCA 27F530T User manual

Retourner le cahier pour la
version fran_aise
TOCOM 1620181B

IE_ This symbol indicates that tMs product incorporates double
insulation between hazardous rnains voltage and user
aeeess[ble parts. When serv[ch'lg use only identieal
replacement palts.
Caution: To reduce the risk of electric shock, do not remove cover (or back). No user serviceable
parts inside. Refer servicing to qualified service personnek
This symbol indicates important
instructions accompanying the
product.
This symbol indicates "dangerous voltage" inside the
produet that presents a risk of electric shock or
personal injury.
WARNING
To reduce the risk of fire or electric shock,
do not expose this product to rain or
moisture.
The apparatus shall not be exposed to
dripping or splasMng and that no objects
filled with liquids, such as vases, shall be
placed on the apparatus.
Refer to the identification/rating label located on the
back panel of your product for its proper operating
voltage.
FCCRegulations state that unauthorized changes or
modifications to this equipment may void the user's
authority to operate it.
Caution: Using video games or any external accessory
with fixed images for extended periods of time can
cause them to be permanently imprinted on the
picture tube (or projection W picture tubes). ALSO,
some network/program Iogos, phone numbers, etc.
may cause similar damage, This damage is not covered
by your warranty,
Cable TV Installer: This reminder is provided to call yore
attention to Art(de 820-40 of the National Electrical
Code (Section B4 of the Canadian Electrical Code, Palt
1) which provides guidelines fm Hoper grounding and,
in particular, specifies that the cable ground shall be
connected to the grounding system of the buiN[ng as
close to the point of cable entry as practical.
Product Registration
Please fill out the product registration card (packed separately) and return it immediately. For U.S.
customers: Your RCA Consumer Electronics product may also be registered at www.rea.eom/
productregistrat[on. Registering this product allows us to contact you [f needed.
Product information
Keep your sales receipt to obtain warranty parts and service and for proof of purchase. Attach it here
and record the serial and model numbels. These numbers are located on the product.
Model No. Serial No. Purchase Date:
Dealer/Address/Phone:

_ter t :Connections _ Setup_
Things to Consider Before You Connect ....................................................................... 3
ProtectAgainst PowerSurges....................................................................................................................3
ProtectComponentsfrom Overheating..................................................................................................3
PositionCablesProperlyto AvoidAudio Interference........................................................................3
Important Standand BaseSafetyInformation .....................................................................................3
UseIndirect Light ..........................................................................................................................................3
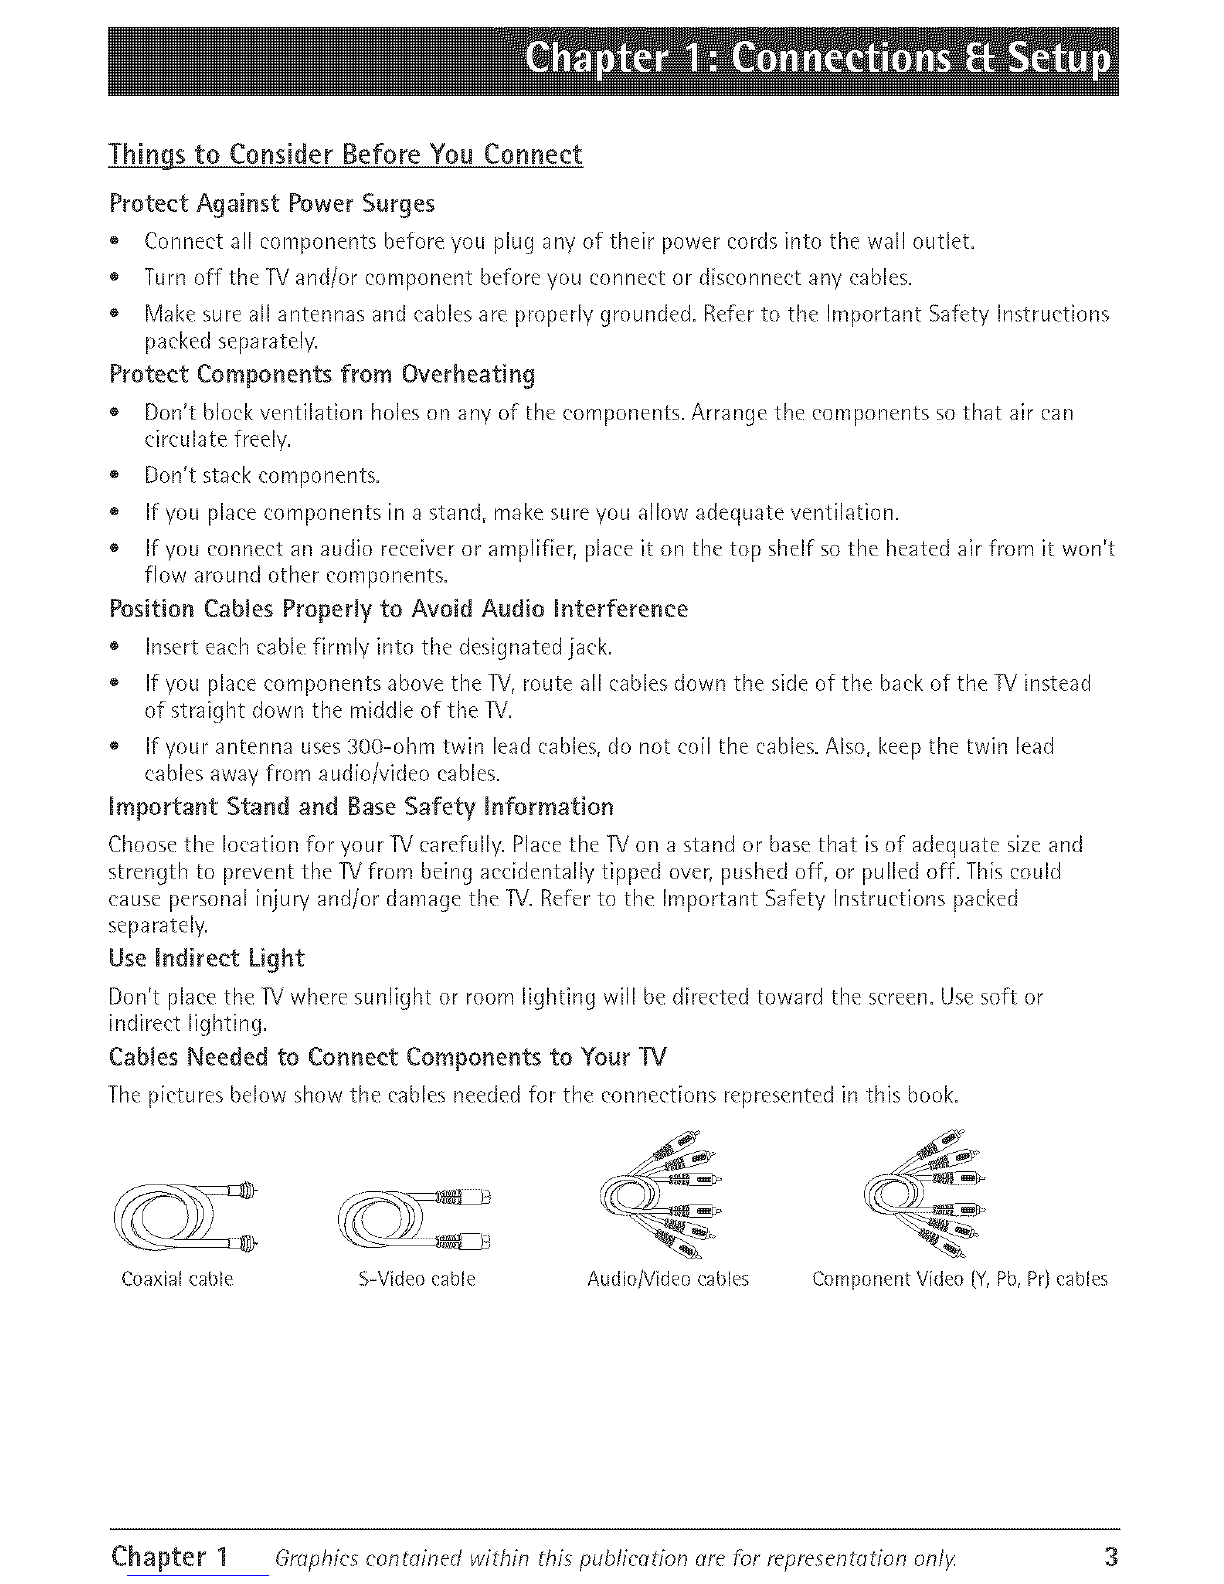
CablesNeededto ConnectComponentsto YourTV............................................................................3
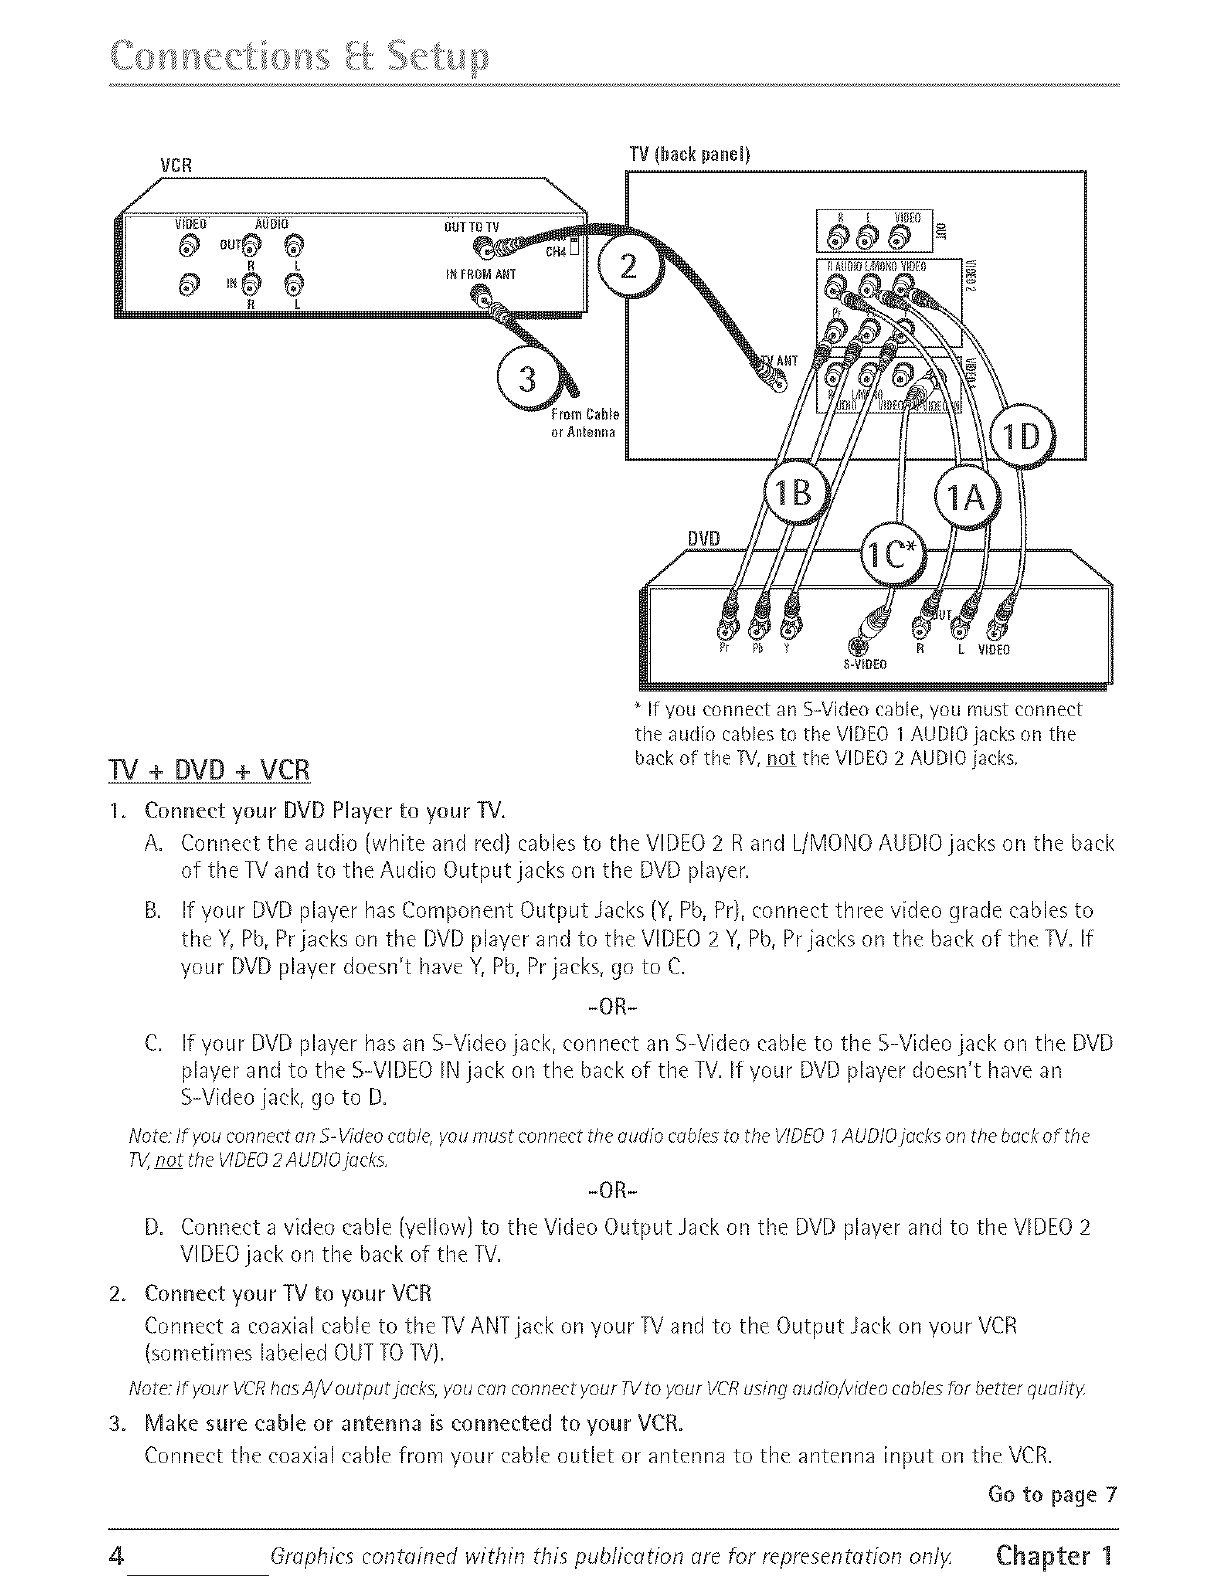
"IV + DVD + VCR .............................................................................................................. 4
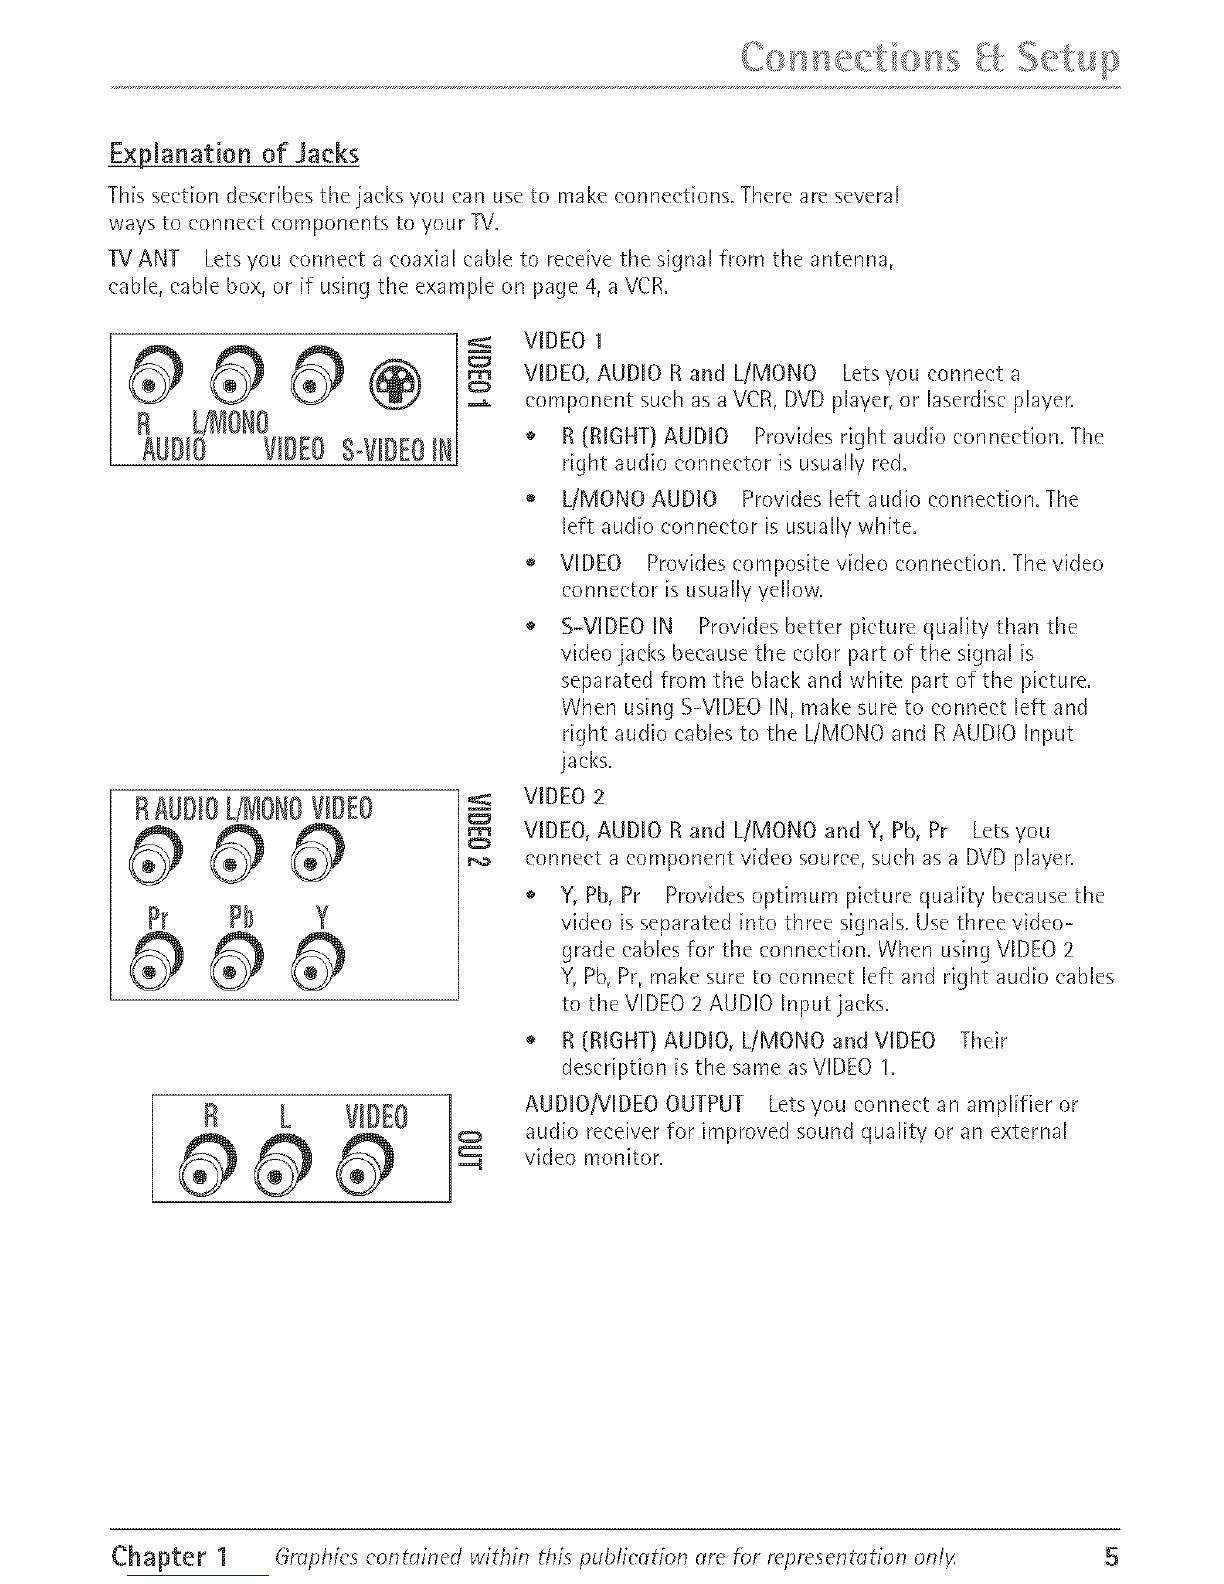
Explanation of Jacks ....................................................................................................... 5
The Front of Your "IV ...................................................................................................... 6
Front Input Jacks...........................................................................................................................................6
Front PanelButtons ......................................................................................................................................6
Plug in the TV .................................................................................................................. 7
Put batteries in the remote ........................................................................................... 7
How to Use the Remote Control to Complete the Initial Setup ................................ 7
Turn on the 31/................................................................................................................. 7
Complete the Initial Setup ............................................................................................. 7
CompleteAuto ChannelSearch.................................................................................................................8
ChC_ha_ter2: Using the Remote Control
Button Descriptions for TV Mode .................................................................................. 9
Button Descriptions for DVD and VCR Modes .............................................................. 9
Usingthe INPUTButton.............................................................................................................................10
Programming the Remote to Operate Other Components ........................................ 10
FindOut If You Needto Programthe Remote....................................................................................!0
Programmingthe Remote.........................................................................................................................10
Howto Usethe RemoteAfter You'veProgrammedIt ......................................................................12
Remote Control Codes .................................................................................................. 12
_ter 3: Using the TV's Features
Channel Banner ............................................................................................................. 14
Why You Should Use the Auto Tuning Feature ......................................................... 14
Howto Set Upthe Auto Tuning Feature...............................................................................................14
Parental Controls and V-Chip ...................................................................................... 15
HowV-Chip Works......................................................................................................................................16

ChCh__ter4: Using the ]_i's Menu System
Sound Menu ................................................................................................................... 22
Picture Menu ................................................................................................................. 22
Setup Menu ................................................................................................................... 23
Parental Control Menu ................................................................................................. 24
Time Menu ..................................................................................................................... 24
Chhapter 5: Other Information
Troubleshooting ............................................................................................................. 25
Care and Cleaning ......................................................................................................... 27
Limited Warranty .......................................................................................................... 27
Accessory Information .................................................................................................. 29

Things to Consider Before You Connect
Protect Against Power Surges
* Connect all components before you plug any of their power cords into the wall outlet.
*Turn off theTVand/or component before you connect or disconnect any cables.
® Make sure all antennas and cables are properly grounded. Refer to the Important Safety Instructions
packed separatd_L
Protect Components from Overheating
® Don't block ventilation holes on any of the components. Arrange the components so that air can
circulate freely.
Don't stack components.
If you place components in a stand, make sure you allow adequate ventilation.
® If you connect an audio recdver or amplifier, place it on the top shelf so the heated air from it won't
flow around other components.
Position Cables Properly to Avoid Audio Interference
*Insert each cable firmly into the designated jack.
*If you place components above the TV, route all cables down the side of the bad< of the TVinstead
of straight down the middle of the TV.
® Ifyoul antenna uses 300-ohm twin lead cables, do not coil the cables. Also, keep the twin lead
cables away from audio/video cables.
Important Stand and Base Safety Information
Choose the location for youl TV carefull_L Place the TVon a stand ol base that is of adequate size and
strength to prevent the TVfrom being accidentally tipped over, pushed off, or pulled off. This could
cause personal injun/and/or damage the TV. Refer to the Important Safety Instructions packed
sepalately,
Use Indirect Light
Don't place the 15/where sunlight or room lighting will be dh'ected toward the screen, Use soft or
indirect lighting,
Cables Needed to Connect Components to Your TV
The pietules below show the cables needed for the connections represented in this book,
Coaxial cable S-Video cable Audio/Video cables Component VkJeo/Y, Pb, Pr) cables
Chapter 1 Graphics eontoined within this publication _lre f_)r representdtion only 3

IfyouconnectanS-Videocable,you must connect
the :_udiocablesto the VIDEOI AUDIOjacks on the
"iV ÷ [}V[} ÷ VC_ back of the TV,not the VIDEO2 AUDIOjacks.
1. Connect your DVD Hayer to your TV.
A. Connect the audio (white and red) cables to the VIDEO 2 R and L/MONO AUDIO jacks on the back
of theTVand to the Audio Output jacks on the DVD player.
B. If yam DVD player has Component Output Jacks (Y, Pb, Pr), connect three video grade cables to
the Y, Pb, Pr jacks on the DVD player and to the VIDEO 2 Y, Pb, Prjacks on the back of the TV. If
your DVD player doesn't have Y, Pb, Pr jacks, go to C.
-aR-
C. If your DVD player has an S-Video jack, connect an S-Video cable to the S-Video jack on the DVD
player and to the S-VIDEO IN jack on the back of the TM If 'four DVD player doesn't have an
S-Video jack, go to D.
Note:If you connectan S-Videocable you must connect theaudiocablesto theVIDEO1AUDiOjacks onthe backof the
71/,,not theVIDEO2AUDlO}aeks. -at-
D. Connect a video cable (yellow) to the Video Output Jack orl the DVD player and to the VIDEO 2
VIDEO jack on the back of the TV.
2. Connect your TV to your VCR
Connect a coaxial cable to theTVANT lack on 'four TV and to the Output Jack on 'four VCR
(sometimes labeled OUT TOTV).
Note If your VCRhasA/Voutput]aek& youcan connect your 71/toyourVCRusingaudio/videocablesfor betterqualit/
30 Make sure cable or antenna is connected to your vet.
Connect the coaxial cable from 'four cable outlet or antenna to the antenna input on the VCR.
Go to page 7
4Grophic_ contained within thi_ public{_tion {_re for representr_tion onl_ Chapter 1

Exltanationof Jacks
This section des('rfbes the jacks you can use to make eonneetfons. There ale several
ways to ('ormeet components to your rv.
TV ANT Lets you eonneet a eoaxial cable to reee[ve the signal from the anterma,
('able, ('able box, or if using the example on page 4, a VCR.
)00 !
L/IOIO
1111 VIDEOS-VIDEO
I AIIII L/IOIOVIDEO
0@0
VIDEO 1
VIDEO, AUDIO R and L/MONO Lets you connect a
eompor_ent such as a VCR, DVD player, or laseld[sc player.
o R (RIGHT} AUDIO Provides right audio connection. The
right audio connector is usually red.
UMONO AUDIO Provides left audio eorlneet[orl. The
left audio connector is usually white.
o VIDEO Provides composite video connection. The video
connector [s usually yellow.
S-VIDEO IN Provides better picture quality than the
video jacks be('ause the eolol part of the signal [s
sepalated from the black and white palt of the p[eture.
When using S-VIDEO IN, make sure to ('ormeet left and
right audio ('ables to the L/MONO and RAUDIO Input
jacks.
VIDEO 2
VIDEO, AUDIO R and L/MONO and Y, Pb, Pr Lets you
connect a component video source, such as a DVD player.
o Y, Pb, Pr Provides optimum picture quality because the
video is separated into three signals. Use thlee video-
grade cables for the connection. When using VIDEO 2
Y, Pb, Pr, make sure to connect left and right audio cables
to the VIDEO 2 AUDIO Input jacks.
o R (RIGHT} AUDIO, LiMONO and VIDEO Their
dese
L
AUDIO
HopHO_EL/_O_O R VIDEO
o0 0
The Front of Your TV
Front Input Jacks
The TV has front input jacks for 'foul convenience: one set of
audio/video inputs and a headphone jack. These jacks ale
towards the front of the TV on the side. To access the
eornponent you eormected to the front of the TV, pless the
INPUT button on your remote until FRNTappears on the
screen. The jacks ale ideal for cormecting a video game
console or a earncorder.
Note:Whenconnectingocomponent thclthoson/}/one oudiojoek,
such ossomeeomeorders,use theTV'sAUOlOL/MONOjock to heor
thecludio,
H-PHONE Allows you to connect headphones to listen to
the sound coming from the TV.
L/MONO and R AUDIO Receives audio from another
component such as a VCR, eamcorder, or video game console.
VIDEO Receives video from another component such as a
VCR, cameorder, or video game console.
Front Panel Buttons
If you cannot locate your remote, you can use the front
panel buttons of your TV to operate many of the TV's
featules.
MENU/OK Brings up the Main menu. In the menu system, it
selects highlighted items.
CH v Scans down through the current channel list. In the
menu system, acts like the down arrow button on the remote
control and adjusts menu controls.
CH A Scans up thlough the channel list. In the menu
system, acts like the up arrow button on the remote control
and adjusts menu controls.
VOL < Decreases the volume, In the merlu system, acts like
the left arlow button on the remote control and adjusts
menu controls.
VOL > Increases the volume. Irl the merlu system, acts like
the right arrow button on the lemote control and adjusts
menu controls.
POWER Turns the TVon and off.
6Orophie_ eontoined within thi_ pub/legation _re fnr representotion onlF Chapter 1

_,_% ........ _,_ _, _ ,_, ,_ ,r _
Mug inthe TV
Plug the end of the powel cord into a grounded wall outlet. Insert the plug
completely into the outlet.
Put batteries in the remote
Remove the battery compartment cover from the back of the remote by
pushing down on and sliding off the cover.
Inselt 2 fresh "AAA" batteries. Make sum the polarities (+ and -) are aligned
cormctly.
o Replace the cover.
Arrows
_-_ OK
button
How to Use the Remote Control to Complete
the Initial Setup_
The technical term is "Navigation"- how you move through
the on-screen menus. The method is the same throughout
the menu screens: highlight 'four choice and select it.
To highlight a menu item, press the arrow buttons on the
remote to highlight one of the items listed on the screen. Use
the up or down arrow button to move up or down. Use the
right or left arrow button to move right or left.
To select the item that you've highlighted, press OK.
Note:Highlightedmeansthat themenu itemstands out from other
menu itemsonthe fist(appearsdarker,t_righter,or adifferent color}
Turn on the TV
Press TV on the remote, or press POWER on the TV's front
panel.
Note: Pressing the R/ Outran not only turns on lhe TV t_utputs the
remote into R/mode _R/ mode" means that the buttons on the
remote control operate the TV'sfunctions,
Auto Ch, S_ar_h
Clo_ed Capllon
_ AUtO Yunlng
Complete the Initial Setup_
The menu system in your TV allows the TV's features to work
properly. The fhst time you turn on your TV, the SETUPscreen
appears with Lcmguoge highlighted. The default language is
English. To choose another language, press the right arrow
button on the remote.
Chapter 1 Grc_phies eontoined within this publiccnion clre for representation only 7

_ ' _ C _ ,4,
iliiii1ii star1
iiiiiiiiiiiiChannel
Complete Auto Channel Search
This part of the setup allows theTVto search for all channels
viewable through 'y'ou_antenna or cable W system. This is
sometimes called auto progran_mirlg.
I. Highlight Auto Ch. Se(_rehand press OK.
2. The Signori Typeoption is set to Coble. To change the
option to Antenn(_, p_essthe right arrow button and then
press OK.
3. Pressthe down arrow button to highlight StdrL PressOK
to begin the auto channel search.
Once the search is complete, you can begin watching TV. For
information on customizing your chanr_els or menu options,
go to Chapter 4.
8Grophies conZdined within this pub/legation {_re fnr represent_tion onlF Chapter 1

Indicator Button Descriptions for TV Mode
Arrows Used to highlight different items in the %/ menu and to adjust the menu
conhols.
Indicator Indicates the programming mode when programming the remoteto
conhol components. Lights when you press a valid button on the remote. Flickers
when a button is pressed and the battelies are low.
(O-9) Number Buttons Enter chanrlel numbers and time settings directly
through the remote control.
To enter a one-digit channel, enter a zero first. To enter a two-digit channel, press
the two digits and expect a few seconds delay. This is if you want to enter a third
digit.
CC Toggles closed captioning on and off.
CH+orCH- Scans upm down through the current charmel list. Press once to
change the channel up m down; press and hold to continue changing channels.
CLEAR Removesanymenuordispiayfmmthescreenandretulnsyoutonmmal
viewing.
GOBACK Retul ns you to the previous channel.
INFO Brings up the channei banner.
iNPUT Toggles through the available input sources (VIDI/SVIDI, VID2/CVtD2,
FRNT,and eulrent charmei).
MENU Brings up the Main menu.
MUTE Reduces the TV's volume to its minimum level. Press again to restore the
volume.
OK When in the menu system, selects highlighted items.
ON,OFF When in TV mode, turns the TVon arid off. If in another mode (VCR,
DVD, etc.) and programmed, will turn the component on and off.
PRESETS Picture options are reset to original factory settings.
SKiP PressoncebefmechangingchannelsandtheTVwiliwait30secondsbefme
retulning to the original channel. Press repeatedly to add more time.
TV Turns on the TV and puts the remote in TV mode. Also displays current status.
VOL - or VOL + Decreases m increases the TV'svolume.
Button Descriptions for DVD and VCR Modes
AGAIN In DVD mode, replays the last several seconds of the title you're playing.
ANTENNA In VCR mode, functions as a W/VCR button.
DVD Puts the remote in DVD mode and, if auto tuning is enabled, will turn on
the TVand tune to the correct video input channel.
GUIDE If you're operating another component that hasaguide, thisbutton
accesses the on-screen Guide.
OPEN.CLOSE In DVD mode, opens or closes the DVD disc tray.
Chapter 2 Graphics eontoined within this publication {lre f_)r representotion only 9

Usm9 ...................................,.....
REVERSE, PLAY, FORWARD, RECORD, STOP, PAUSE If programmed, provides
transpolt control for some remote-controllable VCRs or DVD players.
SEARCH In VCR mode, accesses Index Search feature.
SPEED In VCR mode, selects a reeold[ng speed.
VCR Puts the rernote [n VCR mode arid, if auto tuning [s enabled, will turn on the
TV and tune to the colreet v[deo [nput charmeL
ZOOM In DVD mode, zooms in on the p[cture.
Using the mNPUT Button
Use the INPUT button to scroll through the ava[lable v[deo [nput chanrleJs and
v[ew components you have connected to the TM
1. Make sure the component you want to v[ew is turned ON.
2. Press INPUT to tune to an available v[deo [nput source and view the
component.
3. To retmn to the previous channel, continue pressing INPUT.
DVD and /
VCR buttons
/
REVERSE
and PLAY
buttons
oH_r
{_ "ON*OFF
button
CZb_ CZb_
-STOP
button
You'll use these buttons when
programming the remote.
Programming the Remote to Operate Other
Components
The universal remote can be programmed to operate most
brands of remote eontrollable components. The remote is
aheady programmed to operate most RCA, GE, and Proscan
components.
Notes:TheTVbutton can't beprogrammedonthis remote
Theremotemaynot becompatible with oil brandsand modelsor
eomponents.Italsomay'not operateall functions or theremotethat
camewith youreomponenL
Find Out mfYou Need to Program the Remote
To determine whether the un[velsal remote needs to be
programmed for your component, tmn the component ON.
Fol example, to program the remote for a VCR, tmn on the
VCR. Point the remote at the VCfi, and press the VCR button.
Therl press ON.OFF ol CH + (channel up) or CH - (chanrlel
down) to see [f the VCR responds to the remote commands. If
the component does not respond, the remote needs to be
programmed.
Programming the Remote
There are two ways to program the remote control:
o automatic code search
o direct entry
10 Orophie_ contained within thi_ puh/ic_ltion _lre fnr representation onl% Chapter 2

Using Automatic Code Search
The following instructions can be used to program the remote to operate each of
your componer_ts. If you want to stop the automat[(" (:ode search without
programming any of your eomponents, press (}LEAR until the indicator on the
remote turns off.
1. Turn on the component you want to operate (VCR or DVD player)
2. Pless and hold the eomponent button you want to program (V(}R ol DVD}.
While holding the component button, press and hold ON,OFF until the
indicator on the remote turns on, then release both buttons.
3. Point the remote at the component. Press and release PLAY(the indicator light
on the remote flashes).
The remote is seal('l'_in9 for the conect code to program. When the [ndk'ator
stops flashing (after about 5 seconds), press PLAY again to tell the remote to
sealeh the next set of codes.
Corlt[nue pressing PLAY until the component turns off or the ind[eatol light on
the remote turns off. If the indicator light turns off, then all the codes fol that
partieulal component have been tested once. If the component does not turn
off, then the remote can't be programmed to operate that component.
Note:EachHmeyou pressPIAY,theremotesendsabout 10setsof codesTherefore,you
might haveto pressthePLAYbutton upto 20times
If the component you want to operate does turn off:
1. Press and release REVERSE,then waft 2 seconds. Repeat this step until the
device turns back ON.
2. To finish, press and hold STOP until the indicator on the remote turns off.
Using Direct Entry
1. Turn on the component to be programmed.
2. Look up the bland and ('ode number(s) for the component on the ('ode list [n
this section.
3. Press and hold the component button you want to program on the remote.
4. Enter the ('ode from the remote control ('ode list on the following pages. If the
indicator flashes, you have either entered an invalid ('ode or the button isn't
programmable.
5. Release the component button.
6. Point the remote at the component. Press ON,OFF to see if the eomponent
responds to the command. If it doesn't, try pressing the component button and
then ON.OFF again.
o If you get no response, repeat these steps using the next code listed fol your
brand, until the component responds to the remote commands.
If you try all the ('odes for your component brand and none work, try the
automat[(: ('ode seaK'h method. If automatic ('ode sealch doesn't find the ('ode,
the remote [s not compatible with your component.
Chapter 2 Graphics contoined within this publication _lre for representation only 11

How to Use the Remote After You've Programmed mt
Because this un[velsal remote can operate several different components it uses
opelational modes triggered by the component buttons. Fol example, if you want
the remote to operate the TV, you would press the TV button to put the remote
into TV rnode before you could operate the TV.
1. Press the appropriate (:omponent button (DVD, TV, VCR) to set the remote to
operate the eomponent
2. Press ONoOFF to tmn the emllponent ON ol OFF.
3. Use the remote buttons that apply to that component
Note If you keep pressing buttons ond nothing hoppens, the remote is probably in the wrong
mode You must press the component button thor motches the component you won t to
operate {i e , if you wont to operate the VCR,press VCR on the remote control to put the remote
in VCR mode,}
Remote Control Codes
VCR Codes
Programmable for VCR button,
AdrairaI .................................................................................... 2132 Fund ....................................................................................... 2026
Adve_][ura ................................................................................ 2026 Garrard .................................................................................... 2026
Aiko .......................................................................................... 2027 GE ...................................................................... 2000, 2001, 2013,
Aiwa ......................................................................................... 2026 ............................................ 2021, 2022, 2053, 2115, 2120, 21}1
Akai ................. 2003, 2004, 2005, 2007, 2008, 2111 2112, 2113 Goldstar .................................................. 2009 2014, 2018, 2054
Amerk:at] High ........................................................................ 2(}21 Gr;tdiec_te ................................................................................ 2026
Asha ......................................................................................... 2013 Harley Davidsor_ .................................................................... 2026
Audio Dynamics ........................................................... 2(}09, 2010 Harmon Kardor_ ..................................................................... 2009
Audiovox ................................................................................. 2014 Harwood ................................................................................. 2061
Bell _ Howell ........................................................................... 2011 Headq_mrter ............................................................................. 2011
Beaunmrk ................................................................................. 201_ Hitachi ........................................................................ 205S, 2056,
Brokso_]ic ...................................................................... 2012, 2025 ........................................................ 2057, 2107, 2111,2120, 2122
Calix ......................................................................................... 2014 Hi-Q ......................................................................................... 2023
Cradle ..................................................... 2013, 2014, 2015, 2016, [_]star_t Replay ........................................................................ 2021
............................................................................. 2017,2018,2019 JCL ........................................................................................... 2021
Ca_](m .................................................................. 2021, 2022, 2114 JC Permey ............................................... 2009, 2010, 2011, 20I 3,
Capehart ......................................................................... 2020, 2110 ..................................................... 2014, 2021,2022, 2055, 2056,
Carver ....................................................................................... 2062 ....................................................... 2058 2059, 2060 2107, 2118
CCE ................................................................................ 2027 2061
Cilizct] ........................................................................... 2013 2014,
............................................. 2015, 2016, 2017,2018,2019, 2027
Colortyme ................................................................................ 2009
Colt ........................................................................................... 2061
Craig ......................................................... 201], 2014, 2023, 2061
Curtis Mathes .................................................... 2000, 2009, 2013,
................................... 2016, 2018, 2021,2022, 2024, 2I 1S, 2131
Cybemex ................................................................................. 2013
Je*]sen ................................................................ 2055 2056, 2111
JVC ...................................... 2009, 2010, 2011, 2018, 2111,2123
Ke_wood ................... 2009, 2010, 2011, 2016, 2018, 2111,2123
KLH.......................................................................................... 2061
Kodak ............................................................................ 2014 2021
Lloyd ....................................................................................... 2026
Logik ....................................................................................... 2061
LXI ........................................................................................... 2014
Magn tvox ....................................................... 2021, 2022, 2062,
Daewoo .......... 2015, 2017 2019 202% 2026 2027 2028, 2110 ....................................................... 2063 2104, 2105, 2108 2124
Daytr(m ..................................................................................... 2110
DBX ................................................................................ 2009, 2010
Dimensia ........................................................................ 2000, 2131
Dyriatech .................................................................................. 2026
Electrohome ................................................................. 2014, 2029
Electropho_]ic .......................................................................... 2014
Emers<m ............................. 2012, 2014, 2015, 2021, 2024, 2025,
.......... 2026, 2029, 2030, 2031 2032, 2033, 20_4,2035, 2036,
.......... 2037, 2038, 20]9, 2040, 204I, 2042,2044, 2045, 2046,
............................................ 2047, 2065, 2113, 2116, 2117, 2130
Fisher ............. 2011,2023, 2048 2049, 2050, 2051, 2052, 2118
Magnin .................................................................................... 2013
Marantz ......... 2009, 2010, 2011,2016, 2018, 2021, 2062, 2064
Maria ....................................................................................... 2014
Masushi[a ............................................................................... 202 l
Mei .......................................................................................... 2021
Memorex ....... 2011, 2013, 2014, 2021, 2023, 2026, 2104, 2132
MGA ................................................................... 2029, 2065, 2113
MGN Tcclmology ................................................................... 20I 3
Mk]land ................................................................................... 2053
Mmolm .............................................................. 2055, 2056, 2107
Mitsubish_ ............. 2029, 2055, 2056 2065, 2066, 2067, 2068,
Fuji ................................................................................. 2021 2119 ............ 2069 2070 2071 20721 2073 2074 2106 2113 2123
12 Graphics eontoined within this pub/ic_ltion _/re %r reloresentotion onlz Chapter 2

VCR Codes continued
Mon[gomeo, Ward .................................................... 2075 2132
Motorola ..................................................................... 2021, 2132
MTC ............................................................................. 2013, 2126
Multitvch .................................... 201_, 2016, 2026 2053, 2061
NEC ............................................... 2009, 2010, 2011,2016, 2018
............................................ 2064, 2076, 2(/78, 2079 2111, 2123
Nikko ...................................................................................... 2014
Noblcx .................................................................................... 2013
Olympus ................................................................................. 2021
Optim us ....................................................................... 2014 2132
Oplonica ................................................................................ 2096
Panasonic ......................... 2021, 2022 2109, 2125 2126 2127
Pentax .......................................... 2016 2055, 2056 2107, 212(/
Pcnwx Research ................................................................... 2018
Pbilco ..................................................... 2021 2022, 2(/62 2(/63
Philips .................................................... 2021,2062 2096, 2124
Pilot ........................................................................................ 2014
Pkmccr ........................................ 2010 2055 2080, 2081, 2123
Portland .................................................. 2016 2017 201% 2110
Proscan ............................................................. 2000 2001, 21 _1
Protcc ..................................................................................... 2061
Pulsar ..................................................................................... 2104
Quarter .................................................................................... 201 l
Quartz ..................................................................................... 201 l
Quasar ............................................................... 2021, 2022 2125
RCA ...................... 2000, 2001, 2003 2013, 2021, 2055 2056,
.................. 2082 2083, 2084 2085 2086, 2087 2088, 2089
....................... 2090 2091 2107 2115 2120, 2125 21_], 2]_3
RadiosbackJRcalisdc ............................ 201] 2013, 2014, 202L
.................... 2022, 2023 2026, 2029 2049, 2050 2096, 2132
Radix ...................................................................................... 2014
Randcx ................................................................................... 20I 4
Ricob ...................................................................................... 2128
Runco ..................................................................................... 2104
Samsmlg ........................... 2005, 2013 2015 2033, 2053 2112
Sanky ........................................................................... 2104, 2132
Sansui ..................................................... 20]0 2092, 2111, 2123
Sanyo ................................................................ 2011 2013 2023
Siott ............ 2012, 2015, 2025 2032, 2038 2065, 2093 2116
Scars ............................................ 2011 2014, 202L 2023 2048,
............................... 2049 2050, 205L 2055 2056, 2107, 2118
Sharp ..................... 2017 2029 2094, 2095 2096, 2097, 2132
Shintom ................................................. 2004 2056, 2061 2098
Shogun ................................................................................... 2013
Sign amrc ............................................................................... 2132
Singer ................................................................ 2021, 2061, 2128
Sony ....................................................... 2004 2098 2099, 2119
STS ............................................................................... 2021,2107
Sylvania ................ 2021 2022, 2026 2062, 2063 2065, 2124
Symphonic ............................................................................ 2026
Tandy ...................................................................................... 2011
Tashib ................................................................................... 2014
Tautog ..................................................................................... 2111
TEA( ................................................................. 2026, 2085 2111
Technics ....................................................................... 2021, 2109
Tcknik t ........................................ 2014 2021,2026 2100, 2129
TMK .................................................................. 2013_ 2024 2047
Toshiba ................... 2015, 2049, 2051, 2055 2065, 2093 2116
Totcvsio n .................................................................... 201{ 2014
Unitcch ................................................................................... 2013
Vet[or Research .................................... 2009, 2010, 2015, 2016
Vktor ..................................................................................... 2010
Video Concepts ........................... 2009, 2010 2015, 2016, 2113
Videosonic ............................................................................. 2013
Wards ........................................................ 2013 2014 2015 2021,
........................................... 2023, 2026, 2029, 2055, 2056, 2061,
.................................... 2096, 2101, 2102, 210"L 2107, 2116, 2132
XR 1000 .............................................................. 2021, 2026, 2061
Yamah t ............................................. 2009, 2010, 2011,2018, 2111
Zenith ............................................... 2004, 2(/98, 2104, 2119 2128
DVDcodes
Programmable for DVD button.
Aiwa ........................................................................................... 3009
Apex ................................................................................ 302_ 3024
GE ............................................................................................... 3000
Hitachi ....................................................................................... 3008
JVC .................................................................................. 3002, 3010
Konka ............................................................................... 3011, 3012
Magnaw_x ................................................................................. 3003
Mitsubishi .................................................................................. 3004
Panasonic .................................................................................. 3013
Philips ....................................................... 3003, 3019 3021, 3022
Pioneer ....................................................................................... 3005
Pmscm ...................................................................................... 3000
RCA ................................................................................. 3000, 3001
Samsung .................................................................................... 3025
Sanyo ......................................................................................... 3014
Sony ..................................................................... 3006, 3015, 3016
Toshiba ................................................................. 30W 3017, 3020
Zenith ......................................................................................... 30I 8
Chapter 2 Graphics contoined within this publication (ire for representotion on/g 13

Channel Banner
There are several items that might appear on-screen when
you press the TV or INFO button on the remote. This display [s
called the Channel Banner. The following list describes the
items on the Channel Banner screen (left to right and top to
bottom).
SAP Displayed when the current chanr_el
[s broadcasting SAP (Second Audio
Program) [nfornlation.
VDisplayed when V-CMp has been
activated.
KidPass:2.'24
CC
Displayed when KidPass is set and the
length of time remaining.
Displayed when Closed Captioning [s
available on the current channel.
Stereo or Mono
Skip: 0:30
Stereo displayed when the current
channel [s broadcasting [n stereo.
Mono displayed when the current
chanrlel [s bloadcasting [n mono,
Corresponds to the SK[P button,
Shows the amount of time left before
the TV switches back to the previous
channel.
07:18 am
06 ABCDEF
Displays the current time.
Displays the culrent channel and
label assigned to the channel.
Displayed when you mute the sound.
Why You Should Use the Auto Tuning Feature
The auto tuning feature tunes the TV to the correct channel for different
components you have connected to your TV (like a VCR, DVD Player, etc.). When
you set up auto tuning [n the menu system you don't have to remember to change
your TVto channel 3, for example, when you want to watch the tape [n your VCR.
How to Set Up the Auto Tuning Feature
The way you set up the auto tuning feature [n the lV's menu corresponds to the
component buttons on the remote and the way you have each component
connected to your TV. When you set up auto tuning, you're telling the TV what
channel to tune to when you press theVCR or DVD button on the remote control.
1. Press MENU (the MAIN MENU appeals).
2. Highlight Setup and press OK on your remote control.
3. Highlight Auto Tuning and press OK.
14 Graphics contained within this publication are f_)r represent(_tion onl_ Chapter 3

,_ _ _ ,_ _, _,_
4. Choose which channel you want to set:
Set VCRI Lets you set up the chanr_e[ the TV tunes to when you press the VCR
button.
Set VCR2 Not available with your remote conho[.
Set 5ATJCABLE Not available with your remote control.
Set DVD Lets you set up the channel the TV tunes to when you press the DVD
button.
5. Press the right arlow button to select the choice that matches the way you
have the component connected to this TV.
The choices and a brief explanation follow:
AUTO TUN NG
GO Back
VID1, ,
Set SAT/CABLE CB02, :,
Bet DVD CB03, , ,
N/A Choose this if you don't have this particular component
connected to the TV,ol if you don't want the R/to
automatically tune to the correct channel when you're using
this component.
CH02 (SAT/CABLEonly- Not available with ,/our remote
control).
CHO-}or 04 Component is connected to the TVANT jack on
the back of the _', and you want the TVto tune to charmel 3
or 4 when you press the colrespond[ng button on the
remote. Reminder: make sure the component's Channel 3/4
switch is set to the appropriate channel.
V/DI Component is connected to the VIDEO I VIDEO ol
S-VDEO IN jack on the back of theTVand you want the TV
to tune to a video input channel when you press the
col responding button.
VID2 Component is connected to the VIDEO 2 VIDEO or
Y, Pb, Prjacks on the back of the TV and you want the TV to
tune to a video or component video input channel when you
press the corresponding button.
FRNT(Front Video Input) Component is connected to the
VIDEO jack on the front of the TV and you want the TVto
tune to the front video input channel when you Hess the
corresponding button.
Parental Controls and V-Chip_
The choices in the USA V-CHIP menu involve software inside your TV (referred to as
V-Chip) which allows you to block TV prograrns and movies based on violence, sex,
or other content you may believe children should not view.
Once you block Hograms, you can unbloek programs by entering a password.
By default, the software inside your TV is turned "off." For instructions to tuln on
V-Chip, go to page 21.
Chapter 3 Graphics eontoined within this publicetion clre for representotion only 15

HowV=CNpWorks
V-Chip leads the proglam's age-based rating (TV-MA, TV-I4, etc.) and content themes
[(Violence (\/), Adult Language (L), etcj]. If you have blocked the rating and/or content
themes that the program contains, you will receive the message Thh chunnel bus not
been opproved for viewing. Ohunge rhonnel or press OK to enter possword anti
tempororily deortivote the Pomntol Control.
Broadcasters am not requhed to provide content themes, so programs received with
no content themes will only be blocked if you block their age-based rating. You can
also block out programs that have been given a rating of Not Rated, and programs
that are considered unrated. The TV age-based ratings and content themes you can
block follow:
USA V-CNp Rating System
TV-MA (Mature Audience Only) Specifically designed to be viewed by adults and may
be unsuitable for eh[ldren under 17. It eonta[ns one or more of the following content
themes: elude [ndeeent language (L), expl[c[t sexual aetiv[ty (S), ol graphic" violence
TV-14 (Parents Strongly Cautioned} Contains some rnatel[a[ that many parents would
find unsu[table fol children under 14. Parents are strongly urged to exercise greatel
care [n monitoring this plogram and ale cautioned aga[nst letting cMIdren under the
age of 14 watch unattended. This program conta[ns one or more of the follow[ng
content themes: intensely suggest[ve d[alogue (D), strong coarse language (L), [nterlse
sexual situations (S), ol [ntense v[olenee (V).
TV-PG (Parental Guidance Suggested) Conta[ns mater[a[ that parents may find
unsuitable for younger children. Many parents may want to watch it with their
younger children. The program contains one or more of the following content
themes: some suggestive dialogue (D), infrequent coarse language (L),some sexual
situations (S), or modelate violence (V).
TV-G (General Audience) Most parents would find this plogram suitable for all ages.
It contains little or no sexual dialogue (D) or situations (S), no strong language (L), and
little or no violence (V).
TV-Y7 (Directed to Children 7 years and older} Designed for ehildrerl ages 7 and
above. It may be more appropriate fol children who have acquired the developmental
skills needed to distinguish between make-believe and reality. Themes and elements
in this program may include mild fantasy violence (FV) or eomedie violence, or may
frighten children under the age of 7.
TV-Y [All Children} Themes and elements in tMs prograrn ale designed for a young
audience, including children from ages 2-6. It is not expected to flighten younger
children.
Canadian English V=Ch[p Rating System
18+ (Adults) Programming intended for adults 18 and older. It may contain elements
of violence, language, and sexual content wl'fieh could make it unsuitable for viewels
under 18. Violence Guidelines: May contain violence integlal to the development of
the plot, chalacter or theme, intended for adult audiences. Other Content Gu[dd[nes:
May contain grapMe language and explicit portrayals of nudity and/m sex.
16 Grophies eontoined within this publicution ure fur representotion onl_ Chapter 3

,_ _ _ ,_ _, _,_
14+ (Viewers 14 and over} Programming contains themes ol content which may not be
suitable for viewers under the age of 14. Palents are strongly cautioned to exercise
discretion in permitting viewing by pie-teens and early teens. Violence Guidelines: May
contain intense scenes of violence. Could deal with mature themes and societal issues in a
realistic fashion. Other Content Guidelines: May contain scenes of nudity and/ol sexual
activity. There could be frequent use of profanity.
PG (Parental Guidance] Programming intended for a general audience but which may not
be suitable fol younger children (under the age of 8). Palents rnay consider some content
inapplopriate for unsupervised viewing by children aged 8-1_L Violence Guidelines:
Depictions of conflict and/ol aggression will be limited and modelate; may include physical,
fantasy, or supernatural violence. Other Content Guidelines: May contain infrequent mild
profanity, or mildly suggestive language. Could also contain brief scenes of nudity.
G {General Audience) Programming considered acceptable for all ages gloups. While not
designed specifically for children, it is understood younger viewers may be pair of the
audience. Violence Guidelines: Will contain very little violence, either physical or verbal or
emotional. Will be sensitive to themes wMch could frighten a younger child, will not depict
realistic scenes of violence which minimize ol gloss over the effects of violent acts. Other
Content Guidelines: There may be some inoffensive slang, no profanity and no nudity.
(38+ (Children 8 and Older} Programming generally considered acceptable for children 8
years and ovel to watch on their own. Violence Guidelines: Violence will not be portrayed
as the pleferred, acceptable, ol only way to resolve conflict or encourage cMIdren to
imitate dangerous acts which they may see on television. Any lealistie depictions of
violence will be infrequent, discleet, of low intensity and will show the consequences of the
acts. Other Content Guidelines: There will be no plofanity, nudity ol sexual conterlt.
C {Children] Programming intended for children under age 8. Violence Guidelines: Careful
attention is paid to themes which could thleaten children's sense of security and well
being. Thele will be no lealistie scenes of violence. Depictions of aggressive behaviour will
be infrequent and limited to porhayals that ale clearly imaginary, comedic or unrealistic in
natule. Other Content Guidelines: There will be no offensive language, nudity or sexual
content.
Canadian French V-Chip Rating System
18+ (Adults} Programming is fol adults only. This prograrn contains sustained violence or
extremely violent scenes.
16+ (Viewers 16 and over} Programming is not suitable for those under age 16. This
prograrn contains frequent scenes of violence or intensely violent scenes.
13+ (Viewers 13 and over} Programming may not be suitable for children under the age of
13. This program either contains several violent scenes or one or more scenes that ale
violent enough to affect them. Viewing in the company of an adult is therefore strongly
recommended fol children under the age of I_L
8+ (Viewers 8 and over) Not recommended for young children. This proglam is suitable for
most audiences, but it contains mild or occasional violence that could upset young
children. Viewing in the company of an adult is thelefore recommended for young children
(under the age of 8) who do not distinguish between reality and imagination.
G (General Audience) This plogram is suitable for audiences of all ages. It contains no
violence, or any violence that it does contain is eithel minimal or is plesented in a
humorous manner, as a caricature, ol in an unrealistic way.
Chapter 3 Graphics contained within this publication are for representation only 17

USA V-Chip TV Rating Limit
lhe V-Ok a f\/Rating Limit e[< ¢ou decide which TV
programs Call anq :anno[ )e viewed
T( set TV )rogramnshlg lits
1. Choose ParentolControlfl'om the MAIN MENU (the
PASSWORD seree al]bears the first time you enter the
Porenttl/Contro lent . Create four passwmd using the
qumoer OUEORS on the remote.
Go Back
Status D L _ " c
TV-MA _¢
TV-14 V,e B V V
TV-pG we B V
Ge
T_, V"
TV-Y VEew
L.
J.
-ighlight and select USA V-Chip. Therl select 7l/Rc_tinqs.
Once ou get t the TVRATtNGLIMITsereen, use the
Jrrow bUTtons arlq OK on ' )ur remote to change the
status of a TV program rating or content theme fl'om
view _o Block.
4. For 5,/rating limits to take effect, turn on V-Chip active
in the PARENTALCONTROLmenu (box has cheek mark).
The following sections give you more details about how to
change the status ofTV prograrn limits.
Note:Ifyou forget yourpasswoWyou canreset it:Makesurethe
TVisoft: Simu/taneoualypressandhold VOL<on theTV'sfront
paneland CLEARon theremotefor approximately 5seconds,Enter
anewpassword next time you accessthePARERTALCONTROL
menu,
The V=CMp Rating Sereen
The following is an example of where items are located within the TVRATING LIMIT
sereen.
Rating Status Field
Lets you select whether the status of the age-based rating limit
to the left [s View or Block.
Rating Field
Lets you select from
a list of age-based
ratings you can
block or view.
TV RATING LI /I_T
GO Back
S V FV
VVV
TV_ ! 4 View
TV_PG View B V V Y
TV:G View
TV_Y7 View V
TV-V View
Content Themes
Lists the content themes
you can block or view.
Content Status Fields
Lets 'you select which
content themes to view
for the selected rating,
and whether the status of
the content theme is
currently View (V) or Block
(B).
Rating Settings Area
Lets you see the eurrent bloek/view state of age-based ratings and
assodated content.
18 Grophie_ contained within thi_ publie_ltion _lre for representation onlF Chapter 3
Other manuals for 27F530T
2
Table of contents
Other RCA TV manuals