RCA CR29TF420 User manual

Television
User’s Guide
The New Era in Entertainment.
Model: CR29TF420
TOCOM 1583575A
Please read this manual
before operating this
product for the first time.

This symbol indicates
"dangerous voltage" inside
the product that presents a
risk of electric shock or
personal injury.
WARNING
To reduce the risk of fire or
electric shock, do not expose
this TV to rain or moisture.
CAUTION: To reduce the risk of electric shock, do
not remove cover (or back). No user serviceable
parts inside. Refer servicing to qualified service
personnel.
This symbol indicates
important instructions
accompanying the product.
CAUTION
RISK OF ELECTRIC SHOCK
DO NOT OPEN
Caution: To prevent electric shock, insert plug firmly
into outlet.
Power Consumption: 99-242V ~50/60 Hz A.C.
145 W (for model CR29TF420)
If fixed (non-moving) images are left on the screen for long periods,
they may be permanently imprinted on the picture tube. Such
images include network logos, phone numbers, and video games.
This damage is not covered by your warranty. Extended viewing of
channels displaying these images should be avoided.
Important Information

.1
Table of Contents
Chapter 1: Setup and Connections
Things to Consider Before You Connect ......................................................................... 4
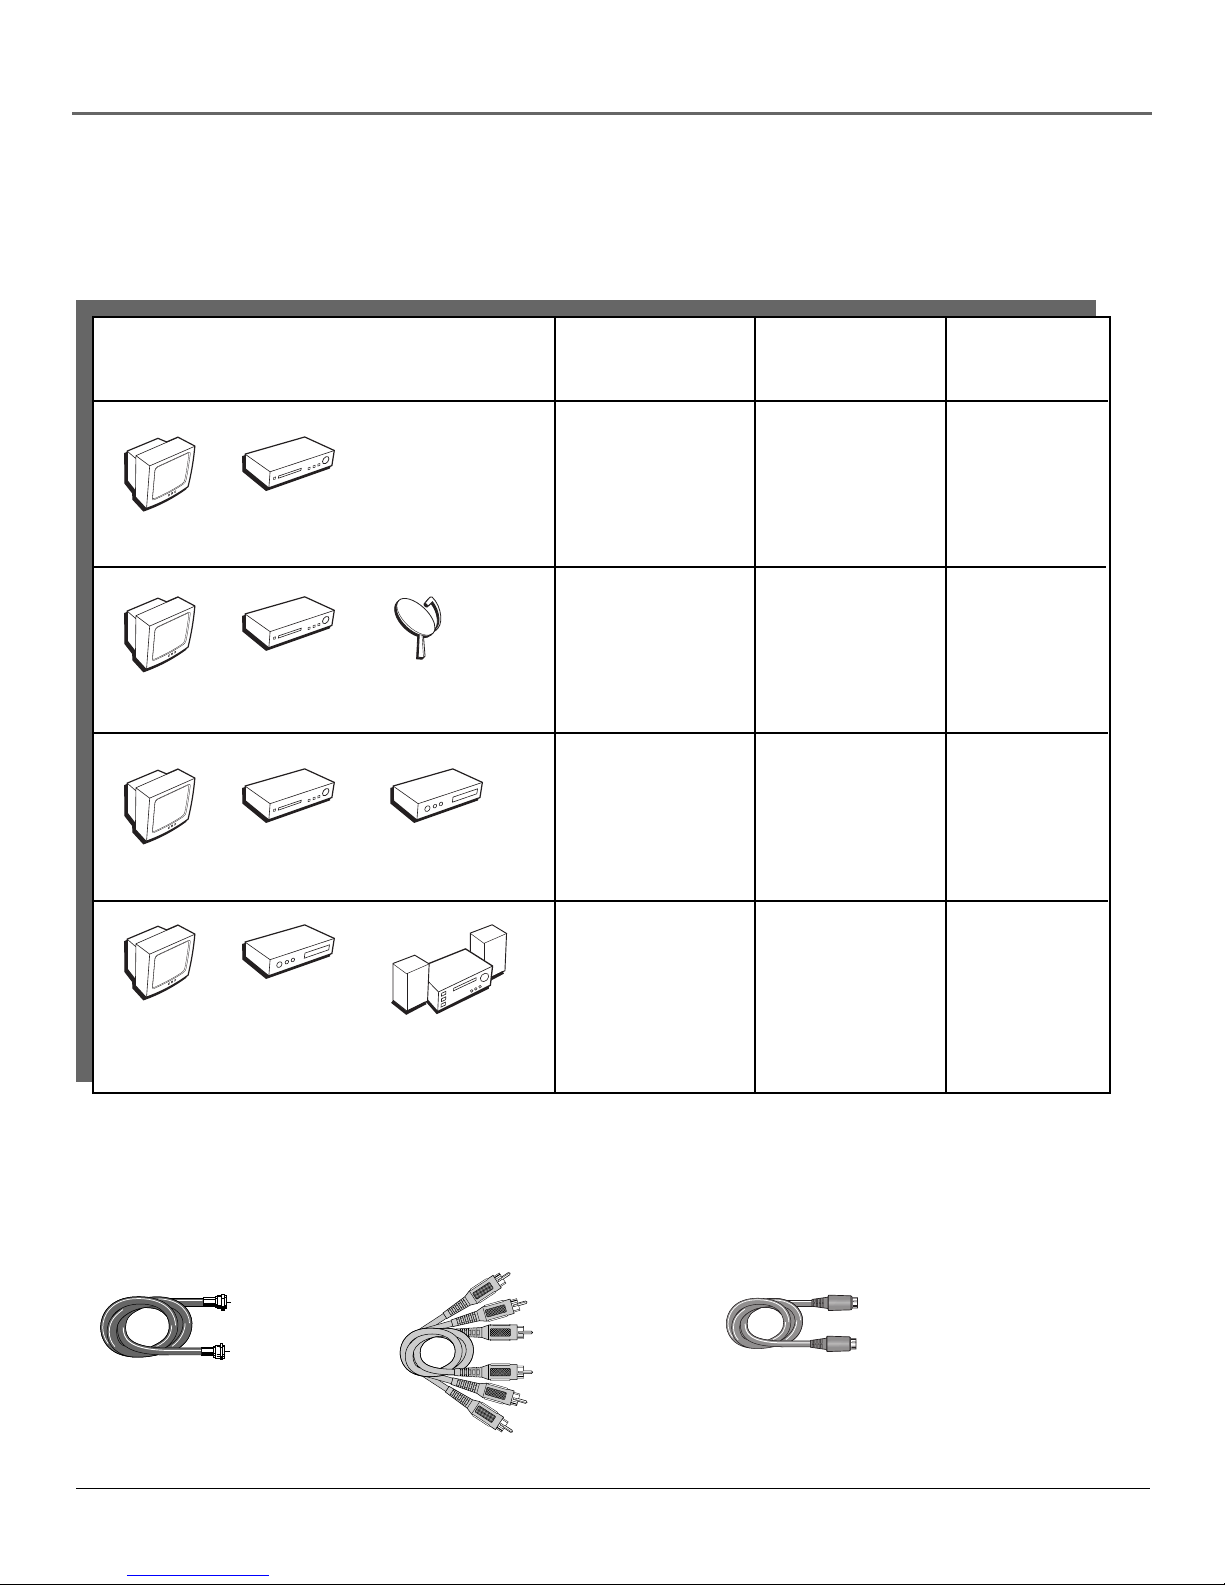
Choose Your Connection .................................................................................................. 5
Cables Needed to Connect Components to Your TV ............................................... 5
TV + VCR ..................................................................................................................... 6
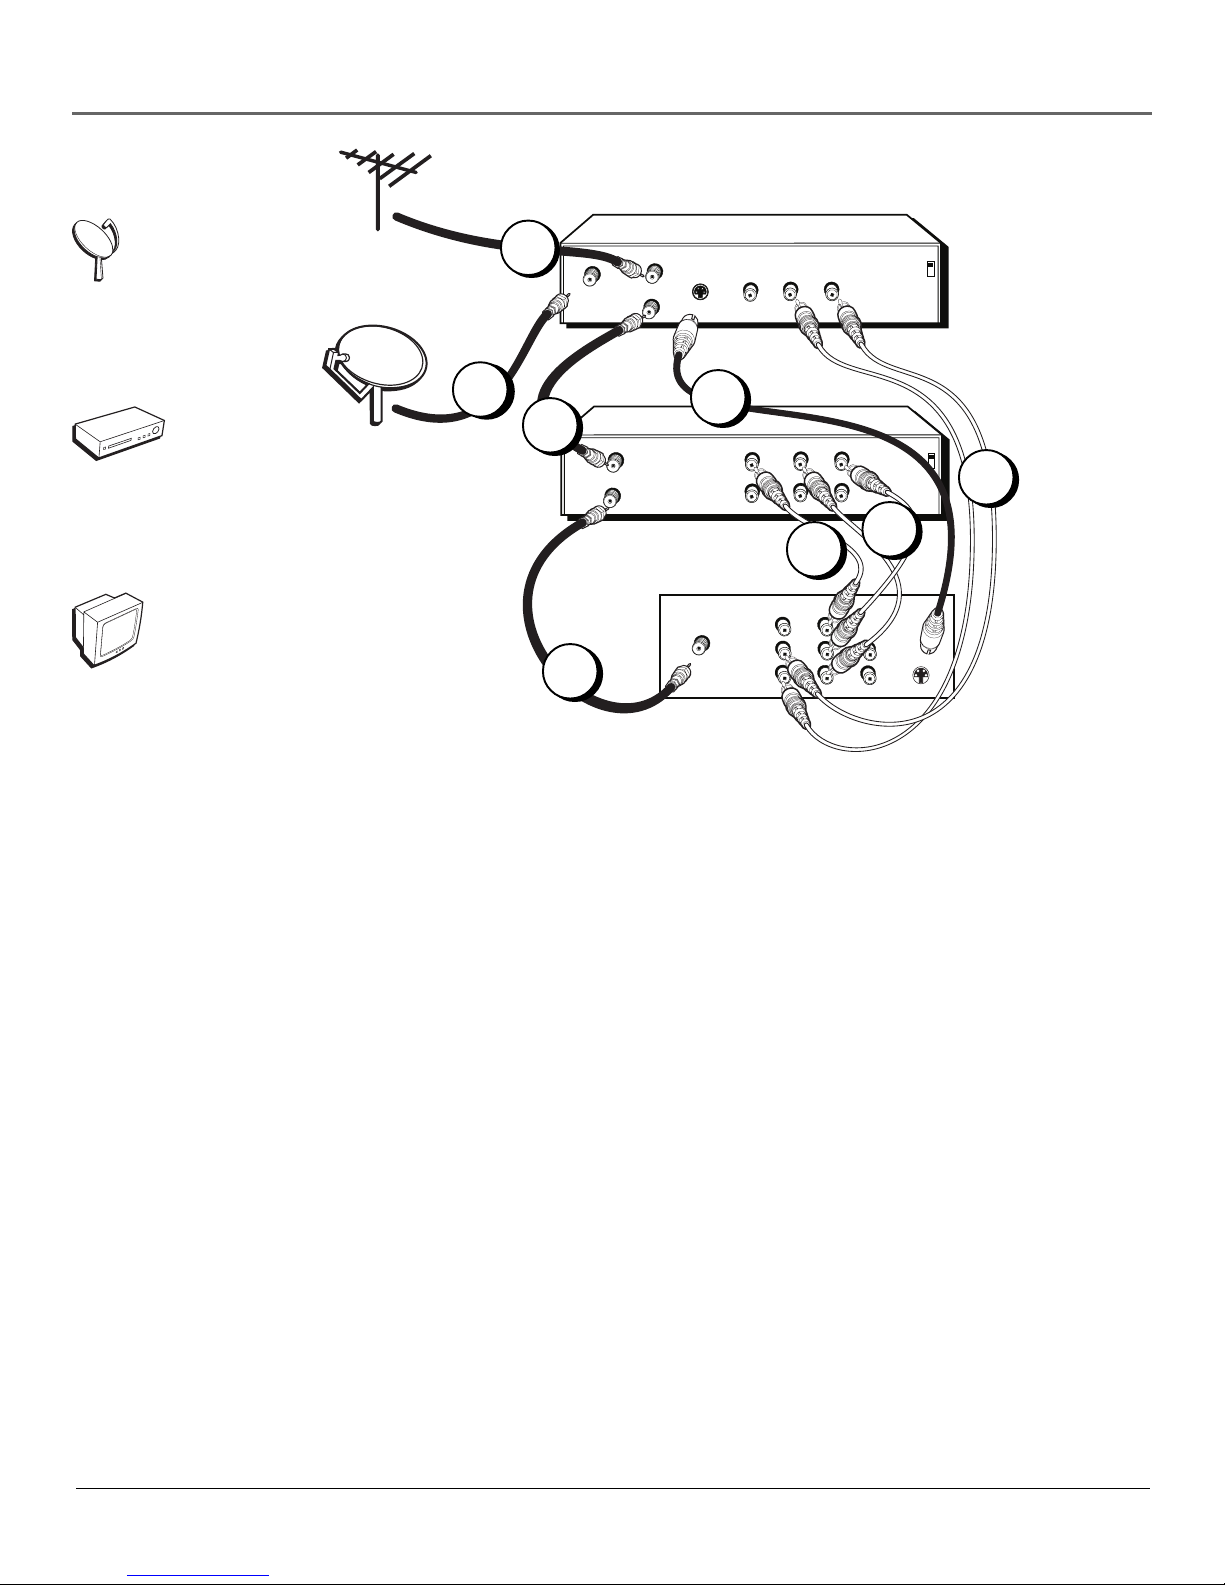
TV + VCR + Satellite Receiver..................................................................................... 7
TV + VCR + DVD.......................................................................................................... 8
TV + DVD + Audio Receiver ....................................................................................... 9
Plug in the TV..................................................................................................................10
Put Batteries in the Remote ........................................................................................... 10
How to Use the Remote Control to Complete Setting Up the TV .............................. 10
Turn on the TV ................................................................................................................10
Finishing the Setup......................................................................................................... 11
Setting Up the Channel Guide ....................................................................................... 12
Adding Channels to the Guide ................................................................................ 12
Using the Guide ........................................................................................................12
Chapter 2: Using the Remote Control
The Buttons on the Remote Control ............................................................................. 14
Programming the Remote to Operate Other Components ......................................... 16
Find Out If You Need to Program the Remote ....................................................... 16
How to Program the Remote ..................................................................................16
How to Use the Remote After You’ve Programmed It ................................................ 17
Code List .......................................................................................................................... 18
Chapter 3: Menus and Features
Menu Icons ......................................................................................................................20
Image & Sound Menu..................................................................................................... 20
Tuning Menu ................................................................................................................... 22
Other Resources Menu ................................................................................................... 23
Channel Marker .............................................................................................................. 24
Chapter 4: Other Information
Troubleshooting .............................................................................................................. 26
Care and Cleaning .......................................................................................................... 27
The Front of Your TV ...................................................................................................... 28
Index ................................................................................................................................29

This page left blank intentionally

Connections & Setup
Chapter Overview:
•Things to Consider Before You Connect
•Choose Your Connection
•Connections
•Plug in the TV
•Put Batteries in the Remote
•How to Use the Remote Control to Complete
Setting Up the TV
•Finishing the Setup
•Setting Up the Channel Guide
3
Chapter 1
The New Era in Entertainment.
Illustrations contained in this document are for representation only.

4Chapter 1
Connections & Setup
Things to Consider Before You Connect
Protect Against Power Surges
• Connect all components before you plug any of their power cords into the wall outlet.
• Turn off the TV and/or component before you connect or disconnect any cables.
• Make sure all antennas and cables are properly grounded. Refer to the Important
Safeguards sheet packed with your TV.
Protect Components from Overheating
• Don’t block ventilation holes on any of the components. Arrange the components so that
air can circulate freely.
• Don’t stack components.
• When you place components in a stand, make sure you allow adequate ventilation.
• If you connect an audio receiver or amplifier, place it on the top shelf so the heated air
from it won’t flow around other components.
Position Cables Properly to Avoid Audio Interference
• Insert each cable firmly into the designated jack.
• If you place components above the TV, route all cables down the side of the back of the
TV instead of straight down the middle.
• If your antenna uses 300-ohm twin lead cables, do not coil the cables. Also, keep the twin
lead cables away from audio/video cables.
Important Stand and Base Safety Information
Choose the location for your TV carefully. Place the TV on a stand or base that is of adequate
size and strength to prevent the TV from being accidentally tipped over, pushed off, or pulled
off. This could cause personal injury and/or damage the TV. Refer to the Important Safeguards
sheet packed with your TV.
Use Indirect Light
Don’t place the TV where sunlight or room lighting will be directed toward the screen. Use soft
or indirect lighting.

Chapter 1 5
Connections & Setup
Coaxial cable
TV
VCR
TV
Components Cables Connection Go to...
Needed Title
Coaxial
Audio/Video
S-Video
TV + VCR +
Satellite Receiver
page 7
Coaxial
Audio/Video
TV + VCR page 6
TV
VCR
Satellite
Coaxial
Audio/Video
S-Video
TV + VCR + DVD page 8
Choose Your Connection
There are several ways to connect your TV. Please use the following chart to determine which
connection is best for you. Proceed to the appropriate page and connect your TV.
Cables Needed to Connect Components to Your TV
You will need the following types of cables for the connections represented in this book.
Notes: Audio/Video cables (A/V cables for short) are usually sold as a bundled set, but the connection pictures in this book
show each cable separately for better visibility. Use the white and red cables for audio connections and the yellow cable for
video connections.
Audio/Video cables
S-Video cable
VCR
DVD
TV
DVD
Audio
Receiver
Coaxial
Audio/Video
S-Video
TV + DVD +
Audio Receiver
page 9

6Chapter 1
Connections & Setup
TV
VCR
TV + VCR
1. Connect your TV to your VCR
A. Connect a coaxial cable to the ANTENNA jack on your TV and to the output jack on your VCR
(sometimes labeled OUT TO TV).
B. Connect the white and red audio cables to the AV1 L and R audio input jacks on the back of the
TV and to the corresponding audio output jacks on the VCR.
C. Connect the video cable (yellow) to the AV1 VIDEO input jack on the back of the TV and to the
video output jack on the VCR.
2. Connect cable or antenna to your VCR
Connect the coaxial cable from your cable outlet, cable box, or antenna to the input jack on your
VCR (sometimes labeled IN FROM ANT).
Go to page 10
ANTENNA
L
R
75 OHMS
INPUTS
(MONO)
AV1 AV2
AUDIO
OUT
S-VHS
TV (back panel)
IN FROM ANT
OUT TO TV
CH3
CH4
VCR
VIDEO
OUT
LR
AUDIO
IN
L
R
From Cable,
Cable Box,
or Antenna
VIDEO
1C
1A
2
1B

Chapter 1 7
Connections & Setup
ANTENNA
L
R
75 OHMS
INPUTS
(MONO)
AV1 AV2
AUDIO
OUT
S-VHS
TV (back panel)
IN FROM ANT
OUT TO TV
CH3
CH4
VCR
VIDEO
OUT
LR
AUDIO
IN
L
R
CH3
CH4
SATELLITE RECEIVER
S-VIDEO L
R
VIDEO
OUT
SATELLITE
IN
IN FROM ANT
OUT TO TV
Satellite Signal
From Cable,
Cable Box,
or Antenna
VIDEO
VCR
Satellite
TV + VCR + Satellite Receiver
1. Connect your Satellite Receiver to your TV
A. Connect the white and red audio cables to the AV1 L and R audio input jacks on the back of the
TV and to the audio output jacks on the satellite receiver.
B. Connect an S-Video cable (not supplied) to the S-VHS jack on the back of the TV and to the
S-Video output jack on the satellite receiver.
Note: If your satellite receiver does not have an S-Video jack, use a regular video cable to
connect the satellite receiver’s video output to the TV’s AV1 VIDEO jack.
2. Connect coaxial cables to your Satellite Receiver
A. Connect the coaxial cable from your cable outlet, cable box, or antenna to the input jack on your
satellite receiver (sometimes labeled IN FROM ANT).
B. Connect the coaxial cable from your satellite dish antenna to the input jack on your satellite
receiver (sometimes labeled SATELLITE IN).
3. Connect your Satellite Receiver to your VCR and TV
A. Connect a coaxial cable to the output jack (sometimes labeled OUT TO TV) on the satellite
receiver and to the input jack on the VCR (sometimes labeled IN FROM ANT).
B. Connect a coaxial cable to the output jack on the VCR (sometimes labeled OUT TO TV) and to the
ANTENNA jack on the TV.
4. Connect your VCR to your TV
A. Connect the white and red audio cables to the AV2 L and R audio input jacks on the back of the
TV and to the corresponding audio output jacks on the VCR.
B. Connect the video cable (yellow) to the AV2 VIDEO input jack on the back of the TV and to the
video output jack on the VCR.
Go to page 10
1A
1B
3A
3B
2B
2A
TV
4A
4B

8Chapter 1
Connections & Setup
ANTENNA
L
R
75 OHMS
INPUTS
(MONO)
AV1 AV2
AUDIO
OUT
S-VHS
TV (back panel)
CH3
CH4
DVD PLAYER
S-VIDEO L
R
VIDEO
OUT
IN FROM ANT
OUT TO TV
CH3
CH4
VCR
VIDEO
OUT
LR
AUDIO
IN
L
R
From Cable,
Cable Box,
or Antenna
VIDEO
TV
VCR
DVD
TV + VCR + DVD
1. Connect your DVD player to your TV
A. Connect the white and red audio cables to the AV1 L and R audio input jacks on the back of
the TV and to the audio output jacks on the DVD player.
B. Connect an S-Video cable (not supplied) to the S-VHS jack on the back of the TV and to the
S-Video output jack on the DVD player.
Note: If your DVD player does not have an S-Video jack, use a regular video cable to connect
the DVD player’s video output to the TV’s AV1 VIDEO jack.
2. Connect your VCR to your TV
A. Connect a coaxial cable to the ANTENNA jack on your TV and to the output jack on your VCR
(sometimes labeled OUT TO TV).
B. Connect the white and red audio cables to the AV2 L and R audio input jacks on the back of
the TV and to the corresponding audio output jacks on the VCR.
C. Connect the video cable (yellow) to the AV2 VIDEO input jack on the back of the TV and to
the video output jack on the VCR.
3. Connect cable or antenna to your VCR
Connect the coaxial cable from your cable outlet, cable box, or antenna to the input jack on your
VCR (sometimes labeled IN FROM ANT).
Go to page 10
1A
1B
2B
2A
2C
3

Chapter 1 9
Connections & Setup
TV + DVD + Audio Receiver
1. Connect your TV to your Audio Receiver
Connect the left and right audio cables to your audio receiver and to the AUDIO OUT L (left –
white) and R (right – red) jacks on the back of your TV.
2. Connect your DVD player to your TV
A. Connect the white and red audio cables to the AV1 L and R audio input jacks on the back of
the TV and to the audio output jacks on the DVD player.
B. Connect an S-Video cable (not supplied) to the S-VHS jack on the back of the TV and to the
S-Video output jack on the DVD player.
Note: If your DVD player does not have an S-Video jack, use a regular video cable to connect
the DVD player’s video output to the TV’s AV1 VIDEO jack.
3. Connect cable or antenna to your TV
Connect the coaxial cable from your cable outlet, cable box, or antenna to the ANTENNA Jack on
your TV.
Go to page 10
ANTENNA
L
R
75 OHMS
INPUTS
(MONO)
AV1 AV2
AUDIO
OUT
S-VHS
TV (back panel)
AUDIO RECEIVER
L
R
AUDIO IN
CH3
CH4
DVD PLAYER
S-VIDEO L
R
VIDEO
OUT
From Cable,
Cable Box,
or Antenna
VIDEO
1
2B
2A
3
TV
DVD
Audio Receiver

10 Chapter 1
Connections & Setup
Use the arrow buttons to move
through the menu system. Use the
OK or right arrow button to select
items.
OK
Plug in the TV
Plug the end of the power cord into the wall outlet. Make sure to insert the plug
completely into the outlet.
Depending on the type of wall outlets in your country, you might need to use
an adapter to plug in the TV.
Put Batteries in the Remote
1. Remove the battery compartment cover on the remote.
2. Insert new batteries. Match the polarities (+ and -) on the batteries with the
diagram on the remote.
3. Put the battery compartment cover back on the remote.
How to Use the Remote Control to
Complete Setting Up the TV
The technical term is “Navigation” – how you move through the on-screen
menus. The theory is the same throughout the menu screens: move the cursor to
your choice and select it.
To move the cursor, use the up and down arrow buttons. To change an item’s
setting, use the left and right arrow buttons.
Press OK or the right arrow button to select an item.
Turn on the TV
Press the ON•OFF button on the remote control or the POWER button on the
TV itself.

Chapter 1 11
Connections & Setup
Finishing the Setup
The first time you tur n on your TV, the scr een shown on the left appears.
Your TV can sear ch for all channels that ar e viewable thr ough your antenna or
cable-TV system. This is sometimes called automatic tuning. Follow the steps
below to start automatic tuning.
1. Make sur e you have either an of f-air antenna or another component
connected to the ANTENNA jack on the back of your TV .
2. Press the left ar row button to continue the setup pr ocedur e.
3. In the next screen (shown on the left), use the up and down arrow buttons
to highlight your selection.
NO Choose this option if you didn’t connect a VCR to your TV.
YES Choose this option if you connected a VCR to your TV. Then select
the video input channel for your VCR according to the way you
connected it to your TV.
CHANNEL 3 or CHANNEL 4 Sets the video input channel to channel
3 or 4. Choose this option if you used an RF coaxial cable (without
audio/video cables) to connect the VCR to the TV. Try to select the
channel number that is not active in your area.
AV Sets the video input channel to the first set of audio/video inputs.
Choose this option if you used audio/video/S-Video cables to connect
your VCR to your TV.
4. Press the left arrow button to start automatic tuning.
Your TV automatically cycles through all channel numbers and places the
active channels into channel memory. When your TV is finished, it tunes to
the lowest channel in its channel memory.
5. Press CH+ or CH- to access the channels in the channel list. The channels
can also be accessed using the number buttons on the remote.
Note: If you change your location or cable company, you will need to
run Automatic Tuning again.
TO RUN AUTOMATIC
TUNING NOW
PLUG THE ANTENNA
NO YES

12 Chapter 1
Connections & Setup
Setting Up the Channel Guide
Your TV has a built-in guide that allows you to set up lists of your favorite channels, organized
into five categories:
Movies,
Sports,
News,
Music, and
Childrens’ entertainment.
You can choose up to five channels for each category.
Adding Channels to the Guide
The first time you turn on your TV, the Channel Guide is empty.
To add your favorite channels to each category:
1. Press GUIDE on the remote control.
2. Use the arrow buttons to highlight a space in the category you want.
3. Add channels to the list with the number buttons on the remote control.
4. When you’re done, press GUIDE to exit.
-
-
-
-
-
-
-
-
-
-
-
-
-
-
-
-
-
-
-
-
-
-
-
-
-
Using the Guide
Once you’ve set up a list of your favorite channels, you can use the Channel Guide to access
them directly.
1. Press GUIDE.
2. Use the left and right arrow buttons to highlight the category you want.
3. Use the up and down arrow buttons to highlight the channel you want.
4. Press OK or GUIDE to tune to the selected channel.

Using the
Remote Control
Chapter Overview:
•The Buttons on the Remote Control
•Programming the Remote to Operate Other Components
•How To Use the Remote After You’ve Programmed It
•Code List
13
Chapter 2
The New Era in Entertainment.
Illustrations contained in this document are for representation only.

14 Chapter 2
Using the Remote Control
S
T
OP
P
AUSE
P
AUSE
P
TV
ON OFF
DVD
PLA
Y
A
Y
A
SOU
N
D
GO
B
ACK
C
H
+
C
H
-
V
O
L
V
O
L
SK
I
P
MU
T
E
INF
O
M
EN
U
C
LE
AR
GU
ID
E
A
NTENN
A
1
2
3
4
5
6
7
8
9
0
INP
UT
V
CR1
L.E.D. The Buttons on the Remote Control
0-9 (Number buttons) Enter channel numbers and time settings directly
through the remote control.
Arrow buttons (up, down, left, right) Press the arrow buttons to move
through the on-screen menu system.
ANTENNA Functions as TV/VCR button in VCR mode and TV/receiver button
in SAT•CABLE mode.
AUX (auxiliary) Puts the remote in auxiliary mode to operate the component
you’ve programmed the remote to operate with this button. You can program
this button to control a cable box, satellite receiver, Dimensia audio
components, some RCA audio components, a laserdisc player, or a VCR.
CH+ and CH– buttons Scan up or down through the current channel list. Press
once to change the channel up or down; press and hold to continue changing
channels.
CLEAR Removes any menu or display from the screen and returns you to
TV viewing.
DVD Puts the remote in DVD mode to operate RCA, GE and Proscan DVD
players. It cannot be programmed.
FORWARD If you’re operating a VCR or DVD player with the remote control,
press FORWARD to advance a disc or videotape.
GO BACK Returns you to the previous channel.
GUIDE Accesses the TV’s channel guide. If you’re operating another
component that has a guide, this button accesses the on-screen guide.
INFO Displays channel information.
INPUT In TV mode, press INPUT to toggle through the available Video Input
channels. In SAT mode, press to select available channel lists for RCA, GE and
Proscan satellite receivers.
L.E.D. (light-emitting diode) The little light on the remote that lights when you
are programming the remote. It also lights when you press a valid button on the
remote.
MENU Displays the TV’s main menu and selects highlighted items.
MUTE Lowers the volume to its minimum level. Press again to restore volume.
OK Selects items in the TV’s menu system. If you’re operating another
component, the OK button might allow you to select a highlighted item in the
on-screen menu.
ON•OFF Turns the TV on and off. When the remote is in another mode (VCR,
DVD, Satellite, etc.) and the remote is programmed to operate that component,
you can press ON•OFF to turn the component on and off.

Chapter 2 15
Using the Remote Control
Tip
To turn off all the RCA, GE,
and PROSCAN components
that are connected to the
TV, press ON•OFF twice
within two seconds.
This feature only works
with most RCA, GE and
PROSCAN products.
PAUSE If you’re operating a VCR or DVD player with the remote control, press
PAUSE when the disc or videotape is playing to pause playback.
PLAY If you’re operating a VCR or DVD player, plays the disc or videotape.
RECORD If the remote is in VCR mode, press RECORD to start recording.
REVERSE If you’re operating a VCR or DVD player with the remote control,
press REVERSE to go backwards on a disc or videotape.
SAT•CABLE Puts the remote in SAT•CABLE mode.
SKIP If you press this button before you change the channel, the TV waits 30
seconds and automatically goes back to the original channel. Each time you
press SKIP, you add 30 seconds (i.e, if you press SKIP two times before you
change the channel, the TV waits 60 seconds and automatically turns back to
the original channel).
SOUND Toggles between the available sound modes for the TV –STEREO,
MONO, or SAP. If you’re operating another component with several sound
options, this button displays those options.
STOP If you’re operating a VCR or DVD player, stops playing the disc or
videotape.
TV Turns on the TV and puts the remote in TV mode. Also displays channel
information.
VCR1 Puts the remote in VCR1 mode.
VCR2 Puts the remote in VCR2 mode.
VOL (up and down) buttons Decrease or increase the TV’s volume.

Using the Remote Control
16 Chapter 2
You’ll use these buttons when you program the
remote to operate another component.
The remote may not operate all models of
all brands.
STOP
TV
ON OFF
AUX
DVD SAT CABLE
PLAYREVERSE
C
H
+
C
H
-
V
O
L
V
O
L
VCR1
VCR2
Tip
To stop the automatic code search without
programming any components, press and hold CLEAR
until the light on the remote turns off.
Programming the Remote to Operate
Other Components
The universal remote control can be programmed to operate most brands
of remote controllable VCRs, satellite receivers and cable boxes. The
remote is already programmed to operate most RCA, GE and Proscan
TVs, VCRs, DVD players, laserdisc players and satellite receivers.
Find Out If You Need to Program the Remote
To determine whether the universal remote needs to be programmed,
turn a component ON, such as a VCR, point the remote at the VCR, and
press the VCR1 button. Then press ON•OFF or channel up or channel
down to see if the VCR responds to the remote commands. If not, the
remote needs to be programmed.
Note: The DVD button cannot be programmed. It can be used to
operate RCA, GE and Proscan DVD players only.
How to Program the Remote
There are two ways to program the remote control: automatic code
search and direct entry. Instructions for both ways follow.
Using Automatic Code Search
1. Turn on the component you want the remote to operate (VCR, cable
box, satellite receiver)
2. Press and hold the component button on the remote control that
corresponds to the component you want the remote to operate
(VCR1, SAT•CABLE). While you hold down the component button,
press and hold ON•OFF (when the light on the remote turns on,
release both buttons).
3. Press PLAY (the light on the remote, located below the ON•OFF
button, starts flashing).
The remote is searching the first set of component codes (there are
20 sets of codes). If the component you want to operate doesn’t turn
off automatically after 5 seconds, press PLAY again (the light starts
flashing again as the remote searches through the next set of codes).
Continue pressing PLAY until the component turns off.
Note: If the component doesn’t turn off after you’ve pressed
the PLAY button 20 times, the component can’t be
programmed.
4. Press REVERSE, wait 2 seconds. Repeat this step until the component
turns back on.
5. To finish, press and hold the STOP button until the light on the
remote turns off.

Chapter 2 17
Using the Remote Control
Tip
The buttons might
operate differently for
other components,
especially when you’re
using another
component’s menu
system.
Using Direct Entry
1. Turn on the component you want the remote to operate.
2. Look up the brand and code number(s) for the component on the code list on page 7.
3. Press and hold the component button that corresponds to the component you want the
remote to operate (VCR1, VCR2, SAT•CABLE, or AUX)
4. Enter the code from the code list.
5. Release the component button.
6. Press ON•OFF to see if the component responds to the remote commands. If it doesn’t, try
pressing the component button and then ON•OFF again.
7. If you get no response, repeat these steps using the next code listed for your brand until the
component responds to the remote commands.
Note: If you try all the codes for your component brand and none work, try the automatic code
search method. If automatic code search doesn’t find the code, the remote is not compatible with
your component.
How to Use the Remote After You’ve
Programmed It
Once the remote has been programmed successfully, you are ready to use it to control your
components. To operate the component:
1. Press the component button (VCR1, VCR2, SAT•CABLE, or AUX) to set the remote to operate
the component.
2. Press ON•OFF to turn the component ON or OFF.
3. Use the remote buttons that apply to that component.
Note: If you keep pressing buttons and nothing happens, the remote is probably in the wrong
mode. You must press the component button that matches the component you want to operate
(i.e., if you want to operate the VCR, press VCR1 on the remote control to put the remote in VCR
mode.)

18 Chapter 2
Using the Remote Control
VCR Codes
Program to VCR1, VCR2, AUX buttons
Admiral ........................................................................ 2131
Adventura .................................................................... 2026
Aiko ............................................................................. 2027
Aiwa ................................................................... 2002, 2026
Akai .......... 2003, 2004, 2005, 2007, 2008, 2111,2112, 2113
American High ............................................................ 2021
Asha ............................................................................. 2013
Audio Dynamics ................................................ 2009, 2010
Audiovox ..................................................................... 2014
Bell & Howell ............................................................. 2011
Beaumark .................................................................... 2013
Broksonic .......................................................... 2012, 2025
Calix ............................................................................. 2014
Candle ............. 2013, 2014, 2015, 2016, 2017, 2018, 2019
Canon ...................................................... 2021, 2022, 2114
Capehart ............................................................ 2020, 2110
Carver .......................................................................... 2062
CCE .................................................................... 2027, 2061
Citizen ...... 2013, 2014, 2015, 2016, 2017, 2018,2019,2027
Colortyme .................................................................... 2009
Colt .............................................................................. 2061
Craig .............................................. 2013, 2014, 2023, 2061
Curtis-Mathes ................................ 2000, 2002, 2009, 2013,
................................... 2016, 2018, 2021, 2022, 2024, 2115
Cybernex ..................................................................... 2013
Daewoo ... 2015, 2017, 2019,2025, 2026, 2027, 2028, 2110
Daytron ........................................................................ 2110
Dbx .................................................................... 2009, 2010
Dimensia ..................................................................... 2000
Dynatech ........................................................... 2002, 2026
Electrohome ...................................................... 2014, 2029
Electrophonic .............................................................. 2014
Emerson ................................................... 2002, 2012,2014,
................. 2015, 2021, 2024, 2025,2026,2029, 2030, 2032,
.... 2033, 2034, 2035, 2036, 2037, 2038, 2039, 2040, 2041,
.... 2042, 2044, 2045, 2047, 2065, 2105, 2113, 2116, 2117,
2130
Fisher ....... 2011, 2023, 2048, 2049, 2050, 2051, 2052,2118
Fuji ..................................................................... 2021, 2119
Funai .................................................................. 2002, 2026
Garrard ........................................................................ 2026
GE .......... 2000, 2001, 2013, 2021, 2022, 2053, 2115, 2120
Goldstar ............................... 2009, 2014, 2018, 2054, 2121
Gradiente ..................................................................... 2026
Harley Davidson ......................................................... 2026
Harman Kardon .......................................................... 2009
Harwood ..................................................................... 2061
Headquarter ................................................................ 2011
Hitachi ... 2002, 2055, 2056, 2057, 2107, 2111, 2120, 2122
HI-Q ............................................................................. 2023
Instant Replay ............................................................. 2021
JCL ............................................................................... 2021
JC Penney ................. 2009, 2010, 2011, 2013, 2014, 2021,
.............. 2022, 2055, 2056, 2058, 2059, 2060, 2107, 2118
Jensen ...................................................... 2055, 2056, 2111
JVC ................... 2009, 2010, 2011, 2018, 2058, 2111, 2123
Kenwood . 2009, 2010, 2011, 2016, 2018, 2058, 2111,2123
KLH .............................................................................. 2061
Kodak ................................................................ 2014, 2021
Lloyd .................................................................. 2002, 2026
Logik ............................................................................ 2061
LXI ............................................................................... 2014
Magnavox ........ 2021, 2022, 2062, 2063, 2104, 2108, 2124
Magnin ......................................................................... 2013
Marantz ................................................... 2009, 2010, 2011,
..................................... 2016, 2018, 2021, 2058, 2062,2064
Marta ............................................................................ 2014
Masushita ..................................................................... 2021
MEI .............................................................................. 2021
Memorex .......................................................... 2002, 2011,
........................ 2013, 2014, 2021, 2023, 2026, 2104, 2131
MGA ......................................................... 2029, 2065, 2113
MGN Technology ........................................................ 2013
Midland ........................................................................ 2053
Minolta ..................................................... 2055, 2056, 2107
Mitsubishi ....... 2029, 2055, 2056, 2065, 2066, 2067, 2069,
.............. 2070, 2071, 2072, 2073, 2074, 2106, 2113, 2123
Montgomery Ward ............................................ 2075, 2131
Motorola ............................................................ 2021,2131
MTC ........................................................ 2002, 2013, 2026
Multitech .................... 2002, 2013, 2016, 2026, 2053, 2061
NEC ..................................... 2009, 2010, 2011, 2016, 2018,
....................... 2058, 2064, 2076, 2078, 2079, 2111, 2123
Nikko .......................................................................... 2014
Noblex ........................................................................ 2013
Olympus ..................................................................... 2021
Optimus ............................................................ 2014, 2131
Optonica ..................................................................... 2096
Orion .......................................................................... 2035
Panasonic .................. 2021, 2022, 2109, 2125, 2126, 2127
Pentax .................................. 2016, 2055, 2056, 2107, 2120
Pentex Research ......................................................... 2018
Philco .............................................2021, 2022, 2062, 2063
Philips ............................................ 2021, 2062, 2096, 2124
Pilot ............................................................................. 2014
Pioneer ................................ 2010, 2055, 2080, 2081, 2123
Portland ........................................ 2016, 2017, 2019, 2110
ProScan ............................................................. 2000, 2001
Protec .......................................................................... 2061
Pulsar .......................................................................... 2104
Quarter ....................................................................... 2011
Quartz ......................................................................... 2011
Quasar .................................................... 2021, 2022, 2125
RCA ..................................... 2000, 2001, 2003, 2013, 2021,
................ 2055, 2056, 2082, 2083, 2084,2085, 2086,2087,
............... 2088, 2089, 2090, 2091, 2107, 2115, 2120, 2125
Radioshack/Realistic ..................... 2002, 2011, 2013, 2014
.... 2021, 2022, 2023, 2026, 2029, 2049, 2050, 2096, 2131
Radix ........................................................................... 2014
Randex ........................................................................ 2014
Ricoh ........................................................................... 2128
Runco ......................................................................... 2104
Samsung .................... 2005, 2013, 2015, 2033, 2053, 2112
Sanky ................................................................ 2131, 2104
Sansui ............................................2010, 2092, 2111, 2123
Sanyo ...................................................... 2011, 2013, 2023
Scott ...... 2012, 2015, 2025, 2032, 2035, 2038, 2065, 2093,
2116
Sears ................................... 2011, 2014, 2021, 2023, 2048,
......................... 2049, 2050, 2051, 2055, 2056, 2107, 2118
Sharp ................ 2002, 2017, 2029, 2094, 2095, 2096, 2131
Shintom ........................................ 2004, 2056, 2061, 2098
Shogun ....................................................................... 2013
Signature .......................................................... 2002, 2131
Singer ...................................................... 2021, 2061, 2128
Sony ........................... 2002, 2004, 2098, 2099, 2119, 2128
STS .................................................................... 2021, 2107
Sylvania . 2002, 2021, 2022, 2026, 2062, 2063, 2065, 2124
Symphonic ........................................................ 2002, 2026
Tandy ................................................................ 2002, 2011
Tashiko ....................................................................... 2014
Tatung ............................................................... 2058, 2111
TEAC .................................... 2002, 2026, 2058, 2085, 2111
Technics ............................................................ 2021, 2109
Teknika ...................... 2002, 2014, 2021, 2026, 2100, 2129
TMK ........................................................ 2013, 2024, 2047
Toshiba ............ 2015, 2049, 2051, 2055, 2065, 2093, 2116
ToteVision ........................................................ 2013, 2014
Unitech ....................................................................... 2013
Vector Research ............................. 2009, 2010, 2015, 2016
Victor .......................................................................... 2010
Video Concepts ................... 2009, 2010, 2015, 2016, 2113
Videosonic .................................................................. 2013
Wards ........... , 2002, 2013, 2014, 2015, 2021, 2023, 2026,
.... 2029, 2055, 2056, 2061, 2096, 2101, 2102, 2103, 2107,
2116, 2131
XR-1000 .................................................. 2021, 2026, 2061
Yamaha ...................... 2009, 2010, 2011, 2018, 2058, 2111
Zenith .................................. 2004, 2098, 2104, 2119, 2128
Cable Boxes Codes
Program to SAT•CABLE or AUX button
ABC .................. 5002, 5003, 5004, 5005, 5006, 5007, 5053
Antronix ............................................................ 5008, 5009
Archer ............................................ 5008, 5009, 5010, 5011
Cabletenna ................................................................. 5008
Cableview ................................................................... 5008
Century ....................................................................... 5011
Citizen ......................................................................... 5011
Colour Voice ..................................................... 5012, 5013
Comtronics ....................................................... 5014, 5015
Contec ...................................................................... 5016
Eastern ...................................................................... 5017
Garrard ..................................................................... 5011
GC Electronics .......................................................... 5009
Gemini .................................................. 5018, 5019, 5049
General Instrument .................................................. 5003
Hamlin .............................. 5020, 5021, 5022, 5035, 5045
Hitachi ...................................................................... 5003
Hytex ........................................................................ 5002
Jasco ......................................................................... 5011
Jerrold ... 5003, 5005, 5007,5018, 5023, 5024, 5046, 5053
Magnavox ................................................................. 5025
Memorex .................................................................. 5026
Movie Time .......................................... 5002, 5027, 5028
NSC ....................................................... 5002, 5027, 5028
Oak ........................................................ 5002,5016, 5029
Panasonic ....................................................... 5048, 5052
Paragon .................................................................... 5026
Philips ........................................ 5011, 5012, 5013, 5019,
5025, 5030, 5031, 5032
Pioneer ........................................................... 5033, 5034
Pulsar ........................................................................ 5026
RCA ....................................................... 5047, 5049, 5052
Realistic ........................................................... 5009, 5049
Regal ............................................................... 5022, 5035
Regency .................................................................... 5017
Rembrandt ................................................................ 5003
Runco ....................................................................... 5026
Samsung ......................................................... 5014, 5034
Scientific Atlanta ......................... 5006, 5036, 5037, 5038
Signal .............................................................. 5014, 5018
Signature ................................................................... 5003
SL Marx ..................................................................... 5014
Sprucer ..................................................................... 5052
Starcom ................................................. 5007, 5018, 5053
Stargate ........................................................... 5014, 5018
Starquest ................................................................... 5018
Tandy ........................................................................ 5040
Teleview ................................................................... 5014
Tocom ................................................... 5004, 5023, 5041
Toshiba ..................................................................... 5026
Tusa .......................................................................... 5018
TV86 ......................................................................... 5027
Unika .................................................... 5008, 5009, 5011
United Artists ............................................................ 5002
United Cable ............................................................ 5053
Universal ..................................... 5008, 5009, 5010, 5011
Videoway .................................................................. 5044
Viewstar ...................................... 5015, 5025, 5027, 5040
Zenith ................................................... 5026, 5050, 5051
Satellite Receivers Codes
Program to SAT•CABLE or AUX button
Chapparal ....................................................... 5056, 5057
Drake .............................................................. 5058, 5059
GE ............................................................................. 5000
General Instruments ............................ 5060, 5061, 5062
Panasonic ................................................................. 5075
Primestar ................................................................... 5076
ProScan ..................................................................... 5000
RCA ........................................................................... 5000
Realistic ..................................................................... 5063
Sony .......................................................................... 5072
STS1 .......................................................................... 5064
STS2 .......................................................................... 5065
STS3 .......................................................................... 5066
STS4 .......................................................................... 5067
Toshiba ..................................................................... 5068
Toshiba ..................................................................... 5073
Uniden ...................................................................... 5069
Audio Codes
Program to AUX button (for Dimensia and some
RCA brands only)
AM/FM ...................................................................... 4003
Aux ........................................................................... 4004
Phono ....................................................................... 4005
CD ............................................................................. 4007
Tape .......................................................................... 4006
Code List
Table of contents
Other RCA TV manuals