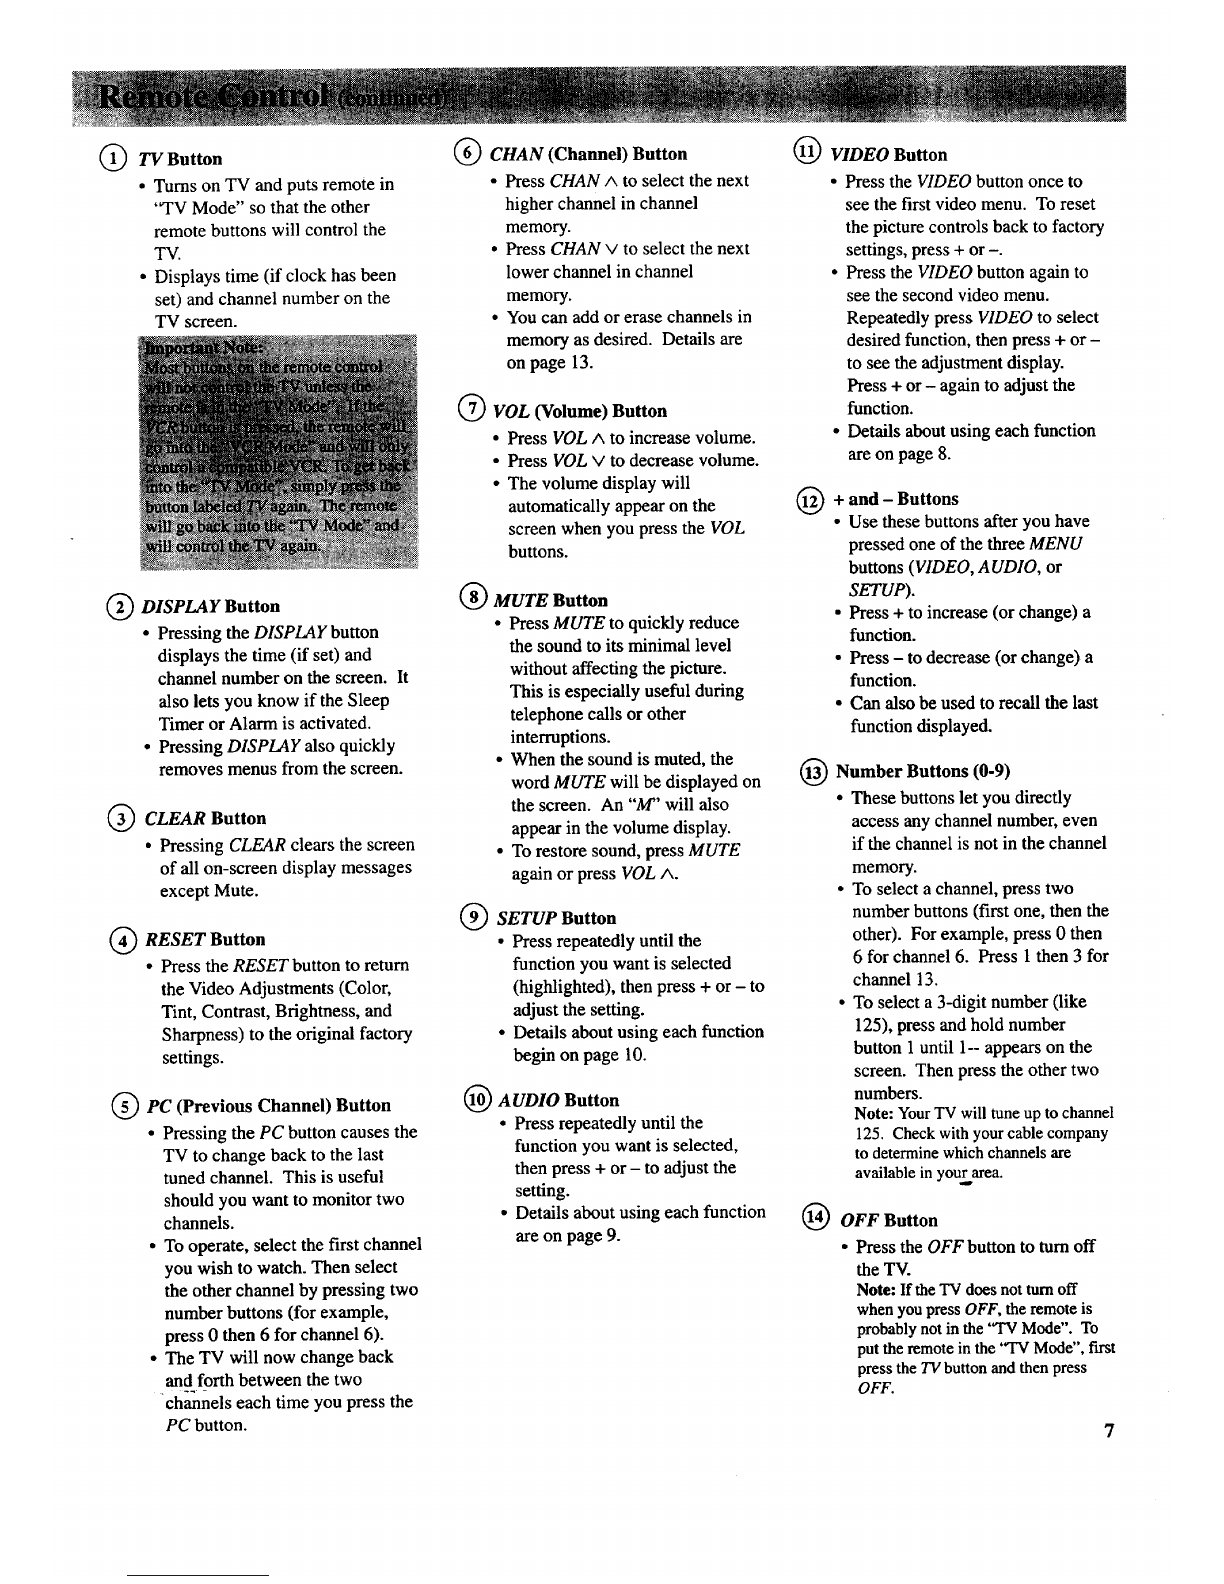
manuals.online logo
Brands
  1. Home
  2. •
  3. Brands
  4. •
  5. RCA
  6. •
  7. TV
  8. •
  9. RCA IB-F20551WN User manual

RCA IB-F20551WN User manual

Other RCA TV manuals

RCA F27343 User manual

RCA

RCA F27343 User manual

RCA MMC101 User manual

RCA

RCA MMC101 User manual

RCA 14F400T User manual

RCA

RCA 14F400T User manual

RCA 27F530T User manual

RCA

RCA 27F530T User manual

RCA 24F524T User manual

RCA

RCA 24F524T User manual

RCA Victor CTC9A Installation instructions

RCA

RCA Victor CTC9A Installation instructions

RCA F27700 User manual

RCA

RCA F27700 User manual

RCA F35674 User manual

RCA

RCA F35674 User manual

RCA F25674 User manual

RCA

RCA F25674 User manual

RCA P60100 User manual

RCA

RCA P60100 User manual

RCA RLED1930A User manual

RCA

RCA RLED1930A User manual

RCA F32690 User manual

RCA

RCA F32690 User manual

RCA P60752 User manual

RCA

RCA P60752 User manual

RCA guide plus User manual

RCA

RCA guide plus User manual

RCA RLED4843-UHD User manual

RCA

RCA RLED4843-UHD User manual

RCA J25400TX52AJ9 User manual

RCA

RCA J25400TX52AJ9 User manual

RCA F27350 User manual

RCA

RCA F27350 User manual

RCA P46728 User manual

RCA

RCA P46728 User manual

RCA RT2412-B User manual

RCA

RCA RT2412-B User manual

RCA F27630 User manual

RCA

RCA F27630 User manual

RCA HDTV Monitor User manual

RCA

RCA HDTV Monitor User manual

RCA MCR61TF30 User manual

RCA

RCA MCR61TF30 User manual

RCA RLDED3258A User manual

RCA

RCA RLDED3258A User manual

RCA RTAU6504 User manual

RCA

RCA RTAU6504 User manual

Popular TV manuals by other brands

IKEA UPPLEVA user manual

IKEA

IKEA UPPLEVA user manual

Toshiba 19A20 Service manual

Toshiba

Toshiba 19A20 Service manual

Sony XBR-100Z9D reference guide

Sony

Sony XBR-100Z9D reference guide

Sony Trinitron KV-HR36M90 Service manual

Sony

Sony Trinitron KV-HR36M90 Service manual

JVC AV-14AG16 instructions

JVC

JVC AV-14AG16 instructions

Loewe Table Stand Reference 55 user guide

Loewe

Loewe Table Stand Reference 55 user guide

Panasonic Genus TX-G10 operating instructions

Panasonic

Panasonic Genus TX-G10 operating instructions

Samsung LN26C350D1D Service manual

Samsung

Samsung LN26C350D1D Service manual

BBK LT1516D Service manual

BBK

BBK LT1516D Service manual

Samsung 55S9 B Series Quick setup guide

Samsung

Samsung 55S9 B Series Quick setup guide

Sharp LC-40FI5012E user manual

Sharp

Sharp LC-40FI5012E user manual

Evervue BN185 Operation manual

Evervue

Evervue BN185 Operation manual

North State TV2GO user guide

North State

North State TV2GO user guide

Toshiba CX35F70 owner's manual

Toshiba

Toshiba CX35F70 owner's manual

Magnavox PS1980 owner's manual

Magnavox

Magnavox PS1980 owner's manual

Philips 20HF5335D manual

Philips

Philips 20HF5335D manual

Panasonic QuintrixF TX-29AS1D operating instructions

Panasonic

Panasonic QuintrixF TX-29AS1D operating instructions

Samsung 4 Series Quick setup guide

Samsung

Samsung 4 Series Quick setup guide

manuals.online logo
manuals.online logoBrands
  • About & Mission
  • Contact us
  • Privacy Policy
  • Terms and Conditions

Copyright 2025 Manuals.Online. All Rights Reserved.

RCA Color TV
Owner's Manual
WARNING: To prevent fire or shock hazard, do not
expose this TV to rain or moisture.
If you suspect that liquid has entered the TV, unplug it
immediately and have it inspected by an RCA TV Servicenter.
Turning it off is not enough - your TV has power applied to
some circuits even when the TV is turned off.
The lightning
and wTowhead
within the h'langle
is • warning sign
alerting you of
"dangerous
voltage" inside the
product that
presents a risk of
electric shock.
CAUTION: TO REDUCE THE
RISK OF ELECTRIC SHOCK,
DO NOT REMOVE COVER
(OR BACK). NO USER-
SERVICEABLE PARTS
INSIDE. REFER SERVICING
TO QUALIFIED SERVICE
PERSONNEL
The exclamation
point within the
_mngle Ism
warning mlgn
alertingyou of
iml:_:_tant
in_s
accompanylng
product.
CAUTION: Maintain electrical safety. Powerline-operated
equipment or accessories connected to this unit should bear the
UL listing mark or CSA certification mark on the accessory
itself and should not have been modified so as to defeat the
safety features. This will help avoid any potential hazard from
electric shock or fire. If in doubt, contact qualified service
personnel.
INote to Cable TV Installer: This reminder is provided to call
your attention to Article 820-22 of the National Electrical
Code (Section 54 of the Canadian Electrical Code, Part 1)
which provides guidelines for proper grounding and, in
particular, specifies that the cable ground shall be connected to
the grounding system of the building as close to the point of
cable entry as practical.
• Your TV operates on 120 volts, 60 Hz AC power (normal
house power) and has a polarized AC plug. Because one
• blade of the plug is wider than the other, the plug fits into the
wall socket only one way. Do not defeat the safety feature of
this plug. If you need an extension cord, make sure it is
polarized.
_AUTION: To prevent electric shock, do not use
the polarized plug on this TV with an extension
cord, receptacle, or other outlet unless both blades
can be fully inserted to prevent blade exposure.
MISE EN GARDE: Pour pr_venir les chocs
_lectriques, ne pas utiliser la fiche polaris6e de cet
appareil avec une rallonge, une prise de courant
ou une autre sortie, _ moins que les lames ne
puissent &re ins_r6es hfond sans qu'aucune partie ne soit
laiss_e h d_couvert.
• All operating controls and their functions are identified and
explained in this manual. For warranty service or routine
maintenance, contact the nearest Authorized RCA TV
Servicenter. All servicing and adjustments to electrical
components should be done by a qualified service technician.
Mail Your Enrollment Card Today
•An RCA Owner's Club Enrollment Card is packed with your
set. Please fill out the card and return it immediately.
• Your name then will be enrolled in the next drawing, which
takes place every three months. If your name is drawn, you
will be reimbursed for thefMl purchase price of your new
RCA product (restricted to residents of USA only).
• Your prompt submission of this card confirms your right to
the protection available under the terms and conditions of the
warranty and also allows us to contact you in the unlikely
issuance of a safety modification.
•With your card on file, we can also help you in the event of
loss or theft by verifying your ownership.
• If you did not receive an RCA Owner's Club Enrollment
Card, please contact your dealer.
/\\ ,-----,--.-, .... \\
I\--------------?._\,,,.,,.,,,,_:,,i,,,,,.,,- \
Attach Your Sales Receipt Here and File at Home For
Future Reference
•To obtain warranty partsand service, you must show your
sales receipt (or other evidence of purchase) to your
Authorized RCA TV Servicenter.
• Tape or staple your sales receipt to this manual so you will
have it handy should service ever be needed. Do not mail
your sales receipt to us. File it athome with your owner's
manual for future reference.
Record Vital Information Here
• No other set has the same serial number as yours. You will
find the serial number and the model number on the back of
your set (and pre-printedon your Enrollment Card).
•Make sureyou recordboth numbers beloW'so that you will
have them in case your set is stolen orin case you need a
complete description for any other reason.
Model:
Serial:
Purchase Date:
Dealer Name/Address/Phone:
Thank youfor choosingRCA
Congratulationsonyourpurchaseof
anRCA TV. You have selected a
high-quality, precision-engineered
instrument designed to give you
years of enjoyment.
Despite its sophistication, your new
TV is amazingly simple to operate
because it has so many automatic
features. To simplify operation even
more, the TV provides on-screen
prompts that guide you thru each
step of the special functions. The
remote control allows adjustment of
major operating controls from the
comfort of your favorite easy chair.
Not only is your new set a state-of-
the-art television receiver that
combines sophistication with ease of
operation, it also has monitor
capability thus providing you
flexibility whenever you choose to
add an additional component.
About This Manual
To take full advantage of all the
features and benefits of this unique
TV, be sure to read this owner's
manual carefully and then keep it in
asafe place for future reference.
Table of Contents
Safety Precautions ............................................... Inside Front Cover
RCA Owner's Club ............................................. Inside Front Cover
First-Time Operation ................................................................... 2-3
Operating Instructions
Front Panel Controls ....................................................................... 4
TV On-Screen Status Displays ....................................................... 5
Remote Control
•Installing Batteries ....................................................................... 6
•TV Functions ............................................................................ 6-7
VIDEO Button - General Instructions ............................................ 8
AUDIO Button - General Instructions ........................................... 9
SETUP Button - General Instructions .......................................... 10
•Sleep Timer ................................................................................ 11
•Alarm Function .......................................................................... 12
• Channel Memory (AutoProgramming Channels) ...................... 13
•Channel Memory (Erasing/Adding Channels) ........................... 13
Detailed Connections
Monitor Panel ............................................................................... 14
Tips to Read Before Connecting Components ............................. 15
Antenna and Cable Connections
•Antenna and Cable Information ................................................. 16
• Home Antenna Connections ...................................................... 17
•Cable-TV Connections ............................................................... 18
• Cable-TV Operation ................................................................... 19
Component Connections
• VCR ........................................................................................... 20
• Remote Buttons that Control VCR ............................................ 21
• Camcorder .................................................................................. 22
• Computers and Equipment with A UDIO/VIDEO Outputs ........ 22
Reference Section
Trouble Checks ............................................................................. 23
Optional Accessories and Order Form .................................... 24-26
Quick-Reference Operating Guide ........................................ 27-28
Cleaning and Care ........................................................................ 29
Index (Alphabetical Subject Reference) ....................................... 29
Limited Warranty ........................................................... Back Cover
The steps below will help you get
your TV connected and working
quickly. The page numbers on which
you can find detailed instructions for
each of these steps are also listed for
your convenience.
1. Unpack TV and accessories.
Shown here are the accessories that came
packed with your TV.
oeoE91
@ @® Lv.JI
g_&g l
Antenna
Adapter
Remote Control and
Two AAA Batteries
2. Connect antenna or cable-TV
system.
Most antenna orcable-TV systems can
be connected as shown here.
Incoming Cable from Antenna or
Cable--TV System
Back
of TV
Details for connecting a home antenna
to your TV are on page 17.
Details for connecting a cable-TV
system to your TV are on page 18.
Details for connecting a VCR to your
TV are on page 20.
3. Attach power cord.
First attach the fiat end of the power cord
completely into the connector on the
back of your TV, and then plug the other
end into a wall outlet.
•Do This
Back Of TV
2nd
Not This
4. Install batteries in remote
control.
Details areon page 6.
5. Turn on TV, adjust the volume,
and select a channel.
Number--
Buttons
_emee_e_
eeel_l.
"® ® ® I__1
_ (,9 r_ L.Y.J
--TV Bu_on
CHAN (Channel)
Buttons
-- VOL (Volume)
Buttons
Press the TV button on the remote to
turn on the TV. When using the
remote, remember to point it at the
front of the TV.
Note: Pressingthe TVbutton puts the
remote in the "TV Mode" so it cancontrol
the TV. Pressing the VCR button puts the
remote in the "VCR Mode" so it can control
a compatible VCR. Always make sure the
remote is inthe "TV Mode" by pressing the
TVbutton whenyou are trying to control
the TV.
Press the VOLUME up or down button
to adjust the volume to a desired level.
Press the CHANNEL up or down button
to select the next channel in memory.
You can also press two number buttons
to select a channel. To select a 3-digit
number (up to 125), press and hold
number button 1until 1-- appears on
the screen. Then press the other two
numbers. Channels 2-13 were
programmed into the channel memory
for you at the factory, so pressing
CHANNEL up or down stops at these
channels only. When you start the
autoprogramming feature (described in
step 6), your set will automatically scan
through all channels and place only the
active channels for your area into its
channel memory.
Details about using the remote are on
page 7.
6. AutoProgram the TV's channel
memory.
To startthe TV autoprogramming itself,
repeatedly press the SETUP button to
select (highlight) the AUTOPROGRAM
function, and then press +. Details are
on page 13.
2nd
Menu
You can also add and erase channels
from memory as desired by repeatedly
pressing SETUP to select (highlight) the
EDIT CHANNELS function. Then press
+ or - to enter the function.
2nd
Menu
Select the desired channel number by
pressing the CHANNEL up or down
buttons or by pressing the two
corresponding number buttons.
Then press +to add a channel, or press
-to erase a channel. Details are on
page 13.
7. Set the clock.
Press VIDEO
once to see
1st video menu
VIDEO Press SETUP
to see 1st
setup menu.
SLEEP :
•Repeatedly press the SETUP button to
select the CLOCK function.
•Press and hold the +or -button to set
the clock. The +button advances the
time forward. The -button moves the
time backward.
•After the clock is set, the time will
appear on the screen whenever you
change channels or press the
DISPLAY button.
•You will have to reset the clock after
extended power interruptions. The TV
will let you know that power has been
interrupted by displaying --:-- in the
CLOCK function and by no longer
showing the time display on the screen
when you press the TV or DISPLAY
button on the remote.
8. Review audio, video, and setup
menus.
Press AUDIO
to see the
audio menu.
Press the VIDEO button once to see the
first video menu. The VIDEO RESET
function lets you quickly return all the
picture controls back to the factory
settings by pressing +or -.
Press VIDEO
again to see
2nd video
menu
Color
adjustment
display
To see the second video menu press
VIDEO again. Repeatedly press
VIDEO to select (highlight) the desired
function, then press +or -to see the
adjustment display on the bottom of the
screen. You can now adjust that display
to your personal preference by pressing
+or -. Details are on page 8.
Press SETUP
repeatedly to
see 2nd setup
menu.
Repeatedly press the SETUP button to
select (highlight) the function you want
to adjust, then press +or -to change it.
Details begin on page 10.
9. Review other features.
Later, after you feel comfortable with
your TV and remote control, you can
review the detailed control descriptions
and special features covered in this
manual.
You can use the rest of this manual as a
reference guide to review detailed
information about each operating control
and function. The alphabetical index in
the back will help you quickly locate
desired information. A quick-reference
operating guide is also printed on pages
27 and 28 for your convenience.
To see the audio menu press the AUDIO
button.
Repeatedly press AUDIO to select
(highlight) desired function, then press +
or - to change it. Details are on page 9.
3
te Sensor
/::i
POWER Button
QPower Indicator --
QAUDIO Button --
VOLUME Buttons
(Also + and -Buttons)
QCHANNEL Buttons
OPOWER Button
• Press once to turn on TV.
• Press again to turn off TV.
VOLUME Buttons
(Also + and -Buttons)
•Press VOL +to increase volume,
orpress VOL - to decrease
volume. The volume display will
automatically appear on the screen
when you press the VOL buttons.
• The + and-buttons are also used
afterone of the menu buttons is
pressed (AUDIO, VIDEO, or
SETUP) to change or adjust
special functions. When the menu
display disappears from the
screen, these buttons once again
become the volume adjustment
controls.
CHANNEL Buttons
• Press CHAN ^to see the next
higher channel in memory.
• Press CHAN v to see the next
lower channel in memory. ,.
• You can add or erase channels in-
--._aaemory as desired. Details are on
page 13.
QVIDEO Button -- --Q SETUP Button
QSETUP Button
•Press repeatedly until the function
you want is selected (highlighted),
then press VOL + or VOL - to
adjust the setting.
• Details about using each function
begin on page 10.
VIDEO Button
•Press the VIDEO button once to
see the first video menu. To reset
the picture controls back to
factory settings, press VOL + or
VOL -.
•Press the VIDEO button again to
see the second video menu.
Repeatedly press VIDEO to select
desired function, then press
VOL + or VOL - to see the
adjustment display. Press VOL +
or VOL - again to set the
adjustment display to your
preference.
•Details about using each function
areon page 8
(_ A UDIO Button
•Press repeatedly until the function
you want is selected, then press
VOL + or VOL - to adjust the
setting.
• Details about using each function
begin on page 9.
Power Indicator
• Lights whenever TV is turned on.
Remote Sensor
• Receives commands from the
remote control.
• When using the remote control,
point it toward this sensor.
VideoInput Display
(AVINPUT)
Sleep Timer Display
(_) Stereo Display (ST)
Channel Number Display
Alarm Timer Display
MUTE Display
Time Display
®
®
®
Stereo Display (ST)
This display appears when the
STEREO function is set to ON and a
TV station is broadcasting stereo.
Details are on page 9.
Channel Number Display
This display appears whenever you
change channels orpress the TV or
DISPLAY button on the remote.
Time Display
This display appears (after the clock
is set) whenever you change
channels or press the TV or
DISPLAY button on the remote.
Note: If the power is interruptedfor an
extendedperiod oftime, the time display
will not appear on the screen. If this
happens, the clock will need to be reset.
I(I_ MUTE Display
This display appears when the TV's
sound is muted. Details are on
page 7.
Alarm Display (ALM)
Timer
This display appears when the
alarm timer has been activated.
Details are on page 12.
®
®
Sleep Timer Display (SLP)
This display appears when the sleep
timer has been activated. Details are
on page 11.
Video Input Display (AVINPUT)
This display appears when the TV is
tuned to channel 91. Channel 91 is
used to view the signal from another
component (such as a VCR,
camcorder, laserdisc player, etc.) that
is connected to the INPUT 1jacks on
the back of the TV. Details are on
pages 20-22.
Operating Remote Control
Before attempting to operate your remote
control, install the batteries as shown here.
Helpful Hint:
The remote control produces an invisible
(infrared) beam thattravels in astraight line
much as the beam of a flashlight. For this
reason, when operating the remote control,
you must point it directly atthe front of the
TV without objects between that can block the
infrared light beam.
-- Installing/Replacing Batteries
1. Turn the remote control face
down.
2. Press down on the ridged area
of the battery cover and slide it
off.
4. Replace the cover and turn remote
over-face up.
Notes-
• Never place anything heavy on top of the
remote control or lay it upside-down.
This may accidentally depress the
buttons for a long time and discharge the
3. Install two "AAA" batteries in
the battery compartment as
shown. Make sure you match
the + end of each battery to
the + end of the battery
compartment.
batteries.
Replace the batteries when the TV fails
to respond to the remote control.
Remove the batteries from the remote
control if it will not be used for a month
or more. This will prevent possible
damage from battery leakage.
OFF Button
Number Buttons
'"" and "+" Buttons
Only the remote control buttons that
are used to control the TV are
described here. The rest of the
buttons are used to operate
compatible RCA VCR models and
are described on page 21.
OTV Button
(_ DISPLAY Button
_CLEAR Button
/
_RESET Button
--'-_-_PC (Previous Channel) Button
_CHAN (Channel) Button
QVOL (Volume) Button
(_ MUTE Button
"(_ SETUP Button
AUDIO Button
"_ VIDEO Button
@TV Button
• Turns on TV and puts remote in
'°TV Mode" so that the other
remote buttons will control the
TV.
• Displays time (if clock has been
set) and channel number on the
TV screen.
DISPLAY Button
•Pressing the DISPLAY button
displays the time (if set) and
channel number on the screen. It
also lets you know if the Sleep
Timer or Alarm is activated.
• Pressing DISPLAY also quickly
removes menus from the screen.
CLEAR Button
• Pressing CLEAR clears the screen
of all on-screen display messages
except Mute.
RESET Button
• Press the RESET button to return
the Video Adjustments (Color,
Tint, Contrast, Brightness, and
Sharpness) to the original factory
settings.
PC (Previous Channel) Button
•Pressing the PC button causes the
TV to change back to the last
tuned channel. This is useful
should you want to monitor two
channels.
•To operate, select the first channel
you wish to watch. Then select
the other channel by pressing two
number buttons (for example,
press 0 then 6 for channel 6).
•The TV will now change back
and forth between the two
--7"--
channels each time you press the
PC button.
CHAN (Channel) Button
• Press CHAN ^ to select the next
higher channel in channel
memory.
• Press CHAN v to select the next
lower channel in channel
memory.
•You can add or erase channels in
memory as desired. Details are
on page 13.
®VOL (Volume) Button
•Press VOLm to increase volume.
• Press VOL v to decrease volume.
• The volume display will
automatically appear on the
screen when you press the VOL
buttons.
®
®
MUTE Button
• Press MUTE to quickly reduce
the sound to its minimal level
without affecting the picture.
This is especially useful during
telephone calls or other
interruptions.
• When the sound is muted, the
word MUTE will be displayed on
the screen. An "M" will also
appear in the volume display.
• To restore sound, press MUTE
again or press VOL ^.
®
SETUP Button
•Press repeatedly until the
function you want is selected
(highlighted), then press + or - to
adjust the setting.
• Details about using each function
begin on page 10.
AUDIO Button
•Press repeatedly until the
function you want is selected,
then press + or - to adjust the
setting.
• Details about using each function
are on page 9.
VIDEO Button
•Press the VIDEO button once to
see the first video menu. To reset
the picture controls back to factory
settings, press + or -.
• Press the VIDEO button again to
see the second video menu.
Repeatedly press VIDEO to select
desired function, then press + or -
to see the adjustment display.
Press + or - again to adjust the
function.
• Details about using each function
are on page 8.
@+ and - Buttons
• Use these buttons after you have
pressed one of the three MENU
buttons (VIDEO, AUDIO, or
SETUP).
• Press + to increase (or change) a
function.
• Press - to decrease (or change) a
function.
• Can also be used to recall the last
function displayed.
@
®
Number Buttons (0-9)
•These buttons let you directly
access any channel number, even
if the channel is not in the channel
memory.
•To select a channel, press two
number buttons (first one, then the
other). For example, press 0 then
6 for channel 6. Press 1 then 3 for
channel 13.
•To select a 3-digit number (like
125), press and hold number
button 1 until 1-- appears on the
screen. Then press the other two
numbers.
Note: YourTV will tune up to channel
125. Check withyour cable company
to determine which channelsare
available inyourarea.
OFF Button
• Press the OFF button to turnoff
the TV.
Note: Ifthe TVdoesnotturnoff
whenyoupressOFF,the remoteis
probablynotinthe 'q'V Mode". To
putthe remote inthe "TV Mode", fast
press the TVbutton and then press
OFF.
Repeatedly press the VIDEO button to select (highlight)
the video function you want to adjust, then press + or - to
select the function. To set a function to your personal
preference, press + or - again when an adjustment display
appears at the bottom of the screen.
Press VIDEO
once to see
1st video menu
The VIDEO RESET function lets you quickly change all the video
functions (shown below) back to the factory settings. Press either
+or- to reset the video functions.
The COLOR function adjusts the amount of color in the picture.
Press + or - to see the color adjustment display at the bottom of
the screen. Then press + or- again to adjust the color.
Press VIDEO
again to see
2nd video menu
llOR
The TINT function adjusts the color of flesh tones. Press +or - to
see the tint adjustment display at the bottom of the screen. Then
press + to add more red tint, or press - to add more green tint.
The CONTRAST function adjusts the overall brightness and contrast
of the picture. Press + or - to see the contrast adjustment display at
the bottom of the screen. Then press + to increase contrast, or
press - to decrease contrast.
The BRIGHTNESS function adjusts the brightness of the dark
portions of the picture. Press +or - to see the brightness
adjustment display at the bottom of the screen. Then press +to
increase brightness, or press - to decrease brightness.
The SHARPNESS function adjusts picture sharpness. Press + or -
to see the sharpness adjustment display at the bottom of the screen.
Then press + to increase sharpness, or press - to decrease
sharpness.
The video menu will automatically disappear from the
screen if you do not press + or - within a few seconds.
Whenever a menu or display disappears from the screen,
the VOL + and VOL - buttons on the front of the TV
become the volume adjustment buttons.
Adjusting for aColor Picture that Pleases You
1. Decrease color to minimum. This will leave a black-and-
white image on the screen.
2. Adjust contrast until the picture pleases you.
3. Adjust brightness until the black parts of the picture appear
black. You may need to walt until the picture shows
something you're sure is black to make this adjustment.
Be careful not to lose the details in darkly skaded areas.
4. Increase color until you reach a pleasing level of intensity.
5. Adjust tint until flesh tones or other color objects appear
natural.
6. Adjust sharpness for a pleasing level of picture sharpness.
(For weak signals, the picture may be more pleasing with
sharpness decreased.)
8