RCA F27730 User manual

nOR Color TV
Owney_LLManual

WARNING: o prevent fire or shock hazard, do not
expose this TV to rain or moisture.
If you suspect that liquid has entered the TV, unplug it
imraediately and have it inspected by an Authorized TV
Servicenter. Turning it off is not enough-your TV has power
applied to some circuits even when the TV is turned off.
A
'r_ I_ing aata
,mr arrowhe_l
,,r,_Jnthetdlng_e
Isa warntngsign
,Je,'ti_l you of
"dsngwous
v_J_e" Inside the
_od_t t_t
presents a dsk of
ek,cb_ shock.
CAUTION; TO REDUCE THE
RISK OF ELECTRIC SHOCK,
DO NOT REMOVE COVER
SERVICEABLE PARTS
INSIDE. REFER SERVICING
TO QUALIFIEO SERVICE
PERSONNEL.
exclamallon
pointwtmtnthe
triangleIsa
alerting yml of
_nporumt
InstrucUons
accornpa_dn9the
pr0duct.
CAUTION: Maintain electrical safety. Powerline-operated
equipment or accessories connected to this unit should bear the
UL listing mark or, if purchased and used in Canada, the CSA
certification mark on the accessory itself and should not have
been modified so as to defeat the safety features. This will
he]Lpavoid any potential hazard from electric shock or fire. If
in doubt, contact qualified service personnel.
Note to Cable TV Installer: This reminder is provided to call
your attention to Article 820-40 of the National Electrical
Code (Section 54 of the CanadianElectrical Code, Part 1)
which provides guidelines forproper grounding and, in
particular, specifies that the cable ground shall be connected to
the grounding system of the building as close to the point of
cable entry as practical.
• Your TV operates on 120 volts, 60 Hz AC power (normal
house power) and has a polarized AC plug. Because one
blade of the plug is wider than the other, the plug fits into the
wall socket only one way. Do not defeat the safety feature of
this plug. If you need an extension cord, make sure it is
polarized.
_AUTION: To prevent electric shock, do not use
the polarized plug on this TV with an extension
cord, receptacle, or other outlet unless both blades
can be fully inserted to prevent blade exposure.
Match wide blade of plug to wide slot, fully insert.
MISE EN GARDE: Pour pr_venir les chocs
61ectriques, ne pas utiliser la fiche polarisre de cet
appareil avec une rallonge, une prise de courant
ou une autre sortie, h moins que les lames ne
puissent 8tre insrrres h fond sans qu'aucune partie ne soit
laissre _tdrcouvert. Introduire la lame la plus large de la
fiche dans la barne correspondante de la prise et pousser
jusqti au fond.
•All operating controls and their functions are identified and
explained in this manual. For warranty service or routine
maintenance, contact the nearest Authorized TV Servicenter.
All servicing and adjustments to electrical components
should be done by a qualified service technician.
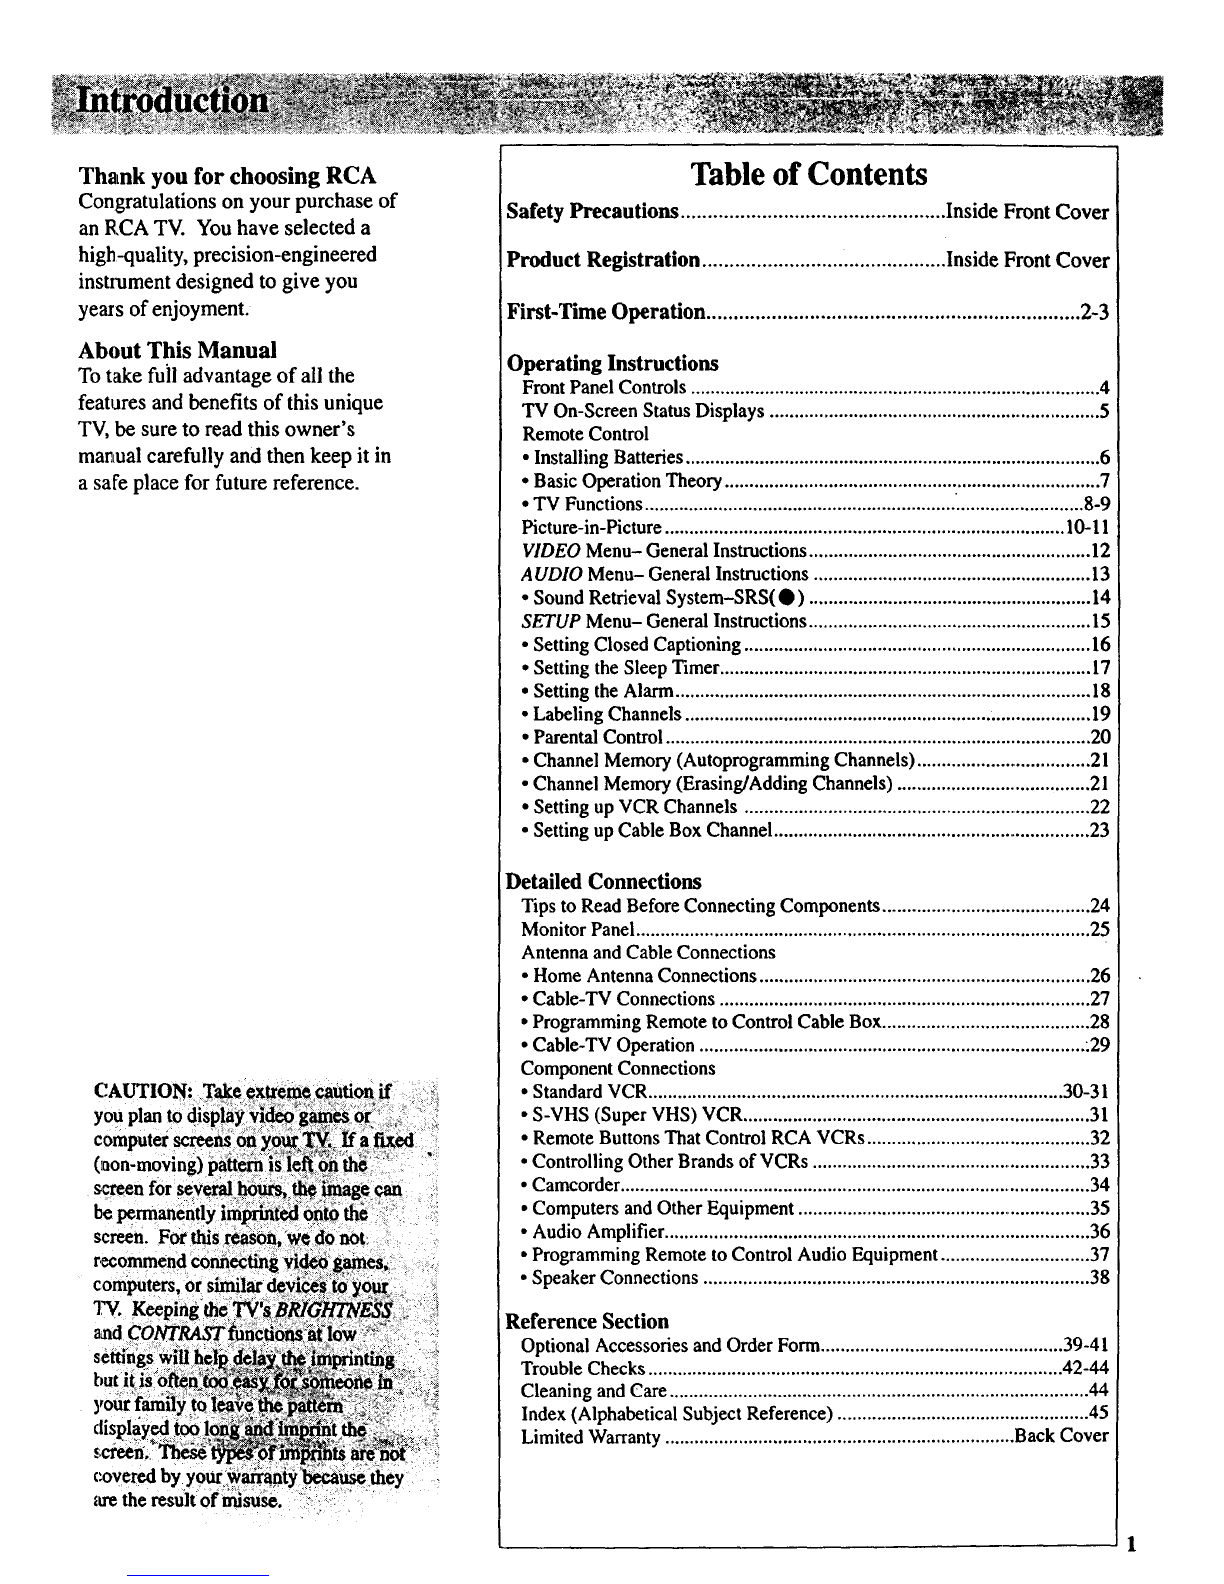
:Product I
Mail Your Registration Card Today
• A Product Registration Card is packed with your set. Please
fill out the card and return it immediately.
• Your prompt submission of this card confirms your fight to
the protection available under the terms and conditions of the
warranty and also allows us to contact you should it ever
become necessary.
• With your card on file, we can also help you in the event of
loss or theft by verifying your ownership.
• If you did not receive a Product Registration Card, please
contact your dealer.
Attach Your Sales Receipt Here and File at Home for
Future Reference
,To obtain warranty parts and service, you must show your
sales receipt (or evidence of purchase) to your Authorized TV
Servicenter.
" Tape or staple your sales receipt to this manual so you will
have it handy should service ever be needed. File it at home
for future reference. Do not mail your sales receipt to us.
Record Vital Information Here
•No other set has the same serial number as yours. You will
find the serial number and the model number on the back of
your set.
• Make sure you record both numbers below so that you will
have them in case your set is stolen or if you need a complete
description for identification.
Model:
Serial:
Purchase Date:
Dealer Name/Address/Phone:

Thank you for choosing RCA
Congratulations on your purchase of
an RCA TV. You have selected a
high-quality, precision-engineered
insuument designed to give you
years of enjoyment.
About This Manual
To take full advantage of all the
features and benefits of this unique
TV, be sure to read this owner's
manual carefully and then keep it in
a safe place for future reference.
Table of Contents
Safety Precautions ................................................. Inside Front Cover
Product Registration ............................................. Inside FrontCover
First-Time Operation ..................................................................... 2-3
Operating Instructions
Front Panel Controls ................................................................................... 4
"IVOn-Screen Status Displays ................................................................... 5
Remote Control
•Installing Batteries.................................................................................... 6
• Basic Operation Theory ............................................................................ 7
• TV Functions ............................................................... .......................... 8-9
Picture-in-Picture ................................................................................. 10-11
VIDEO Menu- General Instructions ......................................................... 12
AUDIO Menu- General Instructions ........................................................ 13
• Sound Retrieval System-SRS(O ) ......................................................... 14
SETUP Menu- General Instructions ......................................................... 15
• Setting Closed Captioning ...................................................................... 16
• Setting the Sleep Timer ........................................................................... 17
•Setting the Alarm .................................................................................... 18
• Labeling Channels ................................................................................... 19
•Parental Control ....................................................................................... 20
• Channel Memory (Autoprogramming Channels) ................................... 21
•Channel Memory (Erasing/Adding Channels) ........................................ 2 l
•Setting up VCR Channels ....................................................................... 22
• Setting up Cable Box Channel................................................................ 23
Detailed Connections
Tips to Read Before Connecting Components .......................................... 24
Monitor Panel............................................................................................ 25
Antenna and Cable Connections
•Home Antenna Connections ................................................................... 26
• Cable-TV Connections ........................................................................... 27
•Programming Remote to Control Cable Box.......................................... 28
• Cable-TV Operation .............................................................................. .29
Component Connections
•StandardVCR.................................................................................... 30-31
•S-VHS (Super VHS) VCR...................................................................... 31
• Remote Buttons That Control RCA VCRs .............................................. 32
• Controlling Other Brands of VCRs ......................................................... 33
•Camcorder................................................................................................ 34
•Computers and Other Equipment ............................................................ 35
• Audio Amplifier ...................................................................................... 36
• Programming Remote to Control Audio Equipment .............................. 37
•Speaker Connections .............................................................................. 38
Reference Section
Optional Accessories and Order Form.................................................. 39-41
Trouble Checks .................................................................................... 42-44
Cleaning and Care ..................................................................................... 44
Index (Alphabetical Subject Reference) ................................................... 45
Limited Warranty ....................................................................... Back Cover

Tlae steps below will help you get your TV connected and
working quickly.
1.Unpack TV and accessories.
Shown here axethe accessories thatcame packed with your TV.
Remote Control Power Cord
2. Install batteries in remote control.
Details areon page 6.
3. Connect antenna or cable-TV system.
Most antenna or cable-TV systems can be connected as
show here.
Back
ot13/
•Details for connecting a home antenna to your TV are on
page 26.
• Details for connecting a cable-TV system to your TV
are on pages 27.
•Details for connecting a VCR to your TV are on
pages 30-31.
4. Attach power cord.
First attach the flat end of the power cord completely into the
connector on the back of your TV, and then plug the other
end into a wall outlet.
5. Turn on TV, adjust the volume, and
• Press the TV button on the
remote to turn on the TV.
When using the remote,
remember to point it at the
front of the TV.
• Press the VOLUME up or
down button to adjust the
volume to a desired level.
• Press the CHANNEL up or
select a channel.
rq_
Number-- c_:
Buttons c:_
dB _d[,I
_: i_l
5_ --o i
Bu.
_" VOLUME
53Buttons
down button to select a channel in memory. You can also
press two number buttons to select a channel. To select a 3-
digit cable channel (up to channel 128), press and hold
number button 1 until I-- appears on the screen. Then press
the other two numbers. Channels 2-13 were programmed
into the channel memory for you at the factory, so pressing
CHANNEL up or down stops at these channels only. When
you start the AutoProgramming feature (described below),
your set automatically scans through all channels and place
only the active channels for your area into its channel
memory.
Details about using the remote are on page 6-9.
6. AutoProgram the TV's channel memory.
To start the TV autoprogramming itself, press the MENU
button repeatedly to select SETUP MENU and then press + to
display the setup functions. Repeatedly press MENU again
to select the AUTOPROGRAM function, and then press +.
Details areon page 21.
Set Narm
ChartLabel
You can also add and erase channels from memory as desired.
Press MENU repeatedly to select the SETUP MENU, then
press + to display the setup functions.
Press MENU repeatedly to select (highlight) the CHAN MEM
function. Select the desired channel number by pressing the
CHANNEL up or down button or by pressing the two
corresponding number buttons.
Then press +to add a channel, or press - to erase a channel.
Details are on page 21.

7. Adjust PICTURE TILT switches if necessary.*
Some TV models have an extra
large color picture tube. The _ +.,G.1----I
effects of geomagnetism [_3 _ow
U
(Earth's magnetic field) may - OFF
cause the picture to tilt slightly. _xAR,rY STRENGr"
The POLARITY and
STRENGTH switches on the
back of the TV let you
compensate for this effect. If poR,rY
CORRECTION
the picture appears tilted,
follow these steps to improve it.
• Make sure the STRENGTH switch is in the OFF position
as the diagram shows.
• Move the STRENGTH switch to the LOW position. If this
improves the tilt but it is still not satisfactory, move the
STRENGTH switch to the HIGH position. This should
correct the situation. If moving the STRENGTH switch
makes the tilt worse, go to the next step.
•Change the position of the POLARITY switch. If this
improves the tilt but it is still not satisfactory, move the
STRENGTH switch to the HIGH position. This should
correct the situation.
You may need to reset the POLARITY and STRENGTH
switches if the TV is moved or repositioned in the room,
especially if the TV will be facing a different direction.
9. Review menus.
1. To see the video menu, repeatedly 0_ I
press MENU button to select _ u t
VIDEO MENU and then press +. iX _ I
Repeatedly press MENU to select _=_ _
desired function and then press + O _
Idlb _l_ db I
or -to adjust it. Details are on Lr,:-_ i
page 12. i_n
Tint -.......I.............÷
Contrast -..............I......+
Bright -.........I...........+
Sharp -. ............I.......+
PictureReset
2. To see the audio menu repeatedly press MENU to select
the AUDIO MENU and then press + or - to adjust it.
Details begin on page 13.
81. Set the clock.
1. Repeatedly press the MENU button to select the SETUP
MENU and then press +. Press MENU repeatedly again
to select the CLOCK SET display. 3. To see the setup menu, repeatedly press MENU to select
SETUP MENU and then press +. Repeatedly press
MENU to select desired function and then press + or - to
adjust it. Details begin on page 15.
2: Press and hold the -button to select the correct hour
(including AM or PM). Press and hold the + button to
select the correct minute. The correct time will now
appear on the screen whenever you change channels or
press the TV or DISPLAY button.
Note: If power is interrupted for an extended time, you will
need to reset the clock.
* Select models only
O0ck_
3

Sthownhere is the front panel control. You
can use either the front panel controls orthe
remote control to operate the TV. When using
the remote control, point ittoward the screen.
MENU
I) CH v
OPOWER Button
• Press once to turn on TV.
• Press again to turnoff TV.
•On some models, an indicator on the POWER button will
light whenever the "IV is turnedon.
(_VOL (Volume) Buttons
• Press VOL up to increase volume, or press VOL down to
decrease volume.
• The volume display will automatically appear on the
screen when you press the VOL buttons.
_3 )CH (Channel) Buttons
•Press CH up to see the next higher channel in memory.
• Press CH down to see the next lower channel in memory.
• You can add or erase channels in memory as desired.
Details are on page 21.
(_ MENU Button
• Press repeatedlyuntil the menu you want to display is
selected, then press + or-. Next pressMENU repeatedly to
select the function you want to adjustand then press + or -
to adjustthe setting.
• Details about using each function begin on page 12.
- and + Buttons
Use these buttons after you have pressed the MENU button
to enter or adjust functions.

(_ Time
(_ Sleep Timer
QParental Control
_MUTE
Channel
Channel Label
:...... (_) Captioning
_Commercial Skip
C)
Time Display
This display appears (after the clock is set) whenever you
change channels or press the remote's TV or DISPLAY
button.
Sleep Timer (SLEEP)
This display appears when the SLEEP TIMER function has
been activated. Details are on page 17.
PARENTAL CONTROL
This display appears to let you know the channel you
have tuned is locked-out and not viewable because the
PARENTALCONTROL function is activated. Details
areon page 20.
MUTE
This display appears when the TV's sound is muted. It is
not displayed when closed captioning is turned on. Details
are on page 8.
Commercial Skip
This display is a count-down timer that appears whenever
the commercial skip function is activated. Details are on
page 9.
Captioning
This display appears if CAPTIONS 1 is turned on and the
TV program uses closed captioning. Details are on page 16.
@
®
Channel Label
This display appears when you label a channel. Details are
on page 19.
Channel
This display shows the TV's channel number whenever you
change channels or press the remote's TV or DISPLAY
button.
The word STEREO appears next to the channel number if
the STEREO/SAP function is set to STEREO and the channel
you've tuned is broadcasting stereo. An asterisk will appear
behind the word stereo (STEREO*) if that stereo channel is
also broadcasting SAP (Second Audio Program). Details
about stereo and SAP are on page 13.
Channels 90, 91, and 92 are used to see the signals coming
from other devices like VCRs or camcorders that are
connected to the INPUT jacks on the back of the TV.
• When you select channel 91, the words INPUT 1 appear to
let you know you are now watching whatever signal is
coming in through the TV's INPUT I jacks.
• When you select channel 92, the words INPUT 2 appear to
let you know you are now watching whatever signal is
coming in through the TV's INPUT 2 jacks.
• When you select channel 90, the word S-VIDEO appears to
let you know you are now watching whatever signal is
coming in through the TV's S-VIDEO connector.
5

Before attempting to operate your
remote control, install the batteries
as shown here.
'Hae remote control produces an
invisible (infrared) beam that travels
in a straight line much as the beam
of a flashlight. For this reason,
when operating the remote control,
you must point it directly at the front
of the TV without objects between
that can block the infrared light
beam.
Ybur remote control is designed to
be very rugged and will withstand a
considerable drop. If it receives an
extreme blow, the case is designed
to slightly separate at the seam
rather than fracture. If this happens,
simply squeeze the case where it
separated until it snaps back
together. The operation of the
remote will probably not be affected.
--Installing/Replacing Batteries
1, Turn the remote control face
down.
2. Press down on the ridged area of
the battery cover and slide it off.
3. Install four "AAA" batteries in the
battery compartment as shown.
Make sure you insert the negative
(-) end of each battery first.
4. Replace the cover and turn remote
over-face up.
Notes:
Never place anything heavy on top of
the remote control or lay it upside-
down. This may accidentally depress
the buttons for a long time and
discharge the batteries.
Replace the batteries when the TV fails
to respond to the remote control.
If you programmed your remote to
control other components, you may
have to reprogram the code numbers
when you change the batteries. Try not
to press any buttons while changing
batteries.
6

Basic Operation Theory
Step 1
First press one of these five
component buttons to tell remote
which component you want to
control. You can program each of
these buttons to control most brands
of equipment.*
Step 2
Then press ON/OFF button to turn on
that component.
Note: The TV and some other components
will automatically turn on when you press the
component button in step 1. Press this button
to turn the component off.
Step 3
These function buttons can now be
used to control the basic functions of
the component you selected in step 1.
To control a different component, first
press its component button (VCR1,
VCR2, CABLE, AUDIO, or TV), and
then press the desired function button.
Note: Not all components have functions
that can be controlled by these buttons, but
you can experiment with your particular
models to discover exactly which buttons will
control it.
* The TV button automatically controls your TV -no additional
programming is required. Details for programming the VCR1 and
VCR2 buttons to control other brands of VCRS are on page 33.
Details for programming the AUDIO button to control audio
equipment are on page 37. Details for programming the CABLE
button to control cable boxes are on page 28.
J

Only the buttons that are used to control the TV are
de.,_cdbed here. The rest of the buttons are used to
op._rate VCRs (pages 32-33), cable-TV boxes
(page 28), and audio equipment (page 27).
@
@
®
@
®
VCR! VCR2
G
O0 Q
VOLUME
D
MUTE
PLAY PALLSE STOP
__GD
REWINO FF RECORD
c._o oM,_ (J)
SRS(e) 0
wz _.
0O:
Q
@
®
®
®
_t_ TV Button
• Turnson TVand puts remotein"TV Mode"so thatthe other
remotebuttonswill control theTV.
• Displaystime (if clockhasbeen set) and channel numberon the
TV screen.
Important Note: Some buttonson the remotecontrol will not
control theTVunless the remoteis inthe"TV Mode". If another
component button(suchas VCR2)is pressed, the remotewill go into
the "VCRMode" and will controla compatible VCR. Toget back
intothe "TV Mode", simplypress the buttonlabeledTV. The
remote will go back into the "TV Mode" and will controlthe TV
again.
(2_ CHANNEL Buttons
•Press CHANNEL up to select the next higher channel in channel
memory.
• Press CHANNEL down to select the next lower channel in channel
memory.
• You can add or erase channels in memory as desired. Details are
on page 21.
VOLUME Buttons
• Press VOLUME up to increase volume.
•Press VOLUME down to decrease volume.
MUTE Button
• Press MUTE to quickly reduce sound to minimum level without
affecting the picture. This is especially useful during telephone
calls or other interruptions.
•When the sound is muted, the word MUTE will be displayed on
the screen.
•To restore sound, press MUTE again or press VOLUME up.
PC (Previous Channel) Button
• Pressing the PC button causes the TV to change back to the last
tuned channel. This is useful should you want to monitor two
channels.
• To operate, select the first channel you wish to watch. Then select
the other channel by pressing two number buttons (for example,
press 0then 6 for channel 6). The TV will now change back and
forth between the two channels each time you press the PC
button.

_DISPLAY Button
• Displays time (if clock has been set) and channel number on the
TV screen.
• Quickly removes menus and displays from the screen.
_'_ CLEAR Button
•Pressing CLEAR clears the screen of all on-screen display
messages except MUTE and PARENTAL CONTROL
_SRS (0)* Button
•Press repeatedly to change settings of SRS (0) function (Sound
Retrieval System).
• Details areon page 13-14.
* SRSand(*)areregisteredtrademarksofHughesAircraftCompany.adivisionof GM
HughesElectronics.
Picture-in-Picture Buttons
•Press PIP to activate the picture-in-picture feature.
•Press PIP again to deactivate the picture-in-picture feature.
•Press FRZ to freeze the small picture.
• Press MOVE to move the small picture to the next corner.
• Press SWAP to switch the small picture with the large picture.
• Details are on pages 10-11.
O_MENU Button and -/+ Buttons
•Press MENU repeatedly until the menu you want to display is
selected, then press + or -. Next press MENU repeatedly to select
the function you want to adjust and then press + or- to adjust the
setting. Details about using each function begin on page 12.
QINPUT Button
•Lets you quickly view signals from the INPUT jacks. Pressing
this button switches the TV from its current channel directly to
channel 90, then channel 91, then channel 92.
• Channel 90 lets you see the signals coming from a device that is
connected to the S-VIDEO connector. Channel 91 accesses the
INPUT I jacks and channel 92 accesses the INPUT 2jacks.
_CS (Commercial Skip) Button
•Use thisbuttonwhenyouwanttoscan otherchannelsduringa
programbreak.
• Whenabreakoccurs,pressUSoncebefore changingchannels.
TheTV will countdown 30secondsonthe screen and then
automaticallyswitchchannelsbackto theoriginalchannel.
•PressCStwice ifyou wanttheTVtocountdown60 seconds.
Eachadditionalpresswill add another30 secondsto the
countdowntime (uptofive minutes) andthen each additional
presswill add another 60 secondstothe countdowntime (upto
60 minutes).
• Tocancel,pressCLEAR. Thecountdownclockwill disappear
fromthescreen, and theTV will staytunedtothe present
channel.
(_) Number Buttons (0-9)
• These buttons let you directly access any channel number-even
if the channel is not in the channel memory.
•To select a channel, press two number buttons (first one, then
the other). For example, press 0 then 6for channel 6. Press 1
then 3 for channel 13.
• To select a 3-digit cable channel (like 127), press and hold
number button 1 until 1-- appears on the screen. Then press the
other two numbers.
Note: Your TV will tune up to channel 128. Check with your
cable company todetermine which channels are available in
your area.
OFF/ON Button
•Press OFF/ONtoturnoffTV.

At"teryou connect another video source (like a VCR) to your
TV, you'll be able to display two different programs on the TV
at the same time.
TwoFootballGames SurveillanceSystem
Starting Picture-in-Picture (PIP)
1Connect another video source (such as a VCR or
camcorder) to INPUT1or INPUT2on your TV (as shown oa
pages 30-31).
2 Turn on the TV and select a channel.
3Press the Pipbutton on the remote. Alittle picture will
appear on the screen. The little picture and the big picture
will be the same.
4
Note: The remote must be
in the "TV mode" when you
press the PIPbutton. To put
remote in "TV mode", press
the TVbutton.
To get a picture from the other source (VCR, camcorder,
etc.), first turn on the other source, and then select TV
channel 90, 91, or 92 (explained at top of next column).
The picture from the other source will appear in the little
picture.
•If the other source is connected to the TV's INPUT 1jacks,
select TV channel 91 to see the signal. If you have
programmed the vcm (or VCR2)button to automatically
select channel 91 as described on page 22, press vcm (or
VCR2).
• Select channel 92 if the other source is connected to the
TV's INPUT2jacks. If you have programmed the VCR1(or
VCR2)button to automatically select channel 92 as
described on page 22, press VCRt(or VCR2).
•Select channel 90 if the other source is connected to the
TV's s-viDEOconnector. (Remember to also connect the
regular video cable to the VIDEOINPUT1jack for picture-
in-picture viewing.). The TV automatically minimizes
any annoying differences in tint between the small and
large picture by electronically coupling the S-VIDEOinput
"to the INPUT1input. If you have programmed the VCR1
(or VCR2)button to automatically select channel 90 as
described on page 22, press vcR1 (or VCR2).
ChangingChannels (PIP)
To change channels on the picture from the TV, press the TV
button on the remote, and then press either the CHANNELup
or down button or two number buttons.
PicturefromTV
To change channels on the picture coming from the VCR,
press the VCR1or VCR2button (if you've programmed one of
these buttons to control the VCR as described on page 32)
and then press either the CHANup or down button or two
number buttons. You can also change the VCR's picture by
pressing the CHANNELbuttons on the front of the VCR.
-Picture fromTV
PicturefromVCR PicturefremVCR
Additional Features tPIP)
Whenever the picture-in-picture feature is activated, the small
picture can be moved, frozen, or switched with the main
picture as desired. Details are on the next page.
10

Whenever you have the picture-in-picture
(PIP) feature activated as described on the
previous page, you can move, freeze, or
switch the big and little pictures as desired.
IuTroN
ON/OFFBUTTON
BUTrON
"FREEZEBUTTON
MOVE
©
SWAP
©
FRZ
@
PIP
®
W-.W Press and release MOVEto move the small
picture to the next corner.
Press SWAPtO switch the small picture with the
main picture.
Press FREEZEto freeze the small picture.
Press FREEZEagain to return to an action picture.
Pressing the PIPbutton will cancel PiPand
remove the little picture from the screen.
11

1. Repeatedly press MENU to select VIDEO MENU and
then press + or - to display the video menu.
2. Repeatedly
press
MENU to
select
function,
then press
_-or -to
adjust it.
The COLOR function adjusts the amount of color in the picture.
Press + to increase color or press - to decrease color.
The TINT function adjusts the color of flesh tones. Press + to add
more red tint, or press - to add more green tint.
The CONTRAST function adjusts the overall brightness and contrast
of the picture. Press + to increase contrast, or press - to decrease
contrast.
The BRIGHTNESS function adjusts the brightness of the dark
portions of the picture. Press + to increase brightness, or press - to
decrease brightness.
The SHARPNESS function adjusts picture sharpness. Press + to
increase sharpness, or press - to decrease sharpness.
The PICTURE RESET function lets you quickly change all the
video functions (shown above) back to the factory settings. Press
either + or - to reset the video functions.
The video menu will automatically disappear from the screen if
you do not press + or - within a few seconds.
Via remote control, your TV will "remember" which function
you displayed last-even after the menu has disappeared from
the screen. So, if you want to adjust the same function again,
simply press the + or - button on the remote control. The last
function you adjusted will reappear on the TV screen.
Custom Picture Memory for Input Channels
The channel numbers you select to see signals from components
(like a VCR) that are connected to the INPUT jacks on the back
of the TV are called input channels. Selecting channel 90 lets
you see the signal coming from whatever component is attached
to the S-VIDEO connector, channel 91 lets you see the signal
from the INPUT I jacks, and channel 92 lets you see the signal
from the INPUT 2jacks. Your TV is equipped with a custom
picture memory for these input channels. When the TV is tuned
to one of these channels (90, 91, 92), you can change the picture
settings for that component's signal as desired without changing
the settings of any other channel. This is very useful because
you'll be able to adjust forthe best picture from each of your
components and the TV will remember those settings
automatically the next time you tune that input channel.
12

1. Repeatedly press MENU to select AUDIO MENU
and then press + or- to display the audio menu.
2. Repeatedly
press
MENU to
select
function,
then press
+or- to
adjust it.
The TREBLE function adjusts the high frequency audio. Press +to
increase treble or press - to decrease treble.
The BASS function adjusts the low frequency audio. Press + to increase
bass, or press - to decrease bass.
The BALANCE function adjusts the left/right balance of sound from the
speakers. When adjusting the BALANCE function, sit in your normal
viewing seat while pressing the + and - buttons until the sound seems to
originate from a point halfway between the speakers. Press + to increase
sound from the right speaker, or press -- to increase sound from the left
speaker.
The STEREO/SAP function lets you choose either MONO (monaural),
STEREO, or SAP audio (if available) by pressing + or -. When a station is
broadcasting stereo and the STEREO/SAP function is set to STEREO, the
stereo indicator (STEREO) will appear on the screen before the channel
number. Normally you can leave the STEREO/SAP function set to
STEREO and your TV will then automatically reproduce either monaural or
stereo audio-whichever is broadcast. Some TV stations that broadcast
stereo also broadcast another sound channel called SAP (Second Audio
Program) which is sometimes used to offer the program in another
language. Your TV lets you know when SAP audio is available by
displaying an asterisk (,) on the screen after the stereo indicator like this
(STEREO*). If you want to listen to the SAP channel when the asterisk
appears, change the STEREO/SAP function to its SAP setting. The SAP
setting will only appear in the function when SAP is available. Your TV
will then reproduce the SAP audio until you change channels or return the
STEREO/SAP function back to STEREO.
Note: Some TV stations transmit a "pilot" signal that makes your TV
think it's receiving stereo, even though the broadcast signal is monaural.
The pilot signal will make the stereo indicator (STEREO) appear on the
screen next to the channel number, however, you will not be able to hear
stereo sound. If this happens, check with the TV station to inquire whether
the program being broadcast is in true stereo or monaural audio.
" The SRS: ON/OFF function lets you add greater depth and dimension to
stereo broadcasts. You can turn this function on and off as desired by
_: pressing + or- to change the setting between ON and OFF. You may
;_ z _._ prefer to leave this function set to ON. Your TV will then automatically
_,_ process the stereo signals whenever a stereo broadcast is received (or
whenever a stereo tape is played through a stereo VCR that is connected to
:i the TV's audio/video jacks labeled INPUT). Details are on page 17.
The audio menu will automatically disappear from the
screen if you do not press + or - within a few seconds.
Via remote control, your TV will "remember" which
function you displayed last-even after the menu has
disappeared from the screen. So, if you want to adjust
the same function again, simply press the + or - button
on the remote control. The last function you adjusted
will reappear on the TV screen.
The SRS WIDTH function lets you enhance the perceived audio separation
that occurs when the above SRS function is ON. Pressing + or - changes
the setting between NORMAL and ENHANCE. Details are on page 17.
The SPEAKERS function lets you turn off the TV's internal speakers by
pressing + or - to change the setting between ON and OFF. You will
probably want to leave the TV's speakers turned on unless you connect an
amplifier (with its own set of speakers) to the appropriate jacks on the back
of the TV as described on page 38.
13

_aurTV includesafeaturecalled
SRS(@)*(SoundRetrievalSystem)
whichbringsdimensionalrealismto
bothstereoandmonobroadcasts.
WhentheSRS ON/OFF function is
sc:t to ON and the STEREOISAP
ftLnction is set to STEREO, your TV
electronically increases the audio
separation of the speakers so you can
perceive a more spacious stereo
sound effect. If a stereo signal is not
present, you can set the SRS
ON/OFF function to its SYNTH
STEREO setting to synthesize and
plrocess the mono signal.
When the SRS ON/OFF function is
set to ON, you can also change the
next menu item called SRS WIDTH
b_tween NORMAL or ENHANCED.
When this function is set to
ENHANCED, the perceived audio
separation will be greater. Try both
settings and select the one you prefer
for your room acoustics.
Note: Some material(audio)will be more
affected than others.
SRS (@) allows you to hear multiple
sound sources. Audio frequencies are
processed to establish directional
cues which gives the impression that
sound is coming from all parts of the
room. External speakers are not
required, but the addition of high
quality external speakers optimizes
the sound performance of your TV.
*SRS and (@) are registered trademarks of Hughes
AircraR Company, adivision of GM Hughes Electronics.
-Turning On SRS (0)
1. Repeatedly press the MENU button to
select AUDIO MENU, press +, and
then repeatedly press MENU again to
select SRS ON/OFF function.
Note: Youcanalsochangethe
SRS:ON/OFFfunctionbetween ON and
OFFwithoutgoing throughthe menuby
pressing the SRSbutton on the remote.
2. Repeatedly press the +button to
change the setting between OFF,
ON, and SYNTH STEREO.
• If the broadcast you are receiving is
stereo audio, select ON. The
STEREO/SAP function must be set
to STEREO before you can hear
SRS (Q) sound with this setting.
•If the broadcast you are receiving is
mono audio, select SYNTH
STEREO.
• If you do not want SRS (Q), select
OFF.
3. Press MENU button to select next
menu item called SRS WIDTH.
Pressing + or- will change the
setting between NORMAL and
ENHANCED. Try both settings and
select the one you prefer.
Note: After turning SRS or synthetic
stereo on, you may find it desirable to
readjust the VOLUME, BASS, and
TREBLE controls to optimize the sound.
The SRS effect, tonal balance, and
volume level will vary from channel to
channel depending on the production
qualities of the program material.
14

1. Repeatedly press MENU to select SETUP MENU
and then press + or - to display the setup menu.
2. Repeatedly
press
MENU to
select
function,
tJhen press
4-or - to
adjust it.
:
ClockSet -Hr +Mfn """ ..
The.,setup menu will automatically disappear
from the screen if you do not press + or -
within a few seconds.
Via remote control, your TV will "remember"
which function you displayed last--even after the
menu has disappeared from the screen. So, if you
want to adjust the same function again, simply
press the + or - button on the remote control.
The last function you adjusted will appear on the
TV screen.
The CAPTIONING feature lets you display the audio portion of programs
encoded with the Closed Captioning (CC) information as text on the screen.
Four types of closed captioning are available. Select CAPTIONS 1 for full
translation of the primary language in your area. CAPTIONS 2 is used for
secondary language translation, or an alternate service, such as simplified
English. Two Text modes are also supported.
By setting the SLEEP TIMER, you can program your TV to turn itself off
after a certain period of time. This is useful whenever you want to watch TV
for an hour or so before going to sleep. Press the + or - button to select the
length of time you want the TV to stay on.
You can program your TV to turn on and/or off at the times you choose by
setting the ALARM function.
CHANLABEL lets you program names (or labels) for the channel numbers.
The names you select will then appear on the screen whenever the channel
number is displayed.
The PARENTAL CONTROL feature lets you lock out any channels that you
don't want your children to watch. Pressing + or- switches this function
from OFF to ON. When this function is set to ON, channels that have been
locked out with the CHAN CTRL function cannot be viewed. When this
function is set to OFF, all channels can be viewed.
The CHAN CTRL (Channel Control) function works hand-in-hand with the
PARENTAL CONTROL function. It lets you select the channels you want to
lock out. First select the channel number you want to lock out and then
press + to change this function from NORMAL to LOCKED. When the
PARENTAL CONTROL function is set to ON, the channels you locked with
this function cannot be viewed.
When you press +or- to start the AUTOPROGRAM function, the TV will
automatically cycle through all channels and place the active channels for
your area in its channel memory. Pressing the CHANNEL up or down
buttons will then allow you to scan only active channels.
The CHAN MEM function allows you to erase and add channels to channel
memory as desired.
The CABLE/AIR function tells your TV whether you have a cable-TV system
or a home antenna connected to the TV. Your TV is so automatic that you
will probably never need to change this function. When your TV
autoprograms, it automatically adjusts the CABLE!AIR setting for you. If
you should ever need to override the automatic setting, press + or - to
change it.
The VCR 1 CHAN function lets you program to which channel the TV will
automatically tune when you press the VCR 1 button on the remote.
The VCR 2 CHAN function lets you program to which channel the TV will
automatically tune when you press the VCR 2 button on the remote.
The CABLE CHAN function lets you program to which channel the TV will
automatically tune when you press the CABLE button on the remote.
After you set the clock, you will be able to see the on-screen time display
whenever you change channels or press the DISPLAY or TV button on the
remote control. To set the clock when this function is selected, first press
and hold - to set the correct hour (including AM and PM). Then press and
hold + to set the correct minutes.
15

The CAPTIONING feature lets
you display the audio portion of a
program as text on the TV screen.
This is useful to the hearing
impaired or anyone who wants to
watch a program without the
sound.
There are four types of closed
captioning transmissions
available: Captions 1, Captions 2.
Text I and Text 2. Captions 1
displays the full translation of the
primary language in your area.
Captions 2 may be used as a
second source for secondary
languages, simplified English, or
other translations transmitted in
your area.
The Text modes, Text I and
TexJ_2, display on-screen boxes
containing the text of general
information not necessarily
related to the program being
watched.
Note:: Closed Captioning is not available on
all channels or at all times. Only specific
programs encoded with Closed Captioning
information (CC) are applicable.
When Captions I is available, the word
"Captioned" appears on the screen when you
change channels or press the TV or DISPLAY
button on the remote. The word "Captioned"
does not appear to tell you if Captions 2or
either Text mode is available.
-Setting Closed Captioning (with or without remote)
1. Repeatedly press MENU to select
SETUP MENU, and then press +or - to
display setup functions.
CAPTIONING will be highlighted since
it is the first function in the setup menu.
4. The screen will begin to display the
TV program's audio portion as text
if the program has captioning.
2. Press the + or - button to select the type
of closed captioning: Off, Captions 1,
Captions 2, Text 1 or Text 2.
3. When finished, the display will
automatically disappear from the screen
in a few seconds. To make it disappear
more quickly, press the CLEAR button.
--Turning Captioning Off
To turn off the closed captioning
feature, enter the CAPTIONING
function and press the + or - button
until the screen shows "Off."
16

By setting the Sleep Timer, you
can program your TV to turn itself
off after a certain period of time
(up to four hours).
'Eais is useful whenever you want
to watch TV for an hour or so
before going to sleep.
Setting Sleep Timer (with or without remote)
1. Repeatedly press MENU to select
SETUP MENU, and then press + or -
to display setup functions. Press
MENU to select SLEEP TIMER.
4. The sleep timer will begin to count
down to zero. The word "'SLEEP'"
will appear on the screen whenever
you change channels or press the
remote's TV or DISPLAYbutton to
let you know the sleep timer is
activated.
2. Press the + or - button to select the
length of time (up to four hours) you
want the TV to stay on.
Each time you press the + or -
button, the time will increase 30
minutes (up to 4 hours). Then the
time display will start over.
3. When finished, the display will
automatically disappear from the
screen in a few seconds. To make it
disappear more quickly, press the
CLEAR button.
The amount of time remaining
before the TV shuts itself off will
appear in the sleep timer menu
whenever you display the SLEEP
TIMER function.
5. When the sleep timer counts down
to 0:00, the sleep timer display will
appear on the screen for a few
seconds. Then the TV will turn
itself off.
If you want the TV to stay on when
this display appears, press the +
button on the remote to add more
time to the SLEEP TIMER display.
- Clearing Sleep Timer
To cancel the sleep timer, enter the
SLEEP TIMER function and then press
the + or - button until the screen shows
0:00.
17

Bysettingthealarm,youcan
program the TV to turn on and/or off
by itself.
After the ON TIME is set and the
ALARM ON/OFF function is set to
OAr, the TV will automatically turn
on each day at the time you selected
and remain on until the OFF TIME
is reached. If no OFF TIME has
been programmed, the TV will
remain on until you turn it off.
The ALARM ON/OFF function lets
yoa easily deactivate or reactivate
the: alarm without having to reset the
ON TIME and OFF TIME.
When the alarm time is reached, the
set will turn on at whatever volume
you left it when you last turned it
off. So if you want the TV to come
on loudly at the ON TIME, be sure
the.,TV is playing loudly when you
turn off the TV for the last time.
When the ALARM ON/OFF function
displays SET CLOCK, you will need
to set the clock time before you will
be able to turn on the alarm function.
Details for setting the clock are
on page 5.
IMPORTANT NOTE: During extended
power failures the alarm function will be
disabled. The alarm ON TIME and OFF
TIME will stay set but the ALARM ON/OFF
function will be set to OFF and will display
S_" CLOCK to inform you that the clock
must be reset to the correct time. Once the
clock has been reset you can reactivate the
ALARM function by changing the ALARM
function to ON.
Setting the Alarm
1. Repeatedly press MENU to select
SETUP MENU, and then press + or-
to display setup functions. Press
MENU to select SETALARM
function, and then press + or -to
display the alarm settings.
.
!i
Timo_Dlsab_ _:
C_n_:: : :
When the first ALARM function is
selected, pressing + or - will switch
the setting between ON and OFF. Set
this function to ON if you want to
activate the alarm. When this
function is set to OFF, the alarm is
deactivated and the TV will not turn
on or off by itself.
.
Note: If SET CLOCKis displayed next to
ALARM, you will need to set the clock
time before you will be able to turn on the
alarm function. Details forsetting the
clock are on page 3.
......................
Press MENU to select the next
function called ON TIME. If you
want the TV to turn on by itself, enter
the desired time by first pressing - to
select the hour (including AM and
PM) and then pressing + to select the
minutes. If you only want the TV
.
.
to turn off by itself and not turn on,
you can disable the ON TIME by
pressing - until the word
DISABLED appears.
Note: Rememberto check the AM/PM
setting. Midnightis 12:00AM and
noon is 12:00PM.
(:_i_:i:_!_ _iiii!!!
Off Time: Disabled
Channel: Off
Press MENU to select the next
function called OFF TIME. If you
want the TV to turn off by itself,
enter the desired time by first
pressing - to select the hour
(including AM and PM) and then
pressing + to select the minutes. If
you only want the TV to turn on by
itself and not turn off, you can
disable the OFF TIME by pressing -
until the word DISABLED appears.
Alarm:On )
On Time: 6:30 PM:
]ii Inuiii[_ iIH[ I_LV,
Channel:Off _......
Press MENU to select the next
function called CHANNEL. This
function lets you program which
channel the TV will tune when it
turns on at the ON TIME. Press
CHANNEL up or down to select the
channel, and then press + or - to
enter it into the CHANNEL function.
Note: The TV will change to the
channel that you select. This will help
you to confirm that it is indeed the
channel you want the TV to turn on to.
18
This manual suits for next models
1
Table of contents
Other RCA TV manuals