RCA M52732 User manual

,

/.
j
:‘. WARNING s
\
To ;ehuce the’risk of fire or shock :
__
hazard, do not’expose this TV to
I..,: , ~,’ IJ
rain or moisture.
: ., II.
I ,
j’.
I’,:.. ’
L
TO REDUCE F RISK OFEiECTRIC SHOCK,DO NOT
R@lOVE COVEti (ORBACK). NO‘USERSERVICEABLE
RI&OF ELEbTRlCSHOCK
PARTSIJ’JSIDE.,REF$R,SERVICING TO QUALIFIED
CONOTOPEN
SERVICEPERSONNEL. .’
.., ,. ~
This symbol indicates .:
“d&gerous voltage” insidethe
A
‘I+ symbolindicates
product that presentsa riskof important instructions
electi+ shockor personal ’ accompanyingt$e 1
injury. product.
/
I
Cautions
I:-,’
’ .
‘F,
/
To prevent electric shock, match wide blade of plug to wide slot, fully
insert. Do not defeat the safety feature.of the plug. The wide blade fits
into the wall socket only one way. If you need and extension cord, make
sure it matches the plug of the TV
.I
1 I
.
Fdr Model l&2732: Operate TV on 120 volts, 60 HzAC power (normal house
,’ power).
;
i :
;_ _
Ensure that the main electrical supply in your house complies with that indicated
1
Jo on the indentification sticker located at the hack of your appliance. /
.-
/ FCC kegulations state that unauthorized changes or modifications to this equipment
may void the user’s authority to operate it.
l
A [email protected] Regikrqtion Card
ispacked with *your set. Please
l
No other set has the same serialnumber asyours. You will
:I,
‘. fill outthe card and return it irmnediately. ‘. .. : 1 : ’ find the serial number and the model number. on the back of .
,.c .’ .’ ,
‘*. *‘Y&r prompt submission &this card confbs your right to your set.. I. 1 :
’ , the protection available.under the terms and conditions of the ,
l
.Make sure you record both numbers below so that you will
j warranty and also allovs us to contact you should it ever have them in case your set is stolen or if you need a,complete
becoine necessary1 / description for identification.
.I
l
With your card on file, we can also help you in the event of .
/
loss or theft by verifying your ownership.
j
l
If you
did not receive
AProduct Registration Card,
please
Model: .I
contact your dealer. \
Serial: .
Attach Your SalesReceipt Here and File at Home for PurchaseDate:
Dealer Name/Add&&Phone: , ’
Future Rkference ’ __ I
l
To obtain warranty parts and service, you must show your
‘: ‘-
‘,
. .
i ‘,,
i;, \‘ salesreceipt (or evidence of purchase
j
to your Authorized TV : ,_ _.., 5,
,
~~~i&n~~~. ‘: ._..I ,’
i ‘-. ,’ ., 4 ,‘,, .’ ,’ / ! ,. ’ ’ ‘.: I.. ,.I
/-,,.
; ‘. ‘I,
‘; Tape or staple your salesreceipt to this manual so you ‘i$ll ’ >,,:. _.i 1I’_ . >.’ I, _
‘% ‘;’ I.
1.” ‘:” ._.I
.’ ,. ,: ‘,.)‘<
have it handy should service ever be needed. File it at home . . : ., .I),
,‘;_!.’
; I
‘1,: .,,;!,I’.,,~~for~~~referencd,~p’notman:your~~~,rec~ipttP us. ,”,‘. : I’., ‘: ‘:. ,: ,,,, ‘:‘,_ : :
, ,, .‘,,.<.:. .c, !
‘. :‘.
~ ’ _I,I , j. ” ’ ‘. S’,
: : :;: I .,
-. -,- ~, : ,, ; ,.::I~J;~~+$~:~:,.,:
I “_.
I -.
.. : ‘i : ,‘,. 5,.,I.. .,‘, 1
, ‘,’ I L\:,. ’ , :,,I.
/ ..’ , ,., . ,’
I, .,,’
g .I i. : 1: ‘) ‘,’ L
. ,i“., ,_.’

Thank’yau for choosingRCA
_
Congratulationsonyour’purchaseof
anRCA TV you’have selecteda” :’
I high-quality, precision-engineered
.instrumentdesignedto give you,
i - _ yearsof enjoymenti: ‘, _.
/
j
Abimi This,Mandl, , ,’ -,.’
/ To takefull advantageof’all the 1
I featuresandbenefitsof thisunique
1 TV, be sure,to readthis owner’s
manualcarefully andthenkeepit for
.I futurereference. ’
+
1
.,s:
.:j ,
,I I
-,
‘I ’
-.
/
TableofCo&& ._,I :-’ “‘.
hfety Prechutions.;‘;....;.‘..I.....................................Inside
Front Cover
,.. , .
‘roduct Registration .............................................Inside
Front Cover
$&Time Operation ...................;..;.. i .2-5
..................................I........._
lperating Ins&u&ions
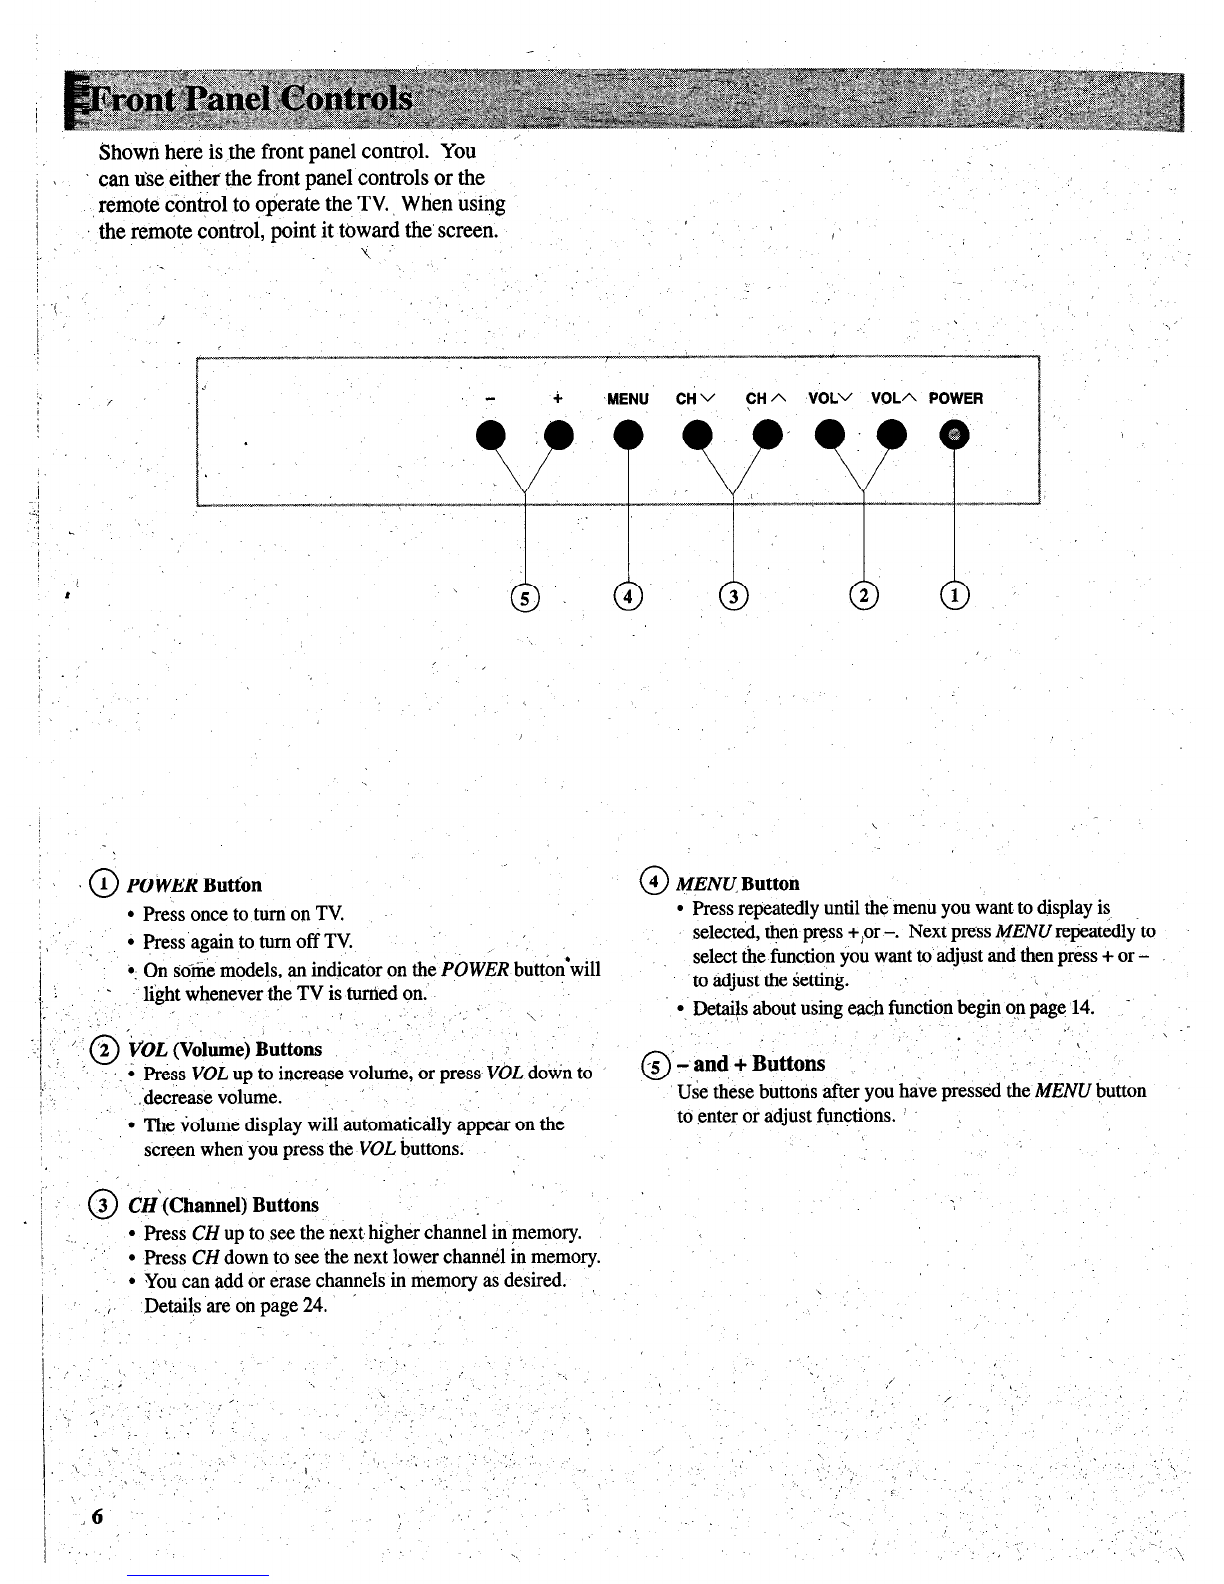
Front Panel Controls .............. .:...................................................................
6
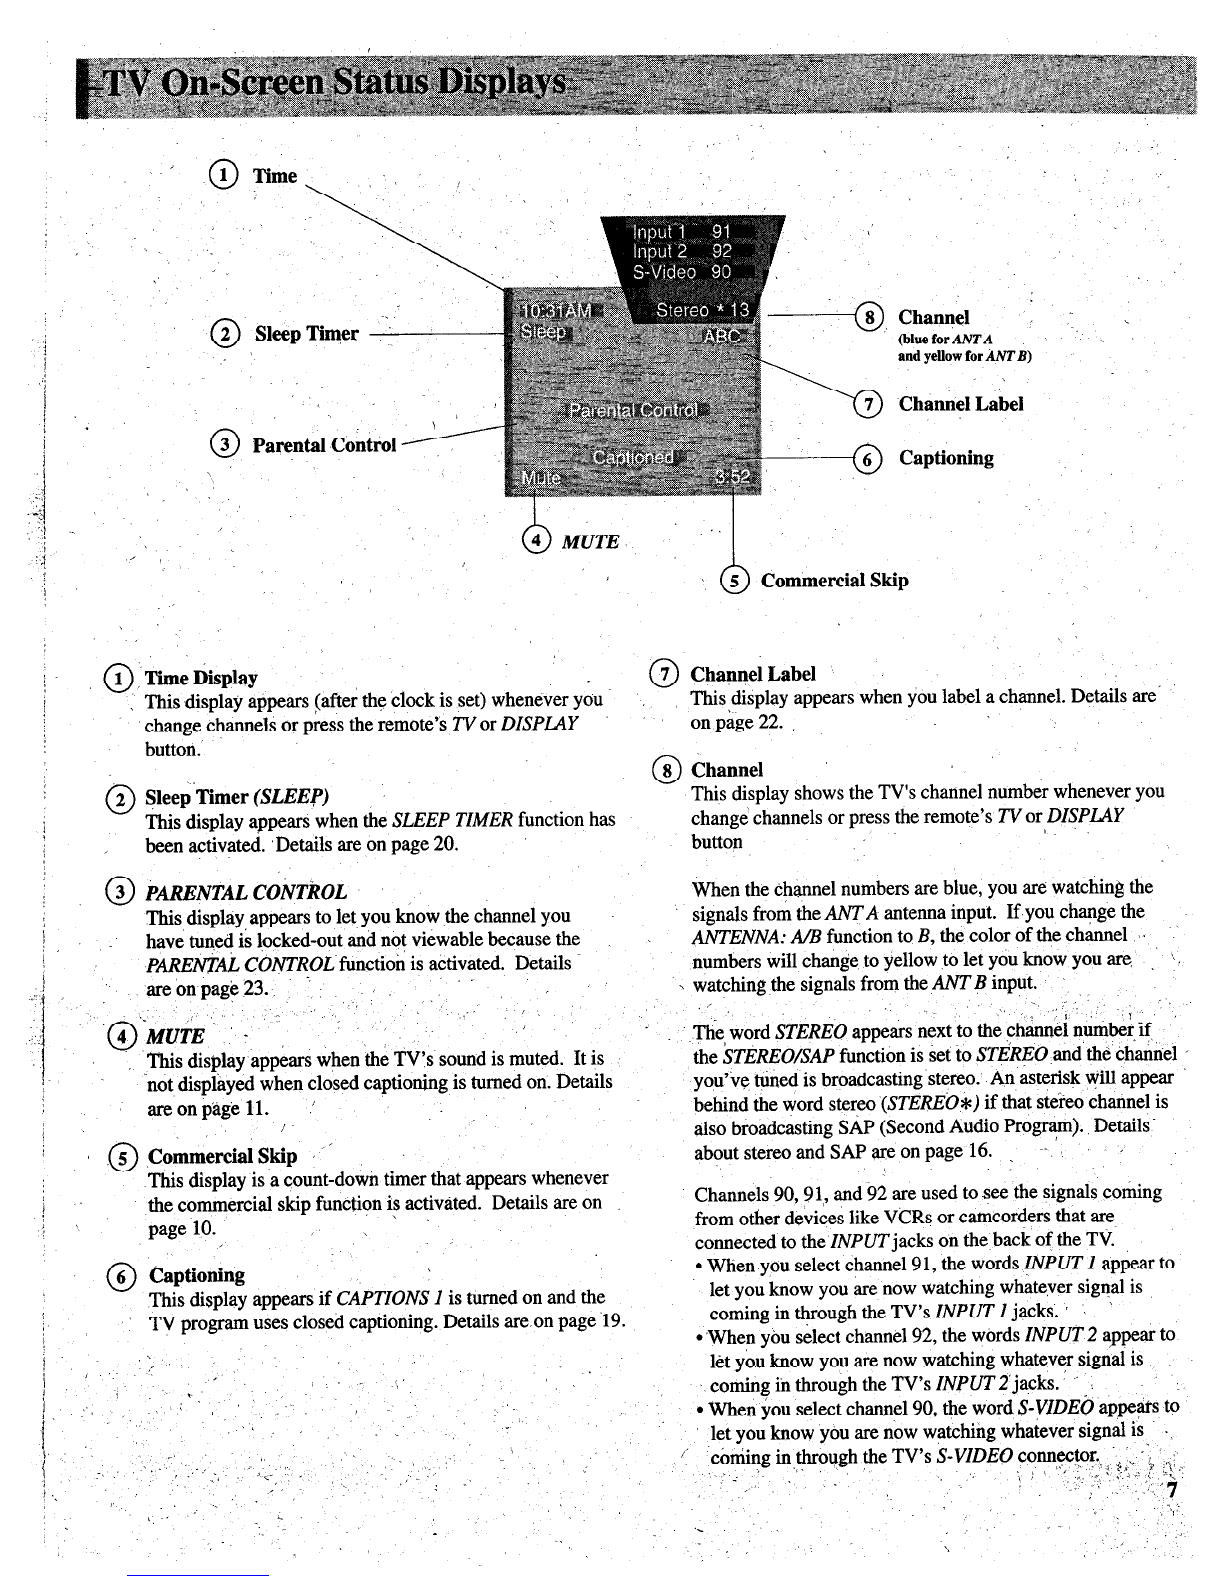
TV On-Screen Status Displays :.................... .
......:.,.
............................... .;.
..7
Remote Control
l
Installing Batteries .................................................................................... g
l
Basic Operation Theory.. ......................................................................... .9
l
TV Functions ..................................................................................... 10-11
Picture-in-Picture ................................................................................. 12-13
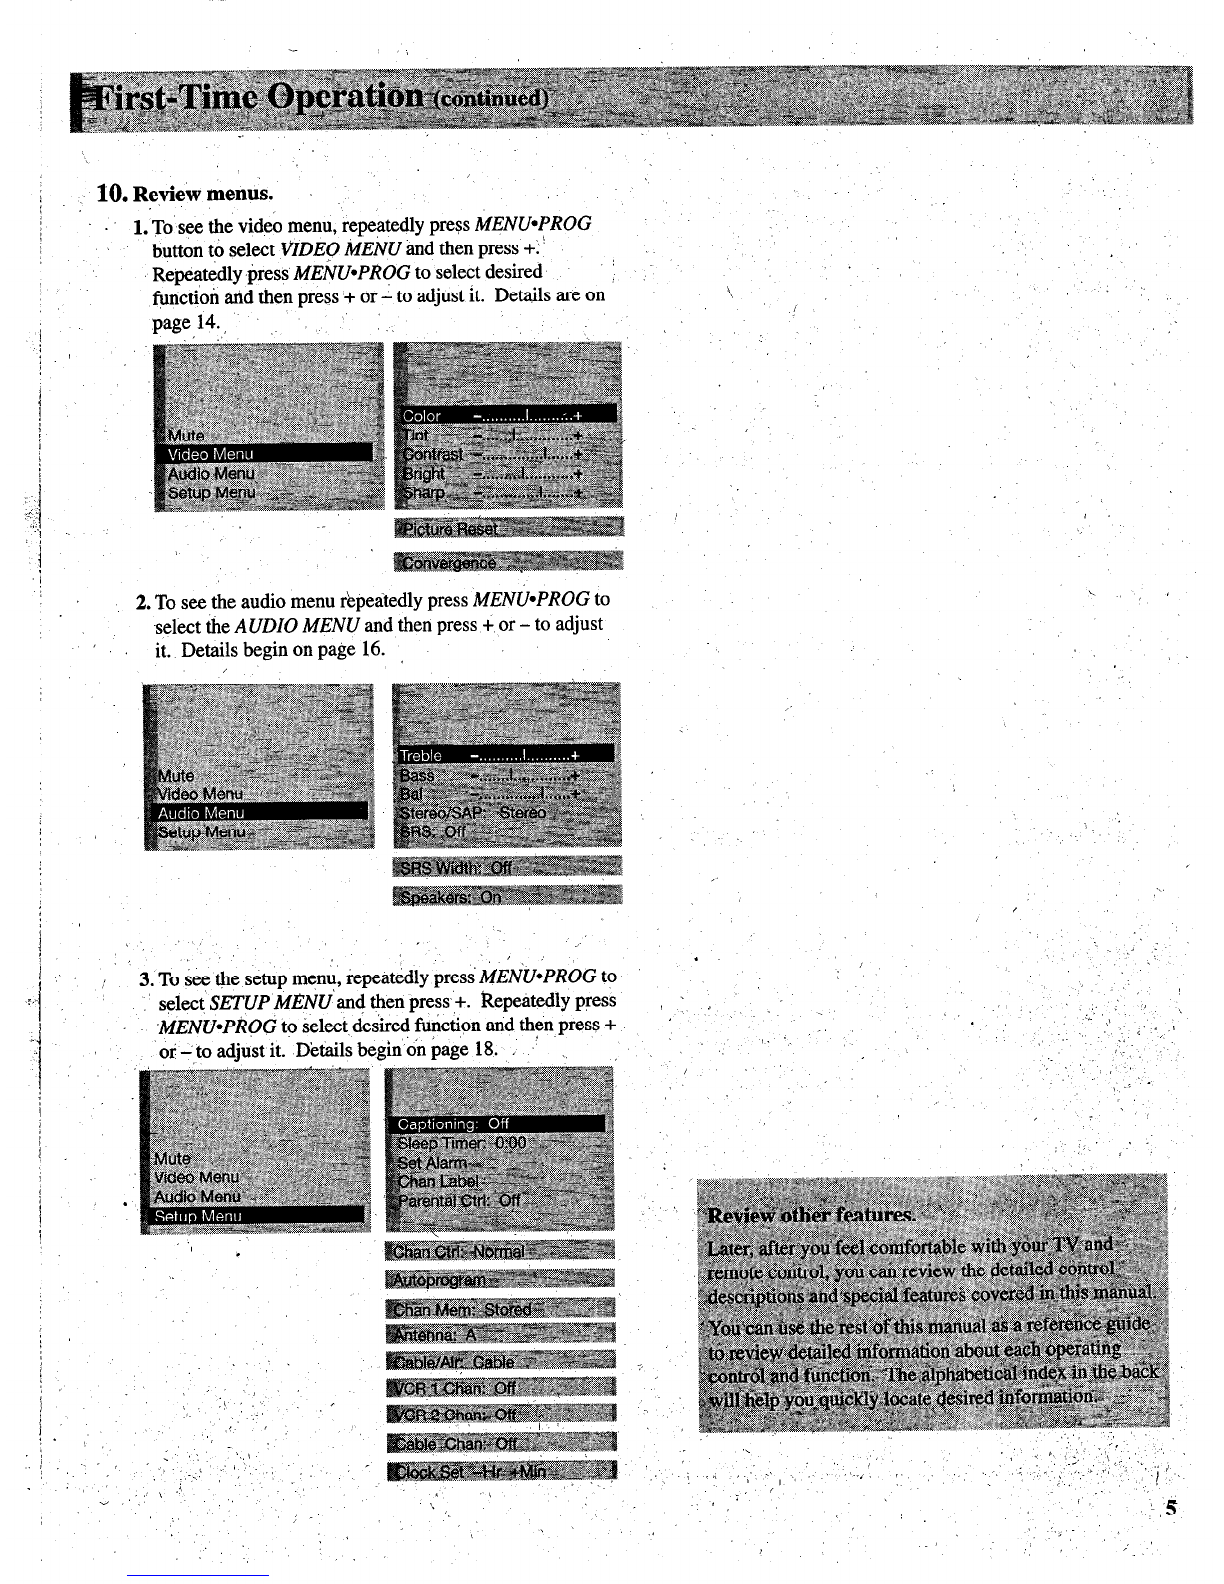
VIDEO
Menu- General Instructions ......................................................... 14
l
Color Convergence ................................................................................ .15
AUDZO
Menu- General Instructions ........................................................ 16
l
Sound Retrieval System-SRS( 0) .................................................. 17
........
SETUP
Menu- General Instructions ......................................................... 18
l
Setting Closed Captioning ...................................................................... ,19
l
Setting the Sleep Timer
.;
.........................................................................
2a
l
Setting the Alarm.. ........?.;..:......... .
........... ................. .
............................. .21
l
Labeling Channels ................................................................................ ...22
l
Parental Control.. ....................................................................................
22
l
Channel Memory (Autoprogramming Channels)
-24
...................................
l
Channel Memory (Erasing/Adding Channels) .......................................
24
l
Changing Antenna Input.. ................................................... . ,2C
...................
l
Setting up VCR.Channels .....................................................................
.2c
.
l
Setting
up
Cable Box Channel.. ............................................................. .2?
Detailed Connehiok .I
Tips to Read Before Connecting Components ..........................................
21
Monitor Panel.. ............;
......
............................. .
...................... .
Antenna and Cable Connections’ ’ , ................. ..2~!
l
Home Antenna Connections ./_’
............................................. ..i.....I(
; ..A.........;
CableyTV ~~nne&ions.. .....
........... .;
..................... l...~..:i......:.A; ....
ii..31-3:
l
Programming Remote to Control Cable Box; .
..-.
.................................... ..3:
Component Connections Y .. ., . >.
. Standard VCR.. ......... ...
......:.:..;...............
l
S-VHS (Super VHS) VCR i...................... .
................... :.34-i:
......................................................................
l
Remote Buttons That Control RCA VCRs.. ................ .........-.
........... ......3i
l
Controlling Other Brands of VCRs ................................... .:........... :. ,3E
........
l
Camcorder .................................. .
..............................................................
35
l
Computers and Other Equipment ...........................................................
4(
l
Audio Amplifier.. :...A 1
........................... .
...................................................
l
Programming Remote to Control Audio Equipment.. ........................... .4:
f Speaker Connections ........... .
................................................................. .4:
‘ _I
ReferenceSection .’
Cleaning and Care ................................
......................................................
6
-~~T’,oubleChecks ..................r....t.......................l....1................i.....+.:....:;.45:4
Index (Alphabetical Subject Reference) ............................~.......................
41
.< ,’ .
, / ., I ‘. *s / ; ,.., .I .,.-
.,
/
._ , ,~.-,, 1 ;. .’
a: ,.- ; ,’ ’ _;j :‘,:‘.:’
.’ .
1
_, ..’
‘,

/
The steps below will help you get your TV connected and
working @rickly. \
I \
1
1.
&jack TV a& ahssorib.
! .’
Shown here are the accessoriesthat came packed with your TV
,I ‘, ,- ‘/ ..
j.
2.
. Install batteries in Amotd control.
1 ,’
‘De& are on page 8. ’ . ,, :
/ I
‘pushing back on the sides of the TV in a swivel pattern.
’
3.
Position TV in room.
A major benefit of a Projection Color Television is its large
viewing screen. To receive full benefit of the expanded screen
size, placement of the TV in the viewing room is important.
The illustrations suggest the “best viewing areas” relating to
the TV’s screen.
You will see the best picture if you sit directly in front of the
TV about -lo- 18 feet from the screen.’ Picture brightness will
: ) decrease if you sit to the extreme left or right of the .TV.
I. Your Projection TV is designed to provide a watchable p&ire
different placement of the,TV ‘-
CAUTION:
Inadequate or poor ventilation may
cause overheatmg, damage, or me risk of fire hazard.
This projection TV is equipped with ventilation openings in
the cabinet back and bottom to allow heat generated during
./. operation to be released. Jnadeqtate air flow to these openings
may result in failures due to overheating, damage to your TV,
andtheriskoffirehazard. ..
,’ t .’ ,I.
~’ : : Wheirlocating ,and installing’ your projection television
‘,. receiver, read and carefully follow the instructions contained
.{’ I’ in the “b&allation” section in the enclosed safety pamphlet.
./
I
” .‘..’ ,, /_ 2
: _,, ; ,,’ )
,, I I_ ” / ,, ‘,,’
/ I .
-2.. \ :. - ,,, .:
,’ . .
Four AAA Batteries for
Remote ,
Remote Control Power Cord
Side View \

4. Con&t antenna or cable-‘& system.
Most antennaorcable-TV systemscan beconnectedas ’
show here, ..’
l
Details for connecting a home antenna to your TV are on
‘page 30.
l
Details for connecting a cable-TV system to your TV
areonpages3i.
ADetails for connecting a VCR to your TV are on ’ ‘I
.
ltkoming Cable from &hwi or Cable-TV System
i
pages 3536.
5. Attach,power cord.
First attach the flat end of the power cord completely into the
i connector on the back of your TV, and then plug the other end
into a wall outlet.
6.
Tin% on TV, adjust the vol,time,and selecta channel.
.
l
Pressthe TV button on the remote to turn on the TV. When
using the remote, remember to point it at the front of the TV
l
Pressthe
VOL
up or down button to adjust the volume to a
desired level.
l
press the CHAN up or down button to select a channel in
memory. You can also press two number buttons to select a
channel. To select a 3-digit cable channel (up to channel
128), press and hold number button 1 until l-- appears on the
screen. Then press the other two numbers. Channels 2-13
were programmed into the channel memory for you at the
factory, so pressing
CHAN
up or down stops at these
channels only. When you start the Autoprogramming feature
(described below), your set automatically scansthrough all
’
channels and place only the active channels for your area
/
into its ch~el memory.
l
Details about using the remote :areon page S-11.
’ :“. ., 1 f I
f’
,,( ‘j
,‘\ ‘,
’
7.
Cokrge COlorsii Necessary. .
-_“,
If you notice colored rings or halos around objects in the
picture, you may need to converge the colors. Over a period ,’
of time, the picture tubes can drift out of alignment due to
normal bumps andvibrations or moving the TV Details for ,
converging the colors are on page 15. < :

.8. Autoprogram the TV’s channel nikmory.
To s&t thk TV autoprogramming its’df, press the
MENU*PROG
button, repeatedly to select
SETUP MENU
and
then press + to display the setup functions. Repeatedly press
MENU~PROG
again to select the
AUTOPROGRAM
function,
and then press’+. Details are on page.24.
You can also add and erase channels from memory asdesired.
PressMENU-PROG
repeatedly to select
the SETUP MENU,
.then press + to display the setup functions.
Press&fENU*PROG
repeatedly to select (highlight) the
CHANMEM
function. Select the desired channel number by
pressing the
CHAN
up or down button or by pressing the two
corresponding number buttons. ,.
Then press + to add a channel, or press - to erase a channel.
Details are on page 24. ,
9. $et th&-clock.
1.Repeatedly press
the &fENU*PROG
button,,to select the
SETUP iMENU
and then press
+: PressMENbPROG
repeatedly again to select the
CLOCK
SET display.
:
.!/ ::
.
I.
!
j .
.:
I,: _
:’ ’ /
,.
2. Pressand hold the - button to ‘selectthe correct hour
,-,
: (including AM or PM). Pressand hold the ‘+button to
: ,. select the correct minute.. The correct time will now
appear on the screen whenever you change channels or
/ ‘, ’:I ,.,+ press the W or DIspLAYbutton.,, : 1.: : a: .;
;:;:‘n ‘;i.;,, ;; ‘,.,‘,,’ : ;
N&C!: If power isinterrupted for an extended time, .
youwillneedtoresettheclock. ,.,, 1 , _:
; .(’ .,,/ %. I>
4 ;, ,
/ \ ”

;
IO.
Review menus.
: .
l.‘To’ seethe video menu, repeatedly press
MENWPROG
button to select
VZDEQMENU
Andthen press +>!
Repeatedly -press’
MENU*PkOG
to select desired j
function and then press‘+or - to adjust it. Details are on
! page14. ,.,
,I .’
:
I
!
I
!
i
.]
2. To seethe audio menu rkpetitedly press
MENU*PROG
to
-selectthe
AUDIOMENU
and then press +,or - to adjust
it. Details begin on page 16.
repeatedly press
MZ&!J~PROG
to

Shownhereis thefront panelcontrol. You ._
! 1
j canu&eeitherthefront panelcontrolsor the
/ remote@x&o1to operatetheTV., Whenusing
I theremotecontrol,point it towardthe’screen.
I 1~
_’
;. Y.’
j 0
1 POWER
Butt&
l
Pressonce to turn on TV
:,
l
Press’again to turn off TV.
l
On some models an indicator on the POWER button’will
1,: ‘I.. :lightwhenevertheTVisturtiedon. \ ,’ ‘, \
.
‘I ’ ‘2
‘ifOL
(Volmi) Buttons
: 0
1;’ ,_ ‘. ; PressVOL up to increase volume, or press VOL down to
: :. .‘decreasevolume. ’
l
The volume display will automatically appear on the
screen when you press the VOL buttons.
0
4
MENU,
Button
l
Pressrepeatedly until the menu you want to display is
selected, then press +,or -. Next pressMENU nqkatedly~to
select the function you want to adjust and then press + or -
to adjust the setting. ,
l
. Det$s about using each function begin on page 14. -
‘. ” ,I \ --
0
-5 ‘-,
and +Buttons ‘.
Use these buttons after you have pressed the MENU button
to enter or adjust functions. ’ ,
.o
3 CH‘(Channe1) Buttons
/
/ ..,
l
Press CH up to seethe next,higher channel in memory.
.,
l
Press CH down to seethe next lower channel in memory.
l
You can add or erase channels in memory asdesired.
/ Details are on page 24. ’,I’
j ,.. ,
:
\
,
*, ,’ ‘, ‘, ,
:,

-
0 \ ,‘,
1 Time
0
2 SleepThqer
03 Parental Control ----
-@, Channel :, ,
@he for ANTA \
and yellow for
AATB)
\
Channel Label
Captioning
6
5 Commercial Skip
1 Time Display
0 0
7 Channel Label
This display appears (after the clock is set) whenever you.
’ ~ change channels or press the remote’s Z’Vor DISPLAY This display appears when you label a channel. Details are’
on page 22. ,
button.
0
8 Channel
0
2 Sleep-Timer
(SLEEP)
This display shows the TV’s channel number whenever you
This display appears when the SLEEP TIMER function has change channels or press the remote’s TV or DZSPLAY
been activated. ,Details are on page 20. / ..
button
0
3 PARGNTALCONTR~L
When the channel numbers are blue, you are watching the
This display appears to let you know the channel you signals from the ANT A antenna input. If you change the ’
I I have tuned is locked-out and not viewable because the ~ ANTENNA: AB function to B, the color of the channel I’
1 P~EN$XL CONTROL function is activated. Details numbers will change to yellow to let you know you are :
] are on page 23. ’ ’ \ watching the signals from the ANT B input.
. “_ ,-
,
.-I.-
./ ., This display appears when the TVs sound is muted. It is
in ‘not displayed when closed captioning is turned on. Details
areonpagell. .’
/ / I,
05 Commercial Skip Y’
This display is a count-down timer that appears whenever
The word STEREO appears next to the channel number if,
the kTEREO/SAP function is set to STdRFO and the channel ’
you’ve tuned is broadcasting stereo.’ An asterisk will appear i
behind the word stereo (STEREO*) if that stereo channel is
also broadcasting SAP (Second Audio Program). Details-
about stereo and SAP areonpage 16. _ ~- ’
/ the commercial skip function is activated. Details are on Channels 90,9 l,, and 92 are used to see the signals coming
’ ,
; page 10. from other devices like VCRs or camcorders that are
connected to the INPUT jacks on the back of the TV
0
6 Captioning
l
When you select channel 91, the words !NPUT I appear to
This display appears if CAPTIONS I is turned on and the let you know you are now watching whatever signal is
TV program usesclosed captioning. Details are.on page ‘19. coming in through the TV’s INPUT 1jacks. /
l
‘When you select channel 92, the words INPUT 2 appear to
! j
,- let you know you are now watching whatever signal is
I,/, (’
.- ‘.coming in through the TV’s INPUT 2 jqh. ’ ’ :
1. ’ , .““. / ~.
i
l
When you select channel 90, the word S-VZDE6 appears to
,‘/ _ let you know you are now watching whatever signal is .
:, 7 ‘:-;, II<. , :,:. : :’ coming in through the TV’s
_’ :
. . ._‘. ,’ : “/;
,
j. . ‘. ,a.
-. I

,I&&oreattemptingto,operateyour
,re,motecontrol, install thebatteries
asshownhere. , .
‘The remotecontrol producesan
’ invisible (infrared)‘beamthattravels
’ in a’straightline much,asthebeam ;
:, (Iof a.flashlight; For this reason,
whenoperatingtheremotecontrol,
‘youmustpoint,it directly atthefront
of theTV without objectsbetween
thatcanblock the‘infrared
’light beam.
Your remotecontrol is designedto
c be veryruggedandwill withstanda
’considerabledrop. If it,receivesan
extremeblosv,thecaseis designed
”to slightly separateattheseam
’ ratherthanfracture. If this happens,
1. Turn the remote control face 3. Install four “AAA” batteries in
down. the battery compartment-as
2. Press‘down on the ridged area of shown. Make sure you insert the
negative (-) end of each battery
the battery cover and slide it off. first. _
\ ’ 4. Replace. the cover and turn remote
over-face up.
simply sq‘ueezethecasewhereit I
I ’ separateduntil it snapsback
together.The operationof the
remoteWill probablynotbeaffected.
j_
Note: Never placeanything heavyon top of the remote control or
lay it upside-down.This,may accidentallydepressthebuttons for a
@ng time anddischarge*hahn++n,~o .’ ‘,
,,‘, . . . . ,.
I ‘_
‘2,’
I:-
_’
z., ;~Note:,,Replacethe batterieswhen the TV fails to respondto the, ‘. . ._ ‘: : ,, -.’
&n#eql&ol:‘ j , : 3 .. \’
: .. ,/
.. !i,. .-.
:. 5 I .
.I,. d
r L ’
.i ,
.
;
:Noti:
If you programmed your remote to control other comRonents, ,.‘. ’
; you may have’to reprogramthe codenumberskhen you changethe /
batteries. Try not to pressmanybuttonswhile changingbatteries. /\ ,’
-Installing/Replacing Batterles
:,” \.
t,
‘,.
’
.: . . .,..~ L
,I ,,’
./
I. ’ /
> .
: (
‘,_/: i
I \ .,
~,:.,, , ’
‘:,
. .. ‘, ,‘.. .,_.’
: .‘L 1, ,,
,,’ ‘, : ., .I ,,,.I’. ., _,
: -*_I

BasicOperation Theory
Step
1
First pressoneof thesefive component
.buttonsto tell remotesvhichcomponent
i ‘! you want to control. You canprogram
most of thesebuttonsto control most
brandsof equipment.* j
:
Step2
Then press
POWER
buttonto turn onthat
component.
Note: The TV and someother componentswill
automatically $m on.whenyou pressthe
component button in step1. Pressthisbutton to
tuti thecomponent’off.
Step3
Thesefunction buttonscannow beused
to control thebasicfunctionsof the
componentyou selectedin step1. ‘To
control adifferent component,first press
its componentbutton
(VCRI,. VCRZ*LD,
ID$NXBLE, AUDIO,
or TV), andthen
~.’ ”
‘s’, [Tdeyr4tincuonbuy.
NOW Not all compon& havefunctions that
:, :,
canbecontrolled by thesebuttons,but you c”
experiment with your particularmodelsto
discoverexactly which buttons will control it.
/
* The TV button automatically controls your TV - no additional
prograr&ing is required.
Details for programming the VCR] tid
VCR2*LD buttons to co&o1 other brands of VCRS are on page :
38. -Details for programming the AUDIO button to control audio I
I . , equipnient ,yk on page 42. Details for ijrogrammitig &e
DSS-CABLE button to control cable boxes are on page 33. : ,_ .I )
\
‘,
.’ ;’ I , I
: - / ,.
; /

Only the buttons that are used to contra! the TV are described here. The rest of the ’
buttons are used to operate VCRs (pages 37-38), a DSS receiver or Cable-TV-boxes _
(page 33),,and audie equipment (page 42). ’ , ,
.’ \
‘.
-- ’
,
REW PLAY FF
SLIDD, REC STOP PAUSE
,-
TV Button
’ /
i ‘I&IS o,h’TVandputs remote in “TV Mode” sothat the otherremote
buttonswill control the TV
‘0
‘, Displaystime (if clockhasbeen,set)andchannelnumber on the
TV screen.
- ,’
Important Note:
Somebuttons on the remotecontrol will not
control the TV unlesstheremote isin the “TV Mode”. If another
component button (suchas
VCRZ*LD)
ispressed,theremote will
go into the “VCR Mode” and will control acompatible VCR. To
get backinto the “TV Mode”, simply pressthe button labeledTV.
The remote.will go back into the “TV Mode” and will control the.
TV again. ,.
POWER Button ’
#
l
Press POWER
to turn off TV.
CHAN Buttons ,
l
press
CHAN
up to selectthe next higher,channelin channel
memory.
l
press
CHAN
down to selectthe next lower channelin channel
memory.
l
Youcanadd orerasechannelsin memory asdesired. Detailsareon
page24. ,
VOL Buttons
l
press
VOL
up to increasevolume.
l
press
VOL
down to decreasevolume.
DZSPLAY Button
l
Displaystime (if clockhasbeen set)andchannelnumber’on the TV
screea.
l.Quickly removesmenusand displaysfrom the screen.
, ,- ,
SKIP (Commercial Skip) Button ’
l
Use,thisbutton whenyou want to scanother channelsduring a
, program break.
l
When abreak occurs,pressSKIPoncebefore changing channels.
The TV will count down 3.0secondson the,screenandthen
automatically switchchannelsbackto the original channel.
l
press
SKIP
twice if you want &TV to count down 60 seconds.
Eachadditional presswill add another 30 secondsto the countdown
time (up to five minutes)and then eachadditional presswill add
another60 secondsto the countdown time (up to 60 minutes).
l
To cancel,press
CLEAR.
The countdown clockwill disappear
from
the screen,andthe TV will stay’tunedto the present,channel.
l
When closedcaptioning isturned on, the counterwill only
display
for2seconds. ‘, 8.

.
,’
.MUTE Button
._’
.
.’
l
1Press
MLkE
to quickly reducesoundto minimum levelwithout
affecting thepicture. This isespeciallyusefulduring telephonecalls
or other interrup,tibns. ,, I ‘_
,..
l
Exceptwhen closedcaptioning is on, when the soundismuted, the
word
MUTE
will bedisplayedon the screen. ’
l
To restoresound,press
MUTE
again or press
Vdi
up. .
,’
PREV CH (Previoui Channel) Button
l
Pressingthe
PREV CH
button causesthe TV to changebackto the
lasttuned channel. This isuseful shouldyou want to monitor two
channels. -
l
Tooperate,selectthefist channelyou wishto ;katch. Then select
theother channelby pressingtwo number buttons(for example,
press0 then 6 for channel6). The TV will now changebackand
forth between the two channelseachtime you pressthe
Z?REV CH
button.
Number ButtonS $9) ,
l
Thesebuttonslet ‘youdirectly accessanychannelnumber-even if the
channelisnot in the channelmemory. ),
l
To selectachannel,presstwo number buttons (first one,then the
.other). For example,press0 then 6 for channel6. Press1then 3 for
channel 13.
l
To selecta3-digit cablechannel(like 127),pressandhold number
button 1until l-- appearson the screen.Thenpresstheother two
numbers.
Note: kour TV will tune up to channel 128. Checkwith your cable
companyto determinewhich channelsareavailablein your area.
INPUTButton ; . ‘1,
l
I&s you quickly view signalsfrom the
INPUT
jacks. Pressingthis
button switchesthe TV from its currentchanneldirectly to channel
.: !10,then channel91, then channel 92. ,
:
; Channel W.1et.syou seethe signalscoming from adevicethat is ..
connected
to‘the
S-VIDEO
connector.‘Channel.91accessesthe
.ZNPUT 1
jacksandchannel
92
accessesthe
INPUT 2
jacks. :,
ANT (Antenna) Button
l
Becauseyour TV hashvo different antennainputs on thebac,k
(labeled ANT
A
andANT
B)
youcan connectmorethan one antenna
or signalsource. PresstheAhrTbutton to switchfrom one input to
theother. . .x ., I
l
The color of the channelnumberson the screenindicateswhich
antennainput you arewatching: The channelnumbersareblue for
ANTA and yellow for ANT
B.
If the channelnumbers‘areblue,you
arewatching whatever isconnectedto theANT
A
input on the back
of yourTV. If the channelnumbersareyellow, you arewatching
,’ whateverisconnectedto the ANT
B
input on the%backof the,TV.
. Detailsareon page25 :
,/
_’
I’
CLEAR ‘But&
l
PressingCLEARclearsthe screenof all on-screendisplaymessages
except
MUTE
and
PpRENTAL CONTROL: /
RESE’T Button
l
Press RESET
to return the picture adjustmentsto the original
settings;
MEibPROG Button and -J+ Buttons
-.
0’ Press MENU*PROG
repeatedlyuntil themenu you want to displayis
selected,then press
+
or
-:
Next press
MENU*PROG
repeatedlyto
selectthe function ‘youwant to adjustandthen press+or - to adjust
thesetting. Detailsabout using eachfunction begin ou page 14.
Arrow Buttons
l
Pressingthe arrow -/+ buttons letsyou adjustfunctions in the menu
system.
Picture-in-Picture Buttons
Press PIP
to activatethe picture-in-picturefeature.
Press
PIP
againto deactivatethe picture-in-picturefeature.
F%iss FREEZE
to freezethe smallpicture. _
Qess MOVE PIP
to move the smallpicture to the next comer.
Press
SWAP
to switch the smallpicturewith thelarge picture.
Details areon pages12-13.
SRS (@)* Button
l
Pressrepeatedlyto changesettingsof
SRS (0)
function (Sound
Retrieval System). ’ -
.
l
Details areon pages16-17. 1
* SRSi Sound Retrieval System, and the. SRS logo (0) ait registk&~tradem@ of SRS
Labs,Inc: /’ .\I
.,, .‘,l
\ : . . /
,/. ,,
‘_
i
. _’ , , ;I
/
‘. ,-_
’
-,. ,I ,:
/. < ‘.
,’ :
‘, -. ./ ,‘. ,‘/ ,I, \
.,, ’ ,I ,li“
,’

i
After you connect another video source (like a VCR) to your
TV, you’ll be able to display two different programs on the TV
.atthesame time.
‘, Two Football Games Surveillance Sysiem
Starting Picture-i!-Pi&we (PIP)
1
Connect another video source (such as a VCR or
camcorder) to
INPUT 1 orINPUT 2
on your TV (as shown
on pages 35-36).
2 Turn on the TV and select a channel.
.3 ‘PressthePZPb utton on the,remote. A little picture will
appear on the screen. ‘Thelittle picture and the big picture
will be the same.
Note: The remote must be
in the “TV mode” When you
press the PIP button. To put
remote in “TV mode”, press
the “button.
:
4, To get a picture from the other source
(VCR, camcorder,
, -[etc.), fit turn on .me,other source, and then select TV ’
I‘,channel 90,9 1, or 92’(explained at top of next ‘column). ”
The picture from the other source will appear in-the little
picture. .’
.”
’Pipture from TV
Picturefiom VCR
:>If the other source is connected to the TV’s
ZiPUT 1
jacks, select TV channel 91 to seethe signal.’ If you have
programmed
the VCR1
(or
VCR2.W)
button to’ ‘.
automatically select channel 91:~
describtd tin pdge.26,
press
VCR1
(or
VCR2aLD). :
l
Select channel 92 if the other source is connectedto the ’
TV’s
INPUT
2 jacks. If you have programmed the
VCR!
(or
VCRZ*LD)
button to automatically select
channel
92 as described
on
page 26,
press
VCR1
(or
VCR24.D).
l
Select channel 90 if the other source is connected to the
TV’s
S-VIDEO
connector. (Remember to also connect
the regular video cable to
the VIDEO INPUT
I jack for
picture-in-picture viewing.). The TV automatically
minimizes any annoying differences-in tint between the
small and large picture by electronically coupling the S-
VIDEO
input to
the INPUT 1
input. If you have ,,
programmed
the VCR1
(or
VCRZ*LD)
button to
automatically select channel 90
as descfibed on page 26,
press
VCR1
(or
VCR2*LD);
Changing Channels (PIP)
To change channels on the picture from the TV, press the TV
button on the remote, and then press either the
CHAN
,up
or down button or two number buttons.
.’ ‘.
- Picture from TV
,.
To change channels on the picture coming from the VCR, ‘r
press
the VCRI. or VCR2*LD
button (if you’ve programmed
one of these buttons to control the VCR-as
~eh-ihed on
page 38)
and then press either the
GHAN
ui;or down button
or two number buttons:,, You can also change the VCR’s
nicture bv uressina’the
CHAN
buttons on the front of the
VCR..--‘, ‘I -,’
.’
’
A ,~
...Picture from VCR
“i
_
Whenever the picture-in-picturefeature is activated, the small
nicture can be moved, frozen, or switched with the main
‘. .,
pictured
as
desrred.
&tails aie on t/z &xt ptije. I ‘,,,,,,,
:
,_’
j . .’
c I. ‘: ‘.,

; - (PIP) feature adtivated as described on the ,
I
j brevious page, you can move, freeze, or
, switch the big tid little pictures &‘+lesired. .\
; I,
1 ’ ,, ‘, 1 ,‘.
, Whenever you hive the picture-in-picture
\
0
ncn
BUllON FREEZE BUTTON
(-
,Press and release
MOVE
$YF’to
move’the
smail
picture to the next corner. .,
_MOVE-PIP )
0,
‘SWAP _’ / I I-.
FREEZE
PIP
,
/ ’
_ .<
,
Press SWk to switch the small picture wi% ,’ ‘J’
,- ,” .i ’
Press
FREEZE
to freeze the&all picture.
Press
FkEEZE
again to return to an action
k3ure.
Pressing the
PIP
button will cancel
PIP
and
‘remove the little picture from the screen. .

i
1:.’
1.
Repeatedly press MENU to select VIDEO MENU and ’
1. then. press + or - to display the video menu.
, The COLOR function adjusts the amount of color in the picture.
I, 8.” .., I
I’ ,’ Press+ to increase color or press - to decrease
c&r.-
, ’
: , \.
The ‘TINT function adjusts the color of flesh tones. Press+ to add
more red tint, or press - to add more green tint.
: press
MENU to
l.’ select
+?Jy. .’
LB function,
1.
,.“. then press
+or-to
.adjust it.
_’
The CONTRAST function adjusts the overall brightness and
contrast of the picture. Press + to increase contrast, or press - to _
decrease contrast.
The BRIGHTNESS function adjusts the brightness of the dark
portions of the picture. Press+ to increase brightness, or press - to
decrease brightness.
The SHARPNESS function adjusts picture sharpness. Press+ to’
increase sharpness, or press - to decrease sharpness.
The PICTURE RESET function lets you quickly change all the
video functions (shown above) back to the factory settings. Press
either + or - to reset the video functions.
The CONVERGENCE function allows you to precisely align the
beams of the three projection picture tubes (red, green, blue) for
optimum picture detail. Pressthe + button to display the pattern and
VOL
up
or down to align the colors. Seenext page for details.
/
1.: .’
Adjusting for a Color Picture that PleasesYQU
1. Decrease color to minimum. This wih’leave a black-and-white
image on the screen.
! j- 2. Adjust contrast until the picture pleases you.
j 3. Adjust brightness until the black parts of the picture appear
’ The video menu will automatically disappear from,me screen if black. You may need to wait until the picture shows something
1 you do, not press $-or -within a.few seconds. you’re sure is black to make this adjustment. Be careful not to
lose the details in darkly shaded areas.
.-
,, .. Via remote control, your TV will ‘?emember” which function ,4. Increase color until you reach a pleasing level,of intensity.
;:,,, _t..
’ ‘,nyou displayed last-even after the menu has disappeared from ,
.:
*:
.,_ .,
.. the screen. So, if you want to’adjust the same function again, 5: Adjust tint, until flesh tones or other color objects appear natural..
. .-
: simply press the i or - button on the remote control. The last %j 6. Adjust sharpness for a pleasing level of picture sharpness.
(For weak signals, the picture.may be more pleasing with
.. ‘+ function you’adjusted $11 reappear on the TV screen. sharpness’decreased.)
:
_.
,/.; ,*.. *
Custom Picture Memory for Input channels
~’
I!.. ,
The channel numbers you select to seesignals from components
.,
I / (like a VCR) that are connected to the INPUT jacks on the back of
.,, _‘. the TV are called input channels. Selecting channel 90 lets you see
.I.;..: .I. the signal coming from whatever component is attached to the
S-VIDEO connector, channel 9 1lets you seethe signal from the
INPUT 1jacks, and ch,annel92 lets you seethe signal from the
’ \ INPUT 2 jacks. Your TV is,equipped with a custom picture
I- memory for these input channels. When the TV is tuned to one of
:-
. > !. _
_, / ‘-- these channels (90,9J, 92), you can change the picture settings for
-, .:
,; .’
..;,;.:. ” that component’s signal as desired without changing the settings of
: ,,.,
’ ..‘, \’ any other channel. This is very useful because you’ll be able to ”
.- ..-( .“. >_.’ ,,’ -.
.,<, - : ,:_.*,’ ,, .‘, .: ,I ; i . .
.’ :.,. ,_. ,, .’ adjust for the’best picture from each of your components and the
,,. %’ jl.II
j.,’ :r ,!f ; .*’ ’
;;.“<.‘. : ,;;:+..F. ..i,;.:.. ,. (
? .,_ ;
‘., .., :
TV will remember those settings automat&ally the next time
you
,. .I.~ I, ;,,. ‘,. ;:.
..‘. iii,‘ :::,.:;:..
: .;. ‘.
.‘. , ., : tune that input channel. ‘,,’ <‘,.f’~i,, :,
‘, ~ . , ., .’
._ /
._, ,. :
,. ‘.

YourbroiectionTV hasthreecolor
, j
projekok tubes-onefor red,onefor
green,tid onefor blue. Whenmixed
- togetherin theprdperpropo$ion,the’
outputof thesethreecolor tubesdan ,
produkemahy’colors. To produce
thesecolors,however,thebeanis
mustbeIj’ecisely alignedovereach\
othersothatthecolorscanbemixed.
The processbf aligning thesepicture
be,amsis called;settingthe,,
“convergence”.
Over aperiodof time, theiicttire ”
tubescandrift butof alignmentdue
to tiotial bumpsandvibratjonsor
_ moving theTV. If you moveyour
. TV or if, afteratime, you notice
coloredrings or halosaroundobjectk
in thepicture,you may wantto
converge(align) thecolors.
To simplify convergence,an?n-,
screenmenuis providedthatallows
yoti to ‘displayatestpatternof four
-
lineson thescreen.Properly
converged,theliries appear
> white-which is actuallya
1
1 tiombinationof theoutputsof the
threecolor,tubescThe position of the
greenlines is stationary.The
I positionsof theredandblue linesare
.i adjustable.Whenproperlyadjusted,
theredandblue lines shouldlie \
directly overthegreenlinest0 ,I
pioduce..tinglewhite lines.
:: 4: ,, _
I
3.Thenpressthe+ button’todisplay
thepattern. .
,:
m USE VOL
TV f0 EXIT
J
Pressing
VOL
upor
down when
theseblue
arrows
aPp&w
movesthe
blue linesup
or down.
.
Pressing
VOL
up or
down when
Convkging (Aligning) the ColorS
-(wit@remote
ody)
1j TurnontheTV andselectachannel
5. Pressthe + button to select the.arroW
that is
activein yq~ &ea. Allow the coloranddirection,thenpressthe
TV tooperate&tleasttenminutes
.beforeconvkging.
VOL
upordown.buttofi,tdmdvethe
’ lines.
i. -Repeitedlypre>sthe
VIDEO
button
untilthe
COh?VERGENCE
function
isselected.
blue lines
TV TO EXIT
colorsin thepattern(red,blue,
and
green)shouldalign-toforinwhite,
lines,.If youseeanyredorbluelines
: in thepattern,youcanmovethemto
alignwiththeg&enlinesby’pressing
‘the
VOL
UPordownbutton.
m USE VOL
4.Whenproperlyconverged,gllthree
thesered z
arrows
~. ._. _
appear9
fnoves the I
/
r&i linesleft :.
L iV TO EXIT
orright.
+-I--
Pressing
VOL
up or
down when
thesered c
arrows
aPp*,
movesthe \
red linesup
pr down.
N&i:
Youcan alsopressthe-button
\. .%
.,
~ : 6.When‘finished,presstheTVbuttorita
\, .., ~-‘:.-,~,.. removethepattenifromthe..screen.

-
-
!
i
I
j’
‘1
I
. :,
I
?J
i
1.
Repeatedly press MENU*PROG to select AUDIO
MENU and then press + or - to display the
,
,.
:.. audio menu. , ,,
2. Repeatedly
press
MENU*
PROG to
select
function,
then press
+or-to
adjust it.
.i
The audio menu will’automatically disappear from me ’
screen if you do not press + or - vAhin a few seconds. j
I Via remote control, your TV will “remember” which
function you displayed last-even after the menu has
I ,$sappeared from the screen So, jf you %ant to.adjust ’the same funcnon, again, simply press the + or - button
, on the remote’control: .,The last function you adjusted ‘,
., (_
,: .will reappear~on the ,TV screen;‘\ : : ,’ * ,.,,
.’ _ i,: ; j ,_ ‘x
: I
The TREBLE
function adjuststhe high,frequencyaudio. Press’i- to
” ‘.,increasetreble orpress- to decreasetreble. :,
,The
BASS
function adjuststhe low frecluencyaudio. Press+ to increase
bass,or press-to decreasebass.
-,
’ The BALANCE
function;adjuststheleft/right balanceof soundfrom the
speakers.When adjusting
the BALANCE
function, sitin your normal
viewing seatwhile pressingthe + and- buttons until the soundseemsto
originate from apoint halfway betweenthe speakers.Press+ to increase
soundfrom the right speaker,or press-to increasesound’from the left
speaker.
The STEREO/SAP
function letsyou chooseeither
MONO
(monaural),
STEREO,
or SAPaudio (if available)by pressing+ or-. When a stationis
broadcastingstereoand
the STEREO/SAP
function issetto
STEREO, the
stereoindicator
{STEREO)
will appearon the screenbefore the channel
number. Normally you
can
leavethe
STEREO/SAP
function setto
STEREO
andyour TV will then automatically reproduceeither monaural or
stereoaudio-whichever isbroadcast. SomeTV stationsthat broadcast
stereo.alsobroadcastanother soundchannelcalled SAP(SecondAudio
Program)which issometimesusedto offer the program in another
language. YomTV letsyou know when SAPaudio isavailableby
displaying anasterisk(*) on the screenafter the stereoindicator like this
(STEREO*).
If you want to listento the SAPchannelwhen theasterisk,
appears,change
the STEREO/SAP
function to its
SAP
setting. The
SAP
settingwill only appearin the functionwhen SAPisavailable. YourTV
will then reproducethe SAPaudio until you changechannelsor return the
STEREO/SAP
function back
t&STEREO.
Note: SomeTV stationstransmit a“pilot” signalthat makesyour TV
think it’s receivingstereo,eventhough the broadcastsignalis monaural.
The pilot signalwill makethe stereoindicator
(STEPEO)
appearon the
screennext to thechannelnumber,however,
you
will not be able.10hear
stereosound. If this happens,checkwith the TV stationto inquire whether
the program beingbroadcastisin truestereoor monauralaudio.
The SFS:
?N/OFF
function letsyou add greaterdepth and dimensionto
stereobroadcasts.Youcanturn thisfunction on andoff.asdesired,by
pressing+ or - to changethe settingbetween ON and
OFE
You’may
prefer to,leavethisfunction set.toON. Your TV will then automatically
processthestereo’signalswhenevera,stereobroadcastisreceived.(or
tihenever a stereo,tapeisplayed through a stereoVCR that isconnected to
theTV’s audio/videojackslabeled
INPUT).
Detailsa&on page 17.
‘> I
The EXPAND STEREO
function letsyou add’greaterdepth and dimension
to stereobroadcasts.Youcanturn this function on andoff asdesiredby
pressing+ or - to changethe setting between ONand
OFE You
may
prefer to leavethis function setto ON. Your TV will then automatically
processthe,stereosignalswhenevera stereobroadcastisreceived(or
whenever astereotapeisplayedthrough a stereoVCR that isconnectedto
the TV’s audio/videojackslabeled
INPUT).
The SRS WZDTH
function letsyou enhancethe perceivedaudio separation
that occurswhen theabove SRSfunction isON. Pressing+or - changes
the settingbetween
NOZU4AL.
and
ENHANCE.
Detailsare on page 17.
The SPEAKERIS
function letsyou turn off theTV’s internal speakers,by
pressing+ or - to changethe settingbetween ON and
OFE
You will
probably want to leavethe TV’s,speakersturned on unlessyou connectan
amplifier (with itsown setof speakers)to-theappropriatejackson the back
of the‘TVasdescribedon page43. ,
” / , ‘;
, ’
.. ,, .’
,,16’ . ’
_, I ‘,
,: I \
_ ’ . ‘. I

YourTV includes a feature called
SRS (ej* (Sound Retrieval System)
which brings dimensional realism to
aboth ,stereo and mono broadcasts.
When the SRS ON/OFF function is set
to ON-and the STEREO/SAP function
is set to STeREd, your TV . .:
electronically increases the audio
separation ofthe speakers so you can
perceive a more spacious stereo sound
effect. If a stereo signal is not ‘present,
ym can set the SRS ON/OFF function
to its SYNTH STEREO setting to
synthesize and process the mono
signal.
When the SRS ON/OFF function is’set
to ON, you can also change the next
menu item called.SRS WIDTH between
N,dRMAL or ENHANCED. When this
.function is set to ENHANCED, the ’
perceived audio separation will be /
greater. Try both-settings and select
the one you prefer for your room
acoustics.
Note: Some material (audio) will
be more affected than others.
SRS (0) allows you to hear multiple
sound sources. Audio frequencies are 1
processed to’establish directional cues.,
‘&ich gives the impression that .sound ’ s
is coming from all parts of the room. :
External speakers are not required, but
the addition of high quality external
I
speakers optimizes the sound
performance of your TV.
I
* SRS, Sound Retrieval System, and the SRS logo (0) are
registered tmd~marks of SRS Labs, Inc.
‘) -,., ;
I T .’
1. Repeakdly ‘pressthe MENUiPROG 3. PressMENU*PROG button to k&t
button to select~MJDI0 MEN,U, press next’menu item’cahed SRS.WIDTY.
-‘+, and then repeatedly press .I .- Pressing + or ‘: will change the
MENVPROG again.to select SRS setting between NORMAL and
,QN/OFF function. .ENHA&CED. Try both settings and
select,the one,you prefer.
.
Not ’
SRS:ON/OkF
function between ON and
OF)
without going through the menu by
pressingthe
SRS
button onthe remote.
Z.)Repeatedly press the + button to
change the’setting between OFF,
0N;and SYNTH STEREO.
Note:
After turning SRSor synthetic
stereoon, you may find it desirableto
readjustthe
VOLUME. BASS,
and
TREBLE
controlsto optimizethe sound.
The SR$ effect,,tonalbalance,and
volume level tiill varyfrom channelto
channeldepending on theprodtiction
qualitiesof the progrq material.
.
.’ / _‘-
_. , ‘.
.,
l
If the broadcast you are receiving is J
stereo audio, select ON. The :
, STEREO/SAP function must be set
to STEREO before you can hear
SRS(O),sound with this setting.
l
If the broadcast you are receiving is
mono audio, select SYNCH ’
STEREO. !t
l
If you do ,not want SRS(a), select
OFF.
‘,
:
,. I, . ,,‘?

‘.
i
feature letsyou displayastext on the screenthe
audio
portion of certainprogramsencodedwith theClosedCaptioning (CC)
of closedcaptioning areavailable:Captions 1
and
tions 1for full translationof the primary
language
susedfor an alternateservice,suchas
secondary
simplified English.‘I$o:Text modes’@5also
-: _’ .;:
By settingthe
&EEP TZikiER,
-YOU
canprogram your TV to turn itself
off
after acertainperiod of time. This’isuseful wheneveryou wantto
watch
for anhour or sobefore going to sleep. Pressthe +or - button to
select
the
length of time you want theTV to stayon.
l/oroff at the timesyouYoucanprogram your TV to turn on .anc
settingtheALARM function. choose
by
CHAN.LABEL
letsyou program names(or labels)for the channel
numbers.
The namesyou selectwill then appearon the screenwheneverthe
channel
number isdispIayed. .,
’ me PARENTAL CONTZ$QL
featureletsyou lock out any channels
between
and 99 that you don’t want yourchildren to watch. Pressing+ or -
switches
this function from
OFF
to ON. When thisfunction issetto ON,
channels
that havebeenlockedout with the
CHAN CTRL
function cannotbe
viewed.
Whenthis function issetto
OFF:
all channelscanbe viewed.
The CHAN
CTRL
(Channel Control) function works hand-in-hand with
the
PARENTAL CONTROLfunction.
It letsyou selectthe channelsyou
want
lock out. First selectthe channelnumberyou want to lock out andthen
press
+
to changethisfunction from
NORMAL
to
LOCKED.
When the
PARENTAL CONTROL
function is setto ON, thechannelsyou locked
with
this function cannot beviewed.
function,
thenpress
\-+or-to
adjustit.
,.
I, ,.
When you press
+
or
-
to
start the AUTOPROGRAM
function, the TV
will
automatically cyclethrough all channelsandplacethe activechannels
for
your areainits channelmemory. Pressing
the CHANNEL
up or down
buttons will then allow you to scanonly activechannels. ’
The CHAN MEM
function allowsyou to eraseandadd channelsto
channel
memory asdesired.
Becauseyour,?;v hastwo separateantennainputs on the backlabeled’
ANT
A
andANT@,you canconnecttwo different signalsources,if
desired.
By pressing+ to changethe
ANTENNA
function, you,can switchback
and
forth betweenthe two signalsour&S Eachtime you press+. the
antenna
input will change. ’
k
The setup’m&u will Gtomatically disappear
frointhe screenif ydu donot press+ or -
within afew seconds.
‘he CABLZYAZR
function tellsyour TV whetheryou haveacable-TV
system
or ahome antennaconnectedto the TV YourTV is soautomatic that
you
will probably neverneedto changethis function. When your TV
autoprograms,it automatically adjusts
the CABLE/AIR setting
for you.
you shouldeverneedto overridethe automatic setting,press+ or - to
changeit. /
The
VCR 1 CHAN
function letsyou program to which channeltheTV
will
automatically tune when you pressthe
VCR
?Zbutton on the remote.
Via remotecontrol, your TV wjll “rer----~~-
&l&h function you dis&&d last-evenafterthe
.’ .. .F. ** ~~~~~ n. 1r-.-.-
nember”
The
VCR 2 CHAN
function letsyou program to which channelthe TV
will
/ automatically tune when you pressthe
VCR
2 button on theremote.
menunasaisappearearrom me screen.30,II you
’ want to idjuSt the samefunction again,simply ,
.presstht:+ or - btitton ofi theremotecontrol.
The la& kinction you’adjustedwill appear6qthe
TV screen., ‘I, .,
,_ :.’ \ ,‘. ,,
f,. ‘_-
The
CABLE CHAN
function letsyouprogram to which channelthe
TV
automatically tune when you press
&CABLE
button on the remote.
/
,o , ‘,
After you setthe clock, you will’be ableto seethe on-screentime
display
wheneveryou changechannelsor
press: the DZSPLh ?r TV
button on
the’
remote control: To setthe,clockwhen thisfunction isselected,first
press
andhold - to setthe.correcthour(including AM and PM). Then
press
hold
+
to
set
the
correct
minutes.
’
’
I/
,
.’
,:
Table of contents
Other RCA TV manuals