RCA TOCOM 1634765A User manual

Retoumer te cahier pour ta version
fran_aise
TOCOM 1634765A

[_ his symbol indicates that this product incorporates double
insulation between hazardous mains voltage and user
accessible parts. When servicing use only identical
replacement parts,
Cautbn: To reduce the risk of electric shock, do not remove cover (or back). No user serviceable
parts inside. Refer servich'_g to qualified service personnel.
This symbol indicates [mpm'tant A This symbol indicates "dangerous voltage" inside the
instructiorls accompa'@ng the _ product that presents a risk of electric shock or
product, personal [njuw.
WARNING
To reduce the risk of fire or electric shock,
do not expose this product to rain or
moisture.
The apparatus shall not be exposed to
dripping or splashing and that no objects
filled with liquids, such as vases, shall be
placed on the apparatus.
Refer to the identification/rating label located on the
bacl< panel of your product for its proper operating
voltage.
FCCRegulations state that unauthorized changes or
modifications to this equipment may void the user's
authority to operate it.
Caution: Using video games or any external accessory
with fixed images for extended periods of time can
cause them to be permanently imprinted on the
picture tube (or projection 11/picture tubes)_ ALSO,
some network/program Iogos, phone numbers, etc.
may cause similar damage. This damage is not covered
by your warranty,
Cable TV Installer: This reminder is provided to call your
attention to Art[de 820-40 of the National Elech[cal
Code (Sect[on 84 of the Canadian Elech[cal Code, Part
1) which provides guidelines for propel grounding arid,
in particular, specifies that the cable ground shall be
connected to the grounding system of the building as
close to the point of cable entry as practical.
Product Registration
Please fill out the product registration card (packed separately} and return it immediately. Fm U.S.
customers: Your RCA Consumer Electronics product may also be registered at www.rca.com/
productregistrat[on. Registering this product allows us to contact you if needed.
Product Information
Keep your sales receipt to obtain warranty parts and service and for proof of purchase. Attach it here
and record the serial and model numbers. These numbers are located on the product.
Model No. Serial No. Purchase Date:
Dealer/Address/Phone:

_ _ _l _ _ _ ...... _ ,,, 4....
Chapter I : Connections _€Setu_
Things to Consider Before You Connect ....................................................................... 3
ProtectAgainst PowerSurges....................................................................................................................3
ProtectComponentsfrom Overheating..................................................................................................3
PositionCablesProperlyto AvoidAudio Interference ........................................................................3
Important Standand BaseSafety Information .....................................................................................3
UseIndirect Light ..........................................................................................................................................3
CablesNeededto ConnectComponentsto Your TV............................................................................3
TV + DVD.......................................................................................................................... 4
Exphnation of Jacks ....................................................................................................... 5
The Front of Your TV ...................................................................................................... 6
Front Input Jacks...........................................................................................................................................6
Front PanelButtons ......................................................................................................................................6
Hug in the TV .................................................................................................................. 6
Put batteries in the remote ........................................................................................... 6
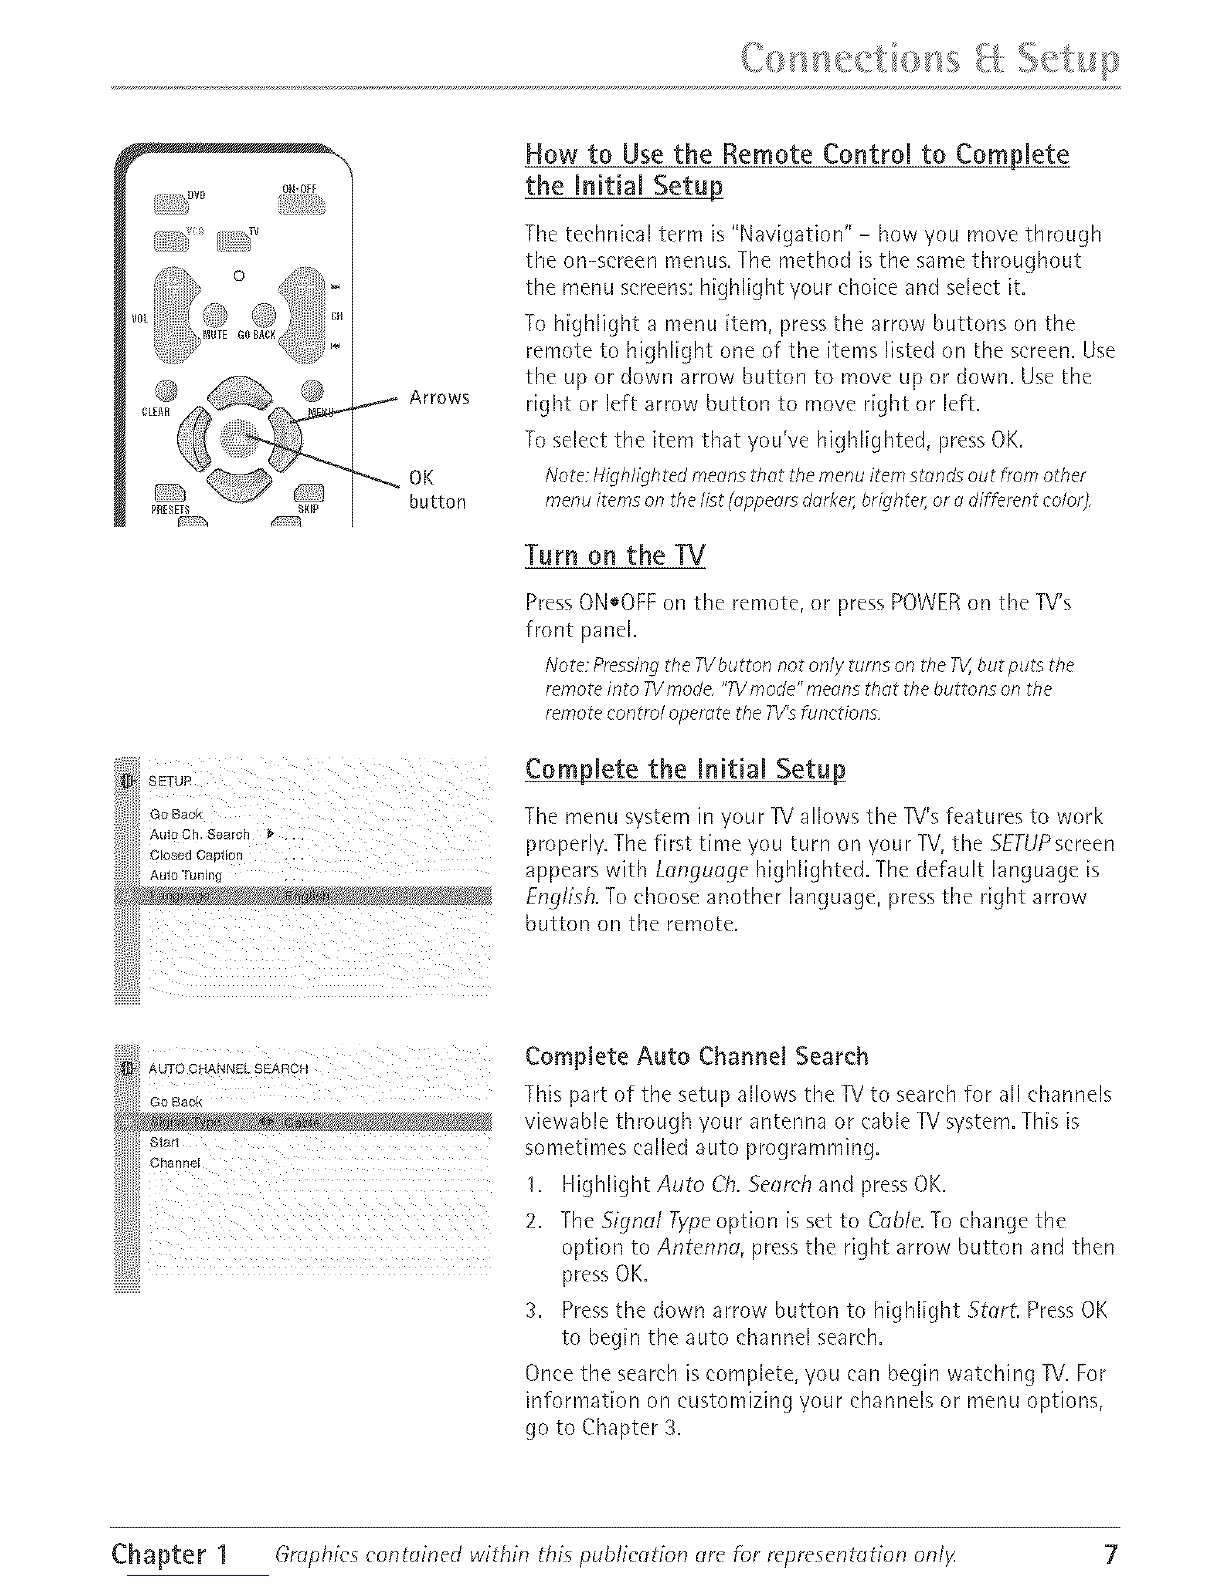
How to Use the Remote Control to Complete the Initial Setup ................................ 7
Turn on the TV ................................................................................................................. 7
Complete the initial Setup ............................................................................................. 7
CompleteAuto ChannelSearch.................................................................................................................7
_ter 2: Using the Remote Control
Button Descriptions for TV Mode .................................................................................. 8
Button Descriptions for DVD and VCR Modes .............................................................. 8
Usingthe INPUTButton ...............................................................................................................................9
_ter 3: Using the ]Ii's Features
Channel Banner ............................................................................................................. 10
Why You Should Use the Auto Tuning Feature ......................................................... 10
How to Set Up the Auto Tuning Feature ...............................................................................................10
Parental Controls and V-Chip ....................................................................................... 11
How V-Chip Works ......................................................................................................................................12
USAV-Chip Rating System .......................................................................................................................12
Canadian English V-Chip Rating System ..............................................................................................13
Canadian French V-£h[p Rating System ...............................................................................................14
USAV-Chip TV Rating Limit .....................................................................................................................14
Blocking Specific Content Themes .........................................................................................................16
Viewing Specific Content Themes...........................................................................................................16

,I> ,.... i _, I i %..... i .......
Chapter 4: Using the ]_/'s Menu System
Sound Menu ................................................................................................................... 19
Picture Menu ................................................................................................................. 19
Setup Menu ................................................................................................................... 20
Parental Control Menu ................................................................................................. 21
Time Menu ..................................................................................................................... 21
Chapter S: Other Information
Troubleshooting ............................................................................................................. 22
Care and Cleaning ......................................................................................................... 24
Limited Warranty .......................................................................................................... 25
Accessory Information .................................................................................................. 27

Thingsto Consider Before You Connect
Protect Against Power Surges
Connect all comporlents before you plug any of their power colds into the wall outlet.
Turn off the TV and/or component before you connect or disconnect any cables.
® Make sure all antennas and cables are properly grounded. Refer to the Important Safety Instructions
packed separately=
Protect Components from Overheating
o Don't block ventilation holes on any of the components, Arrange the components so that air can
circulate freely,
* Don't stack components.
® If you place components [n a stand, make smeyou allow adequate ventilation.
o If you connect an audio rece[vel or amplifier, place it on the top shelf so the heated air from it won't
flow around other components.
Position Cables Properly to Avoid Audio interference
o Insert each cable firmly into the designated jack.
o If you place components above the TV, route all cables down the side of the back of the TVinstead
of straight down the middle of the IV.
o If your anterma uses 300-ohm twin lead cables, do not coil the cables. Also, keep the twin lead
cables away from audio/video cables.
mmportant Stand and Base Safety information
Choose the location for your TV carefully. Place the IV on a stand or base that is of adequate size and
strength to prevent the IV from being accidentally tipped over, pushed off, or pulled off. This could
cause personal injury and/or damage the IV. Refer to the Important Safety Instructions packed
separately.
Use indirect Light
Don't place the IV where sunlight ol room lighting will be dheeted toward the screen. Use soft or
indirect lighting.
Cables Needed to Connect Components to Your TV
The pictures below show the cables needed fol the cormeet[ons represented in this book.
Coaxial cable S-Video cable Audio/Video cables
Chapter 1 Graphics contoined within this publie_ltion _lre for representotion only 3

TV(backpanel)
FromCable
TV ANT
DVD
R L VIDEO
TV + DVD
1. Conne_'t your DVD Hayer to your TV.
A. Connect the audio (white and red) cables to the R and L/MONOAUDIO jaeks on the back of the
TVand to the Audio Output jacks on the DVD player.
B. If your DVD player has an S-Video jack, connect an S-Video cable to the S-VIDEO jack on the
back of the TV and to the S-Video jack on the DVD player. If your DVD player doesn't have an
S-Video jack, go to C.
-OR-
C, Connect a video cable (yellow) to the VIDEO jack on the back of the TV and to the Video Output
.Jack on the DVD pJayer.
2. Make sure cabJe or antenna is connected to your TV.
Connect the coaxial cable fl'om youl cable outlet or antenna to the TV ANT jack on 'four TV.
Go to page 6
4Grophics contoined within this puDlieetion _lre for represent_tion onlF Chapter 1

...... t p
Exj_lanation ofJacks
This section describes the jacks you can use to make connections. There ale several
ways to connect components to your TV.
TVANT Lets you connect a eoaxial cable to rece[ve the signal from the antenna,
cable, or cable box.
@@@® -
R 'MoHo--
AUDIO VmDEOS-VIDEO[H
VIDEO1
Lets you connect a compor_er_t such as a VCR or DVD player.
o R (Right) AUDIO Provides right audio connection. The
right audio connector is usually red.
o LiMONO AUDIO Provides left audio connection. The
left audio connector is usually white.
o VIDEO Provides composite video connection. The video
connectol is usually yellow.
o S-VIDEO IN Provides bettel picture quality than the
video jacks because the color palt of the signal is
sepalated from the black and white palt of the picture,
When using S-VDEO IN, make sure to connect left and
right audio cables to the R and L/MONO AUDIO jacks,
Chapter 1 Graphics eontoined within this publication tire for representdtion only 5

The Front of Your TV
Front input Jacks
The -rv has one set of front audio/video input jacks for your convenience, These
jacks are towards the front of the IV on the side, To access the component you
connected to the front of the IV, press the INPDT button on your remote until
FRNTappears on the screen, The jacks are ideal fol connecting a video game
console Ol a earncorder,
Note Whenconnecting acomponentthot onlyhasoneaudiojock,such ossome comcorders,
use theTV'sAUDIOL/NlONOjockto heortheoudio,
H-PHONE Allows you to connect headphor_es to l[sten to the sound coming from
the TV,
VUDEO Receives video from another component such as a VCR, camcorder, or
video game console,
L/MONO and R AUDIO Receives audio from another component such as a VCR,
camcorder, or video game console,
Front Panel Buttons
If you cannot locate your remote, you can use the buttons on the front of your _/
to operate many of the TV's features,
MENU/OK Brings up the Main menu, In the menu system, it selects highlighted
items,
CH v Scans down through the current channel list, In the menu system, acts like
the down arrow button on the remote control and adjusts menu controls,
CH ^ Scans up through the channel list, In the menu system, acts like the up
arrow button on the remote control and adjusts menu controls,
VOL< Decreases the volume, In the menu system, acts like the left alrow button
on the remote control and adjusts menu controls,
VOL> Increases the volume, In the menu system, acts like the right arrow button
on the remote control and adjusts menu controls,
POWER Turns the TV on and off,
Plug in the TV
Plug the end of the power cold into a grounded wall outlet, Insert the plug
completely into the outlet,
Put batteries in the remote
Remove the battery compartment cover from the back of the remote by
pushing down on and sliding off the cover,
o Insert 2 fresh "AAA" batteries, Make sure the polarities (+ and -) are aligned
correctl%
Replace the cover.
6Grophics contained within this puL>lic_tion _lre for representotion onl_ Chapter 1

SETUP
: GO Back.
AutoCh, Search _ , , ,
Closed Caption •, ,
Au_o Tuning ,
_AUTO CHANN_ SEARCH
3hanne
How to Use the Remote Control to Complete
the Initial Setu !
The technical term is "Navigation" - how you move through
the on-screen menus, The method is the same throughout
the menu screens: highlight your choice and select it.
To Mghlight a menu item, press the arrow buttons on the
rernote to highlight one of the items listed on the screen. Use
the up m down alrow button to move up or down. Use the
right or left arlow button to move right or left.
To select the item that you've highlighted, press OK.
Note;Highlightedmeansthat themenu itemstands out from other
menu itemsonthe list (appearsdarker,brighter,or adifferent color}
Turn on the TV
PressONoOFF on the remote, or press POWER on the TV's
front panel.
Note:Pressingthe TVOutrannot only turns on theTV,butputs the
remoteinto TVmode "77Vmode"meansthat the buttons onthe
remotecontrol operatethe7V'sfunctions
Complete the Initial Setup_
The menu system in your TV allows the TV's features to work
properly. The first time you turn on your TV, the SEI-UPsereen
appears with Language highlighted. The default language is
English. To choose another language, Hess the right arrow
button on the remote.
Complete Auto Charme[ Search
TMs part of the setup allows the -IV to search for all channels
viewable through youl antenna or cable TV system. This is
sonletimes called auto programming.
1. Highlight Auto C& Search and press OK.
2. The Signal Type option is set to Cable. To change the
option to Antenna, press the right arrow button and then
press OK.
3. Press the down alrow button to highlight StarL Press OK
to begin the auto channel search.
Once the search is complete, you can begin watching TV.For
information on customizing your channels or menu options,
go to Chapter 3.
Chapter 1 Graphics contained within thispuDlieation are for representation only 7

!i/i/i__'_,,_,,,_,,,_
_HF_
CZ:3_ CZJ
Button Descriptions for TV Mode
Arrows Used to highlight different items in therv menu and to adjust the menu
eontlols.
(0-9) Number Buttons Enter chanr_ei numbers and time settings directly
through the remote eontroi.
To enter a one-digit channel, enter a zero first. To enter a two-digit channel, press
the two digits and expect a few seconds delay. This [s if you want to enter a tMrd
digit.
CC Toggles closed captioning on and off.
CH+orCH- Seans up or down through the current channei iist. Press once to
change the channel up or down; press and hold to continue changing channels.
CLEAR Removesanymenuordisplayfromthesemenandretmnsyoutonormal
viewing.
GO BACK Returnsyou to the previous ehanneL
INFO Br[ngs up the channei banner.
iNPUT Toggles through the available input sources (VIDI/SVID1, FRNT,and
('urmnt channel).
MENU Brings up the Main menu.
MUTE Reduees the TV's volume to its minimum level. Pressagain to restore the
volume.
OK When in the menu system, selects highlighted items.
ON*OFF When inTVmode, turnsthelVonandoff.
PRESETS Picture options are reset to original factory settings.
SKiP Press once before changing channels and the TV will wait 30 seconds before
returning to the original channel. Press repeatedly to add more time.
1V Turns on the TVand puts the remote [n TV mode. Also displays currant status.
VOL - or VOL + Decreases or increases the TV'svolume.
Button Descriptions for DVD and VCR Modes
AGAIN In DVD mode, replays the last several seconds of the title you're playing.
ANTENNA In VCR mode, functions as a W/VCR button.
DVD Puts the remote [n DVD mode and, [f auto tin'ring is enabled, will turn on
the TVand tune to the correct video input channel
GUIDE Ifyou'moperat[nganothercomponentthathasagu[de, th[sbutton
accesses the on-screen Guide.
OPEN,CLOSE In DVD mode, opens or closes the DVD disc tray.
8Graphics contained within thi_ publication _re fi)r representotion on/_ Chapter 2

REVERSE, PLAY, FORWARD, RECORD, STOP, PAUSE Provides transpolt control for
most remote-controllable RCA, GE, or Proscan VCRs or DVD players.
SEARCH In VCR mode, accesses Index Search featule.
SPEED In VCR mode, selects a recold[ng speed.
VCR Puts the rernote in VCR mode and, if auto tuning is enabled, will turn on the
TV and tune to the colrect video input charmel.
ZOOM In DVD mode, zooms in on the picture.
Using the mNPUT Button
Use the INPUT button to serolJ through the available video input charmels and
view components you have connected to the IV.
1. Make sure the component you want to view is turned ON.
2. Press INPUT to tune to an available video input source and view the
component.
3. To return to the previous channel, continue pressing INPUT.
Chapter 2 Graphics contained within this publication are f_r representation only 9

Channd Banner
There are several items that might appeal on-screen when
you press the INFO button on the remote. This display is
called the Channel Banner. The following list describes the
items on the Chanrlel Banner semen (left to right arid top to
bottom).
SAP Displayed when the current channel
is broadcasting SAP (Second Audio
Program) information.
Displayed when V-Chip has been
activated.
V'
CC
Stereo or Mono
Skip: 0:30
07:18 dm
O6ABCDEF
(_x
Displayed when Closed Captioning is
available on the current charmel.
Stereo displayed when the current
channel is broadcasting in stereo.
Mono displayed when the currant
channel is broadcasting [n mono.
Cm responds to the SKIP button.
Shows the amount of time left before
the TV switches back to the previous
channel.
Displays the currant time.
Displays the current charme[ and
label assigned to the channel.
Displayed when you mute the sound.
Why You Should Use the Auto Tuning Feature
The auto tuning feature tunes the TV to the correct charmel for different
components you have connected to your TV (like a VCR, DVD Player, etc.) When
you set up auto tuning in the menu system you don't have to remember to change
your TV to channel 3, for example, when you want to watch the tape in your VCR.
How to Set Up the Auto Tuning Feature
The way you set up the auto tuning feature in the TV's menu corresponds to the
component buttons on the remote and the way you have each component
connected to your TV. When you set up auto tuning, you're telling the TV what
channel to tune to when you press theVCR or DVD button on the remote control.
1. Press MENU (the MAiN MENU appears).
2. Highlight Setup and press OK on your remote control.
3. Highlight Auto Tuning and press OK.
4. Choose which channel you want to set:
10 Grophics contained within this publication (lre f_)r represent(_tion onl_ Chapter 3

Set VCRt Lets you set up the channel the TV tunes to when you press the
VCR button.
Set VCR2 Not available with your remote conhoL
SetSAT/CABLE Not available with youl remote control.
Set DVD Lets you set up the channel theTV tunes to when you press the
DVD button.
5. Pressthe right alrow button to select the choice that matches the way you
have the component connected to this TV.
The choices and a bl[ef explanation follow:
AUTO ]UNING
GO Back
Set VCR2 \/IDl , ,
Set SAT!CABLE CB02, , i
Sel DVD CH08 ,
N/A Choose this if you don't have this particular
component connected to the Ri, ol if you don't want the TV
to automatically tune to the correct channel when you're
using this component.
CH02 (SAT/CABLE only- Not available with your remote
control.)
CH03 or04 Component is connected to the TV ANT jack on
the back of the TV, and you want the TVto tune to channel 3
when you press the corresponding button on the remote.
Reminder: make sure the component's Channel 3/4 switch is
set to the apHopr[ate channel.
VtD1 Component is connected to the VIDEO jack on the
back of the TV and you want the TVto tune to the video
input channel when you press the corresponding button.
SViD Component is connected to the S-VIDEO IN jack on
the back of the TV and you want the TVto tune to the
S-Video input channel when you press the colresponding
button.
FRNT(Front Video/nput_ Component is connected to the
VIDEO jack on the front of the TV and you want theTVto
tune to the front video input channel when you press the
corresponding button.
Parental Controls and V-Chip_
The choices in the USA V-CHIP menu invoive software inside your TV (referred to
as V-Chip) which allows you to block TV programs and movies based on violence,
sex, or other content you may believe children should not view.
Once you block Hograms, you can unbloek programs by enter[rig a password.
By default, the software inside 'your TV is turned "off." For instructions to turn on
V-Chip, go to page 18.
Chapter 3 Graphics contained within this publication are h_r representation only 11

How V_Chip Works
V-Chip leads the program's age-based rating (R/-MA, TV-14, etc.) and eontent
themes [(Violence (V}, Adult Language (L), etc.)]. If you have blocked the rating
and/ol content themes that the program contains, you will receive the message
This channel has not been @proved for viewing. Change channel orpress OK to enter
password and tempomri/y deactivate the Parental Control
Broadcasters ale not required to provide content themes, so plograms received
with no content themes will only be blocked if you block their age-based rating.
You can also block out plograms that have been given a rating of Not Rated, and
programs that are considered unrated. The TV age-based ratings and content
themes you can block follow:
USA V-Chip Rating System
TV-MA (Mature Audience Only) Specifically designed to be viewed by adults and
may be unsuitable for children under 17. It contains one or more of the following
content themes: clude indecent language (L), explicit sexual activity (S), ol
graphic violence (V).
TV-14 (Parents Strongly Cautioned) Contains some matelia[ that many parents
would find unsuitable for children under 14. Paents are strongly urged to exercise
greater care in monitoring this program and are cautioned against letting children
under the age of 14 watch unattended. This program contains one or more of the
following content themes: intensely suggestive dialogue (D), strong coarse
language (L), intense sexual situations (S), or intense violence (V).
TV-PG (Parental Guidance Suggested) Contains material that palents may find
unsuitable for younger children. Many parents may want to watch it with their
younger children. The plogram contains one or more of the following content
themes: some suggestive dialogue (D), infrequent eoalse language (L),some sexual
situations (S), or modelate violence (V).
TV-6 (General Audience) Most parents would find this program suitable for all
ages. It contains little or no sexual dialogue (D) or situations (S), no strong
language (L), and little ol no violence (V).
TV-Y7 (Directed to Children 7 years and older) Designed for children ages 7 and
above. It may be more appropriate for childlen who have acquired the
developmental skills needed to distinguish between make-believe and reality.
Themes and elements in this program may include mild fantasy violence (F\/} or
eomedie violence, or may frighten children under the age of 7.
TV-Y (All Children} Themes and elements in tMs prograrn are designed for a young
audience, including eMIdren from ages 2-6. It is not expected to fl'ighten younger
children.
12 Graphics contained within _his publication are for representation onl_ Chapter 3

Canadian English V-Chip Rating System
18+ (Adults) Programnqng intended fol adults 18 and older. It may contain
elements of violence, language, and sexual content which could make it unsuitable
for viewers under 18. Violence Guidelines: May contain violence integral to the
development of the plot, character ol theme, intended for adult audiences. Other
Content Guidelines: May contain graphic language and explicit poltrayals of
nudity and/or sex.
14+ (Viewers 14 and over) Proglarnming contains themes or content which may
not be suitable for viewers under the age of 14. Parents are strongly cautioned to
exercise discletion in permitting viewing by pie-teens and earl,/teens. Violence
Guidelines: May contain intense scenes of violence. Could deal with rnatule themes
and societal issues in a lealistic fashion. Other Content Guidelines: May contain
scenes of nudity and/or sexual activity. There could be flequent use of profanity.
PG (Parental Guidance) Programming intended for a general audience hut wMeh
may not be suitable for younger chil@en (under the age of 8). Palents may
consider some content inappropriate for unsupervised viewing by children aged
8-13. Violence Guidelines: Depictions of conflict and/or aggression will be limited
and rnodelate; may include physical, fantasy, ol supernatural violence. Other
Content Guidelines: May contain infrequent mild plofanity, or mildly suggestive
language. Could also contain brief scenes of nudity.
G (General Audience] Proglamm[ng considered acceptable fm all age gloups.
While not designed specifically for children, it is understood younger viewers may
be part of the audience. Violence Guidelines: Will contain very little violence,
eithel physical ol verbal or emotional Will be sensitive to themes which could
frighten a younger child, will not depict realistic scenes of violence which
minimize or gloss over the effects of violent acts. Other Content Guidelines: There
may be some inoffensive slang, no profanity and no nudity.
(38+ (Children 8 and Older} Prograrnrning genelally considered acceptable for
children 8 yeas arid over to watch on their own. Violence Guidelines: Violence will
not he portrayed as the preferred, acceptable, or only way to lesolve conflict or
encourage children to imitate dangerous acts wMch they may see on television.
Any realistic depictions of violence will be infrequent, discreet, of low intensity and
will show the consequences of the acts. Other Content Guidelines: There will be no
profanity, nudity ol sexual content.
C (Children] Programming intended for childrerl under age 8. Violence Guidelines:
Careful attention is paid to themes which could threaten children's sense of
security and well being. There will be no realistic scenes of violence. Depictions of
aggressive behaviour will be infrequent and limited to portrayals that are clearly
imaginaly, comedic ol unrealistic in nature. Other Content Guidelines: There will be
no offensive language, nudity or sexual contenL
Chapter 3 Graphics contained within this publication {lre for representdtion only 13

Canadian French V-Chip Rating System
18+ (Adults) Programming is for adults only. This program contains sustained
violence or extremely violent scenes.
16+ (Viewers 16 and over) Programming is not suitable for those under age 16.
This Hograrn contains frequent scenes of violence or intensely violent scenes•
13+ (Viewers 13 and over) Programming may not be suitable for children under
the age of 13. This program either contains several violent scenes or one or more
scenes that are violent enough to affect them. Viewing in the company of an adult
is therefore strongly recommended for children under the age of 13.
8+ (Viewers 8 and over) Not recommended for yourlg children. This program is
suitable for most audiences, but it contains mild or occasional violence that could
upset young children• Viewing in the company of an adult is thelefme
recommended for young children (under the age of 8) who do not distinguish
between reality and imagination.
G (General Audience) This program is suitable for audiences of all ages. It contains
no violence, or any violence that it does contain is either minirnal or is presented
in a humorous manner, as a caricatur% or in an unrealistic way.
USA V-Chip R/Rating Limit
The V-Chip TV Rating Limit lets you decide which W
proglams can and cannot be viewed.
To set TV proglamming limits:
I. Choose PdrentelControlfl'om the MAIN MENU (the
PASSWORD screen appears the first time you enter the
P_lrentol Control menu). Create your passwold using the
number buttons on the lemote.
2.
3.
Highlight and select USA V-C_fip. Then select TV
Rtltings.
Once you get to the TVRATIN6 LIM/Tscreen, use the
arrow buttons and OK on your remote to change the
status of a TV program rating or content theme from
View to Block.
4. For TV rating limits to take effect, turn on V-Chip active
in the PARENTALCONTROLmenu (box has check mark).
The following sections give you more details about how to
change the status of TV program limits.
Note:Ifyou forget yourpasswordyou canreseti£ Makesurethe
TVisoff:Simultaneously pressandhold VOL<onthe TV'sfront
panelandCLEARon theremotefor approximately 5seconds,Enter
anewpa%word next time youaccessthePARENTALCONTROL
menu,
14 Graphics contained within this publication _lre for representation onlF Chapter 3

TheV=Chip Rating Screen
The followh'_g is an example of where items are located within the iV RATING LIMIT
screen.
Rating StatusField
Lets you select whether the status of the age-based rating Hmit
to the left is View or Block,
Rating Field
Lets you select from
a list of age-based
ratings you can
block or view.
Content Themes
Lists the content themes
you can block or view.
V V V
TV-14 View Content_,,selectwMchStatusFields
TV-PG Vie,_ B V V V _e.s_ou
content themes to view
TV-G V_ew for the selected
TV-Y7 View v laun9,
and whether the status of
the content theme is
currently View (V} or Block
(B).
Rating Settings Area
Lets you see the eurrerlt block/view state of age-based rat[rigs and
associated content.
Hierarchy of Age-Rased Ratings
TV-MA Mature Audience Only
71/- 14 Parents Strongly Cautioned
TV-PG Parental Guidance Suggested
TV-G Oeneral Audience
TV-Y7 Directed to Children 7 years and
aider
7"vcy All Children
Blocking Age=Based Ratings
You can automatically block all program ratings above a
specified age-based rating level.
To block programs with higher ratings:
1. Press the up or down arrow button to scroll to the lating
eolresponding with the lowest rating you do not want
the child to watch.
2. Press the OK button to toggle between View and Block.
The status for the rating listed to the left and all higher
ratings automatically changes to Block.
3. Press the up or down arrow button to highlight Go beck
and press OK.
4. Turn on V-Ch@ _lctiye in the PARENTALCONTROL menu
(box has cheek mark) for rating limits to take effect.
Viewing Age-Rased Ratings
After you block age-based ratings, you can change some of
the ratings back to View.
1. Press the up or down arrow button to select the rating
with a status of Block.
2. Press OK to select Wew.
Chapter 3 Graphics contained within this publieetion (ire for representation only 15

Content Themes
D Sexuallyexplicit dialogue
L Adult language
S Sexualsituations
Y Violence
FV FantasyViolence
TV, PG View v V V V
TVY View
Blocking Specific Content Themes
You can block programs based on their content. (Content is
represented by the D, L, S,V and FVon yam screen.) When
you block a content theme for a particular lating, you
automatically block that content theme for higher rated
programs as well.
To block Hogram content:
I. Determine the content themes you want to block.
2. Press the down arow button to scroll to the rating
whose content theme you want to change.
3. Press the right allow button to move the highlight to a
particular content theme status.
4. Press the OK button to change its status to S. (In the
example to the left, you block the language (L)
corresponding with TV-14. The language for TV-MA is
blocked as well).
Notes;Broadcastersam notrequiredtoprovide content themesor
age-basedratings
Youmust remembertoactivate ParentalControlsfor rating limits to
takeeffect
Viewing Specific Content Themes
If you block specific content themes, you have the option of
going [Jack and changing some of the content themes back
to (V} View:
1. Determine the content themes you want to change to (Y)
View.
2. Press the down arrow button to scroll to the rating
whose content theme you want to change, such as B
under language (L) corresponding with TV-14.
3. Press the right arrow button to move the highlight to a
palticuiar content theme status.
4. Press the OK button to change the status back to V. Your
child would then be able to watch programs with the
TV-14 adult language content, {Jut not programs with
TV-MA language content.
Note; Only thecontent themestatus correspondingto TV 14(LJ
languagechangesto{Y_View Higherratedcontent themes,suchas
that far TVMA languag6 do not change
16 Graphics contained within ihis publieetion {sre hJr represent{_tion onlF Chapter 3

,4, • _...... ,
(,,_:S L_] B, , V 2,*
J
18+
14+
Blocking CanadianV-Chip Ratings
Uyou leeeive Canadian plograms you can block Canadian
English and French V-Chip by ratings only. When you block a
particular rating, you automatically block the higher rated
programs as well.
To block Canadian English and French program ratings:
I. Select Canada V-Chip from the PARENTAL CONTROL
menu.
2, Highlight English Ratings or French Ratings and press
OK.
3. Determine the rating you want to block.
4. Press the down alrow button to scroll to the rating you
want to change.
5. Press the OK button to change its status to block (the
lock icon appears and all ratings above the one you
selected change to lock).
V=Chip Movie Rating Limit
Set movie rating limits by bloddng movies rated above a specified level.
To access the Movie Rating Limit menu:
1. Press MENU on the remote control (the MAIN MENU appears).
2. Select ParentalControL
3. Select USA V-Chip.
4. Select Movie Ratings.
Blocking Movie Ratings
Once you are in the Movie Rating Limit menu, follow the same steps described for
blocking Canadian V-CMp Ratings.
V=Chip Exempt Program Block
The Exempt Prgms. option lets you decide if programs that the V-Chip recognizes
as unrated can be viewed. Umated TV programs may include news, spolts, political,
religious, local and weather programs, emelgency bulletins, public announcements,
and programs without ratings. The Exempt option applies to both USA and
Canadian unrated programs arm Canadian programs rated E.
Unlocked All unrated programs are available.
Locked All unrated programs are not available.
Note: Youmust rememberto activate V-Chipfor rating limits to takeeffect
Press the down arrow to Mghiight Exempt Prqms. Then press the right alrow to
toggle between the lock and unlock icon.
Chapter 3 Graphics contained within this puWication are for representation only 17

V-CMp Active
Seleet[r_g this option lets you activate and deactivate parental control settings,
1. From the PARENTAL CONTROL menu, press the up or down arow to highlight
V-Chip active.
2. Press the right or left arrow to turn on (box has check mark) or off (box doesn't
have check mark) V-Chip active.
if you do not activate V-Chip, none of the settings for V-Chip will take effect.
If you forget your password you can reset it. Make sure the TV[s off.
Simultaneously press and hold VOL< on the TV's front panel and CLEAR on the
remote for approximately 5 seconds. Enter a new password next time you access
the PARENTALCONTROL menu.
Front Panel Lock
Selecting this option lets you lock (disable) or unlock (enable) the TV's front panel.
The remote still tunes to any channel. When using this as a Parental Control
method, remove access to any remote that [s capable of opelating the television.
1. From the PARENTAL CONTROL menu, press the up or down arow to highlight
Lock Fr: PaneL
2. Press the right or left arrow to turn on (box has cheek mark) or off (box doesn't
have check mark) front panel lock.
Change Password
Selecting this option lets you simply create a new password at any time. Once you
enter a new password from Change Passwd. in the PARENTAL CONTROL menu it [s
the password you use until you change it again.
18 Graphics contained within this publication are for representation onl_ Chapter 3
Table of contents
Other RCA TV manuals

RCA
RCA 20F410T - 20" TruFlat TV User manual

RCA
RCA F27550 User manual

RCA
RCA F36683 User manual

RCA
RCA F19425 User manual

RCA
RCA J13801CL User manual

RCA
RCA 24F512T User manual

RCA
RCA MM36100 User manual

RCA
RCA L WD250 Series Installation instructions

RCA
RCA 20F410T - 20" TruFlat TV User guide

RCA
RCA F27442 User manual