RCA VR702HF User manual

videocassette record ervideocasset
terecordervideocassetterecorderv
ideocassetterecord ervideocassett
erecorclervideocassetterecorclervi
deocassetterecordervideocassette
recordervldeocassetterecordervid
eocassetterecorder_ideocassetter
ecordervideocassetter_cordervide
ocassetterecordervideocassettere
cordervideocassetter_ordervideo
cassetter_co rdervideocassetterec
rdervideoca_setter_cordervideoca
ssetterecordervideocassetterecor
dervideocassetterecordervideocas
setter_cordervideocassetterecord
er_ideocassetter_corder_/ideocass
etterecordervideocassetterecorde
rvideocassetterecordervideocasse
tter_col_lervideocassetter_corder
videocassetterecordervideocasset
ter_cor_lervide_etterecorderv
ideocassett_ deocassett
recordervi
deocass eocassette

WARNING
To reduce risk of fire or
shock hazard, do not
expose this product to
rain or moisture.
TO REDUCE THE RISK OF ELECTRICSHOCK, DO NOT REMOVE
COVER (OR BACK). NO USER SERVICEABLEPARTSINSIDE.
REFERSERVICING TO QUALIFIED SERVICEPERSONNEL.
This symbol indicates "dangerous
This symbol indicates _Ik voltage" inside the product that
important instructions _ presents a risk of electric shock or
accompanying the product, personal injury.
Cautions Caution: To prevent electric shock, match wide blade of plug to wide slot, fully
insert.
Attention: Pour eviter les chocs dlectriques, introduire la lame la plus large de la
fiche dans la borne correspondante de la prise et pousser jusq_J au fond.
Refer to the identification/rating label located on the back panel of your product
for its proper operating voltage.
FCCRegulations state that unauthorized changes or modifications to this
equipment may void the user's authority to operate it.
Cable TV Installer: This reminder is provided to call your attention to Article
820-40 of the National Electrical Code (Section 54 of the Canadian Electrical Code,
Part 1) which provides guidelines for proper grounding and, in particular, specifies
that the cable ground shall be connected to the grounding system of the building
as close to the point of cable entry as practical.
Care and Cleaning: Use a soft cloth or the dusting attachment of your vacuum cleaner to dust your
VCR. Remove dust from the ventilation holes.
Plastic surfaces are easily scratched and can be marred by aicohol and various
solvents. Avoid excessive use of oil-based furniture polishes since the materials
used in the cabinet will accumulate more dust. Anonabrasive, antistatic cleaner/
polisher is recommended.
Product Registration
Please fill out the product registration card and return it immediately. Returning the card allows us to contact you if needed.
Keep your sales receipt to obtain warranty parts and service and for proof of purchase. Attach it here and record the serial and model
numbers in case you need them. The numbers are located on the back of the product.
Model No. VRT0_HF
Serial No.
Purchase Date:
Dealer/Address/Phone:
VCR PlUs+system and PlusCnde are registered trademarks of Gemstar Development Corporation.
The VCRPlus+System ismanufactured under the license from Gemstar Development Corporation.
COMMERCIAL ADVANCE and MOVIE ADVANCE are registered trademarks of SRT,Inc.; aJerry Iggulden Invention licensed in a$5ociafion with Arthur D. Little Enterprise_
i

First Things First ..................................................... 3
Initial Setup ............................................................. 5
Setting Up the VCR ................................................. 7
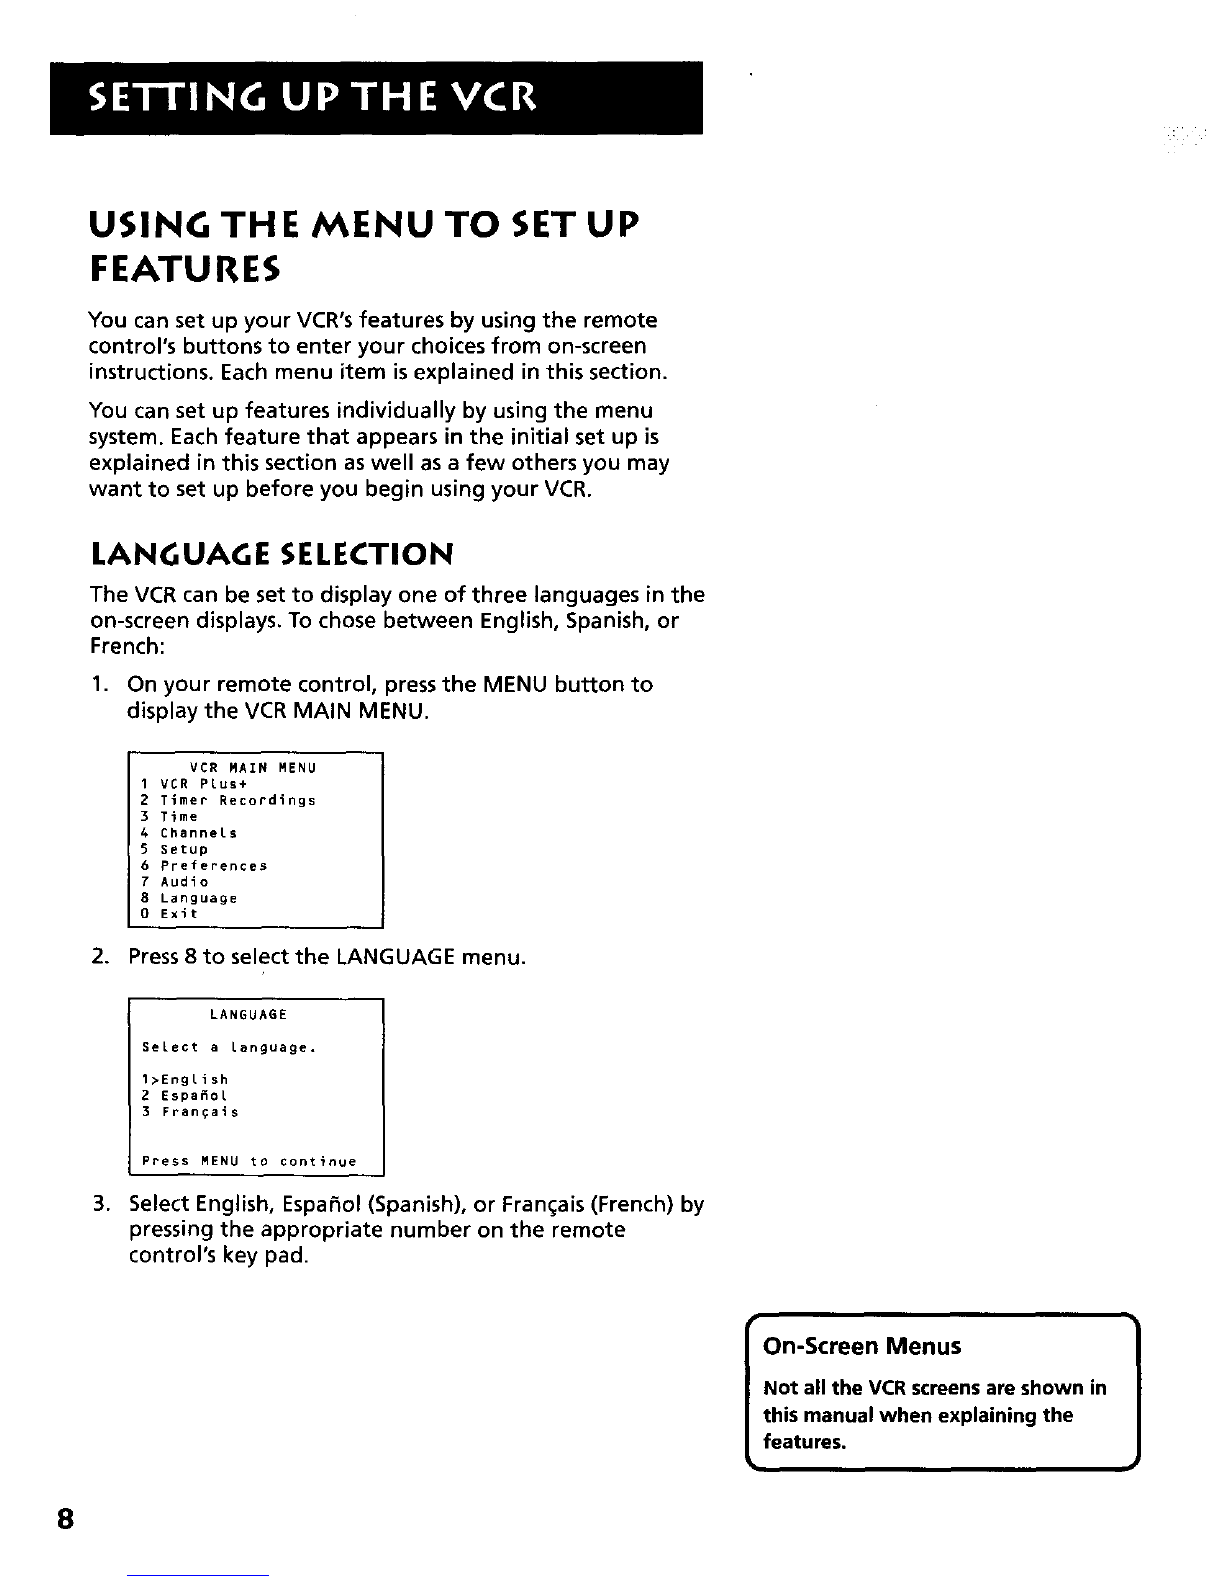
Using The Menus to Set Up Features ..................... 8
Language Selection ........................................... 8
Cable Box Setup ................................................ 9
VCR Channels List ............................................ 10
To Auto Channel Search ........................... 10
Changing the Signal Type ......................... 11
Adding or Removing Channels ................. 11
Time and Date ................................................. 12
Auto Clock Set Feature ............................. 12
Setting the Time Zone ........................... 12
Setting Daylight-Saving Time ............... 13
VCR Plus+ SILVER Guide System ..................... 14
Auto VCR Plus+ download ........................ 15
Mapping VCR Plus+ Channels Manually .. 16
VCR Plus+ System Worksheet ................ 17
Additional Setup Features .............................. 18
Remote VCR1/VCR2 Option ...................... 18
Auto Play ................................................... 19
Auto I-V/VCR .............................................. 19
EnergySaver ............................................... 19
Front Panel Brightness (VCR Display) ....... 20
Preferred Tape Speed ................................ 20
Set Auto Repeat ........................................ 20
VCR Basics ............................................................... 23
Remote Buttons .................................................... 24
Component Buttons ........................................ 24
VCR Function Buttons ..................................... 25
TV Function Buttons ....................................... 26
Playing a Tape ....................................................... 27
Automatic Rewind .......................................... 27
Tape Eject ......................................................... 27
Recording .............................................................. 28
Check the Safety Tab ....................................... 28
Recording ................................................................ 29
Recording Features ............................................... 30
Express Recording (XPR) ................................. 30
Timer Recording .............................................. 31
VCR Plus+ Programming System .............. 32
Setting Up the Channel List .................. 32
Using the VCR Plus+ System .................. 32
Stopping a Timer Recording ..................... 34
Reviewing and Clearing Programs ........... 34
Recording Broadcast Stereo TV Or SAP
(Second Audio Program) Programming ...... 35
Recording Audio Only ............................... 35
Playing Back Audio Only ........................... 36
Copying and Editing Tapes ............................. 36
Using Dual Remote with AutoEdit ................. 37

Program the Remote ............................................ 39
About Programming the Remote ........................ 40
Testing the Remote ......................................... 40
Programming the Remote to Control a TV,
Satellite Receiver, or Cable Box .................... 40
Using Direct Entry ..................................... 41
Operating Components .................................. 41
Other Features ....................................................... 45
Commercial Advance ............................................ 46
Marking ........................................................... 47
Playback ........................................................... 48
Display ............................................................. 48
MOVIE ADVANCE .................................................. 49
Picture Search Options .......................................... 51
Forward and Reverse Search .......................... 51
Slow Motion .................................................... 51
Frame Advance ................................................ 51
Index Search .................................................... 52
Go-To Search .................................................... 52
Tracking ................................................................. 53
Pro-Tect Plus TM Locking ......................................... 53
Time Counter ......................................................... 53
On-Screen Displays ................................................ 54
Audio Set-Up Features .......................................... 54
Connections ........................................................... 57
Jacks and Cables .................................................... 58
RF Jacks and Coaxial Cables (F-type) .............. 58
AudioNideo (A/V) Jacks and Cables (RCA-type) .. 58
Choosing a VCR Connection ........................... 59
Advantages of A/V Cable Connections .... 59
TV With RF Jack Only ................................ 60
TV With AN Jacks ...................................... 61
TV With A/V Jacks and Cable Box ............. 62
TV With RF Jack and Satellite Receiver .... 63
TV With A/V Jacks and Satellite Receiver. 64
Reference ................................................................ 65
Front Panel Diagram ............................................. 66
Display Panel Diagram .......................................... 67
Back Panel Diagram .............................................. 68
Troubleshooting Tips ............................................ 69
Questions and Answers About
Commercial Advance ........................................... 73
Specifications ......................................................... 74
Cleaning the VCR .................................................. 74
How to Find Your TV's Video Input Channel ....... 75
Warranty ................................................................ 76
Index ...................................................................... 77
2

WELCOME TO YOUR
NEW VCR...
To help you get started using your VCR with as
little reading as possible, we've put all the basic
information needed in the first three sections.
To help you along, there's even an initial setup
feature the first time you turn on your VCR
which walks you through several setup steps at
once.
FIRSTTHINGS FIRST I
V
V
GETTING STARTED
Before this first step, though, learning about the
time and date, your remote control's features,
working with channels, and basic video tape
operations are essential to get all you can out of
the VCR. Once you are comfortable with these
features, feel free to refer to other sections
because they cover the more detailed
information.
WHAT REMAINS?
The final sections of this manual contain
playback and recording information, a detailed
connections section, and a reference section
including troubleshooting tips, warranty
information, and an index.
¥
¥
V
¥
READ ME!
These note boxes give you tips for
your new video cassette recorder. J
3

STEP 1: WHAT'S IN THE BOX?
The following items come packed in the box:
•VCR
• Remote control
• RFcoaxial cable
STEP 2: INSTALL BA'FFERIES IN
THE REMOTE CONTROL
Follow these steps whenever you need to install or change
the batteries in your VCR remote:
,
2.
Remove the cover of the battery compartment.
Place the batteries into the remote control's back
panel. Match the positive (+) and negative (-) ends of
each battery to the diagram inside the battery
compartment.
3. Replace the cover.
Ib,Q,4e
/ ,i,Q.li
Q,I.! i
STEP 3: CONNECT YOUR VCR
If the VCR is connected to an antenna or cable system and
then to the TV, use the VCR's ANT. IN and RF OUT jacks for
a good signal (see the diagram to the right).
If the TV has AUDIONIDEO jacks, use AN cables to
connect the two for a better picture. See the Connections
section in this manual for additional connection options.
STEP 4: PLUG IN THE VCR
The VCR's power cord has a plastic band strung through
the blades. Remove plastic band before plugging the
cord into the power outlet. To remove band, cut with a
pair of scissors and pull it free of the blades. Once the
plastic is removed, match the wide blade of the power
cord to the wide slot in the AC outlet. Be sure to insert the
plug completely.
VCR
I
CABLE, CABLE BOX, OR ANTENNA "_
P/
4

STEP 5: TUNE THE TV
Tune the TV to the VCR viewing channel. The VCR viewing
channel is channel 3 or 4 or the TV's video line input.
If you connect your VCR using the ANT. IN and RF OUT
jacks with RF coaxial cable, set the CH. 314 switch to
channel 3 or channel 4--the channel you want to use
on your TV.
If the VCR is connected to the TV using the AUDIO/
VIDEO jacks and A/V cables, select the TV's video line
input with the remote control's INPUT button to see the
signal. See "How to Find Your TV's Video Input
Channel" in the References section of this manual for a
detailed explanation of video line input.
STEP 6: TURN ON THE VCR
Press POWER on the VCR's front panel or the VCR button
on the remote control to turn on the VCR. The first time
you turn the VCR on, a menu screen appears. This is the
start of an initial set up which helps you set different
options for your VCR.
STEP 7: INITIAL SETUP
The first on-screen menu during the initial set up asks
which language you prefer to use for the VCR's displays.
Use the remote control's number buttons to select the
corresponding language.
Select a language,
SeLeccione un idioma.
Choisissez une Langue.
1English
2 EspaSot
3 Fran_ais
I. Press 1for English, 2 for Espaffol (Spanish), or 3 for
Fran_ais (French).
The remaining menus in the setup will appear in the
chosen language. Just follow the step-by-step screens until
setup is complete.
(Continues on next page)
VCR Viewing Channel
I .........I
-0°,
AUDIOIVIDEO OUT Jacks CH.314Switch
When using the ANT IN and RFOUT
jacks to connect your VCR, tune your
TV to channel 3 or 4.
The CH. 3/4 switch on the back of the
VCR determines which TV channel is
used to see the VCR's output.
When using the AUDIO/VIDEO jacks
to connect the VCR0tune the TV to
the its Video Input Channel using the
TV and INPUT buttons on the VCR's
remote control.
See "How to Find Your TV's Video
Input Channel" in the References
section of this manual for more
information about video line input.
5

(Continued from Previous Page)
If the menu does not appear:
Make sure the TV is tuned to the same channel as the
CH. 314 switch or the TV's video input channel (see "How
to Find Your TV's Video Input Channel" in the
References section of this manual for more information).
• Make sure the VCR indicator is on in theVCR's front
display if the VCR is connected using the ANT. IN and
RF OUT jacks.
• Check your connections to make sure they are correct
and snug.
If you chose to set up the VCR's options individually, then
go to the next section for specific menu instructions.
STEP 8: ACCESS THE MENUS
The MENU and number buttons let you access, select, and
change the VCR's display preferences. For example, to
select a different preferred on-screen language than the
one selected during the initial set up, do the following:
1. Press MENU to display the VCR MAIN MENU.
VCR MAIN MENU
I VCR PLus+
2 Timer Recordings
3Time
4 ChanneLs
5 Setup
6 Preferences
7 Audio
8 Language
0Exit
2. Press 8 to display the LANGUAGE menu.
LANGUAGE
SeLect a language.
1>EngLish
2 Espa_ot
3Fran_ais
Press MENU to continue
3. Using the remote control, press 1 for English, 2 for
Espahol (Spanish), or 3 for Fran(;ais (French).
All other on-screen menus are worked in similar
ways; using the remote control to follow on-screen
instructions. See the next section, Additional Set-Up
Features, for detailed information about accessing menus.
6

ADDITIONAL SETUP
FEATURES
Below is alist of features that need to be set up
before using your VCR for the first time.
•On-screen language
• Cable box setup
• VCR channel List
(using auto channel search)
• Auto clock set
• Setting time and date manually
• Setting VCR Plus+ system channels
• Remote VCR1/VCR2 feature
• Auto Play*
• Auto TV/VCR*
• Energy Saver*
• Front panel brightness*
• Preferred tape speed*
V
SETTING UP THE VCR
V
V
V
V
V
V
Features not set up during the OuikSet Guide first-time setup and must be set manually
7

USING THE MENU TO SET UP
FEATURES
You can set up your VCR's features by using the remote
control's buttons to enter your choices from on-screen
instructions. Each menu item is explained in this section.
You can set up features individually by using the menu
system. Each feature that appears in the initial set up is
explained in this section as well as a few others you may
want to set up before you begin using your VCR.
LANGUAGE SELECTION
The VCR can be set to display one of three languages in the
on-screen displays. To chose between English, Spanish, or
French:
1. On your remote control, press the MENU button to
display the VCR MAIN MENU.
VCR MAIN MENU
1 VCR Plus+
2Timer Recordings
3Time
4Channels
5 Setup
6Preferences
7 Audio
8 Language
0Exit
2. Press 8to select the LANGUAGE menu.
LANGUAGE
Select a Language.
1>English
2Espa_ol
3 FranGa_s
,
Press MENU to continue
Select English, Espa_ol (Spanish), or Fran_ais (French) by
pressing the appropriate number on the remote
control's key pad.
On-Screen Menus
Not all the VCR screens are shown in
this manual when explaining the
features.
8

CABLE BOX SETUP
This setup applies only when all channels are received
through the cable box. There are two steps:
• The first sets up the VCR for the output channel of the
cable box signal.
The second sets up the VCR for a remote-controllable
cable box so the VCR can control the cable box by
changing channels for timer or VCR Plus+ recordings.
Position the remote-controllable cable box above the
VCR as shown in the Connections section.
1. Press MENU to displaythe VCR MAIN MENU.
VCR MAIN MENU
1VCR Plus+
2 Timer Recordings
3 Time
4Channels
5 Setup
6Preferences
7Audio
B Language
0Exit
2. Press 4to display the CHANNELS menu.
CHANNELS
1 Auto Channel Search
2Add/Remove Channels
3Signal Type: CABLE
4 VCR Plus+ Setup
5Cable Box Setup
0 Exit
3. Press 5 to display the CABLE BOX SETUP menu. Then
select one of the three choices.
,
CABLE BOX SETUP
Do you use your cable
box to receive ALL
channels or only SOME
channels?
1 ALL channels
2 Only SOME channels
3 Cancel setup
If you selected ALL channels, enter the output channel
of your cable box, usually 03, 04, or video line input and
press MENU.
Cable Box Setup
ALL channels: enter two numbers for
output channel of your cable box or
press INPUT if you connect your cable
box with AUDIO/VIDEO jacks.
Only SOME channels: if you only use
the cable box to tune premium
channels.
Cancel setup: select to cancel.
9

CABLE BOX SETUP
On what channel does
the VER receive signals
from the cable box?
(usually 3, 4, or Video)
OA
Press CLEAR to correct
Press MENU to continue
CABLE BOX SETUP
The VCR will now
receive all signals
from the cable box
on channel 04.
Press MENU to continue
Once you complete the setup, the VCR confirms that it
will receive all signals on the designated channel.
VCR CHANNELS LIST
If you use acable box for all channels, this step is not
necessary. Your VCR may come with a channel list preset at
the factory, but you may want to add or delete some
channels depending on whether they are active.
TO AUTO CHANNEL SEARCH
I. Press MENU to display the VCR MAIN MENU.
2. Press 4to display the CHANNELS menu.
CHANNELS
1 Auto Channel Search
Add/Remove ChanneLs
Signal Type: CABLE
VER PLus+ Setup
Cable Box Setup
Exit
3. Press 1 to display the AUTO CHANNEL SEARCH menu.
AUTO CHANNEL SEARCH
What type of signal
are you using?
I Cable TV
2 Antenna
3 Detect Automatically
0Cancel
4. Select one of the three AUTO CHANNEL SEARCH
options:
•Cable TVsearches for cable channels
•Antenna searches for local broadcast stations
• Detect Automaticallywill make this decision for you
The VCR begins scanning for the available channels--this
10

takes about one to two minutes. When the scan is
complete, the VCR tunes to the lowest channel number. At
this point, pressing CHAN up or down on the remote
control or VCR should only select the active channels.
CHANGING THE SIGNAL TYPE
1. Press MENU to display the VCR MAIN MENU.
2. Press 4to display the CHANNELS menu.
3. Press 3 to change the Signal Type between CABLE and
ANTENNA.
ADDING OR REMOVING CHANNELS
You may want to add or remove channels after you Auto
Channel Search, especially if some of the channels have
weak signals or you don't want to watch them.
1. Press MENU to display the VCR MAIN MENU.
2. Press 4to display the CHANNELS menu.
CHANNELS
1Auto Channel Search
2 Add/Remove Channels
3 Signal Type: CABLE
4VCR Plus+ Setup
5Cable Box Setup
0 Exit
3. Press 2 to display the ADD/REMOVE CHANNELS screen.
Use the CHAN up or down keys on the remote or
number buttons to go to the channels you want to
remove or add.
Detect Automatically
A strong cable or antenna signal in
your area may cause Auto Detect to
mis-detect. If this should happen,
select I or 2 for the system you have.
Auto Channel Search
Use the Auto Channel Search feature
to place all available channels in
memory.
If you ever change cable or antenna
signals, you may need to Auto
Channel Search again.
km
Selecting Channels
The Channel up and down buttons
access those channels active in your
VCR channel list.
You can still accesschannels not
on the channel list by using the
number buttons on the remote
control.
]
ADD/REMOVE CHANNELS
Channel 115
is presently ADDED
Press CLEAR to remove
Press MENU to exit
ADD/REMOVE CHANNELS
Channel 115
is presently REMOVED
Press INFO to add
Press MENU to exit
4. When at the channel, it will be added if not already on
the list or deleted if it was. If the channel was added,
you can press CLEAR to remove it. If the channel was
deleted, you can press INFO to add.Setting Time and
Date Manually
11

TIME AND DATE
The VCR gives you two ways to set the time and date: the
Auto Clock Feature or manually. The Auto Clock Feature
enables the VCR to update the clock each time the VCR is
turned off. The Auto Clock is advantageous because it
updates the time for you automatically.
Before you set the time and date, set the Auto DST
(Daylight-Saving Time) feature to ON or OFF for your area.
AUTO CLOCK SET FEATURE
The Auto Clock Set feature is set to ON at the factory. In
the ON setting, the VCR looks for a channel carrying AIIset
data. AIIset data updates the clock using the Coordinated
Universal Time. To use this automatic feature, certain steps
are required such as Auto Channel Search, setting the time
zone, and setting the Daylight Saving feature before the
Auto Clock feature works.
SE'IIFING THE TIME ZONE
1. Press MENU on the remote control to display the VCR
MAIN MENU.
2. Press 3 to display TIME menu.
TIME
1 Set Time and Date
2 Auto Clock Set: ON
3 Set Time Zone
4Set Daylight Savings
Time Data was found on
channel 20.
0 Exit
3. Press 3 to display the SET TIME ZONE screen.
SET TIME ZONE
What is your Time Zone?
I Eastern
2Central
3 Mountain
4 Pacific
5Alaska
6Hawaii
Z>Automatic
Press MENU to continue
4. Select your time zone, then press MENU to continue.
If you chose Automatic for your time zone, the VCR sets
the clock using the first Coordinated Universal Time
i_ormation it finds. If the time is not correct, select
another time zone or manually set the time and date
through the menu system.
12
Auto Clock Information
With a cable box, the VCR will not
reset the clock after a power outage
unless the cable box isset to the
channel carrying the XDS signal.
If Auto Clock Set is unsuccessful, try
tuning the VCR (or cable box) to
a channel carrying the broadcast
information (usually PBS), then turn
the VCR off. If the time does not set
within 10 minutes, set the time and
date manually through the menus.
Check your local cable system or TV
stations for availability of channels
with XDS.

SE'IFFINGDAYLIGHT-SAVING TIME
1, Press MENU to display the VCR MAIN MENU.
2. Press 3 to display the TIME menu.
TIME
1Set Time and Date
2 Auto CLock Set: ON
3SeE Time Zone
4Set Daylight Savings
Time Data was found on
channel 20.
0 Exit
3. Press 4 to display the SET DAYLIGHT SAVINGS screen.
SET DAYLIGHT SAVINGS
Does your area observe
Daylight Savings Time
from April to October?
1 Yes, DST is observed
2No
3>Automatic
Press MENU to continue
4. Select one of the options and then press MENU to
continue.
•DST stands for "Daylight Saving Time."
• If you choose Automatic, the VCR sets the clock using
the DST information broadcast in the signal (channel).
If the Auto Clock Set was unsuccessful, set the clock
through the TIME menu. The Auto Clock Set feature is set
to OFF automatically when you set the clock this way.
1. Press MENU to display the VCR MAIN MENU.
2. Press 3 to display the TIME menu.
TIME
1Set Time and Date
2Auto Clock Set: ON
3Set Time Zone
4Get Daylight Savings
Time Data was not found
0Exit
3. Press 1to display the SET TIME AND DATE menu.
Spring forward, Fall back
In the Spring, daylight-saving time
begins on the first Sunday in April.
Because the clock automatically
changes from 2 a.m. to 3 a.m.
(forward one hour), including the
extra hour for timer recording within
this time frame is necessary.
In the Fall, Daylight-Saving time ends
on the last Sunday in October. The
VCR clock automatically changes
from 2 a.m. to 1 a.m. (back one hour).
Therefore, it can affect your
recording length.
13

,
SET TIME AND DATE
Time --:--
(hh:mm)
Date --/--/--
Press MENU to cancel
Enter the data using the number buttons. Press 0
before single-digit numbers and follow the on-screen
directions.
ITime/Date Display 1
Pressing INFO on the remote displays
the time and date on the screen.
SET TIME AND DATE
Time 12:34 PM
Date 11116100 Thursday
Press CLEAR to correct
Press MENU to set
VCR Plus+®SILVER GUIDE SYSTEM
The VCR Plus+ SILVER programming system makes VCR set
up automatic by setting and updating the clock and
channel list for you. During the one-time QuickSet Guide
set up, the VCR prompts you to enter your zip code. Soon
after, the VCR clock will set itself and your VCR Plus+
programming system channel list will be input for you.
Time, date, and VCR Plus+ system information are
downloaded from participating TV stations over your
antenna or cable system. Time and date are updated each
time the VCR is turned off (and after every power
interruption). So, when your TV stations or cable company
update their lineups, your ProScan VCR will get the most
current channel list automatically, freeing you from having
to manually change the channel list yourself.
If your VCR Plus+ Silver system fails to download the
proper information for any reason, you can always
manually map the channels. You can also turn off AUTO
VCR Plus+ if you keep getting prompts about "multiple
cable" services by choosing (2) in the VCR Plus+ SETUP
menu.
VCR Plus+ system is a registered trademark of Gernstar Oevelopment Corporation.
The VCR Plus+ system is manufactured under the license from Gemstar Development Corporation.
VCR Plus+ Download
When your VCR Plus+ SILVERsystem
first downloads information, this can
take anywhere from 5 minutes to
several hours depending on when
local broadcasters send the data.
14

TURNING ON OR OFF THE
AUTO VCR Plus+ DOWNLOAD
If the automatic VCR Plus+ download continuously fails for
any reason, you will see the prompt:
VCR PLUS+ SETUP
Last automatic setup
was unsuccessfuL.
WouLd you Like to:
1 Try again
2Finish setup manuaLLy
] Cancel the auto setup
If you decide to turn off Auto VCR Plus+ all together, you
can do this by:
1. Press the MENU button on the remote control to access
the VCR's MAIN MENU
2. Press 4 to access the CHANNELS menu.
CHANNELS
1Auto ChanneL Search
2Add/Remove ChanneLs
3 Signal Type: CABLE
4VCR PLus+ Setup
5CabLe Box Setup
0Exit
3. Press 4 to access the VCR Plus+ Setup menu.
VCR PLUS+ SETUP
1 Set channel Lists
2Auto VCR PLUS+: ON
VCR PLus+ data was not
found.
4. Pressing 1 will take you to a screen to manually map
VCR Plus+ channels. Pressing 2 will toggle between
Auto VCR Plus+ ON or OFF.
Make sure this feature is turned off if you continually
get "fail to download" prompts and map the channels
manually.
15

MAPPING VCR Plus+ CHANNELS MANUALLY
Using the VCR Plus+ SILVER system can make taping timer
recordings for cable or off-air antenna easier. If your VCR
Plus+ SILVER system setup failed during the QuickSet, then you
will need to map the channels for your local service manually.
A worksheet and abbreviated codes for typical cable services
in the U.S. and Canada are provided.
1. Press MENU to display the VCR MAIN MENU.
2. Press 4to display the CHANNELS menu.
CHANNELS
1Auto Channel Search
2 Add/Remove Charmers
] Signa_ Type: CABLE
4 VCR Plus+ Setup
5 Cable Box Setup
O Exit
3. Press 4 to display the VCR Plus+ Setup screen.
VCR PLUS+ SETUP
1 Set channel lists
2Auto VCR PLus+: ON
VCR PLus+ data was not
found,
4. Press 1 to display the Set Channel Lists menu.
VCR+ Channel My Channel
5--
4--
3-> -> -> --
2--
1--
Use CH+/- to select
Press 0-9 to change
Press MENU to save
5. Enter the data following the on-screen directions using
'our worksheet.
VCR+ Channet My Channel
5 46
4 --
3-> -> -> 23
2--
1--
Use CH +/- to select
Press 0-9 to change
Press MENU to save
Screen shown is for an example onl)¢)
16
Two-Digit VCR Plus+ System
Channel Numbers for
Cable TV (USA List)
35 American Movie Classics
39 Arts &-Entertainment
57 Black Entertainment
54 Bravo
42 Cable News Network
45 Cinemax
98 Cinemax 2
37 The Discovery Channel
53 The Disney Channel
63 Entertainment Television
34 ESPN Sports Network
47 The Family Channel
33 Home Box Office
95 Home Box Office 2
96 Home Box Office 3
51 The Learning Channel
46 Lifetime
58 The Movie Channel
48 Music Television
49 The Nashville Network
38 Nickelodeon
64 Nostalgia Television
99 Quality Value Cable
41 Showtime
97 Showtime 2
59 Sports Channel
52 Turner Network
Television
44 USA-Network
62 Video Hits 1
93 Viewer's Choice 1
94 Viewer's Choice 2
55 WGN Chicago
43 WTBS Atlanta
60 WWOR-New York
See next page for Canadian List
VCR Plus+ System Channel List
Refer to your local television list for
a complete VCR Plus+ channel list for
your viewing area or contact your
cable company. Using the list may
save you some time.

VCR Plus+ SYSTEM WORKS H E ET
Broadcast or
Cable-TV
Station Name
HBO
ESPN
VCR Plus+ System
Channel Number**
33
34
*Checkyourlocalorcablelistin ;forthechannelnumberyoureceivethlsstationon.
Channel Number
You Receive the
Station On*
"*Check your local listings for broadcast or VCR Plus+ channel number assigned.
Two-Digit VCR Plus+ System
Channel Numbers for
Cable TV (Canadian List)
67 Allarcom Pay Television/
Superchannel
44 Arts & Entertainment
72 Cable News Network-
Headline News
61 Cable News Network
70 Canadian Home
Shopping Network
56 Canal Famille
69 Cathay International
Television Inc.
68 Chinavision Canada
Corp
60 Country Music
Television
63 Family Channel
62 First Choice
96 First Choice Two
97 First Choice Three
99 First Choice Four
90 House of Commons
91 La Chaine Francaise
51 The Learning Channel
65 MeteoMedia/The
Weather Network
48 MuchMusic Network
55 MusiquePlus
52 Nashville Network
73 Newsworld/CBC
53 Le Reseau des Sports
43 The Sports Network
64 Super Ecran
37 Super Ecran B
98 Super Ecran C
66 Telatino Network
46 TV5 Montreal
92 Viewer's Choice 1
93 Viewer's Choice 2
94 Viewer's Choice 3
95 Viewer's Choice 4
71 Vision TV: Canada's
Faith Network
38 Youth "IV, Canada Inc.
17

ADDITIONAL SETUP FEATURES IN THE
PREFERENCES MENU
The features in this section are all accessed through the
PREFERENCES menu.
1. Press MENU to display the VCR MAIN MENU.
2. Press 6 to display the PREFERENCES menu.
PREFERENCES
1 Remote Control: VCR1
2Auto Play: ON
3 Auto TV/VCR: ON
4 EnergySaver: 2:00
5Front PaneL; AUTO
6 Tape Speed: SLP
7 Set Auto Repeat
8 Commercial Advance
0 Exit
Now you are ready to select an item from the menu to
change the VCR's preferences.
REMOTE VCR1/VCR2 OPTION
If you own a compatible RCA, GE, or PROSCAN remote that
has a VCR2, VCR2,LD, or VCR2,DVD button, this feature
allows you to set this VCR to respond to that button.
In the PREFERENCES menu, press 1 to select Remote
Control. With the compatible remote control, press the
VCR2, VCR2.LD, or VCR2,DVD button to change which
remote controls the VCR.
PREFERENCES
(Press VCR2 to Change)
2Auto PLay: ON
3Auto TV/VCR: ON
4 EnergySaver: 2:00
5 Front Panel; AUTO
6Tape Speed: SLP
7 Set Auto Repeat
8 Commercial Advance
0Exit
PREFERENCES
1Remote Control: VCR2
2 Auto Play: ON
3Auto TV/VCR: ON
4EnergySaver: 2:00
5Front Panel: AUTO
6 Tape Speed: SLP
7 Set Auto Repeat
8 Commercial Advance
0Exit
The VCR will only respond to the compatible remote's
VCR2, VCR2,LD, or VCR2-DVD button. If the PREFERENCES
setting is changed to VCR2, the remote that came with
your VCR will no longer control it.
To change the setting back to VCR1, so the remote which
came with your VCR can control the unit, use the
compatible remote to display the PREFERENCES menu,
press 1, and then VCR on this VCR's remote.
18
Remote Control Option
Changing the remote option to VCR2
disables the remote that came with
your VCR.
Table of contents
Other RCA VCR System manuals