RCBS ChargeMaster 1500 User manual

ChargeMaster 1500 Scale &
ChargeMaster Dispenser
Instruction Manual
PRECISIONEERED RELOADING EQUIPMENT
Wethink that wemake the very best reloading equipment in the world.
If you agree, pleasetell your friends. If youdisagree, tellus wewant todo something
about it!
Customer Service
1-800-533-5000 (US or Canada) or 530-533-5191
Hours: Monday –Thursday, 6:30am –3:00pmPacific Time
e-mail: rcbs.tech@atk.com
Web site: http://www.rcbs.com
RCBS Ÿ605 Oro DamBlvd. ŸOroville, CA95965-4650

IMPORTANTSAFETYINFORMATION
IMPORTANT: PLEASE READ ALLINFORMATION FIRST
Like any scale, you controltheaccuracy of your RCBS ChargeMaster 1500 Scale. Before using
the scale, read this instruction manual carefullytofully learn howto safely operatethe scale.
Failureto properlyoperate the scale can result in severepersonal injuryand/or
equipment damage. If you have read these instructions and still donot understand some
operation, call us at 1-800-533-5000 and a technician will assist you. This instruction manual
contains specific safety and operating information. It shouldbe considered a permanent part of
your reloading equipment and remain with the equipment at all times for easy reference.
SAFETY
Reloading is an enjoyable and rewarding hobby that can beconducted safely. However, as with
any hobby, carelessness or negligence can make reloading hazardous. This product has been
designed from thebeginning with the user’s safety inmind. When reloading, safetyrules must
be followed. By observing theserules, the chance of a hazardous occurrencecausing personal
injury or property damage is minimized.
GENERAL
lUse allequipment as themanufacturer recommends. Study the instructions carefully and
become thoroughly familiar with the operation of theproduct. If you do not have written
instructions, request a copy from the equipment manufacturer.
lDo not take short cuts. Attemptingto bypass establishedprocedures is an invitation to an
accident.
lKeep tools andcomponents neat, clean and orderly. Promptly andcompletely clean all
primerand powder spills.
lReload only when you can give your undivided attention. Do not reload when fatigued or ill,
or under the influenceof medications or alcohol. Develop areloading routine toavoid
mistakes which may prove hazardous. Don’t rush –load at aleisurely pace.
lAlways wear adequate eye protection to protect your eyes from flyingparticles. Youassume
unnecessary risk when reloading without wearing safety glasses.
PRIMERS AND POWDER
lStore primers and powder beyond the reach of children andaway from heat, dampness,
open flames andelectricalequipment. Avoid areas where static electricity is evident.
lDo not use primers of unknown identity. Discardunknown primers in accordance with
applicable regulations.
lKeep primers inthe originalfactory container until ready to use. Return unused primers to
the same factory packaging for safety and topreserve theiridentity and shelf life. Primer
packaging is designedtoprovide safe storage.
lDO NOTstore primers in bulk. The blast of just a fewhundred primers is sufficient tocause
serious injury toanyone nearby.
lDO NOTforceprimers. Usecarein handling primers.
lDO NOThave more thanone can of powder on the benchat onetime. Powder cans should
be stored away fromthe bench to avoid picking up the wrong one.
lDO NOTuse any powder unless its identity is positively known. The only positive
identification is the manufacturer’s label on the originalcanister. Discard allmixed powders
and thoseof uncertainidentity.
lDO NOTstore powder in the unit after a reloadingsession. Over timethepowder will
corrode the powder hopper.
LOADING DATA
lDO NOTSMOKE WHILE RELOADING
lOBSERVEALL WARNINGSABOUTTHE USE OF MAXIMUM LISTED LOADS.
lUse only laboratory tested reloading data. Werecommend the SPEER Reloading Manual.
WARNING
This digitalscaleis forusewith smokeless powders only. Do not use with black powder (used
in muzzle loading firearms). If black powder should come incontact with an electricalspark, an
explosion may occur, resulting in serious injury or death.
CALIBRATION
Check calibration prior to each use of the scaleand re-check frequently during usewith the
calibrationweights provided. Aspot check can easily bemade during operation with an RCBS
ScaleCheck Weight Set. If accuracy is found tobe out of tolerance, the scale must be
recalibrated as explained in theCALIBRATION section of this instructionmanual. Ascalewith
improper calibration will cause anincorrect charge weight which mayexceed the maximum
recommended load.
This instrument must be serviced only by a trained, qualified factory technician to insure
warranty and safety. For repair information, call: 1-800-533-5000
PRECAUTIONS
Digital scales are very reliable devices. However, here are some events which may result in an
inaccuratereading:
lChange in temperature. If thetemperature changes more than a few degrees, you must re-
calibrate the scale. Allowscaletostabilizefor 20-30 minutes prior to use.
lChanges in scale locationor an un-level working surface.
lUn-centered weights on the platen.
lJarring of the scale during operation.
lUse only the two calibration weights suppliedfor accuracy.
lWeight accuracy is crucial. Keepweights clean andcarefully stored. If dropped or
damaged, have weights inspectedagainst known standards. Contact RCBS Customer
Service.
lStatic electricity can cause the scale to “jump around”. If static build-up is evident, wipe
scalewith an anti-static sheet, or use anti-static spray. Spray on clean soft cloth first. Do
not allowspray toget into mechanism.
lIf powder should get inside the unit, stop operation immediately and do not use scale until it
has been serviced. Contact RCBS Customer Service.
lDo not press ontheplatformwith your hand. Youcandamage the load cell.
RECORD KEEPING
lKeep completerecords of reloads. Apply adescriptivelabel to each boxshowing the date
produced, and the primer, powder and bullet used. Labels for this purpose are packed with
SPEER bullets. Never attempt toguess at the identity of your ammunition.
NOTE: Thescale was shipped in protective packaging. Save anduse for transporting or long-
termstorage of the unit. This instrument may only be serviced by acertified technician. See
back cover for address and Toll-free Customer Service phone number.
!
!
!
ChargeMaster 1500 -1- SME300000080
ChargeMaster 1500 -2- SME300000080

CHARGEMASTER 1500 SCALE INSTRUCTIONS:
GENERALINFORMATION
The scale should bestored and used at
normalroomtemperature. It should never be
stored incold or freezing temperatures, which
can damagethe load cell. If the scale has
been sitting at acooltemperature, remove it
fromthe carton and allowit tosit at room
temperature forabout 20to30 minutes before
using.
Carefully unpack thescale. Look for and
identify the following items:
nScalewith Platen
nAC Power Adaptor
nTwo 50 gramweights
nPowder pan
nInstruction Manual
The scale was shipped inprotective packaging
which should be saved and used for
transporting the scale. This packaging is also
recommended for long term storage of the unit.
POWERSUPPLY(ADAPTOR):
(1) Input : 120 VAC60Hz
Output : 9V DC 1 A
(2) Input : 230 VAC50Hz
Output : 9V DC 1 A
Power Consumption:
Average current consumption: 33mA
Power consumption of dispenser:
Scale à33 mA
Scale+ Dispenser à36 mA
Scale+ Dispenser+ motor à220mA(Max)
SPECIFICATION:
1500.0 grains / 0.1 grain
100.00 grams / 0.01 gram
IMPORTANT:
Treat the scale as you would any fine
instrument. The ChargeMaster 1500 is
physically very fragileand the loadcellcan be
damaged bythe following:
nPushingdown or dropping the scale.
nPulling upon theplatenin sucha
way that it binds in theload cell.
nAsudden, violent physical shock to
the scale.
SCALE- KEYPAD
FUNCTION DESCRIPTION
StableOver Under Mem Disp Link
GN/GMS ZERO CAL ON/OFF
Stable: When black arrowpoints to stable the
weight is stable
The remaining indicators arefor use with the
ChargeMaster Dispenser
GN/GMS: Key switches scale from GN (grains)
to GMS (grams) . The default is GN.
ZERO: Key is used tore-zero the scale. For
example, toweigh powder in a powder
pan, you would first place an empty pan
on the scale platenand push theZERO
key tore-zero the scale. This will
automatically subtract the weight of the
pan fromthe scale.
CAL: Key is used to calibrate the scale. You
should calibrate your scale each time
you begin a newreloading session.
See thecalibration section for full
details. (Note: it is important to make
certain the scale display is properly set
to theweight unit (either grains or
grams) that you are using.
ON/OFF: Key is to power the scale on and off.
When you turn thescaleon thedisplay
will first show9999999 and will go
through a quick count down and will
then display to0.0 GN(grain mode).
The arrowwill be pointing to “stable”
when ready to use. When thescale is
not in use the scale should be turned off
and unplugged.
CALIBRATION
Always calibrateyour scale before use. This
must be done WITHOUT the powder pan on
the platform. Tocalibrate the scale, followthe
steps below:
Step 1.Be sure the powder pan has been
removed fromthe scaleplatenand then
press the ONkey. Whenyou turn the
scaleon, the display will show9999999
across the display fora fewseconds
and then counts down to display 0.0
GN (grains mode). The arrowwill be
pointing to “stable”when ready to
proceed with calibrating. SEE
PICTURE #1.
Step 2.Next press theCALkey on thescale.
The displaywill showC 0, with alower
caseg inthe upper right hand corner of
the display. SEE PICTURE #2.
Step 3.When the display shows C 0 press the
CALkey again.
Step 4.When the display shows C 50, place a 50
gram weight on the platen and press the
CALkey. SEE PICTURE #3
Step 5.When the display shows C 100, add the
second 50gramweight to theplaten and
press the CALkey. SEE PICTURE #4.
Step 6.Nowthe display will show100.00 g, SEE
PICTURE #5. Remove both weights from
the platen, and replace themto their
weight holders. The display will
automatically switchto 0.0 GN(grains)
and the scalewill sounda beep.
Step 7.Next place the powder pan on the platen
and press the ZEROkey to zero the
weight of the pan. The display willshow
0.0 GN and is nowcalibrated andready
to operate. SEE PICTURE #6.
Notice: In the calibrationprocess,
when it showsERROR, itisprobably
caused by theincorrect weight.
Please use the weightswe provided.
1
2
3
4
5
6
ChargeMaster 1500 -3- SME300000080 ChargeMaster 1500 -4- SME300000080

CHARGEMASTER DISPENSER INSTRUCTIONS
Your newChargeMaster Dispenser is an
exciting advancement in reloading
technology.It is not only fast and convenient,
but canstore up to 30of your favorite loads.
Once you programthe unit, you can recall
the stored charge and dispense it with
precisionand accuracy. The ChargeMaster
is fast andrepeats with the accuracy you’ve
come to expect fromRCBS.
GettingStarted:
The ChargeMaster Dispenser is used in
conjunction with the ChargeMaster 1500
Scale. The ChargeMaster scale simply plugs
into thedispenser. Thetransformer on the
ChargeMaster scalesupplies thepower for
the ChargeMaster Dispenser. If you
purchase your ChargeMaster as aCombo
Unit, the Scale& Dispenser are
preassembledintoa single unit. The two
units are solidly mounted into one unit using
two rigid steelbrackets onthe underside of
the Dispenser and Scale. If you purchased
your ChargeMaster Scaleand ChargeMaster
Dispenser separately, you will need to
assemble the two units.
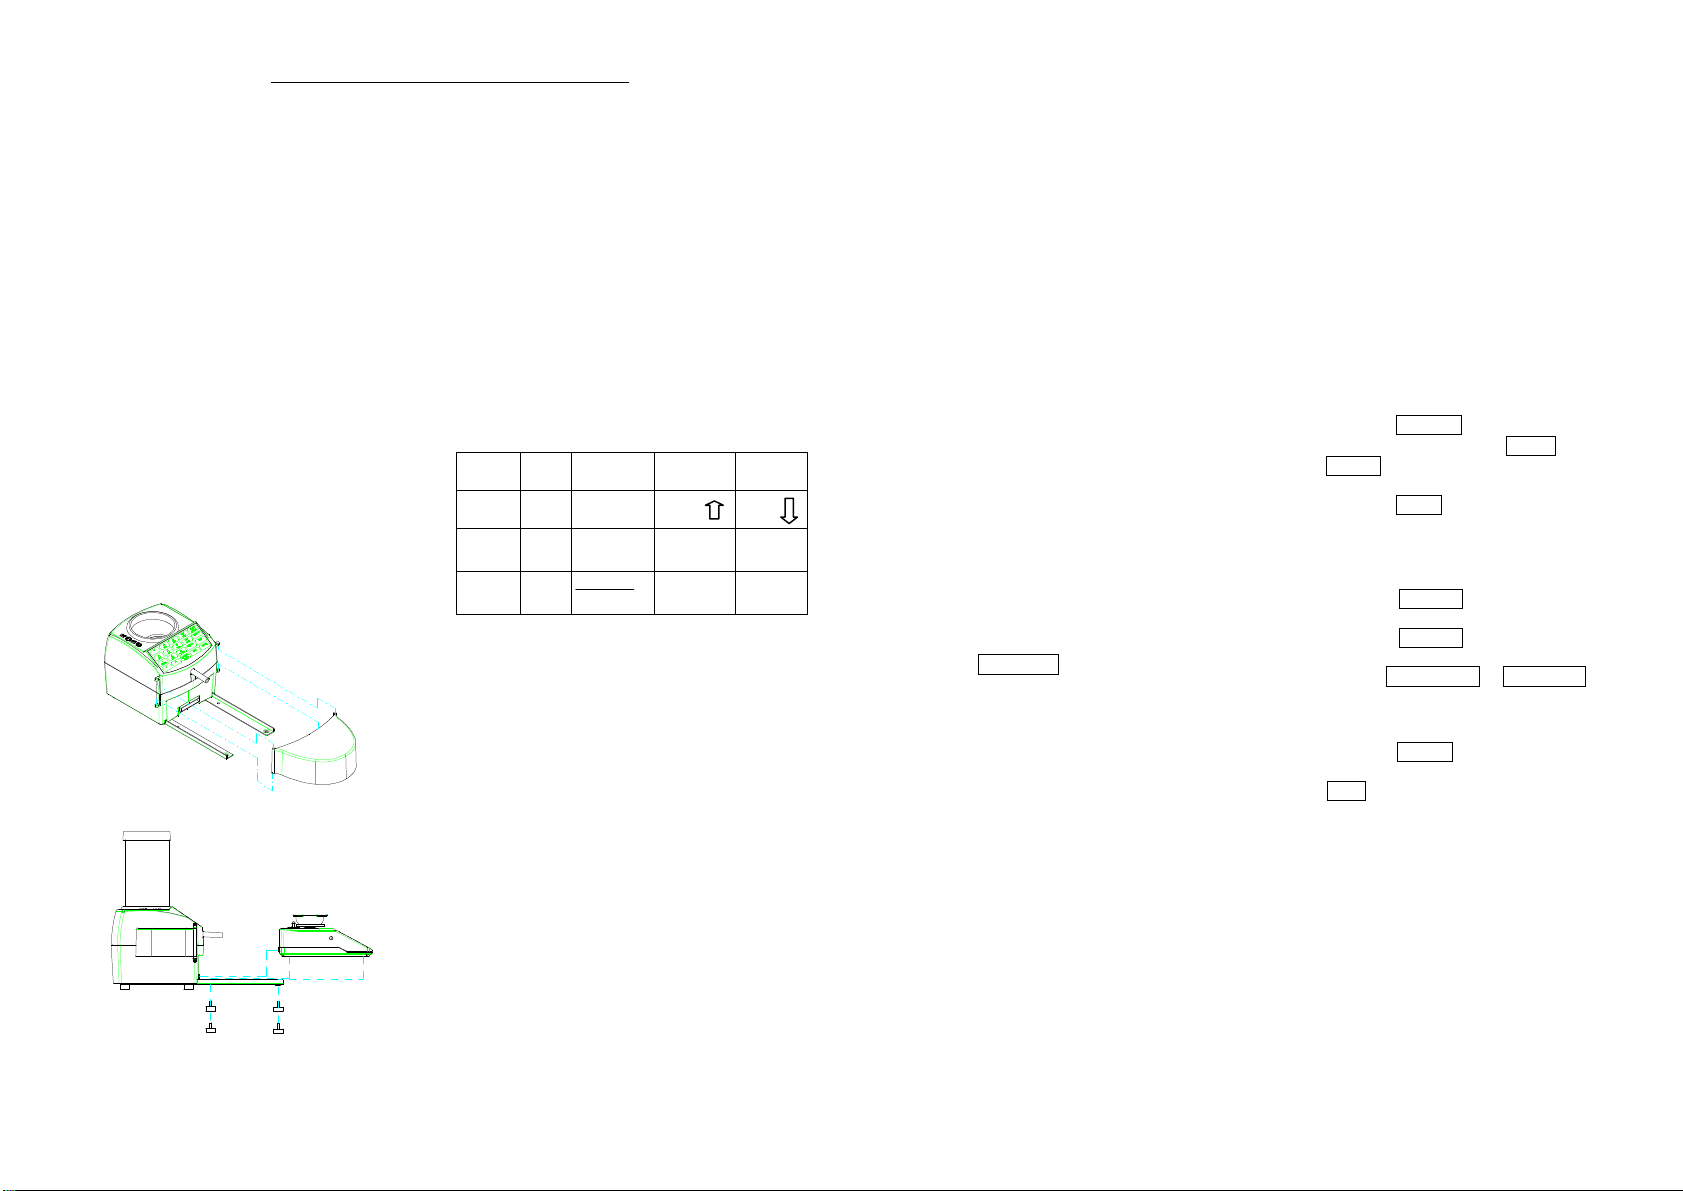
Step 1.To attachthescale to the dispenser,
remove the 4 screws on the bottom of
the scaleand slide the scalealongthe
rails until the two units are plugged in
together. Replace the screws andhand
tighten. DONOTOVER TIGHTEN.
Step 2.The ChargeMaster dispenser comes
equipped with a wind guard. This allows
you to load inconditions that most scales
will not handle.
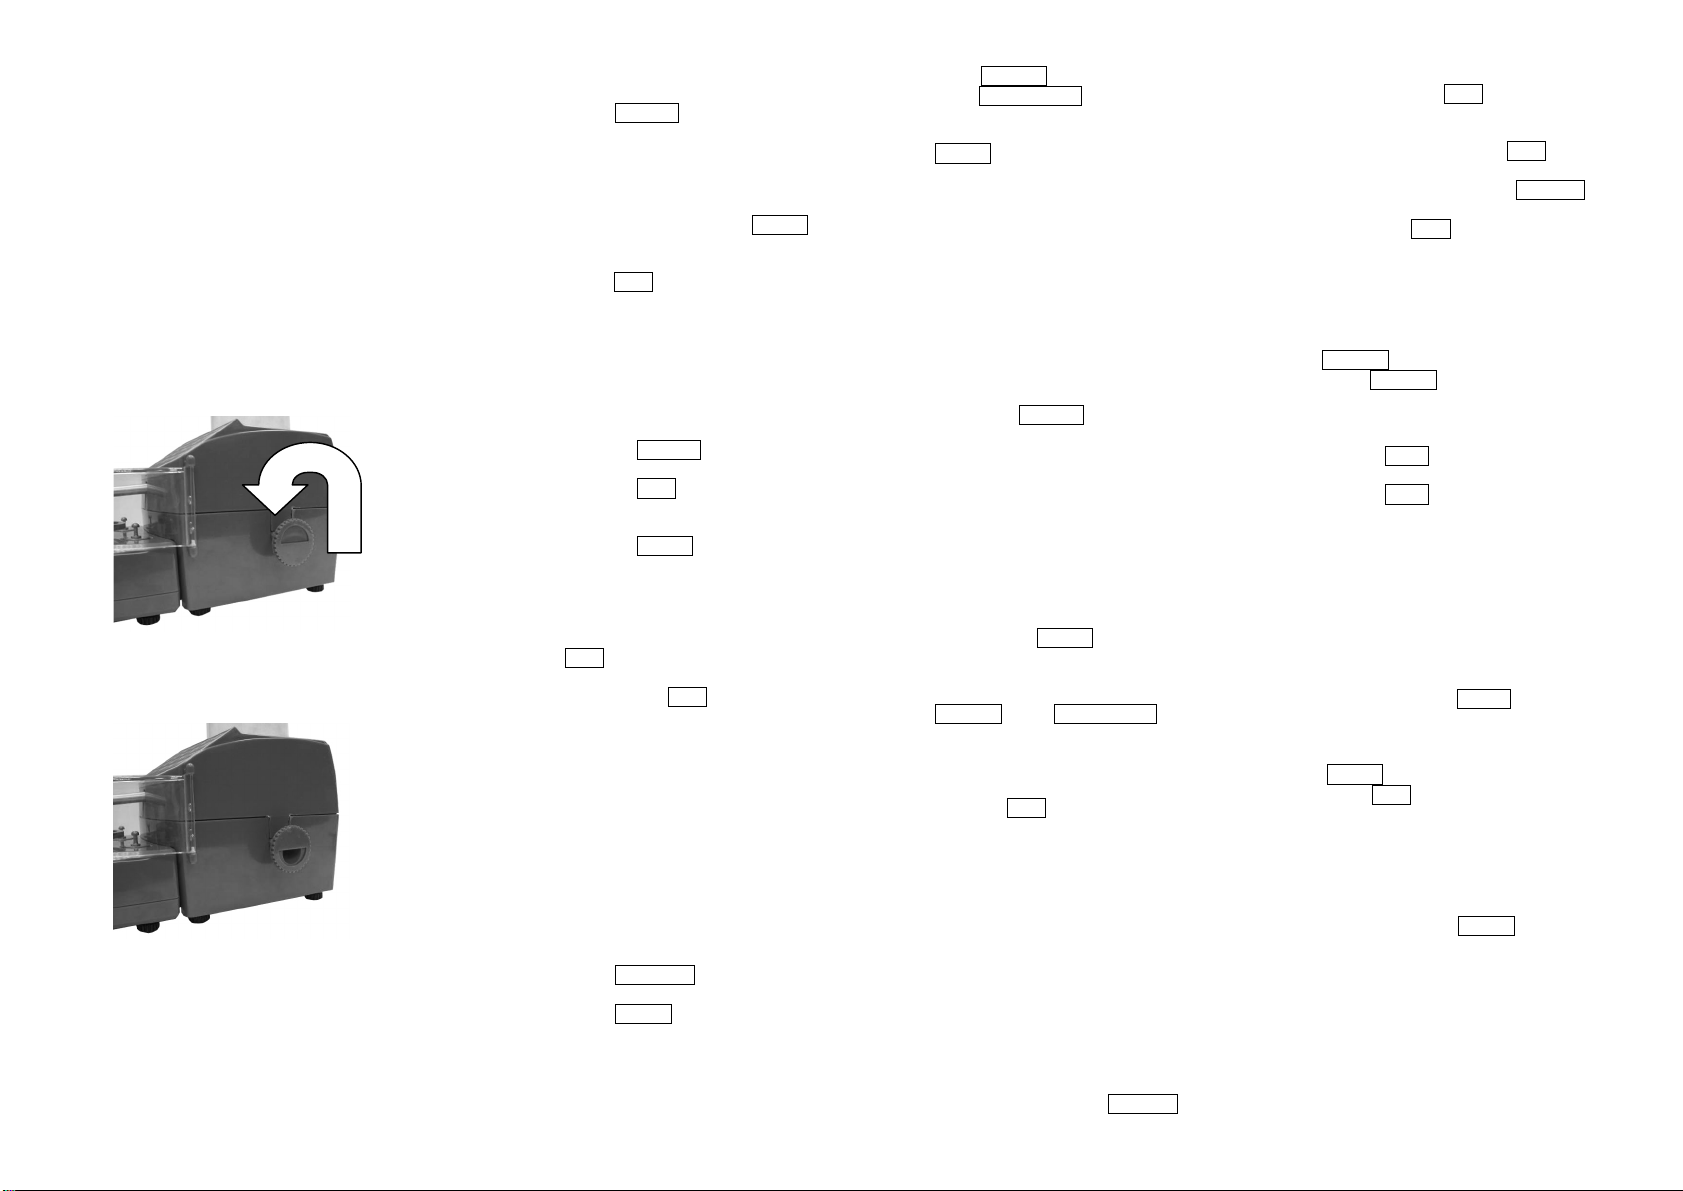
Step 3.The knob onthesideof the dispenser is
the drain. To open the drain turn knob½
turn, twist it to remove the powder left in
the dispenser. It is not agood idea to
allowthe powder to remainin the hopper
for long periods of time.
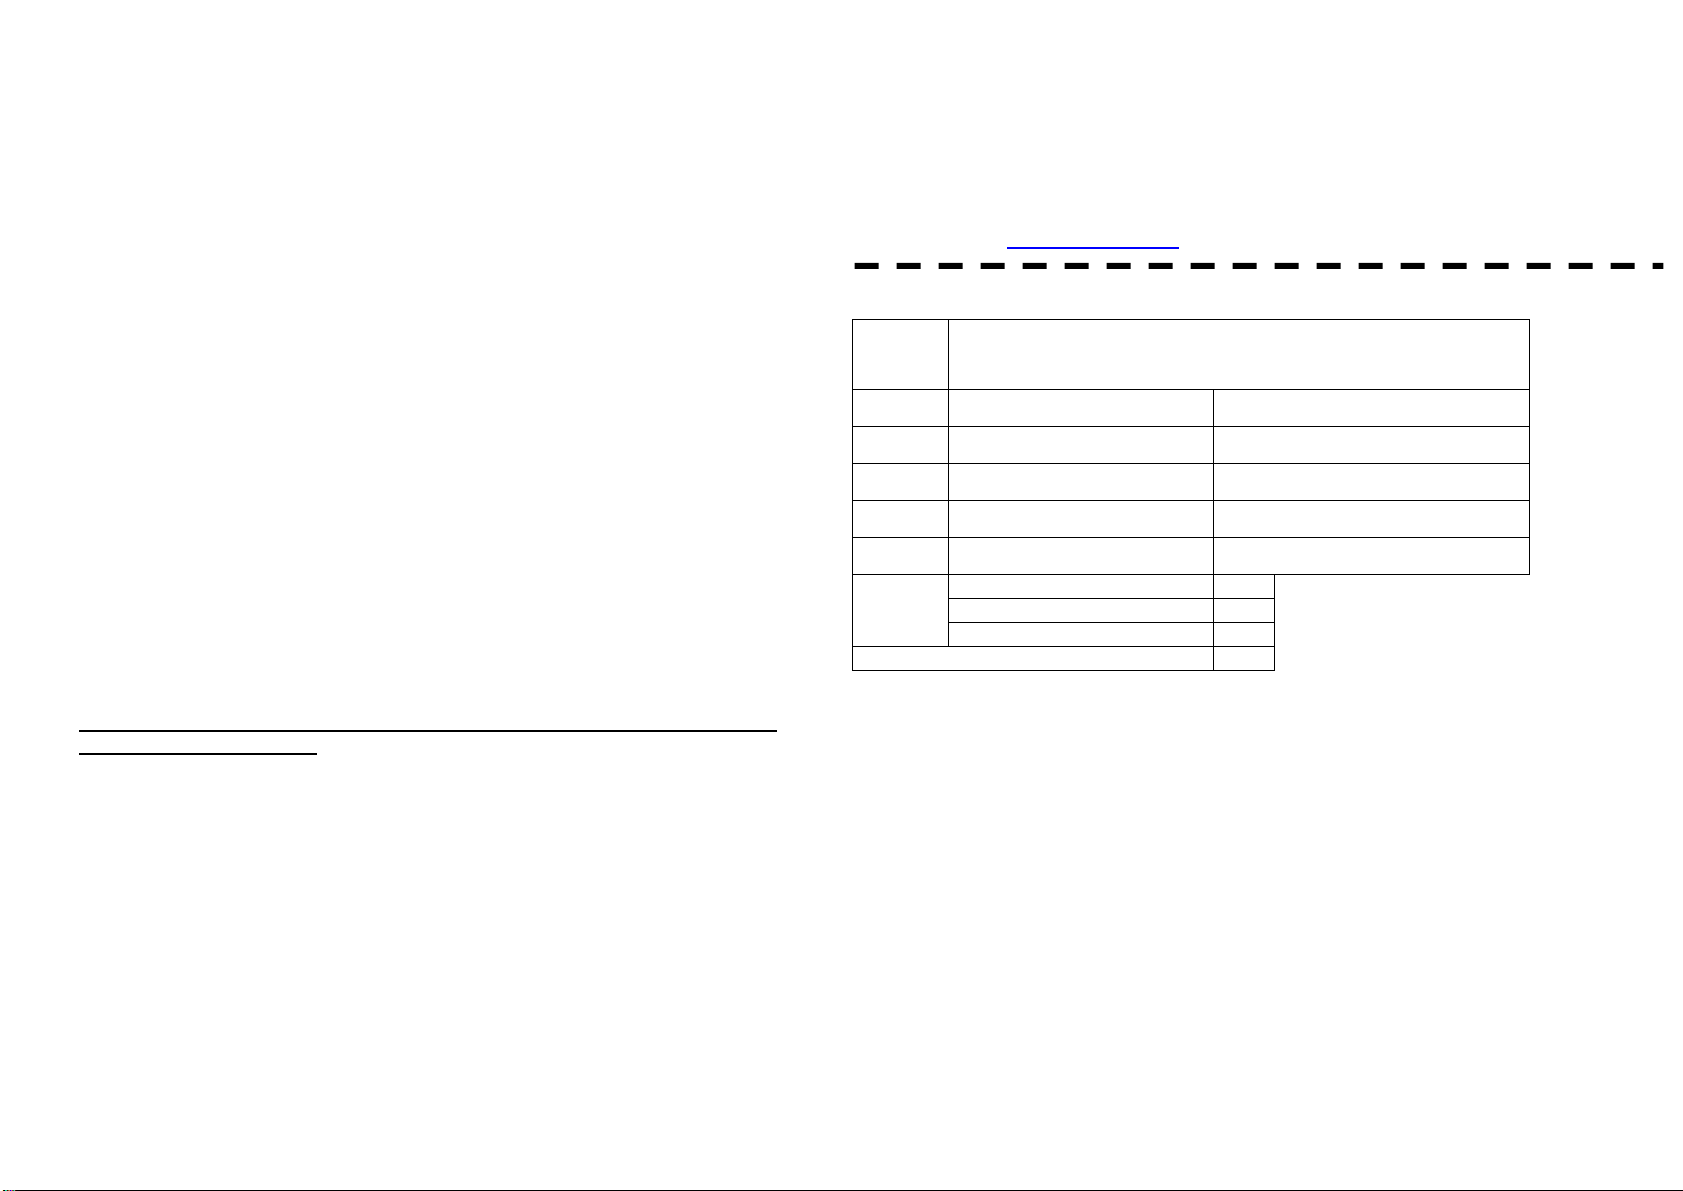
DISPENSER - KEYPAD
FUNCTION DESCRIPTION
1 2
ABC
3
DEF EDIT
MEM BACK
SPACE
4
GHI 5
JKL
6
MNO NEW
MEM TRICKLE
7
PQRS
8
TUV
9
WXYZ RECALL
DISP
.0 CANCEL
STOP MEM ENTER
BACK SPACE: Deletes thelast digit
displayed on the farright sideof the LCD
Display window. Each timeyou push this
key it deletes onemore digit.
TRICKLE ò:Manual operation to dispense
the powder or scrollthrough load data
in memory
DISP: Press key to dispense thepowder
once you have entered agiven charge
ENTER: Confirmyour charge
EDITMEM: Edit theLOADDATA MEMORY
data
NEW MEM ñ:Sets the newmemory data or
scrolls through load data inmemory.
RECALL: Recalls theLOAD DATAMEMORY
data
MEM: This recalls the LOAD DATAMEMORY
data by memory number, 01 through 30.
Press until you get tothecharge you
want to dispense or enter.
CANCEL/STOP: Clears the data or stopthe
operation
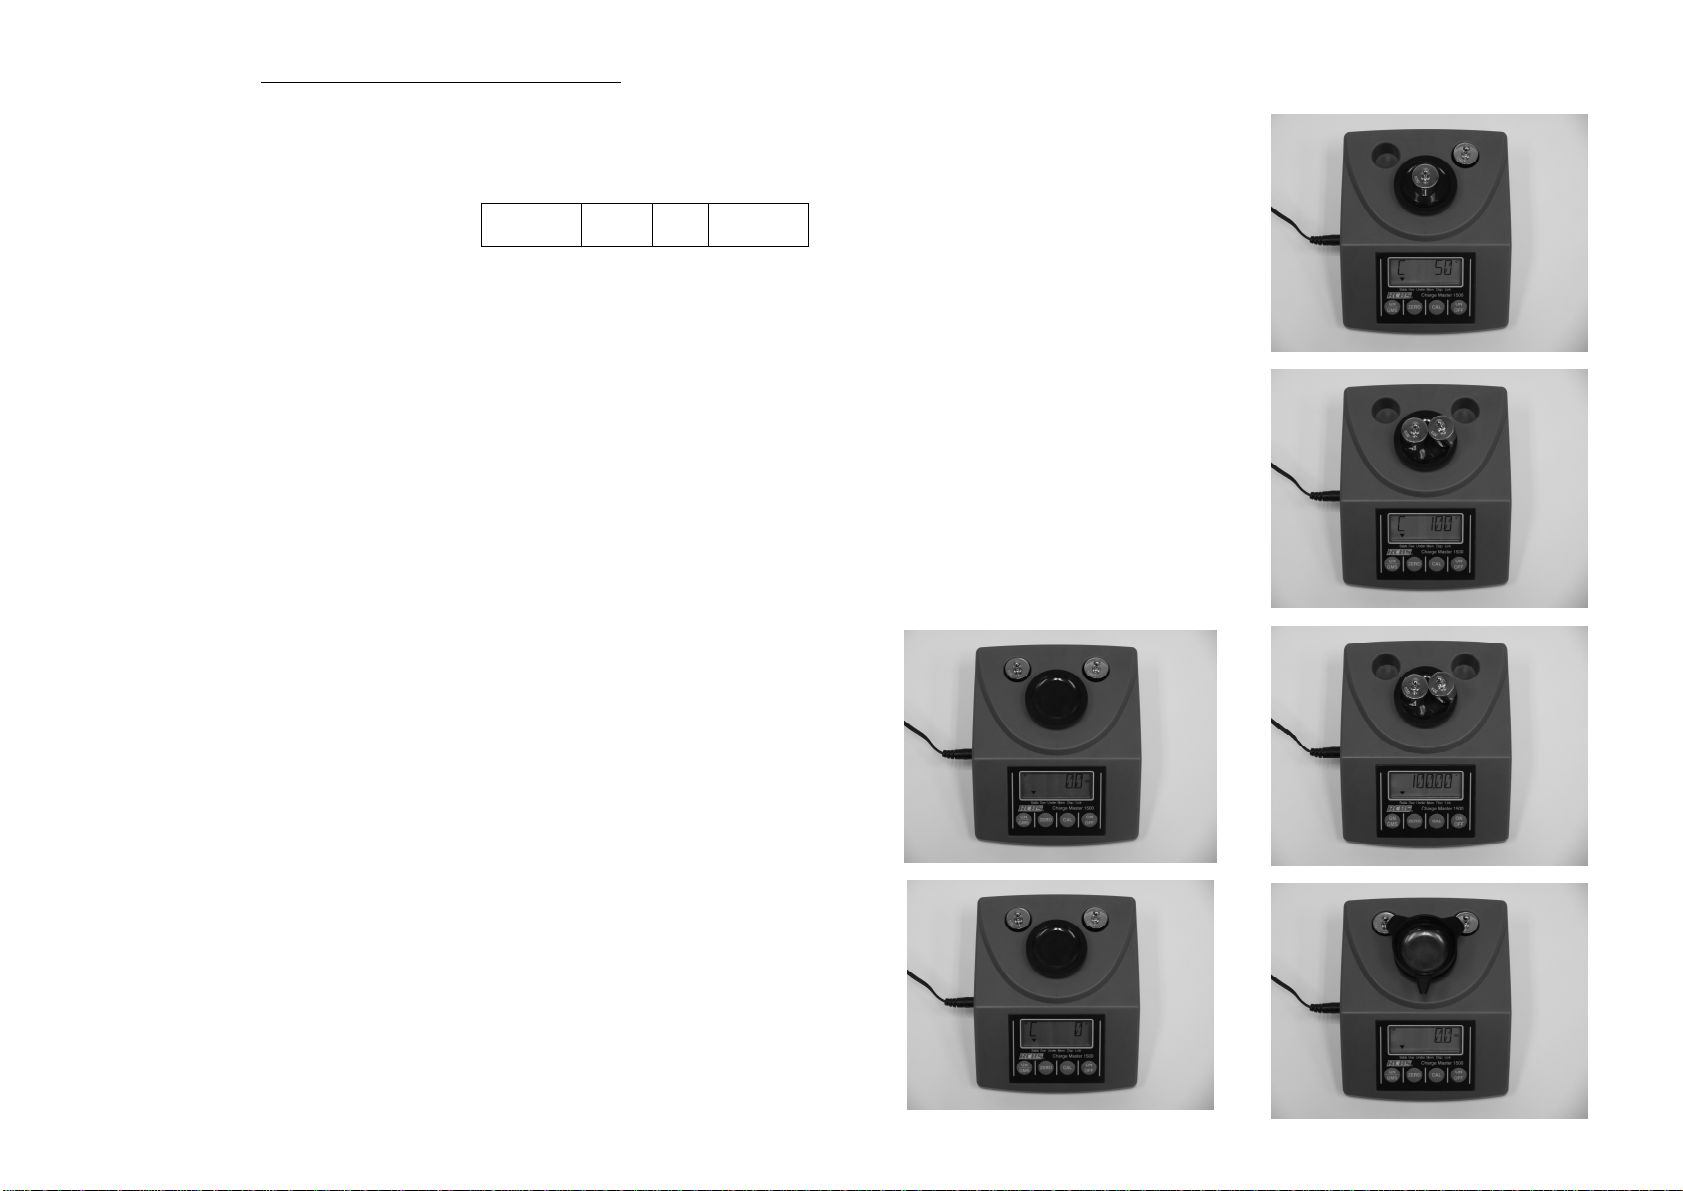
SCALE - DISPLAYPANELDESCRIPTION
StableOver Under Mem Disp Link
Stable: The black arrowindicates the weight is
stable
Over: The black arrowindicates the powder
weight in the pan is higher than the set value
Under: The black arrowindicates the powder
weight in the pan is lower than theset value
Mem: The black arrowindicates the desired
weight as set in theLOADDATA MEMORY
Disp: Theblack arrowindicates powder is
being dispensed from theDispenser to the
Scale
Link: The black arrowindicates that the
dispenser andscale communication link is
established
LOAD DATA MEMORY CONFIGURATION:
Eachmemory has four items of data:
C=_ (Cartridge), this is thename or number of
the cartridge
B_ (Bullet weight), this is the weight of the
bullet used.
P=_ (Powder type), this is forthe nameor
number of the powder
W_(Weight of powder), the charge is entered
here
CONFIGURE NEW LOAD DATA MEMORY
(30 memorystores available)
To exit dispenser and revert back to scale
modepress ZEROKeyon your scale.
Step 1.Press the NEWMEMkey to start the
process
Step 2.The first time you programMEM=0 will
showon the display. (MEM=01, 02, 03 and
so on through MEM=30 will appear on the
screen as each MEM field is used).
Step 3.Press the ENTER key, the display will flash
“CART”and thenshowC=. Keyinthe
cartridge one number/letter at a time. To
select aletter continue to push the
appropriate key until the desired letter
appears. After you select the appropriate
number/letter, you will need towait untilthe
keys stop flashingto proceed tothe next
number/letter. There are 5 spaces
available to enterthe cartridgename.
When you’ve selected the cartridge name
press ENTER.
Step 4.The displaywill flash “B_WT”and shows
“B_”. Key inyour bullet weight and press
ENTER.
Step 5.The displaywill flash “POWD”and shows
P=. Key in the powder name. Remember
that you’llneed toscrollthrough the keys
until you get totheletter you want. Allow
the letter/number to stopblinking before
you proceed to the next letter/number. You
have 5 spaces to enter your powder name.
When you have your powder name on the
display, press ENTER.
Step 6.“WT”will flash and then thedisplay will
show “W_”. Key in the powder charge and
press ENTER.
Step 7.The configuration of this memory is now
complete.
Step 8.Afteryouhave finishedthe current memory,
the display will be ready for the next
memory number to be stored. Youmay
repeat the above steps until you have
entered all your informationup to30
selections.
Note 1: Press the CANCEL key todelete the
data in afield. Press theBACK
SPACEkey to clear theprevious digit.
Note 2: Press the ZEROkey onyour scale at
any timeto exit the dataedit process.
RECALLTHE LOAD DATA MEMORY:
Step 1.Press the RECALLkey, the display will
show “C=_ ”
Step 2.Press the RECALLkey again, the
display shows the first memory setting.
Step 3.Use theNEWMEMñor TRICKLEò
keys to scroll through the stored
memory. When thedisplay shows the
memory that your are looking for,
press the ENTERkey.
Step 4.Afteryou have selectedit, press the
DISPkey, and the powder feed tube
will start todispense the powder.
ChargeMaster 1500 -5- SME300000080 ChargeMaster 1500 -6- SME300000080

QUICK DRAIN FEATURE:
To quickly drain theremaining powder fromyour
dispenser.
Step 1.Placea tray under the drain spout on
the right hand side of your dispenser.
Step 2.Turn thedrain spout ½turn toopen the
spout. Youmay need to tapon the top
of thedispenser to start the powder to
drain.
Step 3.To drain the powder in your dispenser
tube pushthe dispense button andthe
powder will dispense into the powder
pan.
Step 4.Use thesmallbrush provided to clean
all of the powder revisor.
Step 5.When finished be sure to closethe
drain spout.
RECALLTHE LOAD DATA MEMORY WITH
CARTRIDGE NAME:
Step 6.Press the RECALLkey, the display
will show “C=_ ”
Step 7.Key in the cartridge name. (e.g., 7
Mag). Youmay use the NEWMEM
(up arrow) or TRICKLE (down arrow)
to scroll through the stored cartridges.
Step 8.Toselect the cartridge press ENTER.
Step 9.Make sure that the data stored is for
this cartridge. If it is correct, then
press the DISPkey to start
dispensingthe powder.
Note: If the cartridge names are repeated,
this functionwill automatically recall the
cartridge namethat is first in the memory.
RECALLTHE AMMUNITION WITH THE
MEMORY NUMBER:
Step 1.Press the RECALLkey, and the
display will read “C=_ ”
Step 2.Press the MEMkey.
Step 3.Key in the memory number
required (e.g. , MEM=12)
Step 4.Press the ENTERkey, and the
display shows thememory data
in a loop. Note: Press ENTER
key torepeat dataloop.
Step 5.Make sure that the data stored is
what you require, and press the
DISPkey todispense the powder.
Note: If the wrong memory number is
selected, usethe MEMkey to enter
the correct number required.
EDITTHE LOAD DATA MEMORY DATA:
Step 1.Use thesteps on RECALLTHE
LOAD DATAMEMORY to select the
memory settingyou’d like to modify.
You can recall the setting you’d like
to modify 3 different ways.
a. 1: UsetheRecallkeyto
recall the memory setting
b. 2: Key in the cartridge name
c. 3: Key in the memory
number
Step 2.Press the EDITMEMkey to re-edit
the data.
Step 3.Press the ENTERkey to display the
data in aloop. (Cartridge
name=>Bullet weight=>Powder
name=>Weight)
Note: Press the CANCELkey to delete the
data. Press the BACK SPACEkey to clear the
previous digit.
Step 4.Aftereditingthe newdata, press the
ENTERkey to stepon tothenext
memory location.
CLEAR THE LOAD DATA MEMORY:
Step 1.Use thesteps on RECALLLOAD
DATAMEMORY to select the
memory tobe deleted. There are 3
ways to select thedata from
memory
1: UsetheRecallkeyto recall
the memory setting
2: Key in the cartridge name
3: Key in the memory number
Step 2. Hold the CANCEL key for 2seconds
toclear the data. Then the display
will showthe next memory setting.
Note: When the memory is cleared, thestore
remains empty until newdata is entered.
DISPENSING MODE:
Step 1.There are two ways to set the
dispensedweight value:
Step 2.Use the numberkeys on the
dispenser to key inthe desired weight,
and press the ENTERkey toconfirm
the charge. The decimalpoint must be
used toenter charges usingtenth
grain increments. (e.g, 45.5) Use the
CANCELkey or BACK SPACEkey to
modify the charge.
Step 3.You can use theRECALLButton to
pull up charges that you’ve put into the
LOAD DATAMEMORY.
Step 4.Press the DISPkey tostart the
dispensingprocess.
Step 5.Afterthe dispenser has finished
dispensingthe charge, press the DISP
key again to dispensethe sameweight
again. Continue this process as long
as you do not want tochange the
powder charge.
Step 6.If you needto change the weight, key
in the newweight as in Step #1and
press DISP.
Step 7.If you aredispensing powder and wish
to exit dispensing mode, press the
CANCELkey. Press the ZEROkey to
go back toScalemode.
Step 8.To change thedispensed weight value
in dispensing mode, the TRICKLEkey
maybe usedtofine-tunethe exact
value and press MEMkey to
memorize thenewdispensing weight.
For example, 10.0GN is the first
dispensingweight, press DISPkey to
start thedispensing process. Afterthe
dispensingprocess, press TRICKLE
key tokeep dispensing till12.5GN.
Then press MEMkey to memorizethe
last dispensing weight –12.5GN.
Note: This feature can beused in working up
newcharge loads.
MANUALLYDISPENSING OPERATION WITH
TRICKLE KEY:
Press the TRICKLEkeyto dispense the powder
slowly. Release TRICKLEkeyto stop dispensing.
DISABLE/ENABLE AUDIBLE TONE (BEEPS):
Press and hold the ZEROkeyuntil the display
shows “BEEPOF”.The tones are nowturned off.
Press and hold the ZEROkeyuntil the display
shows “BEEPON”to turn tones back on.
AUTOMATIC DISPENSE MODE:
The improved ChargeMaster combo has been
outfitted with anAuto-Dispense feature. This allows
powder charges to automatically dispense fromthe
unit once an empty scale pan is placed ontothe unit.
Step 1. Press and hold the ENTERkeyon the
Dispenser until the displayshows
“AUTO”
Step2. Enter the desired charge andpress
ENTER
Step3. Press DISPto dispensethe first
charge
Step4. Return the empty scale pan ontothe
scaleplaten.When the display shows
“00.0”the Dispenser will automatically
dispensethe charge.
Step5. To return to the normal operating mode.
Press and hold the ENTERkey on the
Dispenser until the display shows
“MANUAL”
Drain spout on theright handside
of your dispenser
Turn thedrain spout ½turn toopen
the spout
ChargeMaster 1500 -7- SME300000080
ChargeMaster 1500 -8- SME300000080

LIMITED WARRANTY
Congratulations on the purchase of your new RCBS Electronic Powder
Handling Equipment. Your newElectronic Equipment is warrantedto be free
fromdefects in material or workmanship for a period of two (2) years fromthe
date ofpurchase. This warrantyis extended onlytothe original consumer
purchaser. Should youbelievethatyour Electronic Equipment is defective in
material or workmanship, you must return it toAmmunitionAccessories Inc.
through its RCBS Operation, postage paid for evaluation. Ifdefective, the
product will be repairedor replaced at RCBS Operation option, atno charge.
Send a checkin the amount often dollars, U.S. payable to RCBS Operation for
return shipping and handling, alongwith the Unit to:
RCBS Operation, 605 Oro DamBlvd., Oroville CA. 95965-4650.
Please complete the attached warrantyregistration card and mail this card
to us at the above address within 30 days of purchase. Failure to send
this cardwill not adversely affect your warrantyrights if you can
otherwise showin a reasonable waythedate the product was purchased
( e.g. your dated purchase receipt). Sending this card isone convenient
wayto establish in our files the dateof purchase and will provide us with
marketing information which should allowus to better meet your needs in
the future.
THIS WARRANTY DOES NOTCOVER DEFECTS OR DAMAGE RESULTING
FROM: CARELESSNESS, MISUSE, IMPROPERINSTALLATION,
MODIFICATION, OR IF YOUR SCALE HAS BEEN ALTERED OR REPAIRED
BY ANYONE OTHER THATFACTORY PERSONNEL.
WARRANTY SERVICES CANNOTBE PROVIDED WITHOUTMEETING THE
ABOVE REQUIREMENTS. Please retain this warrantycertificatefor future
reference.
THE IMPLIED WARRANTIES OF MERCHANTABILITYAND FITNESS FOR A
PARTICULARPURPOSE ARE LIMITED TO THE DURATION OF THIS
LIMITED WARRANTY. RCBS OPERATION IS NOTLIABLE FOR DAMAGES
IN EXCESS OF THE PURCHASE PRICE OF THE PRODUCTAND UNDER
NO CIRCUMSTANCES SHALL RCBS OPERATIONSBE LIABLE FOR
CONSEQUENTIAL OR INCIDENTAL DAMAGES. HOWEVER, SOME
STATES DO NOTALLOW LIMITATIONS ON INCIDENTAL, OR
CONSEQUENTIAL DAMAGES, SO THE ABOVE LIMITATION OR
EXCLUSION MAY NOTAPPLYTO YOU.
The above warrantyprovides the sole and exclusive warrantyavailableto the
customer in the event ofa defect in material or workmanship in the Scale.This
warrantygives you specific legal rights, and you mayalso have other rightswhich
varyfromState to State.
RCBS Operation, 605 Oro DamBlvd., Oroville, CA.95965-4650
Customer Service PhoneNumber: 1 (800) 533 5000, Fax Number: (530) 533 1647
Email Address: rcbs.tech@atk.com
DETACH AND PLACEIN ENVELOPE
Complete all sections
Mail to:
RCBS Operation
605 Oro DamBlvd.
Oroville, CA95965-4650
1.
Where Purchased
2.
Name: Mr/Ms
3.
StreetAddress
4.
Product Purchased:
5.
Date Purchased:
Choose:
ChargeMaster Dispenser
ChargeMaster Scale
RangeMaster Scale
Copy of Register Receipt Enclosed
ChargeMaster 1500 -9- SME300000080 ChargeMaster 1500 -10- SME300000080
This manual suits for next models
1
Table of contents
Other RCBS Scale manuals

RCBS
RCBS CHARGEMASTER LITE Instruction sheet

RCBS
RCBS 1500 GN User manual

RCBS
RCBS Partner-Electronic Instruction sheet

RCBS
RCBS RangeMaster 750 Instruction sheet

RCBS
RCBS RangeMaster 2000 Instruction sheet

RCBS
RCBS RC-130 Instruction sheet

RCBS
RCBS M500 Instruction sheet

RCBS
RCBS M1000 User manual

RCBS
RCBS Powder Pro Instruction sheet
Popular Scale manuals by other brands

Burg Wächter
Burg Wächter TARA PS 7610 Operation instructions

TREVIDEA
TREVIDEA Girmi Real Fit BP75 user manual

Health O Meter
Health O Meter Professional 498KL User instructions

Adam Equipment
Adam Equipment HIGHLAND HCB123 manual

CTC Union
CTC Union Clatronic PW 3050 instruction manual

Fitbit Zip
Fitbit Zip FB203WT user manual