RCF CT61 User manual

the rules of sound
CT61
User manual
Manuale d’uso
6 POSITION SELECTOR TO BE MATCHED
TO THE TL 128 LINE TRANSFORMER (or equivalent)
IN ORDER TO GET A (MAX.) 120 W VOLUME CONTROL.
COMMUTATORE A 6 POSIZIONI DA ABBINARE
AL TRASFORMATORE DI LINEA RCF TL128
(o equivalente) PER OTTENERE UN ATTENUATORE
CON POTENZA MAX. 120 W.

2
ITALIANO
INDICE ITALIANO
Avvertenze per la sicurezza pag. 2
Descrizione pag. 4
Collegamenti pag. 4
Installazione pag. 9
Dati tecnici pag. 10
ENGLISH INDEX
Safety precautions page 11
Description page 13
Connections page 13
Installation page 18
Specifications page 19
Prima di collegare ed utilizzare questo prodotto, leggere attentamente le istruzioni contenute in
questo manuale, il quale è da conservare per riferimenti futuri. Il presente manuale costituisce parte
integrante del
prodotto e deve accompagnare quest’ultimo anche nei passaggi di proprietà, per permettere al
nuovo
proprietario di conoscere le modalità d’installazione e d’utilizzo e le avvertenze per la sicurezza.
L’installazione e l’utilizzo errati del prodotto esimono la RCF S.p.A. da ogni responsabilità.
ITALIANO
ATTENZIONE: Per prevenire i rischi di fiamme o scosse elettriche, non esporre le parti che
compongono il commutatore alla pioggia o all’umidità.
AVVERTENZE PER LA SICUREZZA
1. Tutte le avvertenze, in particolare quelle relative alla sicurezza, devono essere lette con
particolare attenzione, in quanto contengono importanti informazioni.
2. La linea diffusori (uscita dell’amplificatore) può avere una tensione sufficientemente alta (es. 100 V)
da costituire un rischio di folgorazione per le persone: non procedere mai all’installazione o alla
connessione del commutatore quando la linea diffusori è in tensione.
3. Assicurarsi che tutte le connessioni siano corrette, verificando che la tensione della linea sia
compatibile con le caratteristiche del commutatore.
4. Accertarsi che le linee diffusori non possano essere calpestate o schiacciata da oggetti, al fine
di salvaguardarne la perfetta integrità.
5. Impedire che oggetti o liquidi entrino nelle parti che compongono il commutatore, perché
potrebbero causare un corto circuito.
IMPORTANTE

3
ITALIANO
6. Non eseguire sul prodotto interventi / modifiche / riparazioni.
Contattare i centri di assistenza autorizzati o personale altamente qualificato quando:
il commutatore non funziona (o funziona in modo anomalo);
oggetti o liquidi sono entrati nel commutatore;
il commutatore non è più integro (a causa di urti / incendio).
7. Nel caso che dalle parti che compongono il commutatore provengano odori anomali o fumo,
togliere immediatamente la tensione alla linea diffusori.
8. Non collegare al commutatore apparecchi ed accessori non previsti.
Verificare l’idoneità del supporto (parete, struttura, ecc.) e dei componenti utilizzati per il
fissaggio (non forniti da RCF) che devono garantire la sicurezza dell’impianto / installazione
nel tempo, anche considerando, ad esempio, vibrazioni meccaniche normalmente generate
da un trasduttore.
9. La RCF S.p.A. raccomanda vivamente che l’installazione di questo prodotto sia eseguita
solamente da installatori professionali qualificati (oppure da ditte specializzate) in grado di
farla correttamente e certificarla in accordo con le normative vigenti.
Tutto il sistema audio dovrà essere in conformità con le norme e le leggi vigenti in materia
di impianti elettrici.
10. Vi sono numerosi fattori meccanici ed elettrici da considerare quando si installa un sistema
audio professionale (oltre a quelli prettamente acustici, come la pressione sonora, gli angoli di
copertura, la risposta in frequenza, ecc.).
11. Perdita dell’udito
L’esposizione ad elevati livelli sonori può provocare la perdita permanente dell’udito. Il livello di
pressione acustica pericolosa per l’udito varia sensibilmente da persona a persona e dipende
dalla durata dell’esposizione. Per evitare un’esposizione potenzialmente pericolosa ad elevati
livelli di pressione acustica, è necessario che chiunque sia sottoposto a tali livelli utilizzi delle
adeguate protezioni; quando si fa funzionare un trasduttore in grado di produrre elevati livelli
sonori è necessario indossare dei tappi per orecchie o delle cuffie protettive.
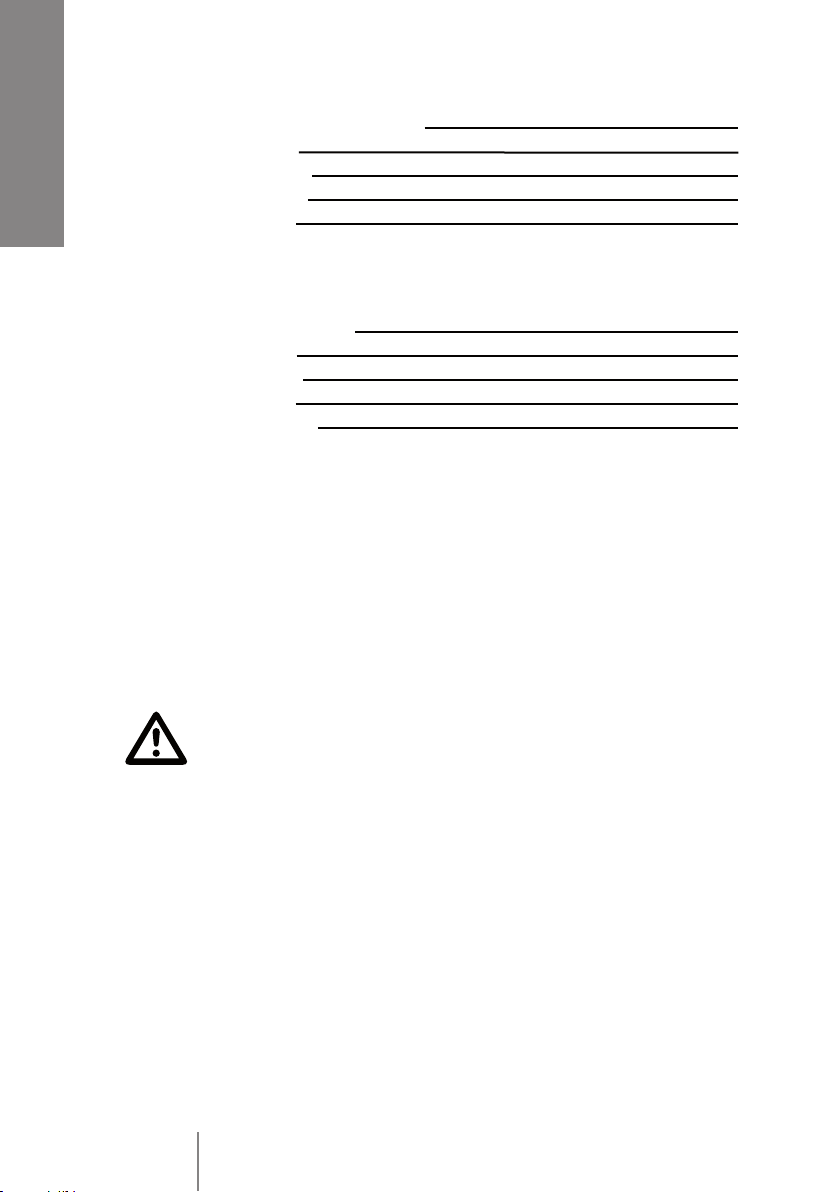
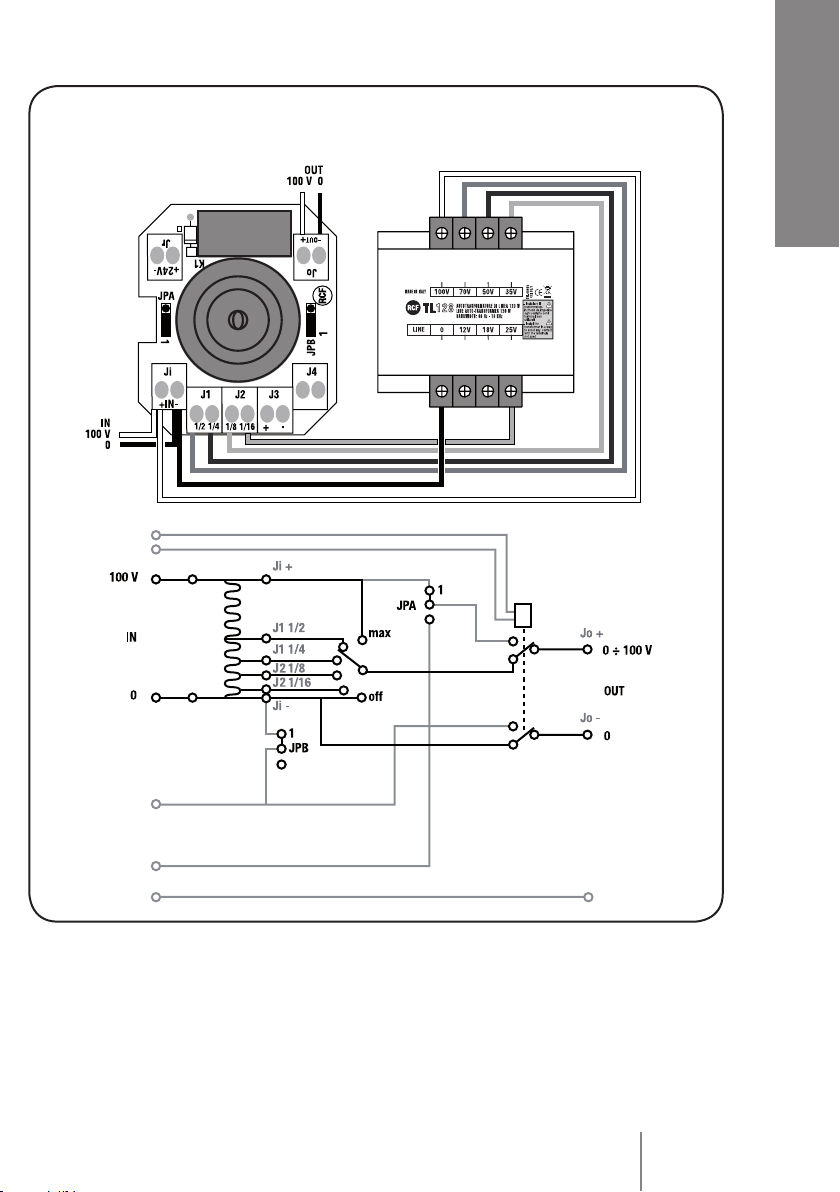
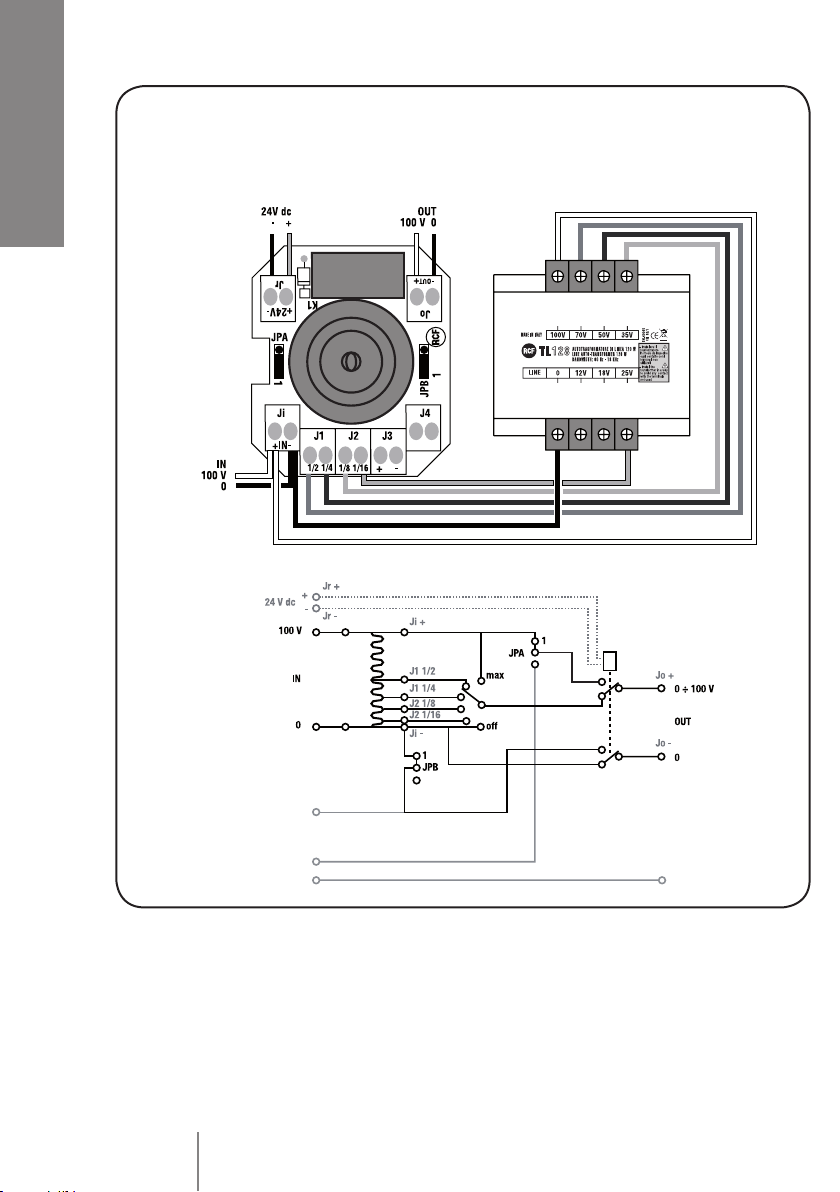
12. Tutti i commutatori devono essere collegati in fase (corrispondenza delle polarità +/- ).
13. Per evitare che fenomeni induttivi diano luogo a ronzii, disturbi e compromettano il buon
funzionamento dell’impianto, le linee diffusori non devono essere canalizzate insieme ai
conduttori dell’energia elettrica, ai cavi microfonici, alle linee di segnale a basso livello che
fanno capo ad amplificatori.
14. I cavi per il collegamento del commutatore dovranno avere conduttori di sezione adeguata
(possibilmente intrecciati, per minimizzare gli effetti induttivi dovuti all’accoppiamento con
campi elettro-magnetici circostanti) ed un isolamento idoneo.
PRECAUZIONI D’USO
Collocare il commutatore lontano da fonti di calore.
Non sovraccaricare il commutatore.
Non usare solventi, alcool, benzina o altre sostanze volatili per la pulitura delle parti esterne.
•
•
•
•
•
•

4
ITALIANO
DESCRIZIONE
Il commutatore CT 61 a 6 posizioni (5 + off) abbinato ad un trasformatore di
linea (non incluso) RCF TL 128 (o equivalente) funge da attenuatore di volume
per un gruppo di diffusori acustici (in un sistema a tensione costante 100 V)
aventi trasformatori di linea ed una potenza complessiva non superiore a
120 W.
È dotato di relè (attivabile tramite un comando 24 V c.c.) per effettuare annunci
con volume forzatamente al massimo oppure per inserire una seconda linea
100 V (non soggetta al controllo di volume), ma è anche configurabile per
operare con linee a 3 fili (per ottenere il volume massimo all’uscita senza
utilizzare il relè 24 V c.c. interno).
Il commutatore CT 61 può essere installato su qualunque telaio portafrutti
(per impianti elettrici civili) semplicemente forando un falso polo ed avvitando
il modulo; il trasformatore TL 128 dovrà essere posizionato separatamente
(es. dentro un’altra scatola). Sono fornite a corredo 3 manopole, ciascuna di
colore diverso: bianco, argento, antracite.
COLLEGAMENTI
ATTENZIONE: si raccomanda di rivolgersi a personale qualificato ed
addestrato, ossia personale avente conoscenze tecniche o esperienza o
istruzioni specifiche sufficienti per permettergli di realizzare correttamente le
connessioni e prevenire i pericoli dell’elettricità.
Per evitare il rischio di shock elettrici, non effettuare i collegamenti con
l’amplificatore acceso.
Prima accendere il sistema è buona norma ricontrollare tutte le connessioni,
verificando attentamente che non vi siano dei cortocircuiti accidentali.
Tutto l’impianto di sonorizzazione dovrà essere realizzato in conformità con le
norme e le leggi vigenti in materia di impianti elettrici.
RCF S.p.A. Vi ringrazia per l’acquisto di questo prodotto, realizzato
in modo da garantirne l’affidabilità e prestazioni elevate.
120W
120W
CT 61
TL128
TL128
CT 61

5
ITALIANO
Esempio nr. 1: collegamento base con 2 fili
• un ingresso audio (100 V)
Il segnale d’ingresso 100V (IN) è collegato direttamente ai morsetti Ji+ , Ji- (0,
comune) ed al trasformatore (100 V, 0), le cui uscite con tensioni intermedie
70V, 50V, 35V e 25V sono rispettivamente connesse ai morsetti J1 1/2, J1 1/4,
J2 1/8, J2 1/16.
Il livello dell’uscita (OUT: morsetti Jo+ e Jo-) è selezionato tramite il
commutatore a 6 posizioni (5 + off). La posizione dei jumper JPA e JPB è
ininfluente (si possono lasciare nella posizione 1-2).

6
ITALIANO
Il segnale d’ingresso 100 V (IN) è collegato direttamente ai morsetti Ji+ , Ji- (0,
comune) ed al trasformatore (100 V, 0), le cui uscite con tensioni intermedie
sono connesse ai morsetti J1 1/2, J1 1/4, J2 1/8, J2 1/16.
Il livello dell’uscita (OUT: morsetti Jo+ e Jo-) è selezionato tramite il
commutatore a 6 posizioni (5 + off). In caso di necessità, il livello dell’uscita è
forzatamente ripristinato al massimo (saltando di fatto il commutatore) tramite
un comando esterno con tensione 24 V c.c..
Entrambi i jumper JPA e JPB devono essere posti nella posizione 1-2.
Esempio nr.2: collegamento con comando per annunci (linea con 4 fili)
un ingresso audio (100 V)
un comando a 24 V c.c.
•
•

7
ITALIANO
Il segnale d’ingresso 100 V (IN A) è collegato direttamente ai morsetti Ji+, Ji-
(0, comune) ed al trasformatore (100V, 0), le cui uscite con tensioni intermedie
70V, 50V, 35V e 25V sono rispettivamente connesse ai morsetti J1 1/2, J1 1/4,
J2 1/8, J2 1/16. Il livello dell’uscita (OUT: morsetti Jo+ e Jo-) è selezionato
tramite il commutatore a 6 posizioni (5 + off). In caso di necessità, all’uscita è
forzatamente inviato il secondo segnale d’ingresso 100V (IN B) per annunci
tramite un comando esterno con tensione 24 V c.c..
Entrambi i jumper JPA e JPB devono essere posti nella posizione 2-3.
Esempio nr.3: collegamento con comando e linea audio per annunci (linea con 6 fili)
un ingresso audio “IN A” principale (100 V)
un secondo ingresso audio “IN B” per annunci (100 V)
un comando a 24 V c.c.
•
•
•

8
ITALIANO
Esempio nr.4:
collegamento con linea a 3 fili
• un ingresso audio (100 V)
con 3° filo (scambio 0 – 100 V)
100 V
100 V
0
Vdc
0 / 100 V
0

9
ITALIANO
La linea del segnale d’ingresso 100V presenta 3 fili:
1. 100 V;
2. 0;
3. commutazione 0 (funzionamento normale) / 100 V (annunci).
Il primo (100 V) ed il terzo filo (commutazione 0 / 100 V) sono collegati
direttamente rispettivamente ai morsetti Ji+, Ji- (0, comune) ed al trasformatore
(100 V, 0), le cui uscite con tensioni intermedie 70V, 50V, 35V e 25V sono
rispettivamente connesse ai morsetti J1 1/2, J1 1/4, J2 1/8, J2 1/16; il secondo
filo (0) è riportato direttamente all’uscita (morsetto J4).
Il livello dell’uscita (OUT: morsetti Jo+ e J4) è selezionato tramite il commutatore
a 6 posizioni (5 + off).
In caso di necessità, il livello dell’uscita è forzatamente ripristinato al massimo
portando la tensione del 3°filo da 0 a 100 V (ad esempio, tramite un relè).
La posizione dei jumper JPA e JPB è ininfluente (si possono lasciare nella
posizione 1-2).
INSTALLAZIONE
Utilizzare come supporto un falso-polo da
un modulo per comuni scatole “portafrutti”
usate negli impianti elettrici.
Rimuovere le eventuali nervature centrali
utilizzando delle tenaglie.
Forare il falso-polo al centro utilizzando un
trapano. Diametro del foro: 12 mm .
Montare i falsi-poli nel telaio portafrutti;
quello forato va posto al centro.
Avvitare il distanziatore nel commutatore.
A
B
C
D
E

10
ITALIANO
Dopo aver effettuato tutti i
collegamenti elettrici, porre il
commutatore CT61 all’interno
della scatola
(nota: il trasformatore TL 128
andrà posto in un’altra sede).
DATI TECNICI
Max. tensione ingresso / uscita 100 V
Max. potenza applicabile 120 W (abbinato al trasformatore RCF TL 128)
Dimensioni commutatore 43 mm (l), 50 mm (h), 68 mm (p)
(senza manopola)
Peso commutatore ca. 40 g
Inserire l’albero del
commutatore nel foro dal
retro del falso-polo e fissare il
telaio portafrutti.
Avvitare la vite per fissare il
commutatore al falso-polo.
Applicare una delle 3
manopole disponibili.
G
H
I
F

11
ENGLISH
ENGLISH INDEX
Safety precautions page 11
Description page 13
Connections page 13
Installation page 18
Specifications page 19
Before connecting and using this product, please read this instruction manual carefully and keep
it on hand for future reference. The manual is to be considered an integral part of this product and
must accompany it when it changes ownership as a reference for correct installation and use as well
as for the safety precautions.
RCF S.p.A. will not assume any responsibility for the incorrect installation and / or use of this
product.
WARNING: To prevent the risk of fire or electric shock, never expose this selector to rain or
humidity.
SAFETY PRECAUTIONS
1. All the precautions, in particular the safety ones, must be read with special attention, as they
provide important information.
2. Loudspeaker lines (from amplifier outputs) can have a sufficiently high voltage (i.e. 100 V) to
involve a risk of electrocution: never install or connect this selector when the line is alive.
3. Make sure all connections have been made correctly, verifying that the line voltage matches
the selector specifications.
4. Protect loudspeaker lines from damage; make sure they are positioned in a way that they
cannot be stepped on or crushed by objects.
5. Make sure that no objects or liquids can get into this selector, as this may cause a short
circuit.
6. Never attempt to carry out any operations, modifications or repairs.
Contact your authorized service centre or qualified personnel should any of the following occur:
The selector does not function (or works in an anomalous way).
Objects or liquids have got into the selector.
The selector has been damaged (due to heavy impacts or fire).
•
•
•
IMPORTANT
NOTES

12
ENGLISH
7. Should any part of the selector emit any strange odours or smoke, remove it from the line after
having immediately switched the amplifier off.
8. Do not connect this product to any equipment or accessories not foreseen.
Check the suitability of the support surface (wall, structure, etc., which the product is anchored
to) and the components used for attachment (not supplied by RCF) that must guarantee the
security of the system / installation over time, also considering, for example, the mechanical
vibrations normally generated by transducers.
9. RCF S.p.A. strongly recommends this product is only installed by professional qualified
installers (or specialised firms), who can ensure a correct installation and certify it according
to the regulations in force.
The entire audio system must comply with the current standards and regulations regarding
electrical systems.
10. There are numerous mechanical and electrical factors to be considered when installing a
professional audio system (in addition to those which are strictly acoustic, such as sound
pressure, angles of coverage, frequency response, etc.).
11. Hearing loss
Exposure to high sound levels can cause permanent hearing loss. The acoustic pressure level
that leads to hearing loss is different from person to person and depends on the duration
of exposure. To prevent potentially dangerous exposure to high levels of acoustic pressure,
anyone who is exposed to these levels should use adequate protection devices. When a
transducer capable of producing high sound levels is being used, it is therefore necessary to
wear ear plugs or protective earphones.
12. Pay attention to all selector terminal labels when connecting.
To ensure a correct musical reproduction, loudspeaker phase is to be respected too.
13. To prevent inductive effects from causing hum, noise and a bad system working, loudspeaker
lines should not be laid together with other electric cables (mains), microphone or line level
signal cables connected to amplifier inputs.
14. Cables connected to this selector shall have wires with a suitable section (twisted, if possible, to
reduce inductive effects due to surrounding electro-magnetic fields) and a sufficient electrical
insulation.
Refer to local regulations since there may be additional requirements about cable
characteristics.
OPERATING PRECAUTIONS
Install this selector far from any heat source.
Do not overload.
Do not use solvents, alcohol, benzene or other volatile substances for cleaning the external
parts of this product.
•
•
•

13
ENGLISH
RCF S.p.A. would like to thank you for purchasing this product, which
has been designed to guarantee reliability and high performance.
DESCRIPTION
The 6 (5 + off) position selector CT 61 shall be matched to a (not included)
RCF TL 128 line transformer (or equivalent), in order to get a volume control
for a loudspeaker group (in a 100 V constant voltage system) having a
total power not exceeding 120 W.
All connected loudspeakers shall have 100 V line matching transformers.
It includes a 24 V dc override relay to either bypass the 6 position selector
or insert a second 100 V line (not affected by the volume control) for
paging.
It can works with 3 wire lines as well, in order to make emergency
announcements without using the internal 24 V dc relay.
CT 61 can be installed on whichever supporting frame for home/office
electrical systems by drilling a hole in a blank key and fixing the control
circuit.
3 knobs are included in 3 different colours: white, silver, anthracite.
CONNECTIONS
WARNING: connections should be only made by qualified and experienced
personnel having the technical know-how or sufficient specific instructions (to
ensure that connections are made correctly) in order to prevent any electrical
danger.
To prevent any risk of electric shock, do not connect volume controls /
loudspeakers when the amplifier is switched on. Before turning the system on,
check all connections and make sure there are no accidental short circuits.
The entire sound system shall be designed and installed in compliance with
the current local laws and regulations regarding electrical systems.
120W
120W
CT 61
TL128
TL128
CT 61

14
ENGLISH
Example no. 1: basic 2 wire connection
an audio input (100 V)•
The 100 V input (IN) is directly connected to the Ji+ , Ji- (0, common) terminals
and the transformer (100 V, 0), of which outputs having intermediate voltages
70V, 50V, 35V, 25V are respectively connected to the J1 1/2, J1 1/4, J2 1/8,
J2 1/16 terminals.
The output level (OUT: Jo+ and Jo- terminals) is selected by means of the 6
position selector(5 + off).
JPA and JPB jumpers are not influential (they can be left in the position 1-2).

15
ENGLISH
The 100 V input (IN) is directly connected to the Ji+ , Ji- (0, common) terminals
and the transformer (100 V, 0), of which outputs having intermediate voltages
70V, 50V, 35V, 25V are respectively connected to the J1 1/2, J1 1/4, J2 1/8, J2
1/16 terminals. The output level (OUT: Jo+ and Jo- terminals) is selected by
means of the 6 position selector (5 + off).
If necessary, the output level can be forced to its maximum (the selector is
bypassed) through a 24 V dc dry closing contact.
Both jumpers (JPA and JPB) are to be set to the position 1-2.
Example no.2: connection with override relay (4 wire line)
an audio input (100 V)
a 24 V dc command
•
•

16
ENGLISH
The (100 V) IN A input is directly connected to the Ji+ , Ji- (0, common)
terminals and the transformer (100 V, 0), of which outputs having intermediate
voltages 70V, 50V, 35V, 25V are respectively connected to the J1 1/2, J1 1/4,
J2 1/8, J2 1/16 terminals. The output level (OUT: Jo+ and Jo- terminals) is
selected by means of the 6 position selector (5 + off).
If necessary, the second audio input (IN B) for paging can be routed to the
output (the selector is bypassed) through a 24 V dc dry closing contact.
Both jumpers (JPA and JPB) are to be set to the position 2-3.
Example no.3: connection with the second audio line and the override relay (6 wire line)
an audio input (100 V), “IN A”
another audio input (100 V), “IN B”
a 24 V dc command
•
•
•

17
ENGLISH
The 100 V input signal has 3 wires:
1. 100 V;
2. 0;
3. 0 (normal) / 100 V (override) commutation.
Example no.4:
3 wire connection
• an audio input (100 V) with
3rd wire (0 – 100 V exchange)
100 V
100 V
0
Vdc
0 / 100 V
0

18
ENGLISH
The first (100 V) and the third wire (0 / 100 V commutation) are directly connected
(respectively) to the Ji+, Ji- terminals and the transformer (100 V, 0), of which
outputs having intermediate voltages 70V, 50V, 35V, 25V are respectively
connected to the J1 1/2, J1 1/4, J2 1/8, J2 1/16 terminals. The second wire (0) is
directly sent to the output (J4 terminal).
The output level (OUT: Jo+ and J4 terminals) is selected by means of the 6
position selector (5 + off).
If necessary, the output level can be forced to its maximum by commuting the
3rd wire voltage from 0 to 100 V (by using an additional external relay).
JPA and JPB jumpers are not influential (they can be left in the position 1-2).
INSTALLATION
Use a blank key for common electric wall
surface / flush-mounted boxes.
Remove all ribs (if present) by using
tongs.
Drill the blank key in the centre.
Hole diameter: 12 mm
Mount all blank keys into the frame.
Put the drilled blank key in the centre.
Screw the spacer into the selector.
A
B
C
D
E

19
ENGLISH
SPECIFICATIONS
Max. input / output voltage 100 V
Max. power 120 W (matched to the RCF TL 128 transformer)
Selector dimensions 43 mm (w), 50 mm (h), 68 mm (d)
(without a knob)
Selector weight ca. 40 g
G
H
I
After connecting all wires,
put the CT 61 selector
into the box (note: the TL
128 transformer shall be
placed somewhere else).
Insert the selector shaft
into the hole of the blank
key rear side and fix the
frame.
Screw the nut to fix the
selector to the blank key.
Add one of the 3 available
knobs.
F

RCF SpA: Via Raffaello, 13 - 42100 Reggio Emilia >Italy
tel. +39 0522 274411 - fax +39 0522 274484 - e-mail: rcfservice@rcf.it
Salvo eventuali errori ed omissioni.
RCF S.p.A. si riserva il diritto di apportare modifiche senza preavviso.
Except possible errors and omissions.
RCF S.p.A. reserves the right to make modifications without prior notice.
10307083
the rules of sound
103 07 156
Table of contents
Languages:
Other RCF Recording Equipment manuals
Popular Recording Equipment manuals by other brands

Extron electronics
Extron electronics Architectural Series Universal Interfaces with Audio and ADSP RGB... user manual

NEUTRIK
NEUTRIK NA2-IO-DLINE user manual

Cochlear
Cochlear Baha 5 SuperPower quick guide

Altera
Altera Arria 10 Avalon-ST Interface user guide

LIGHTFOOT LABS
LIGHTFOOT LABS gk3 quick guide

Precidia
Precidia Ether232Plus user guide