REA Clematis User manual

Rea®Clematis®
enManualwheelchairpassive
ServiceManual
DEALER:Keepthismanual.
TheproceduresinthismanualMUSTbeperformedbyaqualied
technician.

©2017Invacare®Corporation
Allrightsreserved.Republication,duplicationormodicationinwholeorinpartisprohibitedwithoutpriorwritten
permissionfromInvacare.Trademarksareidentiedby™and®.AlltrademarksareownedbyorlicensedtoInvacare
Corporationoritssubsidiariesunlessotherwisenoted.

Contents
1General.........................................4
1.1Introduction..................................4
1.2Deliverycheck.................................4
1.3Customerservice...............................4
2Assembly........................................5
2.1Mountingthetrunksupport......................5
2.2Mountingtheattachmentfortabletray..............5
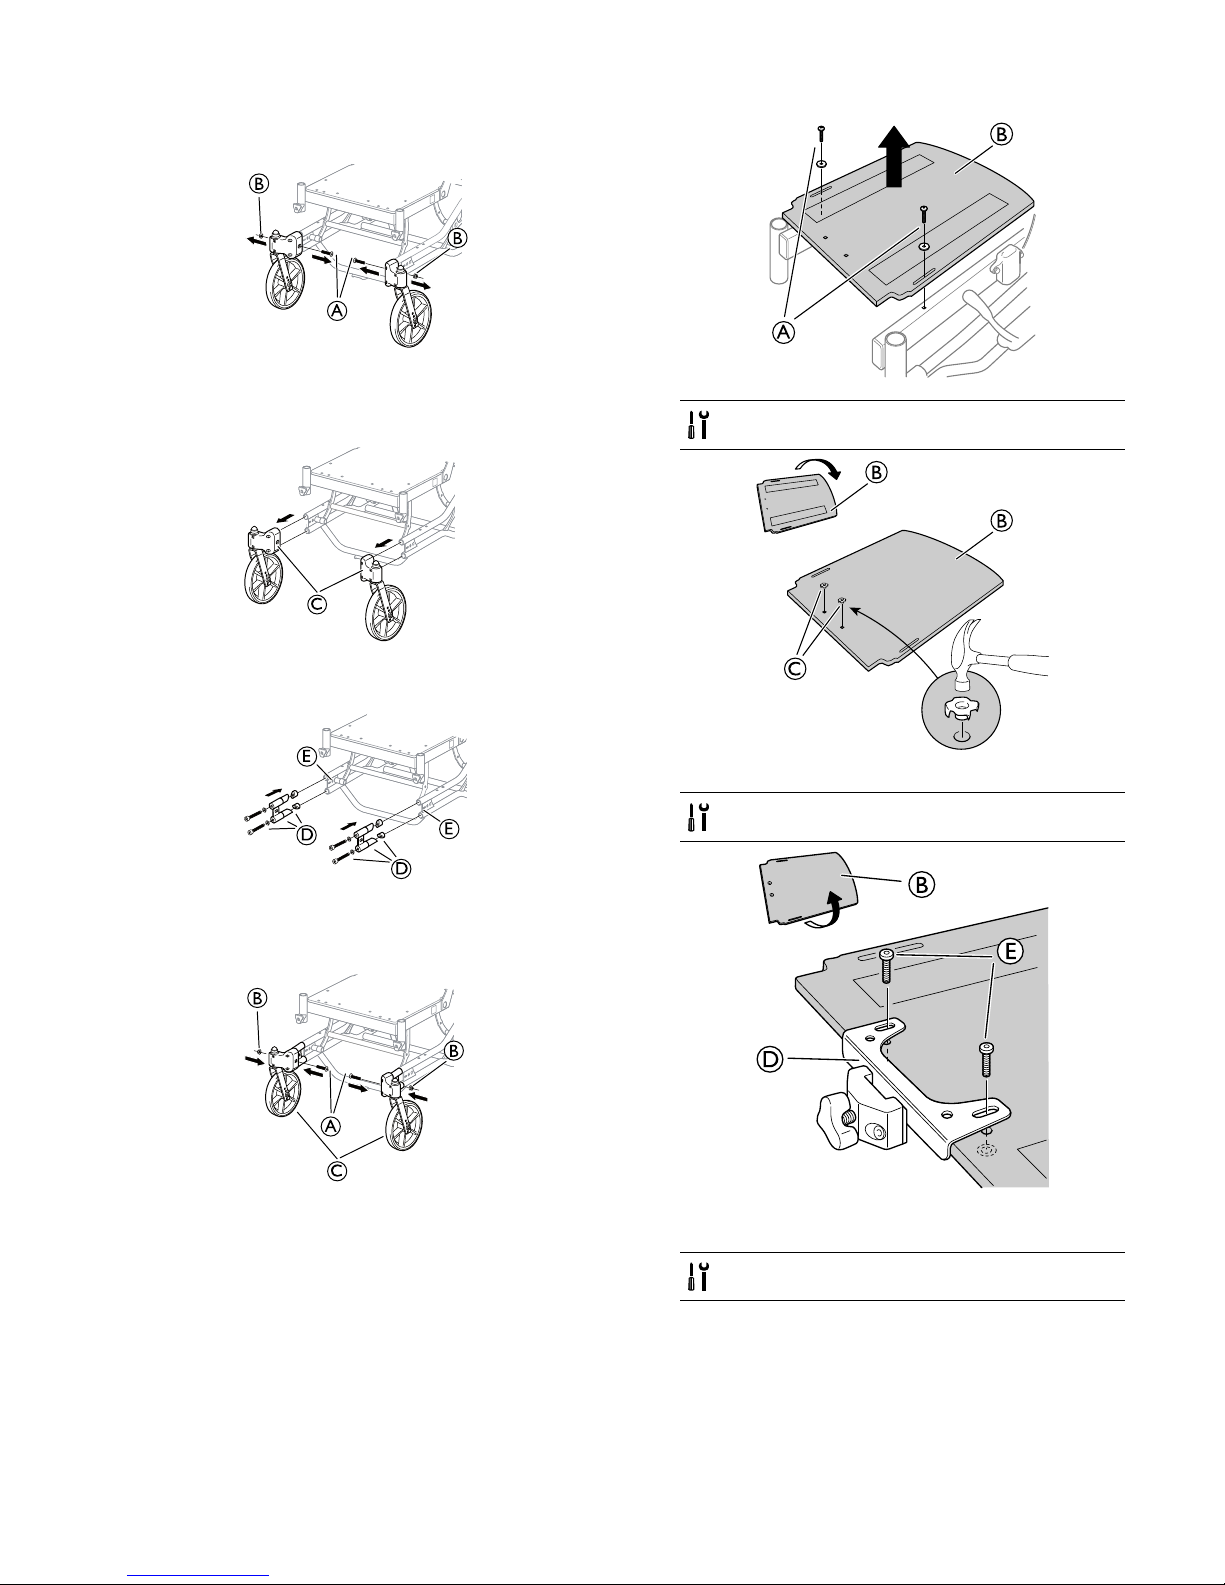
2.3Mountingthetabletray.........................5
2.4Mountingthehalftray..........................5
2.5Rearwheels..................................6
2.6Drumbrakefor22–24”..........................6
2.7Mountingthechassisextender....................7
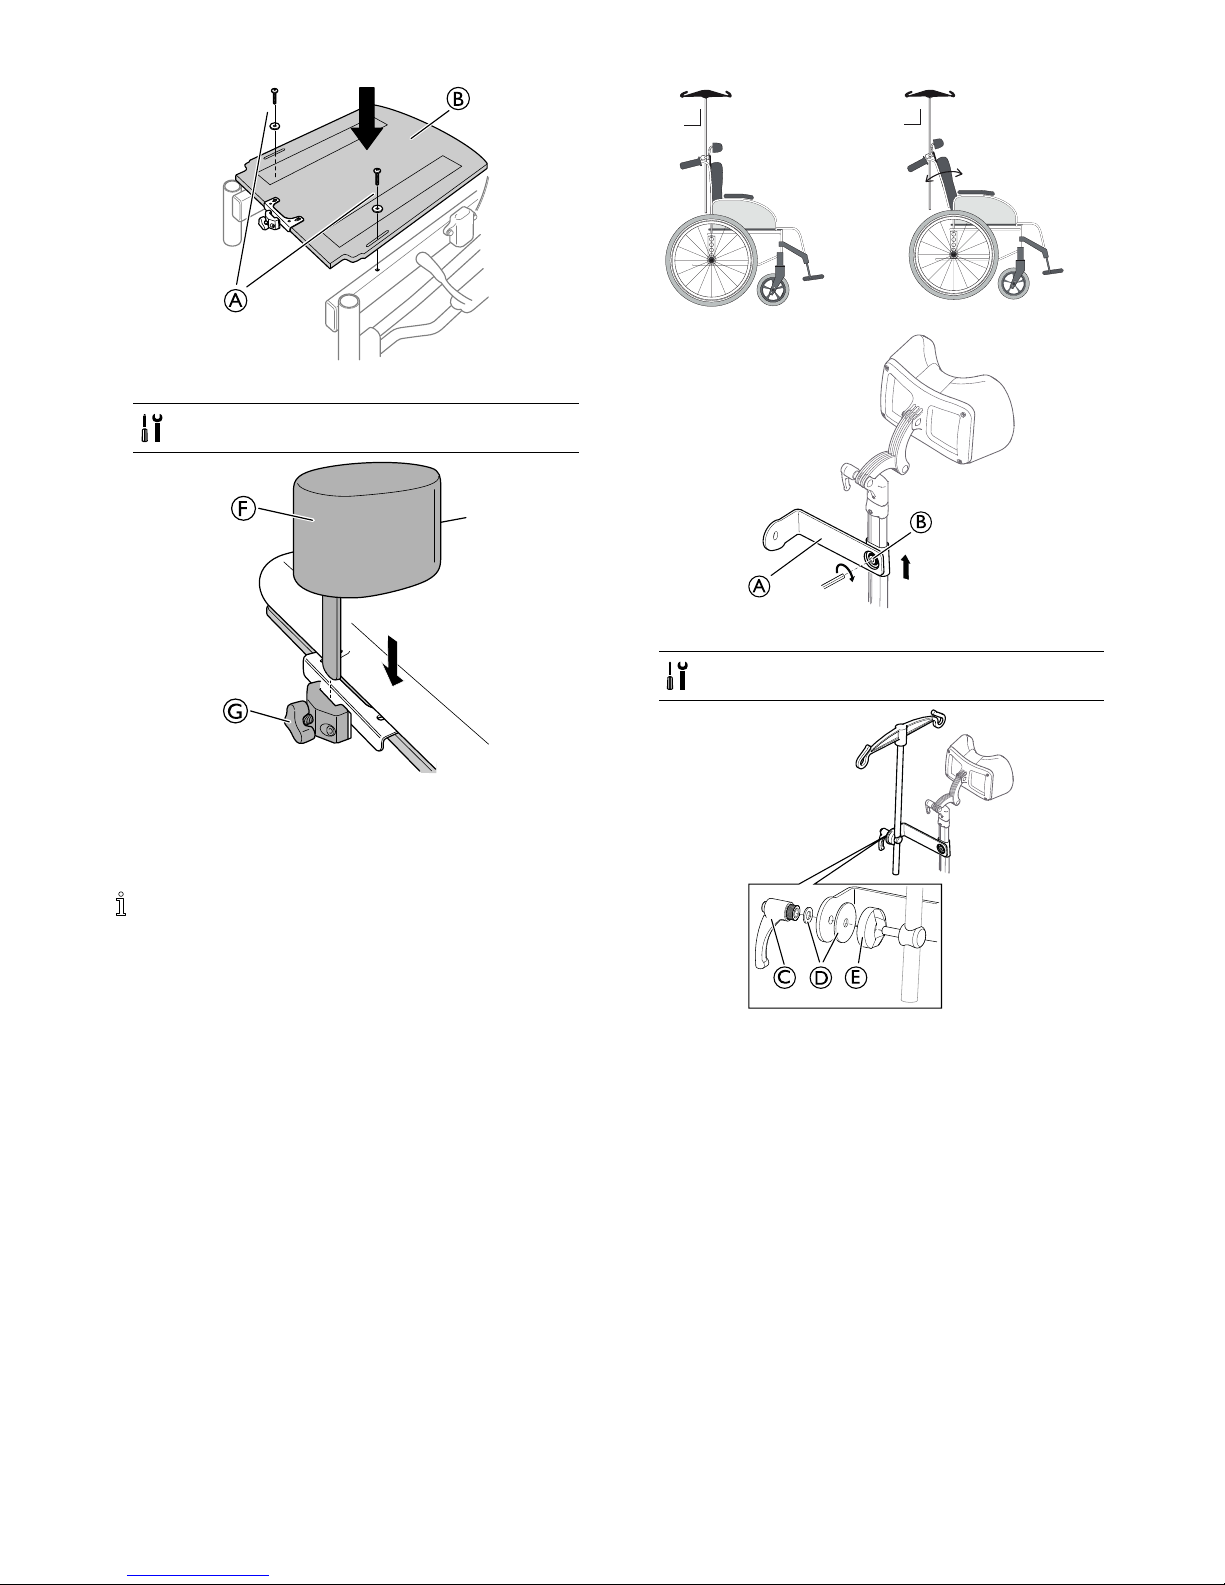
2.8Mountingthepommel..........................7
2.9MountingtheDripstand.........................8
3SettingsandAdjustments............................9
3.1Positioningtheheadrest/neckresttothefront.........9
3.2Widthadjustment..............................9
3.3Adjustingthecalfpads..........................9
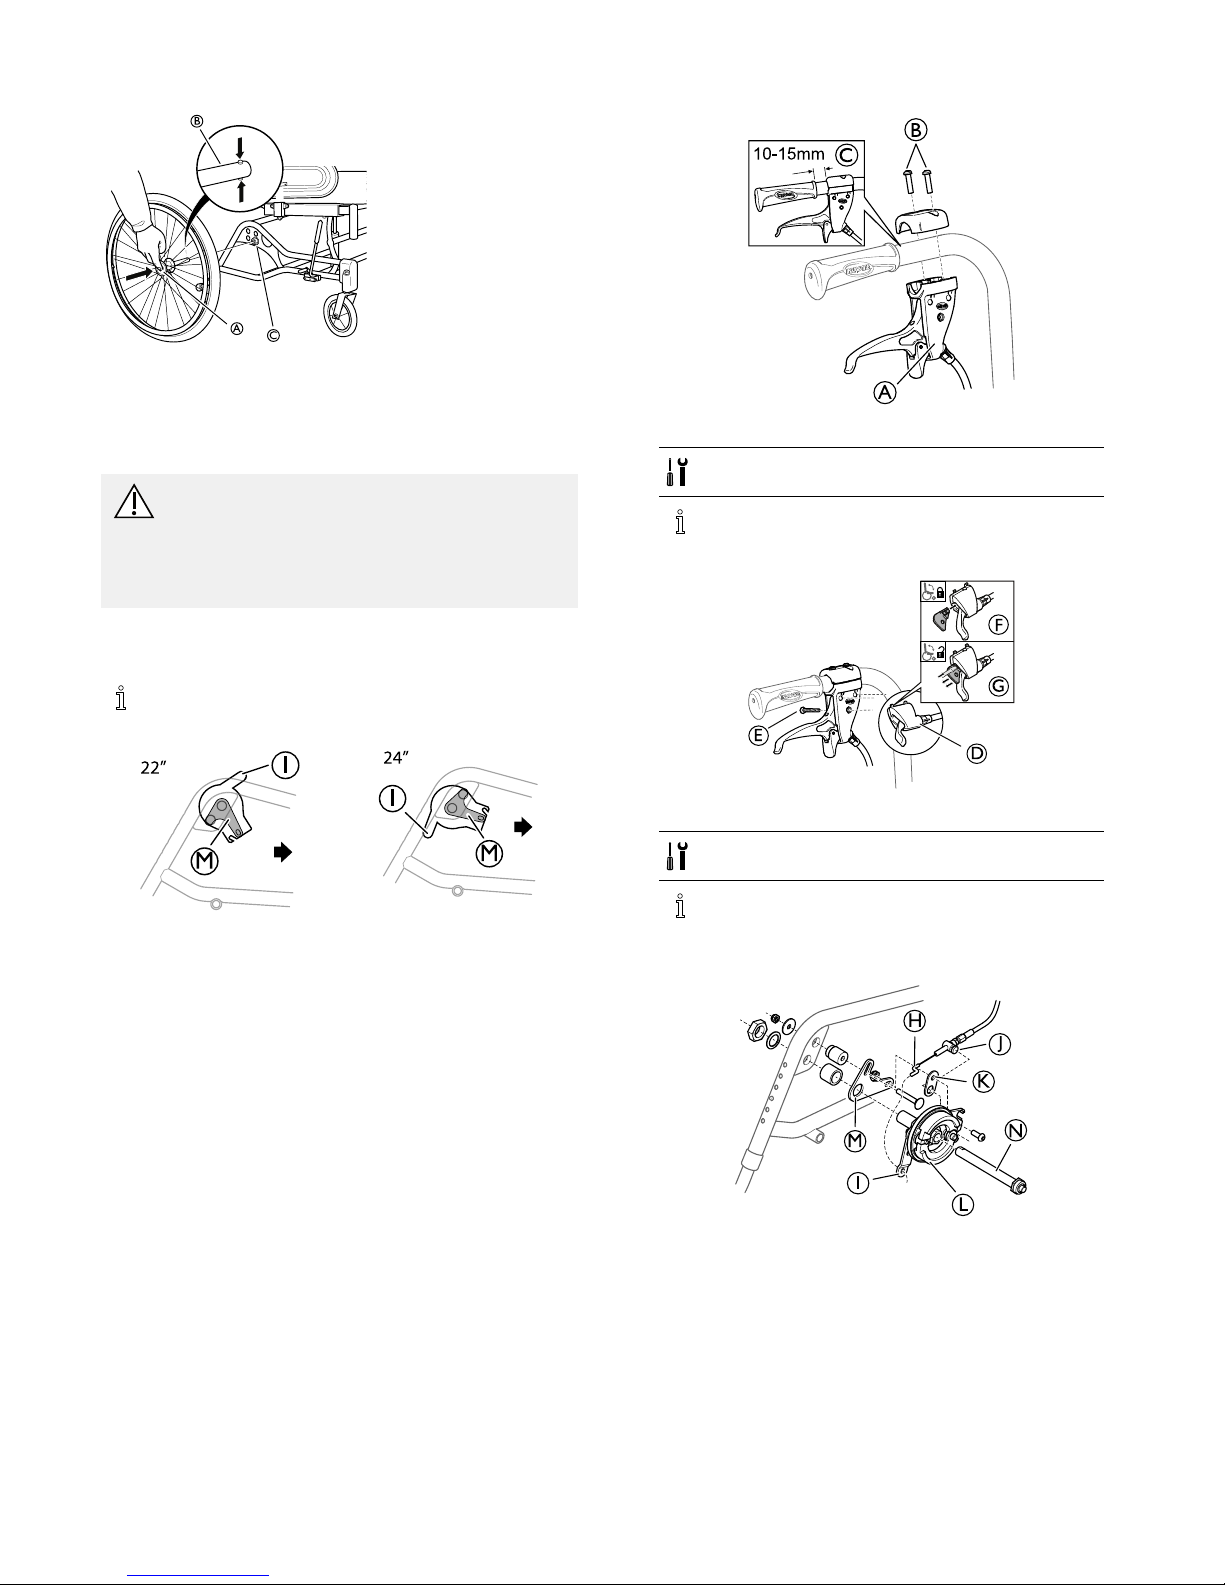
3.4Adjustingthebrakeeffect........................10
3.4.1Userbrake—adjustment......................10
3.4.2Drumbrake—adjustments....................10
4Maintenance.....................................11
4.1Safetyinformation..............................11
4.2Flattire......................................11
4.3Cleaning.....................................11
4.4Washinganddisinfection.........................11
4.5Reconditioning................................11
4.5.1Checklistforreconditioning....................14
5AfterUse........................................15
5.1Recycling.....................................15
5.2Wastedisposal................................15
6T echnicaldata....................................16
6.1Dimensionsandweights.........................16
6.2Material.....................................18
6.3Environmentalconditions........................18
6.4Seatheighttable...............................18

Rea®Clematis®
1General
1.1Introduction
TheReaClematis®’sseatframe,pushhandlesandcertain
othercomponentssubjectedtostrainaremadeofsteel.
Legrestsaremadeofhighqualityaluminium.
Castorsuspensionandthejointedpartsoftheframeare
madeofpolyamidereinforcedwithberglass.Thebackrest
plateisalsomadeofpolyamidereinforcedwithberglass.
Plasticdetailsaremarkedforrecycling.Seatandbackrest
cushionsaremadeoffoamrubberandtheupholsteryis
madeofwashableplushorelasticpolyurethanecloth.
TheReaClematis®isacarer-operatedwheelchairwithan
angle-adjustableseatunit.Theangleofthebackrestunitcan
beadjustedindependentlyoftheseat.Thecontrolsforthe
seatandbackrestangleadjustmentareincludedonthepush
handles.TheReaClematis®isavailableinthreeseatwidths.
Thearmrestheightofeachchaircanbeadjusted.
Thewheelscanbepneumaticorsemisolid.
Theseatandbackrestpadshavebeenergonomically
designedfortheuser.Theyaretoprovideasmuch
stabilityandcomfortaspossible,aswellasgoodpressure
distribution.
1.2Deliverycheck
Anytransportdamagemustbereportedimmediatelyto
thetransportcompany.Remembertokeepthepackaging
untilthetransportcompanyhascheckedthegoodsanda
settlementhasbeenreached.
1.3Customerservice
Forcontactdetailspleaserefertothelastpageofthis
publicationwhereyouwillndtheaddresstoyourlocal
Europeansalescompany.
41580314-C

Assembly
2Assembly
2.1Mountingthetrunksupport
1.
A
B
LoosenthescrewsAandremovethelockingnutsB.
2.
C
A
D
D
MountthetrunksupportbarCwiththescrewsAand
thewashersandnutsD.
3.
E
F
G
MountthetrunksupportholderEwiththescrewsF
andtheattachmentwasherG.
4.
H
E
I
MountthetrunksupportIinthetrunksupportholder
EandtightenthehandwheelH.
Screwdriver
2.2Mountingtheattachmentfortabletray
1.
A
B
MountthetableattachmentAwiththeattachmentpart
facingoutwards.TheplainsurfaceBoftheattachment
shouldbeplacedupwardswhenusingthetableonthe
thinarmrests.
2.
A
C
TotthetableattachmentAtothewidearmrest,turn
theattachmentaround,thepatternedsurfaceCshould
nowbefacingupwards.
2.3Mountingthetabletray
A
B
MountthetabletrayAinthetabletrayattachmentsB.
2.4Mountingthehalftray
Mountingthehalftray
A
B
1.InsertthetubeofthehalftrayAintotheattachment
Bunderthearmpad.
D
C
2.PushonthepushpinCandinserttheringDonthe
tubeA.
3.ReleasethepushpinC.
1580314-C5

Rea®Clematis®
2.5Rearwheels
A
B
C
1.Pressandholdinthequick-releasebuttonA.
2.PlacetherearwheelaxleBintherearwheel
attachmentC.
3.Pullthewheelsoutwardstocheckthatthewheelis
securelylockedinposition.
WARNING!
Riskofinjury
–Itisreallyimportanttocheckthattherear
wheelissecurelylockedinposition!Itshould
notbepossibletoremovethewheelswhenthe
quick-releasebuttonAisinactivated.
2.6Drumbrakefor22–24”
Thepositionofthebrakeunitdiffersdependingon
therearwheelsize.
I
M
M
I
22”wheels=Thewire
holderIshouldbeplaced
upwardsandtheattachment
plateMasshownonthe
picture.
24”wheels=Thewire
holderIshouldbe
placeddownwardsand
theattachmentplateMas
shownonthepicture.
Mounting
1.
B
C
A
Mountthehandlefortheassistantmaneuvereddrum
brakeAonthepushhandleandattachthescrewsB.
TorxT20
Thedistancebetweenthehandleandthehandle
fortheassistantmaneuvereddrumbrakemust
be10—15mmC.
2.
D
E
F
G
MountthetilthandleDonthebrakehandleunitand
tightenthescrewE.
Screwdriver
Thereisalockingfunctiononthetilthandle,
insertthelockingkeyFtolockthetiltfunction.
RemovethelockingkeyGinordertounlock
thetiltfunction.
3.
K
L
H
J
M
I
N
MountthewirehookfromthebrakehandleHinthe
wireholderI.
4.MountthewireJintheattachmentwasherKand
mounttheattachmentwasherKonthebrakeunitL.
5.Tightenthescrew.
6.MounttheattachmentplateMontheframeofthe
wheelchair.
7.MountthebrakeunitLandtherearwheelaxleNon
theattachmentplate.
8.Tightenthescrews.
61580314-C

Assembly
2.7Mountingthechassisextender
1.
A
B
B
LoosenthescrewsAandthenutsB.
2.
C
RemovethecastorattachmentsC.
3.
D
DE
E
MountthechassisextenderDinthechassistubesE
andtightenthescrews.
4.
A
B
B
C
Re-mountthecastorattachmentCandtightenthe
screwsAandthenutsB.
2.8Mountingthepommel
1.
A
B
LoosenthescrewsAandremovetheseatplateB.
5mmallenkey
2.
B
C
B
TurntheseatplateBupsidedownandmountthetee
nutsC.
Hammer
3.
D
E
B
TurntheseatplateBbackagainandmountthe
attachmentforthepommelD.
4.AttachthescrewsE.
5mmallenkey
1580314-C7

Rea®Clematis®
5.
B
A
Re-mounttheseatplateBontheseatframeand
tightenthescrewsA.
5mmallenkey
6.
F
G
PlacethepommelFintheattachmentandtightenthe
handwheelG.
2.9MountingtheDripstand
Therodofthedripstandmustalwaysbeplacedin
averticalposition,i.eina90degreeangletothe
ground,nomatterthepositionofthebackrestor
thewheelchair .
90°
90°
1.
A
B
MounttheholderforthedripstandAontheneckrest
holderandtightenthescrewB.
allenkey5mm
2.
CDE
MounttheleverC,thewashersDandtheholderwith
thedripstandEintheattachmentandtightenthelever.
81580314-C

SettingsandAdjustments
3SettingsandAdjustments
3.1Positioningtheheadrest/neckresttothe
front
Thisadditionaldepthadjustmentwillmovethe
headrestanother7cmforward.
A
C
D
E
A
C
D
Youcanalsoadjusttheangleanddepthbyturning
theattachmentfortheheadrest/neckrest.
1.LoosenthehandwheelA.
2.Removetheheadrest/neckrest.
3.LoosenthehandleD.
4.Removethescrewandthehandle.
5.Rotatetheheadrest/neckrestattachmentpoleincluding
theattachmentE.
6.Returntheheadrest/neckresttotheattachment.
Notethatthescrewtotheheadrest/neckrest
attachmentCandthehandleDmustbemounted
ontheoppositesideduetothegrovesinthescrew
hole.
7.Returntheheadrest/neckresttotheattachmenton
thebackrest.
8.Re-tightenthehandleD.
3.2Widthadjustment
1.
4x
A
Loosenthe4screwsA.
2.
B
AdjusttheattachmentbarsBinordertotthetable
tothedesiredwidth.Re-tightenthescrews.
3.
C
FitthetabletotthewidthofthechairC.
3.3Adjustingthecalfpads
A
C
1.Swingthepadforwards.
2.UnscrewscrewA.
Tools:5mmAllenkey
3.RemovethelargenutConthereversesideandplaceit
inthesecondattachmenthole.
4.Movethecalfpadtothenewposition.
5.SecureitintoplacewiththescrewAandthenutC.
1580314-C9

Rea®Clematis®
3.4Adjustingthebrakeeffect
A
C
B
ThedistanceAbetweenthepinBandthetireC
shouldbemax.2mm.
3.4.1Userbrake—adjustment
Toattainthecorrectbrakingeffect,thebrakepinshould
pressintothetirewhenyouapplythebrake.Thebrakemay
thereforerequiredepthadjustment.
WARNING!
Riskofreducedbrakeeffect
–Incorrectsettingoruseofthebrakereduces
thebrakingeffect.
B
A
C
Tool:5mmAllenkey
1.LoosenthescrewA.
2.Movethebraketotherequiredposition.
3.Re-tightenthescrewA.
CAUTION!
Riskoftrappingngers
–Becarefulnottotrapyourngersbetweenthe
brakepinBandrearwheelC.
3.4.2Drumbrake—adjustments
1.
A
AdjustthebrakeeffectwiththeadjustmentnutAon
thewire.
2.
B
B
Whenthedesiredbrakeeffectisachieved,xatethe
brakewirewiththexationnutB.
WARNING!
Riskofinjury
Poorbrakeeffect
–Checkthebrakeeffectaftermountingor
adjustingthebrake.
101580314-C

Maintenance
4Maintenance
4.1Safetyinformation
Regularchecksandmaintenanceofthewheelchairensure
theuser’ssafetyandtheexpectedlifetimeofthechair .
4.2Flattire
Incaseofatirepunctureconsultasuitableworkshop
(e.g.bikerepairshop,bicycledealer...)tohavethe
tubereplacedbyaskilledperson.
4.3Cleaning
•Wipemetalpartsandtheupholsteryregularlywitha
dampcloth.
•Amilddetergentcanbeused.
•Ifnecessary,theupholsterycanbewashedat60ºC.
•Ordinarywashingpowder/liquidcanbeused.
•Fordisinfectiononlyusealcoholbaseddetergent.
Onlyusewaterandsoftsoaptocleanthetable!
4.4Washinganddisinfection
1.Removealllooseandremovablecoversandwash
theminawashingmachineaccordingtothewashing
instructionsforeachcover.
2.Removeallpaddedpartssuchasseatcushions,armrests,
headrest/neckrestwithxedpaddedparts,calfpads
andsoonandcleanthemseparately.
Thepaddedpartscannotbecleanedwitha
high-pressurecleanerorwaterjet.
3.Spraythewheelchairchassiswithdetergent,forexample
acar-cleaningagentwithwax,andleaveontowork.
4.Rinsethewheelchairchassiswithahigh-pressure
cleaningorordinaryjetofwaterdependingonhowdirty
thewheelchairis.Donotaimthejettowardsbearings
anddrainingholes.Ifthewheelchairchassisiswashed
inamachinethewatermustnotbehotterthan60ºC.
5.Spraythewheelchairchassiswithalcoholfordisinfection.
Onlyusewaterandsoftsoaptocleanthetable!
6.Leavethewheelchairtodryinadryingcabinet.Remove
partswherewaterhascollectedforexampleinend
tubes,ferrulesetc.Ifthewheelchairhasbeenwashed
inamachine,blow-dryingwithcompressedairis
recommended.
Dartex®
Lighterstainsonthefabricmaybeneutralizedwithasoft
dampclothandsomeneutraldetergent.Toneutralize
larger,morepersistentstains,wipethefabricwithalcohol
orturpentinesubstitutes,andwashwithhotwateranda
neutraldetergent.
Proprietarydisinfectantsmaybeused,providedthatthe
manufacturer’sinstructionsarefollowed.Thefabriccan
bewashedattemperaturesupto71ºC(160ºF).Normal
detergentscanbeused.
AllpartsofthewheelchairwithDartex®upholstery,
suchasarmrestpads,calfpads,headrest/neckrest,
shouldbecleanedaccordingtotheinstructionabove.
4.5Reconditioning
Components
Lubricateallremovablepartswithadryteonbasedspray,e.g“Viso900–B5”.
ChassisAllpartsmustbecheckedforcracksorotherdamages.Payspecialattentiontoareascloseto
welds.Ifdamagesarediscovered,thechassismustbediscarded.
BackrestangleCheckthattheangleiseasytoadjust,itshouldbeeasytofoldandthelockingmechanism
mustfunctionproperly.
Pushhandles/PushbarCheckthatthepushhandles/pushbarworksproperly.Theyshouldbermandthescrews
mustbetightenedproperly.
Back-andseatcovers•Checkthatthevelcro®stripsareintactandcanbexedproperly.
•Checkthatthecoversareintactandclean,ifnotseesection:“Washinganddisinfection”
•Ifthefabricistorn,replacethecover .
SeatangleCheckthefunctionbychangingtheanglefromthelowertothehighestposition.
Riskofdamage
–Thegaspistonmustnotbeopened,itcontainsoilandgasunderhighpressure.
CAUTION!
Riskofdamage
–Thegaspistonmustnotbeopened,itcontainsoilandgasunderhighpressure.
1580314-C11

Rea®Clematis®
Components
Carer-operatedbrakesCheckthatthebrakefunctionisgood,ifnot:
1.Checkthatthewireisintact,ifnot,itmustbereplaced.
2.Checkthatthewirecoverisintact,ifnot,thewiremustbereplaced.
3.Adjustthewireatthehandleand/oratthewheelhub.
4.Tightenthewireuntiltheoptimalbrakefunctionisachieved.
Armrests/siderestsCheckthatthearmrests/siderestsareintact,theyshouldbeeasytodetach/attach.
LegrestsCheckthatthelegretsare:
•Easytodetach
•Easytoattach
•Easytoadjustinheightandangle
Anti-tipdevice•Checkthattheanti-tipdeviceiseasytoadjustandfold.
•Checkthatthescrewsaretight,ifnot,retighten.
Rearwheels•Changethetiresifthepatternisworn.
•Replacemissingspokesandtightenloosespokes.
•Fastenthehandrimifitisloose.
•Checkthatthehandrimissmoothandthattherearenocracksorsharpedges.If
so,replacethehandrim.
•Checktherearwheelaxle,itshouldbecompletelyinsertedintotheaxlehousing.
Checkthattherearwheelaxlelocksproperly.Pullontherearwheeltocheckthatthe
removableaxledoesnotcomeoff.
•Checktheairpressure—recommendedairpressureis3,5bar/50psiforstandardtires.
RearwheelattachmentCheck:
•Thatthescrewsontherearwheelattachmentaretight.
•Thattheaxlehousingiscorrectlyplaced.
Theaxlehousingshouldbetightenedwithamanualanddynamometricwrench
calibratedto40Nm.
Brakes•Checkthatthehubbrakesworkproperlyonbothtires.
•Checkthepositioningoftheuserbrakes.
•Checkthatthebrakepinisnotworndown.Ifso,replaceit.
•Checkthatthescrewsaretightened.
•Testthebrakefunction.Whenbraking,thebrakepinshouldpressthetiredownby5mm.
Makesurethatyouhavethecorrectairpressureinthetirestoattaintheoptimal
brakeeffect.
Castors•Detachthecastorsandcleanthecastorforks.
•Removeanydirtorhairfromthecastors.
•Attachthecastorsagainandcheckthatthecastorsturnfreely.
•Ifthecastorsareairlled,checkthepressure—recommendedairpressureforlow
proletiresis8”/4.0bar.
•Ifthecastorsaresolid,checkthetiresforcracks.Ifthetiresaredryandlledwith
cracks,theyneedtobereplaced.
Allfastenersforwearand
tightness
Boltsandotherfastenerscancomelooseduetoconstantuse:
1.Checkthatthefastenersaretightonthecastorforks,footrest,seat,siderests,backrest,
handlesetc.
2.Tightenanylooseboltsorscrews.
Accessories
Lubricateallremovablepartswithadryteonbasedspray,e.g“Viso900–B5”.
Allfastenersforwearand
tightness
Boltsandotherfastenerscancomelooseduetoconstantuse:
1.Checkthatthefastenersaretightonthecastorforks,footrest,seat,siderests,backrest,
handlesetc.
2.Tightenanylooseboltsorscrews.
Headrest•Checkthattheside-andangleadjustmentforthe“wings”worksproperly.
•Checkthattheangleadjustmentworksandthatthereisamemoryfunction.
121580314-C

Maintenance
Accessories
Neckrest•Checkthattheangleadjustmentworksandthatthereisamemoryfunction.
Trunksupport“Multi
functional”
•Checkthattheangleadjustmentworksproperlyandthatthereisamemoryfunction.
Abductioncushion•Checkthatthedepthadjustmentworks.
Tabletray•Whenre-mountingthetabletray,trytondthethreadmanuallybeforefasteningthe
screwswithtools.Thissparethethreading.
1580314-C13

Rea®Clematis®
4.5.1Checklistforreconditioning
OKNOTESIGN
WASHING
RECONDITIONING:
Chassis
Backrestangle
Pushhandles/Pushbar
Backrestcover
Seatcover
Seatangle
Carer-operatedbrake
Armrests/Siderests
Legrests
Footrests
Anti-tipdevice
Rearwheels
Rearwheelattachment
Brakes
Castors
Fastenersforwearandtightness
Headrest
Neckrest
Trunksupport
Abductioncushion
Tabletray
TEST:
Chairrollsinstraightline
Easytopropel
DELIVERYCHECK:
Includeausermanual
141580314-C

AfterUse
5AfterUse
5.1Recycling
Thewheelchaircanbedividedintothefollowingmain
components:
•Chassis
•Plasticparts
•Upholstery
•Wheels,tiresandtube
•Packing
5.2Wastedisposal
Pleasebeenvironmentallyresponsibleandrecyclethis
productthroughyourrecyclingfacilityatitsendoflife.
Wastedisposalmustcomplywiththelawsandregulations
pertainingwastehandlingineachcountry.
Invacare®iscontinuouslyworkingtowardsensuringthat
thecompany’simpactonenvironment,locallyandglobally,
isreducedtoaminimum.WeonlyuseREACHcompliant
materialsandcomponents.
Thewheelchaircanbedividedintothefollowingmain
components:
Chassis
•Thechassisisproducedinsteelandisfullyrecyclable.
•Recyclingofsteelrequiresonly20-25%oftheenergy
comparedtonewproducedsteel.
•Thewheelchairhastwogaspistonsandtheycontain
oilandmustbedisposedaccordingtonational
requirements.
Beawareofthatthegaspistonscontainshigh
pressureandmustbehandledwithcareduring
destruction.
Plasticparts
•Theplasticpartsinthechairsareproducedof
"Thermoplastic"andaremarkedwithrecyclingsymbols
(whereitispossibleduetopartsize).
•Themainplasticmaterialispolyamide.
•TheplasticmaterialsforthetableareABSand
polyamide.
•Thismaterialcanberecycledorburnedinapproved
facilities.
Upholstery
•Upholsteryisproducedofpolyesterbres(PUR)and
Dartex®.
•Theefcientwaytorecyclethepartsistoburnthem
inapprovedfacilities.
Wheels,tiresandtubes
•Thehandrim,rim,spokesandhubaremadeofsteel,
stainlesssteeloraluminiumandcanberecycled
accordingtoabove.
•Tiresandtubesaremadeofrubberandcanberecycled
accordingtoabove.
Packing
•AllInvacareReaABpackingmaterialisdevelopedtot
theproductsinanoptimalwaytoreduceunnecessary
materialwaste.
•Allboxesarerecyclable.
Endoflife
Attheendofthisproductslife,itshouldberecycled
accordingtolawsandregulationsforwastehandlingineach
country.
Contactyourlocalrecyclingagenttoobtainthe
correctinformationonhowtohandletheabove
mentionedmaterials.
1580314-C15

Rea®Clematis®
6Technicaldata
6.1Dimensionsandweights
WARNING!
Limitedaccesstoemergencyescaperoutes
–Insomecombinations,thetotalwidthandlengthofthewheelchairexceedstherecommendedmeasurements
foremergencyescaperoutes.
–Therecommendedvaluesconcerningaccesstoemergencyescaperoutesare:Lengthmax.1200mmandwidth
max.700mm.
CLEMATIS
Effectiveseatwidth*390/440/590mm
Seatdepth420–480mm
Seatheight*1400–450mm
Backrestheight*1/*2600–710mm
Armrestheight(Armresttoseatdistance)*1230–340mm
Legrestlength(Footresttoseatdistance)400–520mm
OverallwidthSW+210mm
Tiltadjustment(seatplaneangle)-1°–+19°
Totalheight960–1120mm
Totallength(Overalllengthwithlegrests)1120–1480mm
Weight30/32/33,5kg
Max.userweight125kg
Transportweights*320,5/21/21,5kg
Backrestadjustment-1°–+32°
Foldedlength840mm
Foldedwidth585/635/685mm
Foldedheight535mm
Staticstabilityuphill12°–18°
Staticstabilitydownhill10°–18°
Staticstabilitysideways12°
Maximumslopewithparkingbrake7°
Legtoseatsurfaceangle96°–211°
Frontlocationofarmreststructure343–571mm
Handrimdiameter450–540mm
Horizontallocationofaxle–35–35mm
Minimumturningradius820mm
*+20mmwithspacers
*1Measuredfromseatplate.
*2Excludingneckrestandpushhandles
*3Withoutrearwheels,neckrest,armrests,legrests,trunksupportsandseatcushion
Insomecongurations,theoveralldimensionsexceedtherecommendeddimensionsforawheelchair .
161580314-C

Technicaldata
16”20”22”24”
Widthofthewheels13/4”13/8”1-13/8”1-13/8”
Wheelinclination0°(Wheelchairwithoutload)
1580314-C17

Rea®Clematis®
6.2Material
Chassis,backresttubesSteel,powdercoated
Plasticpartslikepushhandles,brakehandles,footplates
andpartsofmostaccessories
Thermoplastic(e.g.PA,PE,PP ,ABSandTPE)accordingto
markingontheparts
Upholstery(seatandbackrest)FoamPURandPolyether,fabricDartex®andplush
TableABS
SeatplateCoatedBirchplywood
OthermetalpartsZinkalloys,aluminiumalloysandsteel
Screws,washersandnutsSteel,corrosionfree
6.3Environmentalconditions
Longterm/Shorttermstorage
andtransportation
Operation
Temperature-10ºCto+50ºC-5ºCto+40ºC
Relativehumidity20%to75%
Atmosphericpressure800hPato1060hPa
Beawarethatwhenawheelchairhasbeenstoredunderlowtemperatures,itmustbeadjustedtooperatingconditions
beforeuse.
6.4Seatheighttable
Seatheight*RearwheelRearwheelpositionFork110Castors
SH
1
2
3
40022"13150
45012"31200
45024"21200
*Allmeasurementsareinmm
181580314-C

Notes

InvacareSalesCompanies
Ireland:
InvacareIrelandLtd,
Unit5SeatownBusiness
Campus
SeatownRoad,Swords,County
Dublin
Tel:(353)18107084
Fax:(353)18107085
ireland@invacare.com
www.invacare.ie
UnitedKingdom:
InvacareLimited
PencoedTechnologyPark,
Pencoed
BridgendCF355AQ
Tel:(44)(0)1656776222
Fax:(44)(0)1656776220
uk@invacare.com
www.invacare.co.uk
Manufacturer:
InvacareReaAB
Växjövägen303
SE-34371Diö
Sweden
1580314-C2017-01-01
*1580314C*
MakingLife’sExperiencesPossible®
Table of contents
Popular Wheelchair manuals by other brands

Handicare
Handicare LI2161.121 Series manual

AMG Medical
AMG Medical MedPro DEFENSE Zorbi 770-305 Assembly instructions

Permobil
Permobil SpeedControl installation instructions

Nuprodx
Nuprodx MULTICHAIR 3000Tilt Series Assembly instructions

KMINA
KMINA K30018 manual

Platinum Health
Platinum Health PHB3300 Assembly and instruction manual

Invacare
Invacare rea Focus Service manual

Mountain Trike
Mountain Trike MT3.001.0001 owner's manual

Sunrise Medical
Sunrise Medical SOPUR Xenon2 FF Directions for use

Pride Mobility
Pride Mobility Jazzy Select 14, Jazzy Select 14XL owner's manual

Drive Medical
Drive Medical DuoMotion 24 operating instructions

ILS
ILS Rear Bag and Cane Holder Assembly guide