Excel Mobil User manual

EXCEL
EXCEL
EXCEL
EXCEL
EXCEL
EXCEL
EXCEL
EXCEL
EXCEL
EXCEL
User Manual
Excel Mobil

~ 1 ~
© 2014 VAN OS MEDICAL UK Ltd., Excel House, 2 Ashbrooke Park
, Lincoln Way, Sherburn in Elmet,North Yorkshire, LS25 6P
Tel. +44-(0)1904-720170, Fax +44-(0)1904-720398,
E-mail: sales@vanosmedical.com, www.vanosmedical.com
info@vanosmedical.nl, www.vanosmedical.com
User manual
YOU AND/OR YOUR ATTENDANT MUST READ AND FULLY UNDERSTAND
THIS MANUAL BEFORE USE.
General Information
You have just purchased a wheelchair from Van Os Medical UK Ltd. We want to thank
you for your confidence in our Excel products. The wheelchair is a quality product.
The policy of Van Os Medical UK Ltd. is to continuously improve the quality and
reliability of our products. We reserve the right, therefore, without proper
notification, to alter this guide.
It is important that you read this manual carefully. The manual contains important
information on the safe use and maintenance of your manual wheelchair. We
recommend that you keep this manual, it is also your proof of warranty and it can
come in useful later.
The safety instructions in this guide are general guidelines that should be seen as
broad guidelines.
Your new wheelchair requires frequent maintenance much of which you can do
yourself. We want you to take your wheelchair once a year to be inspected by an
expert.
Caution!
In this guide you will find informative notes and warnings. These are clearly
identified by the symbols and the appearance of the text.
Tip
Information.
Warning:
To avoid personal injury, follow the instructions.

~ 2 ~
© 2014 VAN OS MEDICAL UK Ltd., Excel House, 2 Ashbrooke Park
, Lincoln Way, Sherburn in Elmet,North Yorkshire, LS25 6P
Tel. +44-(0)1904-720170, Fax +44-(0)1904-720398,
E-mail: sales@vanosmedical.com, www.vanosmedical.com
info@vanosmedical.nl, www.vanosmedical.com
User manual
Enter the information from your authorised dealer:
Company : …………………………………………………………………
Address: …………………………………………………………………
…………………………………………………………………
Telephone number: …………………………………………………………………
Fax number: …………………………………………………………………
E-mail address: …………………………………………………………………
Website: …………………………………………………………………

~ 3 ~
© 2014 VAN OS MEDICAL UK Ltd., Excel House, 2 Ashbrooke Park
, Lincoln Way, Sherburn in Elmet,North Yorkshire, LS25 6P
Tel. +44-(0)1904-720170, Fax +44-(0)1904-720398,
E-mail: sales@vanosmedical.com, www.vanosmedical.com
info@vanosmedical.nl, www.vanosmedical.com
User manual
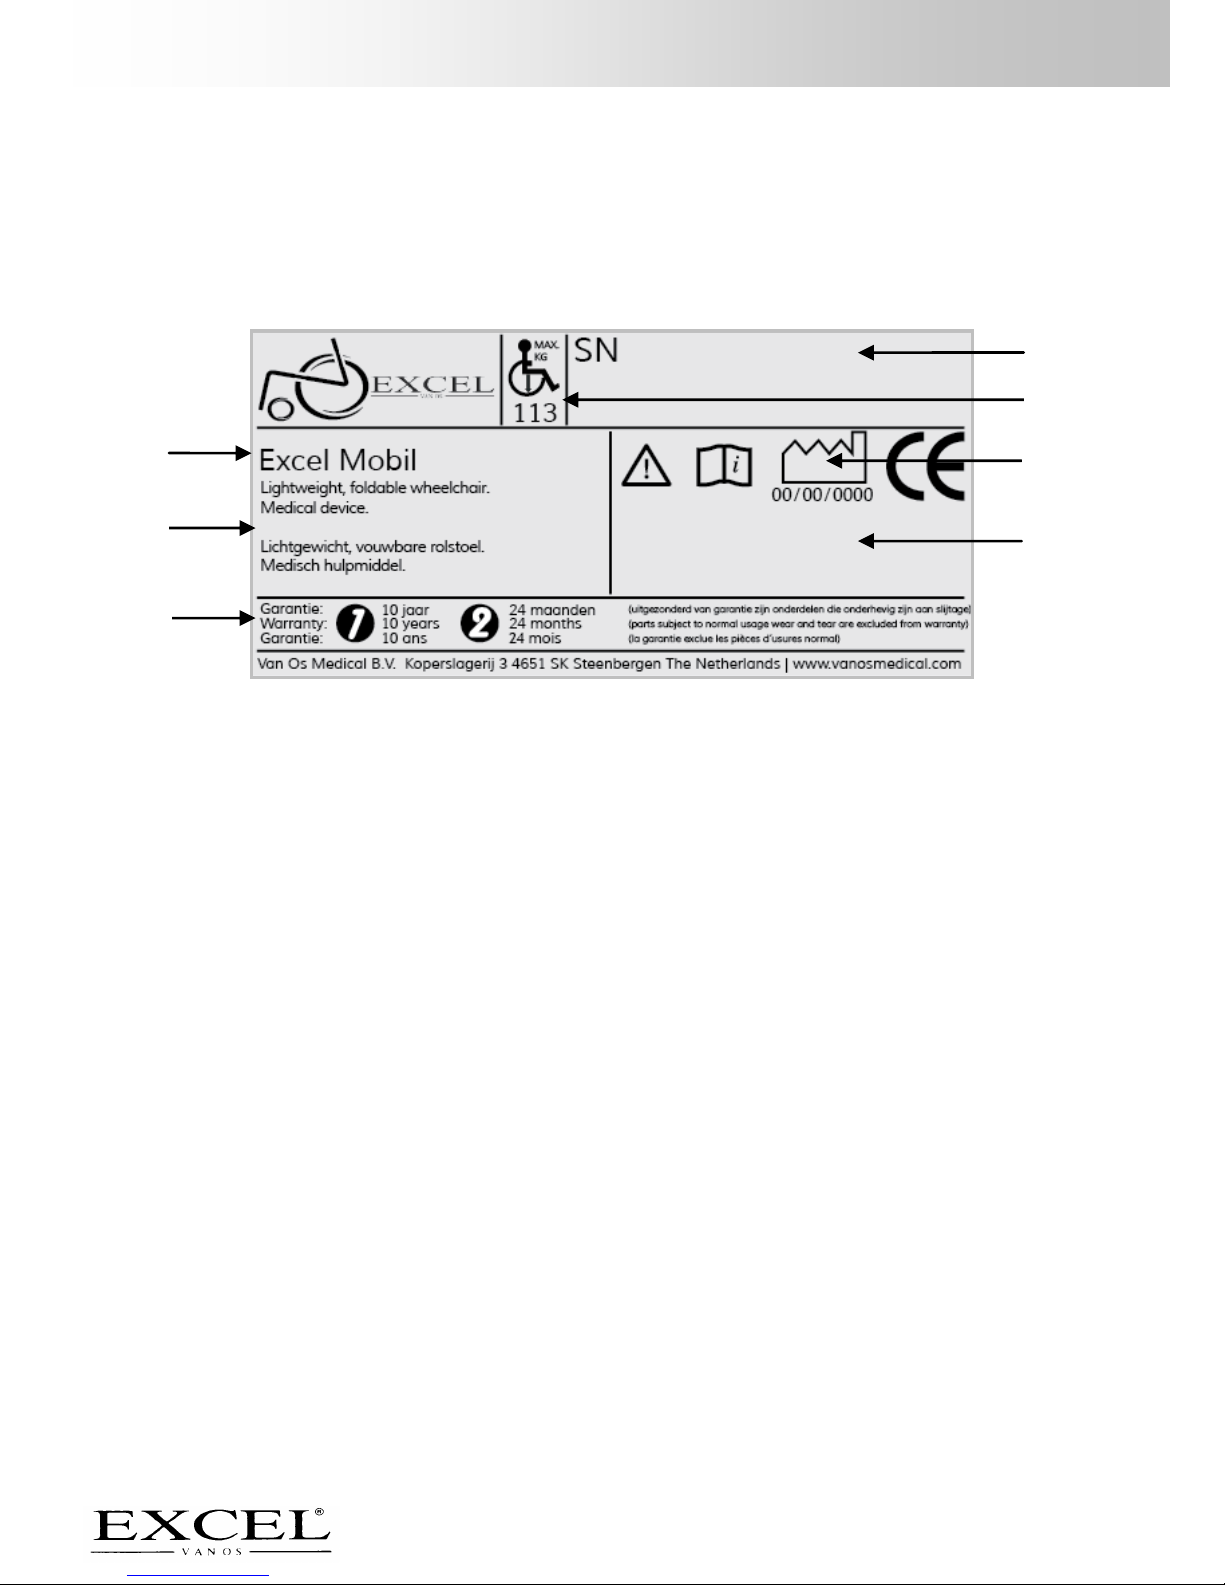
1 INDENTIFICATION .................................................................................................................... 4
2 GENERAL EXPLANATION OF YOUR WHEELCHAIR....................................................................... 5
2.1 COMPONENTS OF THE WHEELCHAIR ..............................................................................................5
2.2 GENERAL EXPLANATION OF THE FUNCTION AND POSSIBILITIES OF YOUR WHEELCHAIR ................................5
3 SAFFETY REGULATIONS ............................................................................................................ 6
3.1 GENERAL SAFETY......................................................................................................................6
3.2 WARNINGS FOR SAFE USE ..........................................................................................................6
4 USER INSTRUCTIONS ................................................................................................................ 7
4.1 SAFETY TIPS ............................................................................................................................7
4.2 NEGOTIATING PAVEMENTS AND UNEQUAL SURFACES ........................................................................8
4.3 GOING UP AND DOWN RAMPS.....................................................................................................9
4.4 GOING UP AND DOWN STAIRS .....................................................................................................9
5 INSTRUCTIONS FOR USE AND MOUNTING OPTIONS ............................................................... 10
5.1 TECHNICAL INFORMATION ........................................................................................................10
5.2 UNFOLDING AND FOLDING THE WHEELCHAIR.................................................................................11
5.3 USE OF THE FOOTPLATE AND FOOTREST .......................................................................................11
5.4 ARMRESTS............................................................................................................................13
5.5 BRAKES................................................................................................................................15
5.6 THE FOLDING BACKREST ...........................................................................................................15
5.7 USING THE PUSH HANDLES .......................................................................................................16
5.8 USE OF THE SEAT BELT .............................................................................................................17
5.9 USE OF THE QUICK RELEASE REAR WHEEL......................................................................................17
6 TRANSPORT THE WHEELCHAIR ............................................................................................... 18
6.1 DE-ASSEMBLY .......................................................................................................................18
6.2 ASSEMBLY ............................................................................................................................18
7 MAINTENANCE....................................................................................................................... 18
7.1 TYRES..................................................................................................................................18
7.2 BRAKES................................................................................................................................18
7.3 CROSS FRAME .......................................................................................................................18
7.4 REAR WHEELS........................................................................................................................18
7.5 FRONT CASTOR AND FRONT CASTOR FORK ....................................................................................19
7.6 UPHOLSTERY.........................................................................................................................19
7.7 CLEANING ............................................................................................................................19
8 PROBLEM ANYLYSIS AND SOLUTIONS..................................................................................... 20
9WARRANTY............................................................................................................................ 21
9.1 WARRANTY APPLICATION .........................................................................................................21
9.2 WARRANTY DEFINITION ...........................................................................................................21
10 GENERAL MAINTENANCE INSTRUCTIONS................................................................................ 22

~ 4 ~
© 2014 VAN OS MEDICAL UK Ltd., Excel House, 2 Ashbrooke Park
, Lincoln Way, Sherburn in Elmet,North Yorkshire, LS25 6P
Tel. +44-(0)1904-720170, Fax +44-(0)1904-720398,
E-mail: sales@vanosmedical.com, www.vanosmedical.com
info@vanosmedical.nl, www.vanosmedical.com
User manual
6
7
1 INDENTIFICATION
Your Excel Mobil wheelchair is equipped with a unique serial number. You can find
this number on the frame of your wheelchair. Below is an example of the frame label
on which you can find the identification number. Furthermore you will find the
explanation of the various data stored on the frame label listed below.
1. Model name The model name from your wheelchair.
2. Definition Description of the design of your wheelchair.
3. Warranty This is the warranty period. Chapter 9 describes
your warranty terms and conditions in more
detail.
4. Serial number The unique serial number. You will need this
number when making technical requests or if
warranty parts are required.
5. Maximum weight The largest occupant weight allowed for your
wheelchair.
6. Production date Production date of your wheelchair.
7. Type number This number indicates what type of wheelchair
you have, again this is always required when
making technical calls.
6
4
4
1
2
3
7
5

~ 5 ~
© 2014 VAN OS MEDICAL UK Ltd., Excel House, 2 Ashbrooke Park
, Lincoln Way, Sherburn in Elmet,North Yorkshire, LS25 6P
Tel. +44-(0)1904-720170, Fax +44-(0)1904-720398,
E-mail: sales@vanosmedical.com, www.vanosmedical.com
info@vanosmedical.nl, www.vanosmedical.com
User manual
17
2 GENERAL EXPLANATION OF YOUR WHEELCHAIR
2.1 Components of the wheelchair
1
In depth adjustable push handle
9
Backrest
2
In depth adjustable arm pad
10
Armrest
3
Rear wheel
11
Cloth protector
4
Rim
12
Seat
5
Brake
13
Cross frame
6
Bearing house
14
Footrest
7
Front fork
15
Heel strap
8
Front castor
16
Footplate
Your wheelchair is equipped with a number of elements and parts. You should know
these before continue reading this manual. Designs and specifications may change
without prior notice.
2.2 General explanation of the function and possibilities of your wheelchair
Your wheelchair is foldable and designed so that it is easy to transport. Your
wheelchair is a medical equipment product and is not a standard consumer product.
You must follow this manual completely to ensure good, optimal and safe use of your
wheelchair.
9
10
11
12
13
14
8
1
2
3
4
5
6
7
15
16

~ 6 ~
© 2014 VAN OS MEDICAL UK Ltd., Excel House, 2 Ashbrooke Park
, Lincoln Way, Sherburn in Elmet,North Yorkshire, LS25 6P
Tel. +44-(0)1904-720170, Fax +44-(0)1904-720398,
E-mail: sales@vanosmedical.com, www.vanosmedical.com
info@vanosmedical.nl, www.vanosmedical.com
User manual
3 SAFFETY REGULATIONS
Van Os Medical UK Ltd. specifically disclaims responsibility for any body injury or
property damage which may occur during any use which does not comply with laws or
ordinances. The Excel Mobil is if the instructions for use as described in this manual
are followed you will have a highly secure and stable product. It is however possible
that, when the Excel Mobil is not used properly, dangerous situations may occur.
3.1 General safety
Protect your Excel wheelchair by checking it regularly. When a part of your
wheelchair is not functioning properly, a dangerous situation could occur.
Warning:
You must keep your wheelchair in a good state to guarantee safe use.
3.2 Warnings for safe use
Warnings:
Failure to follow all the instructions in this manual may result in damage to the
scooter or serious injury;
Avoid using your wheelchair on roads. Use pavements if possible;
Do not use your wheelchair on sand, rough area, wet and slippery surfaces or
surfaces with little grip;
Do not use the wheelchair when it is broken or is not functioning correctly;
This model of wheelchair is not suitable for use as a seat in a motor vehicle.
The wheelchair could fail in a vehicle impact, leading to injury of the
wheelchair occupant or others;
Do not lean over the back of the wheelchair. This can result in rolling over the
wheelchair;
Do not drive into curbs;
For suitable protection from potential obstruction the footrests should be a
minimum of 7 cm clear of the ground;
Engage the brakes when you are in or on a lift and when you want to get off;
Before leaning or reaching forward, push your bottom to the back of the chair
and face the castors forwards;
Never connect anything to the wheels, this may cause damage to the
wheelchair and also effect the balance of the wheelchair and may injure the
user;
Place the wheelchair on a stable, flat surface and engage the brakes before
transferring to or from the wheelchair;
The maximum weight capacity has been indicated on your wheelchair frame
label;

~ 7 ~
© 2014 VAN OS MEDICAL UK Ltd., Excel House, 2 Ashbrooke Park
, Lincoln Way, Sherburn in Elmet,North Yorkshire, LS25 6P
Tel. +44-(0)1904-720170, Fax +44-(0)1904-720398,
E-mail: sales@vanosmedical.com, www.vanosmedical.com
info@vanosmedical.nl, www.vanosmedical.com
User manual
Do not stand on the footrests, this will cause the wheelchair to tip over and
injure the user (figure 1);
Unauthorized modification and or use of parts not supplied by Van Os Medical
UK Ltd. will invalidate the warranty of this wheelchair and may lead to injury
to the user and or damage to the wheelchair.
4 USER INSTRUCTIONS
You will have to learn the characteristics of your wheelchair. It is most important to
learn the safest methods to develop the daily activities in accordance to your life
style. Consult your medical advisor or therapist for assistance by developing safe and
effective techniques for your daily activities and your physical possibilities.
4.1 Safety tips
Daily operations such as getting off the wheelchair, reaching and bending in the
wheelchair will cause a change of weight distribution and in the center of gravity of
you and your wheelchair. You will need to perform these movements and techniques
as described below.
Transferring
Transferring in a wheelchair is a difficult manoeuvre. Consult your physical therapist
for assistance in developing your individual technique. The possibilities you have for
making a transfer are depending on your physical characteristics. We advise you to
discuss this first with your physical therapist.
However if you have sufficient body strength and you want to transfer to and from
the wheelchair can you best do this in the following manner:
Figure 1

~ 8 ~
© 2014 VAN OS MEDICAL UK Ltd., Excel House, 2 Ashbrooke Park
, Lincoln Way, Sherburn in Elmet,North Yorkshire, LS25 6P
Tel. +44-(0)1904-720170, Fax +44-(0)1904-720398,
E-mail: sales@vanosmedical.com, www.vanosmedical.com
info@vanosmedical.nl, www.vanosmedical.com
User manual
To get out of the wheelchair:
First of all you must make sure that your wheelchair stands as closely as possible to
the place of where you wish to transfer to. Put the castors forward and engage the
brakes. Swing away the footplates and place your feet on the ground. You are now in
position to carry out the operation. Shift your weight to the front of the chair, you
can use the armrests as a support and move yourself to the place where you wish to
transfer to. If necessary you can use a transfer board.
To get in:
To get in your wheelchair you need to do the same things as when you want to get
out of the wheelchair, only in reversed order.
Reaching:
We strongly recommend that you seek the help of an attendant to pick something up
for you.
4.2 Negotiating pavements and unequal surfaces
Going up the pavement:
The attendant can help you in two different ways, however we advise you to do it
the first way:
1. In the first method for going up a pavement you and the attendant reach to
pavement facing forward. The attendant must pull the push handles towards
him and place his foot on the stepper on the rear side of the wheelchair,
see figure 2. Because of this there is a leverage effect that tips the
wheelchair.
2. In the second method the attendant is already standing on the pavement
and makes sure that the wheelchair is positioned with the rear wheels as
close to the pavement as possible. The user of the wheelchair needs to lean
backwards. This way the wheelchair will tip backwards and the attendant
can pull the chair on the pavement. The attendant needs to make sure that
the front wheels are on the pavement before he lets the wheelchair down.
Warning:
Do not drive into curbs!
Figure 2

~ 9 ~
© 2014 VAN OS MEDICAL UK Ltd., Excel House, 2 Ashbrooke Park
, Lincoln Way, Sherburn in Elmet,North Yorkshire, LS25 6P
Tel. +44-(0)1904-720170, Fax +44-(0)1904-720398,
E-mail: sales@vanosmedical.com, www.vanosmedical.com
info@vanosmedical.nl, www.vanosmedical.com
User manual
Going down the pavement:
The attendant should move the wheelchair forward to the curb. Then the user should
lean back so the attendant can tilt the wheelchair to find a balance point. When the
wheelchair is balanced the attendant can move the wheelchair slowly off the curb.
When the wheelchair is off the pavement, the attendant can let the front wheels
back onto the ground.
4.3 Going up and down ramps
Inspect the slope always for risks, such as holes or slippery and uneven surfaces
before you drive off.
Warning:
Do not carry any weight on the back of the wheelchair whilst ascending. This
changes the balance and increases the chances of tipping backwards.
You may recall earlier in the manual that you were instructed to ensure the footrests
are a minimum 7 cm from the ground. One reason for this is that when you are
descending a slope you need a minimum of this amount of clearance in order to
ensure the footplates do not catch the end of the slope.
4.4 Going up and down stairs
Stairs are one of the largest obstacles for wheelchair users. However, with a little
help from others it is possible to climb up and down the stairs. Assessment of the
weight that has to be moved should be undertaken by the attendants prior to this
manoeuvre.
Going up the stairs
You need to go up the stairs backwards with two attendants, one attendant at the
front and one attendant at the back. The attendant at the back grabs the push
handles and let the wheelchair tip backwards until it is in balance. When the wheels
are in balance the attendant at the front needs to grab the side frames. You are now
in position to climb the stairs. The attendant on the front pushes the side frames up
until they are above the first step and the attendant at the back makes the first step
on the stairs. Repeat this technique until the last step of the stair. You can let the
front castors down when the attendant at the front has taken the last step.

~ 10 ~
© 2014 VAN OS MEDICAL UK Ltd., Excel House, 2 Ashbrooke Park
, Lincoln Way, Sherburn in Elmet,North Yorkshire, LS25 6P
Tel. +44-(0)1904-720170, Fax +44-(0)1904-720398,
E-mail: sales@vanosmedical.com, www.vanosmedical.com
info@vanosmedical.nl, www.vanosmedical.com
User manual
Going downstairs
To go downstairs, the wheelchair should be facing forwards. The rear attendant
should tip the wheelchair until it balances. The front attendant should support the
wheelchair by holding the side frames. The wheelchair should then be slowly guided
down each step.
Warning:
Never lift a wheelchair by the push handles, armrests or footrests. Always hold
a part of the main frame.
MAKING ADJUSTMENTS TO YOUR WHEELCHAIR CAN CAUSE BIG RISKS FOR YOUR
SAFETY AND THE FUNCTION OF YOUR WHEELCHAIR. ADJUSTMENTS MADE BY
YOURSELF ARE STRONGLY ADVISED AGAINST AND CARRIED OUT AT YOUR OWN
RISK.
5 INSTRUCTIONS FOR USE AND MOUNTING OPTIONS
In this chapter we will explore all the possibilities that you have with your
wheelchair. All setting and user instructions, such as the removal of the footrest, will
be discussed.
Your wheelchair is a Excel Mobil
5.1 Technical information
Excel Mobil
Seat width 40, 42½, 45 and 50 cm
Seat depth 40, 42½, 45 and 50 cm
Seat height 50½ cm
Backrest height 48 cm
Total width Seat width + 31 cm
Total length 101 cm (with the footrests)
Total height Between the 91½ cm and 103 cm
Armrest height 30 cm
Maximum user weight 100 kg

~ 11 ~
© 2014 VAN OS MEDICAL UK Ltd., Excel House, 2 Ashbrooke Park
, Lincoln Way, Sherburn in Elmet,North Yorkshire, LS25 6P
Tel. +44-(0)1904-720170, Fax +44-(0)1904-720398,
E-mail: sales@vanosmedical.com, www.vanosmedical.com
info@vanosmedical.nl, www.vanosmedical.com
User manual
5.2 Unfolding and folding the wheelchair
Unfolding the wheelchair
Make sure you stand next to the wheelchair;
Grab both seat tubes and move them apart, photo 1;
Push both seat tubes downwards so that the wheelchair will unfold;
Go to the front of the wheelchair and push again on the seat tubes to ensure
that they are directly on the frame, photo 2. This is confirmed when the seat
upholstery is flat;
Place the footrest onto the wheelchair and fold down the footplates;
Replace the seat cushion, if your wheelchair is equipped;
You can now use the wheelchair.
Folding the wheelchair
Fold the footplates and remove the footrests;
Remove the seat cushion, if your wheelchair is equipped;
Make sure you stand next to the wheelchair;
Loosen the tension bar. You can do this by turning the knob and pull down the
strap;
Place one hand at centre of the front side of the seat and one hand at the
centre of the rear side of the seat;
Pull the seat straight up until the frame is completely folded.
5.3 Use of the footplate and footrest
Adjusting the heel straps
You can adjust the heel straps with the Velcro;
Adjust the heel strap to the desired width and fasten the Velcro;
Check if the Velcro of the heel straps is tightened properly.
Photo 1
Photo 2

~ 12 ~
© 2014 VAN OS MEDICAL UK Ltd., Excel House, 2 Ashbrooke Park
, Lincoln Way, Sherburn in Elmet,North Yorkshire, LS25 6P
Tel. +44-(0)1904-720170, Fax +44-(0)1904-720398,
E-mail: sales@vanosmedical.com, www.vanosmedical.com
info@vanosmedical.nl, www.vanosmedical.com
User manual
Folding the footplate away
Go to the front of the wheelchair and get a hold of the footplate, photo 3 at
the front side;
Fold the footplate in the direction of the footrest.
Fold down the footplate
Go to the front of the wheelchair and get a hold of the footplate, photo 3 at
the front side;
Fold down the footplate.
Removing the footrest from the wheelchair
Stand in front of the wheelchair;
Push the black adjustment lever away from you, photo 4;
You now can swing away the footrest;
Swing away the footrests 90ᵒto the outside of your wheelchair and pull the
complete footrest straight upwards from the receiving tube.
Photo 3
Photo 4

~ 13 ~
© 2014 VAN OS MEDICAL UK Ltd., Excel House, 2 Ashbrooke Park
, Lincoln Way, Sherburn in Elmet,North Yorkshire, LS25 6P
Tel. +44-(0)1904-720170, Fax +44-(0)1904-720398,
E-mail: sales@vanosmedical.com, www.vanosmedical.com
info@vanosmedical.nl, www.vanosmedical.com
User manual
Placing the footrest back on your wheelchair
Stand in front of the wheelchair;
Place the footrest with an angle of 90ᵒback on the wheelchair;
Swing away the footrest to the front;
You will hear a click this confirms the footrest is in the right place.
Adjusting the height of the footrest
Stand in front of the wheelchair;
Remove the footrest from the wheelchair;
Loosen the star knob at the rear side of the footplate, photo 5;
Move the footplate up or down until the desired height;
Tighten the star knob to lock the footplate;
Make sure that the footplate is correct locked by moving it up and down
5.4 Armrests
Removing the armrest
Stand next to the wheelchair;
Loosen the screws, photo 6;
Move the armrest upwards to remove it.
Photo 6
Photo 5

~ 14 ~
© 2014 VAN OS MEDICAL UK Ltd., Excel House, 2 Ashbrooke Park
, Lincoln Way, Sherburn in Elmet,North Yorkshire, LS25 6P
Tel. +44-(0)1904-720170, Fax +44-(0)1904-720398,
E-mail: sales@vanosmedical.com, www.vanosmedical.com
info@vanosmedical.nl, www.vanosmedical.com
User manual
Adjusting the armrest height
Stand next to the wheelchair;
Loosen the 6 screws, photo 6;
Move the armrest up or down until the desired height;
Tighten the screws to lock the armrest;
Make sure the armrest is securely tightened.
Adjusting the depth of the arm pad
Stand next to the wheelchair;
Press the silver button, photo 7;
Move the arm pad to the front of back until the desired depth;
Loosen the silver button;
Check if the arm pad is securely tightened by moving it for and backwards.
Photo 7

~ 15 ~
© 2014 VAN OS MEDICAL UK Ltd., Excel House, 2 Ashbrooke Park
, Lincoln Way, Sherburn in Elmet,North Yorkshire, LS25 6P
Tel. +44-(0)1904-720170, Fax +44-(0)1904-720398,
E-mail: sales@vanosmedical.com, www.vanosmedical.com
info@vanosmedical.nl, www.vanosmedical.com
User manual
5.5 Brakes
Activate the brake of the wheelchair
When you are placed in the wheelchair
Grasp the black handle of the brake, photo 8;
Push the lever forward. When you hear a click, this confirms that the brake is
activated.
De-activate the brake of the wheelchair
When you are placed in the wheelchair
Grasp the black handle of the brake, photo 8;
Pull the handle towards you to de-activate the brake.
5.6 The folding backrest
The folding backrest
Make sure you stand behind the wheelchair;
Remove the armrests;
Squeeze the silver button, photo 9 at both sides of the back side of the
wheelchair;
Push down the push handles until the backrest is completely folded, photo 10.
Photo 8
Photo 9
Photo 10

~ 16 ~
© 2014 VAN OS MEDICAL UK Ltd., Excel House, 2 Ashbrooke Park
, Lincoln Way, Sherburn in Elmet,North Yorkshire, LS25 6P
Tel. +44-(0)1904-720170, Fax +44-(0)1904-720398,
E-mail: sales@vanosmedical.com, www.vanosmedical.com
info@vanosmedical.nl, www.vanosmedical.com
User manual
Unfolding backrest
Make sure you stand behind the wheelchair;
Grab the push handles and pull the backrest towards you;
You will hear a click this confirms that the backrest is completely folded;
Replace the armrests onto the wheelchair.
5.7 Using the push handles
Adjust the height of the push handles
Make sure you stand behind the wheelchair;
Loosen the black lever, photo 11 and the side of the push handle;
Move the push handles up or down until the desired height;
Tighten the black lever back to lock the push handle;
Check if the push handle is securely tightened by moving it up and down.
Photo 11

~ 17 ~
© 2014 VAN OS MEDICAL UK Ltd., Excel House, 2 Ashbrooke Park
, Lincoln Way, Sherburn in Elmet,North Yorkshire, LS25 6P
Tel. +44-(0)1904-720170, Fax +44-(0)1904-720398,
E-mail: sales@vanosmedical.com, www.vanosmedical.com
info@vanosmedical.nl, www.vanosmedical.com
User manual
5.8 Use of the seat belt
Your wheelchair is equipped with a seat belt which you can use the following way:
When in the wheelchair, you can fasten the belt by clicking the two loose ends
together, photo 12;
If the belt is too loose or too tight you can make it more secure by pulling the
short loose strap. If you wish to loosen the safety belt you should pull the long
loose strap;
To release the seat belt, you press the red button with 'press' printed on.
5.9 Use of the quick release rear wheel
Removing the rear wheel
The rear wheels of the wheelchair are removable by using the 'quick-release’ system:
Stand next to the wheelchair;
Tilt the wheelchair away from you;
Press the black button in the middle of the rear wheel, photo 13 and pull the
rear wheel towards you.
To replace the rear wheel you should follow the above steps in reversed order. Check
if the wheels are correctly locked before using the wheelchair.
Photo 13
Photo 12

~ 18 ~
© 2014 VAN OS MEDICAL UK Ltd., Excel House, 2 Ashbrooke Park
, Lincoln Way, Sherburn in Elmet,North Yorkshire, LS25 6P
Tel. +44-(0)1904-720170, Fax +44-(0)1904-720398,
E-mail: sales@vanosmedical.com, www.vanosmedical.com
info@vanosmedical.nl, www.vanosmedical.com
User manual
6 TRANSPORT THE WHEELCHAIR
Your Excel wheelchair is designed to be easily transported by car. Your wheelchair is
foldable which makes it easy to transport the wheelchair.
6.1 De-assembly
For de-assembly your wheelchair please refer to chapter 5.
6.2 Assembly
For assembly your wheelchair please refer to chapter 5.
7 MAINTENANCE
There are a lot of things you can do yourself to keep your wheelchair in optimum
condition. If you regularly check the wheelchair and perform (small) maintenance,
this will extend the lifetime and increase the ease of use.
7.1 Tyres
Examine tyres periodically for wear and replace them as needed.
7.2 Brakes
Inspect both brakes. Ensure that all the parts of the brake are in the right position
and fastened secure.
Make sure that the mechanism is functioning smoothly. If it is not functioning
smoothly put some oil at turning points with one or two drips of WD40 oil or
Teflon;
Make sure the brakes do not come into contact with the wheels as you are
driving.
7.3 Cross frame
The cross frame of the wheelchair has to be in a good condition. The cross frame is
the basic of your wheelchair.
Make sure the wheelchair can easily be fold and unfold;
Make sure the wheelchair travels in a straight line while driving;
Make sure the cross frame is not bent and shows no wear signs.
7.4 Rear wheels
A good adjustment of the rear wheels improves the stability of the wheelchair.
Make sure that the wheels can move freely without touching anything;
Make sure there is no margin on the rear wheels.

~ 19 ~
© 2014 VAN OS MEDICAL UK Ltd., Excel House, 2 Ashbrooke Park
, Lincoln Way, Sherburn in Elmet,North Yorkshire, LS25 6P
Tel. +44-(0)1904-720170, Fax +44-(0)1904-720398,
E-mail: sales@vanosmedical.com, www.vanosmedical.com
info@vanosmedical.nl, www.vanosmedical.com
User manual
7.5 Front castor and front castor fork
The front fork must move and turn freely to ensure a smooth ride.
Make sure the nut of the front fork is nor to loose or to tight. When the nut is to
loose, the wheels will rotate but the ride will be uncomfortable. If the nut is to
tight, the chair will be difficult to steer because of the bearings getting pushed
so the balls can not move freely. When the nut is correct in place the front
wheel will stop slowly;
Make sure the front castor shows no wear signs.
7.6 Upholstery
It is important to check the upholstery of your wheelchair regularly. Torn or worn
upholstery can no longer support human weight and this can create dangerous
situations.
Check the textile coating for holes, cracks and worn spots;
Check the upholstery-mounting grommets to make sure that they are all
correctly aligned and secure.
7.7 Cleaning
It is important to clean your wheelchair regularly.
Clean the upholstery, chassis and plastic components on the wheelchair
regularly with a mild soap and water. Never use abrasive cleaners, they can
damage the varnish. Also never use steam or high pressure cleaners;
Wax the varnish of the chassis regularly. Never use solvents, abrasive waxes,
caustic chemicals or spray silicone.
Dry the wheelchair after cleaning. Also dry you wheelchair after you have been, for
example, in a rainstorm.
Tip
You can also use a car shampoo. This cleans, protects and gives a beautiful
gloss to your wheelchair.
Table of contents
Other Excel Wheelchair manuals
Popular Wheelchair manuals by other brands

Stealth Products
Stealth Products The World's Best Laterals user manual

Lumex
Lumex 7921R Series Assembly & operation instructions

Merits
Merits P322 series owner's manual

Sunrise Medical
Sunrise Medical Quickie installation instructions

Nissin
Nissin CB user manual

MINOS
MINOS CRONOS Instruction and maintenance manual