Valex M-MU 18-MULTI ONE User manual

- 1 -
Multiutensile a batteria M-MU 18 -MULTI ONE
ISTRUZIONI D’USO
Istruzioni originali
Cordless multifunctional tool M-MU 18 -MULTI ONE
INSTRUCTION MANUAL
Translation of the original instructions
S401631
25.10.2018
ATTENZIONE! Prima di usare la macchina, leggete e comprendete le istruzioni di sicurezza e le istruzioni d’uso fornite.
CAUTION! Before using the machine, read and understand the supplied safety instructions and operating instructions.

- 2 -
Multiutensile a batteria
Cordless multifunctional tool
a 18 V
b 5000-19000 min-1
c 3,2°
f 75 dB(A) K=3
g 86 dB(A) K=3
h 20,3 m/s2 K=1,5
i 880 g
DATI TECNICI
a. Tensione
b. Numero di giri a vuoto
c. Angolo di oscillazione
f. Livello di pressione acustica LpA
g. Livello di potenza acustica LwA
h. Livello di vibrazioni con trapanatura nel metallo ah, ag
i. Peso
TECHNICAL DATA
a. Voltage
b. No load rpm
c. Oscillating angle
f. Acoustic pressure level LpA
g. Acoustic power level LwA
h. Vibration emission, drilling in metal ah, ag
i. Weight
DICHIARAZIONE DI CONFORMITA’
La ditta indicata in etichetta dichiara sotto
la propria responsabilità che il prodotto ivi
citato è conforme ai requisiti essenziali di
sicurezza e salute contenuti nelle seguenti
direttive europee:
2006/42/CE, 2014/30/CE, 2011/65/CE
DECLARATION OF CONFORMITY
The firm indicated on the label declares, under
its own responsibility, that the product cited
there complies with the essential health and
safety requirements contained in the following
European directives:
2006/42/EC, 2014/30/EC, 2011/65/EC
Persona autorizzata a costituire il fascicolo tecni-
co presso/ The person authorized to compile
the technical file is in
Valex SpA - Via Lago Maggiore 24
36015 Schio (VI) - Italy
Schio, 10.2018
Un procuratore - Attorney
SMIDERLE STEFANO
M-MU 18
MULTI ONE

- 3 -

- 4 -

- 5 -

- 6 -
i
SIMBOLOGIA
Osservate con attenzione la simbologia della fig.B e memorizzate il
rispettivo significato. Una corretta interpretazione dei simboli consente
un uso più sicuro della macchina.
1 Modello macchina
2 Dati tecnici
3 Numero di lotto (le prime 2 cifre del lotto indicano l’anno di co-
struzione)
V Volt
Hz Hertz
~ corrente alternata
Corrente continua
W Watt
mm millimetri
m metri
s secondi
kg chilogrammi
novelocità a vuoto
min-1 giri al minuto
dB decibel
Vi ringraziamo per averci preferito nella scelta di questo utensile elettri-
co, di seguito chiamato ‘multiutensile’, ‘elettroutensile’ o ‘apparecchio’.
ATTENZIONE! Il multiutensile con gli accessori in dotazione è
idoneo per levigare a secco legno, ferro, plastica e materiali simili
usando i rispettivi fogli abrasivi.
L’apparecchio è anche concepito per segare legno, plastica e ma-
teriali simili, e per raschiare moquette incollate, mastice residuo,
vernici vecchie e applicazioni analoghe.
Altri accessori possono ampliare il campo di utilizzo, fate riferi-
mento alla relativa documentazione E’ vietato l’utilizzo di materiali
pericolosi e in ambienti con pericolo di incendio.
Il multiutensile è destinata ad un utilizzo hobbystico e non professionale.
Questo istruzioni riportano le informazioni e quanto ritenuto necessario
per il buon uso, la conoscenza e la normale manutenzione dell’utensile.
Esse non riportano le informazioni sulle tecniche di lavorazione dei vari
materiali; l’utilizzatore troverà maggiori notizie su libri e pubblicazioni
specifiche o partecipando a corsi di specializzazione.
COMPONENTI
Fare riferimento alla Fig. A e seguenti, allegate alle presenti istruzioni.
1. Alloggiamento batteria
2. Impugnatura principale
3. impugnatura supplementare
4. Sede dell’utensile
5. Flangia di fissaggio utensile
6. Leva di sblocco utensile
7. Interruttore di avviamento/arresto
8. Regolatore elettronico di velocità
9. Raschietto
10. Platorello
11. Carta abrasiva
12. Lama
13. Luce led
INSTALLAZIONE
ATTENZIONE! La Ditta costruttrice declina ogni responsabilità
per gli eventuali danni diretti e/o indiretti causati da un errato
allacciamento.
ATTENZIONE! Prima di effettuare le seguenti operazioni assi-
curatevi che la batteria sia scollegata dall’apparecchio.
TRASPORTO
Per trasportare l’utensile utilizzate sempre il suo imballo o la sua va-
ligetta (se presente); questo lo preserverà da urti, polvere e umidità
che ne possono compromettere il regolare funzionamento.
Durante il trasporto togliete il disco abrasivo/spazzola ecc. dalla
macchina.
MOVIMENTAZIONE
Afferrate saldamente l’impugnatura (Fig.A, 2) senza azionare l’inter-
ruttore, mantenete l’utensile lontano dal vostro corpo e dopo l’uso
appoggiatelo senza battere.
MESSA IN SERVIZIO
Nel luogo che utilizzerete l’utensile elettrico è opportuno considerare:
-che la zona non sia umida e sia al riparo dagli agenti atmosferici.
-che attorno sia prevista un’ampia zona operativa libera da impedimenti.
-che vi sia una buona illuminazione.
-che sia utilizzata in vicinanza dell’interruttore generale con differen-
ziale.
-che l’impianto di alimentazione sia dotato di messa a terra conforme
alle norme (solo se l’utensile elettrico è di classe I, cioè dotato di
spina con cavo di terra).
-che la temperatura ambiente sia compresa tra 10° e 35° C.
-che l’ambiente non sia in atmosfera infiammabile/esplosiva.
Estraete la macchina ed i componenti e verificate visivamente la loro
perfetta integrità; a questo punto procedete ad una accurata pulizia per
togliere gli eventuali oli protettivi dalle superfici metalliche.
MONTAGGIO DEGLI UTENSILI
Utensili con attacco aperto: seguite i pittogrammi riportati in Fig.C.
Utensili con attacco chiuso: seguite i pittogrammi riportati in Fig.D.
Attenzione: Indossate guanti a protezione delle mani.
Attenzione: i perni/dentini devono entrare nella sede dell’u-
tensile.
- Verificate che l’utensile sia ben fissato.
Fissaggio dei fogli abrasivi
- Il foglio abrasivo si applica esercitando una leggera pressione sul
velcro, si sostituisce tirandolo.
MONTAGGIO IMPUGNATURA LATERALE (Fig.A, 3)
L’impugnatura laterale può essere montata su più lati dove è presente
il foro filettato; di norma viene fissata sul lato sinistro per impugnarla
con la mano sinistra, ma può essere montata nella posizione a voi più
favorevole (es. per mancini). Inseritela nel foro filettato della macchina
e avvitatela bene a fondo.
CARICA DELLA BATTERIA (seguire le istruzioni allegate al
caricabatterie)
ATTENZIONE! Prima di utilizzare l’apparecchio è necessario
effettuare una carica completa della batteria.
ATTENZIONE! Ricaricare soltanto con un caricabatterie previsto
per questo tipo di apparecchio. Un caricabatterie che è adeguato
per un tipo di gruppo di batterie può creare un rischio di incendio
quando viene utilizzato con altri gruppi di batterie.
Per mantenere efficiente la batteria, non scaricarla completamente.
Eseguite una successiva ricarica completa:
- Dopo ogni utilizzo.
- Almeno ogni 4 mesi, anche in caso di inutilizzo.
- Se durante il lavoro notate un calo evidente delle prestazioni dell’ap-
parecchio.

- 7 -
INSERIMENTO E RIMOZIONE DELLA BATTERIA (Fig.E)
- Inserite la batteria attraverso le guide presenti sull’alloggiamento
batteria (1).
- Estraete la batteria dalla sede dell’utensile agendo sul dispositivo di
sgancio (8).
AVVIAMENTO, ARRESTO E REGOLAZIONE VELOCITA’
ATTENZIONE! Prima di avviare l’utensile elettrico è obbliga-
torio indossare i dispositivi di protezione individuale elencati nel
manuale di sucurezza, capitolo AVVERTENZE DI SICUREZZA PER
UTENSILI MULTIFUNZIONE e AVVERTENZE DI SICUREZZA PER LA
RUMOROSITA’ E PER LE VIBRAZIONI.
ATTENZIONE! Prima dell’avviamento e durante la fase di lavoro,
afferrare saldamente l’utensile con entrambe le mani senza mai
abbandonare la presa, in modo tale che, in caso di pericolo, possiate
arrestarla immediatamente.
ATTENZIONE! Durante l’utilizzo fate in modo che nessuno si
avvicini alla vostra zona di lavoro.
ATTENZIONE! Prima di collegare la batteria all’elettroutensile,
verificare che l’interruttore sia in posizione OFF (“0”).
AVVIAMENTO
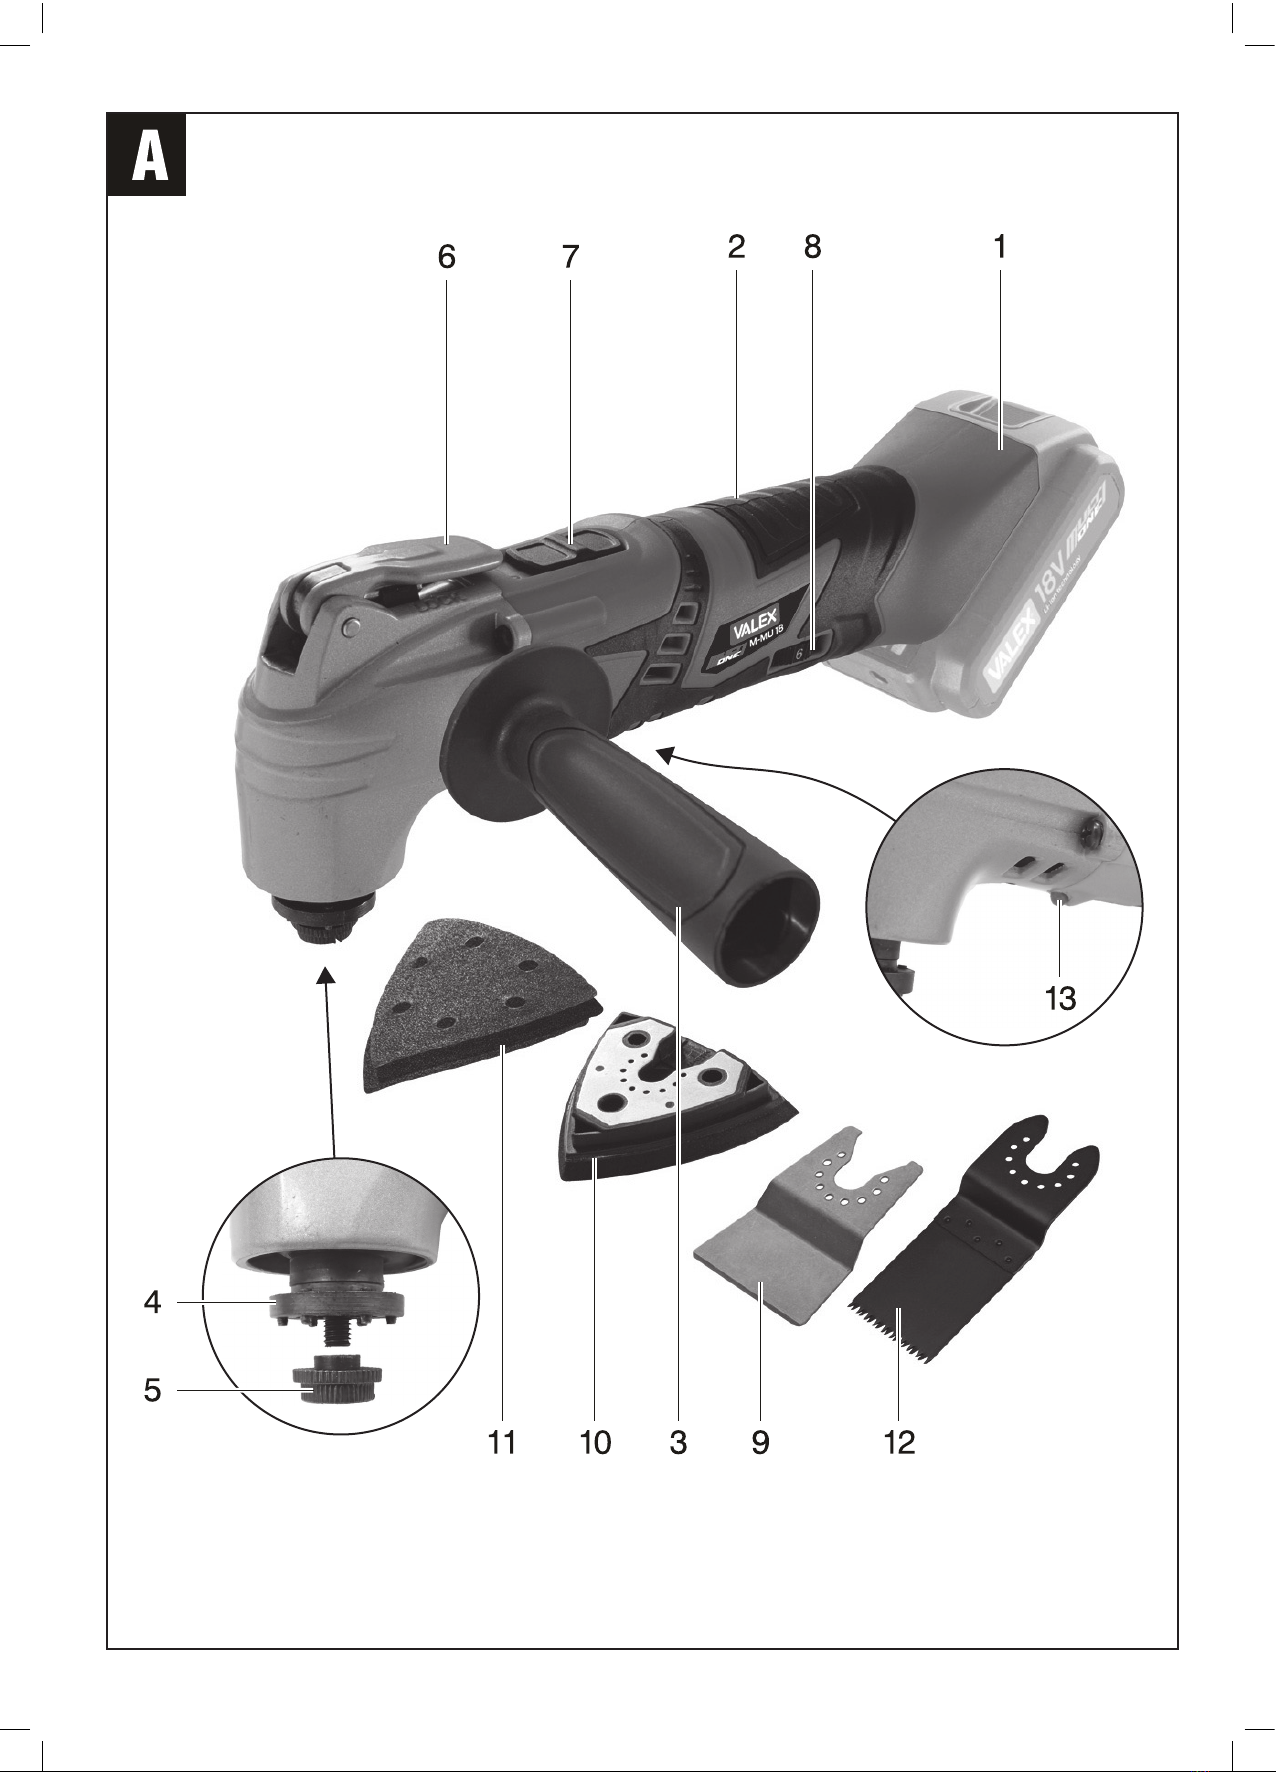
1) Inserite la batteria carica nell’alloggiamento dell’aparecchio (Fig.A, 1).
2) Afferrate l’utensile usando entrambe le impugnature (Fig.A, 2-3)
3) Per avviare l’utensile spostate il pulsante dell’interruttore (Fig.A, 4)
in ON (“I”).
ARRESTO
Per arrestare l’utensile spostate l’interruttore (Fig.A, 4) in OFF(“0”)
mantenendo ben saldo l’utensile.
REGOLAZIONE VELOCITÀ
Per variare la velocità é necessario ruotare il regolatore (Fig.A, 8)
secondo la scala:
numero alto = velocità alta
numero basso = velocità bassa
Vi consigliamo di ripetere queste operazioni alcune volte prima di
iniziare il lavoro in modo da familiarizzare il più possibile con i comandi.
Se osservate delle anomalie di funzionamento spegnete l’utensile
elettrico e consultate il capitolo “Problemi, cause e rimedi”.
Quando non lavorate spegnete e staccate la batteria.
ISTRUZIONI PER L’USO
Dopo aver letto attentamente i capitoli precedenti, seguite scrupolo-
samente questi consigli che vi permetteranno di ottenere il massimo
delle prestazioni.
Procedete con calma in modo da prendere familiarità con tutti i co-
mandi; solo dopo aver acquisito una buona esperienza riuscirete a
sfruttarne a fondo tutte le potenzialità.
Operazioni di levigatura
Montando il platorello (Fig.A, 10) e applicando una carta abrasiva
(Fig.A, 11) l’utensile può essere utilizzato per lavori di levigatura in
particolare di angoli e bordi di difficile accesso.
- Prima di operare su oggetti importanti (esempio mobili, veicoli ecc.)
effettuate una prova di levigatura per verificare di aver installato
l’abrasivo adatto.
- Se il pezzo è piccolo e leggero fissatelo sempre con una morsa
durante la lavorazione; se non ben fissato l’azione della macchina
potrebbe scagliarlo contro di voi.
- Non lavorate pezzi umidi o bagnati o con abrasivo umido.
- Di norma utilizzate inizialmente un abrasivo con grana più grossa
(esempio 40), poi rifinite le superficie lavorata con un abrasivo di
grana più fine (esempio 120 o maggiore).
- Assicuratevi che l’abrasivo sia correttamente montato e perfetta-
mente aderente alla piastra orbitante.
- Avviate l’ apparecchio solo dopo averlo impugnato saldamente
nell’impugnatura/e.
- Appoggiate il platorello sul pezzo e azionate la macchina esercitando
una pressione leggera.
- Non insistere nella levigatura nello stesso punto ma muovere costan-
temente la macchina nella zona di lavoro.
- Una eccessiva pressione della mano/i sulla macchina non migliora
le prestazioni ma rischia di surriscaldare il motore con successivi
guasti non coperti dalla garanzia, o può provocare un incendio a
causa delle alte temperature prodotte sul pezzo.
- Non coprite con la mano/i le feritoie di ventilazione della macchina.
- Sostituite l’abrasivo non appena è consumato o deteriorato, eviterete
di far lavorare la macchina sotto carico eccessivo, eviterete di dan-
neggiare il platorello ed otterrete un risultato migliore con un minor
sforzo e tempo.
Operazioni di rasatura
Montando il raschietto (Fig.A, 9) è possibile ad esempio raschiare
vernici vecchie o rimuovere colla per moquette e colla per piastrelle.
Portate l’utensile verso il punto da raschiare.
Iniziate con un angolo di incidenza piatto e con pressione di contatto
bassa.
Attenzione: In caso di eccessiva pressione di contatto la superficie
(per es. legno, intonaco) può danneggiarsi.
Operazioni di taglio:
Montando la lama (Fig.A, 12) è possibile segare piccoli pezzi di legno,
cartongesso, plastica e simili.
Nel segare fate attenzione ai corpi estranei nel materiale e toglieteli
se necessario.
Accessori opzionali:
Valex fornisce accessori opzionali che consentono ulteriori tipi di
lavorazione.
MANUTENZIONE
ATTENZIONE! Prima di ogni controllo o regolazione togliete la
batteria dall’apparecchio.
ATTENZIONE! Non manomettete o tentate di riparare l’utensile
elettrico.
ATTENZIONE! Una eventuale revisione interna manutenzione,
deve essere effettuata solo da un centro assistenza autorizzato.
La durata e il costo d’esercizio dipendono anche da una costante e
scrupolosa manutenzione.
Pulite regolarmente ed abbiate cura del vostro utensile elettrico, vi
garantirete una perfetta efficienza ed una lunga durata dello stesso.
- Rimuovete la polvere e i residui di lavorazione con uno straccio e un
pennello a setole morbide.
- Non spruzzate o bagnate d’acqua l’utensile elettrico, pericolo di
infiltrazioni interne.
- Non usate infiammabili, detergenti o solventi vari.
- Le parti in plastica sono aggredibili da agenti chimici.
- Non utilizzate un getto d’aria compressa per la pulizia: pericolo lancio
materiale!
- Prestate particolare attenzione alla pulizia dell’interruttore e alle feritoie
di ventilazione del motore.
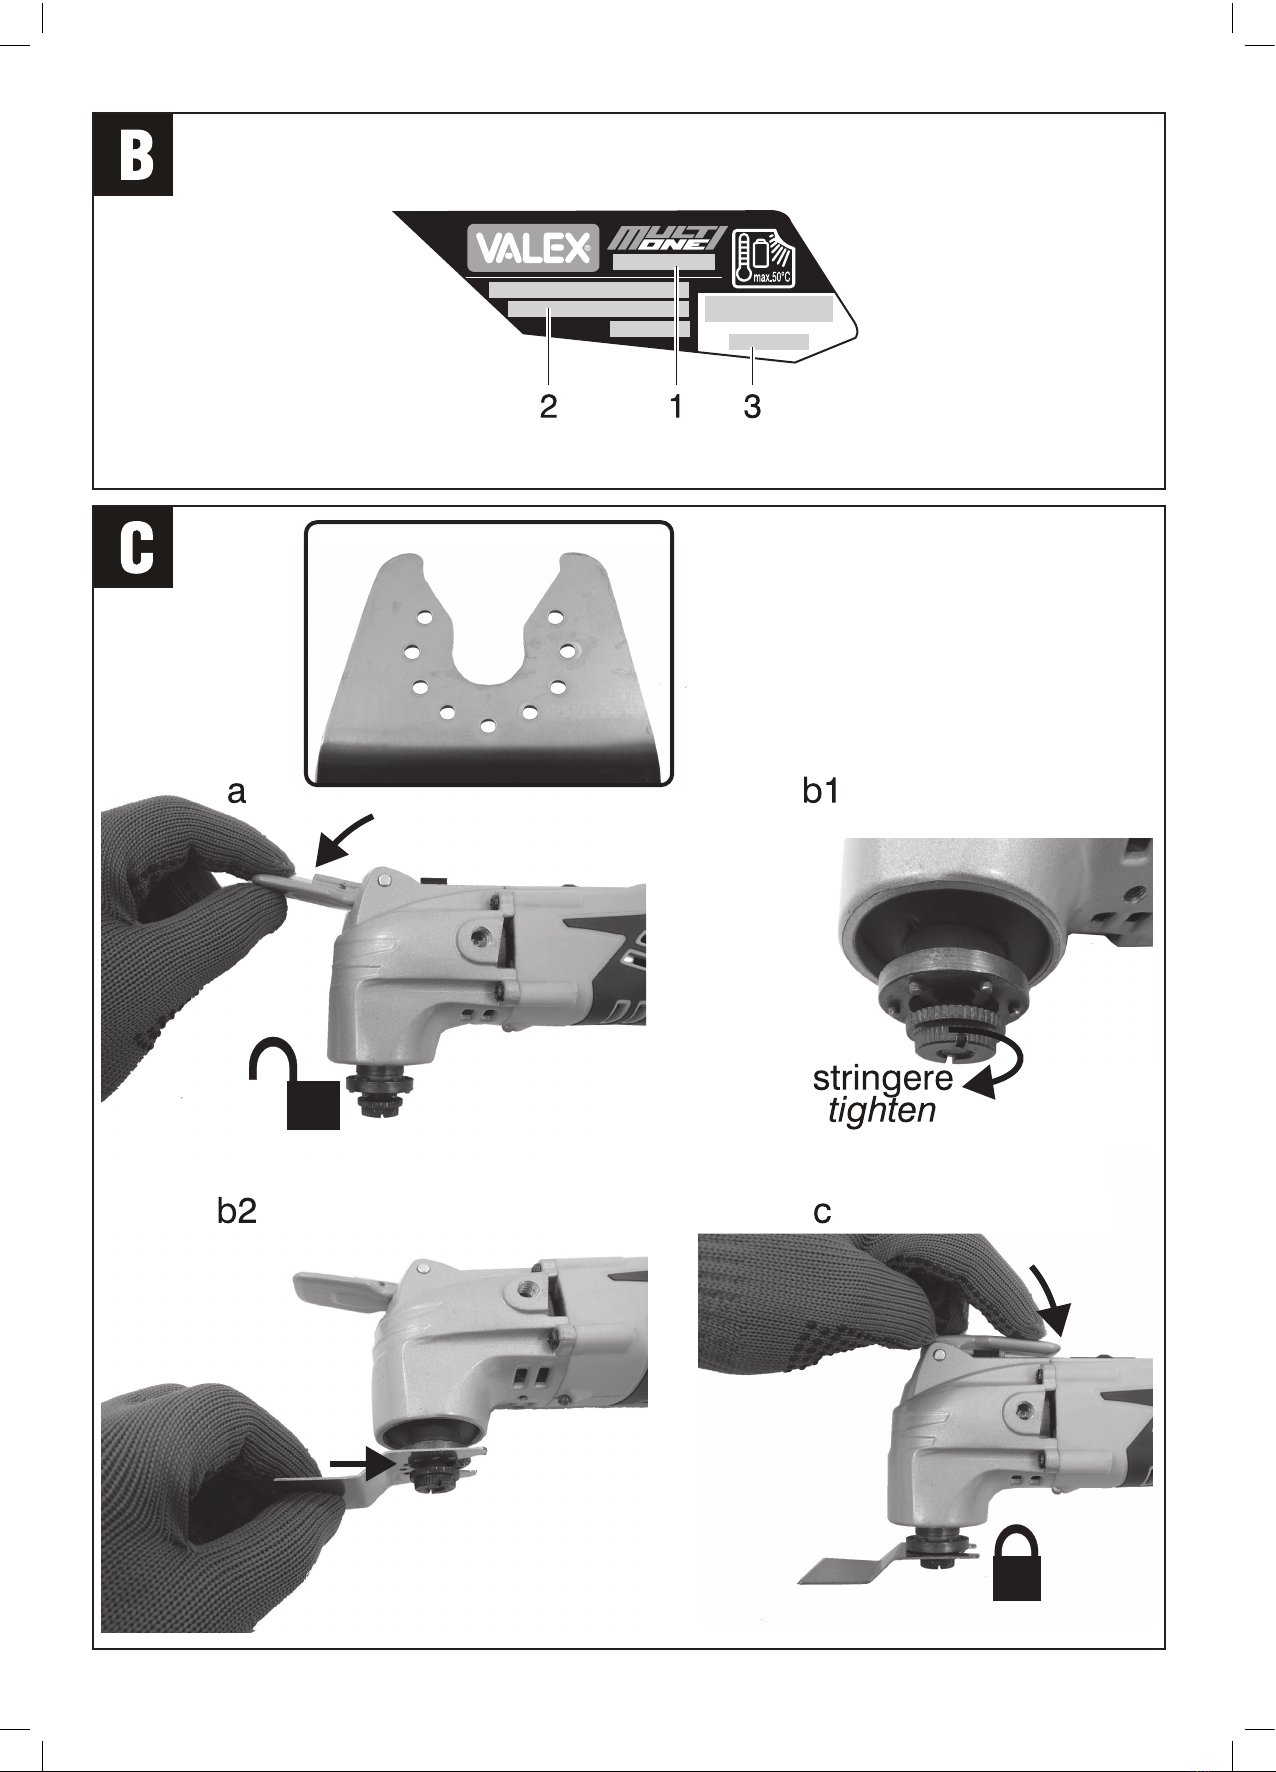
Sostituzione delle lame e dei raschietti
Attenzione: prima di eseguire questa operazione indossare guanti
protettivi.
Toccando l’accessorio esiste pericolo di lesioni.
- Svitare completamente la vite di fissaggio (Fig.C, 3b) e togliere l’
accessorio.
Sostituzione del platorello
- Seguite le istruzioni di Fig.C Fig.D.
Sostituzione del foglio abrasivo
- Capovolgere la macchina, strappare l’abrasivo dal platorello, pulire,
attaccare il nuovo abrasivo, verificare che il foglio sia ben teso e
allineato con i bordi del platorello.
- Al termine effettuare una prova di funzionamento a vuoto.

- 8 -
PROBLEMI, CAUSE E RIMEDI
PROBLEMA CAUSE RIMEDI
L’utensile
elettrico non
si avvia
Interruttore in posizione
OFF “O” Azionare l’interruttore in posizio-
ne acceso “I”
Batteria scarica Effettuare una ricarica completa
alla batteria
Batteria non inserita cor-
rettamente nell’alloggia-
mento dell’utensile
Sganciate la batteria e inseritela
correttamente
La batteria è surriscal-
data ed è intervenuta la
protezione interna auto-
ripristinabile
Attendere che la batteria si
raffreddi
Utensile elettrico o batte-
ria guasti Sostituite la batteria o/e rivolge-
tevi ad un centro di assistenza
autorizzato
L’utensile si
avvia ma non
leviga il mate-
riale o leviga
poco
Abrasivo usurato Sostituite l'abrasivo
Abrasivo non idoneo Cambiate tipo e grana dell'a-
brasivo
Abrasivo non teso Riposizionate correttamente
l'abrasivo
L’utensile non
taglia/raschia Materiale da tagliare/
raschiare non idoneo Consultare l’elenco materiali nel
capitolo ‘Istruzioni per l’uso’
Utensile usurato o dan-
neggiato Sostituire l’utensile
La batteria
non si ricarica Batteria non inserita cor-
rettamente nell’alloggia-
mento del caricabatterie
Sganciate la batteria e inseritela
correttamente
Caricabatteria o batteria
non pronto per la carica.
Batteria surriscaldata.
Attendere che la batteria si
raffreddi
Caricabatterie o batteria
guasti Sostituite la batteria o/e rivolge-
tevi ad un centro di assistenza
autorizzato
ATTENZIONE! Se dopo aver eseguito gli interventi sopra descritti
l’utensile non funziona correttamente o in caso di anomalie diverse
da quelle indicate, portatelo presso un centro di assistenza autoriz-
zato esibendo la prova di acquisto e richiedendo ricambi originali.
Fate sempre riferimento alle informazioni riportate sull’etichetta
dati tecnici.
IMMAGAZZINAMENTO
Effettuate una accurata pulizia di tutta la macchina e sue parti acces-
sorie (vedi paragrafo Manutenzione). Proteggete le parti non verniciate
con un olio protettivo ed utilizzate l’imballo originale o la valigetta (se
presente) per proteggerla.
Riponete la macchina lontano dalla portata dei bambini, in posizione
stabile e sicura. Il luogo dovrà essere asciutto, privo da polveri, tem-
perato e protetto dai raggi solari diretti.
Al locale di rimessaggio non devono avere accesso i bambini e gli
estranei.
SMALTIMENTO
Per la salvaguardia ambientale procedete secondo le leggi vigenti del
Paese in cui vi trovate. Rivolgetevi alle autorità competenti per maggiori
notizie in merito.
Quando la macchina non è più utilizzabile né riparabile, consegnatela
con l’imballo ad un punto di raccolta per il riciclaggio.
I rifiuti elettrici ed elettronici possono contenere sostanze pericolose
per l’ambiente e la salute umana; non devono pertanto essere smaltiti
con quelli domestici ma mediante una raccolta separata negli appositi
centri di raccolta o riconsegnati al venditore nel caso di acquisto di
una apparecchiatura nuova analoga. Lo smaltimento abusivo dei rifiuti
comporta l’applicazione di sanzioni amministrative.
Smaltimento batterie: Le batterie incluse nell’apparecchio
possono essere smaltite assieme ad esso.
Non gettate nel fuoco e non disperdete nell’ambiente le batterie
esauste ma consegnatele agli appositi centri per il loro smaltimento.
Non smaltire assieme ai rifiuti domestici.
GARANZIA
Il prodotto è tutelato a norma di legge contro non conformità rispetto
alle caratteristiche dichiarate purché sia stato utilizzato esclusivamente
nel modo descritto dalle istruzioni, non sia stato manomesso in alcun
modo, sia stato conservato correttamente, sia stato riparato da tecnici
autorizzati e, ove previsto, siano stati utilizzati solo ricambi originali.
In caso di utilizzo industriale o professionale oppure in caso di impiego
simile la garanzia ha validità di 12 mesi.
Per emettere una richiesta di intervento in garanzia è necessario
presentare la prova di acquisto al rivenditore o ad centro assistenza
autorizzato.

- 9 -
g
SYMBOLS
Carefully observe the symbols in fig. B and memorise their respective
meanings. Correct interpretation of the symbols allows safer use of
the machine.
1 Machine model
2 Technical data
3 Batch number (the first 2 figures of the batch number indicate the
year of manufacture)
V Volt
Hz Hertz
~ alternating current
Direct current
W Watt
mm millimetres
m metres
s seconds
kg kilograms
no no load speed
min-1 revolutions per minute
dB decibel
We thank you for having preferred us in choosing this electric tool,
hereinafter called ‘multi-tool’, ‘electric tool’ or ‘apparatus’.
WARNING! The multi-tool with the supplied accessories is
suitable for dry sanding of wood, iron, plastic and similar materials
using the respective abrasive sheets.
The appliance is also designed for sawing wood, plastic and similar
materials, and for scraping bonded carpets, residual mastic, old
varnishes and similar applications.
Other accessories may extend the range of use, refer to the relevant
documentation. The use of hazardous materials and in environments
with fire risk is prohibited.
The multi-tool is intended for hobby and non-professional use.
This instruction contains the information and all that is deemed ne-
cessary for the good use, knowledge and normal maintenance of the
tool. They do not report information on the processing techniques of
the various materials; the user will find more information on books
and specific publications or by taking part in specialization courses.
COMPONENTS
Refer to fig. A and following, attached to these instructions.
1. Battery compartment
2. Main handle
3. additional handle
4. Tool location
5. Tool mounting flange
6. Tool release lever
7. Start / stop switch
8. Electronic speed regulator
9. Scraper
10. Backing pad
11. Abrasive paper
12. Lama
13. LED light
INSTALLATION
WARNING! The manufacturer is not liable for any direct and/or
indirect damage caused by incorrect connections.
WARNING! Before carrying out the following operations, make
sure that the battery is disconnected from the tool.
TRANSPORT
Always use the packaging or case (when provided) when transporting
the tool; this will protect it from impact, dust and humidity which can
compromise normal operation.
During transport, remove the abrasive disc, brush, etc. from the
machine.
HANDLING
Firmly grasp the handgrip (Fig.A, 2) without using the switch; keep
the tool well away from your body and after use place it down gently
without hitting.
SWITCHING ON
When choosing where to use the power tool, the following should be
considered:
- that the place is not damp and is protected from the weather.
- that there is a large working area free from obstacles.
- that there is good lighting.
- that it is used close to the main switch with residual current device.
- that the power supply system is earthed and conforms to the stan-
dards (only if the power tool is class I, which is equipped with an
earth cable plug).
- that the room temperature is between 10° and 35°C.
- that the environment is not in a flammable/explosive atmosphere.
Take out the machine and components and visually check that they
are perfectly intact; then proceed to thoroughly clean them in order to
remove any protective oils from metal surfaces.
ASSEMBLY OF TOOLS
Tools with open connection: follow the pictograms shown in Fig.C.
Tools with closed connection: follow the pictograms shown in Fig.D.
Warning: Wear gloves to protect your hands.
Attention: the pins / teeth must enter the tool housing.
- Check that the tool is well fixed.
Fastening of abrasive sheets
- The abrasive sheet is applied by exerting a slight pressure on the
velcro, replacing it by pulling it.
SIDE HANDGRIP ASSEMBLY (Fig.A, 3)
The lateral handgrip can be assembled on any side on which there is
a threaded hole; it is usually secured on the left in order to grab hold
with the left hand, but it can be assembled in the position of your
preference (e.g. for left-handed people). Insert the handgrip into the
threaded hole of the device and secure by screwing tightly.
CHARGING THE BATTERY (follow the instructions attached to the
battery charger)
WARNING! Before using the apparatus it is necessary to fully
charge the battery.
WARNING! Recharge only with a battery charger designed for
this type of tool. An inappropriate battery charger can cause a fire
hazard when used with other battery units.
To keep the battery in good working order, do not discharge it
completely.
Fully charge the battery:
- After each use.
- At least every 4 months, even if not used.
- If while working you notice a clear drop in the performance of the tool.
INSERTING AND REMOVING THE BATTERY (Fig. E)
- Insert the battery through the guides in the battery compartment (1).
- Take out the battery from its housing in the tool by operating the
release device (8).

- 10 -
STARTING, STOPPING AND SPEED ADJUSTMENT
WARNING! Before starting the electric tool, it is mandatory to
wear the personal protective equipment listed in the safety manual,
chapter SAFETY WARNINGS FOR MULTIFUNCTION TOOLS and
SAFETY WARNINGS FOR NOISE AND VIBRATIONS.
WARNING! Before starting and during the work phase, grasp
the tool firmly with both hands without ever leaving the socket, so
that, in case of danger, you can stop it immediately.
WARNING! During use, make sure that nobody approaches
your work area.
WARNING! Before connecting the battery to the power tool,
make sure that the switch is in the OFF position (“0”).
STARTING
1) Insert the charged battery into the housing of the appliance (Fig.A, 1).
2) Grasp the tool using both handles (Fig.A, 2-3)
3) To start the tool, move the switch button (Fig.A, 4) to ON (“I”).
STOPPING
To stop the tool, move the switch (Fig. A, 4) to OFF (“0”) keeping the
tool firmly in place.
SPEED ADJUSTMENT
To change the speed it is necessary to turn the regulator (Fig. A, 8)
according to the scale:
high number = high speed
low number = low speed
We recommend that you repeat these steps a few times before starting
work so as to become as familiar with the commands as possible.
If you observe malfunctions, turn off the tool
electric and consult the chapter “Problems, causes and remedies”.
When not working, switch off and unplug the battery.
INSTRUCTIONS FOR USE
After carefully reading the previous chapters, scrupulously follow these
tips that will allow you to get the maximum performance.
Proceed calmly so as to become familiar with all the commands;
only after having acquired a good experience will you be able to fully
exploit its full potential.
Sanding operations
By mounting the pad (Fig. A, 10) and applying an abrasive paper (Fig.
A, 11), the tool can be used for sanding work, particularly for corners
and edges which are difficult to access.
- Before working on important objects (eg furniture, vehicles, etc.),
carry out a sanding test to verify that the appropriate abrasive has
been installed.
- If the piece is small and light, always fix it with a vice during proces-
sing; if not well fixed, the action of the machine could hurl it at you.
- Do not work pieces that are wet or wet or with a wet abrasive.
- As a rule, initially use an abrasive with a coarser grain (example
40), then finish the worked surfaces with a finer-grained abrasive
(example 120 or greater).
- Make sure that the abrasive is correctly mounted and perfectly
adherent to the orbiting plate.
- Start the appliance only after having firmly gripped it in the handle (s).
- Place the sanding pad on the piece and operate the machine by
applying light pressure.
- Do not insist on sanding in the same place but constantly move the
machine in the work area.
- Excessive hand pressure (s) on the machine will not improve per-
formance but may overheat the engine with subsequent failures
not covered by the warranty, or may cause a fire due to the high
temperatures produced on the workpiece.
- Do not cover the ventilation slots of the machine with the hand (s).
- Replace the abrasive as soon as it is worn or deteriorated, avoid
making the machine work under excessive load, avoid damaging
the sanding pad and obtain a better result with less effort and time.
Shaving operations
By fitting the scraper (Fig. A, 9) it is possible, for example, to scrape
old varnishes or remove carpet glue and tile adhesive.
Move the tool to the point to be scraped.
Start with a flat incidence angle and low contact pressure.
Caution: In case of excessive contact pressure, the surface (eg wood,
plaster) may be damaged.
Cutting operations:
By fitting the blade (Fig. A, 12) it is possible to saw small pieces of
wood, plasterboard, plastic and the like.
When sawing, pay attention to the foreign bodies in the material and
remove them if necessary.
Optional accessories:
Valex supplies optional accessories that allow further types of pro-
cessing.
MAINTENANCE
WARNING! Before any checks or adjustment take the battery
out of the tool.
WARNING! Do not tamper or attempt to repair the power tool.
WARNING! Any internal overhaul or maintenance must only be
performed by an authorised service centre.
The working life and costs also depend on constant and meticulous
maintenance.
Take good care of your power tool and clean it regularly. In this way
its good working order will be ensured and its lifespan extended.
- Remove dust and machining residuals with a cloth or a brush with
soft bristles.
- Do not wet or spray water over the power tool - risk of internal
infiltrations.
- Do not use any flammables, detergents or solvents.
- The plastic parts can easily be damaged by chemical agents.
- Do not use compressed air for cleaning: risk of ejecting material!
- Be careful when cleaning the switch and motor air vents.
Replacing blades and scrapers
Warning: wear protective gloves before performing this operation.
Touching the accessory there is a danger of injury.
- Completely unscrew the fixing screw (Fig. C, 3b) and remove the
accessory.
Replacement of the pad
- Follow the instruction of Fig.C Fig.D.
Replacing the abrasive sheet
- Turn the machine upside down, remove the abrasive from the backing
pad, clean, attach the new abrasive, check that the sheet is taut and
aligned with the edges of the sanding pad.
- At the end, carry out a test run with no load.

- 11 -
PROBLEMS, CAUSES AND SOLUTIONS
PROBLEM CAUSES SOLUTIONS
The power
tool fails to
start
ISwitch in the OFF “O”
position Flip the switch to the ON “I”
position
Flat battery Fully charge the battery
Battery not correctly
inserted in the tool
housing
Take out the battery and insert
it correctly
The battery has overhe-
ated and the internal
auto reset protection
has cut in
Wait for the battery to cool
down
Power tool or battery
faulty Replace the battery and/or
contact an authorised service
centre
The tool
starts but
does not
smooth the
material or
smoothes
slightly.
Abrasive worn out Replace the abrasive
Unsuitable abrasive Change the type and texture of
the abrasive
Non-tensed abrasive Reposition the abrasive
correctly
Tool does not
cut / scrap Material to be cut /
scraped unsuitable Refer to the material list in the
chapter ‘Instructions for use’
Worn or damaged tool Replace the tool
The battery
does not
charge
Battery not correctly
inserted in the battery
charger housing
Take out the battery and insert
it correctly
Battery charger or
battery not ready for
charging. Battery is
overheated.
Wait for the battery to cool
down
Battery charger or
battery faulty Replace the battery and/or
contact an authorised service
centre
WARNING! If the tool still fails to operate correctly after you have
carried out the above operations, or in the event of anomalies other
than those described above, take it to an authorised service centre
with proof of purchase and ask for original spare parts. Always refer
to the information shown on the technical data label.
STORAGE
Clean the machine and all its accessories thoroughly (see Maintenance
section). Protect the unpainted parts with protective oil and use the original
packaging or case (where fitted) to protect it.
Store the machine in a stable and safe position out of the reach of children. The
place must be dry, free from dust, temperate and protected from direct sunlight.
Keep children and unauthorised personnel out of the storage room.
DISPOSAL
In order to protect the environment, proceed according to the local
laws in force. Contact the relevant authorities for more information.
When the machine is no longer usable or repairable, take the machine
and its packaging to a recycling centre.
Electric and electronic waste may contain substances hazardous
to the environment and human health. It should therefore not be di-
sposed of with household waste, but by means of separate collection
at special collection centres or returned to the vendor in the event of
purchasing a new similar tool. Illegal disposal of waste will result in
administrative sanctions.
Battery disposal: The batteries included in the equipment can be
disposed of along with it.
Do not dispose of used batteries in fire and do not dispose of them
in the environment, but take them to special disposal centres. Do
not dispose of them with domestic waste.
WARRANTY
The product is protected by law against all non-conformities with regard
to its stated characteristics, provided that it has been used solely in the
way described in these user’s instructions, it has not been tampered
with in any way, it has been stored correctly, it has been repaired by
authorised personnel and, where necessary, only original spare parts
have been used.
In the event of industrial or professional use or similar, the warranty is
valid for 12 months.
To issue a request for intervention covered by warranty, proof of purchase
must be shown to the retailer or authorised service centre.

Table of contents
Languages:
Popular Wheelchair manuals by other brands

progeo
progeo Physio Air user manual

Otto Bock
Otto Bock C1000 SF Instructions for use

Handicare
Handicare Beatle - Puma user manual

Everest & Jennings
Everest & Jennings Traveler L3 Plus 3F012 user manual

TGA
TGA Minimo Autofold Operating instructions and owner's handbook

Z-Tec
Z-Tec Lite SP series user manual

Drive DeVilbiss Healthcare
Drive DeVilbiss Healthcare DSF 130 Instructions for use

Shoprider
Shoprider XtraLite Jiffy UL7WR user manual

Platinum Health
Platinum Health PHB3300 Assembly and instruction manual

Evocare
Evocare LM9515 owner's manual

Croydex
Croydex AP503122 quick start guide

Alu Rehab
Alu Rehab Netti 4U comfort CED user manual