manuals.online logo
Brands
  1. Home
  2. •
  3. Brands
  4. •
  5. Really Right Stuff
  6. •
  7. Camera Accessories
  8. •
  9. Really Right Stuff MACRO 150 User manual

Really Right Stuff MACRO 150 User manual

All Really Right Stuff Brand Products are guaranteed to the original
purchaser to be free of defects in materials or workmanship for 5
years from the date of purchase.
Products will be repaired or replaced at our option.
GUARANTEE
MACRO 150
MACRO FOCUSING RAIL
720 S 850 E Lehi, UT 84043
www.ReallyRightStuff.com
1-385-248-0777 or TF 1-888-777-5557
© 1990-2021 Really Right Stuff, LLC. All rights reserved.v.1.0
TOP VIEW
BOTTOM VIEW
End Screw-Knob
points towards subject
Lead Screw
is micro-polished stainless
steel and delivers 1 mm of
travel per rotation
Accessory Socket
is threaded ¼"-20
Safety Stop
screws on both ends
prevent accidental release
Clutch Release
disengages stage from lead
screw for gross adjustment
Laser Engraved Scale
in 1 mm increments from
0 to 15 cm
Clamp Lever
is made of corrosion-
resistant stainless steel
Main Lead Screw-Knob
points towards photographer
for precise clamp travel.
Zeroing Travel Dial
SPECS OF THE MACRO 150
LENGTH: 8.09 in / 205 mm
HEIGHT: 1.38 in / 35 mm
WIDTH: 3.05 in / 78 mm
WEIGHT: 13.8 oz / 390 g
LEAD SCREW ADJUSTMENT RANGE: 4 in / 103 mm
STAGE TRAVEL (per revolution of lead screw): 1 mm
LOAD CAPACITY: 20 lbs / 9 kg
Use marked apertures in the f8–f16 range;
avoid f22. Use a cable release, and apply
mirror lockup if exposure is by ambient light.
Supplementary (strobe) lighting is often
essential; manually zoom any strobe head to
its widest angle setting.
FOR BEST RESOLUTION
(35 mm)
HOW TO USE THE MACRO 150
1Look through the viewfinder, and MOVE the camera toward
the subject until it can be seen in rough focus (don’t change
focus).
2SET UP the tripod according to your desired composition.
3MOUNT the focusing rail at its midpoint (with the main
screw-knob facing you) on your ball head. MOUNT the
camera body in the top clamp of the Macro 150.
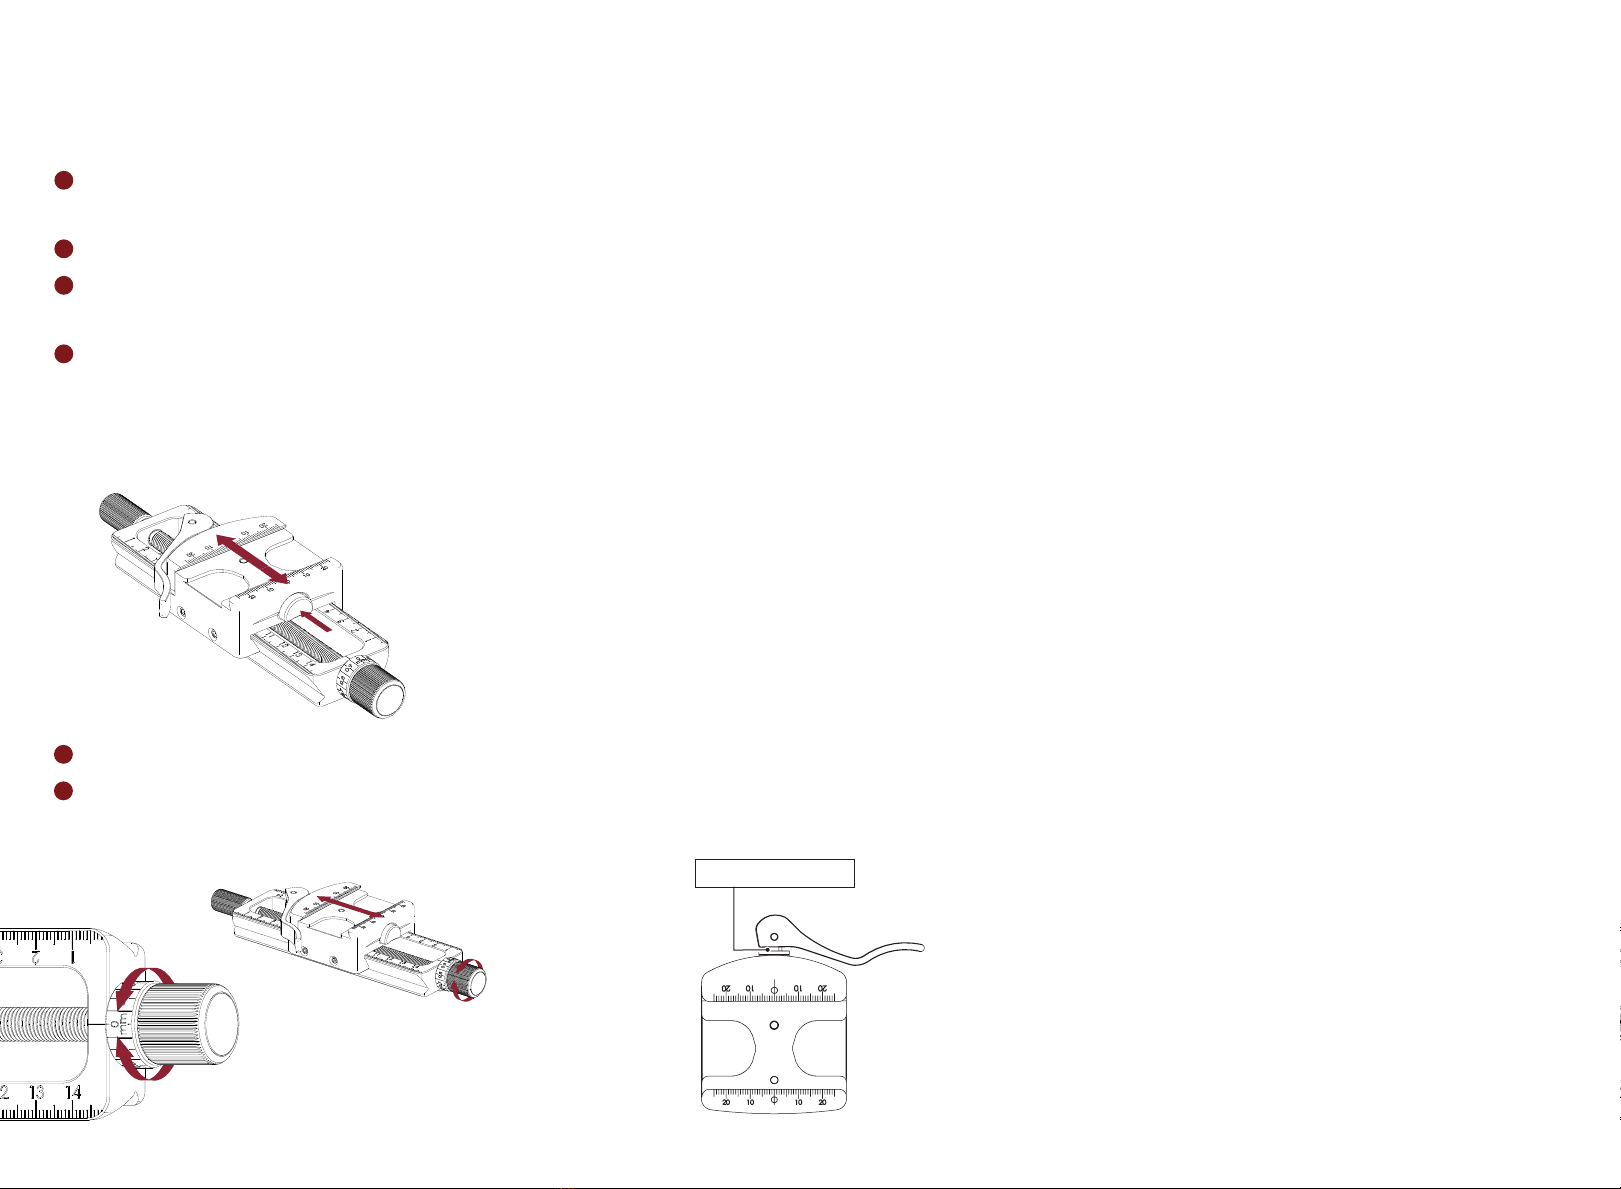
4ROUGH FOCUS by doing the following:
1. SLIDE the focusing rail within the ball head’s clamp,
then LOCK DOWN with the ball head clamp.
2. PRESS and HOLD the Clutch Release button and slide
the stage along the rail.
Keep all rail and stage mating surfaces free of dust,
dirt and debris. If you foul the surfaces, please do not
work the focusing action without first thoroughly
cleaning all surfaces. Dry dust and dirt can be blown
off and/or wiped off with a cloth. Mud or salt water
should be washed off with clean, fresh water and then
thoroughly dried. Do not disassemble your Macro 150
for cleaning.
CLEANING
Action of the lead screw may improve if a small
amount of light machine oil is applied to the threads.
However, if you intend to use the equipment in areas
where windblown contamination (sand/dirt) is likely,
we recommend keeping all surfaces clean and dry (i.e.;
do not apply lubricant).
The stainless-steel lever on the quick-release clamp
rides on a special bronze bearing surface. This bronze
bearing washer slides up and down the stainless-steel
shaft which attaches the lever to the clamp body. This
shaft and the lever cam was lubricated at the factory
with a high-quality synthetic lubricant. Over time, you
may need to re-lubricate this shaft and/or the cam
surface of the lever. Only use a high-quality machine
oil or lightweight grease sparingly and wipe off any
excess.
LUBRICATION
MAINTENANCE
5RELEASE the Clutch Button to its engaged position.
6TURN Lead Screw Knob for fine focusing. One revolution of
the Main Lead Screw-Knob = 1 mm of movement.
LUBRICATE HERE
Begin by understanding image scale—the ratio of the
size of the subject to the size of the image registered
“on film” (or on digital sensor) in the camera. Close-
up photography encompasses the image scale range
from 0.1X to 1X (or “life size”), meaning that the in-
camera image size is from 1/10th as big as the subject
(ratio 1:10), up to the same size (ratio 1:1) as the
subject. And photomacrography defines image scale
greater than 1X (ratio > 1:1), where the in-camera
image is a magnified enlargement of the subject’s true
dimensions; e.g. 2X (2:1) signifies an in-camera image
that’s twice the size of the subject. (“Macro” denotes
largeness, or, as a prefix, enlarged.)
Conventional focusing technique can be applied
when the closeup range is from only 0.1X (1:10) to
about 0.5X (1:2). However, this method becomes
a frustration as image scale approaches 1X (1:1)
because any rotation of the lens’ focusing ring has
simultaneous and significant impact on the intended
reproduction scale.
So, estimate the approximate image scale that’s
desired. A U.S. dollar bill is useful for comparison
reference—its length (less blank ends) is ≈ 4X the
horizontal width of the 35mm film frame, so a
subject of that size would represent an image scale
≈ 0.25X (1:4) if fully framed. Folded in half, the bill
would replicate a subject size ≈ 0.5X (1:2), or ≈ 1X
(1:1) if folded again. Apply this guideline to select the
approximate image scale that’s appropriate for the
subject (allow for some “air”), and manually (AF off) set
the lens’ focus ring for that reproduction scale. (Most
“macro lenses”, as made for closeup work, have handy
image scale settings that are clearly marked on the
lens’ barrel.)
FOCUSING RAIL THEORY

Other Really Right Stuff Camera Accessories manuals

Really Right Stuff B150-B User manual

Really Right Stuff

Really Right Stuff B150-B User manual

Really Right Stuff LCF-10P User manual

Really Right Stuff

Really Right Stuff LCF-10P User manual

Really Right Stuff FH-7240 User manual

Really Right Stuff

Really Right Stuff FH-7240 User manual

Really Right Stuff VERSA User manual

Really Right Stuff

Really Right Stuff VERSA User manual

Really Right Stuff TQC-14 User manual

Really Right Stuff

Really Right Stuff TQC-14 User manual

Really Right Stuff FH-350 User manual

Really Right Stuff

Really Right Stuff FH-350 User manual

Really Right Stuff WPF-QR2 User manual

Really Right Stuff

Really Right Stuff WPF-QR2 User manual

Really Right Stuff TMC-43C User manual

Really Right Stuff

Really Right Stuff TMC-43C User manual

Popular Camera Accessories manuals by other brands

HOLATRON SYSTEMS SureFire-1 Operation & maintenance guide

HOLATRON SYSTEMS

HOLATRON SYSTEMS SureFire-1 Operation & maintenance guide

Meade 2045 Instructions for use

Meade

Meade 2045 Instructions for use

Ikelite S520 Supplemental instructions

Ikelite

Ikelite S520 Supplemental instructions

Vitek VT-IR1/24 Specifications

Vitek

Vitek VT-IR1/24 Specifications

Aegis ABL-14005P user manual

Aegis

Aegis ABL-14005P user manual

Philips RESPIRONICS 1096770 manual

Philips

Philips RESPIRONICS 1096770 manual

Robus RCTT-200 manual

Robus

Robus RCTT-200 manual

Strategic Victa ACC1600 user manual

Strategic Victa

Strategic Victa ACC1600 user manual

oConnor 2575B Operator's guide

oConnor

oConnor 2575B Operator's guide

Olympus BCL-1580 instructions

Olympus

Olympus BCL-1580 instructions

D-Link DCS-60 user manual

D-Link

D-Link DCS-60 user manual

Contardi Muse Small installation instructions

Contardi

Contardi Muse Small installation instructions

Sideline Power High Riser Lite Setup instructions

Sideline Power

Sideline Power High Riser Lite Setup instructions

Zacuto EVF & Z-Finder Recoil Kits manual

Zacuto

Zacuto EVF & Z-Finder Recoil Kits manual

Panasonic AM-2PI Specifications

Panasonic

Panasonic AM-2PI Specifications

Velbon SPT-1 operating manual

Velbon

Velbon SPT-1 operating manual

Axis Q86 Front Kit A installation guide

Axis

Axis Q86 Front Kit A installation guide

Sony CBK-55BK Operation manual

Sony

Sony CBK-55BK Operation manual

manuals.online logo
manuals.online logoBrands
  • About & Mission
  • Contact us
  • Privacy Policy
  • Terms and Conditions

Copyright 2025 Manuals.Online. All Rights Reserved.