Rechner Sensors KFI-5-1 Series User manual

RECHNER
Industrie-Elektronik GmbH
Gaußstraße 8 - 10
D-68623 Lampertheim
Tel. +49 (06206) 5007-0
Fax. +49 (06206) 5007-36
Fax. Intl. +49 (0) 6206 5007-20
e-mail [email protected]
http://www.rechner-sensors.com
# 79002115
Bedienungsanleitung: kapazitive Füllstandsmesssysteme
Grenzwert Füllstandsmessung KFI-5-1(2)...ETW
Operating Instructions: Capacitive Level Measuring Systems
Limit Value Measurement KFI-5-1(2)...ETW
Instrucciones de servicio: Sistema capacitivo para la medición
del nivel de relleno
Medición de valor límite de llenado KFI-5-1(2)...ETW
Manuel d’utilisation: Systèmes capacitifs de contrôle de niveaux
Sondes capacitives à seuils pour contrôle de niveaux
KFI-5-1(2)...ETW
Manuale d’uso: Sistema di misura capacitivo
Misurazione del valore limite di riempimento KFI-5-1(2)...ETW

2
Wichtige Hinweise
Diese Bedienungsanleitung vor der Inbetriebnahme lesen und genau beachten.
Die Geräte dürfen nur von Personen benutzt, gewartet und instand gesetzt werden, die mit der Bedienungs-
anleitung und den geltenden Vorschriften über Arbeitssicherheit und Unfallverhütung vertraut sind.
Entfernen der Seriennummer sowie Veränderungen am Gerät oder unsachgemäßer Gebrauch führen zum
Verlust des Garantieanspruches.
Important Note:
Please read carefully and pay full attention to this instruction manual before powering up this device for the
rst time. The use, servicing and initial operation of this device is only permitted for persons who are familiar
with the instruction manual and the current rules of safety in the work place and accident-prevention.
Removal of the serial number, changes to the units or improper use will lead to loss of guarantee.
Nota importante:
Estas instrucciones de servicio deben leerse y respetarse escrupulosamente antes de la puesta en marcha.
Sólo las personas que conozcan perfectamente las instrucciones de servicio y las normas en vigor sobre
seguridad en el trabajo y prevención de accidentes pueden manejar, mantener y poner en marcha los aparatos.
La eliminación del número de serie y las modicaciones realizadas en el aparato o el uso indebido del mismo
provocan la pérdida de la garantía.
Remarque importante:
La présente notice est à lire attentivement avant mise en service du matériel. Sa stricte observation est
impérative. Les appareils peuvent être utilisés, entretenus ou réparés uniquement par du personnel dispo-
sant du manuel d’utilisation et des attributions nécessaires en ce qui concerne la sécurité du travail et la
prévention des accidents.
La suppression du numéro de série, la modication de l’appareil ou son utilisation inappropriée conduiront
à la perte de la garantie.
Nota importante:
Vi invitiamo a seguire attentamente queste istruzioni prima di collegare il sensore.
Queste apparecchiature devono essere usate e messe in funzione da persone competenti, che conoscono
le istruzioni, le norme vigenti di sicurezza e le norme di prevenzione incidenti.
Il distacco del numero di serie e modiche all’apparecchiatura o l’utilizzo improprio comportano il non rico-
noscimento della garanzia.
© RECHNER 09 / 2014 - Printed in Germany
Irrtümer und Änderungen ohne vorherige Ankündigung vorbehalten.
All specications are subject to change without notice.
Se reserva el derecho a efectuar errores y modicaciones sin previo aviso.
Sous réserve d’erreurs et modications sans préavis.
Tutti i dati sono soggetti a variazione senza preavviso.

3
Inhaltsverzeichnis • Table of contents • Indice • Table des matières • Indice
ITALIANO
ESPAÑOL
FRANÇAIS
ENGLISH
DEUTSCH Wichtige Hinweise Seite 2
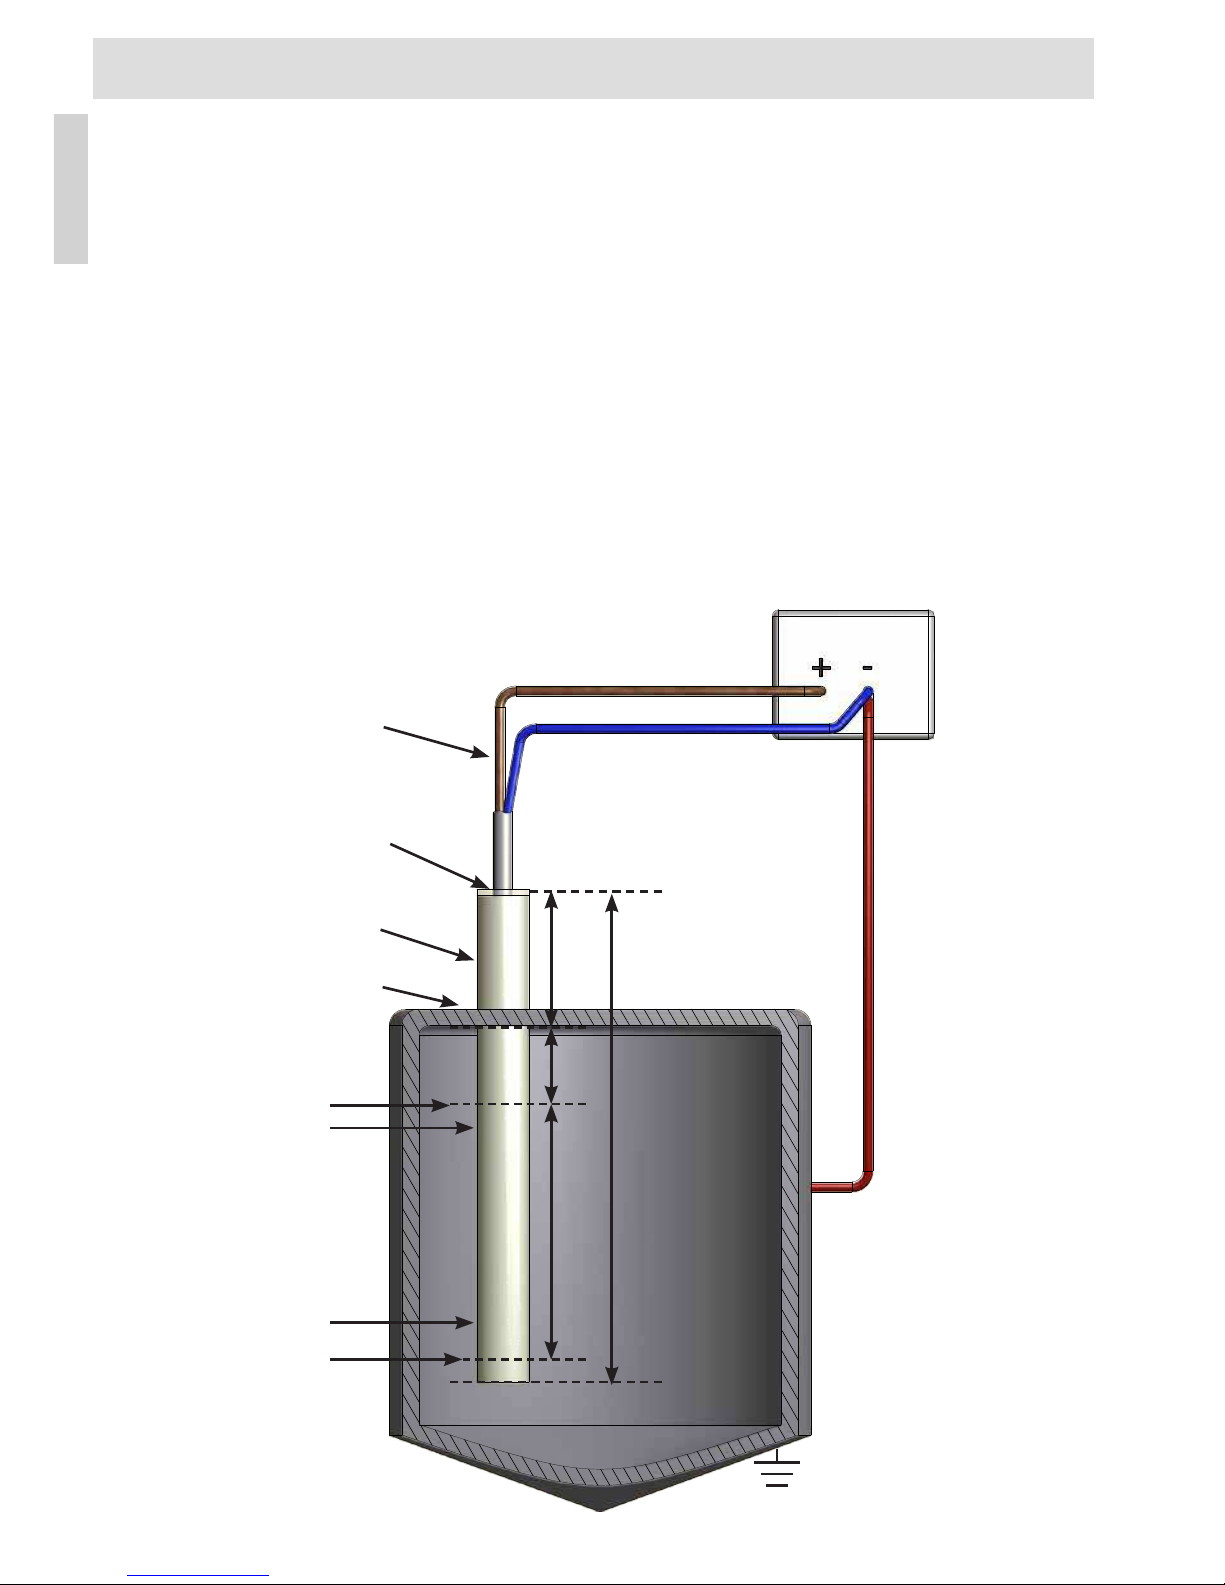
Allgemeine Beschreibung Seite 4
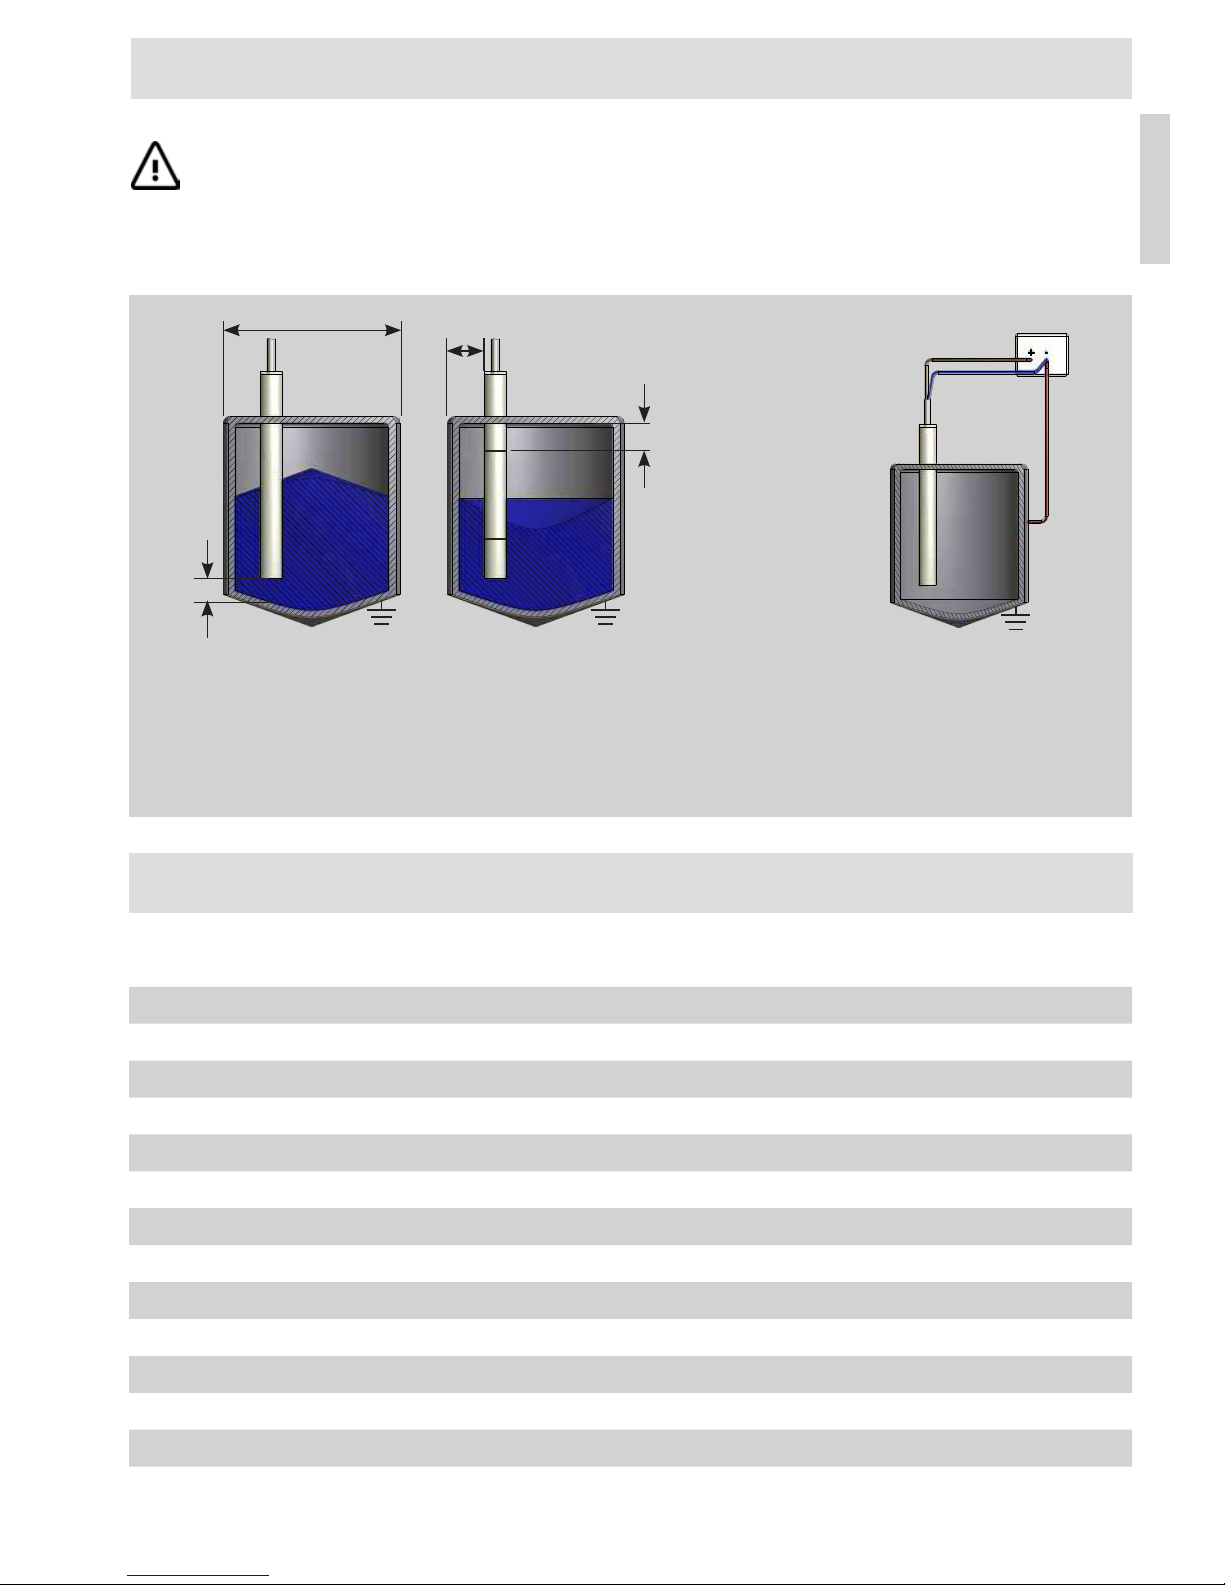
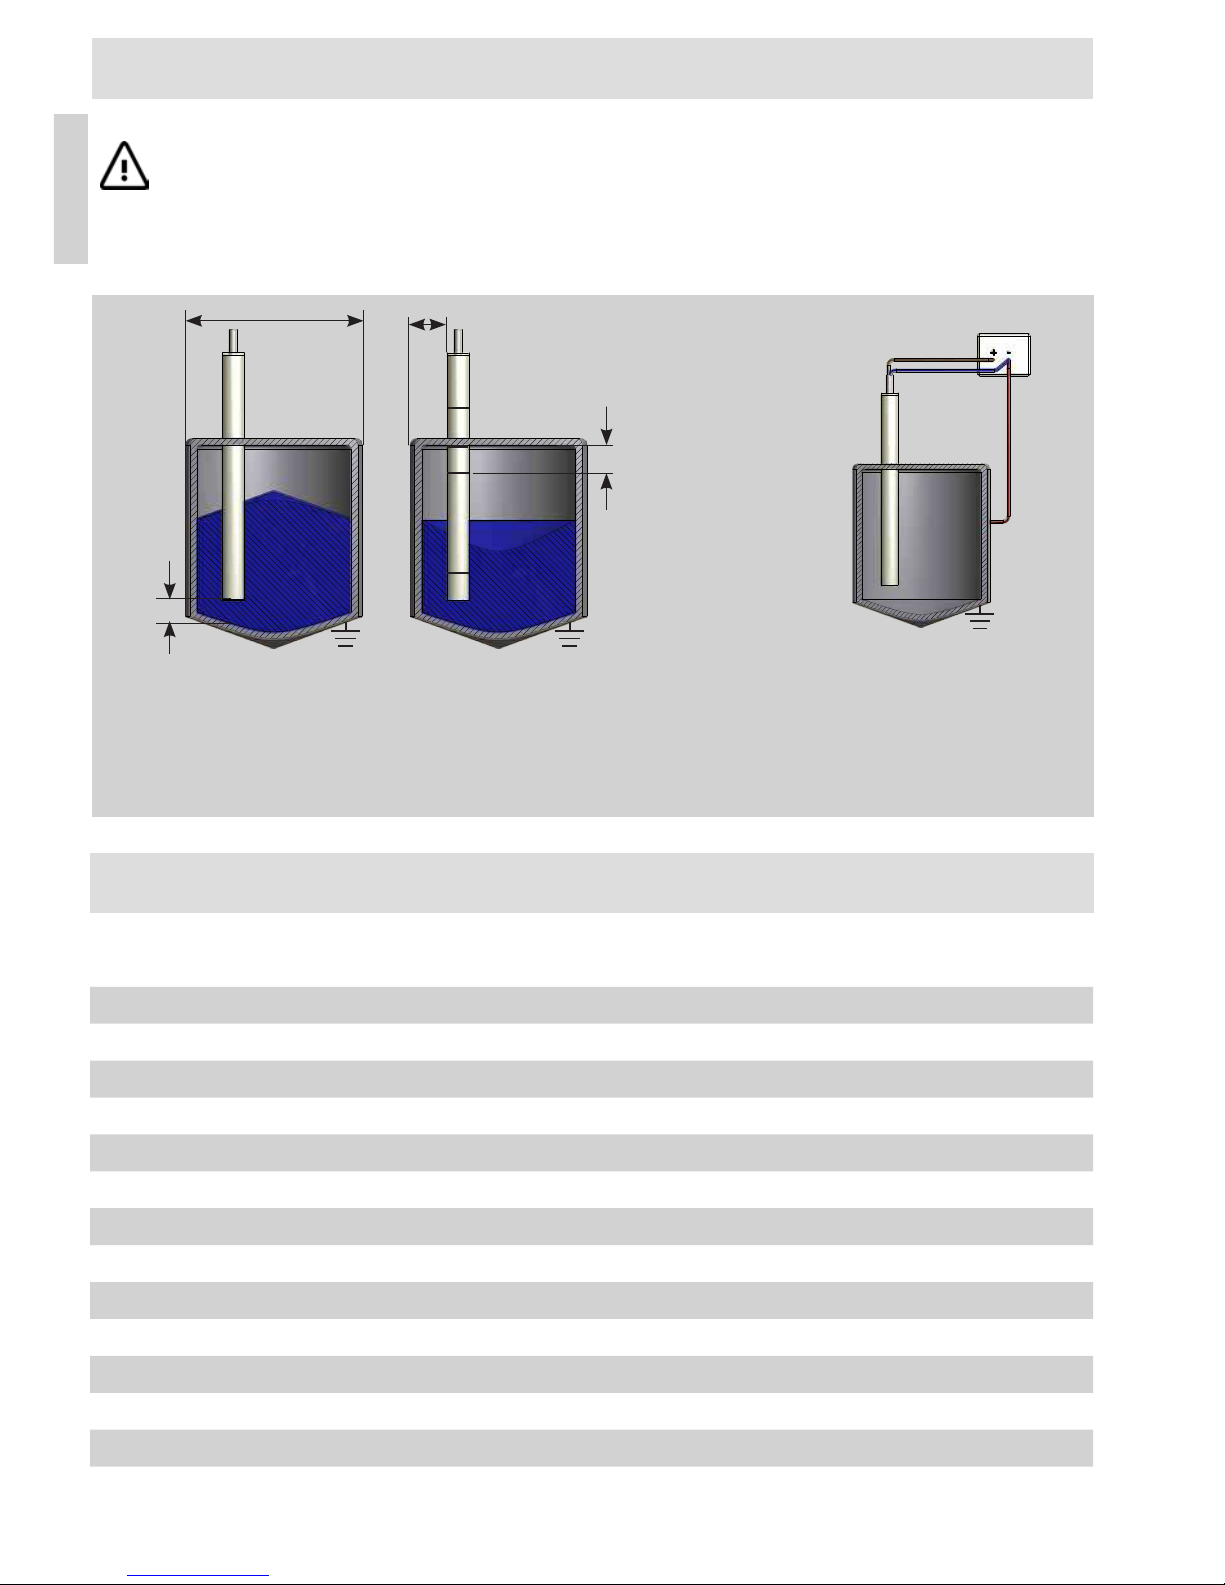
Montage / Technische Daten Seite 5 / 6
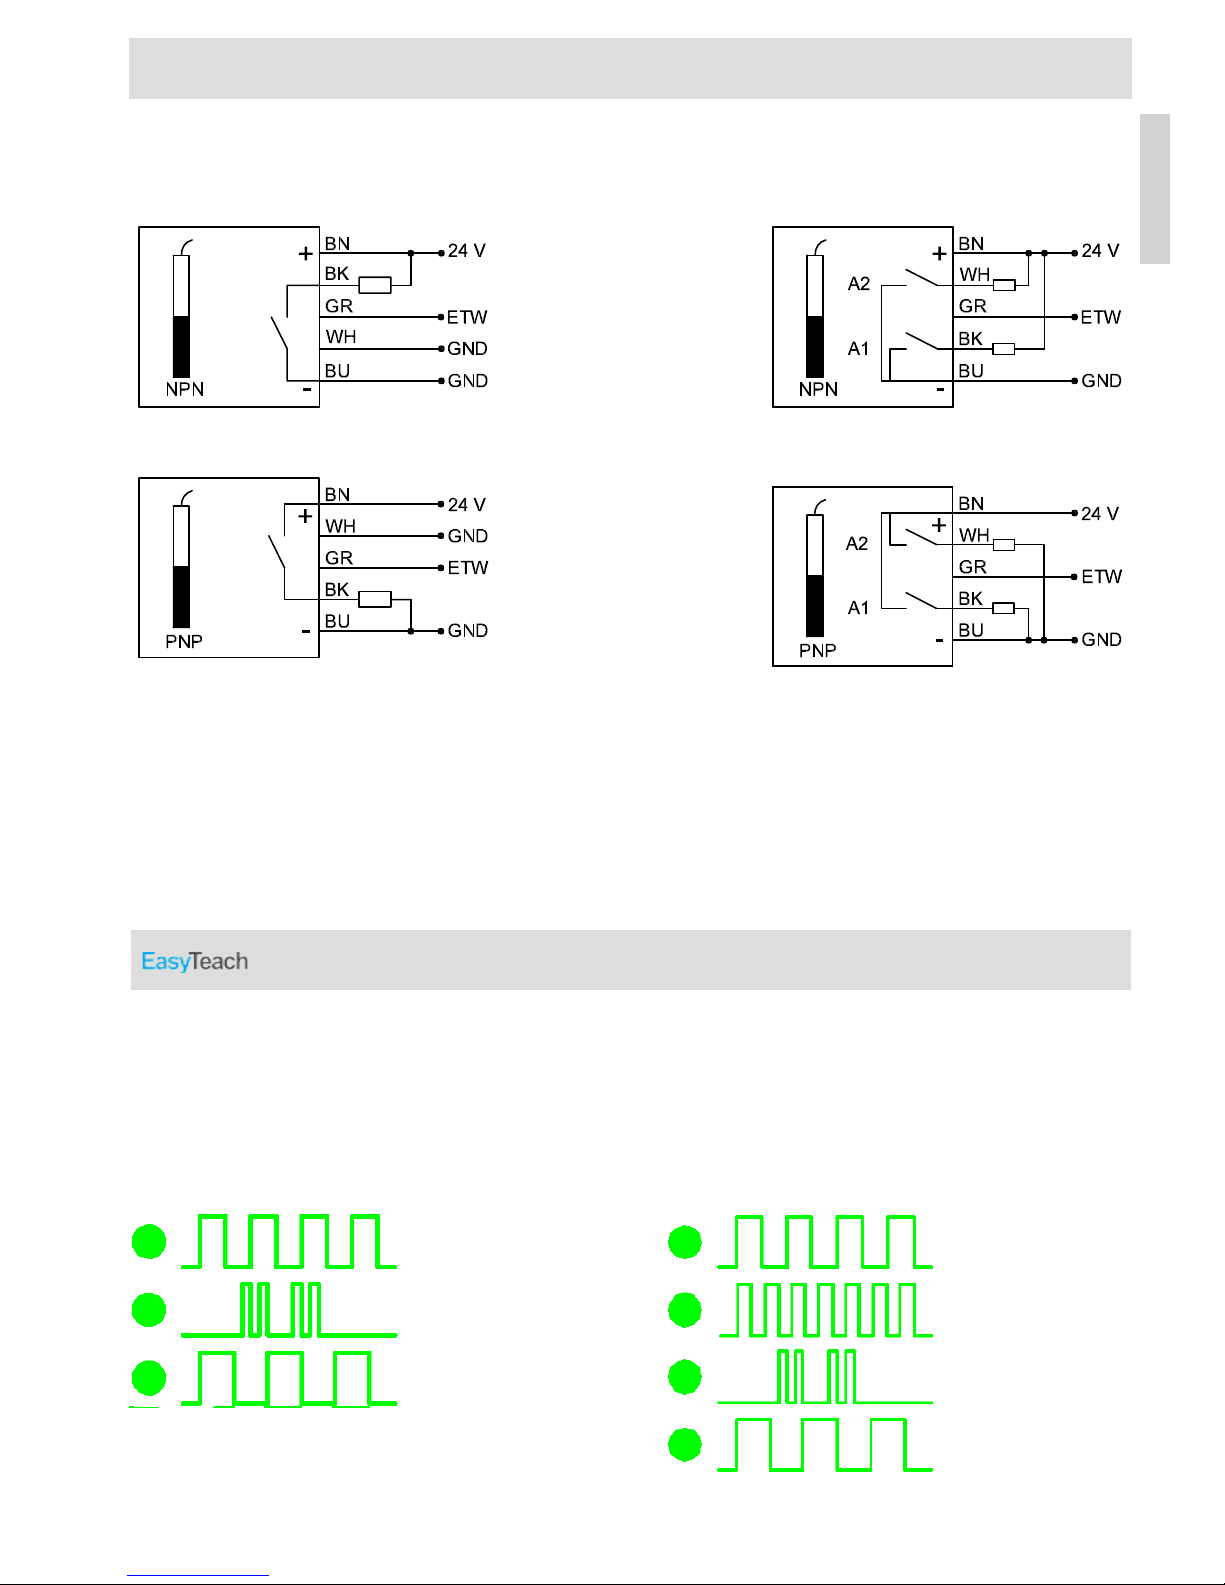
Elektrischer Anschluss / EasyTeach Chart Seite 7
Schaltausgangs-Charakteristika / Einstellbedingungen Seite 8
Einstellphilosophie KFI-5-1...ETW (1 Schaltpunkt) Seite 9
Einstellung KFI-5-1...ETW (1 Schaltpunkt) Seite 10
Reset / Testbetrieb KFI-5-1..ETW (1 Schaltpunkt) Seite 11 / 12
Einstellphilosophie KFI-5-2...ETW (2 Schaltpunkte) Seite 13
Einstellung KFI-5-2...ETW (2 Schaltpunkte) Seite 14
Reset / Testbetrieb KFI-5-2...ETW (2 Schaltpunkte) Seite 15 / 16
Important Note Page 2
General Description Page 18
Mounting / Technical Data Page 19 / 20
Electrical Connection / EasyTeach Chart Page 21
Switching output characteristics / Adjustment conditions Page 22
Adjustment philosophy KFI-5-1...ETW (1 Switching Point) Page 23
Adjustment KFI-5-1...ETW (1 Switching Point) Page 24
Reset / Test mode KFI-5-1...ETW (1 Switching Point) Page 25 / 26
Adjustment philosophy KFI-5-2...ETW (2 Switching Points) Page 27
Adjustment KFI-5-2...ETW (2 Switching Points) Page 28
Reset / Test mode KFI-5-2...ETW (2 Switching Points) Page 29 / 30
Nota importante Página 2
Descripción general Página 32
Montaje / Características técnicas Página 33 / 34
Conexión eléctrica / EasyTeach Chart Página 35
Características de las salidas de conmutación / Condiciones de ajuste Página 36
Filosofía de ajuste KFI-5-1...ETW (1 punto de conmutación) Página 37
Ajuste KFI-5-1...ETW (1 punto de conmutación) Página 38
Reset / Modo test KFI-5-1...ETW (1 punto de conmutación) Página 39 / 40
Filosofía de ajuste KFI-5-2...ETW (2 puntos de conmutación) Página 41
Ajuste KFI-5-2...ETW (2 puntos de conmutación) Página 42
Reset / Modo test KFI-5-2...ETW (2 puntos de conmutación) Página 43 / 44
Remarque importante Page 2
Description générale Page 46
Montage / Caractéristiques techniques Page 47 / 48
Raccordement électrique / Charte EasyTeach Page 49
Caractéristiques des sorties de commutation / Conditions d‘étalonnage Page 50
Philosophie d‘étalonnage pour sonde KFI-5-1…ETW (1 seuil) Page 51
Étalonnage pour sonde KFI-5-1…ETW (1 seuil) Page 52
Fonctions RESET / TEST pour sonde KFI-5-1…ETW (1 seuil) Page 53 / 54
Philosophie d‘étalonnage pour sonde KFI-5-2…ETW (2 seuils) Page 55
Étalonnage pour sonde KFI-5-2…ETW (2 seuils) Page 56
Fonctions RESET / TEST pour sonde KFI-5-2…ETW (2 seuils) Page 57 / 58
Nota importante Pagina 2
Descrizione generale Pagina 60
Montaggio / Dati tecnici Pagina 61 / 62
Collegamento elettrico / EasyTeach Chart Pagina 63
Caratteristiche uscita di commutazione / Condizione di regolazione Pagina 64
Regolazione KFI-5-1...ETW (1 punto di commutazione) Pagina 65 / 66
Reset / Funzione Test KFI-5-1...ETW (1 punto di commutazione) Pagina 67 / 68
Regolazione KFI-5-2...ETW (2 punti di commutazione) Pagina 69 / 70
Reset / Funzione Test KFI-5-2...ETW / (2 punti di commutazione) Pagina 71 / 72

4
DE
Allgemeine Beschreibung
Kapazitive Füllstandssonde zur Füllstandsmessung von 1 (KFI-5-1...ETW) oder 2 (KFI-5-2...ETW) Grenz-
werten. Diese kompakte Stabsonde mit integrierter Auswerteelektronik basiert auf unserem patentierten
3-Elektroden-Messprinzip. Zwischen der Messelektrode in der Sonde und der metallischen Behälterwand
(oder Zusatzelektrode) ndet die Messung statt. Das Messfeld wird durch inaktive Bereiche nach oben
und unten begrenzt. Als BE-Elektrode dient normalerweise die geerdete Behälterwand. Ist der Behälter
nicht aus Metall, kann eine metallische geerdete Folie an der Behälterwand oder andere masseführende
Maschinenteile als Zusatzelektrode dienen. Dabei ist zu beachten, dass diese in der Länge dem gesamten
Bereich der Messstrecke entspricht. Die BE-Elektrode sollte entlang der Messstrecke die gleiche Breite und
den gleichen Abstand zur Sonde besitzen.
Eine manuelle Vorauswahl des Kapazitätsbereiches oder einer Grundkapazität ist nicht notwendig. Dies
übernimmt die intelligente Sonde bei der ersten Inbetriebnahme automatisch.
Mit der i-Level Kompaktsonde lassen sich innerhalb der Messstrecke je nach Model 1 oder 2 frei wählbare
Schaltpunkte realisieren:
KFI-5-1...ETW = 1 Schaltpunkt
KFI-5-2...ETW = 2 Schaltpunkte
Messbereich
Schaltpunkt S2
einstellbar
Erdung des Behälters oder
Gegenelektrode am Behälter
Sondenstab BE-Anschluss
über Kabelverbindung
Optional Halter für
Prozessanschluss,
Material VA oder AL
Kabel 5 x 0,34 mm²
LED grün
IB3 =
73 mm
IB1 = 7 mm
Sondenlänge (L)
Schaltpunkt S1
einstellbar
BE
Position der Schaltpunkte S1
bzw. S2 frei programmierbar
innerhalb des Messbereichs
Netzteil
IB2 =
50 mm

5
DE
Montage
Zwischen der blauen (GND) Litze des Kabels und dem geerdetem Behälter (bzw. Gegenelektrode)
muss eine direkte galvanische Verbindung bestehen! Bei nichtmetallischen Behältern wird die Ge-
genelektrode über eine direkte Kabelverbindung zur blauen Litze des Kabels realisiert.
Die Sonde kann auch kopfstehend, also von unten nach oben montiert werden.
Technische Daten
* Soweit zutreffend.
Weitere technische Daten: Siehe Datenblatt
Elektrische Ausführung 5-Leiter DC
Ausgangsfunktion für KFI-5-1...ETW 1 Schaltausgang, Schließer
Ausgangsfunktion für KFI-5-2...ETW 2 Schaltausgänge, Schließer
Betriebsspannung (UB) 15...30 V DC
Zul. Restwelligkeit max. 5 %
Ausgangsstrom (Ie) 100 mA
Leistungsaufnahme max. (Ausgänge unbelastet) 0,9 W
Zul. Umgebungstemperatur -25...+70 °C
LED-Anzeige Grün
Schutzbeschaltung Eingebaut
Schutzart IEC 60529 IP 67
Norm EN 60947-5-2*
Anschlusskabel 2 m, PVC, 5 x 0,34 mm²
BE
KFI-5-1(2)-ETW
≥15 mm
D¼D
IB2
M
IB1
1/3D,
min. 50 mm
IB3
Messbereich (M) inaktiver Bereich 1 (IB1) inaktiver Bereich 2 (IB2) inaktiver
Bereich 3 (IB3)
Messbereich nicht im Bereich von Querschnittsänderungen des Behälters
montieren, wie z. B. im Konusbereich.
Sondenmontage mittig oder aussermittig möglich. Um unabhängig vom Schüttkegel zu messen, ist der Einbau bei ¼ Durch-
messer zu empfehlen. Mindestabstand vom Ende der Messstrecke bis zum leitfähigen Behälterdeckel 50 mm.
Behältererde BE direkt mit blau-
er Litze vom Kabel verbinden.

6
Montage - Sonde mit Temperaturpuffer
Zwischen der blauen (GND) Litze des Kabels und dem geerdetem Behälter (bzw. Gegenelektrode)
muss eine direkte galvanische Verbindung bestehen! Bei nichtmetallischen Behältern wird die Ge-
genelektrode über eine direkte Kabelverbindung zur blauen Litze des Kabels realisiert.
Die Sonde kann auch kopfstehend, also von unten nach oben montiert werden.
Technische Daten
* Soweit zutreffend.
** Weitere technische Daten: Siehe Datenblatt
Elektrische Ausführung 5-Leiter DC
Ausgangsfunktion für KFI-5-1...TP...ETW 1 Schaltausgang, Schließer
Ausgangsfunktion für KFI-5-2...TP...ETW 2 Schaltausgänge, Schließer
Betriebsspannung (UB) 15...30 V DC
Zul. Restwelligkeit max. 5 %
Ausgangsstrom (Ie) 100 mA
Leistungsaufnahme max. (Ausgänge unbelastet) 0,9 W
Zul. Umgebungstemperatur -25...+70 °C
Zul. Umgebungstemperatur (für aktive Zone) -25 bis zu +200 °C**
LED-Anzeige Grün
Schutzbeschaltung Eingebaut
Schutzart IEC 60529 IP 67
Norm EN 60947-5-2*
Anschlusskabel 2 m, PVC, 5 x 0,34 mm²
DE
BE
KFI-5-1(2)-ETW
≥15 mm
D¼D
IB2
M
IB1
1/3D,
min. 50 mm
IB3
Messbereich (M) inaktiver Bereich 1 (IB1) inaktiver Bereich 2 (IB2) inaktiver
Bereich 3 (IB3), Temperaturpuffer (TP)
Messstrecke nicht im Bereich von Querschnittsänderungen des Behälters
montieren, wie z. B. im Konusbereich.
Sondenmontage mittig oder aussermittig möglich. Um unabhängig vom Schüttkegel zu messen, ist der Einbau bei ¼ Durch-
messer zu empfehlen. Mindestabstand vom Ende der Messstrecke bis zum leitfähigen Behälterdeckel 50 mm.
Behältererde BE direkt mit blau-
er Litze vom Kabel verbinden.
TP

7
Chart
Elektrischer Anschluss
Elektrischer Anschluss:
• Anlage spannungsfrei schalten.
• Sonde nach Anschlussbild anschließen.
• Spannungsversorgung einschalten.
• Beim Einschalten erkennt die Sonde automatisch und für jeden der Schaltausgänge unabhängig, ob der
jeweilige Schaltausgang gegen „-“ (= PNP) oder „+“ (= NPN) angeschlossen ist. Lastwiderstände ≤ 20
kOhm der Schaltausgänge (A1, A2).
KFI-5-1...ETW KFI-5-2...ETW
LED grün / Einstellfunktion
Einstellung S1
Einstellung S2
Werkseinstellung
Test
LED grün / Einstellfunktion
Einstellung S1
Werkseinstellung
Test
KFI-5-1...ETW KFI-5-2...ETW
DE
A1
A1

8
Schaltausgangs-Charakteristika
Einstellbedingungen KFI-5-2...ETW
Nach dem Einschalten benötigt die Füllstandssonde 2 Sekunden Initialisierungszeit. Die Füllstandssonde
wird ohne Einstellungen geliefert, demnach sind die Ausgänge im OFF Modus. Während der Initialisierungs-
zeit ist der ETW Eingang und die Ausgänge deaktiviert.
Hinweis:
Während der Einstellung ist der Messmodus deaktiviert.
Ausgangs-Charakteristika KFI-5-1...ETW (1 Schaltpunkt):
A1 =
OFF, keine Reaktion auf den Füllstand gkeine Einstellung für S1 oder die Einstellung war nicht erfolgreich (Fehler!)
A1 = Alternierend mit Frequenz 15 Hz
g
Einstellung von S1 aktiv
A1 = Alternierend mit Frequenz 0,4 Hz
g
Ausgang Testfunktion
A1 = Reaktion auf den Füllstand
g
S1 ist eingestellt
Ausgangs-Charakteristika KFI-5-2...ETW (2 Schaltpunkte):
A1 =
OFF, keine Reaktion auf den Füllstand gkeine Einstellung für S1 oder die Einstellung war nicht erfolgreich (Fehler!)
A2 =
OFF, keine Reaktion auf den Füllstand gkeine Einstellung für S2 oder die Einstellung war nicht erfolgreich (Fehler!)
A1 = Alternierend mit Frequenz 15 Hz
g
Einstellung von S1 aktiv
A2 = Alternierend mit Frequenz 15 Hz
g
Einstellung von S2 aktiv
A1 = Alternierend mit Frequenz 0,4 Hz
g
Ausgang Testfunktion
A2 = Alternierend mit Frequenz 0,4 Hz
g
Ausgang Testfunktion
A1 = Reaktion auf den Füllstand
g
S1 ist eingestellt
A2 = Reaktion auf den Füllstand
g
S2 ist eingestellt
• Die Schaltpunkte sind vollkommen unabhängig voneinander, die Einstellung von S1 hat keinen Einuss
auf S2 und umgekehrt.
• Die Reihenfolge ist beliebig.
• Beim Reset werden beide Schaltschwellen zurückgesetzt.
DE

9
ETW
H
L
3s
T0t
8s 13s
Einstellphilosophie KFI-5-1...ETW (1 Schaltpunkt)
DE
S1 RESET Test
Funktion
Der Moduswechsel erfolgt entsprechend des dargestellten Endlos-Zeitdiagramms.
Mit dem grauen ETW-Kabel wird der Moduswechsel aktiviert.
Die Einstellung erfolgt durch das Lösen des ETW-Kabels von der Versorgungsspannung (+) an dem ge-
wünschten Menüpunkt „S1“, „Reset“ oder „Test-Funktion“. Alle Einstellungen beziehen sich auf das abstei-
gende ETW-Signal.
HIGH level: UB, LOW level: 0 V
Als Einstellhilfe empehlt sich die LED-Anzeige, mit unterschiedlichen Blinkfolgen für jeden Menüpunkt.
Der ETW Eingang ist inaktiv während der Initialisierung und bei der Einstellung.
LED Anzeige
ON
OFF
3s t
8s 13s
f = 1,5Hz f = 3Hz f = 0,4Hz
Doppel
Impulse

10
ETW
H
L
3s
T0t
8s 13s
S1
A1 + LED
ON
OFF
3s
T0t
8s 13s
Einstellung KFI-5-1...ETW (1 Schaltpunkt)
Nach einem Einstellungsfehler (ERROR) nimmt der Sensor den zuletzt gespeicherten Status wieder ein.
Der Einstellvorgang kann wiederholt werden.
Sonde ist ordnungsgemäß montiert und elektrisch angeschlossen. Die Versorgungsspannung ist einge-
schaltet.
Mit dem grauen ETW-Kabel wird der Moduswechsel aktiviert.
• Behälter mit dem zu messenden Füllgut auf das gewünschte Niveau befüllen.
• Graue Litze (ETW) mit Versorgungsspannung verbinden und innerhalb von 3 bis 8 Sekunden die Teach-
Verbindung lösen. Die LED blinkt während der Initialisierungsphase (15 Hz). Der Ausgang pulst
entsprechend.
• Ausgang A1 wechselt zu HIGH, Füllstand erkannt. Einstellung S1 erfolgreich abgeschlossen.
LED blinkt 15 Hz
DE

11
ETW
H
L
3s
T0t8s 13s
LED
ON
OFF
3s
T0t
8s 13s
A1
ON
OFF
3s
T08s 13s
Reset KFI-5-1...ETW (1 Schaltpunkt)
DE
• Graue Litze (ETW) mit der Versorgungsspannung verbinden und innerhalb >8 und <13 Sekunden die
Teach-Verbindung lösen. LED erlischt für 1,5 Sekunden.
• A1 = OFF, Reset erfolgreich
Reset
[1,5 s]
Man kann die Sonde jederzeit auf Werkseinstellungen (Reset) zurücksetzen.

12
ETW
H
L
3s
T0t
8s 13s
LED
ON
OFF
3s
T0t
8s 13s
A1
ON
OFF
3s
T0t
8s 13s
Testbetrieb KFI-5-1...ETW (1 Schaltpunkt)
(LED blinkt, f = 0,4 Hz)
Test Funktion
f = 0,4 Hz
DE
Die Füllstandssonde kann jederzeit in den Testbetrieb umgeschaltet werden. Damit kann die Installation der
Sonde einfach überprüft werden.
Aktivierung Testbetrieb:
Graue Litze (ETW) mit Versorgungsspannung (+) verbinden und > 13 Sekunden halten. Im Testbetrieb blinkt
die LED mit 0,4 Hz und der Ausgang pulsiert dem entsprechend.
Durch Lösen des ETW-Kabels wird der Testmodus beendet und der Sensor nimmt den zuletzt gespeicher-
ten Status wieder ein.

13
ETW
H
L
3s
T0t
8s 13s 18s
ON
OFF
3s t
8s 13s 18s
f = 1,5Hz f = 3Hz f = 0,4Hz
Einstellphilosophie KFI-5-2...ETW (2 Schaltpunkte)
DE
S1 S2 RESET Test
Funktion
Der Moduswechsel erfolgt entsprechend des dargestellten Endlos-Zeitdiagramms.
Mit dem grauen ETW-Kabel wird der Moduswechsel aktiviert.
Die Einstellung erfolgt durch das Lösen des ETW-Kabels von der Versorgungsspannung an dem gewünsch-
ten Menüpunkt „S1“, S2“, „Reset“ oder „Test-Funktion“. Alle Einstellungen beziehen sich auf das abstei-
gende ETW-Signal.
HIGH level: UB, LOW level: 0 V.
Als Einstellhilfe empehlt sich die LED-Anzeige, mit unterschiedlichen Blinkfolgen für jeden Menüpunkt.
Der ETW Eingang ist inaktiv während der Initialisierung und bei der Einstellung.
Doppel Impulse
LED
Anzeige

14
ETW
H
L
3s
T0t
8s 13s 18s
A1 + LED
ON
OFF
3s
T0t
8s 13s 18s
A2 + LED
ON
OFF
3s
T0t
8s 13s 18s
Einstellung KFI-5-2...ETW (2 Schaltpunkte)
Nach einem Einstellungsfehler (ERROR) nimmt der Sensor den zuletzt gespeicherten Status wieder ein.
Der Einstellvorgang kann wiederholt werden.
Füllstandssonde ist ordnungsgemäß montiert und elektrisch angeschlossen. Die Versorgungsspannung ist
eingeschaltet.
Mit dem grauen ETW-Kabel wird der Moduswechsel aktiviert.
Einstellung S1
• Behälter mit dem zu messenden Füllgut auf das gewünschte Niveau S1 befüllen.
• Graue Litze (ETW) mit Versorgungsspannung (+) verbinden und innerhalb von 3...8 Sekunden die ETW-
Verbindung lösen. Die LED blinkt während der Einstellphase (15 Hz), Der Ausgang pulst dem
entsprechend.
• Ausgang A1 wechselt zu HIGH. Füllstand erkannt. Einstellung S1 erfolgreich abgeschlossen.
Einstellung S2
• Behälter mit dem zu messenden Füllgut auf das gewünschte Niveau S2 befüllen.
• Graue Litze (ETW) mit Versorgungsspannung (+) verbinden und innerhalb 8...13 Sekunden die ETW-
Verbindung lösen. Die LED blinkt während der Einstellphase (15 Hz), Der Ausgang pulst dem
entsprechend.
• Ausgang A2 wechselt zu HIGH. Füllstand erkannt. Einstellung S2 erfolgreich abgeschlossen.
(LED blinkt 15 Hz)
(LED blinkt 15 Hz)
S1 S2
DE

15
ETW
H
L
3s
T0t
8s 13s 18s
LED
ON
OFF
3s
T0t
8s 13s 18s
A1 + A2
ON
OFF
3s
T0t
8s 13s 18s
Man kann die Sonde jederzeit auf Werkseinstellungen (Reset) zurücksetzen.
DE
Reset KFI-5-2...ETW (2 Schaltpunkte)
• Graue Litze (ETW) mit der Versorgungsspannung (+) verbinden und innerhalb von 13...18 Sekunden die
ETW-Verbindung lösen. LED erlischt für 1,5 Sekunden.
• A1 und A2 = OFF, Reset erfolgreich
Reset
[1,5 s]

16
ETW
H
L
3s
T0t
8s 13s 18s
LED
ON
OFF
3s
T0t
8s 13s 18s
A1 + A2
ON
OFF
3s
T0t
8s 13s 18s
Testbetrieb KFI-5-2...ETW (2 Schaltpunkte)
Die Füllstandssonde kann jederzeit in den Testbetrieb umgeschaltet werden. Damit kann die Installation
der Füllstandssonde einfach überprüft werden.
Aktivierung Testbetrieb:
Graue Litze (ETW) mit Versorgungsspannung (+) verbinden und > 18 Sekunden halten.
Im Testbetrieb blinkt die LED mit 0,4 Hz und die Ausgänge pulsieren dem entsprechend.
Durch Lösen des ETW-Kabels wird der Testmodus beendet und der Sensor nimmt den zuletzt gespeicher-
ten Status wieder ein.
Test Funktion
(LED blinkt,
f = 0,4 Hz)
f = 0,4 Hz
DE

17
EN
Table of contents
Important Note Page 2
General Description Page 18
Mounting / Technical Data Page 19 / 20
Electrical Connection / EasyTeach Chart Page 21
Switching output characteristics /
Adjustment conditions Page 22
Adjustment philosophy KFI-5-1...ETW
(1 Switching Point) Page 23
Adjustment KFI-5-1...ETW (1 Switching Point) Page 24
Reset / Test mode KFI-5-1...ETW
(1 Switching Point) Page 25 / 26
Adjustment philosophy KFI-5-2...ETW
(2 Switching Points) Page 27
Adjustment KFI-5-2...ETW (2 Switching Points) Page 28
Reset / Test mode KFI-5-2...ETW
(2 Switching Points) Page 29 / 30

18
General description
Capacitive Level probe for level control of 1 (KFI-5-1...ETW) or 2 (KFI-5-2...ETW) measuring points. This
probe which has its evaluation electronics integrated in the sensor’s head is based on our patented 3 elec-
trode measuring principle. This measurement is made between the measuring electrode in the probe and
a metal container wall (or additional electrode). The measuring area is dened by means of inactive areas
that are placed above and below the dened measuring area. An earthed container wall is normally used
as the BE electrode. If the container is not made of metal, an earthed metal foil or other machine parts can
serve as the additional electrode, whereby one has to make sure that the length of the additional electrode
is the same as the length of the measuring range you wish to measure. Furthermore the additional electrode
(BE electrode) should have the same width and distance to the probe over the measuring range you wish
to measure.
During initial setup, the i-Level probe automatically calibrates itself to the basic capacity of the container.
The following measurements can be made with the compact i-Level probe:
KFI-5-1...ETW = 1 Switching Point
KFI-5-2...ETW = 2 Switching Points
EN
Measuring area
Switching point S2
adjustable
Earth connection of the con-
tainer or counter electrode on
the container
Probe rod BE-connection via
cable connection
Optional holder for
connection head,
material VA or AL
Cable 5 x 0,34 mm²
LED green
IB3 =
73 mm
IB1 = 7 mm
Probe length (L)
Switching point S1
adjustable
BE
Position of the switching
points S1 or S2 free adjust-
able within the measuring
range
Power Supply
IB2 =
50 mm

19
EN
Mounting
It is mandatory to have a galvanic connection between the blue (GND) wire and the earthed container
(or additional electrode)! With non-metal containers the connection to the BE electrode is made by
means of a direct cable connection to the blue wire of the cable.
The probe can also be installed up-side down.
Electrical version 5-wire DC
Output function for KFI-5-1...ETW 1 limit value switching point, normally open
Output function for KFI-5-2...ETW 2 limit value switching points, normally open
Operating voltage (UB) 15...30 V DC
Permitted residual ripple max. 5 %
Output current max. (Ie) 100 mA
Power consumption max. (outputs no-load) 0,9 W
Permitted ambient temperature -25...+70°C
LED-Display Green
Protective circuit Built-in
Degree of protection IEC 60529 IP 67
Norm EN 60947-5-2*
Connection cable 2 m, PVC, 5 x 0,34 mm²
Technical Data
*Where applicable
For further technical data: See data sheet
BE
KFI-5-1(2)-ETW
≥15 mm
D¼D
IB2
M
IB1
1/3D,
min. 50 mm
IB3
Measuring area (M) non-active range 1 (IB1) non-active range 2 (IB2) non-active
range 3 (IB3)
The measuring range must not be mounted in the area of the container where
there is a change in the cross section; for example the cone.
The probe can be mounted in the centre of the container or just off to one side. For a measurement to be independent of the
lling cone, we recommend that the probe be mounted at ¼ of the diameter. The minimum distance between the end of the
measuring range and the container’s lid is 50 mm.
Connect the BE direct to the
blue wire of the cable.

20
EN
Mounting probe with temperature buffer
It is mandatory to have a galvanic connection between the blue (GND) wire and the earthed con-
tainer (or additional electrode)! With non-metal containers the connection to the BE electrode is
made by means of a direct cable connection to the blue wire of the cable.
The probe can also be installed up-side down.
Electrical version 5-wire DC
Output function for KFI-5-1...TP...ETW 1 limit value switching point, normally open
Output function for KFI-5-2...TP...ETW 2 limit value switching points, normally open
Operating voltage (UB) 15...30 V DC
Permitted residual ripple max. 5 %
Output current max. (Ie) 100 mA
Power consumption max. (outputs no-load) 0,9 W
Permitted ambient temperature -25...+70 °C
Permitted ambient temperature (for active zone) -25 up to +200 °C**
LED-Display Green
Protective circuit Built-in
Degree of protection IEC 60529 IP 67
Norm EN 60947-5-2*
Connection cable 2 m, PVC, 5 x 0,34 mm²
Technical Data
*Where applicable
** For further technical data: See data sheet
BE
KFI-5-1(2)-ETW
≥15 mm
D¼D
IB2
M
IB1
1/3D,
min. 50 mm
IB3
Measuring area (M) non-active range 1 (IB1) non-active range 2 (IB2) non-active
range 3 (IB3) area temperature buffer (TP)
Do not mount the measuring range in the area of the container with changes in
the cross section, like the bottom cone of the container
The probe can be mounted in the centre of the container or just off to one side. For a measurement to be independent of the
lling cone, we recommend that the probe be mounted at ¼ of the diameter. The minimum distance between the end of the
measuring range and the container’s lid is 50 mm.
Connect the BE direct to the
blue wire of the cable.
TP
This manual suits for next models
1
Table of contents
Languages:
Other Rechner Sensors Measuring Instrument manuals
Popular Measuring Instrument manuals by other brands

TRIMOS
TRIMOS V3 user manual

TechnipFMC
TechnipFMC 4728 Installation & operation manual

PCB Piezotronics
PCB Piezotronics IMI SENSORS 602M102 Installation and operating manual

Circutor
Circutor CVM-D41 DC instruction manual

wtw
wtw inoLab pH/ION 735 operating manual

CyberOptics
CyberOptics SE 300 Ultra Hardware reference