Red Arrow SHC-BAT-SM User manual

Battery Operated Smoke Alarm
Product Codes: SHCBATSM
Box Contents -
1 x SHC-BAT-SM Wireless Smoke Alarm
Dimensions: L: 120mm x W: 120mm x D: 35.5mm
Power: built-in DC 3V(CR17450) Lithium battery (battery not replaceable)
Product Life: 10 Years after initial activation
Alarm Volume: >85dB (A) at 3 meters
Alarm Sensitivity: 0.10-0.16dB /m
Sound Pattern: ISO8201 (BI 0.5s -pause 0.5s - BI 0.5s -pause 0.5s - BI 0.5s - pause 1.5s,
with the RED LED ash, repeat this alarm pattern)
Wireless Alarm
Sound Pattern: BI - BI - pause 1.2s, with the red LED ash, repeat this alarm pattern
INSTALLATION INSTRUCTIONS
PAGE 1 (FRONT PAGE)
Specication
DESCRIPTION:
Built-in non-replaceable battery operated Photoelectric smoke alarm, Designed with quick t base
and sensitive photoelectric sensor for detecting micro particles associated with smoldering res and
reacts faster than Ionization alarms. Keeping your household and loved ones safe with built in RF
Interlinking function for pairing with Red Arrow battery operated heat alarms.
Recommended Installation Locations
Safety Warning
• The installation should be carried out
by a competent person.
• Follow the provided installation
instructions, using the xings supplied
or recommended.
• Keep out of reach of children.
KM 694336
Thank you for purchasing
the SHC-BAT-SM Smoke
Alarm. Please take a few
minutes to thoroughly
read the user guide
and familiarize yourself
and your family with its
operation and save for
future reference.
5
YRS
GUARANTEE
Easy
Install
Ceiling
Best here
Never here
30 cm
50 cm
Not in this
area
Any where in this area
200 cm
Never here
Diagram 1 Diagram 2
35.5mm120mm
Ver: 1.0
PHOTO
ELECTRIC
The following suggestions are intended to help you to position and
install your alarm.
1. The locations must comply with the applicable building regulations.
BS 5839 Part 6 gives guidance on the number, types and positioning
of alarms. In general, smoke alarms should be installed in every
circulation space such as Hallways, Landings, Bedrooms and
principal living spaces (living room). Larger spaces may require the
use of more than one unit.
2. Installed on each and every storey.
3. Hot smoke rises and spreads out, so a central ceiling position is the
preferred location. The air is“dead” and does not move into corners,
therefore smoke must be mounted away from corners. Position the
unit at least 30 cm away from walls and corners and 30 cm away
from any light tting or decorative object witch may obstruct smoke
entering the Alarm. (see the diagram 1).
4. When the ceiling is slanting, the alarm needs to be installed
minimum 50cm away from the highest ceiling point in the room (see
the diagram 2).
CAUTION: Our smoke alarm is also suitable for use in leisure
accommodation vehicles (LAVs).
1. Don’t place Alarms in bathrooms, Kitchens, Garages or other rooms where
the Alarm may be triggered by steam, condensation and normal smoke/
heat from appliances.
2. In areas with high humidity, like bathrooms or areas near dishwashers or
washing machines, install at least 3 meters away from these areas.
3. Near air returns or heating and cooling supply vents, install at least lm
away from these areas. The air could blow smoke away from the detector,
interrupting its alarm.
4. In rooms where temperature may fall below 0°C or rise above 40°C. (due to
nuisance/false alarm activation).
5. In extremely dusty, dirty, or insect infested areas where particles may
interfere/obstruct with Alarm operation.
6. Away from air conditioning or ventilation grilles/ louvres.
Locations to Avoid
Press test button and hold it for above 3 seconds until LED lightswith a “beep”
and release it within 3 seconds, the unit will generate a “beep”again, indicates
that it is activated and goes into work status.
Activation
INTER
CONNECT
22
0086
BS EN 14604:2005/AC:2008
22
2797
EN 14604:2005/AC:2008

Wireless Interconnecting Function
1. Ensure product activation is complete.
2. Select one of smoke alarm as the MASTER unit. Treat all other units
as SLAVE units.
3. Press the test button on the MASTER unit three times within two
seconds, the red LED will ash quickly, the unit is now in sending
radio signal mode. This mode will last for 90 seconds.
4. While the MASTER unit is in sending radio signal mode. Press the
test button on any SLAVE unit three times within two seconds, the
SLAVE unit learns this signaland complete the pairing after a sound
“beep”with light ash once.
5. Repeat the above steps on all other SLAVE units.
Clear wireless connection function
Press the test button on any SLAVE unit three times within two seconds,
the red LED will ash quickly, then press and hold the test button again
until the red light goes out the rst time and release the button imme-
diately, the red LED will ash slowly, at this time, press the test button
again, the SLAVE unit will beep 3 times, which means that the SLAVE
unit clears wireless connected successfully.
CAUTION: MUST activate alarm rst, or else there is no function for this
unit. The smoke alarm is designed to be wirelessly interlinked with up
to 40 products. They are not designed to communicate with wireless
alarms from other ranges or manufacturers. These alarms need to be
“learning”or interlinked in order to communicate with each other. If
one alarm activates, all other interlinked alarms will also sound. Only
successful interconnection units can clear the radio signal. Clearing
the radio signal only removes the radio signal from the slave unit. The
MASTER unit can not clear the radio signal.
Testing:
Test by pushing the test button on the cover. This will sound the alarm if the
electronic circuitry, alarm, and battery are working. If no alarm sounds, the unit
has defective batteries or other failures. DO NOT use an open ame to test your
alarm, you could damage the alarm or ignite combustible materials and start a
structure re.
NOTE: WEEKLY TESTING IS REQUIRED
Normal Condition
The red LED should ash every 48 seconds to show that the alarm is active.
Alarm Condition
When the Alarm senses products of combustion and sounds the audible alarm,
the red LED will ash one ash/second. The ashing LED and pulsating alarm
will continue until the air is cleared.
Low Power Pack Condition
IMPORTANT: Your smoke alarm requires the power pack to have sucient
capacity of power to operate correctly. Should your smoke alarm enter a low
power pack condition the unit will emit an audible chirp once every 48 seconds
with light ash once. When this occurs you must replace the alarm immediately.
Your smoke alarm will continue to warn of this low power pack condition for
at least 30 days, however, failure to change the alarm after this time would
mean your smoke alarm may have insucient power to alert you in a real re
situation.
Fault Indication
The alarm chirp occurs every 48 seconds.
Alarm silence
During the unit is alarming, push the test button, it will be paused the unit
alarming for approx 8 minutes. The red LED will ash once every 8 seconds,
it indicates the smoke alarm device is running into the silence mode. If your
smoke alarm emits the full alarm signal and you are not testing the unit, the
smoke alarm is warning you of a potentially dangerous situation that requires
your immediate attention. Only use the alarm silence function after making
sure that there is no ongoing re emergency situation. Do not block the vents
on the alarm or disable the smoke alarm in any way, as this will remove your
protection. Smoke alarms can sometimes react to cooking fumes or other
non emergency situations. In the event of a known false alarm your smoke
alarm can be temporarily silenced by pressing the test button. You alarm will
automatically return to full sensitivity within 8 minutes.
NOTE:
1. Press and release the silence button, the alarm sound will stop.
2. Your alarm will silence and enter into a reduced sensitivity reset cycle for
approximately 8 minutes.
3. During the reduced sensitivity reset cycle, the red LED will ash once every
8 seconds.
4. Your alarm will automatically return to full sensitivity on completion of the
reset cycle and the red LED will revert to ashing once every 48 seconds.
DANGER: Never ignore any alarm ignoring the alarm may result in injury or
death. If your smoke alarm activates and alarms and you are not absolutely
certain of the source of the smoke, get everyone out of the house immediately.
Operation & Testing
WARNING: To prevent injury, this unit must be securely attached to the
ceiling in accordance with the installation instructions.
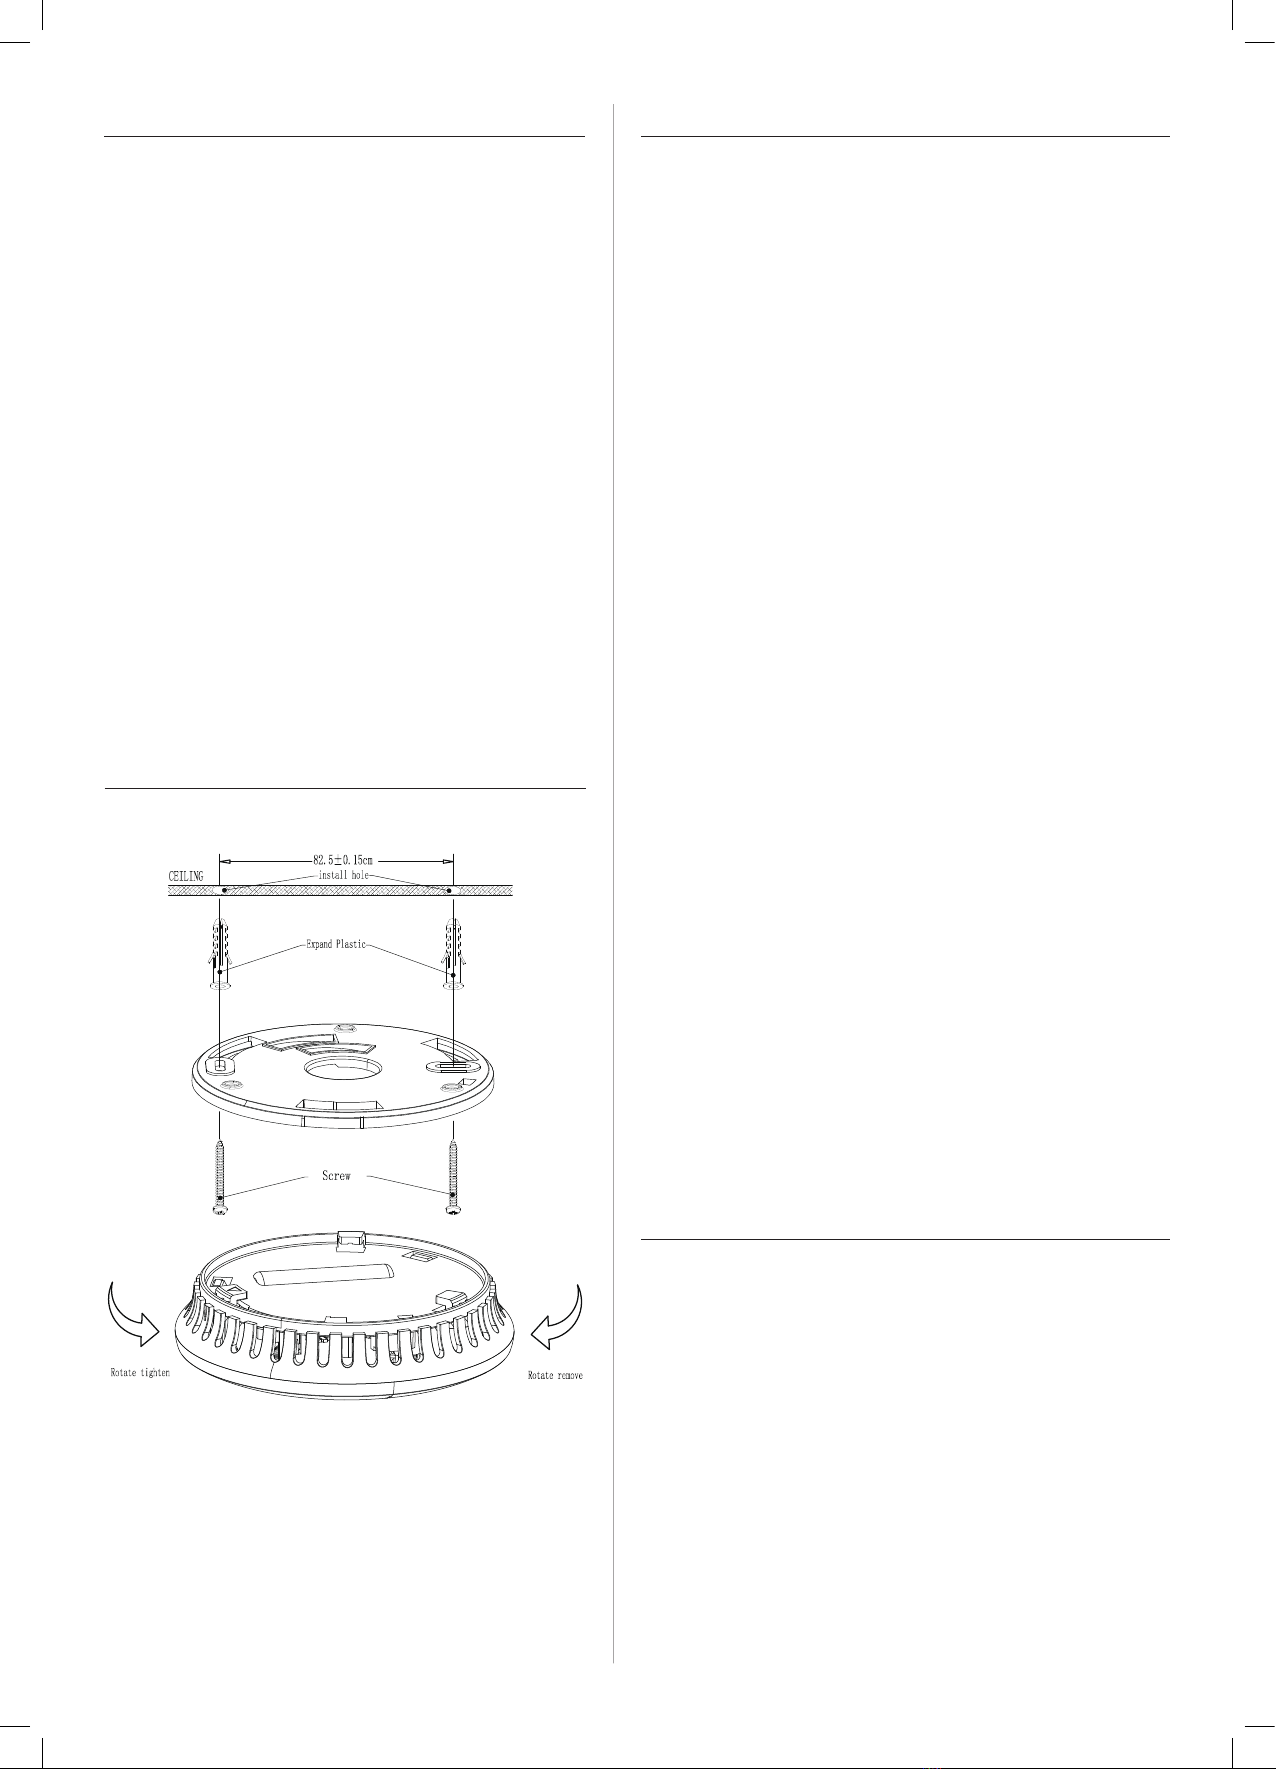
Installation
1. Do not panic, and stay calm.
2. Alert small children in the home.
3. Leave immediately by your escape plan. Every second counts, so don’t waste
time getting dressed or picking up valuables.
4. In leaving, don’t open any inside door without rst feeling its surface. If hot,
or if you see smoke seeping through crack don’t open that door! Instead,
use your alternate exit. If the inside of the door is cool, place your shoulder
against it, open it slightly and be ready to slam it shut if heat and smoke
rush in.
5. If the air is smoky, stay close to the oor. Breathe shallowly through a cloth,
wet if possible.
6. Once outside, go to your selected meeting place and make sure everyone
is there.
7. Call the re department from your neighbor’s home -not from yours!
8. Don’t return to your home until the re ocials say that it is all right to do so.
What To Do In Case Of A Fire In Your Home

This product is guaranteed for a period of 5 years from the date of purchase.
The guarantee is invalid in the case of improper use, tampering, removal
of the Q.C. date label, installation in an improper working environment or
installation not according to the current Regulations. Should this product
fail during the guarantee period it will be replaced free of charge, subject
to correct installation and return of the faulty unit. We do not accept
responsibility for any installation costs associated with the replacement of
this product. Your statutory rights are not aected. We reserve the right to
alter specications without prior notice.
Guarantee
T: 0800 195 0006
sales@redarrowelectrical.co.uk
Red Arrow Electrical Ltd
Cortonwood Drive, Brampton,
Barnsley, S73 0UF redarrowelectrical.co.uk
INS/ELEC/0005/SHC-BAT-SM/V1
Trouble Shooting
PROBLEM SOLUTION
Smoke alarm device does not
sound when tested
1. Must activate alarm before installation.
2. Clean smoke alarm device. Please refer to
the “maintenance and does not sound when
cleaning” section. tested.
3. If there are still failures during warranty, you
can return to your retailer.
4. If the unit is out of warranty, please replace
another new alarm.
The alarm“chirp”with red
LED ashe once every 48
secounds.
The battery is under low battery status, please
replace the smoke alarm device
Smoke alarm device chirp
occurs every 48 seconds
(alarm goes into fault mode).
Clean smoke alarm device. Please refer to the
“maintenance and cleaning”section. Purchase and
change another smoke alarm if the problem still
exists.
Smoke alarm sounds
device unwanted alarms
intermittently or when
residents are cooking, taking
showers, etc.
1. Press test button to pause alarm.
2. Clean smoke alarm device. Please refer to the
“maintenance and cleaning”section.
3. Move smoke alarm device to new location and
press test button.
The alarm sounds dierent
from it is used to. It starts
and stops.
1. Clean smoke alarm device. Please refer to the
“maintenance and cleaning”section.
2. If there are still failures during warranty, you
can return it to your retailer.
3. If the unit is out of warranty, please replace it
with another new alarm.
• In addition to weekly testing, the alarm requires periodic cleaning to
remove dust, dirt, and debris.
• Clean the alarm at least once a month to remove dust, dirt, or debris.
• Use a vacuum cleaner with the soft brush, vacuum all sides and
covers of smoke alarm device.
• This alarm has a low battery monitor which will cause the alarm to
“chirp”approx every 48 seconds and the red LED ash once at the
same time for a minimum of thirty days when the battery gets low.
• If there is a defective battery or other failures, you can refer to“Trou-
ble shooting”for solution, if there are still failures during warranty,
you can return it to your retailer.
IMPORTANT: Do not attempt to remove the cover to clean inside. This
will aect warranty.
Cautions:
• Photoelectric smoke detectors can reduce the likelihood of a disas-
ter, but they cannot guarantee a 100% safety.
• To ensure your maximum security, please install all smoke detectors
exactly according to this manual.
• Keep the detectors clean. Do not allow dust to accumulate and test
them at least once a week.
• Replace them immediately if they are not working properly
Routine Maintenance
Other Red Arrow Smoke Alarm manuals
Popular Smoke Alarm manuals by other brands

UTC Fire and Security
UTC Fire and Security AirSense Stratos EX installation manual

Perenio
Perenio PECSS01 Installation and operation manual

System Sensor
System Sensor B112LPA Installation and maintenance instructions

ELRO
ELRO Sensus5Z instruction manual

Risco
Risco RWX35S Installation and user guide

Kidde
Kidde Fyrnetics Slick 1SFW Installer's guide