Red Arrow SMAS-P User manual

Photoelectric Smoke
Alarm Installation
Instructions P.1.
For models: SMAS-P
Main Features
• AC/DC operated Photoelectric type Smoke Alarm
• Photoelectric Sensor
• Non-radioactive technology
• High and stable sensitivity
• Operated with 220-240V AC 50Hz
and 9V DC Battery back-up
• Compact size: 110mm diameter
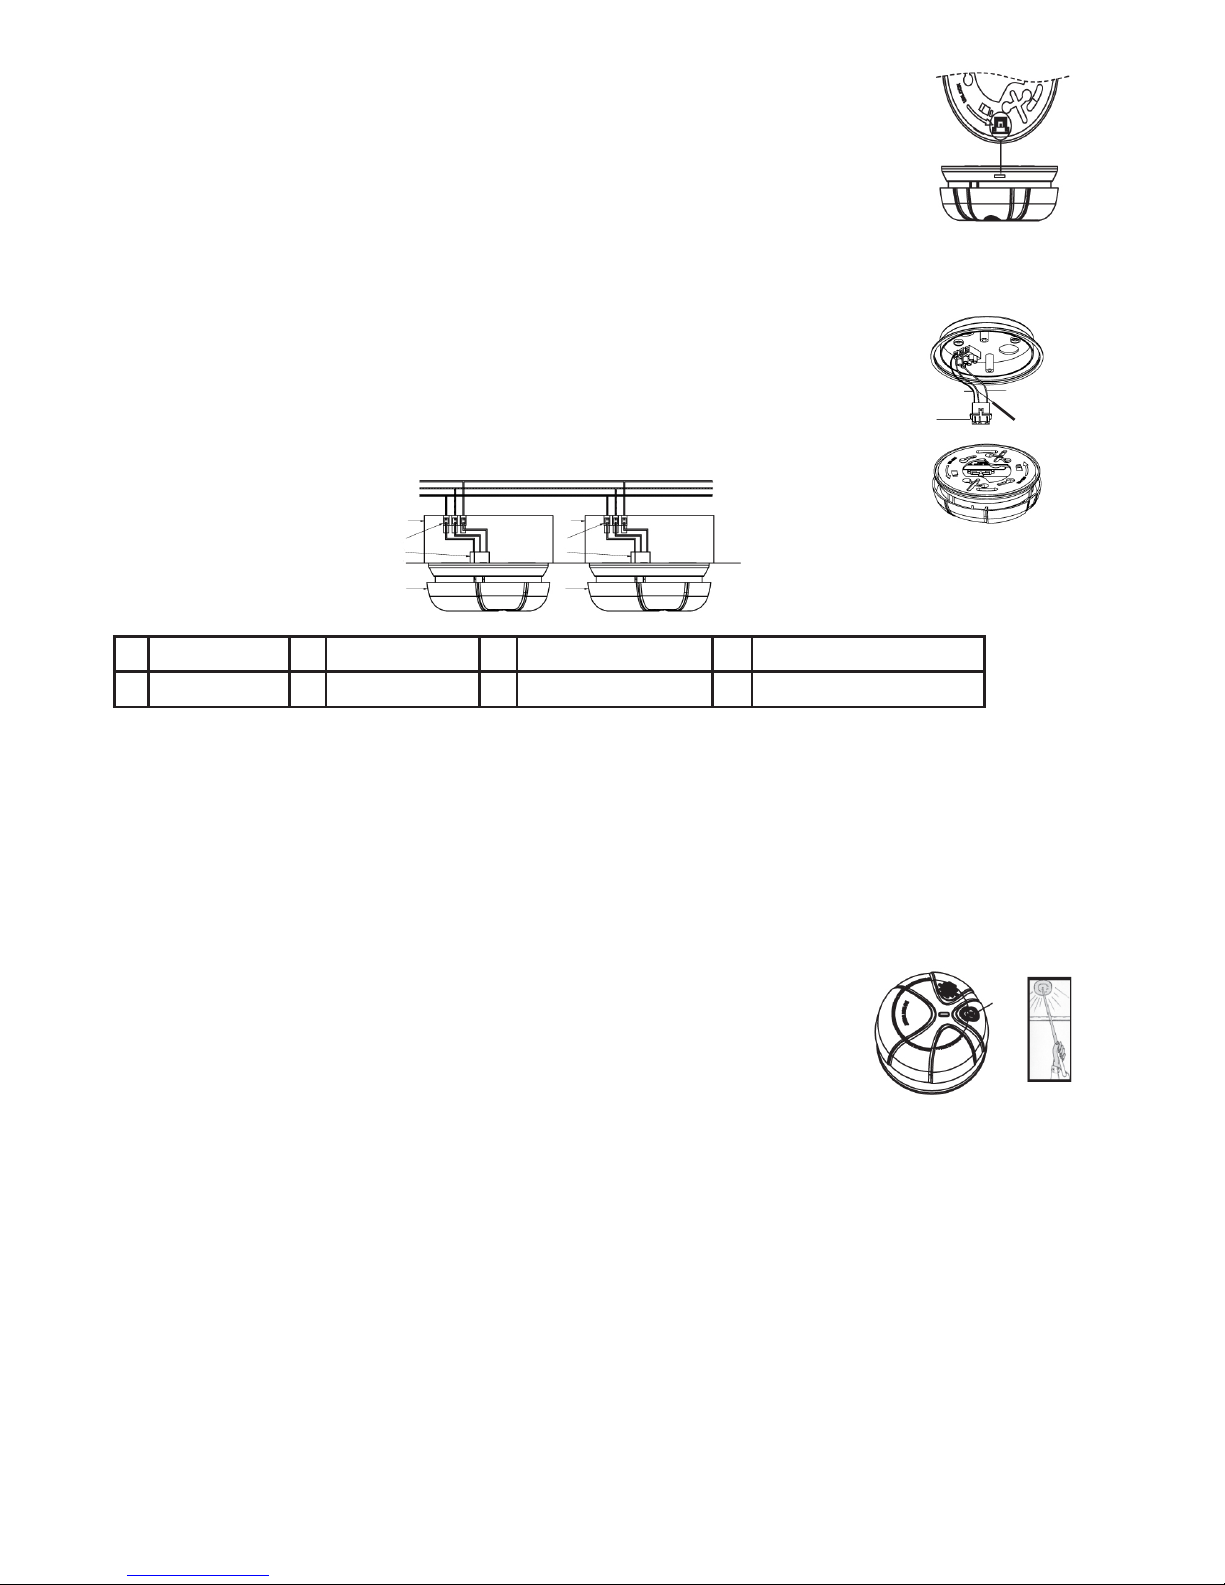
• Quick fix mounting bracket and simple
AC connector for easy installation
• Fitting and battery tamper-resist
feature
• Inter-connectable up to 40 units
• Self-test button
• 2 Colour LED indicator (Alarm and
AC power indicator)
• Extra loud alarm sound over 85dB
• Low-battery and battery missing warning indicator
• Auto-reset when smoke clears
This installation must be carried out by an electrician.
Please read these instructions carefully before installation.
Leave a copy for the user/maintenance engineer for future reference.
• Humidity Rating: 10%-90%
• Interconnect Quantities: 40 Smoke detectors and / or heat
detectors over 150m maximum
IMPORTANT SAFETY INFORMATION
1. This smoke alarm requires constant 220-240V AC 50Hz
mains power supply to operate properly. Backup 9V DC
battery will offer additional protection in the event of power
failure. This smoke alarm WILL NOT work if AC power is
not connected ir has failed or been interrupted for any
reason. AND if the backup battery is removed, drained or
improperly connected, the alarm will not work during a
power failure. DO NOT use any other kind of battery except
as specified.
2. The Push-to-test button accurately tests all smoke alarm
functions. Do not use any other test method. Test smoke
alarm weekly to ensure proper operation.
3. DO NOT cut off AC power supply or remove or disconnect
backup battery to quiet unwanted alarms. This will remove
your protection. Open windows or fan the air around smoke
alarm to silence it.
4. Observe and follow all local and national electrical and
building codes for installation.
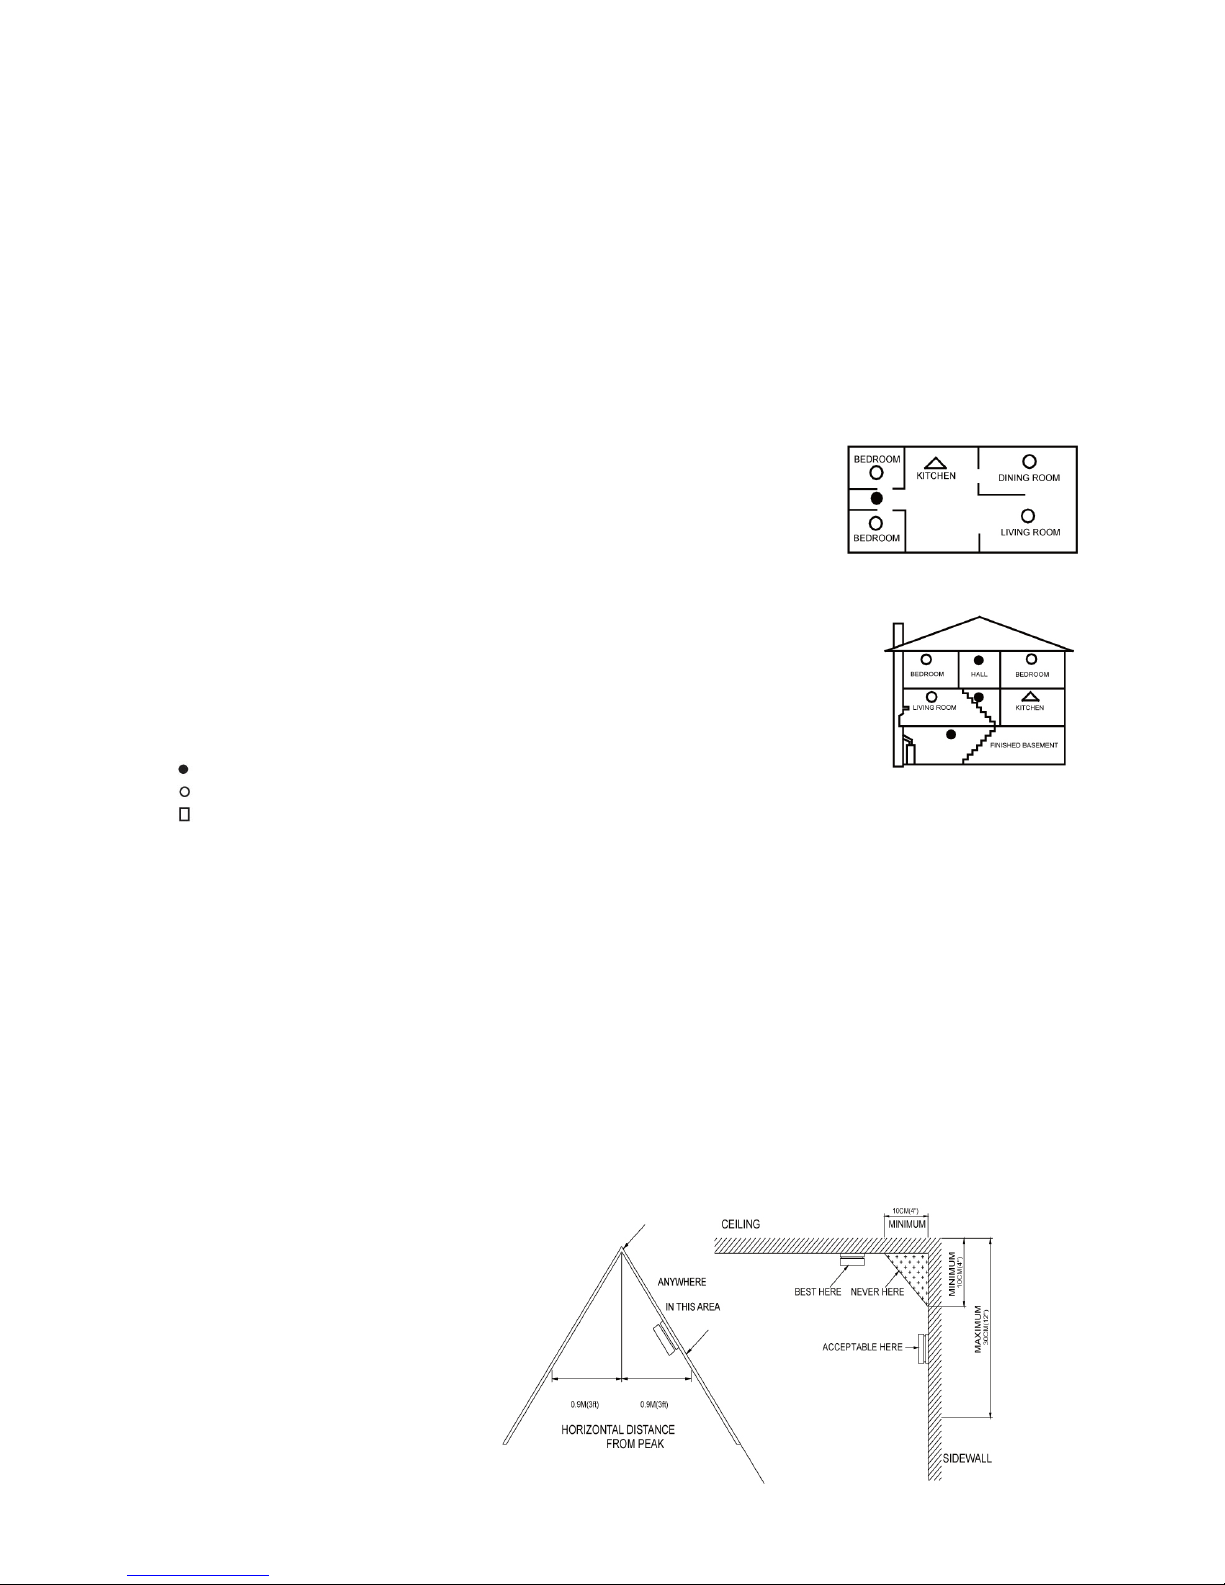
5. This smoke alarm is designed to be used inside a single room
only. In multi-room buildings, each individual living unit
should have its own smoke alarm. Do not install in non-
residential buildings. And this smoke alarm is not a
substitute for a complete alarm system.
6. Smoke may not reach the smoke alarm for many reasons.
For example, if a fire starts in a remote part of the home,
on another level, in a chimney, wall, roof, or the other side
of a closed door, smoke may not reach the smoke alarm
in time to alert household members. A smoke alarm will not
promptly detect a fire except in the area or room in which
it is installed.
7. Smoke alarms may not alert every household member every
time. The alarm horn is loud in order to alert individuals
to a potential danger. However, there may be limiting
circumtances where a household member may not hear the
alarm (i.e. outdoor or indoor noise, sound sleepers, drug or
alcohol usage, the hard of hearing, etc.). If you suspect that
Specification
• Model: SMAS-P
• Operating Temperature: 5°C to 45°C.
• Electrical Rating: 220-240V AC 50Hz
and 9V DC Battery back-up
• Battery Back-Life: In the event of a break in the mains
supply the battery will give detector operation for 1 year
minimum
• Standby Current (9V Battery): 15uA max
• Alarm Current (9V Battery): 30mA max
• Horn Output: 85 Decibles at 3m (10 feet)

this smoke alarm may not alert a household member, install and maintain specialty smoke alarms. Household member
must hear the alarm’s warning sound and quickly respond to it to reduce the risk of damage, injury, or death that may
result from fire. If a household member is hard of hearing, install special smoke alarms with lights or vibrating devices to
alert occupants.
8. Smoke alarms can only sound their alarms when they detect smoke. Smoke alarms detect combustion particles in the
air. They do not sense heat, flame or gas. This smoke alarm is designed to give audible warning of a developing fire.
However, many fires are fast-burning, explosive, or intentional. Others are caused by carelessness or safety hazards.
Smoke may not reach the smoke alarm QUICKLY ENOUGH to ensure safe escape.
9. Smoke alarms have limitations. This smoke alarm is not foolproof and is not warranted to protect lives or property
from fire. Smoke alarms are not a substitute for insurance. Homeowners and renters are responsible for insuring their
own lives and property. In addition, it is possible for the smoke alarm to fail at any time. For this reason, you must test
the smoke alarm weekly and replace every 10 years.
Note: For best protection, we recommend that you install a smoke alarm in every room.
Smoke Alarm Placement
Typical single-story home
Install a smoke alarm on the ceiling or wall inside each bedroom and in the hallway
outside each separate sleeping area. If a bedroom area hallway is more than 30 feet long,
install a smoke alarm at each end. If there is a basement: Install a smoke alarm on the
basement ceiling at the bottom of the stairwell. SINGLE-STORY RESIDENCE
APARTMENT, MOBILE HOME
Typical Multi-story or split level home
Install a smoke alarm on the ceiling or wall inside each bedroom and in the hallway outside
each separate sleeping area. If a bedroom area hallway is more than 30 feet long, install a
smoke alarm at each end. And please install a smoke alarm on the top of a first-to-second floor
stairwell.
KEY:
Minimum required smoke alarm locations
Recommended additional smoke alarm locations MULTI-STORY RESIDENCE
Smoke alarms with silence features recommended for additional protection
IMPORTANT SMOKE ALARM PLACEMENT AND EXCEPTION
INFORMATION
1. Install a smoke alarm as close to the center of the ceiling as possible. If this is not practical, mount no closer than
4 inches from a wall or corner. Also, if local codes allow, install smoke alarms on walls, between 4 and 12 inches from
ceiling / wall intersections.
2. Install a minimum of two smoke alarms in every home, no matter how small the home.
3. Install a smoke alarm in each room that is divided by a partial wall. (either coming down from the ceiling at least 8
inches, or coming up from the floor.)
4. Install a smoke alarm in lived-in attics or attics which house electrical equipment like furnaces, air conditioners, or
heaters.
Do Not Install Smoke Alarms:

1. Near appliances or areas where normal combustion regularly occurs (kitchens, near furnaces, hot water heaters). Use
specialised smoke alarm with unwanted alarm control for these areas.
2. In areas with high humidity, like bathrooms or areas near dishwashers or washing machines. Install at least 10 feet
away from these areas.
3. Near air returns or heating and cooling supply vents. Install at least 3 feet away from these areas. The air could blow
smoke away from the detector, interrupting its alarm.
4. In rooms where temperatures may fall below 4°C or rise above 38°C.
5. In external dusty, dirty, or insect-infested areas where loose particles interfere with smoke alarm operation.
WARNING: Incorrect orientation will result in a decrease in operational effecitiveness.
How To Install This Smoke Alarm
DANGER: ELECTRICAL SHOCK HAZARD.
Turn off power at the main fuse box or circuit breaker by removing the fuse or switching the circuit breaker to the OFF
position.
WARNING: This smoke alarm is mains powered and requires wiring by a qualified electrician in accordance with the
current IEE Regulations for Electrical Installations (BS7671).
The circuit used to power the smoke alarm must be a dedicated permanent supply that cannot be switched off accidentally
by the normal user. Before installing, ensure the electrical supply is isolated.
1. From back of smoke alarm, remove the mounting plate by turning it counterclockwise. (To later engage tamper-resist
feature, twist out and set aside one of the pins molded into plate. Both pins are exactly the same).
2. Gently pull household wires through center hole of plate.
3. Secure plate to ceiling or wall with mounting screws.
4. With a small wire connector, connect the brown wire from connector plug to brown household wire.
5. Connect blue wire from connector plug to blue houeshold wire.
6. If interconnection is desired, connect yellow wire from connector to interconnect wire between smoke alarms.
See Section: Interconnecting Smoke Alarms
NOTE: If this will be used as a single-station smoke alarm, cover yellow wire with electrical tape and tuck it into junction
box.
7. Lift open battery pocket door.
8. Connect new 9V battery to battery connector inside battery pocket. Be sure battery is securely connected. Smoke
alarm may beep briefly when battery is installed.
9. Close battery pocket door, snapping it into place.
10. Attach connector plug to pins on back of smoke alarm. Plug will only fit one way and will snap into place.
11. Gently tug connector to be sure it is attached securely.
Mounting slots
Mounting bracket
Screw
9V Battery

12. Position smoke alarm to mounting plate and turn clockwise to lock into place. To engage
tamper-resist feature, insert pin into notch on edge of smoke alarm after alarm is
properly positioned in base.
NOTE: Smoke alarm will not mount to plate if battery is not installed.
13. Turn on power at main fuse box or circuit breaker.
14. Push test button to test smoke alarm. See Testing The Smoke Alarm
Interconnecting Smoke Alarms
For interconnecting line, only use #14-#18 AWG minimum solid or stranded wire. When being
interconnected, maximum wire length between any two is 1500 feet for #18 AWG or 4000 feet for
#14 AWG (20 OHMS loop resistance). This smoke alarm can be interconnected with as many as 40
other DC or AC smoke alarms and / or heat alarms. Do not connect to any other type or model
smoke alarms except the ones we specify. And this smoke alarm is powered by 220-240V
AC 50Hz and with 9V DC battery back-up.
Operating Your Smoke Alarm
Once the smoke alarm has been installed a small GREEN indicator light (LED) should be visible through the alarm grill
indicating that AC supply is healthy. A RED indicator light (LED) should also flash approximately once a minute to
indicate the battery is healthy and the unit is operating properly. If smoke is detected, the unit will emit a load pulsating
alarm and a RED indicator light (LED) will be flashing quickly until the air is clear.
Testing The Smoke Alarm
1. Test each smoke alarm to be sure it is installed correctly and operating properly.
2. The push-to-test button accurately tests functions. Do not use an open flame to test this
smoke alarm. You may ignite and damage the smoke alarm or your home.
3. Test smoke alarms weekly and upon returning from vacation or when no one has been in the
household for several days.
4. Stand at arm’s length from the smoke alarm when testing.
DANGER: If alarm horn sounds, and smoke alarm is not being tested, the smoke alarm is sensing smoke. THE SOUND
OF THE ALARM HORN REQUIRES YOUR IMMEDIATE ATTENTION AND ACTION.
Maintenance and Cleaning
In addition to weekly testing, this smoke alarm requires yearly battery replacement and periodic cleaning to remove dust,
dirt, and debris.
Battery Replacement
Always turn off the AC supply to the smoke alarm before replacing the battery.
1 Smoke alarm 3Power connector 5 Junction box 7Interconnect (Yellow) wire
2 Ceiling or wall 4 Terminal 6Live (Brown) AC wire 8 Neutral (Blue) AC wire
Interconnect
(Yellow)
Power Connector
Neutral (Blue) Live
(Brown)
6
7
8
5
4
3
1
5
4
3
2
1
Test
Button

Replace the battery at least once a year or immediately when the low battery signal sounds once a minute, even though
the smoke alarm is receiving AC power. Batteries should be replaced regularly as neccessary.
WARNING: Do not use any other type of battery, except specified in this manual. Do not use rechargeable batteries.
CAUTION: Explosion will happen if battery is incorrectly replaced.
You’d better use good battery to make the alarm work long.
The battery should only be replaced by a qualified electrician or similarly qualified person.
1. Turn off AC power supply to the smoke alarm.
2. Turn smoke alarm counterclockwise to detach it from the mounting plate.
3. Gently pull down smoke alarm.
4. Remove battery from from the compartment.
5. Insert a new 9V battery to connector. NOTE POLARITY OF CONNECTIONS. Ensure the metal tab is fully depressed
when the battery has been fitted.
6. Using the Push-To-Test button, test the heat alarm to verify 9V DC battery back-up. See Testing The Smoke Alarm.
7. Reattach the smoke alarm to the mounting plate by turning smoke alarm clockwise until it snaps into place.
8. Turn on power supply and test smoke alarm using push-to-test button. See Testing The Smoke Alarm.
Choosing a Replacement Battery
This unit requires one standard 9V battery. The following batteries are acceptable as replacements:
Golden Power #6F22; Megaton #6F22; New Leader #6F22; Gold Peak #1604; Eveready #522, #1222;
Golden Power G6F22; Golden Power GL6F22A.
Cleaning
Clean the smoke alarm at least once a month to remove dust, dirt or debris. Using the soft brush or wand
attachment to a vacuum cleaner, vacuum all sides and cover of smoke alarm. Be sure all the vents are free of
debris. If neccessary, use a damp cloth to clean smoke alarm cover.
IMPORTANT: Do not attempt to remove the cover to clean inside the smoke alarm. This will void your warranty.
Practice Fire Safety
If the smoke alarm sounds its alarm horn, and you have not pushed the test button, it is warning of a dangerous situation.
Your immediate response is neccessary. To prepare for such occurrences, develop family escape plans, discuss them with
all household members, and practice them regularly.
1. Expose everyone to the sound of a smoke alarm and explain what the sound means.
2. Determine two exits from each room and an escape route to the outside from each exit.
3. Teach all household members to touch the door and use an alternative exit if the door is hot. Instruct them not to open
the door if the door is hot.
4. Teach household members to crawl along the floor to stay below dangerous smoke, fumes and gases.
5. Determine a safe meeting place for all members outside the building.
What To Do In Case Of Fire
1. Do not panic, stay calm.

2. Leave the building as quickly as possible. Touch doors to feel if they are hot before opening them. Use an alternative
exit if neccessary. Crawl along the floor, and do not stop to collect anything.
3. Meet at a pre-arranged meeting place outside the building.
4. Call the fire department from outside the building.
5. Do not go back inside a burning building. Wait for the fire department to arrive.
These guidelines will assist you in the event of a fire. However, to reduce the chance that fires will start, practice fire
safety rules and prevent hazardous situations.
TROUBLESHOOTING
WARNING: DO NOT disconnect battery to quiet an unwanted alarm. This will remove your protection. Fan the air or
open a window to remove smoke or dust.
Problem Solution
Smoke alarm does not sound when tested. NOTE: Push
test button for at least five seconds while testing!
1. Remove smoke alarm from mounting plate and check
that battery is properly attached to connector.
2. Clean smoke alarm.
Smoke alarm bleeps about once a minute. Replace battery. See battery replacement in the
maintenance and cleaning section.
Smoke alarm sound unwanted alarms intermittently or
when residents are cooking, taking showers, etc.
1. Clean smoke alarm. See cleaning in the maintenance and
cleaning section.
2. Move the smoke alarm to a new location. See Smoke
Alarm Placement.
The alarm sounds different to what i’m used to. It
starts and stops.
The alarm is operating correctly. This alarm features the
internationally recognised horn signal for evacuation. The
horn pattern is 3 short beeps followed by a 2 second pause
and then repeats.
T: 0800 195 0006 F: 0870 043 3946
E: [email protected] www.redarrowtrading.com
Red Arrow Trading
Elsworth House, Herries Road South,
Sheffield, S6 1QS
Guarantee
This product is guaranteed for a period of 5 year from the date of purchase. The guarantee is invalid in the case of improper use, tampering, removal of the Q.C. date label, installation in
an improper working environment or installation not according to the current edition of the I.E.E. Wiring Regulations (BS7671). The guarantee is also invalidated if the luminaire has
been Mega tested. Should this product fail during the guarantee period it will be replaced free of charge, subject to correct installation and return of the faulty unit. We do not accept
responsibility for any installation costs associated with the replacement of this product. We reserve the right to alter specifications without prior notice.
Table of contents
Other Red Arrow Smoke Alarm manuals
Popular Smoke Alarm manuals by other brands

COMPANION
COMPANION COMP490 instruction manual

Aparton
Aparton ASD-10 Instructions for use

Greystone
Greystone DSD120 Installation and maintenance instructions

Ei Electronics
Ei Electronics Ei603MRF instructions

Perenio
Perenio PECSS01 Installation and operation manual

Linear
Linear DX DXT-72 installation instructions

LEGRAND
LEGRAND tynetec ZXT811 Installation instruction

Argus Security
Argus Security TAURUS TW-DO-01/BL manual

LST
LST 2251EIS Specification sheet

Kidde
Kidde P4010DCSCO-W user guide

HomeMatic
HomeMatic HM-Sec-SD-2 Installation and operating manual

American Sensor
American Sensor Professional COS2010 owner's manual