7
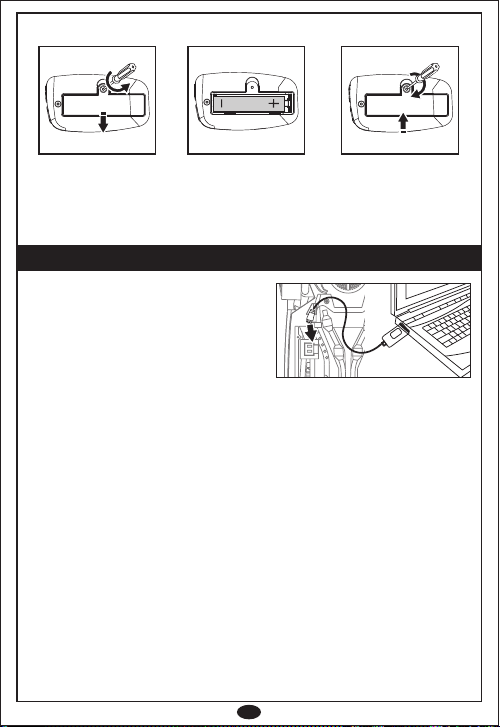
• Requires 1 x 'AAA' battery. Not Included.
• Batteries should only be replaced by an adult.
• Do not mix old and new batteries.
• Do not mix alkaline, standard (carbon-zinc) or rechargeable
(nickel-cadmium) batteries.
• Do not re-charge non-rechargeable batteries.
• Rechargeable batteries are only to be charged under adult supervision.
• Rechargeable batteries are to be removed from the product before
being charged.
• Ensure batteries are inserted with the correct polarity.
• Exhausted batteries should always be removed.
• The terminals should not be short circuited.
• Use a screwdriver to remove the screw from the battery cover.
Replace battery cover and screw before use.
Manufactured by RED5 RH4 1XA
Please retain the important information
on this packaging for future reference.
71534
MADE IN CHINA
Supplier item reference: FX-101
02/18
WWW.RED5.COM
Hereby, Gift Universe Management Ltd, declares this product is in
compliance with the essential requirements and other relevant provisions
of Directive 2014/53/EU. A copy of the original Declaration of Conformity
can be obtained at the following address: Gift Universe, The Atrium, Curtis
Road, Dorking Surrey RH4 1XA.
This product bears the selective sorting symbol for waste electrical and
electronic equipment (WEEE). This means that this product must be
handled pursuant to European Directive 2012/19/EU in order to be
recycled or dismantled to minimize its impact on the environment.
For further information, please contact your local or regional authorities.
Electronic products not included in the selective sorting process are
potentially dangerous for the environment and human health due to
the presence of hazardous substances.
Ages
8+
Ages
8+