Redback A 4580 User manual

Redback® A 4580 Zone Paging System
www.redbackaudio.com.au Redback® Proudly Made In Australia 1
User manual revision number: 1.8 19/07/2023
Operating Manual
A 4580 Zone Paging System
A 4658 Power Injector Box (Optional)
A 4660 4-32 Zone Paging Console (Optional)
A 4658
A 4580
Distributed by Altronic Distributors Pty. Ltd.
Phone: 1300 780 999 Fax: 1300 790 999 Internet: www.altronics.com.au
IMPORTANT NOTE:
Please read these instructions carefully from front to back prior to installation.
They include important setup instructions.
Failure to follow these instructions may prevent the unit from working as designed.
A 4660

Redback® A 4580 Zone Paging System
www.redbackaudio.com.auRedback® Proudly Made In Australia
2
REDBACK is a registered trademark of Altronic Distributors Pty Ltd
You may be surprised to learn that Altronics is still manufacturing hundreds of product lines right here in Australia. We
have resisted the move offshore by offering our customers better quality products with innovations to save them time and
money.
Our Balcatta production facility manufactures/assembles:
Redback public address products
One-shot speaker & grill combinations
Zip-Rack 19 inch rack frame products
We strive to support local suppliers wherever possible in our supply chain, helping to support Australia’s manufacturing
industry.
Redback Audio Products
100% developed, designed & assembled in Australia.
Since 1976 we have been manufacturing Redback ampliers in Perth, Western Australia. With over 40 years experience
in the commercial audio industry, we offer consultants, installers and end users reliable products of high build quality with
local product support. We believe there is signicant added value for customers when purchasing an Australian made
Redback amplier or PA product.
Local support & feedback.
Our best product features come as a direct result of feedback from our customers, and when you call us, you speak to a
real person - no recorded messages, call centres or automated push button options.
It’s not only the assembly team at Altronics who are employed as a direct result of your purchase, but hundreds more at
local companies used in the supply chain.
Industry leading 10 year warranty.
There’s a reason we have the industry leading DECADE warranty. It’s because of a long tried and tested history of bullet-
proof reliability. We’ve heard PA contractors tell us they still see the original Redford amplier still in service in schools.
We offer this comprehensive parts & labour warranty on almost every Australian Made Redback public address product.
This offers both installers and end users peace of mind that they will receive prompt local servicing in the rare event of any
problems.
Published by Altronic Distributors
© 2023 Altronic Distributors

Redback® A 4580 Zone Paging System
www.redbackaudio.com.au Redback® Proudly Made In Australia 3
1.0 Overview
1.1 Introduction 4
1.2 Features 4
1.3 What’s in the box 4
1.4 Front panel guide 5
1.5 Rear panel connections 6
2.0 Setup
2.1 Setup Guide 7
2.2 Switching 100V Speaker Levels 8
2.2.1 Single Amplier 100V Line Switching 8
2.2.2 Two Amplier 100V Line Switching 9
2.3 Switching Line Level signals 10
2.4 Evac Input 11
2.5 All Call Input 11
2.6 24V DC Switched Output 12
3.0 A 4660 Paging Console
3.1 A 4660 Setting Menu 14
3.1.1 System Settings 15
3.1.2 Backlight Settings 16
3.1.3 PIN Access 16
3.1.4 Change Labels 16
3.1.5 Zone Lock 16
3.1.6 Microphone Settings 17
3.2 A 4660 Connections 18
3.2.1 Connecting the Paging Consoles 18
3.2.2 Cascading the Paging Consoles 18
3.2.3 32 Zone System 19
3.3 A 4660 Paging 22
4.0 Troubleshooting
4.1 Symptoms and Remedies 23
5.0 Firmware Updates 24
6.0 Specications 24

Redback® A 4580 Zone Paging System
www.redbackaudio.com.auRedback® Proudly Made In Australia
4
WARNING
System components are connected using standard “pin to pin”
conguration RJ45 data cabling. When installing ensure all connections
are veried before switching any system component on.
Failure to follow the correct wiring conguration may result in damage to
system components.
For the correct wiring conguration, see section 5.0 “Troubleshooting”.
1.0 OVERVIEW
1.1 INTRODUCTION
This unit is a very versatile cost effective public address/background music control system which provides audio to up to 32
zones (*32 zones only available when two A 4580 units are daisy chained). Background music which can be selected to
play through any zone is muted when general paging occurs or when an evacuation input overrides the system.
Operation is as follows:
Background music is piped to any zone which has been selected to have background music via switches on the front of
the A 4580.
General Paging (via optional paging consoles) will mute the background music to the zone paged or all zones de-
pending on the setup conguration. The paging audio will then feed to the selected zones.
Evac Input mutes background music to all zones. This is a vox enabled dual RCA input which can be adjusted via the vox
sensitivity control on the front of the unit. Once the evac input is triggered, background music will be muted to all zones
and the audio present at the Evac input will be piped to all zones.
1.2 FEATURES
• 16 zone paging (up to 32 zones with a second unit)
• Background music selectable to each zone
• 100V or line level switching
• 24V switched output
• Evac Input
• Evac Trigger
• Backup battery input
• Single amp or Dual amp mode
• 24V DC operation (plugpack supplied).
• 19” Rack Mount (2 unit).
Optional Features
• Zone and emergency over-ride paging via A 465 and A 4660 paging consoles.
1.3 WHAT’S IN THE BOX
A 4580 Audio Switcher
24V DC 2A Plugpack
USB - PS2 compatible keyboard (Altronics D 2111)
Instruction Booklet

Redback® A 4580 Zone Paging System
www.redbackaudio.com.au Redback® Proudly Made In Australia 5
1.4 FRONT PANEL GUIDE
Fig 1.4A shows the layout of the A 4580 front panel.
Fig 1.4A
1 Zone Background music selector switches
Use these switches to turn on or off the background music to a zone.
2 Background music volume control
Use this control to adjust the volume of the background music input.
3 Paging microphone volume control
Use this control to adjust the volume of the paging microphone input.
4 Evac volume control
Use this control to adjust the volume of the Evac Input.
5 Evac VOX
This trimpot is used to set the VOX sensitivity of the Evac input.
6 Evac active indicator
These LED illuminate to indicate when the evac input is active.
7 Mic active indicator
This led illuminates to indicate when the microphone is active.
8 LED VU Meter
This LED bargraph provides a visual indication of the output signal.
9 On indicator
This led indicates the unit has power.
10 Standby Switch
When the unit is in standby mode this switch will illuminate. Press this button to switch the unit ON. Once the
unit is ON the On indicator will illuminate. Press this switch again to put the unit back in standby mode.
Evac
Active
Mic
Active
Zone Background Music Selector
Mic Vol
BGM Vol
0
2
46
8
10 0
2
46
8
10
16/32
O
Evac
Vol
Evac
VOX
On
Communicator
A 4580
Standby
Power/
-12dB -9dB -6dB -3dB 0dB
15/31
O
14/30
O
13/29
O
12/28
O
11/27
O
10/26
O
9/25
O
8/24
O
7/23
O
6/22
O
5/21
O
4/20
O
3/19
O
2/18
O
1/17
O
Communicator
A 4580
1 2 3 4 65 97 810

Redback® A 4580 Zone Paging System
www.redbackaudio.com.auRedback® Proudly Made In Australia
6
1.5 REAR PANEL CONNECTIONS
Fig 1.5A shows the layout of the A 4580 rear panel.
Fig 1.5A
1 24V DC Input
Connects to a 24V DC Plugpack with 2.1mm Jack. (Please observe the polarity)
2 24V Battery Backup
Connect a 24V backup supply to these terminals. (Please observe the polarity)
3 24V DC Switched Output
A 24V output is provided which operates in a normally closed and normally open condition.
This is activated whenever a zone is paged or when an evac input is triggered (see dip switch settings).
4 Evac Trigger
This is activated by a closing contact such as a switch. Once activated the audio from the Evac input will be piped
to all zones.
5 Micro SD Card Socket
This is used for rmware updates (see Section 5.0 for more details). A Micro SD card is not supplied.
6 PA Out RCA Connectors
Connect these outputs to the input of the paging amplier
7 BGM Out RCA Connectors
Connect these outputs to the input of the background music amplier
8 BGM In RCA Connectors
Connect these inputs to the output of the background music source such as a CD player.
9 Evac In RCA Connectors
Connect these inputs to the output of an evacuation tone generator.
10 Zone 17-32 Extender
Use this port for connection of a second A 4580 for paging to zones 17-32 .
11 RJ45 connectors for paging consoles
These RJ45 ports connect to the A 4660 zone paging consoles.
NOTE: A maximum of two A 4660 microphone paging consoles may be connected to each port.
+ -
_
Manufactured in Australia By Altronic Distributors Pty. Ltd.
From
BGM
AMP
L
R
BGM Out
24V
Switched
Out
From
24V
BATTERY
24V DC
IN
Zone 17-32
From
PA
AMP
Zones
1 2 3 4 5 6 7 8
1/17
34
12
+ -
+ -
2/183/194/205/216/227/238/249/2510/2611/2712/2813/2914/3015/31
16/32
100V Switching -
1 AMP SYSTEM - Connect PA amp 100V output to “From PA AMP”Terminals
2 AMP SYSTEM - Connect PA amp 100V output to “From PA AMP”terminals and BGM amp 100V ouput to “From BGM AMP terminals.
Connect Zone amplier speakers to ”+”and“-”terminals.
Connect Zone amplier line level inputs to“+”, ” - ” and“ ” terminals.
Preamp Switching -
DIP Switch Settings
SW
1
2
4-8
On O
Single Amp Mode
Not Used
Dual Amp Mode
Line Level Speaker Level
N/O
N/C
+-
www.redbackaudio.com.au
+_
PA Out
BGM Input Evac Input
+_
+_
324V Out Trigger
ON-Evac/OFF-Any
L
R
Extender
16GB
Maximum
Micro
SD Card
+
-
Evac
Trigger
120mA
Max
To Paging Consoles
(Maximum 500mA per output)
+- +- +- +- +- +- +- +- +- +- +- +- +- +- +-
1 2 3 4 5 6 7 8
1 2 3 4 5 6 7 8
1 2 3 4 5 6 7 8
O
N
Down is ON.
15
1 2 3 4 5 6 7 8 9 10 11 12
13
14

Redback® A 4580 Zone Paging System
www.redbackaudio.com.au Redback® Proudly Made In Australia 7
12 Dip Switch Settings
. Note: The DIP switches are ON when they are down.
DIP switch 1 sets the amplier mode, either single amp or dual amp mode. (see section 2.2 for more details)
ON - Single Amp Mode, OFF - Dual Amp mode
DIP switch 2 sets the output level, either line level or 100V speaker level. (see section 2.2 for more details)
ON - Line Level, OFF - Speaker Level
DIP switch 3 sets the 24V DC switched output conguration. This can be set to operate when any zone is
triggered or for Evac triggering (see section 2.5 for more details).
ON - Evac Triggering, OFF - Any Zone Triggering
DIP switches 4 sets the A 4580 as either a master or slave unit. When using the A 4580 with 16 zones only, it
must still be set to be a master unit. When the A 4580’s are being used for 32 zones of paging
one unit must be the master and the second unit must be a slave.
ON - Slave, OFF - Master
DIP switches 5 sets the master A 4580 as a 16 or 32 zone switcher (This switch is not used on the slave unit).
ON - 32 zone system, OFF - 16 zone system
DIP switches 6-8 are not used.
. Note: The DIP switches are ON when they are down.
13 From BGM AMP input
Connect this 100V line input from the 100V output of the BGM (background music) amplier.
14 From PA AMP input
Connect this 100V line input from the 100V output of the PA (or paging) amplier.
15 Zone 1-16 outputs.
The zone outputs can be either 100V or line level depending on conguration of the dip switches (see Fig1.6A)
2.0 SETUP
2.1 Setup Guide
The A 4580 is a 16-32 zone paging system which switches 100V speaker levels or balanced low level (line levels) signals.
Background music which can be piped to any zone is muted when paging is initiated by the paging consoles or when the
Evac input is triggered.
WARNING : For correct operation the dip switches 1 & 2 need to be set before using the unit.
If the A 4580 is being used in single amplier mode (see section 2.2.1) dip switch 1 must be set to “ON”
otherwise if the unit is being used in two amplifer mode (see section 2.2.2) then dip switch 1 must be set to “OFF”
When using the unit for 100V speaker switching Dip switch 2 must be set to “OFF”.
If line level switching is required then Dip Switch 2 must be set to “ON”.
Failure to set the dip switches correctly might result in the unit malfunctioning.
IMPORTANT NOTE:
Ensure power is switched off when adjusting DIP switches.
New settings will be effective when power is switched back on.

Redback® A 4580 Zone Paging System
www.redbackaudio.com.auRedback® Proudly Made In Australia
8
2.2 SWITCHING 100V SPEAKER LEVELS
There are two different congurations for switching 100V speaker levels. The rst uses a single amp system which is used
for both Background music and PA paging. This setup mutes background music to “ALL” zones when any zone is paged.
(see section 2.2.1)
The second setup involves a two amplier system where both the background music and the PA paging has its own dedi-
cated amplier. This setup mutes background music to only those zones which are being paged. (See section 2.2.2)
2.2.1 SINGLE AMPLIFIER 100V LINE SWITCHING
A single amp system uses one amplier which is used for both the background music and the PA paging. In this congura-
tion when any zone or zones is paged the background music will be muted to all zones. (Note: If muting is desired for only
those zones being paged a two amplier setup is required (See section 2.2.2)).
NOTE : Before turning the unit on make sure the dip switches are set correctly.
For single amp switching of 100V speaker levels, Dip switch 1 should be set to “ON”
and dip switch 2 should be set to “OFF” (see Dip switch settings)
IMPORTANT NOTE:
Ensure power is switched off when adjusting DIP switches.
New settings will be effective when power is switched back on.
Each zone requiring background music must be switched “ON” from the “Zone Background Music Selector” switches on
the front of the A 4580. (refer to section 1.4)
A background music source such as a CD player is connected to the BGM input (RCA connectors) on the rear of the
A 4580.
The amplier audio connection is from the “PA Out” RCA sockets on the rear of the A 4580. This is a line level signal and
must be connected to a Line/Aux input on the amplier. This is a mixed output which contains both the paging audio and
BGM audio.
The amplier 100V output must be connected to the “From PA AMP” terminals on the rear of the A 4580.
The zone 100V speakers are wired to the “+” and “-” terminals only on the rear of the A 4580 as shown in Fig 2.1.
(Note: the earth connection is not used for 100V switching system. This terminal is used when switching line level signals.)
Fig 2.1
BGM (Background Music Source)
Line Input 100V Output
Connect to
“From PA AMP”
terminals
Single Amplier 100V Line Switching
Speakers to be paged must be tted
with 100V line transformers.
Connect using the “+” and “-”
terminals. (Do not use the “ ” terminal)
Zone
16
Manufactured in Australia By Altronic Distributors Pty. Ltd.
From
BGM
AMP
L
R
BGM Out
24V
Switched
Out
From
24V
BATTERY
24V DC
IN
Zone 17-32
From
PA
AMP
Zones
1 2 3 4 5 6 7 8
1/17
34
12
+ -
+ -
2/183/194/205/216/227/238/249/2510/2611/2712/2813/2914/3015/31
16/32
100V Switching -
1 AMP SYSTEM - Connect PA amp 100V output to “From PA AMP” Terminals
2 AMP SYSTEM - Connect PA amp 100V output to “From PA AMP” terminals and BGM amp 100V ouput to “From BGM AMP terminals.
Connect Zone amplier speakers to ”+”and“-” terminals.
Connect Zone amplier line level inputs to“+”, ” - ”and“ ” terminals.
Preamp Switching -
DIP Switch Settings
SW
1
2
4-8
On O
Single Amp Mode
Not Used
Dual Amp Mode
Line Level Speaker Level
N/O
N/C
+-
www.redbackaudio.com.au
+_
PA Out
BGM Input Evac Input
+_
+_
324V Out Trigger
ON-Evac/OFF-Any
L
R
Extender
16GB
Maximum
Micro
SD Card
+
-
Evac
Trigger
120mA
Max
To Paging Consoles
(Maximum 500mA per output)
+- +- +- +- +- +- +- +- +- +- +- +- +- +- +-
1 2 3 4 5 6 7 8
CD
REDBACK
POWER
REDBACK
A 4270 125W
PublicAddress Amplie
PHASE
5
100V LINE AMPLIFIER
Cat5e/6 cable
(Max 200 Metres)
Zone
15
Zone
14
Zone
13
Zone
12
Zone
11
Zone
10
Zone
9
Zone
8
Zone
7
Zone
6
Zone
5
Zone
4
Zone
3
Zone
2
Zone
1
A 4660 Paging Console
Model: A 4660
To Main Unit To 2nd Console
Manufactured in Australia By
Altronic Distributors Pty.Ltd.
www.redbackaudio.com.au

Redback® A 4580 Zone Paging System
www.redbackaudio.com.au Redback® Proudly Made In Australia 9
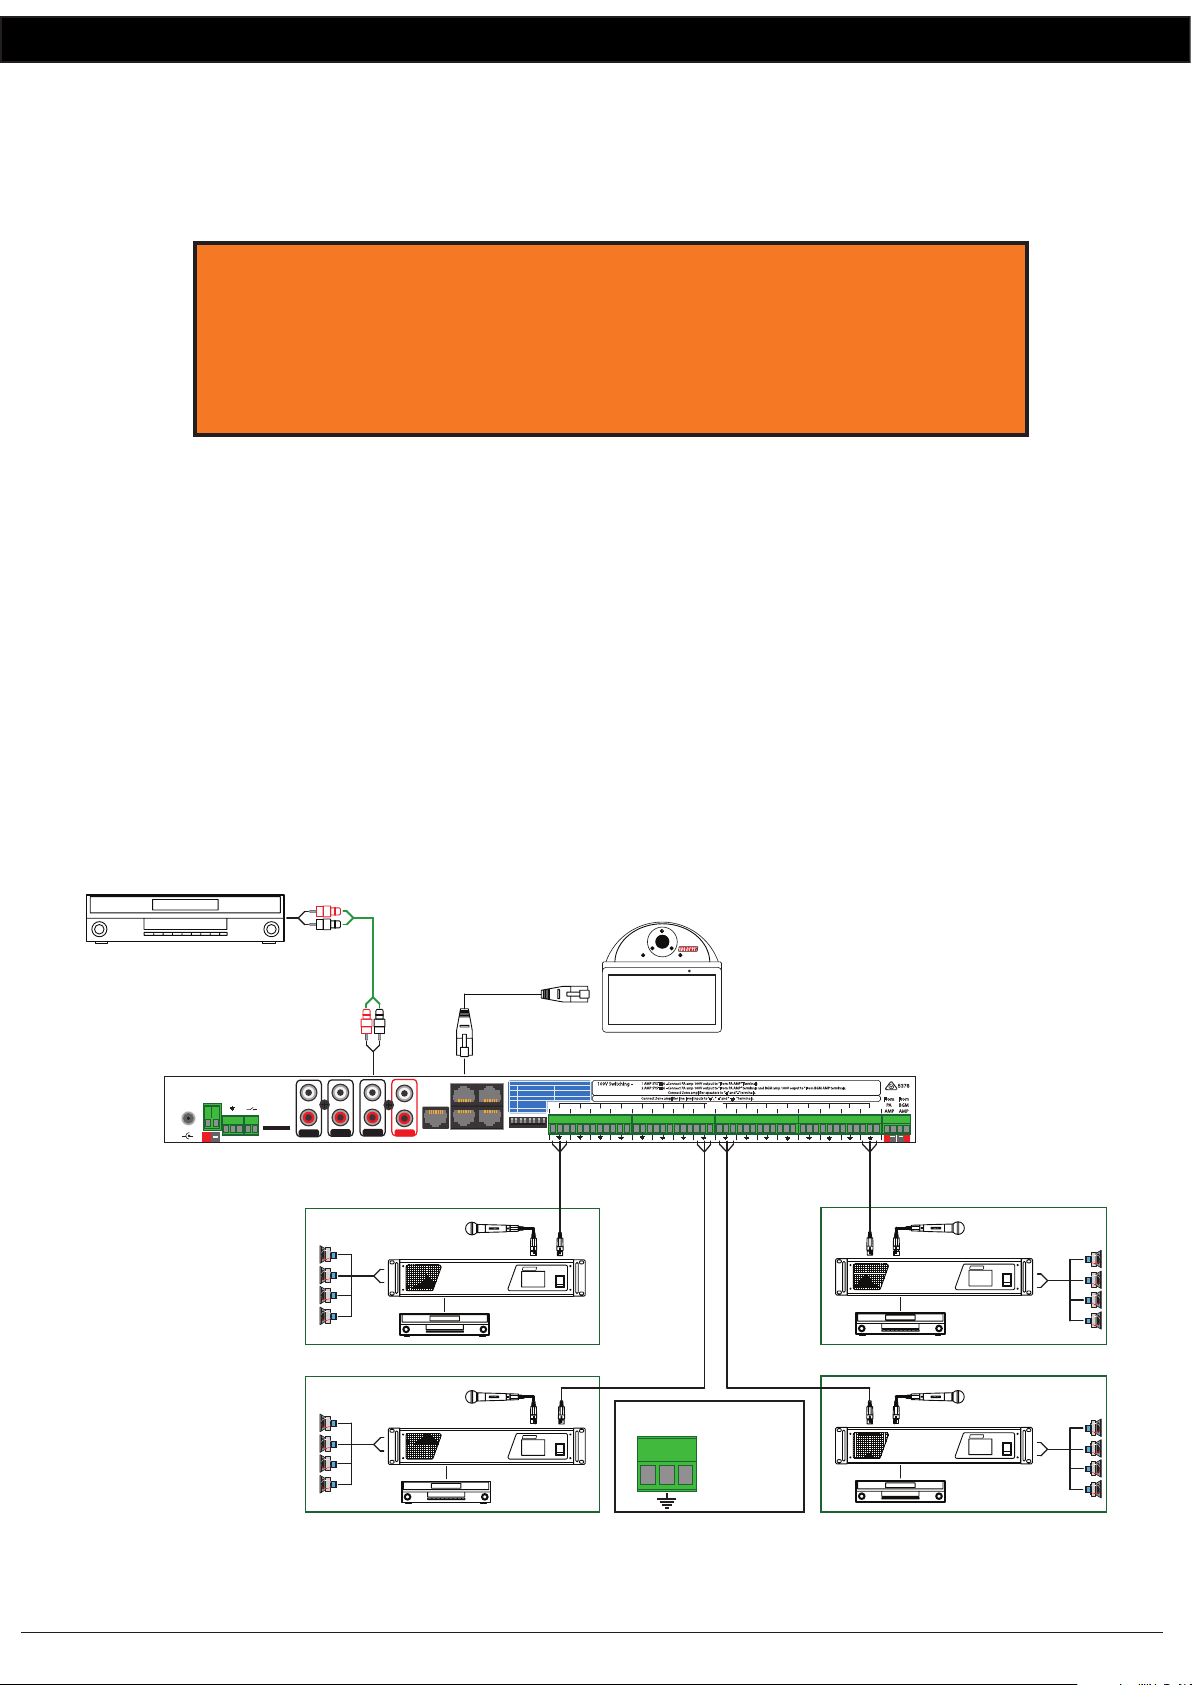
2.2.2 TWO AMPLIFIER 100V LINE SWITCHING
A two amplier system uses dedicated ampliers for both the background music and the PA paging. This setup mutes
background music to only those zones which are being paged.
NOTE : Before turning the unit on make sure the dip switches are set correctly.
For two amp switching of 100V speaker levels, Dip switch 1 should be set to “OFF”
and dip switch 2 should be set to “OFF” (see Dip switch settings)
IMPORTANT NOTE:
Ensure power is switched off when adjusting DIP switches.
New settings will be effective when power is switched back on.
Each zone requiring background music must be switched “ON” from the “Zone Background Music Selector” switches on
the front of the A 4580. (refer to section 1.4)
A background music source such as a CD player is connected to the BGM input (RCA connectors) on the rear of the
A 4580.
Paging Amplier Connections
The paging amplier audio connection is from the “PA Out” RCA sockets on the rear of the A4580. This is a line level
signal and must be connected to a Line/Aux input on the amplier.
The paging amplier 100V output must be connected to the “From PA AMP” terminals on the rear of the A 4580.
Background Music Amplier Connections
The background music amplier audio connection is from the “BGM Out” RCA sockets on the rear of the A 4580. This is
a line level signal and must be connected to a Line/Aux input on the amplier.
The background music amplier 100V output must be connected to the “From BGM AMP” terminals on the rear of the
A 4580.
The zone 100V speakers are wired to the “+” and “-” terminals only on the rear of the A 4580 as shown in Fig 2.2.
(Note: the earth connection is not used for 100V switching system. This terminal is used when switching line level signals.)
Fig 2.2
BGM (Background Music Source)
Line Input
100V Output
Connect to
“From PA AMP”
terminals
Two Amplier 100V Line Switching
Speakers to be paged must be tted
with 100V line transformers.
Connect using the “+” and “-”
terminals. (Do not use the “ ” terminal) Zone
16
CD
REDBACK
POWER
REDBACK
A 4270 125W
PublicAddress Amplie
PHASE5
100V LINE PAGING AMPLIFIER
Cat5e/6 cable
(Max 200 Metres)
Zone
15
Zone
14
Zone
13
Zone
12
Zone
11
Zone
10
Zone
9
Zone
8
Zone
7
Zone
6
Zone
5
Zone
4
Zone
3
Zone
2
Zone
1
Line Input
100V Output
POWER
REDBACK
A 4270 125W
PublicAddress Amplie
PHASE5
100V LINE BACKGROUND MUSIC AMPLIFIER
Manufactured in Australia By Altronic Distributors Pty. Ltd.
From
BGM
AMP
L
R
BGM Out
24V
Switched
Out
From
24V
BATTERY
24V DC
IN
Zone 17-32
From
PA
AMP
Zones
1 2 3 4 5 6 7 8
1/17
34
12
+ -
+ -
2/183/194/205/216/227/238/249/2510/2611/2712/2813/2914/3015/31
16/32
100V Switching - 1 AMP SYSTEM - Connect PA amp 100V output to “From PA AMP” Terminals
2 AMP SYSTEM - Connect PA amp 100V output to “From PA AMP” terminals and BGM amp 100V ouput to“From BGM AMP terminals.
Connect Zone amplier speakers to ”+” and“-”terminals.
Connect Zone amplier line level inputs to“+”, ” - ” and“ ” terminals.
Preamp Switching -
DIP Switch Settings
SW
1
2
4-8
On O
Single Amp Mode
Not Used
Dual Amp Mode
Line Level Speaker Level
N/O
N/C
+-
www.redbackaudio.com.au
+_
PA Out
BGM Input Evac Input
+_
+_
324V Out Trigger
ON-Evac/OFF-Any
L
R
Extender
16GB
Maximum
Micro
SD Card
+
-
Evac
Trigger
120mA
Max
To Paging Consoles
(Maximum 500mA per output)
+- +- +- +- +- +- +- +- +- +- +- +- +- +- +-
1 2 3 4 5 6 7 8
A 4660 Paging Console
Model: A 4660
To Main Unit To 2nd Console
Manufactured in Australia By
Altronic Distributors Pty.Ltd.
www.redbackaudio.com.au

Redback® A 4580 Zone Paging System
www.redbackaudio.com.auRedback® Proudly Made In Australia
10
2.3 SWITCHING LINE LEVELS
The A 4580 can also be used to switch line level signals. Ampliers are not connected to the PA OUT or BGM OUT of the
A 4580. Instead each zone has its own dedicated amplifer which can then feed multiple areas. Background music and the
evacuation tones are still supplied by the A 4580 and are fed into each zone amplier. Each zone amplier can still have its
own local microphone or background music.
NOTE : Before turning the unit on make sure the dip switches are set correctly.
Dip switch 2 should be set to “ON” (see Dip switch settings)
Dip switch 1 will be disabled if dip switch 2 is set to “ON”
IMPORTANT NOTE:
Ensure power is switched off when adjusting DIP switches.
New settings will be effective when power is switched back on.
This setup mutes the background music (supplied by the A 4580) to only those zones which are being paged.
Each zone requiring background music must be switched “ON” from the “Zone Background Music Selector” switches on
the front of the A 4580. (refer to section 1.4)
A background music source such as a CD player is connected to the BGM input (RCA connectors) on the rear of the
A 4580.
The zone output terminals on the rear of the A 4580 are connected to the zone amplier inputs. The “+”,”-” and earth
terminals are all used. Each zone output is a low impedance signal suitable for feeding directly into a power amplier. As
the signal is balanced the amplier can be remotely located when connected using 2 core shielded cable. This enables the
amplier to be located up to 100m from the A 4580 switch box.
Fig 2.3
BGM (Background Music Source)
100V Output
Individual Zone Amplier Preamp (Low Level) Switching
LOCAL MIC
+
-
Output connector
conguration for
each zone.
Hot
Cold
Earth
Manufactured in Australia By Altronic Distributors Pty. Ltd.
From
BGM
AMP
L
R
BGM Out
24V
Switched
Out
From
24V
BATTERY
24V DC
IN
Zone 17-32
From
PA
AMP
Zones
1 2 3 4 5 6 7 8
1/17
34
12
+ -
+ -
2/183/194/205/216/227/238/249/2510/2611/2712/2813/2914/3015/31
16/32
100V Switching - 1AMP SYSTEM - Connect PA amp 100V output to“From PA AMP”Terminals
2 AMP SYSTEM - Connect PAamp 100V output to “From PAAMP ”terminals and BGM amp 100V ouput to “FromBGM AMP terminals.
Connect Zone amplier speakers to ”+”and “-”terminals.
Connect Zone amplier line level inputs to“+” , ” - ”and “ ” terminals.
Preamp Switching -
DIP Switch Settings
SW
1
2
4-8
On O
Single Amp Mode
Not Used
Dual Amp Mode
Line Level Speaker Level
N/O
N/C
+-
www.redbackaudio.com.au
+_
PA Out BGM Input Evac Input
+_
+_
324V Out Trigger
ON-Evac/OFF-Any
L
R
Extender
16GB
Maximum
Micro
SD Card
+
-
Evac
Trigger
120mA
Max
To PagingConsoles
(Maximum 500mA per output)
+- +- +- +- +- +- +- +- +- +- +- +- +- +- +-
1 2 3 4 5 6 7 8
CD
REDBACK
POWER
REDBACK
A4270 125W
PublicAddress Amplie
PHASE5
ZONE 1 AMPLIFIER
Cat5e/6 cable
(Max 200 Metres)
100V Output
LOCAL MIC
POWER
REDBACK
A4270 125W
PublicAddress Amplie
PHASE5
ZONE 8 AMPLIFIER
100V Output
LOCAL MIC
POWER
REDBACK
A4270 125W
PublicAddress Amplie
PHASE5
ZONE 16 AMPLIFIER
100V Output
LOCAL MIC
POWER
REDBACK
A4270 125W
PublicAddress Amplie
PHASE5
ZONE 9 AMPLIFIER
CD
REDBACK
LOCAL BGM
CD
REDBACK
LOCAL BGM
CD
REDBACK
LOCAL BGM
CD
REDBACK
LOCAL BGM
A 4660 Paging Console
Model: A 4660
ToMain Unit To 2nd Console
Manufacturedin Australia By
AltronicDistributors Pty. Ltd.
www.redbackaudio.com.au

Redback® A 4580 Zone Paging System
www.redbackaudio.com.au Redback® Proudly Made In Australia 11
2.4 EVAC INPUT
There are two forms of evacuation triggering available on the A 4580.
The rst method for triggering is a closing contact on the Evac Trigger terminals on the rear of the unit (see Fig 2.4).
The second method for triggering is a VOX controlled input in the form of a dual RCA audio input on the rear of the unit
labelled Evac Input (see Fig 2.4). The trigger level is adjusted via the evac vox sensitivity control of the front of the A 4580.
Once either evac input is triggered, background music will be muted to all zones and the audio present at the Evac input
will be piped to all zones.
Paging from an A 4660 paging console will over-ride the evac input.
When the evac input is active the “Evac active” led on the front of the unit will illuminate.
The volume of the Evac input is adjusted via the trimpot on the front of the unit labelled “Evac Vol”.
Fig 2.4
2.5 ALL CALL INPUT
The EVAC Input (discussed in section 2.4) which is primarily aimed for use as an Evac input, can also be used as an All Call
Input from any line level input source.
This could be used for ALL CALL telephone paging when used with a suitable Line Isolation Unit.
NOTE: The volume of the Evac input is adjusted via the trimpot on the front of the unit labelled “Evac Vol”. The trigger
level is adjusted via the evac vox sensitivity control of the front of the A 4580.
EVACUATION INPUT TRIGGERING VIA EVAC INPUT
Cat5e/6 cable
(Max 200 Metres)
A 4580 COMMUNICATOR
Made In Australia by Altronic Distributors Pty Ltd.
www.altronics.com.au
DC Fuse
M205 500mA
N816
24V
DC In
L
R
Audio Out
V/Over
Tones
Chime
Volume
Record
1 2 3 4 5 6 7 8
Mic
+
-
N/O
GND
N/C
Switched
N/O
GND
N/C
N/O
GND
N/C
N/O
GND
N/C
24V OUTPUTS
Bell Evac AlertBellAlertEvacCancel
CONTACTS
DIP SWITCHES
+-
1 2 3 4 5 6 7 8
Dual RCA Lead
A 4572 ALERT/EVAC TONE GENERATOR
Evac tones generated by
Altronics A 4572 or similar
Manufactured in Australia By Altronic Distributors Pty. Ltd.
From
BGM
AMP
L
R
BGM Out
24V
Switched
Out
From
24V
BATTERY
24V DC
IN
Zone 17-32
From
PA
AMP
Zones
1 2 3 4 5 6 7 8
1/17
34
12
+ -
+ -
2/183/194/205/216/227/238/249/2510/2611/2712/2813/2914/3015/31
16/32
100V Switching -
1 AMP SYSTEM - Connect PA amp 100V output to “From PA AMP” Terminals
2 AMP SYSTEM - Connect PA amp 100V output to “From PA AMP” terminals and BGM amp 100V ouput to “From BGM AMP terminals.
Connect Zone amplier speakers to ”+”and “-”terminals.
Connect Zone amplier line level inputs to“+”, ” - ”and“ ” terminals.
Preamp Switching -
DIP Switch Settings
SW
1
2
4-8
On O
Single Amp Mode
Not Used
Dual Amp Mode
Line Level Speaker Level
N/O
N/C
+-
www.redbackaudio.com.au
+_
PA Out
BGM Input Evac Input
+_
+_
324V Out Trigger
ON-Evac/OFF-Any
L
R
Extender
16GB
Maximum
Micro
SD Card
+-
Evac
Trigger
120mA
Max
To Paging Consoles
(Maximum 500mA per output)
+- +- +- +- +- +- +- +- +- +- +- +- +- +- +-
1 2 3 4 5 6 7 8
Evac Trigger
(Activated by a closing contact)
A 4660 Paging Console
Model: A 4660
To Main Unit To 2nd Console
Manufactured in Australia By
Altronic Distributors Pty.Ltd.
www.redbackaudio.com.au

Redback® A 4580 Zone Paging System
www.redbackaudio.com.auRedback® Proudly Made In Australia
12
2.6 24V DC SWITCHED OUTPUT
A switched output has been provided to allow for the connection of external 24V DC operated xtures.
This is set by Dip Switch 3 (see section 1.5)
The 24V DC output can be used to operate attenuators tted with override relays, evacuation strobes (with the addition
of external relays and DC supplies), or any other re evacuation equipment operated of 24V DC. It is important that any
product connected to the 24V DC output not draw more than 100mA maximum.
This output can be set to be activated any time any zone is paged or any form of evac input is triggered (see Fig 2.5a).
“or”
only when the Evac input has been triggered (see Fig 2.5b).
Fig 2.5a
The 24V DC Switched output terminals operate as follows.
N/O - No voltage present when non-active, 24VDC present when active
N/C - 24VDC present when non-active, No voltage present when active
24V DC Switched Output
N/O - No voltage present when non-active
24VDC present when active
N/C - 24VDC present when non-active
No voltage present when active
N/C
N/O
Made In Australia byAltronic Distributors Pty Ltd.
www.altronics.com.au
DC Fuse
M205 500mA
N816
24V
DC In
L
R
Audio Out
V/Over
Tones
Chime
Volume
Record
1 2 3 4 5 6 7 8
Mic
+
-
N/O
GND
N/C
Switched
N/O
GND
N/C
N/O
GND
N/C
N/O
GND
N/C
24V OUTPUTS
Bell Evac AlertBellAlertEvacCancel
CONTACTS
DIP SWITCHES
+-
1 2 3 4 5 6 7 8
Dual RCA Lead
A 4572 ALERT/EVAC TONE GENERATOR
DIP switch 3 set to“OFF”
The 24V switched output activates when any zone on any
paging console is paged or when any evac input is triggered.
Cat5e/6 cable
(Max 200 Metres)
Evac tones generated by
Altronics A 4572 or similar
Attenuator tted with
over-ride relay
Evacuation strobe
DC supply
24V DC
Relay
External DC supply to
power strobe.
General paging will
activate the 24V output.
Manufactured in Australia By Altronic Distributors Pty. Ltd.
From
BGM
AMP
L
R
BGM Out
24V
Switched
Out
From
24V
BATTERY
24V DC
IN
Zone 17-32
From
PA
AMP
Zones
1 2 3 4 5 6 7 8
1/17
34
12
+ -
+ -
2/183/194/205/216/227/238/249/2510/2611/2712/2813/2914/3015/31
16/32
100V Switching -
1 AMP SYSTEM - Connect PA amp 100V output to “From PA AMP” Terminals
2 AMP SYSTEM - Connect PA amp 100V output to “From PA AMP” terminals and BGM amp 100V ouput to “From BGM AMP terminals.
Connect Zone amplier speakers to ”+”and “-” terminals.
Connect Zone amplier line level inputs to“+” , ” - ” and“ ” terminals.
Preamp Switching -
DIP Switch Settings
SW
1
2
4-8
On O
Single Amp Mode
Not Used
Dual Amp Mode
Line Level Speaker Level
N/O
N/C
+-
www.redbackaudio.com.au
+_
PA Out
BGM Input Evac Input
+_
+_
324V Out Trigger
ON-Evac/OFF-Any
L
R
Extender
16GB
Maximum
Micro
SD Card
+
-
Evac
Trigger
120mA
Max
To Paging Consoles
(Maximum 500mA per output)
+- +- +- +- +- +- +- +- +- +- +- +- +- +- +-
1 2 3 4 5 6 7 8
Evac Trigger
(Activated by a closing contact)
A 4660 Paging Console
Model: A 4660
ToMain Unit To 2nd Console
Manufactured in Australia By
Altronic Distributors Pty.Ltd.
www.redbackaudio.com.au

Redback® A 4580 Zone Paging System
www.redbackaudio.com.au Redback® Proudly Made In Australia 13
24V DC Switched Output
N/O - No voltage present when non-active
24VDC present when active
N/C - 24VDC present when non-active
No voltage present when active
N/C
N/O
Made In Australia byAltronic Distributors Pty Ltd.
www.altronics.com.au
DC Fuse
M205 500mA
N816
24V
DC In
L
R
Audio Out
V/Over
Tones
Chime
Volume
Record
1 2 3 4 5 6 7 8
Mic
+
-
N/O
GND
N/C
Switched
N/O
GND
N/C
N/O
GND
N/C
N/O
GND
N/C
24V OUTPUTS
Bell Evac AlertBellAlertEvacCancel
CONTACTS
DIP SWITCHES
+-
1 2 3 4 5 6 7 8
Dual RCA Lead
A 4572 ALERT/EVAC TONE GENERATOR
Cat5e/6 cable
(Max 200 Metres)
DIP switch 3 set to“ON”
The 24V switched output activates when the Evac Trigger is activated
tor when an evac audio signal is received at the Evac RCA input .
NOTE : General zone paging will not activate the 24V output.
Evac tones generated by
Altronics A 4572 or similar
Attenuator tted with
over-ride relay
Evacuation strobe
DC supply
24V DC
Relay
External DC supply to
power strobe.
General paging will “NOT”
activate the 24V output.
Manufactured in Australia By Altronic Distributors Pty. Ltd.
From
BGM
AMP
L
R
BGM Out
24V
Switched
Out
From
24V
BATTERY
24V DC
IN
Zone 17-32
From
PA
AMP
Zones
1 2 3 4 5 6 7 8
1/17
34
12
+ -
+ -
2/183/194/205/216/227/238/249/2510/2611/2712/2813/2914/3015/31
16/32
100V Switching -
1 AMP SYSTEM - Connect PA amp 100V output to “From PA AMP” Terminals
2 AMP SYSTEM - Connect PA amp 100V output to “From PA AMP” terminals and BGM amp 100V ouput to “From BGM AMP terminals.
Connect Zone amplier speakers to ”+”and “-” terminals.
Connect Zone amplier line level inputs to“+” , ” - ” and“ ” terminals.
Preamp Switching -
DIP Switch Settings
SW
1
2
4-8
On O
Single Amp Mode
Not Used
Dual Amp Mode
Line Level Speaker Level
N/O
N/C
+-
www.redbackaudio.com.au
+_
PA Out
BGM Input Evac Input
+_
+_
324V Out Trigger
ON-Evac/OFF-Any
L
R
Extender
16GB
Maximum
Micro
SD Card
+
-
Evac
Trigger
120mA
Max
To Paging Consoles
(Maximum 500mA per output)
+- +- +- +- +- +- +- +- +- +- +- +- +- +- +-
1 2 3 4 5 6 7 8
Evac Trigger
(Activated by a closing contact)
A 4660 Paging Console
Model: A 4660
ToMain Unit To 2nd Console
Manufactured in Australia By
Altronic Distributors Pty.Ltd.
www.redbackaudio.com.au
Fig 2.5b
RJ45 cabling conguration for system components (586A ‘Straight through’)
System components are connected using “pin to pin” conguration RJ45 data cabling as shown below. When installing
ensure all connections are veried with a LAN cable tester before switching any system component on.
Failure to follow the correct wiring conguration may result in damage to system components.
568A
1 RX+
2 RX-
3 TX +
4
5
6 TX-
7
8
StraightThrough
(both ends)
Pins Face Upwards
1 TX+
2 TX-
3 RX +
4
5
6 RX-
7
8

Redback® A 4580 Zone Paging System
www.redbackaudio.com.auRedback® Proudly Made In Australia
14
3.0 A 4660 PAGING CONSOLE
The A 4660 paging console provides up to 32 zones* of paging to
the A 4580 audio switcher. (* 17-32 zones only available when a
second A 4580 is connected to the system).
The consoles can be used for multi zone paging with the facility to
store and recall multiple zones to a single button. The zones and re-
call functions can be labelled via the menu. Example might be board
room as a zone label and “sales” as a recall label. An installer label
can also be displayed for service calls etc.
A maximum of 8 paging consoles can be connected to the A 4580 at
the same time. These work in a “rst in, best dressed” arrangement.
A maximum of two consoles can be cascaded together and then
wired back to one of the four paging console connection ports on
the rear of the A 4580.
Note: For long cable runs or when cascading consoles, Redback®A
4658 power injectors may be required.
Each unit must be assigned a unique address which is set when the
A 4660 is rst initialised, or it can be re-assigned by accessing the
Factorty Reset option (see section 3.1.1). The address must match the
output port number on the rear of the A 4580 (refer to gures XX
and XX for more details).
Features
• Multi zone paging.
• Recall multiple zones with a single button press.
• Labelling of zones and installer label.
• Pre and post announcement chimes.
• Backlight and timeout adjustments
• Microphone gain and AGC adjustment
3.1 A 4660 SETTINGS MENU
The settings menu can be accessed using the icon on the top left of the screen. Once in this menu the following screen
will be displayed.
Fig 3.1 - Console Settings Screen.
System Backlight PIN Access Labels Microphone
Zone Lock
Back

Redback® A 4580 Zone Paging System
www.redbackaudio.com.au Redback® Proudly Made In Australia 15
3.1.1 System Settings
The System settngs screen is shown in gure 3.2.
Fig 3.2 - System Settings Screen.
1Audible Feedback - Allows you to enable/disable the audible feedback (in built speaker) on button presses and
set the volume. Press the button to enable/disable and use the slider below to adjust the feedback volume.
2Restart unit - This will cycle power to the A 4580 and re-start the unit. Handy if the unit is locked away. (Note: If
two A 4580’s are connected for a 32 zone system, both units will re-start).
3Factory reset - This will reset the unit back to it’s default settings. This option is also required to re-assign the
paging console address (Press the factory reset button, tap conrm and a prompt will appear for the units
address. Select the required address (this must match the output port of the A 4580). If any settings need saving
before the factory reset, use the Export Settings option below.
Note: Each console must have a unique address or the system will not operate correctly.
4Export Settings - This feature allows the settings of the unit to be transferred to another unit or kept as a back
up. Handy if the unit’s address needs to be re-assigned.
Simply insert a Micro Sd card into the unit and follow the prompts.
5Import Settings - This feature allows the settings of the unit to be imported from another unit. Insert a Micro SD
card and follow the prompts.
6Set Max Zones - This sets the number of zones displayed on the main screen. Move the slider to display the
number of zones from a minimum of four zones up to a maximum of 32 zones in multiples of 4.
(Note: A second A 4580 is required for zones greater than 16).
Fig 3.3 - Example of a 32 Zone Screen.
Audible
Feebback
DISABLED
Restart
unit
Factory
Reset
Export
Settings
Import
Settings
Zone Lock
Back
Max Zones
32
Feedback Vol
0dB
12 3 4 5
6

Redback® A 4580 Zone Paging System
www.redbackaudio.com.auRedback® Proudly Made In Australia
16
3.1.2 Backlight Settings
Press the “backlight” button to display the screen shown in gure 3.4.
There are two levels of screen brightness which come into effect, when the screen hasn’t been touched for a period of
time set by the user.
Fig 3.4 - Backlight Settings Screen.
This menu screen allows the user to select the active screen brightness level, the dimmed brightness level and timeout
periods for the transition from active screen mode to dimmed mode, and the transition period from dimmed mode to
screen off mode.
1Active Screen Brightness Level - Use this slider to adjust the brightness level of the active screen.
2Dimmed Screen Brightness Level - Use this slider to adjust the brightness level of the dimmed screen
3Active Screen to Dimmed Mode transition time - Use these buttons to adjust the timeout period to enter
dimming mode (set to 0 for the screen to be remain always on).
4Dimmed Mode to screen Off transition time - Use these buttons to adjust the timeout period from
dimmed screen mode to the screen turning off completely (This is unavailable if the dimming mode is set to zero).
3.1.3 PIN Access - Set an optional access PIN preventing unauthorised access to the wallplates settings. Type in a preferred
PIN and press “E” to accept. Press “C” to delete PIN digits or to reset the PIN (For access without a PIN, delete all PIN dig-
its). Once complete press the BACK button and the change will take effect.
3.1.4 Change labels - Allows you to set and change the labels for the output zones, and also customise an installer label
which is displayed on the top of the main screen.
Select the desired zone button or installer label button and then use the displayed keyboard to enter the labels.
3.1.5 Zone Lock - General paging can be blocked to any zones via this menu. Select the zones to be blocked and then
press the back button. On the main screen these blocked zones will be blacked out and unavailable.
NOTE: This will only lock out zones for this console. It will not lock out the same zones from other paging consoles
connected to the A 4580.
Dim Level
43%
Level
100%
30 S0 M0 H
Back
Set Full-brightness level
and Full -> Dim transition time.
3
1
2
4
+S
+M+H
-S
-M-H
Set Dim-brightness level
and Dim -> Off transition time.
0 S2 M0 H
+S
+M+H
-S
-M-H

Redback® A 4580 Zone Paging System
www.redbackaudio.com.au Redback® Proudly Made In Australia 17
3.1.6 Microphone settings
Press the “microphone” button to display the screen shown in gure 3.5.
From this menu the chime options and action of the paging button are set.
Fig 3.5 - Microphone Settings Screen.
1 Console Speaker - This button enables the speaker built into the A 4660. If enabled the chime will be audible
from the console as well as through the paging system.
2 Chime In - This button allows you to enable or disable the pre-annoucement chime on the paging audio. The
level can also be adjusted to suit the installation. For instance a user may require the pre-annoucement chime be
louder than the normal programming.
3 Chime Out - This button allows you to enable or disable the post-annoucement chime on the paging audio. The
level can also be adjusted to suit the installation. For instance a user may require the post-annoucement chime be
louder than the normal programming.
3 PTT Action - This button determines the action of the paging button. If momentary action is selected the paging
button will need to be held to page. If alternate action is selected the paging button needs to be pressed and
released to start paging. The paging mode will stay active for the period set by the timeout, or until the paging is
cancelled by the user.
5 Mic AGC - Allows for the microphones automatic gain control (AGC) effect to be adjusted up or down according
to installation requirements. AGC allows the signal to automatically adjust to compensate for variations in level
of peoples voices when making paging annoucements. Please note high levels of AGC will increase audible noise
in the system while paging.
6 Paging Level - Adjust the paging level to suit the installation. This allows for paging to be adjusted to suit the
level of programming from other sources connected to the system.3.2 A 4660 CONNECTIONS
Timeout
4m
1
234 5 6
Vol
-9B
Chime In
Enabled
Vol
-9dB
Chime Out
Enabled
AGC
1.5x
Mic AGC
Enabled
Back
Enable intro and outro
chimes and chime volume.
Control paging microphone
level and presence & level
for AGC.
PTT Action
ALTERNATE
Speaker
DISABLED
Vol
-0dB
Chime through local speaker ->

Redback® A 4580 Zone Paging System
www.redbackaudio.com.auRedback® Proudly Made In Australia
18
3.2.1 Connecting the paging consoles
The consoles are connected to the A 4580 via standard Cat5e/6 cabling as shown in Fig 3.6. There are four RJ45 ports on
the back of the A 4580 which can be used to connect the A 4660 paging consoles. The maximum distance between the
A 4580 and a paging console is 200m.
Note: External power injectors (Redback ® A 4658) may be required if power problems are encountered from long cable
runs.
Note: Power Over Ethernet or POE’s cannot be used as the power injectors as they run on 48V. The A 4580 and
A 4660 systems are powered by 24V DC. Use of POE’s will void the warranty.
Each paging console must be assigned an address via the console menu before operation. Eg Console 1 is set to address
1 and connected to port 1 on the A 4580, console 2 is set to address 2 and connected to port 2 on the A 4580 and so on
(Refer to section see section 3.1.1 for details).
Fig 3.6 shows how to connect one paging console per RJ45 port.
Fig 3.6
3.2.2 Cascading the paging consoles
A maximum of eight consoles can be connected to the A 4580 but only when used in a certain conguration. There are
four RJ45 ports on the back of the A 4580 which can be used to connect the A 4660 paging consoles. Each port can
accomodate a maximum of 2 paging consoles in a loop, in loop out conguration as shown in gure 3.7.
Consoles 1 - 4 are connected to their respective number ports. Ie console 1 to port 1, console 2 to port 2 etc. Any extra
consoles are connected as shown, so console 5 to port 1, console 6 to port 2 and so on.
Note: External power injectors (Redback® A 4658) are required when cascading consoles, and the maximum cable run
from the A 4580 to the second console is 200m. The power injectors can be inserted into the cable run either before the
rst console, or before the second console as illustrated in gure 3.7.
Note: Power Over Ethernet or POE’s cannot be used as the power injectors as they run on 48V. The A 4580 and
A 4660 systems are powered by 24V DC. Use of POE’s will void the warranty.
Manufactured in Australia By Altronic Distributors Pty. Ltd.
From
BGM
AMP
L
R
L
R
BGM Out
24V
Switched
Out
N/O
DC FUSE
(1A M205)
From
24V
BATTERY
24V DC
IN
A 4575 Input
N/C
From
PA
AMP
Zones
1 2 3 4 5 6 7 8
1
Paging Stations
34
12
+ -
+ -
2345678910111213141516
100V Switching - 1 AMP SYSTEM - Connect PA amp 100V output to “From PA AMP” Terminals
2 AMP SYSTEM - Connect PA amp 100V output to “From PA AMP” terminals and BGM amp 100V ouput to“From BGM AMP terminals.
Connect Zone amplier speakers to ”+” and“-”terminals.
Connect Zone amplier line level inputs to“+”, ” - ” and“ ” terminals.
Preamp Switching -
DIP Switch Settings
SW
1
2
3-8
On O
Single Amp Mode
Not Used
Dual Amp Mode
Line Level Speaker Level
+- +- +- +- +- +- +- +-
+-
+-
+-
+-
+-- +
+
-- +
www.altronics.com.au
++
__
PA Out
BGM Input Evac Input
Evac Vox
Sensitivity
+_
+_
1 2 3 4 5 6 7 8
CAT5e/6 cable
(Max 200 Metres)
A 4580 COMMUNICATOR
A 4660 Paging Console
CAT5e/6 cable
(Max 200 Metres)
CAT5e/6 cable
(Max 200 Metres)
CAT5e/6 cable
(Max 200 Metres)
CONSOLE 1
Address = 1 CONSOLE 2
Address = 2
CONSOLE 4
Address = 4
CONSOLE 3
Address = 3
Note: The Console addresses must match the output port numbers they are connected to.
(Power Injectors (A 4658) may be required on long cable runs)
Model: A 4660
To Main Unit To 2nd Console
Manufactured in Australia By
Altronic Distributors Pty.Ltd.
www.redbackaudio.com.au
A 4660 Paging Console
Model: A 4660
To Main Unit To 2nd Console
Manufactured in Australia By
Altronic Distributors Pty.Ltd.
www.redbackaudio.com.au
A 4660 Paging Console
Model: A 4660
To Main Unit To 2nd Console
Manufactured in Australia By
Altronic Distributors Pty.Ltd.
www.redbackaudio.com.au
A 4660 Paging Console
Model: A 4660
To Main Unit To 2nd Console
Manufactured in Australia By
Altronic Distributors Pty.Ltd.
www.redbackaudio.com.au

Redback® A 4580 Zone Paging System
www.redbackaudio.com.au Redback® Proudly Made In Australia 19
Fig 3.7 shows how to connect two paging consoles per RJ45 port.
Fig 3.7
3.2.3 32 Zone System
The Redback® A 4580 has a maximum of 16 zones of paging available, but this can be increased to 32 zones with the
addition of a second A 4580. One of these is assigned as the master and the other as the slave.
Figure 3.8 illustrates the connection diagram to achieve 32 zones of paging.
Note: All paging consoles must be connected to the A 4580 master unit. Do not t any consoles to the slave unit.
PLEASE NOTE : A maximum of 8 paging consoles can be connected to the A 4580, with a maximum of 2 paging consoles per port.
Take note of the addresses for each paging console.
(Power Injectors (A 4658) are required when cascading consoles).
CONSOLE 1
Address = 1
CONSOLE 5
Address = 5
CONSOLE 2
Address = 2
CONSOLE 6
Address = 6
Manufactured in Australia By Altronic Distributors Pty. Ltd.
From
BGM
AMP
L
R
BGM Out
24V
Switched
Out
From
24V
BATTERY
24V DC
IN
Zone 17-32
From
PA
AMP
Zones
1 2 3 4 5 6 7 8
1/17
34
12
+ -
+ -
2/183/194/205/216/227/238/249/2510/2611/2712/2813/2914/3015/31
16/32
100V Switching -
1 AMP SYSTEM - Connect PA amp 100V output to“From PA AMP”Terminals
2 AMP SYSTEM - Connect PA amp 100V output to“From PA AMP”terminals and BGM amp 100V ouput to “From BGM AMP terminals.
Connect Zone amplier speakers to ”+” and“-” terminals.
Connect Zone amplier line level inputs to“+” , ” - ” and“ ”terminals.
Preamp Switching -
DIP Switch Settings
SW
1
2
4-8
On O
Single Amp Mode
Not Used
Dual Amp Mode
Line Level Speaker Level
N/O
N/C
+-
www.redbackaudio.com.au
+_
PA Out
BGM Input Evac Input
+_
+_
324V Out Trigger
ON-Evac/OFF-Any
L
R
Extender
16GB
Maximum
Micro
SD Card
+-
Evac
Trigger
120mA
Max
To Paging Consoles
(Maximum 500mA per output)
+- +- +- +- +- +- +- +- +- +- +- +- +- +- +-
1 2 3 4 5 6 7 8
Model: A 4660
ToMain Unit To 2nd Console
Manufactured in Australia By
Altronic Distributors Pty.Ltd.
www.redbackaudio.com.au
Model: A 4660
ToMain Unit To 2nd Console
Manufactured in Australia By
Altronic Distributors Pty.Ltd.
www.redbackaudio.com.au
Cat5e/6 cable
(Max total run to
2nd console 200 Metres)
Model: A 4660
ToMain Unit To 2nd Console
Manufactured in Australia By
Altronic Distributors Pty.Ltd.
www.redbackaudio.com.au
Model: A 4660
ToMain Unit To 2nd Console
Manufactured in Australia By
Altronic Distributors Pty.Ltd.
www.redbackaudio.com.au
24V DC
PLUGPACK
24V DC
PLUGPACK
Cat5e/6 cable
(Max total run to
2nd console 200 Metres)
A 4658
A 4658
CONSOLE 7
Address = 7
Model: A 4660
ToMain Unit To 2nd Console
Manufactured in Australia By
Altronic Distributors Pty.Ltd.
www.redbackaudio.com.au
24V DC
PLUGPACK
A 4658
Model: A 4660
ToMain Unit To 2nd Console
Manufactured in Australia By
Altronic Distributors Pty.Ltd.
www.redbackaudio.com.au
CONSOLE 3
Address = 3
CONSOLE 8
Address = 8
CONSOLE 4
Address = 4
Model: A 4660
ToMain Unit To 2nd Console
Manufactured in Australia By
Altronic Distributors Pty.Ltd.
www.redbackaudio.com.au
Model: A 4660
ToMain Unit To 2nd Console
Manufactured in Australia By
Altronic Distributors Pty.Ltd.
www.redbackaudio.com.au
24V DC
PLUGPACK
Cat5e/6 cable
(Max total run to
2nd console 200 Metres)
A 4658
Cat5e/6 cable
(Max total run to
2nd console 200 Metres)

Redback® A 4580 Zone Paging System
www.redbackaudio.com.auRedback® Proudly Made In Australia
20
Figure 3.8
In order to be able to page to 32 zones , two A 4580 switching units are required, one of which is the master unit and the other is the slave.
The master and slave options are set by the DIP switches on the rear of the A 4580 units (refer to the DIP Switch 4-5 settings on pg 7). The master
A 4580 has DIP switch 4 set to OFF and DIP switch 5 set to ON. The Slave A 4580 has DIP switch 4 set to ON.
All paging consoles must be connected back to the master A 4580 unit. Connection is made between the Master A 4580 and the Slave A 4580 via a Cat5e/6 lead which connects
between the (Zone 17-32 Extender) ports on both units. Please note : a maximum of 8 paging consoles can be connected to the a 4580 (with a maximum of 2 paging consoles per
port).
Note: External power injectors (Redback® A 4658) are required when cascading consoles, and the maximum cable run from the A 4580 to the second console is 200m. The power
injectors can be inserted into the cable run either before the rst console, or before the second console as illustrated above.
CAT5e cable
(Max 300 Metres)
CAT5e cable
(Max 300 Metres)
CONSOLE 4
Address =4
CONSOLE 3
Address =3
Manufactured in Australia By Altronic Distributors Pty. Ltd.
From
BGM
AMP
L
R
BGM Out
24V
Switched
Out
From
24V
BATTERY
24V DC
IN
Zone 17-32
From
PA
AMP
Zones
1 2 3 4 5 6 7 8
1/17
34
12
+ -
+ -
2/183/194/205/216/227/238/249/2510/2611/2712/2813/2914/3015/31
16/32
100V Switching -
1 AMP SYSTEM - Connect PA amp 100V output to “From PA AMP”Terminals
2 AMP SYSTEM - Connect PA amp 100V output to “From PA AMP” terminals and BGM amp 100V ouput to “From BGM AMP terminals.
Connect Zone amplier speakers to ”+”and “-” terminals.
Connect Zone amplier line level inputs to“+”, ” - ” and “ ” terminals.
Preamp Switching -
DIP Switch Settings
SW
1
2
4-8
On O
Single Amp Mode
Not Used
Dual Amp Mode
Line Level Speaker Level
N/O
N/C
+-
www.redbackaudio.com.au
+_
PA Out BGM Input Evac Input
+_
+_
324V Out Trigger
ON-Evac/OFF-Any
L
R
Extender
16GB
Maximum
Micro
SD Card
+-
Evac
Trigger
120mA
Max
To Paging Consoles
(Maximum 500mA per output)
+- +- +- +- +- +- +- +- +- +- +- +- +- +- +-
1 2 3 4 5 6 7 8
Manufactured in Australia By Altronic Distributors Pty. Ltd.
From
BGM
AMP
L
R
BGM Out
24V
Switched
Out
From
24V
BATTERY
24V DC
IN
Zone 17-32
From
PA
AMP
Zones
1 2 3 4 5 6 7 8
1/17
3
4
1
2
+ -
+ -
2/183/194/205/216/227/238/249/2510/2611/2712/2813/2914/3015/31
16/32
100V Switching -
1 AMP SYSTEM - Connect PA amp 100V output to “From PA AMP”Terminals
2 AMP SYSTEM - Connect PA amp 100V output to “From PA AMP” terminals and BGM amp 100V ouput to “From BGM AMP terminals.
Connect Zone amplier speakers to ”+”and “-” terminals.
Connect Zone amplier line level inputs to“+”, ” - ” and “ ” terminals.
Preamp Switching -
DIP Switch Settings
SW
1
2
4-8
On
O
Single Amp Mode
Not Used
Dual Amp Mode
Line Level
Speaker Level
N/O
N/C
+-
www.redbackaudio.com.au
+_
PA Out
BGM Input
Evac Input
+_
+_
3
24V Out Trigger
ON-Evac/OFF-Any
L
R
Extender
16GB
Maximum
Micro
SD Card
+
-
Evac
Trigger
120mA
Max
To Paging Consoles
(Maximum 500mA per output)
+- +- +- +- +- +- +- +- +- +- +- +- +- +- +-
1 2 3 4 5 6 7 8
A 4580 MASTER UNIT
A 4580 SLAVE UNIT
A 4580 MASTER
DIP4 = OFF
DIP5 = ON
A 4580 SLAVE
DIP4 = ON
ALL OTHER DIP
SWITCHES = OFF
DO NOT USE ANY OF THE CONNECTIONS ON THE
REAR OF THE SLAVE A 4580 EXCEPT POWER, THE
ZONE 17-32 EXTENDER PORT, THE ZONE OUTPUTS
AND THE AMPLIFIER CONNECTIONS.
Model: A 4660
To Main Unit To 2nd Console
Manufactured in Australia By
Altronic Distributors Pty.Ltd.
www.redbackaudio.com.au
Model: A 4660
To Main Unit To 2nd Console
Manufactured in Australia By
Altronic Distributors Pty.Ltd.
www.redbackaudio.com.au
CONSOLE 2
Address = 2
CONSOLE 6
Address = 6
Model: A 4660
To Main Unit To 2nd Console
Manufactured in Australia By
Altronic Distributors Pty.Ltd.
www.redbackaudio.com.au
Model: A 4660
To Main Unit To 2nd Console
Manufactured in Australia By
Altronic Distributors Pty.Ltd.
www.redbackaudio.com.au
Cat5e/6 cable
(Max total run to
2nd console 200 Metres)
24V DC
PLUGPACK
A 4658
CONSOLE 1
Address = 1
CONSOLE 5
Address = 5
Model: A 4660
To Main Unit To 2nd Console
Manufactured in Australia By
Altronic Distributors Pty.Ltd.
www.redbackaudio.com.au
Model: A 4660
To Main Unit To 2nd Console
Manufactured in Australia By
Altronic Distributors Pty.Ltd.
www.redbackaudio.com.au
24V DC
PLUGPACK
Cat5e/6 cable
(Max total run to
2nd console 200 Metres)
A 4658
1 2 3 4 5 6 7 8
1 2 3 4 5 6 7 8
O
N
Down is ON.
1 2 3 4 5 6 7 8
1 2 3 4 5 6 7 8
O
N
Down is ON.
Other manuals for A 4580
1
Table of contents
Other Redback Microphone manuals