Turning the oven off
To turn the oven off make sure that the interior lighting and the heating elements have been turned off, then turn
the main switch to “0“.
Control panel (pic. 1)
OPERATING INSTRUCTIONS
• When baking you must check the pizzas and if necessary turn them so that they are baked uniformly.
• When starting the baking process switch the chamber on with the thermostats turned to maximum. After the
oven has been heated set the thermostats to operating temperature.
• The temperature set on the upper and lower thermostat is not usually identical (a lower temperature on the
bottom thermostat).
• When the oven is switched on and empty the temperature of the fi re-clay slabs rises from the upper heating
elements.
• In two storey ovens heat is transferred between the upper and lower chambers.
• Clean the fi re-clay slabs regularly using the appropriate equipment.
• A basic set of tools can be purchased additionally for each oven.
• Only switch the light on when baking, this will extend the service life of the light bulbs.
• If too much steam is produced in the work area it can be released by opening the steam vale using the draw-rod
(pos. G, pic. 1).
INSTRUCTION FOR USE
Warning! Before you begin using this oven you must remove the protective fi lm from its whole surface, wash
it well with water containing washing up liquid and then wipe it with a damp rag. Before starting baking switch
the oven on for approx. 4 hours at its 300 °C so that the residues of preservative substances are burnt off.
Before using the oven for the fi rst time the temperature must be set to 300 °C and the oven must be
kept running for 4 hours. After the oven has been prepared in this manner standard operation can be
commenced.
Open and close the doors using the handles (pos. H, pic. 1). When the oven is on do not touch the
metal components, you could be burnt. All control elements and the handles are protected against
radiant heat. When handling foods in the baking chamber use protective aids on your hands. Do not
cover the oven, not even partially, do not place anything on it.
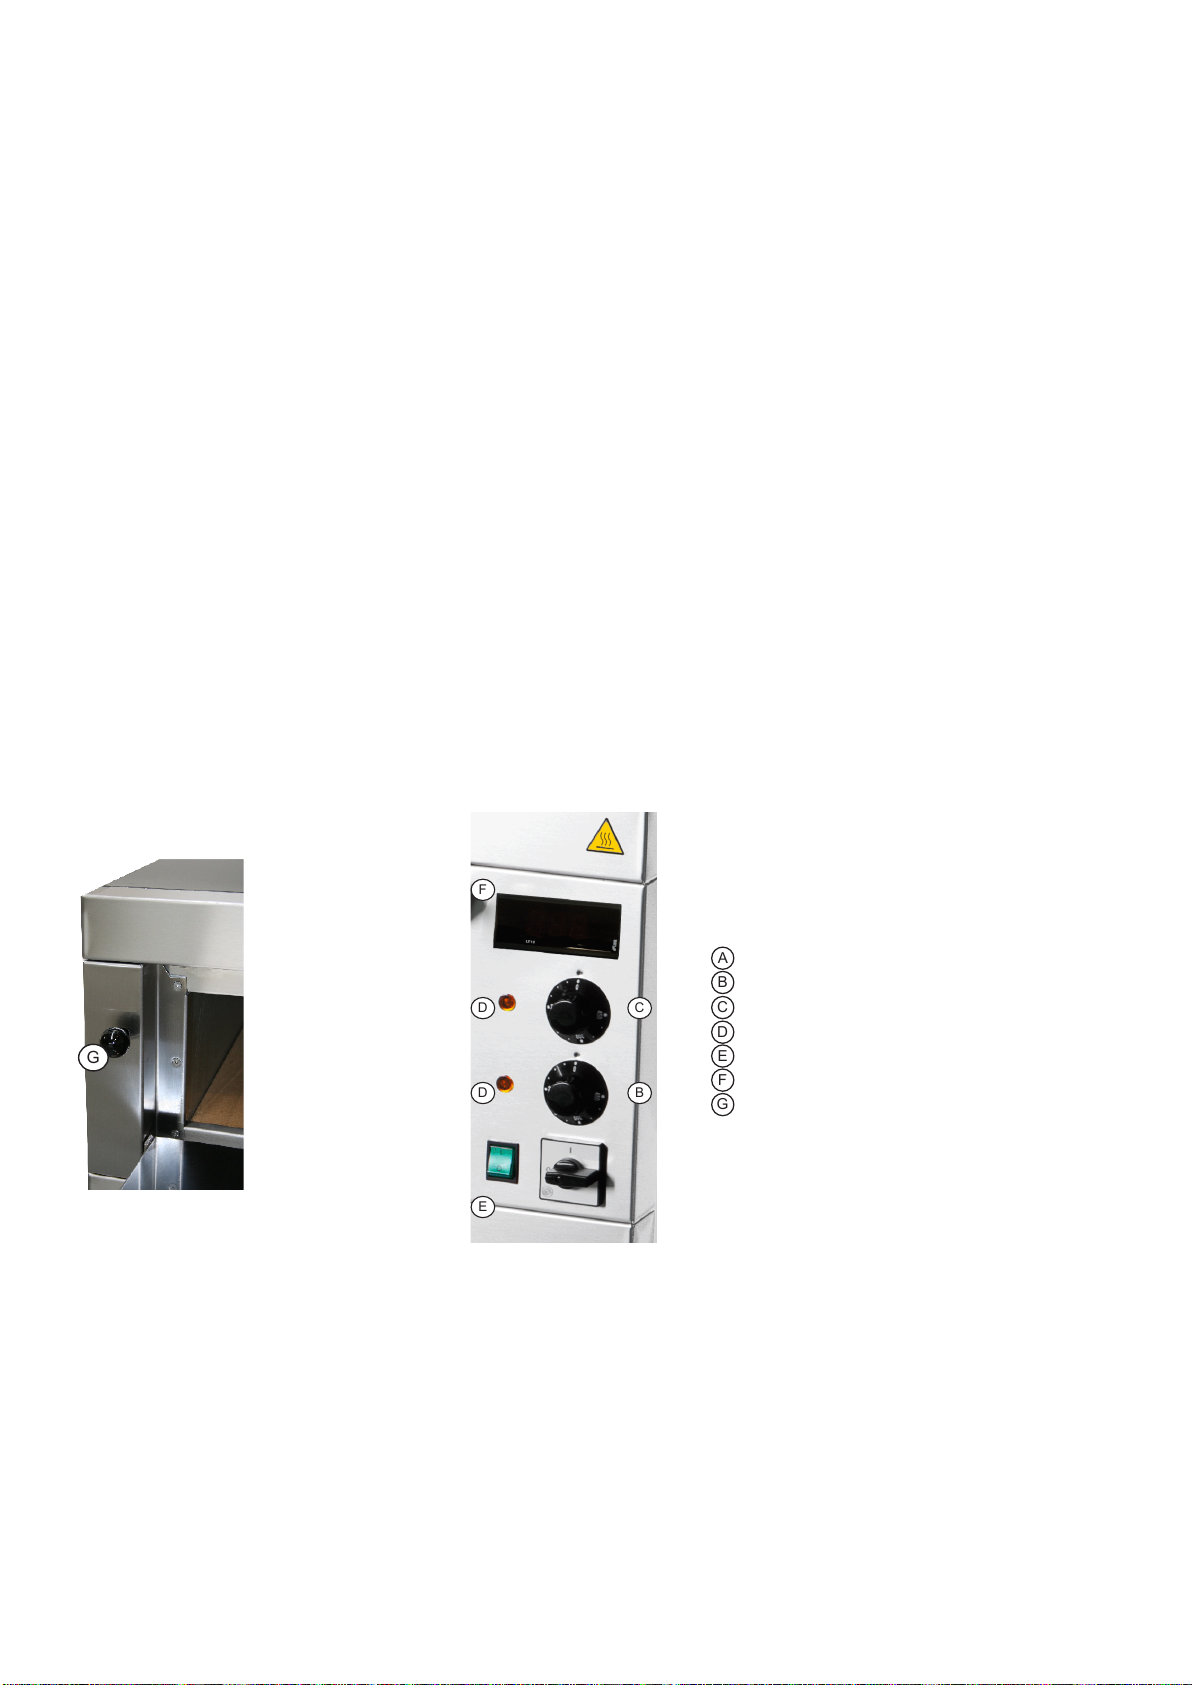
Controls (pic. 1)
Start the oven by turning the main switch (A) to point “I“ according to the label on the knob. The machine is
now switched on. Use the regulation buttons on the thermostat to independently regulate the upper (B) and
lower (c) heating elements, which are switched on after the required temperature is set. The pilot lights (D)
for the upper and lower part of the chamber light up when the heating elements are on. To turn the heating
elements off set the thermostat for the specifi c level to 0°C. The interior chamber lighting is turned on by
pressing the backlit switch (e), switching it to “I“ and turned off by switching it to “O“. The lighting only works
if the oven is turned on using the main switch (A).
MAIN SWITCH
UPPER HEATING ELEMENT THERMOSTAT
LOWER HEATING ELEMENT THERMOSTAT
HEATING ELEMENT PILOT LIGHTS
INTERIOR LIGHTING SWITCH
THERMOMETER
VALVE DRAW-ROD
Turning the oven off
To turn the oven off make sure that the interior lighting and the heating elements have been turned off, then turn
the main switch to “0“.
Control panel (pic. 1)
OPERATING INSTRUCTIONS
• When baking you must check the pizzas and if necessary turn them so that they are baked uniformly.
• When starting the baking process switch the chamber on with the thermostats turned to maximum. After the
oven has been heated set the thermostats to operating temperature.
• The temperature set on the upper and lower thermostat is not usually identical (a lower temperature on the
bottom thermostat).
• When the oven is switched on and empty the temperature of the fi re-clay slabs rises from the upper heating
elements.
• In two storey ovens heat is transferred between the upper and lower chambers.
• Clean the fi re-clay slabs regularly using the appropriate equipment.
• A basic set of tools can be purchased additionally for each oven.
• Only switch the light on when baking, this will extend the service life of the light bulbs.
• If too much steam is produced in the work area it can be released by opening the steam vale using the draw-rod
(pos. G, pic. 1).
INSTRUCTION FOR USE
Warning! Before you begin using this oven you must remove the protective fi lm from its whole surface, wash
it well with water containing washing up liquid and then wipe it with a damp rag. Before starting baking switch
the oven on for approx. 4 hours at its 300 °C so that the residues of preservative substances are burnt off.
Before using the oven for the fi rst time the temperature must be set to 300 °C and the oven must be
kept running for 4 hours. After the oven has been prepared in this manner standard operation can be
commenced.
Open and close the doors using the handles (pos. H, pic. 1). When the oven is on do not touch the
metal components, you could be burnt. All control elements and the handles are protected against
radiant heat. When handling foods in the baking chamber use protective aids on your hands. Do not
cover the oven, not even partially, do not place anything on it.
Controls (pic. 1)
Start the oven by turning the main switch (A) to point “I“ according to the label on the knob. The machine is
now switched on. Use the regulation buttons on the thermostat to independently regulate the upper (B) and
lower (c) heating elements, which are switched on after the required temperature is set. The pilot lights (D)
for the upper and lower part of the chamber light up when the heating elements are on. To turn the heating
elements off set the thermostat for the specifi c level to 0°C. The interior chamber lighting is turned on by
pressing the backlit switch (e), switching it to “I“ and turned off by switching it to “O“. The lighting only works
if the oven is turned on using the main switch (A).
MAIN SWITCH
UPPER HEATING ELEMENT THERMOSTAT
LOWER HEATING ELEMENT THERMOSTAT
HEATING ELEMENT PILOT LIGHTS
INTERIOR LIGHTING SWITCH
THERMOMETER
VALVE DRAW-ROD
6