Redgum Deluxe User manual

Australia’s No.1 Selling Honda Powered Log Splitters
Owner’s Manual
Operating Instructions for
RedGum Deluxe Model
Product Description & Intended Purpose:
This Log Splitter / Wood Splitter is an outdoor product that splits
^VVKSVNZMVY\ZLHZM\LSPUHÄYLWSHJLVYH^VVKZ[V]L
WARNING: All operators must read this manual,
ILMVYLVWLYH[PUN[OPZ9LK.\T:WSP[[LY
Deluxe
RED GUM SPLITTER
SPLITTERS
REDGUM
Shown in Horizontal
Splitting Mode
Shown in Vertical
Splitting Mode
RGLSD-0422 Rev?

/HaHYK:PNUHSZ+LÄUP[PVU
This is the safety alert symbol0[PZ\ZLK[VHSLY[`V\[VWV[LU[PHSWLYZVUHS
PUQ\Y`OHaHYKZ6IL`HSSZHML[`TLZZHNLZ[OH[MVSSV^[OPZZ`TIVS[VH]VPK
WVZZPISLPUQ\Y`VYKLH[O
+(5.,9PUKPJH[LZHUPTTPULU[S`OHaHYKV\ZZP[\H[PVU^OPJOPMUV[
H]VPKLK^PSSYLZ\S[PUZLYPV\ZPUQ\Y`VYKLH[O
>(9505.PUKPJH[LZHWV[LU[PHSS`OHaHYKV\ZZP[\H[PVU^OPJOPMUV[
H]VPKLK^PSSYLZ\S[PUZLYPV\ZPUQ\Y`VYKLH[O
*(<;065PUKPJH[LZHWV[LU[PHSS`OHaHYKV\ZZP[\H[PVU^OPJOPMUV[
H]VPKLKJV\SKYLZ\S[PUTPUVYVYTVKLYH[LPUQ\Y`
DANGER
WARNING
CAUTION
WARNING
Read and thoroughly understand all instructions contained in
this operations manual before operating the RedGum Splitter.
Serious injury or death can result if safety instructions are not
understood or followed. If you wish to discuss this log splitter’s
operational procedures after reading this manual, please call
our customer service personnel on 1300 039 251. Monday -

Table of Contents
0TWVY[HU[:HML[`9\SLZ
Operation Instructions
Proper Operation of the Log Splitter
How to split a log with slanted surface
Horizontal & Vertical Operating Modes
Vehicle Towing of the Log Splitter
Log Splitter Components
Log Splitter Troubleshooting
Maintenance and Storage
,UNPUL*VTWVULU[Z:WLJPÄJH[PVUZ
Notes
Accessories
4-5
7
7
8
9
10
11
12
13
14
15
16

Important Safety Rules
WARNING
1.) Read this manual completely.
:LYPV\ZPUQ\Y`VYKLH[OJHUYLZ\S[PMZHML[`PUZ[Y\J[PVUZHYLUV[MVS-
SV^LK
,]LY`VUL^OVVWLYH[LZ[OPZSVNZWSP[[LYT\Z[YLHKHUKJVTWSL[LS`
\UKLYZ[HUKHSSZHML[`Y\SLZVWLYH[PUNPUZ[Y\J[PVUZHUKTHPU[LUHUJL
PUZ[Y\J[PVUZ
- You must be 18 or older to operate this machine and in sound
TPUKMYLLVM[OLPUÅ\LUJLVMTLKPJH[PVUKY\NZVYHSJVOVS2LLW
\U[YHPULKWLVWSLH^H`
2.) Crush hazard.
The Cush Hazard Zone is between the splitter wedge(5) and the end
WSH[L>LKNLJHUJ\[[OYV\NOZRPUHUKIYLHRIVULZMake sure
OHUKZHYLJSLHYVMJY\ZOOHaHYKaVUL^OLUSVNZWSP[[LYPZPUVWLYH[PVU
3.) Flying objects.
7PLJLZVMSVNTH`Å`V\[^OPSLZWSP[[PUN>LHYZHML[`NSHZZLZ
:LYPV\ZL`LPUQ\Y`JHUVJJ\YPMZHML[`NSHZZLZHYLUV[^VYU
- Serious accidents can happen when other people are allowed
PUZPKL[OLZHML[`HUKVWLYH[VYaVUL2LLWL]LY`VULLSZLV\[VM[OL
ZHML[`HUKVWLYH[VYaVUL^OPSLVWLYH[PUNSVNZWSP[[LY:LLWHNLMVY
VWLYH[VYaVUL
4.) Skin injection hazard.
/PNOWYLZZ\YLÅ\PKJHUPUQLJ[\UKLYZRPUYLZ\S[PUNPUZLYPV\ZPUQ\Y`
PUJS\KPUNHTW\[H[PVU
0MZRPUPUQLJ[PVUOHWWLUZZLLRPTTLKPH[L¸:\YNPJHS;YLH[TLU[¹
Call 000
4HRLZ\YLHSSÄ[[PUNZHYL[PNO[ILMVYLZ[HY[PUN[OLSVNZWSP[[LY
9LSPL]LZ`Z[LTWYLZZ\YLILMVYLZLY]PJPUNI`[\YUPUNVɈ[OLSVN
ZWSP[[LYHUKTV]PUNJVU[YVS]HS]LSL]LYHMVY^HYKHUKIHJRHUK
YL[\YUPUN[VUL\[YHSWVZP[PVU
+VUV[JOLJRMVYSLHRZ^P[OOHUK0UZ[LHK\ZLHWPLJLVMJHYK-
IVHYK[VJOLJRMVYSLHRZ
Important Safety Rules Continued...

Important Safety Rules (continued)
WARNING
9PZRVMÄYLHUKL_WSVZPVU
/V[L_OH\Z[M\TLZMYVTLUNPULJHUJH\ZLÄYL.HZVSPULPZOPNOS`
ÅHTTHISLHUKL_WSVZP]L@V\JHUILI\YULKVYZLYPV\ZS`PUQ\YLK
^OLUOHUKSPUNM\LS
7VZP[PVUT\ɊLYH[SLHZ[MLL[MYVTJVTI\Z[PISLVIQLJ[Z
- Before adding fuel, stop the engine and keep heat, sparks, and
ÅHTLH^H`+VUV[HKKM\LS^OLULUNPULPZY\UUPUNVYZ[PSSOV[5V
ZTVRPUNULHYLUNPUL
+VUV[W\TWM\LSKPYLJ[S`PU[VLUNPULH[NHZZ[H[PVU:[H[PJJOHYNL
JHUI\PSKHUKPNUP[LM\LS<ZLHUHWWYV]LKM\LSJVU[HPULY[V[YHUZMLY
WL[YVS[V[OLLUNPUL>PWL\WM\LSZWPSSZPTTLKPH[LS`
:[VYLHUKOHUKSLM\LSV\[KVVYZ.HZVSPUL]HWVYZJHUPNUP[LPM[OL`
JVSSLJ[PUZPKLHULUJSVZ\YL,_WSVZPVUJHUYLZ\S[
+VUV[JOHUNLVYHKK[VL_OH\Z[Z`Z[LT-PYLJHUYLZ\S[
+VUV[JOHUNLVYHKKM\LS[HURZVYM\LSSPULZ-PYLJHUYLZ\S[
)LMVYLLHJO\ZLJOLJRM\LS[HURHUKM\LSSPULZMVYSLHRZ(U`M\LS
SLHRPZHÄYLOHaHYK-P_HU`M\LSSLHRZILMVYLZ[HY[PUNLUNPUL
- During transportation take precautions to make sure machine will
UV[[PWV]LYHUKJH\ZLHM\LSSLHRHUKÄYLOHaHYK,UNPULM\LSSL]LY
ZOV\SKIL[\YULK[VVɈ^OPSL[YHUZWVY[PUN[OPZSVNZWSP[[LY
7.) Breathing hazard.
7VPZVUV\ZM\TLZMYVTLUNPULJHURPSS`V\+VUV[VWLYH[LPUKVVYZ
L]LUPM]LU[PSH[LK;OPZWYVK\J[PZMVYV\[KVVY\ZLVUS`
/V[T\ɊLY
@V\JHUILI\YULKI`T\ɊLY+VUV[[V\JOT\ɊLYK\YPUNVY
PTTLKPH[LS`HM[LY\ZL

WARNING
Read & thoroughly understand the following Operational Warnings
before operating this RedGum Log Splitter.
Operational Warning
· Intended purpose: This product is designed as an outdoor product to split wood logs to use
HZM\LSPUHÄYLWSHJLVYH^VVKZ[V]L5L]LY\ZL[OLSVNZWSP[[LYMVYHU`V[OLYW\YWVZL[OHU
splitting wood.
· (S^H`ZWSHJLSVNZZV[OLH_LOLHKZWSP[Z^P[O[OL^VVKNYHPUHUKUV[HJYVZZ[OL^VVKNYHPU
· Personal Protective Equipment: Safety glasses are required to be worn at all times. It’s also
YLJVTTLUKLK[V^LHY,HY4\ɈZ:[LLSJHWWLKIVV[Z;PNO[Ä[[PUNNSV]LZ
· ALWAYS wear suitable clothing, free from hanging strings, jewellery or other items that could
get caught up in moving parts. If you have long hair make sure it is tied back and kept out of
the way of moving parts.
· ALWAYS inspect log splitter before using to ensure it is in good working condition.
· Replace or repair damaged or worn parts immediately.
· ALWAYS check and tighten hardware and assembled parts before operation.
· (3>(@:VWLYH[LSVNZWSP[[LYVUÄYTJSLHYHUKSL]LSNYV\UK
· ALWAYS set up a SAFETY ZONE restricting onlookers to at least 3m away from the log
splitter when in use.
· ALWAYS remove split wood from around the log splitter immediately after it’s spilt into
smaller pieces so that you don’t stumble over it.
· +V56;L_JLLKLX\PWTLU[TH_PT\TZWSP[[PUNJHWHJP[`I`HS[LYPUNJVTWVULU[ZL[[PUNZ
· Do NOT operate the log splitter at night, only during daylight hours.
· :O\[LUNPULVɈILMVYLSLH]PUNSVNZWSP[[LY\UH[[LUKLK
Keep this operations manual for future reference and re-read this manual periodically.
9LK.\T:WSP[[LYZHYLHZZLTISLKHUKYLHK`MVY\ZLOV^L]LY
- Check/`KYH\SPJ6PSSL]LSZ^P[OH+PWZ[PJR
- CheckLUNPULVPSSL]LSI`ZPNO[PUNLUNPULKPWZ[PJR
*SVZLS`inspectHSSSVNZWSP[[LYJVTWVULU[Z0M`V\ZPNO[KHTHNLKJVTWVULU[Z[OLUJVU[HJ[`V\Y
9LK.\TKLHSLYILMVYL\ZL
-Always wear safety glasses^OPSLVWLYH[PUN[OPZSVNZWSP[[LY0[»ZHSZVYLJVTTLUKLK[V^LHY
,HY4\ɈZ:[LLSJHWWLKIVV[Z;PNO[Ä[[PUNNSV]LZ:\P[HISLJSV[OPUN
Operation Checklist

OPERATION INSTRUCTIONS
(operating instructions continued...)
3m Safety Zone
3m Safety Zone
Proper Operation of the Log Splitter.
(S^H`ZMVSSV^6WLYH[PVUHS^HYUPUNZJOLJRSPZ[YLMLYWHNL
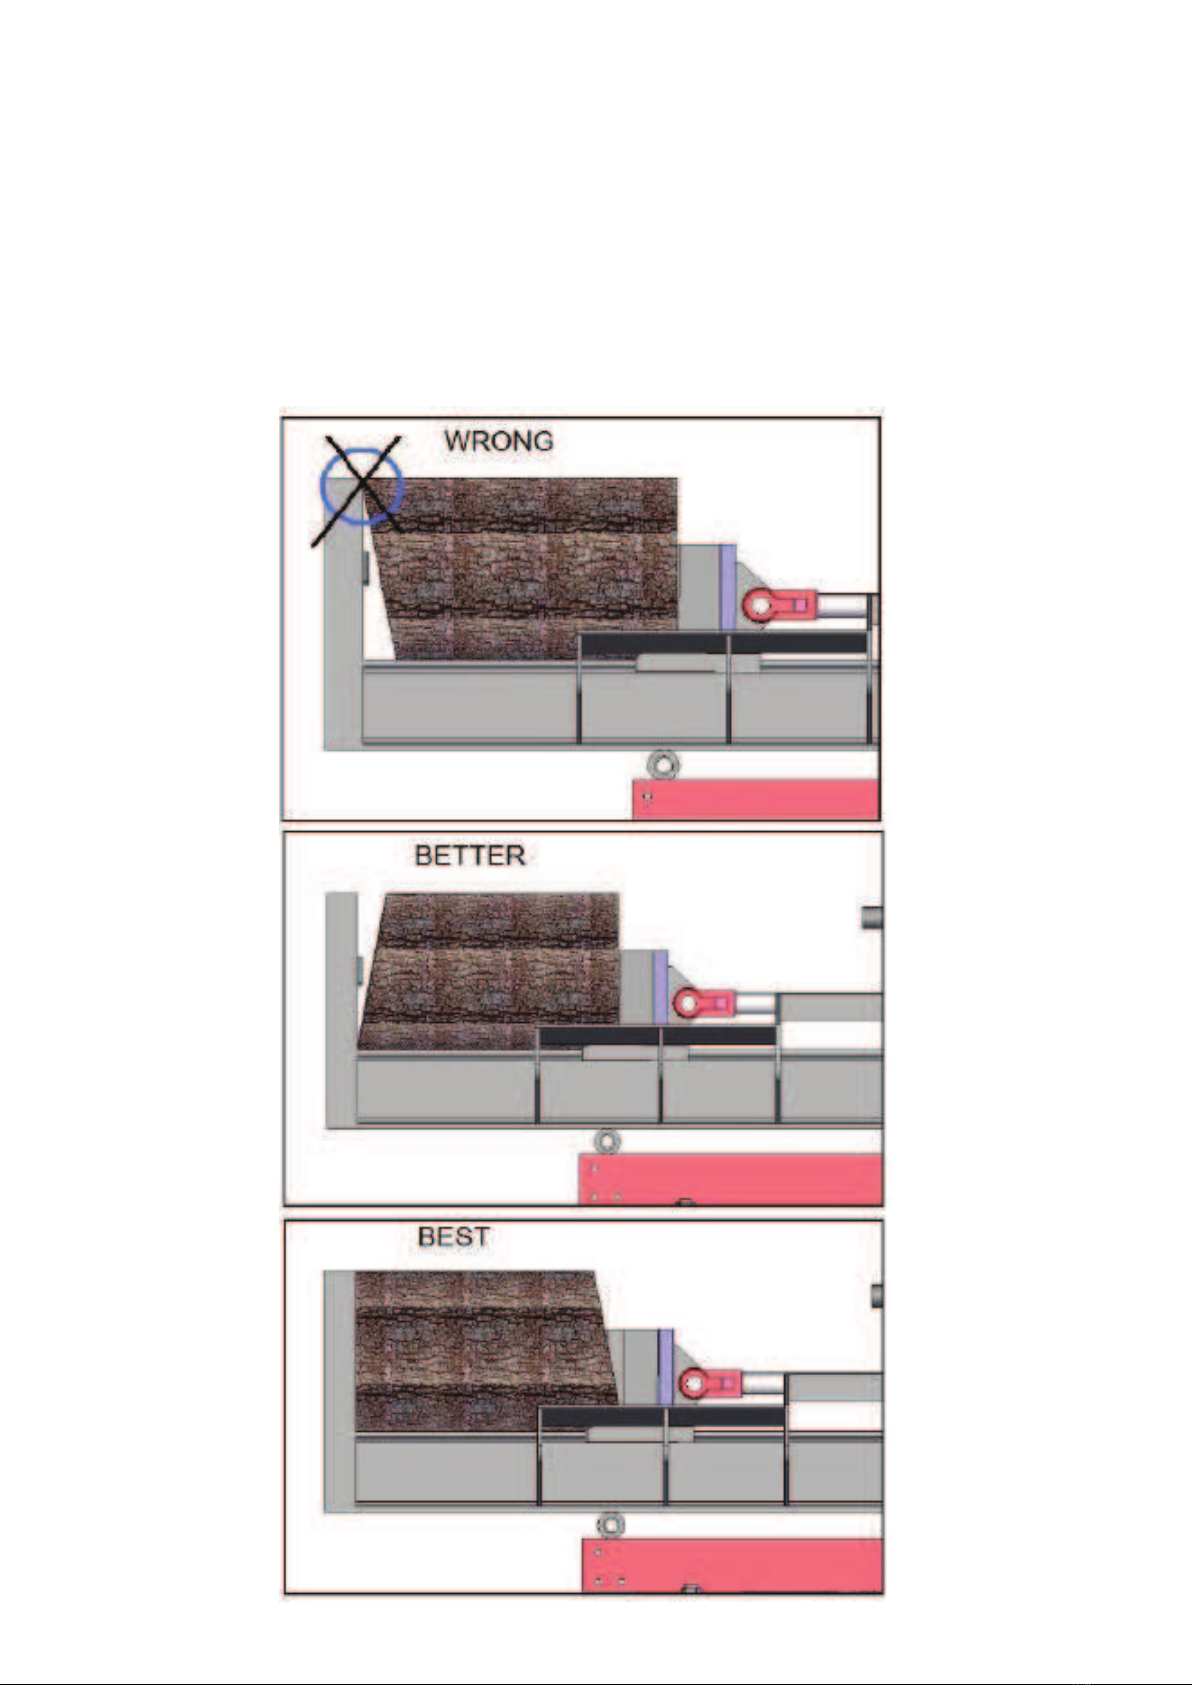
3VHKHSVNVU[V[OLILHTHUKHNHPUZ[[OLLUKWSH[L:LLUL_[WHNLMVYPUZ[Y\J[PVUZVU
ZWSP[[PUNSVNZ^P[OHZSHU[VY\UL]LUZ\YMHJLZ/V^L]LYSVNZOV\SKILJ\[HZZX\HYLHZWVZZPISL[VÄ[
WYVWLYS`VU[V[OLZWSP[[LYHUKÄYTS`HNHPUZ[[OLLUKWSH[L
:LYPV\ZHJJPKLU[ZJHUOHWWLU^OLUV[OLYWLVWSLHYLHSSV^LKPUZPKL[OL67,9(;69A65,ZLL
KPHNYHTILSV^2LLWL]LY`VULV\[VM[OLVWLYH[VYaVUL^OPSLVWLYH[PUN[OLSVNZWSP[[LY
I(3>(@:ZL[\WH:(-,;@A65,YLZ[YPJ[PUNVUSVVRLYZ[VH[SLHZ[TH^H`MYVT[OLSVNZWSP[[LY
^OLUPU\ZL
4.) Start Engine by using the following instructions:
H;\YU[OLLUNPULZ^P[JO[Vº65»WVZP[PVU
I:SPKL[OLJOVRLSL]LYH^H`MYVT[OLM\LS[HUR[VHJ[P]H[L[OLJOVRL
J;\YU[OLM\LS[HWVU
K9HPZL[OLLUNPULYL]ZI`ZSPKPUN[OL[OYV[[SLSL]LYH^H`MYVT[OLM\LS[HUR(S^H`Z\ZLM\SS
[OYV[[SL^OLU\ZPUN[OPZTHJOPUL
L7\SS[OLZ[HY[LYJVYKOHUKSLSPNO[S`\U[PSYLZPZ[HUJLPZMLS[[OLUW\SSIYPZRS`
M>OLU[OLLUNPULZ[HY[Z[VY\UKLHJ[P]H[L[OLJOVRLI`ZSPKPUN[OLSL]LY[V^HYKZ[OLM\LS
[HUR
N*(<;065+VUV[SL[NVVM[OLZ[HY[LYJVYKHUKHSSV^P[[VZUHWIHJR
5.) Start the splitting procedure by pushing and holding the control valve handle (4) FORWARD.
;OL*\ZO/HaHYKAVULPZIL[^LLU[OLZWSP[[LY^LKNLHUK[OLLUKWSH[L
4HRLZ\YLOHUKZHYLJSLHYVMJY\ZOOHaHYKaVUL
H;VYL[\YU^LKNL[VZ[HY[PUNWVZP[PVUZPTWS`W\SS[OLJVU[YVS]HS]LSL]LYHIHJR^HYKZHUK
H^H`MYVT[OLLUKWSH[L7SLHZLUV[L[OH[[OLZWSP[[LY^LKNLVUS`TV]LZMVY^HYK^OLU
`V\HYLOVSKPUN[OLSL]LYMVY^HYK>OLU`V\SL[NVVM[OLJVU[YVSSL]LYH[OLZWSP[[PUN^LKNL
ZOV\SKZ[VW
I7SLHZLUV[L[OLZWSP[[PUN^LKNLYL[\YUZIHJR[V[OLVYPNPUHSZ[HY[PUNWVZP[PVUH\[VTH[PJHSS`
@V\T\Z[LUZ\YLJVU[YVSSL]LYHYL[\YUZ[V[OLUL\[YHSWVZP[PVUHM[LY[OLZWSP[[PUN^LKNLOHZ
YL[\YULK[VP[»ZVYPNPUHSZ[HY[PUNWVZP[PVU
J-VYZHML[`YLHZVUZ[OL^LKNLZ[VWZHWWYV_JTMYVT[OLLUKWSH[L;VH]VPK
O`KYH\SPJWYLZZ\YLI\PSK\WWSLHZLYLMYHPUMYVTOVSKPUN[OLJVU[YVSSL]LYHMVY^HYKHM[LY[OL
^LKNLOHZYLHJOLK[OLLUKVMP[»Z[YH]LS
7.) Clear the split wood from the operator zone.
8.) Repeat above steps as required.
WARNING

OPERATION INSTRUCTIONS (continued 2)
How to split a log with slant(or uneven) surface
*VYYLJ[VWLYH[PUNWYVJLK\YLZHYLYLX\PYLK[VLUZ\YL`V\Y9LK.\TSVNZWSP[[LYPZUV[
KHTHNLK0UJVYYLJ[VWLYH[PVUJHUYLZ\S[PUILUKPUN[OLILHTHUKVYLUKWSH[L
Important: If beam or end plate are bent due to incorrect operation, it is not a
THU\MHJ[\YLYZMH\S[HUKZ\IZLX\LU[S`PZUV[JV]LYLK\UKLY^HYYHU[`
0KLHSS`[OLSVNZOV\SKILJ\[PU[V¸YV\UKZ¹^P[OÅH[VYL]LUZ\YMHJLZ0M[OL`HYLJ\[
HUK[OLLKNLZHYLVUHUHUNSLVYOH]LHU\UL]LUZ\YMHJL`V\T\Z[LUZ\YL`V\WSHJL
[OLSVNVU[V[OLILHTHZZOV^UPU[OLKPHNYHTZ),;;,9VY),:;ILSV^
(operating instructions continued...)

(operating instructions continued...)
OPERATION INSTRUCTIONS (continued 3)
(operating instructions continued...)
-VY=LY[PJHS<ZL!
To secure beam in vertical
position you MUST place
the pin through the top
hole of the rear leg AND
through the
“locking pin tabs” on the
back of splitting beam as
shown on horizontal use
diagram.
Remove the work table
before operating in
vertical mode.
Rotate rear leg down and slide the
lock pin into top hole to lock rear leg
into place.
Important: Note position of “lock-
ing pin tab”. This is required for
vertical operation.
Image shows rear leg
lock down
-VY/VYPaVU[HS<ZL!
CAUTION
WARNING
When converting the log
splitter from horizontal to vertical use and/or
returning to horizontal from vertical operation,
the rear leg must be secured in downwar with
locking pin to prevent the tow bar from snap-
ping up.
WARNING
WARNING
Step 1: Ensure rear leg is down
Step 2: Pull out pin
:[LW!3PM[ILHT[V]LY[PJHS
Step 4: Insert locking pin

9LTLTILY[V[\YU[OLLUNPULM\LS[HWVɈWYPVY[V[V^PUN[VWYL]LU[ÅVVKPUNVM[OLLUNPUL
Warning: Towing incorrectly is a serious risk and can result in serious injury or death. Please read
Towing Warnings below:
Towing the log splitter:
Towing Warnings:
9LTLTILY[V[\YU[OLLUNPUL[V[OLVɈWVZP[PVUWYPVY[V[V^PUNHUK[\YUVɈM\LS[HW
·Serious injury or death can occur if towing safety rules are not followed.
·Review towing safety warnings in your towing vehicle manual.
·Drive safely. Be aware of the added length of the log splitter adds to your vehicle.
·Never ride or transport cargo on the log splitter.
·ALWAYS secure and lock the log splitter to the vehicle hitch before towing.
·Drive the vehicle only after the log splitter is securely attached.
·;\YUVɈ[OL]LOPJSLILMVYLSLH]PUN[OLSVNZWSP[[LY\UH[[LUKLK
·Choose a level surface to operate the log splitter.
·Block the log splitter wheels to prevent unintended movement.
·5L]LY[V^VYVWLYH[L[OPZZWSP[[LY^OPSL\UKLY[OLPUÅ\LUJLVMHSJVOVSKY\NZVY
medication. AVOID large holes and ditches when towing the equipment.
·ALWAYS tow at reduced speed on rough or uneven terrain, along creeks, ditches and on
hillsides.
·To AVOID personal injury and/or equipment damage DO NOT EXCEED 45 km/h.
WARNING
1b.) Rotate jockey wheel
leg up & slide the lock pin
into place to hold jockey
wheel in place.
1a.) Ensure log splitter is secured in horizontal mode. (See 1b & 1c)
2.) Ensure log splitter tow
hitch is locked onto vehicle
tow ball.
1c.) Rotate rear leg
up and slide the
lock pin
locking pin
tab for use
in vertical
position.
3.) Hook safety chain to
towing vehicle

9LTLTILY[V[\YU[OLLUNPULM\LS[HWVɈWYPVY[V[V^PUN[VWYL]LU[ÅVVKPUNVM[OLLUNPUL
LOG SPLITTER COMPONENTS
:HML[`*OHPUZ(ZHML[`MLH[\YL[VWYL]LU[SVZZVMSVNZWSP[[LY^OPSL[V^PUN
TT;YHPSLY*V\WSLY([[HJOLZ[V`V\Y]LOPJSL-P[ZZ[HUKHYKTTOP[JOIHSSZ
/`KYH\SPJ*`SPUKLY;OL/`KYH\SPJJ`SPUKLYOHZHñ¹IVYL3/4¹Z[YVRL
*VU[YVS=HS]LH*VU[YVS=HS]L/HUKSL<ZL[OLJVU[YVS]HS]LOHUKSL[VTV]L[OL:WSP[[LY
^LKNLZSPKLMVY^HYKHUKIHJR^HYK
:WSP[[LY>LKNL;OLZWSP[[LY^LKNLMLH[\YLZ^PUNZHUKH[HWLY[OH[THRLZZWSP[[PUNLHZPLY
3VN*YHKSL2LLWZ[OLSVNVU[OLILHT^P[OV\[VWLYH[VYHZZPZ[HUJL
)LHT;OLILHTPZTHKLVM¹^PKLÅHUNLILHTHSZVJHSSLK0)LHTHUKPZYLPUMVYJLK
>VYR;HISL4H_PT\TSVHK2N
,UNPUL;OLHPYJVVSLK/VUKH.?LUNPULWV^LYZ[OLO`KYH\SPJW\TW
9LHY:\WWVY[3LN
>OLLS;`YL4H_PT\TYH[LKZWLLKPZRTWLYOV\Y
-LUKLY
;^V:[HNL/`KYH\SPJ7\TW4HRLZ[OLO`KYH\SPJVPSÅV^[OYV\NO[OLZ`Z[LT
;V^)HY
:^PUN1VJRL`>OLLS-VYLHZ`THUVL\]YHIPSP[`
/`KYH\SPJ/VZLZH0USL[/VZLI6\[SL[/VZLJ*`SPUKLY/VZLK6PSWPWL
/`KYH\SPJ6PSÄS[LY[VPUJYLHZL[OLZLY]PJLSPMLVM[OLSVN:WSP[[LYJVTWVULU[Z
,UK7SH[L
17
16c
16a
16d
18
4a
16b
9
10

LOG SPLITTER TROUBLESHOOTING
Problem
*`SPUKLYYVKZWSP[[PUN^LKNL^PSSUV[
TV]L
:VS\[PVU!(+,/1
:SV^J`SPUKLYZOHM[ZWLLK^OLU
extending or retracting
:VS\[PVU!()*/023
>VVK^PSSUV[ZWSP[VYZWSP[ZL_[YLTLS`
ZSV^S`
:VS\[PVU!()*-02
Engine bogs down during splitting Solution: G, L
Engine stalls under low load condition Solution: D, E, L, M
Cause Solution
(0UZ\ɉJPLU[VPS[VW\TW *OLJRVPSSL]LSPUYLZLY]VPY
B - Air in oil *OLJRVPSSL]LSPUYLZLY]VPY
*,_JLZZP]LW\TWPUSL[]HJ\\T Check pump inlet hose for blockage or
kinks
+)SVJRLKO`KYH\SPJSPULZ -S\ZOJSLHU[OLZWSP[[LYO`KYH\SPJ
Z`Z[LT
,)SVJRLKJVU[YVS]HS]L -S\ZOJSLHU[OLZWSP[[LYO`KYH\SPJ
Z`Z[LT
-3V^JVU[YVS]HS]LZL[[PUN (KQ\Z[JVU[YVS]HS]L^P[OHWYLZZ\L
gauge
./PNOJVU[YVS]HS]LZL[[PUN (KQ\Z[JVU[YVS]HS]L^P[OHWYLZZ\L
gauge
/+HTHNLKJVU[YVS]HS]L 9L[\YUJVU[YVS]HS]LMVYH\[OVYPZLK
repair
00U[LYUHSJVU[YVS]HS]LSLHR 9L[\YUJVU[YVS]HS]LMVYH\[OVYPZLK
repair
10U[LYUHSJ`SPUKLYSLHR 9L[\YUJ`SPUKLYMVYH\[OVYPZLKYLWHPY
20U[LYUHSS`KHTHNLKJ`SPUKLY 9L[\YUJ`SPUKLYMVYH\[OVYPZLKYLWHPY
L - Engine control out of adjustment Return for authorised repair
M - Engine is loaded during idle down
mode
Use shorter log length (24” or less) to
allow engine to speed up before contact

What When How
Hoses Each Use 0UZWLJ[MVYL_WVZLK^PYLTLZOSLHRZ
Replace all worn or damaged hoses before
Z[HY[PUNLUNPUL
/`KYH\SPJ
-P[[PUNZ
Each Use 0UZWLJ[MVYJYHJRZSLHRZ
9LWSHJLHSSKHTHNLKÄ[[PUNZILMVYLZ[HY[PUN
LUNPUL
Nuts & Bolts Each Use Check for loose bolts
Beam Each Use (WWS`NYLHZL[VILHTZ\YMHJL
4V]PUN7HY[Z Each Use Clear debris
:RPUPUQLJ[PVUOHaHYK
/PNOWYLZZ\YLÅ\PKJHUPUQLJ[\UKLYZRPUYLZ\S[PUNPUZLYPV\ZPUQ\Y`PUJS\KPUN HTW\[H[PVU
4HRLZ\YLHSSOVZLHUKJVU[YVSÄ[[PUNZHYL[PNO[ILMVYLHWWS`PUNWYLZZ\YL
9LSPL]LZ`Z[LTWYLZZ\YLILMVYLZLY]PJPUN
+VUV[JOLJRMVYSLHRZ^P[OOHUK0UZ[LHKWSHJLHWPLJLVMJHYKIVHYK\UKLY[OL
\UP[[VJOLJRMVYSLHRZ
0MZRPUPUQLJ[PVUOHWWLUZZLLRPTTLKPH[Lº:\YNPJHS;YLH[TLU[»*HSS
WARNING
Oil Filter:
(M[LY[OLÄYZ[OV\YZVMVWLYH[PVUJOHUNL[OLVPSÄS[LY;OLYLHM[LYL]LY`OV\YZVM\ZL
VY ZLHZVUHSS`JOHUNLÄS[LY
Refer to engine manual for engine maintenance.
. Tighten before operating.
MAINTENANCE, STORAGE AND
ESSENTIAL CHECKS BEFORE USE
Before performing maintenance, the log splitter must be placed in maintenance mode.
To do so follow these steps:
1.) Turn off engine
2.) Move the control valve handle (4a) forward and backward to relieve Hydraulic Pressure.
After performing maintenance, make sure all guards, shields and safety features are put
back in place. Failure to follow this warning can result in serious injury.
Essential checks before each use
•Before storing, make sure the log splitter is clean and dry for years of trouble-free service.
•Lightly lubricate all log splitter surface and moving parts to prevent rust.
•Store indoors or protected area during severe weather and winter months.
•It is essential to fully retract axe head, ensuring no silver part of piston rod is exposed to
the elements.
Storage

-\LS*HW
-\LS;HUR
6PS+YHPU7S\N
6PS-PSSLY*HW+PWZ[PJR
7;6:OHM[
4\ɊLY
:WHYR7S\N
*OVRL3L]LY
-\LS=HS]L3L]LY
:[HY[LY.YPW
9LJVPS:[HY[LY
(PY*SLHULY
ENGINE COMPONENTS
2
1
34
5
7
6
12 11
10
8
9
For more information on Engine Operation & Engine Maintenance please refer to
engine manual supplied with the log splitter.
:7,*0-0*(;065:
;LZ[LK:WSP[[PUN-VYJL
-HZ[LZ[*`JSL;PTL
Solid Splitting Wedge Size
/`KYH\SPJ;HUR*HWHJP[`
4H_3VN3LUN[O
4H_3VN>LPNO[
Coupler Ball Size
;`YL:PaL
4H_;V^PUN:WLLK
*`SPUKLY:PaL
4H_7YLZZ\YL
/`KYH\SPJ-S\PK;`WL
Gear Pump
4H_-SV^*HWHJP[`
*VU[YVS=HS]L
Weight
Height
Width
Length
30000kgs
15 Seconds
20cm(8”)
14 Litres
600mm (24”)
45kgs (100Lbs)
50mm
40mm (16”)
2TWLYOV\Y
41/2” x 223/4”
3500 psi
10W-AW32 &/or 10W-AW46
2 stage
374
Detent (auto-return)
2N
TT¹
T
T
6]LYHSS+PTLUZPVUZVM[OLSVNZWSP[[LY^OLUOVYPaVU[HS

15.
Warranty Information
Please note down for future reference
RedGum Splitter Model:
RedGum Deluxe Logsplitter
Date of Purchase:..............................................................................................
Serial Number:...................................................................................................
Purchased from: ................................................................................................
The manufacturer reserves the right to make improvements in design and/or changes in
eviously
sold.
Warranty and Service Information
Congratulations on the purchase of your new RedGum product. RedGum products assist
you to complete the “job at hand” in an economical, safe and efficient manner.
This brochure explains the warranty and maintenance information for your product. This
combined with your Owner’s Manual and the knowledge and expertise offered to you by
your RedGum Dealer, should provide you with the confidence that your decision to
purchase a RedGum product was a good one.
STATEMENT OF WARRANTY
This statement of warranty applies to RedGum products and has been offered by the
RedShed. The RedShed provides warranty to the initial purchaser of this product (who has
purchased it from the RedShed directly or an authorised RedGum dealer) for a period
commencing from the date of purchase.
If the product is found to be defective, in the RedShed’s opinion (due to fault of the
manufacturer) within the warranty period, the RedShed will carry out the repair or
replacement to the customer Free of charge, providing;
- The fault is reported directly to the RedShed or place of purchase.
- Proof of purchase is provided.
- The fault is not caused by misuse, neglect or incorrect adjustment by the user.
- The failure has not occurred through normal wear and tear.
- The product has not been serviced, repaired or alterations made by any one not
authorised by the RedShed.

WHAT IS NOT COVERED BY WARRANTY
16.
The following items are not covered by this warranty;
- Normal maintenance items which become worn through
use, including, but not limited to, belts, blades, oil, blade
ropes, clutches and sprockets.
- Natural discoloration of material due to sunlight.
- Engines not manufactured by RedGum, these items
are covered by the respective original equipment
manufacturers’ warranty, all claims must be sent to the
appropriate manufacturer’s agents.
- Using stale or contaminated fuel in the product.
- Damage or failure caused by accident, misuse and/or
neglect, including, ingress of dirt, abrasives, moisture, rust
& corrosion, and damage due as a result of inadequate
maintenance.
- Failure to operate or maintain the unit in accordance
with the Owners/Operators manual, this handbook or
instruction given by a RedGum dealer.
use of the product or affect the product’s performance,
operation, safety or durability, or causes the product to
fail to comply with any applicable laws.
- Damage due to incorrect usage such as incorrect log
placement as shown in the product’s Owners Manual.
- Additional damage to parts or components due to
continued use occuring after any of the above.
The following list is a guide to the types of items for which
a charge will be made (unless failure is caused by a
Service:
replaced in line with the maintenance schedule shown in
this handbook.
Mechanical Adjustments: Including engine tuning,
adjusting brakes, belts & clutches, etc.
Drive System: Sprockets, belts, clutches, pulleys and
bearings all wear and will require replacement.
Cutting Equipment: Blades, cutting discs and hammers
wear during use and sharpening/replacement is required
as a matter of normal maintenance.
ITEMS FOR WHICH A CHARGE WILL
BE MADE
YOUR RIGHTS AS A CUSTOMER
The New Product Warranty that is provided by the
RedShed on RedGum products is in addition to the rights
and remedies conferred on consumers by the relevant
authorities and/or legislation. The warranty does not affect
those rights or remedies, except to the extent that their
application may lawfully be excluded.
Any consequential, direct or incidental loss or damage is
not covered by the warranty. Any statutory or other rights or
remedies available in connection with a claim for such loss
or damage should be pursued separately.
Spark Plugs: Periodic replacement is required to ensure
maximum engine performance and best fuel economy.
Induction/Combustion System: The removal of deposits
and cleaning may be required from time to time and should
be performed as necessary.
Tyres: Are subject to wear and with contact from external
not a warrantable
item.
External Surfaces, Paint, Trim and other Appearance
items: Are affected by normal wear and tear and exposure
to environmental conditions. A charge will be made for paint
and trim items that require attention due to causes outside
the manufacturer’s control.
Hydraulics:
The frequency of replacement, repair or adjustment will
depend mainly on where and how you use your product,
weather, atmospheric and environmental conditions and
frequency of use.
CUSTOMER RESPONSIBILITIES
The customer must provide to the Authorised RedGum
Dealer proof of purchase information such as a receipt.
The product must exhibit reasonable care in the
maintenance, operation, storage and general upkeep
pratices as explained in the maintenance section of the
Owners/Operators Manual or this handbook. This includes
the whole product or any general wear item or component
on the product. Any costs incurred to obtain warranty
consideration or services is the customer’s responsibility,
including shipping and handling, travel expenses, lost time,
lost production or pickup and delivery.
NOTES

THE WARRANTY PERIODS
The warranty periods below commence on the date of purchase.
WHERE TO GO FOR WARRANTY REPAIRS
Take your product to any authorised RedGum Dealer if it needs warranty repairs. All authorised
RedGum Dealers will honour the New Product Warranty, and will repair, replace or adjust free of
charge any part of your product that is defective in factory materials or workmanship. Please
note that RedGum is unable to reimburse the cost of repairs carried out during the warranty
period by a repairer other than an Authorised Servicing Dealer.
For your nearest authorised RedGum servicing dealer visit
www.RedGumProducts.com.au or Call Toll Free 1300 136 572
Customer RedGum
Splitter
RedGum
Chipper
Private/Domestic 24 months 12 Months
Commercial 3 months 3 Months
NOTE:
- Engines are covered by the respective original equipment
manufacturers warranty and claims are made direct to the
manufacturer agent.
- Replacement parts and accessories fitted during a repair under
terms of warranty will enjoy cover for the remainder of the warranty
period of the finished product.
- Warranty claims may only be made through an Authorised
RedGum Dealer.
COMPONENT L/S C/S Interval
1 2 3 4
Complete Unit
On Off Switch
Choke/Primer
Engine Oil
Throttle Lever
Cables and
Connections
Fuel Filter
Carburettor
Air Filter
Clutch
Spark Plug
Cooling Fins
Starter Cord
Starter Housing
Vents
Spark Arrestor
All Screws, Nuts &
Linkage
I I I/C I
I I I I
I/A I I/A I
I R R I
I I I I
I/A I I/A I
I I R
T T T
I I C/R I/C
I I I
I I/C R I
I I/C C C
I I I I
I I/C C C
I I I/R I
I I I I
Yes
Yes
Yes
Yes
Yes
Yes
Yes
Yes
Yes
No
Yes
Yes
Yes
Yes
Yes
Yes
Yes
Yes
Yes
Yes
Yes
Yes
Yes
Yes
Yes
Yes
Yes
Yes
Yes
Yes
Yes
Yes
MAINTENANCE SCHEDULE
COMPONENT L/S C/S Interval
1 2 3 4
Anti Vibration
Mounts
Hydraulic Oil
Hydraulic Oil Pump
Hoses
Hydraulic Fittings
Beam
Control Valve
Belts
Blades
Flails/Hammers
I I I
I I I/R I
I I I I/A
I I I I
I I I/C I/C
I I I I
I I I I
I I I/A
I I I/R
I I I/R
Yes
Yes
Yes
Yes
Yes
Yes
Yes
No
No
No
Yes
No
No
No
No
No
No
Yes
Yes
Yes
LEGEND: L/S = Log Splitter, C/S = Chipper Shredder
I = Inspect, T = Tune, R = Replace, C = Clean, S = Sharpen, A = Adjust,
L = Lubricate
INTERVAL:
1 = Pre Delivery, 2 = First Service, 3 = Dealer Service, 4 = Every time the
machine is used
DEALER SERVICE:
17.

18.
NOTES

19.
NOTES

High quality hydraulic oil fluid - ideal for topping up the logsplitter’s hydraulic reserve, when required.3.) RedGum Logsplitter Dust Cover - RRP $99
Heavy-duty 200D logsplitter cover for superior protection
against dust, dirt and heavy rain!
BRAND NEW ACCESSORY - CHECK IT OUT!
RedGum Vertical Splitting Plate - RRP $179
A new innovation by RedGum, this accessory is
compatible with all non-lifter RedGum logsplitters.
As an alternative to the Log Turn Table, this
stationary plate makes vertical splitting of logs
super simple and pain-free!
RedGum Logsplitter Accessories Available
Table of contents
Other Redgum Media Converter manuals
Popular Media Converter manuals by other brands

Scheppach
Scheppach HSC130 Translation from the Original Operating Manual

Monico
Monico CDL Installation and operation guide

MiLAN
MiLAN MIL-185C installation guide

TR-Electronic
TR-Electronic CMW582M-00015 Assembly instructions

Murata
Murata PE25200 user manual

Shinybow USA
Shinybow USA SB-6357 instruction manual