Redsail X700 User manual

Laser Engraver
User Manual
Applicable models:X700 、X900
济南红帆科技有限公司
R E D S A I L T E C H C O . , L T D

This type of laser machine is class GB4
laser product.Please be careful about the laser
radiation, avoid raying to eyes or skin by
direct or scattered radiation!

X700 / X900 Laser Machine User Manual
2
济南红帆科技有限公司
Redsail Tech Co., Ltd
h t t p : / / w w w . h f l a s e r . c o m
Contents
Chapter One Preface................................................................................................................................................3
Chapter Two Summary
2.1 Characteristics...........................................................................................................................................................4
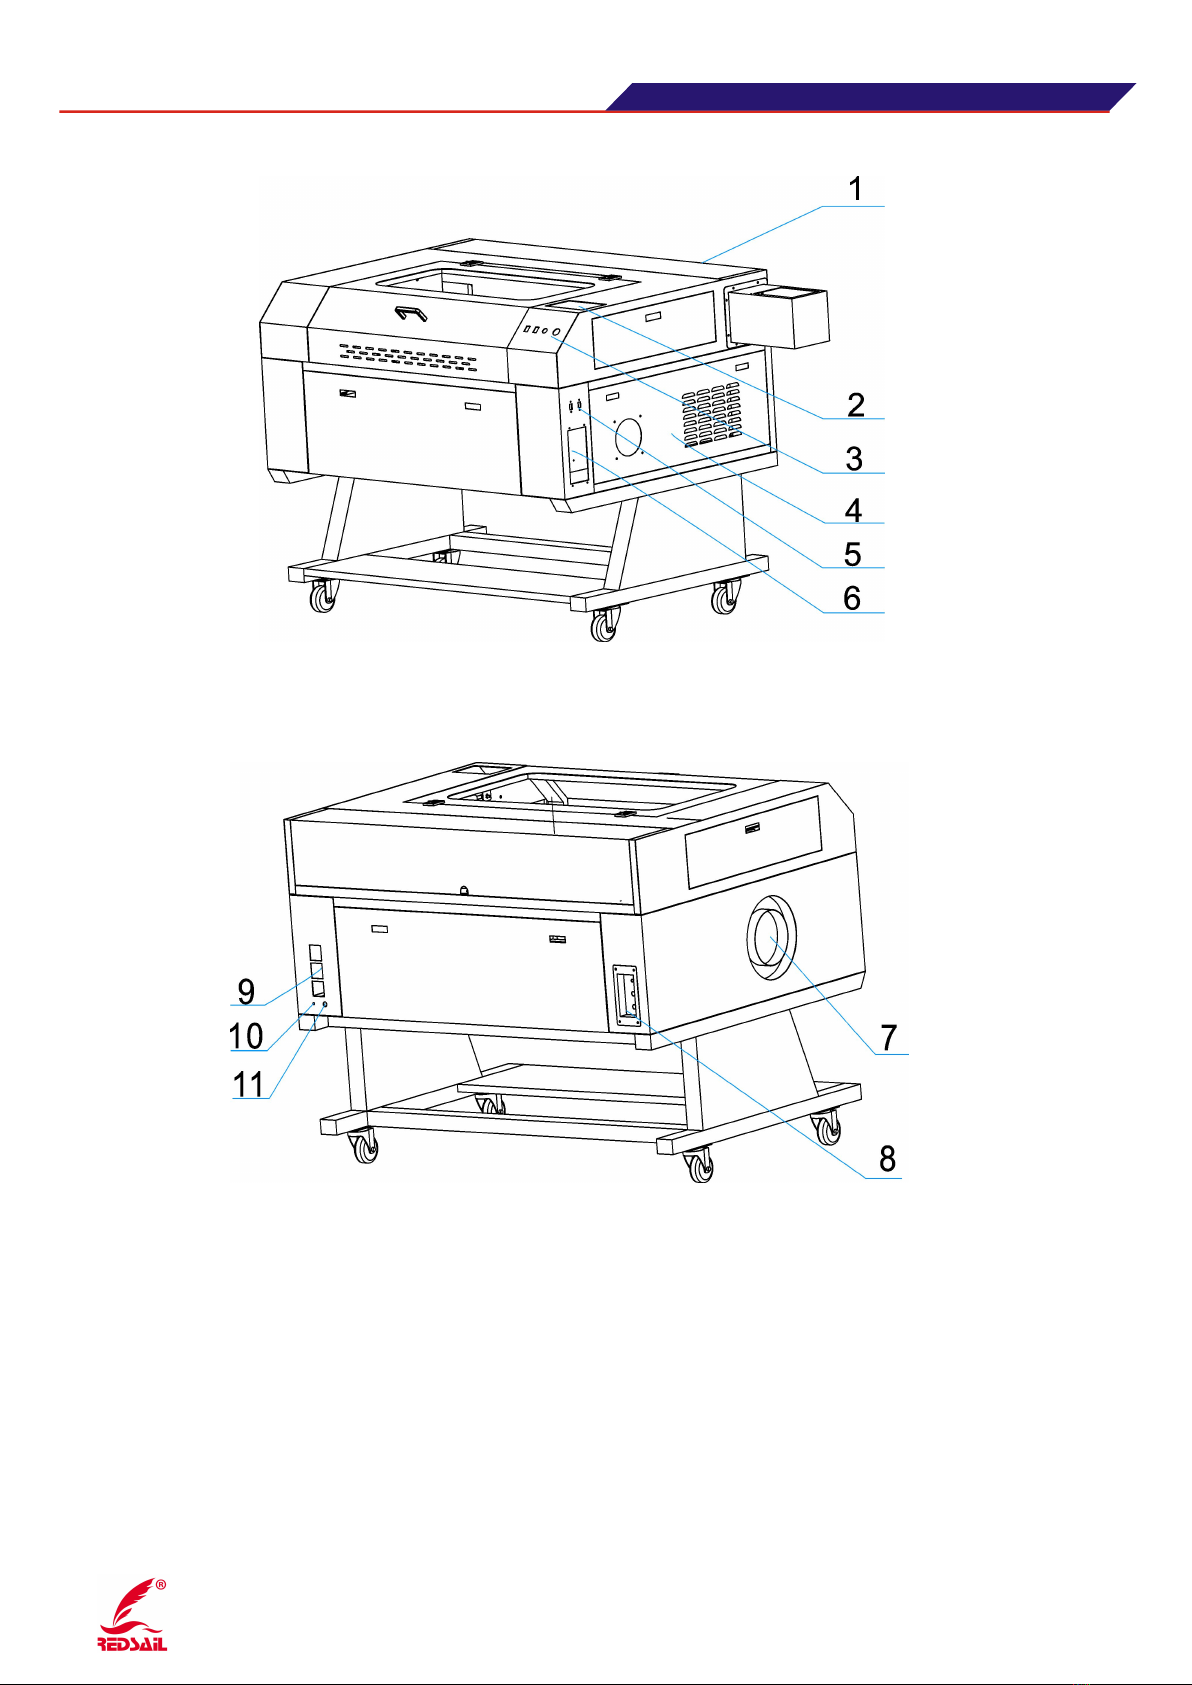
2.2 Introduction of main parts..........................................................................................................................................5
Chapter Three Installation and description of accessories
3.1 How to Install Laser Tube..........................................................................................................................................6
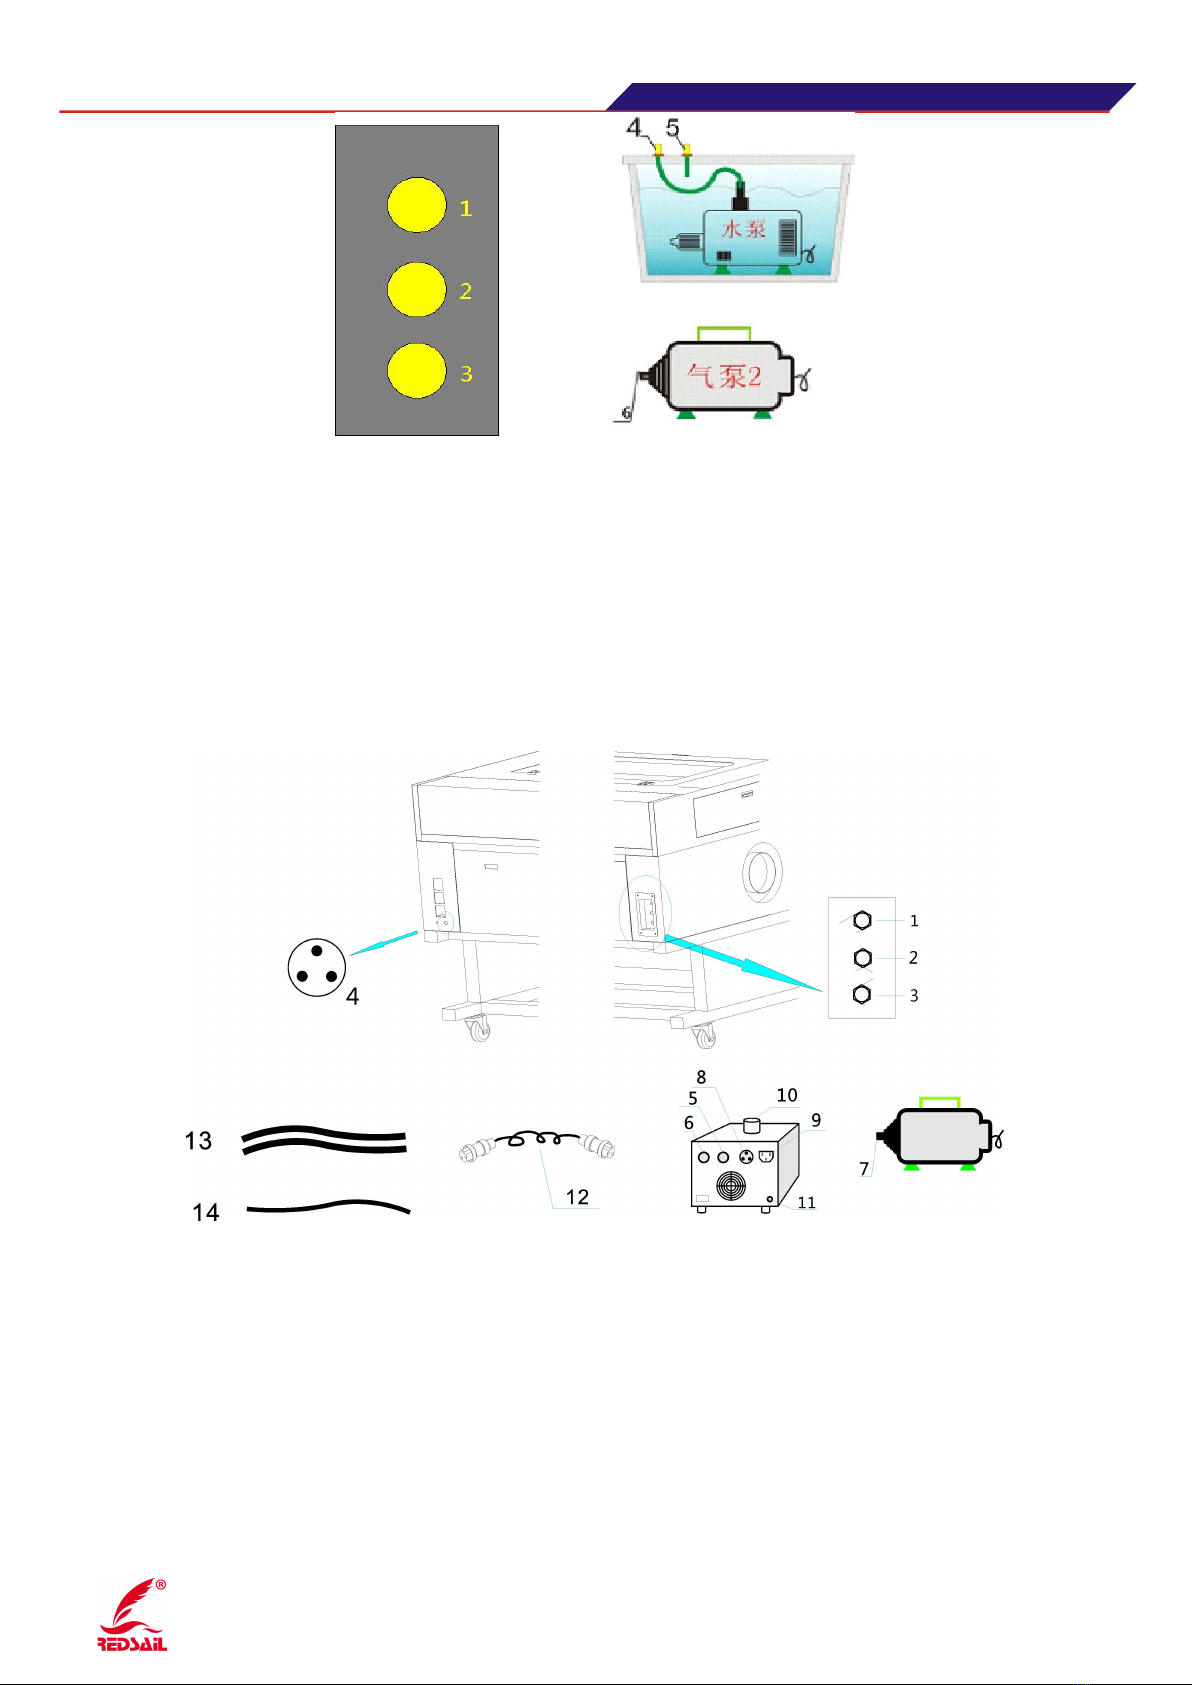
3.2 How to connect water pipe, air pipe and air pump..............................................................................................6
3.3 How to connect the ventilators to ventilation tube...............................................................................................9
3.4 How to install the lamp........................................................................................................................................9
3.5 The instruction of the Power master control switch............................................................................................10
3.6 The instruction of the power deputy control switch............................................................................................10
3.7 How to connect USB cable..............................................................................................................................11
Chapter Four The operation instructions of the equipment
4.1 How to install software.......................................................................................................................................11
4.2 How to adjust laser beam path...........................................................................................................................12
Chapter Five Processing operation of the equipment.................................................................................................14
Chapter Six Maintenance and notes of the equipment
6.1 How to connect to ground wire..........................................................................................................................15
6.2 Maintenance of the equipment..........................................................................................................................15
6.3 Notes of the equipment.....................................................................................................................................16

X700 / X900 Laser Machine User Manual
3
济南红帆科技有限公司
Redsail Tech Co., Ltd
h t t p : / / w w w . h f l a s e r . c o m
Chapter One Preface
Sincerely thank you for choosing REDSAIL products!
This manual includes some notes and guidances about installation, test, use, the troubleshooting and daily
maintenance. In order to use it safety and correctly, please read this instruction carefully and fully understand
before operation. And please keep it well for reference in the future.
If you have any suggestions to our products or need our assistance, please call at 0531-86516855/56/57, or fax
to 0531-86516858.
Notes:
* Please turn off the power, before wiring.
* Electronic components inside the device are particularly sensitive to static electricity, so please don’t put the
foreign objects inside the device or touch the main circuit board.
1. After cutting off AC power, before the indicator light driver, main board, laser power supply turned off. There
still have high voltage inside the device, very dangerous, please don’t touch the internal circuit and components.
2. Be sure the equipment is grounding properly.
The range of application of this manual:
This manual is applicable to our X700/X900 series laser engraving and cutting machines.

X700 / X900 Laser Machine User Manual
4
济南红帆科技有限公司
Redsail Tech Co., Ltd
h t t p : / / w w w . h f l a s e r . c o m
Chapter Two Summary
This series of laser engraving machine adopts high performance two-phase stepper
motor and two-phase stepper driver, with the high speed engraving and high running
accuracy.
2.1 Characteristics:
Model
X700
X900
Laser tube
Water cooling sealed glass CO2
Control system
DSP Control system
Control software
AutoLaser
Working type
Engraving / Cutting / Punching
Image form
Plt. Ai. Dxf. Bmp. Jpg. Dst. etc.
PC interface
USB/U-Disk, support Coreldraw. AutoCAD output
directly.
Drive type
Two-phase stepper motor
Motion mode
High speed profiles bearing nylon wheel
Laser power
50W( 60W optional)
60W
Laser cooling system
Water cooling
Working size(mm)
700*500
900*600
Up and down platform (mm)
200
Working platform
Blade bed platform ( honeycomb platform optional)
Front and rear through material
Yes
Open cover protection
Yes
The workbench auxiliary lighting
Yes
The exhaust system
Yes
Assistant laser head blow
Yes
The red assistance instruction
Optional
The rotary axis system
Optional
The total power of laser machine
<1000W
Power
AC 220V±10%/50~60HZ
Machine dimensions (mm)
1160*870*950(50W)
1410*870*950(60W)
1360*970*950

X700 / X900 Laser Machine User Manual
5
济南红帆科技有限公司
Redsail Tech Co., Ltd
h t t p : / / w w w . h f l a s e r . c o m
2.2 Instruction of main parts
Note : 1. Rear cover ( the place of laser tube, refer to 3.1)
2. The control panel
3. Assistance control switch
4. Switch box( distribution box)
5. USB input
6. The main control switch
7. Ventilator installation area
8. Water, air pipe installation area
9. Socket of the power output
10. Ground interface
11. Aviation plug installation area

X700 / X900 Laser Machine User Manual
6
济南红帆科技有限公司
Redsail Tech Co., Ltd
h t t p : / / w w w . h f l a s e r . c o m
Chapter Three Installation and description of accessories
3.1 How to install laser tube
1. Reflecting mirror frame 2. Water outlet 3. Cathode- 4.Water inlet 5. Anode+
6.holder of the laser tube 7. The laser light outlet
(Picture 1)
Please refer to figure 1 when installing the laser tube. According to the
instructions of the picture,position the anode(red wire) and cathode
wire(black/blue wire) on the laser tube with electric iron(note: the time of the
electric iron connect to the laser tube can’t last too long, in case of high
temperature burnt the laser tube),can’t virtual welding. Later, please wrap it
by high pressure adhesive tape.
After welding, please connect the water outlet pipe with the water outlet of
the laser tube, same connection for the water inlet pipe with the water inlet of
the laser tube( the connection of the water pipe follows the principle of water
from the anode to the outflow from the cathode).
3.2 how to connect water pipe, air pipe and air pump
3.2.1.1 ( how to install water pump)

X700 / X900 Laser Machine User Manual
7
济南红帆科技有限公司
Redsail Tech Co., Ltd
h t t p : / / w w w . h f l a s e r . c o m
Figure 2(2-1)
Note : 1. Water inlet 2. Water outlet 3. Air inlet 4. Water outlet 5. Water inlet 6.
Air outlet
Step of installation: 1--4 2--5 3--6
3.2.1.2( How to install the industrial chiller)
Figure 2 (2-2)
Notes: 1. Water inlet 2. Water outlet 3. Air inlet 4. Signal input of the water cooling
machine 5. Water outlet of the water cooling 6. Water inlet of the water cooling 7.air
pump 8.signal output of the water cooling machine 9. Power input 10. Water inlet of
the water cooling machine. 11. Water outlet 12. The signal wire of the water cooling
machine 13. Water pipe(2 pieces) 14. Air pipe
Installation Steps: 13(1--5) 13(2--6) 14(3--7) 12(4--8)

X700 / X900 Laser Machine User Manual
8
济南红帆科技有限公司
Redsail Tech Co., Ltd
h t t p : / / w w w . h f l a s e r . c o m
3.2.1 How to connect water pipe, air pipe and water pump( industrial chiller)
(1) Please fill the tank with water before connecting( the water level should exceed
the 3/4 of the tank, fooled the water pump)
(2) please connect the water pipe and air pipe according the figure 2.
3.2.2 the effect of the attachment:
(1) the effect of the air pump:
1. Prevent the device from the dust produced by processing the materials into the
gas nozzle, pollute focus lens.
2. Blow away dust generated during working, keep the shading of depth flat.
3. During processing, it can blow out the flame product by flammable objects.
(2) the effect of the water pump( water-cooling machine)
Must ensure the laser tube is filled with circulating water machine before working,
otherwise it will burn out the laser tube, causing irreparable damage.
When the Water, please be sure to keep the water clean, Dirty water will affect the
laser light effect and reduce the laser tube’s life( we recommended to use purified
water).
While pay attention to the water temperature, it should not exceed 35 degrees during
working. Higher temperature can cause the laser tube does not work regularly, even to
burn the laser tube.
In the north, when using the laser cutting machine in winter, the water temperature
within the tank can’t be less than 0℃. Finished the work, must be empty the water
in the laser tube, to prevent the laser tube freezing burst,the water should be at least
3/4 in the tank.

X700 / X900 Laser Machine User Manual
9
济南红帆科技有限公司
Redsail Tech Co., Ltd
h t t p : / / w w w . h f l a s e r . c o m
3.3 How to connect the ventilators to ventilation pipe
(Figure 3)
Note : 1. The mounting holes of ventilator 2. Ventilation pipe 3.ventilator (fan)
Connect the ventilator to the machine:
1.Air the end of the tube (2) on the fan outlet (1) and secure it. Then the vent pipe
is placed outdoors
2.Connect the other end of the ventilation pipe attached to the device vents(1), and
make reasonable fixed to improve the effect of exhaust smoke.
3.4 How to install the lamp
(Figure 4)
Install : figure 4, install the light tube(1) to fixed mount(2), and plug the lamp
power into the tube groove.

X700 / X900 Laser Machine User Manual
10
济南红帆科技有限公司
Redsail Tech Co., Ltd
h t t p : / / w w w . h f l a s e r . c o m
3.5 The instruction of the power master control switch
(Figure 5)
1. Total power switch: control the total power supply of the equipment 2. The switch of the lamp:
control the lamp power of the equipment 3. the switch of the laser: control the laser tube 4. Input
power of the equipment is 220V.
3.6 The instruction of the power deputy control switch
(Figure 6)
1. Emergency stop switch: responsible for controlling the total power ( except the lamp),
when the machine appears unusual situation, please press the button quickly, cut off
the power quickly!
2. Open cover protection knob: cooperate shrapnel switch(5) with upper cover door(6),
when the key turn to right, close to upper cover or not, all are working. When the
key switch is turn on,and close the upper cover door, click to “continue”, the machine
starts to work. When open the cover, the machine suspend work.
3. Red dot(optional): when the switch was turned on, the red dot light( install on the
laser head), return to original,indicate the light position.
4. Temporary empty
5. Shrapnel

X700 / X900 Laser Machine User Manual
11
济南红帆科技有限公司
Redsail Tech Co., Ltd
h t t p : / / w w w . h f l a s e r . c o m
6. Upper cover door
3.7 The connection of the USB Cable
Please connect the USB data cable with the control card USB port and PC USB port.( figure
6)
( Figure 7)
Note : 1. USB interface 2. USB date wire 3. Computer USB port
The device system supports to work offline. Methods: transfer the graphics
parameters in the software to the U disk.then insert the U disk into the USB port
of the device.through the control panel tips, can transfer data to the control
card directly. Completed the download,to realize the offline function.
Chapter Four User Manual of equipment
4.1 Install and use software
Please turn on the power of machine when install software(USB cable connected
well),copy CD contents to PC for back-up.Install software with reference to “System
operation User Manual”.
You can know software clearly and all functions of control panel after reading “System
operation User Manual”.

X700 / X900 Laser Machine User Manual
12
济南红帆科技有限公司
Redsail Tech Co., Ltd
h t t p : / / w w w . h f l a s e r . c o m
4.2 User manual of Laser Beam Path Adjustment
Please switch on the power of chiller(on the front of chiller)after connecting all
accessories,then turn on the switch of machine(leakage protector,emergency switch and
switch of Main Power included) after water circulation good inside the tube.
How to adjust Laser Beam Path:
This is the important step when use laser engraver. We just can engrave and cut
when laser beam path is at good place.It will affect the quality of laser engraving,
and cutting.
Steps:
Step1: Regulate testing power below 50%, then laser power won’t be too much strong.
Step 2:The adjustment of laser tube and the first reflecting mirror.
Put masking paper at the front of the first mirror, press “点射/Pulse” button(just press gently and can
see laser spot on paper is OK), if laser spot at the center, this step done; if not on the mirror or out of
place, we can adjust the position and height of the first mirror frame(or laser tube) to get it. (Figure 8)
(Figure 8)
1. Masking Paper 2 testing spot 3.Adjusting screw 4.reflector frame
Step 3: The adjustment of the first mirror and the second mirror:
Put masking paper in the front of the second mirror. Move the guide rail to the left top corner,
press“点射/Pulse” button, check the position of laser spot. Then move guide rail to the left bottom
corner, press “ 点 射 /Pulse” button, check whether these two spots(the left top corner and the left
bottom corner) coincide. If coincide and spots at the center of mirror, then this laser path is good. If
not coincide, we can adjust screw at the back of the first reflecting mirror frame to let them

X700 / X900 Laser Machine User Manual
13
济南红帆科技有限公司
Redsail Tech Co., Ltd
h t t p : / / w w w . h f l a s e r . c o m
coincide(Figure 9).
The first Mirror frame The second Mirror frame
(Figure 9)
Step 4: The adjustment of the second mirror and the third mirror
Please move the laser head to the left end of X axis, put masking paper int he front of the little hole of
laser head, gently press “点射/Pulse” and see laser spot, then move laser head to the right end, press
“点射/Pulse” again, if two spots coincide, then laser path here is correct.
Not coincide, please adjust screws of the second mirror to get it. (Note: it’s same as Step 3) (Figure
10)
Laser Head The second mirror frame
(Figure 10)
Step 5: The adjustment of the third mirror and focus lens
Put masking paper and press “点射/Pulse”,laser spot should be at the center of paper. If not, we can
regulate the position of laser head to get(three screws of laser head) (Figure 11)

X700 / X900 Laser Machine User Manual
14
济南红帆科技有限公司
Redsail Tech Co., Ltd
h t t p : / / w w w . h f l a s e r . c o m
(Figure 11)
Step 6: Laser Processing
Laser path is OK, you can(Figure 12)
(Figure 12)
Chapter Five The processing of equipment
Please download the working file to laser machine with reference to “System operation user manual”.
5.1 Please put the processing materials on the working table(attention: please keep smooth of
materials , or else, will affect processing quality)
5.2 Click Up, Down buttons, move laser head to the right place, and confirm origin (Click
“Origin”button.)
5.3 Adjust focal length(Figure 12)
5.4 Click the “Start” key of control panel, start working.

X700 / X900 Laser Machine User Manual
15
济南红帆科技有限公司
Redsail Tech Co., Ltd
h t t p : / / w w w . h f l a s e r . c o m
Chapter Six The maintenance of equipment and Notes
For machine’s stable working, day-to-day maintenance is the key. Good maintenance, can prolong the span life of
machine, reduce fault rate and improve product quality. Please refer to below instructions:
The key to make sure machine work stably is the maintenance. Good maintenance, can
prolong the span life of machine, reduce the and release the quality of machine.
6.1 Connection of ground wire
Power supply,Laser power supply, and filter etc. Sensitive components,will produce
static disturbances.For reducing disturbances, and the faults by static electricity,
please attentions notes as follows:
6.1.1 The voltage is 220V, if exceed or not stable, please use voltage regulator.
6.1.2 Left “” right “”, the standard connection for power supply socket with good
ground wire connection.
6.1.3 Ground wire(or An iron bar longer than 1m,make sure ground connection).
Then can set up machine.
6.2 The maintenance of Equipment
6.2.1 Change water and Clean water tank(suggest to change every week).
Attention: Guarantee circulating water inside laser tube before working.
The quality and temperature of circulating water will matter the working life of tube, it
would be better to use pure water, below 35℃. Once exceed 35℃, please change water, or
add ice to lower water temperature(You can choose or use two water tanks).
Clean water tank(change water): Firstly, turn off the power, take out water pipe, water poo,
take out water pipe and signal wire. Open water tank, clean and change circulating water,
connect water pipe and signal wire, check all connectors. Turn on the power, and running
2-3 minutes. (circulating water is full in laser tube)
6.2.2 The cleaning of exhaust fan
Long time using, will get some dusts inside, make exhaust fan noisy, not good for
exhausting and . Turn off the power, clean it,
6.2.3 Clean Mirrors and Lens(it would be better to clean every day before working, when machine
is turned off)
There has 3pcs reflecting mirrors and 1piece focus lens(No. 1 mirror at the exit of laser
tube--the left top corner of machine, No. 2 mirror at the left end of beam, No. 3 mirror at the

X700 / X900 Laser Machine User Manual
16
济南红帆科技有限公司
Redsail Tech Co., Ltd
h t t p : / / w w w . h f l a s e r . c o m
top of laser head. Focus lens in the barrel of the of laser head). Mirrors and lens are easy to
dirty, cause wastage, please take out No. 1 and No. 2 mirrors when clean them.
Notes:
(1) Please clean gently, protect the coating film.
(2) Be careful during cleaning.
(3) Please the convex surface down when install focus lens.
6.2.4 Guide Rail Cleaning (One time every half month, operate when turn off)
6.2.5 Fasten screws and Shaft coupling
After working a while, screws and Shaft coupling at joints will be loosen,it
will affect stability of mechanical movement, when have abnormal
situation,please fasten and maintain in time. We can fasten every screws after
working a while. Please fasten after using about one month.
6.2.6 The checking of Laser path
Laser engraver’s optical system is made by mirror’s reflecting and lens’
focus,suggest users to check laser beam path every working time.
6.3 Notes for equipment
6.3.1 Pay more attention, please, water first before turn on machine, and check water circulation
at any time during working, make sure good water circulation to protect .
6.3.2 Sequence of switch on and off machine: Switch on machine, Industrial chiller first, then
power switch, laser power switch last. Switch off, laser switch first, then power switch,
industrial chiller last.
6.3.3 Control the temperature of water inside laser tube, can not exceed 35, please draw off water
after using in Winter, or else, will frozen laser tube.
6.3.4 Keep machine cleaning, especially mirrors and lens, once dirty, will please use cotton swab
and absolute alcohol to clear mirrors and lens gently to protect the surface.
6.3.5 Store away from combustible and explosive goods, please don’t store any reflecting goods
on platform.
6.3.6 When machine working, operator can not leave, please watch machine at any time,
any urgent, please turn off the power at once.
6.3.7 The ground wire is very important, must connect ground wire with machine, and use the

X700 / X900 Laser Machine User Manual
17
济南红帆科技有限公司
Redsail Tech Co., Ltd
h t t p : / / w w w . h f l a s e r . c o m
same power strip for machine and computer.
Special Statement: Redsail reserves the right to change user
manual contents and products specifications without the
notice.All information has been checked carefully, in
order to being accurate.Any changes of products,please
forgive without the notice.
济南红帆科技有限公司
R E D S A I L T E C H C O . , L T D
Other manuals for X700
1
This manual suits for next models
1
Table of contents
Popular Cutter manuals by other brands

Cembre
Cembre HT-TC026 Operation and maintenance manual

Huskie Tools
Huskie Tools REC-S524H Operating instructions manual

Textron
Textron Klauke K106/1 instruction manual

Duplo
Duplo DocuCutter CC-330 Service and parts manual

Sparta
Sparta Huskie Tools REC-SB624H Operation manual

Mac allister
Mac allister MBCP33-4 manual