Herzlichen Glückwunsch zum Erwerb Ihres neuen reer
Babykostwärmers. Wir sind sicher, Sie werden lange
Zeit Freude an der Qualität unseres Produktes haben.
Bitte lesen Sie sich die Sicherheitshinweise sorgfältig
durch. Nehmen Sie sich für die erste Benutzung bitte
genügend Zeit. Die Bedienungsanleitung muss stets
zusammen mit dem Produkt aufbewahrt und vor Ge-
brauch gelesen werden.
Bitte nehmen Sie sich ein paar Minuten Zeit um die
Sicherheitshinweise gründlich zu lesen. Befolgen Sie
die Anweisungen der Anleitung, da anderenfalls die
Gefahr besteht, dass der Babykostwärmer beschädigt
wird oder sich im schlimmsten Fall Ihr Kind, Sie selbst
oder andere Menschen in Gefahr gebracht oder verletzt
werden.
WICHTIG:
Nur wenn alle der hier aufgeführten Punkte gewährlei-
stet sind, dürfen Sie den reer Babykostwärmer beden-
kenlos verwenden
Seite 4
- Trennen Sie vor der Reinigung das Gerät unbedingt von der Stromversorgung!
- Reinigen Sie das Gerät nicht im heißen Zustand!
- Benutzen Sie zum Reinigen keine scharfen oder scheuernden Reinigungsmittel oder
Gegenstände, da dadurch die Geräteflächen angegriffen werden.
Hinweise zum Umweltschutz:
DDieses Produkt darf am Ende seiner Lebensdauer nicht über den normalen
Hausmüll entsorgt werden, sondern muss an einer Sammelstelle für das Recycling
von elektrischen Geräten abgegeben werden. Das Symbol auf dem Produkt, in
der Gebrauchsanleitung oder auf derVerpackung weist darauf hin. Die Werkstoffe
sind gemäß Ihrer Kennzeichnung wieder verwendbar. Mit der Wiederverwendung,
der stofflichen Verwertung oder anderen Formen der Verwertung von Altgeräten, leisten Sie einen
wichtigen Beitrag zum Schutze unserer Umwelt. Bitte fragen Sie bei Ihrer Gemeindeverwaltung nach
der zuständigen Entsorgungsstelle.
Wartung und Pegehinweise
2. Sicherheitshinweise für die Wartung und Pege
a) Geräteboden mit Heizplatte
b) Betriebsleuchte
c) Temperatureinstellung (Drehschalter)
3. Beschreibung und Inhalt
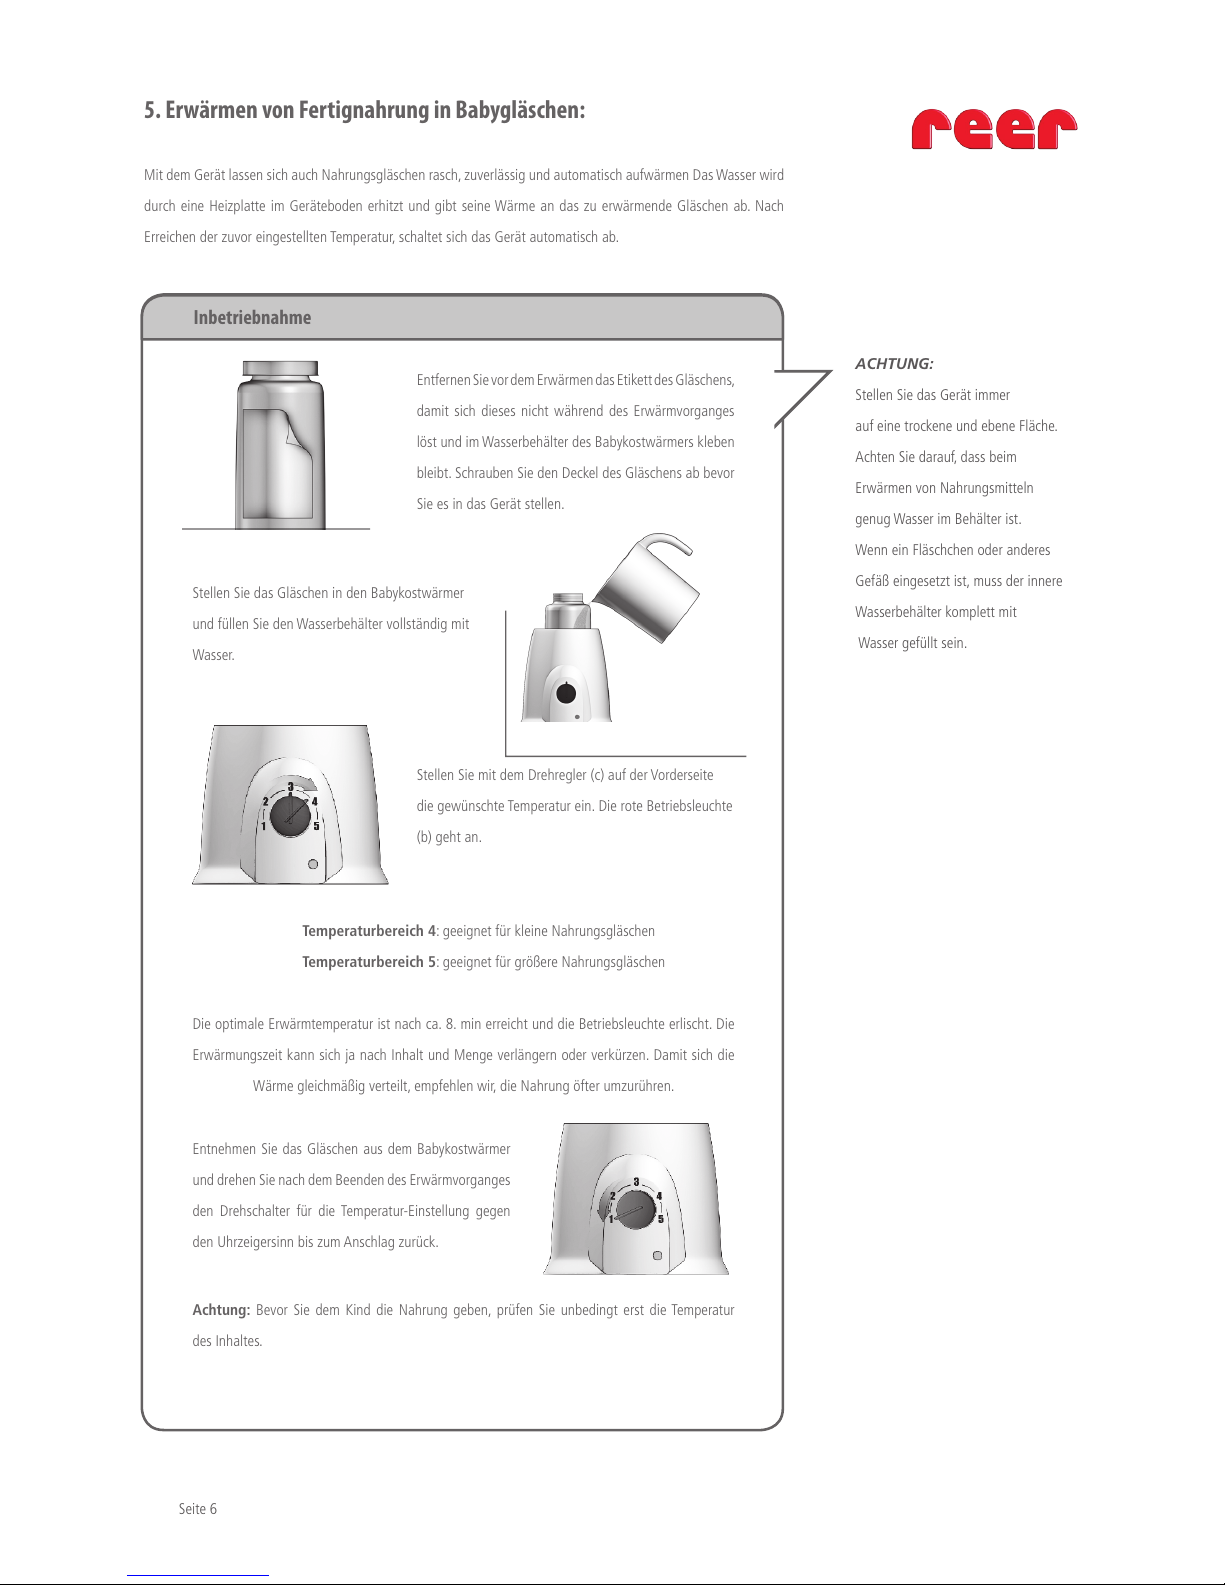
Mit dem Gerät lassen sich – durch Erhitzen von Wasser
– Babykost und andere dafür geeignete Nahrungsmittel
rasch, zuverlässig und automatisch aufwärmen Das Wasser
wird durch eine Heizplatte im Geräteboden erhitzt und
gibt seine Wärme an das zu erwärmende Nahrungsmittel
ab. Nach Erreichen der zuvor eingestellten Temperatur,
schaltet sich das Gerät automatisch ab.
c
b
a
Deutsch (D)
1. Übersicht der Sicherheits und Pegehinweise
Seite 3
Allgemeine Sicherheitshinweise:
•Benutzen Sie denArtikel nur zu dem vorgese-
henen Zweck und beachten Sie die Sicherheits-
hinweise.
•BeiAnzeichen von Mängeln und Beschädi-
gungen des Gerätes oder Netzkabels dieses nicht
verwenden
•Diese Gerät ist nur für den Gebrauch im Haushalt
vorgesehen
•Seien Sie gewarnt, dass sich die Oberfläche des
Heizelements während desWärmvorgangs erhitzt
und auch im Nachhinein noch Hitze abstrahlt
•Stecken Sie das Gerät nach jedem Gebrauch aus
und wischen Sie es mit einem feuchtenTuch nach,
um Kalk zu vermeiden
•Falls dieses Gerät je repariert werden muss, öffnen
Sie es unter keinen Umständen selbst. Stattdessen
kontaktieren Sie die in dieserAnleitung genannte
Adresse
•Funktion (insbesondere Drehregler für dieTempe-
ratursteuerung) regelmäßig überprüfen.
•Beseitigen Sie vor der erstenVerwendung sämt-
lichesVerpackungsmaterial sowie nicht verwen-
dete Bauteile, damit sich Ihr Kind nicht verletzen
oder etwas verschlucken kann.
•Gerät nur an Stromspannungen gemäßTypen-
schild am Geräteboden anschließen
•Gerät nicht innerhalb der Reichweite von Kindern
benutzen. Netzkabel sichern und darauf achten,
dass nicht versehentlich daran gezogen wird und
das Gerät dadurch zu Boden fällt.
•Kinder erkennen die Gefahr nicht, die beim
Umgang mit elektrischen Geräten entstehen kann.
•Kinder sollten beaufsichtigt werden, um sicher zu
stellen, dass sie nicht mit dem Gerät spielen.
•Personen (einschließlich Kinder), die aufgrund Ihrer
physischen, sensorischen oder geistigen Fähig-
keiten oder Ihrer Unerfahrenheit oder Unkenntnis
nicht in der Lage sind, das Gerät sicher zu
benutzen, sollten diese Gerät nicht ohneAufsicht
oderAnweisung durch eine verantwortliche
Person benutzen.
•Zum Betrieb muss das Gerät auf eine trockene
und ebene Fläche gestellt werden.
•Gerät niemals inWasser oder andere Flüssigkeiten
tauchen und nicht in der Spülmaschine reinigen,
sondern mit einem mitWasser und Spülmittel
befeuchtetenTuch reinigen und abwischen
•Das Gerät niemals ohneWasser betreiben und
niemals herumtragen, solange es in Betrieb ist.
•Gerät nach dem Gebrauch von der Stromversor-
gung trennen, um unbeabsichtigten Dauerbetrieb
zu vermeiden.
•Reparaturen dürfen nur von einer qualifizierten
Fachkraft durchgeführt werden. Unsachgemäße
Reparaturen können zu erheblichen Gefahren für
den Benutzer führen
•das gilt auch für dasAuswechseln des Netzkabels
•Kontaktieren Sie uns bei Fragen unter:
service @ reer.de