MOS8 / MOS16 QUICK INSTALLATION GUIDE
REER S.p.A. Via Carcano 32, 10153 Torino Italia 8541456 - Rev. 0 - 06/04/2021 1
Tel. +39 0112482215 r.a. Fax +39 011859867
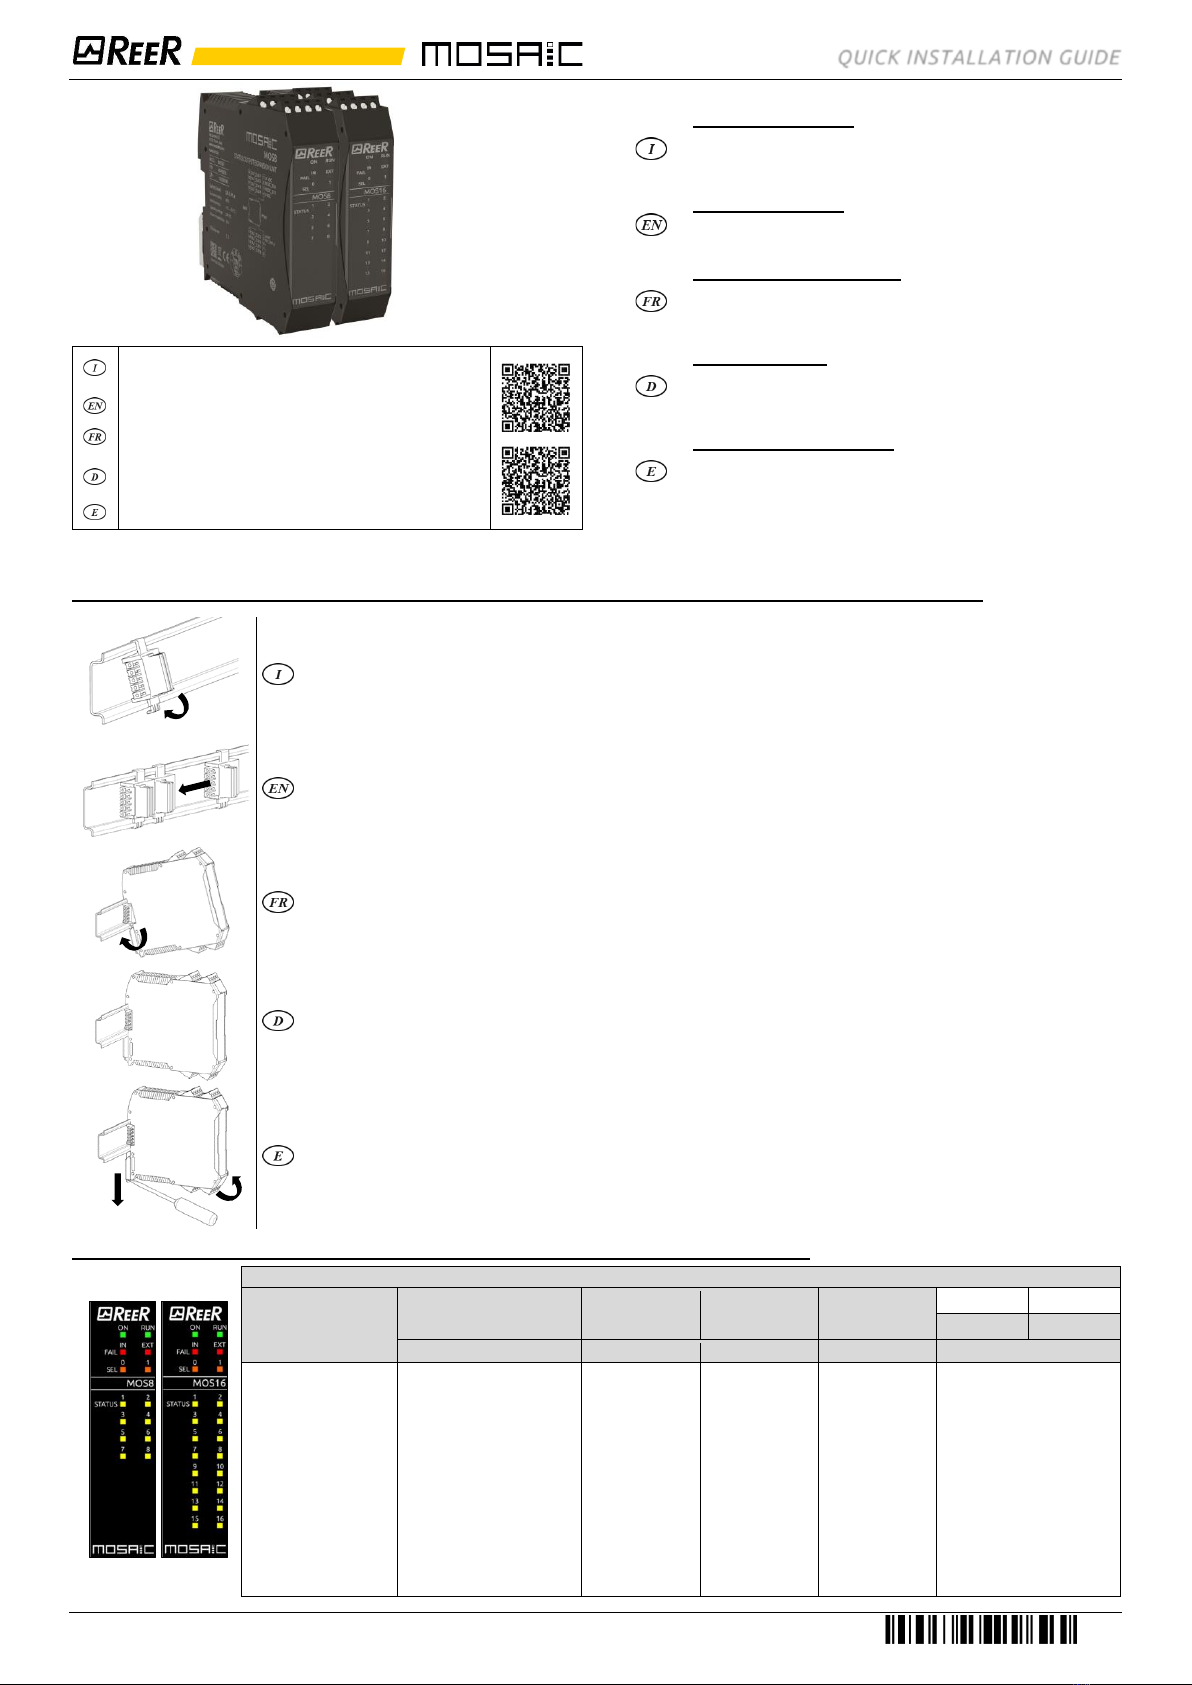
A) MONTAGGIO MECCANICO - MECHANICAL ASSEMBLY - MONTAGE MECANIQUE - BEFESTIGUNG - MONTAJE MECÁNICO
Le operazioni che seguono devono essere effettuate in assenza di alimentazione.
Fissare alla barra Omega DIN 35mm (EN 5022) un numero di connettori posteriori “MSC” a 5 poli uguale al numero di moduli da
montare (agganciandoli prima in alto). Collegare fra loro i connettori appena montati. Fissare quindi i moduli alla barra ponendo
attenzione a inserire la contattiera posta sul fondo del modulo sul rispettivo connettore. Premere il modulo delicatamente fino a
sentire lo scatto del bloccaggio. Per rimuovere un modulo è necessario tirare verso il basso (utilizzando un cacciavite) il gancio di
arresto posto sul retro del modulo; sollevare quindi il modulo dal basso e tirare.
Do not apply power supply before carry out the following operations.
Fix to the Omega DIN 35mm (EN 5022) the same number of "MSC" 5-pole rear panel connectors as the number of units to be
installed (hooking them at the top first). Connect between them the connectors just mounted. Fasten the units to the rail,
arranging the contacts on the base of the unit on the respective connector. Press the unit gently until you feel it snap into place.
To remove a unit, use a screwdriver to pull down the locking latch on the back of the unit; then lift the unit upwards and pull.
Les opérations suivantes doivent être effectuées en l'absence d'alimentation.
Fixer à la barre oméga DIN 35mm (EN 5022) un nombre de connecteurs arrière "MSC" à 5 pôles égal au nombre de modules à
monter (en les accrochant d'abord en haut). Connectez ensemble les connecteurs nouvellement montés. Fixer ensuite les
modules à la barre en faisant attention d’introduire le contact situé sur le fond du module dans le connecteur correspondant.
Appuyer délicatement sur le module jusqu’à entendre le déclic de blocage. Pour enlever un module, il faut tirer vers le bas (à l’aide
d’un tournevis) le crochet d’arrêt situé à l’arrière du module; puis soulever le module par le bas et tirer.
Die im Anschluss beschriebenen Vorgänge müssen bei unterbrochener Stromversorgung ausgeführt werden.
Befestigen Sie an der DIN 35mm-Omega-Schiene (EN 5022) eine der Anzahl der zu montierenden Module entsprechende Anzahl
von 5-poliger "MSC"-Rücksteckern (zuerst oben einhängen). Verbinden Sie die neu montierten Stecker miteinander. Dann die
Module an der Schiene befestigen und dabei darauf achten, die Kontaktvorrichtung auf dem Boden des Moduls auf den
entsprechenden Verbinder zu setzen. Das Modul vorsichtig einsetzen, bis das Einrasten zu hören ist. Um das Modul zu entfernen,
muss (unter Verwendung eines Schraubenziehers) der Sperrhaken auf der Rückseite des Moduls nach unten gezogen und dann
das Modul von unten angehoben und nach oben gezogen werden.
Las siguientes operaciones se deben llevar a cabo con la alimentación cortada.
Fije a la barra Omega DIN 35mm (EN 5022) un número de conectores traseros "MSC" de 5 polos igual al número de módulos a
montar (enganchándolos primero en la parte superior). Conecte los conectores recién montados. Luego, fijar los módulos en la
barra comprobando la introducción del elemento de contacto, presente en la parte inferior del módulo, en el conector
correspondiente. Ejercer una delicada presión sobre el módulo hasta sentir el chasquido de bloqueo. Para retirar un módulo es
necesario tirar hacia abajo (utilizando un destornillador) el gancho de fijación presente en la parte trasera del mismo; luego, alzar
el módulo desde abajo y tirar.
B) SEGNALAZIONI - STATUS INDICATORS - INDICATEURS - STATUSANZEIGEN - INDICADORES DEESTADO
OFF
if the unit is waiting for the
first communication from
the MASTER
FLASHES
if no INPUT or OUTPUT
requested by the
configuration
ON
if INPUT or OUTPUT
requested by the
configuration
Shows the
NODE_SEL0/1
signal table
CONTENUTO IMBALLO
Modulo di espansione dell'automazione con uscite
programmabili.
La presente guida di installazione.
PACKAGE CONTENTS
Automation expansion module with programmable outputs.
This quick installation guide.
CONTENUE DE L’EMBALLAGE
Module d'extension d'automatisation avec sorties
programmables.
Le présent guide d’installation.
PACKUNGSINHALT
Automatisierungserweiterungsmodul mit programmierbaren
Ausgängen.
Die vorliegende Installierungsanleitung.
CONTENIDO DEL EMBALAJE
Módulo de ampliación de la automatización con salidas
programables.
La presente guida de instalación.
Per installare e utilizzare in modo corretto e sicuro il modulo, è
NECESSARIOconsultare il manuale contenuto all’URL:
To guarantee a correct and safe installation and operation of the
module, it is MANDATORY toconsult the usermanual contained at URL:
Pour installer et utiliser correctement et en sécurité le module, il est
NECESSAIRE de consulter le manuel d’instruction qui est contenu à l'URL:
Um das Modul korrekt und sicher zu installieren und zu verwenden,
MÜSSEN Sie das unter der URL enthaltene Handbuch konsultieren:
Para instalar y utilizar el módulo de forma correcta y segura, DEBE
consultar elmanual que se encuentra en la URL:
www.reersafety.com/it/en/products/safety-controllers